Expertises: Painting, Art, Drawing, Pastel
Updated on

Inspiring Ideas for Modern Home
Oil pastels are vastly different from all other mediums and yet it is versatile enough to be used in a huge variety of painting scenarios.

They provide fluidity in motion and consistency in texture simultaneously. This is why plenty of artists prefer oil pastels as their medium of choice.

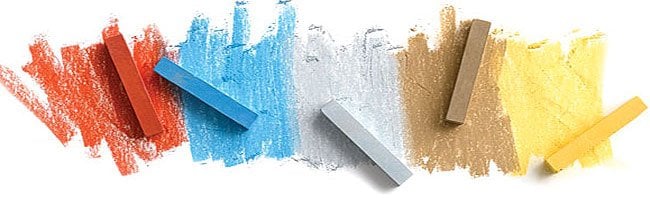
If you are not familiar with oil pastels, you should know that there are two types of pastels - soft (chalk) pastels and oil pastels.
Oil pastels are constituted out of pigments, and the oil that runs through these pigments is linseed oil.
The linseed oil lends these pastels a smooth consistency which is similar to oil paints. Thus oil pants are widely regarded as a painting medium, even though you are actually drawing with them.
Oil pastels have a distinct resemblance to soft pastels, but in many ways, they are also very similar to crayons.
Because oil pastels consist of an oil binder, they are less powdery than soft pastels.
Oil pastels are less powdery than soft pastels, because of the oil binding in them. Thus, it will be tough for you to blend different colors with a finger or a blending stump.
Oil pastels can even be used to make layered paintings. However, if you end up applying too much, the colors are bound to get muddled. In fact, the top layers might start pulling out colors from the layers underneath it.
The first layer of oil pastels on a piece of paper always look like a crayon painting. At this point, the color doesn't yet have the fluidity that is associated with oil pastels.
Fortunately, as you load on more layers on top of the first layer, you start to get that buttery texture which lets you mix and blend the colors with much more dexterity.
Here, in this article, we'll write out a few basic oil pastel techniques which should help you get started and then provide you a bunch of resources on how to get better.
But first, you need to decide on your choice of painting paper.
There are several choices of painting surfaces for every painter from paper to canvas to cardboard. However, for oil pastels, you would mostly prefer paper.
The texture and the weight of the paper determine the quality of the painting as well. The papers differ in varying degrees of thickness and surface grain.
Artists generally paper rougher papers with high thickness because it can absorb more layers of colors without wilting. So if you want to make a detailer, multilayered painting, rough papers are the way to go.
Smoother surfaces have more shine and gloss to them, but they can't absorb multiple layers of paint as well as rougher papers.
It's best to illustrate with an example. Suppose you want to paint a pear with your brand new pastels.
Before you start painting, your first job is to create a loose and basic underpainting with a basic color scheme.
This is more similar to an initial drawing rather than painting. The overall shapes and structures of your painting should be drawn out here.
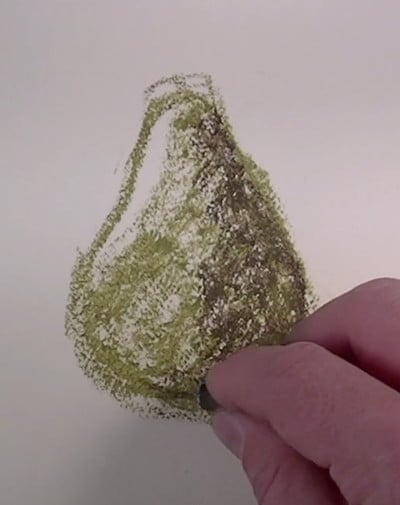
Create layers with different colors, so that they blend together to give your painting depth and detail. To know which colors blend the best and which layers should be put on top of one another, you just have to keep on practicing.
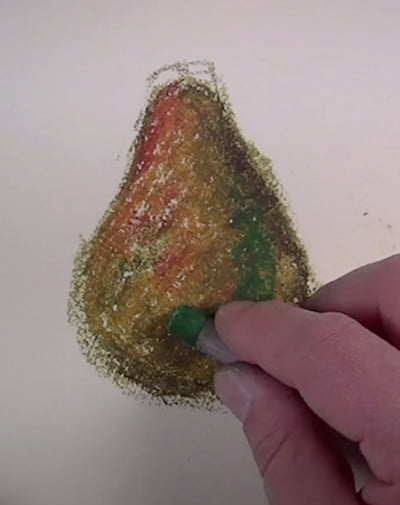
Be careful that you don't add in too much color all at once. Be sure you let the paint dry out for a bit and then put in additional coats of paint unless the paint might get muddied.
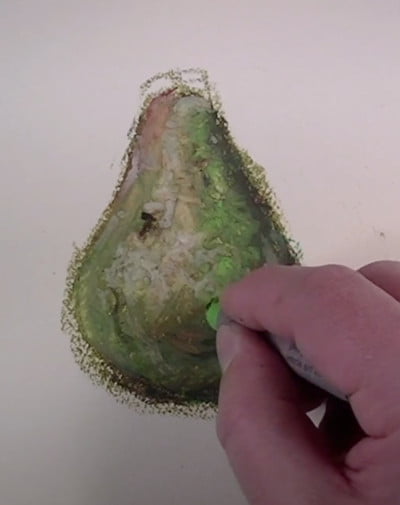
If you want your pear to stand out and you want to create a sharp contrast, you can color in the background with a bright color. This will also highlight and clean up the edges of the pear as well.
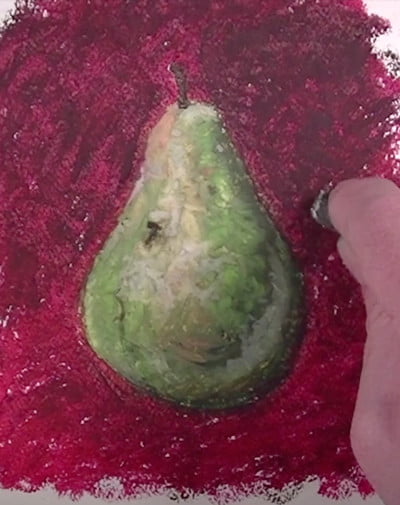
Images via thevirtualinstructor.com
Now that you've got the basics panned out, it's time to move on to bigger and better things. For that purpose, we have compiled a list of tutorials that should be a big help to you on your journey.
The first one on this list is this entertaining video tutorial by Patrick Neumann. What he does in this video is he tells the viewer to implement the Rule Of 3s in their paintings.
Rule Of 3
Most people use their oil pastels to color a certain section with only one color, thereby forming only one layer. What this does is it makes the painting look childish as there is no detail or depth.
What you should do is, instead of using one color, use 3 separate but similar colors to color the same section in your drawing. This will give your painting that much needed layered oil paint-feel.
Which Colors to Use
You should use colors which are analogous to one another and which would go well together like greens and blues or reds, purples and blues.
You should avoid colors which are far away in the spectrum, like red and green or orange and blue.
How To Paint
Now when you paint you should remember to paint in a dashy or blobby way, not all over the surface like a crayon. This will leave some blank space in between your color applications.
This white space should be filled in with subsequent applications of color. Keep dasing and leaving spaces in between. Your third and final layer should fill in all the last remaining blank spaces.
Painting in this fashion lets your colors blend in seamlessly. Don't be afraid to put in colors. Just do it and let loose. You're doing this for yourself anyway. So just have fun with experimenting.
Drawing an apple is the staple beginners painting in any form of painting. However, it's not just a subject for beginners - it's also an opportunity for experienced artists to showcase their talents.
Why Apples?
An apple can allow for a full range of colors - meaning it can have several different shades of red in it and it can also have blacks and whites over the surface as well.
Because an apple can support such a wide range of colors, it's a favorite among painters everywhere.
So How Do You Start?
You start by painting in the darker areas first. You can use colors like dark rose, rose grey and yellow ochre as well. If you want to make your colors particularly dark, you can put in a dark brown.
Remember to not paint like a crayon but rather lightly touch the paper with the paints - dab, not scrape. Remember to make sure there is enough empty space where you can put in other shades of color later on.
How To Put in Shades And Layers
The most useful tool in your arsenal here is the colorless blender. The colorless blender has the binder of the paint but no pigmentation. It is used to make the colors blend with each other more seamlessly.
Her is an example of how the blender is used:-
Because the light is coming and hitting the apple in a certain way, there are certain lighter areas and shadowy areas. To make the shadowy areas darker, you put on a few touches of black over a dark red and then use the blender to blend those two colors together.
Similarly to make the lighter parts more prominent, you can add in layers of white and if you want to increase the intensity, you can add in some yellow ochre as well.
The Finishing Touches
Once the apple is finished, you need to paint the shadow that is cast by the apple and the background. The tutorial teaches you how to create a subtle, lukewarm shadow with a light blue that does not overshadow the rest of the painting.
Finally, the stem of the apple is drawn by an application of Burnt Sienna, brown, white and black. See what we meant by a whole range of different colors and their shades.
Finally, a white background is painted to clean up the edges of the apple and bring it to the forefront.
This isn't exactly a tutorial on how to start with oil pastel painting. Instead, it's a tutorial on how to reproduce Van Gogh's Starry Night.
Start By Drawing
This tutorial starts with a detailed description of how to draw this iconic painting with a pencil. First, you draw the tree in the middle, then the houses and the mountain line in the background. The initial drawing also involves drawing the stars, the moon and the swirl pattern in the sky.
The first layer of coloring
Next, come the basic colors - you fill in the tree, the mountains, the moon, and the stars. Keep your first layer of coloring light. Make sure you use the side of the pastels instead of the head, such that the coloring is more diffused.
Make sure it's a deeper shade of yellow on the stars and the moon. These colors won't change much.
Adding Definition
You need to draw the current that goes around the sky. Use dark bold blue lines to make dashes along the sky, mountain edge and the houses as well.
Next, you use a white pastel to de-emphasize the blue colors and put in more of a swirling, fluid sky feeling which is the hallmark of this painting.
Put in a darker green and brown on the cypress tree and finally, take out the black. Although it's dangerous to use too much black, it's great for painting lines and adding in darker values of a color.
If you're new to oil pastels, you must first figure out what to buy. There are plenty of choices in the market today, and anyone would get confused as to what to buy.
This video lists out 4 popular brands. Depending on your budget, you can choose any one of the 4.
Different Oil Pastel Brands
The first brand on display is the Portfolio Water-soluble oil pastels. They are very affordable and student-grade. If you're starting out, you can buy them to get a feel of what oil pastels are like.
Or you can keep them as spares to use in a large drawing which require a large amount of paint.
The next one is the Van Gogh water pastels. They are slightly more expensive and a little harder as well. Paint quality is good, but these pastels are a little hard.
However, the most premier Water pastel goes to the Sennelier Oil Pastels. They are absolutely top of the line and are really fluid and super easy to work with.
Widely regarded as the best in the market, they are often compared to lipstick.
The painters favorite, however, is the Mungyo Gallery Soft Oil Pastels. They are available in full boxes of 48 colors - and this comes at a cheap price.
They are creamy enough yet affordable. If you can splurge just a little, this should be your choice of pastel.
Scrapers
Next, this video tells you what scrapers are and what they are used for. They are used in the process of subtraction. If your painting has several layers of single or multiple colors, the scraper can be used to scrape out the top colors and top coats.
The scraper can be used to create magnificent subtraction pieces, which the painter shows how to do in the video later.
Color Shapers
Color shapers have rubber heads, and they are used to make sharp lines in your painting. They are used whenever strong lines are required.
Blending Stumps
Blending stumps are extremely important, and they are used to make colors of different values blend together to form one seamless gradient of different values of color.
Blending stumps are absolutely necessary to showcase the play of shadow and light on a painting.
Oil pastels work great in landscapes. Because of the relative ease in layering, oil pastels are great for painting landscapes with a wide range of values.
You can put on the initial layers pretty quickly by a broad application of paint. These areas can then be reworked to build up additional depth and detail in the paintings.
Also, because of the added versatility of oil pastels, you can use them to put in a variety of effects, most notably, you can add an impressionist feel to the paintings. This makes the painting your own - and not just a reproduction of somebody else's work.
You'll find loads of great videos online on Youtube, but there are a few books out there as well, which can really help you become a better painter.
Many consider this to be the definitive book on Oil Pastel painting. This book covers everything about oil pastel painting, starting from the most rudimentary and going up to expert level guides.
What Does This Book Have?
Every page of this book is jam-packed with useful information. It provides meticulous step-by-step illustrations that show you how to use your pastels to achieve nearly any effect you desire.
It covers all oil pastel painting techniques like layering, scraping, washing, blending, and scumbling to achieve an endless variety of effects from delicate lines to very fluid swirls of color.
It even has sections on how to make your own pastels, work with molten pastels, and also use oil pastels in arts and crafts and mixed media.
Featuring the author's work and the work of 40 different artists, this book really has something for everyone.
This is the second book on our list, and it also provides a number of invaluable lessons on how to work with oil pastels.
What's Special About This Book?
Where this book really scores a lot of points is that it takes a step-by-step approach to painting various subjects from flowers to animals to portraits to landscapes.
The steps are written out in such a way, that the reader can go through the first few steps and come up with a moderate, well-defined painting. Anybody can follow the first few steps.
But you can choose to take that painting even further and make it even more realistic and detailed if you keep following the steps. The steps get more involved and intricate as you go along and you may come across a large number of words you haven't heard before like gesso or ground medium.
We weren't entirely sure whether we should include this book in our list because it talks about painting with oil, pastels, and watercolors but not oil pastels per se.
However, we decided to include it as we thought going through the contents of this book would be immensely useful for someone who likes drawing portraits and wants to get better at it.
What Does This Book Contain?
This book will first teach you about the essential elements of painting. You'll begin with learning up the essentials first - drawing, value, color, composition, and edges.
Then you'll learn how light and shadow affect these principles, and then you apply them to create a perfect reproduction of the skin tones of your subject.
You'll also learn about the four major skin color groups - Caucasian, African American, Asian, and Hispanic. You'll also learn how to create skin tones using multiple combinations of these skin color types.
This book also illustrates the differences in tone and texture between males and females, and how your skin changes as you grow older.
Most importantly, you'll learn how light and it's temperature affect the color of the skin of your subject - and how this effect varies depending on whether it's natural or artificial light. If there's light, there must also be a shadow, and there are several elements involved in the painting of shadows as well.
Reading and learning by yourself is great, but if you want a structured learning environment with a course that teaches you everything you need to know in an organized fashion, look towards online courses.
Udemy and other online platforms are making it easy and convenient for everyone to learn painting and only at a fraction of the cost involved with traditional classes.
Here are a few courses that we want to share with you.
This course is mostly meant for kids aged 8-12, but if you're looking for a basic, rudimentary course that you can get through fairly quickly, this course is the best.
Why Is It Good?
This course has 7 art projects that are great for initiating you into the world of oil pastel painting. Apart from teaching you how to paint, they will also teach you how to express yourself and create a capacity for self-reflection and guide you to view the world in a certain way.
The teacher has 20 years of experience in art studios and elementary classrooms, so she has a good grasp on how to teach something from ground zero. All the projects are laid out in a detailed, step-by-step manner, which is easy enough for anyone to follow.
You might find the drawings a little childish and simplistic, but it's still an excellent course. It's best if you and your little kid both sign up for this course together. It'll be a good bonding experience.
If you want a comprehensive library on oil pastel painting, make your way to Jerry's Artarama.
It's not just oil pastels, Jerry's website has a load of details about painting supplies - like canvases, surfaces, easels, and whatnot.
Apart from that, they have a number of free lessons on how to use oil pastels for painting. These clips cover all the basics, and some are quite advanced as well.
For example, they've got a video on how to do blending and crosshatching. Then there are videos on plein air drawing and also, how to draw perspective pieces and reflections on objects.
This is a real treasure trove of painting information and is also simultaneously, a good store for buying painting supplies.
Oil pastels are a great medium for painting. They are not as hard to paint with as oil colors, yet they are versatile enough to be used in a variety of painting applications.
They are especially great for layering and are used to make individual pieces with complex and intricate shading.
There are plenty of tutorials available online which will help jumpstart your painting journey. But obviously, patience and practice are the biggest teachers. So stay dedicated, and I promise, you'll see great results soon.