Expertises: Paint, Home improvement, Wood, Car, Painting
Updated on
Inspiring Ideas for Modern Home
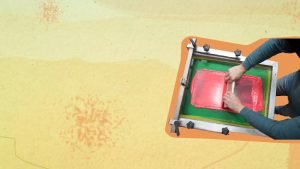
Yes, Cricut machines can screen print, and the screen printing process is fairly easy. All you need is screen printing ink and frames, squeegee, masking and transfer tape, and adhesive vinyl to get started.

With the best screen printing machine, you can create customized t-shirts, handmade greeting cards, stickers, and other custom merchandise. But for that, you need to know how to screen print, and Cricut machines can get the job done.
Want to know how? Read this guide till the end, for it contains all the answers you’re looking for!

Absolutely, yes! Cricut machines are highly versatile devices that can be used to screen print besides cutting materials for craft projects. With Cricut machines, you can screen print complex designs using multiple colors.
Compared to traditional screen printing, Cricut machine screen printing is easy and allows you to create vinyl stencils for items, so you can replicate designs within minutes.
For DIY screen printing with a Cricut machine, you’ll need to purchase a few things to get started. Supplies needed for screen printing aren’t expensive, and you will easily find them in a local store. Things you need for screen printing with a Cricut machine are as follows:
Whether you’re planning to customize a t-shirt or backpack, the first thing that you need to do is make a silk screen. Making a silk screen with a Cricut machine is easy, so beginners won’t face trouble in the process.
Using these machines, you can design and screen print shirts in bulk faster than if you’re using the traditional silk screening process.
If you wish to design only one screen-printed shirt, making a non-permanent screen would be wise. On the flip side, you’ll have to make permanent silk screens if you want to customize multiple shirts of the same design. So instead of adhesive vinyl, consider using heat transfer vinyl.
Step 1: Cut Adhesive Vinyl
Grab your vinyl and cut it as you would do for other projects, keeping in mind two things–
After your design is cut, scrape at all places where you wish the screen printing ink to pass.
Step 2: Place Transfer Tape On Top Of The Adhesive Vinyl
The next thing you’ll have to do is place the transfer or application tape atop the adhesive vinyl where you’ve carved the design. Take a scraper or a squeegee, rub it up and down over the tape, and remove the backing sheet while keeping the vinyl on top of the tape.
Step 3: Put Your Design On The Screen
Take a screen and turn it over such that the border is towards the bottom, and you can clearly see the portion where the mesh is joined.
Double-check if the mesh is tight and well-pressed before placing your design. Then, turn over the screen and polish the pattern from the forepart.
Step 4: Remove The Transfer Tape
Again, turn over the screen and try to separate the vinyl from the transfer tape. To remove that, you need to carefully peel back the transfer tape while ensuring the vinyl is on the screen.
Step 5: Tape Around The Design
When the transfer tape is peeled back from the vinyl, you’ll have to tape off the four sides around the design. Generally, taping is done to prevent ink colors from getting on the surface.
One thing to keep in mind is that the tape must be applied in such a way that it touches both the vinyl and the frame. So, you can use multiple pieces in areas where needed.
Step 6: Burnish The Tape Down
To burnish, you’ll have to turn over the screen; when that’s done, your mesh screen is ready. Hence, you can start your projects and customize a variety of items.
Step 1: Dab Ink Across The Screen
Grab a bottle of black or whichever ink you prefer and dab it all over your screen using a craft stick. Of course, starting slow is the key; initially, you may be unable to understand the amount of ink you should take, and that’s ok!
When adding ink to the screen for the first time, take a little amount, spread it all over the surface, and repeat with more if needed.
Step 2: Allow The Ink To Completely Dry
After applying the ink, set the screen aside for the ink to dry thoroughly. To be on the safe side, I leave the screen untouched for 24 hours, so I recommend you do the same.
Step 3: Set The Ink
Later, use EasyPress or iron to set the ink permanently– place a parchment paper over the surface and heat it for about three to five minutes on medium-high heat. Note that you’ll have to do this on both sides.
So, that was the basics of screen printing with a Cricut machine.
As for screen printing methods, there are three different ways to screen print your favorite design on whichever surface you like. In this section, I’ll walk you through each of them, so you can decide which one to try.
Before I dive in, I’d like to bring to your attention that you must always work on smooth and flat surfaces. Working on uneven surfaces that are full of bumps would either cause the ink to appear overly light in some areas or not at all.
Want to make multiple shirts of the same design? The reverse vinyl screen printing method can help you in making intricate patterns without taking too much time.
Here’s how you can make a variety of things with the reverse vinyl method.
Step 1: Place The Vinyl On The Cutting Mat
In the reverse vinyl method, the first thing you will have to do is place the vinyl on the Cricut maker with the ink side facing up. Remember to choose the vinyl setting on your cutting machine or the silhouette setting, whichever you prefer.
As a piece of advice, position your design towards the center of the vinyl sheet prior to cutting. By doing so, there will be enough space on all sides of the design, thereby preventing ink from flowing anywhere except the pattern.
One of the most common mistakes committed by novices is that they do not flip over the design when putting adhesive vinyl on the bottom of the screen. So, whenever you place the vinyl on the vinyl cutting machine, do not forget to reverse the pattern.
Step 2: Weed Your Design
After unloading your design from the Cricut machine, the next thing to do is to weed it out. Unlike other vinyl projects, you won’t have to weed out around the design but the design itself.
In simple words, you will have to scrape out all the areas where you want the ink to flow and leave its mark on the material being printed. Then, take a transfer paper and lay it over the sheet while lifting the white lining from the vinyl.
Next, lay the vinyl pattern on the bottom of the screen printing frame and pull out the transfer paper. Transfer paper could be reused for multiple projects if removed with care.
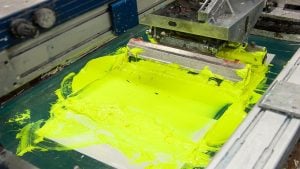
Flip over the screen such that it lays flat on the t-shirt, after which you shall be able to see the actual pattern from the front. Pour a small amount of screen printing ink on your design from the side with the most space. Take a squeegee and spread the ink all over your design while making sure the ink doesn’t go outside the vinyl or it will stain the fabric.
Taking more ink to spread over your design can ruin it, so start with a small amount and keep adding as needed. In case you accidentally pour excess ink, put it back in the jar instead of wasting it.
Also, you’ll have to apply slight pressure when spreading ink all over the surface. That’s because the ink won’t get through the fabric if you fill in the design too lightly.
Besides, make sure the ink is distributed evenly across the whole pattern, or the final design will have variations. Some areas would be thicker, while others may be thin; this is not something that you’d want in the final product.
Step 3: Allow The Surface To Dry
Once the ink is spread evenly, remove the screen print frame slowly and carefully. After that, allow it to dry for a few hours or an entire day if possible.
Make sure you pull off the frame only when the ink is distributed evenly all over the surface to prevent ruining the design on the t-shirt. Placing the screen for the second time to apply ink won’t help; instead, it will make your creation look funky– so do it right the first time.
Step 4: Heat Press The Ink To Set It
After the ink dries, you’ll have to set it on the fabric or the surface by heat pressing it. Ideally, you should heat set the ink at 250 to 300 degrees for about 20 seconds.
During this process, don’t forget to place a paper towel or Teflon sheet inside the shirt to prevent ruining it from ink bleed. To a large extent, ink bleed depends on the fabric you’re using, but better be safe than sorry!
Step 5: Rinse The Screen
Unless you intend to customize multiple shirts of the same design, you’ll have to rinse off the screen after finishing the project. Most of the time, rinsing the screen with clear, lukewarm water cleans the ink, but you’ll have to use soap to remove stubborn inks.
No doubt, the reverse vinyl printing method is ideal for intricate designs, but beginners may find it challenging to create designs using this technique. So, if you’re planning to do a simple design without too many details, the top vinyl method would be the best bet.
In this method, you’ll need to cut vinyl the way you would in the reverse vinyl method. But you won’t have to mirror the pattern because you’ll have to lay it atop the screen face up or how it would appear on the surface.
Much like the reverse vinyl method, you’ll have to weed out the design wherever you wish the ink to flow and leave its mark. The rest of the steps are as follows:
Step 1: Place Transfer Paper Atop The Pattern
Start by placing transfer paper over the pattern while pulling out the white backing paper from the adhesive vinyl.
Step 2: Put The Design Over The Frame
After that, put the pattern atop the screen printing frame and remove the transfer paper. One thing that I suggest doing is using painter’s tape to border the vinyl; in case you don’t have that, use duct tape.
Irrespective of whichever tape you use, border the vinyl well because it will prevent the ink from flowing outside the design on the surface.
Step 3: Pour Ink On The Design
Like the reverse vinyl method, you’ll have to pour ink on the design, which you can pour from anywhere– sides, top, or bottom. Of course, spread it all over the design with the help of a squeegee. When pouring, make sure you take enough ink to cover the entire design.
While spreading the ink with a squeegee, go as slowly as possible because you may scrape up small details of the pattern if you go too fast. And in case that happens, the ink will spread to places where you wouldn’t want it.
If you mistakenly pour more ink than you need, scrape off the excess, and put it back in the ink jar for future use.
Step 4: Pull Off The Screen Print Frame Carefully
Before pulling off the screen print frame from the surface, check whether the entire design is covered with ink. If you remove it without checking, the pattern will look sloppy.
Pull off the screen print frame slowly and cautiously and allow it to dry for some time, ideally 24 hours.
Step 5: Heat Press The Surface To Set The Ink
When the ink dries completely, set the ink onto the fabric by heating it. As mentioned above, heat press the fabric for no more than 30 seconds at a moderate temperature.
For this screen printing method, you’ll need parchment paper; you can also use the leftover backing from previous designs if you’ve created any.
On the cardstock, cut the design without reversing or mirroring it and put it on top of the target material. Take your screen printing frame, place it atop the design, and border the sides with painter’s tape or transfer tape. This way, the ink won’t transfer anywhere other than the weeded portions.
The loose scrap material screen printing method is quite similar to both reverse vinyl and top vinyl methods. Neither you need to reverse the design for cutting nor worry about minute details getting scraped while using a squeegee.
So, if you don’t wish to reverse the design or run out of vinyl, the loose scrap material method will come to your rescue. You can also complete your projects quickly with this method. Hence, this screen printing method can save your day if you have an urgent order.

Whether you know how to clean screen printing machines or not, cleaning the screen is a must.
Since the ink used in screen prints is water-based, so cleaning the screen won’t be much of a challenge. You need to clean the screen only if you intend to use different inks for the same project.
Here’s how you can clean your screen to reuse it for other projects and surfaces.
Inks used in screen printing aren’t easy on the pockets, so wasting them is a big no-no! Before anything else, scrape off the excess ink from the screen and put it back in the ink jar or container, so you can use it in future projects.
However, you won’t be able to put the ink back in the container if you’ve made a custom color after mixing two or more colors.
As already mentioned, most screens can be cleaned by rinsing them with water, so spray water on your screen after putting the ink in the container. The best way to spray water on your screen is to take it to the kitchen sink and run it at a low speed.
Even after spraying water on the screen, you may find some ink remaining. In such cases, use soap to remove them; however, those inks may leave stains, which could be permanent.
Once inks are removed from the screen, leave them in an open area to dry completely. Only when it’s thoroughly dried should you use the same screen for other projects.
One common confusion among novices is when to make a new screen.
First and foremost, you’ll need to make a new screen anytime you decide to screen print a new design. However, your screen won’t be usable if the vinyl design lifts off from the screen, so even then, you’ll have to create a new screen. As adhesive vinyl can be peeled off easily, you can simply add a new design in the latter case.
Many times, novices wonder what they can screen print on Cricut machines. Here’s a quick list of all the items you can screen print with a Cricut machine:
And for all those wondering: can you paint particle board with screen printing ink– the answer is yes, you can!
Tip
In case the ink is too thick, add about two ounces of ink in a cup and add water with an eye dropper. Make sure to add one drop at a time and keep stirring until the thick ink has reached the consistency you want. If the ink is overly thick, add six drops of water and stir the mixture properly for a couple of minutes. Once the ink is thinned, you can use it on your projects without worries.
Honestly, Cricut cutting machines, often called craft plotters, are a crafter’s best friend!
And if you own one, you could screen print anything you want by making vinyl stencils. Having a Cricut machine and the right supplies will make screen printing easy and fun. So, just grab the required supplies and start your own screen printing project today!