Expertises: Heating, ventilation, and air conditioning (HVAC), HVAC control system, Air conditioning, Humidiers, Dehumidifiers
Updated on
Inspiring Ideas for Modern Home
Of all the DIY air conditioners, fan, and ice air conditioners are the most effective because they cool a space well and are easy to build. As for small spaces like garages, I suggest you build a DIY bucket air conditioner.

Don’t have an air conditioner or is your AC unit old and malfunctioning?
Either way, staying cool can almost feel impossible in the scorching summer heat. Even worse, a heat wave can cause major health issues like a stroke. Although nothing can fend off the summer heat like icy-cold air from an air conditioning system, building your own DIY (Do-It-Yourself) air conditioner can take the edge off.
Ready to kickstart your project? Keep reading!
Hunting for ways to cool down a room and keep your skin healthy without mounting up utility bills? Try this fan and ice air conditioner, which is one of the easiest and my favorite hacks.
Materials You’ll Need
Steps To DIY Fan And Ice Air Conditioner
Grab each plastic bottle and cut them in half from the widest end so that you can easily fill them with ice cubes. Next, you will have to punch several holes on each side using a soldering iron at an equivalent distance.
Take a thin thread of metal (wire) and feed it through the hole to form a mesh within the bottles. For attaching the bottle, you will have to use either a metal wire or a plastic strap, making sure the cap faces the floor while the opening is side up.
Finally, add ice cubes to the bottle and that’s it!
A makeshift air conditioner like a DIY bucket model is a cost-effective cooling solution for small spaces like a shed or garage.
In a bucket air conditioner, you will have to drill holes on all sides to ensure an even distribution of cool air in the space. But make sure to place it in the middle of the room only then will it distribute cold air throughout the space.
What I particularly like about this bucket air conditioner is that it is portable, meaning you can move it from one room to another, thanks to its handle.
Materials You’ll Need
Steps To DIY A Bucket Air Conditioner
Trace 3 vent holes on the fore of the bucket using the 3 PVC pipes that you’ve cut. Then, create a cutout using a hole saw and insert a styrofoam liner in the bucket.
You will have to make cutouts in the foam liner as well using a hole saw for inserting the PVC pipes. After that, add the PVC pipes and ice cubes into the cutouts and fill them with water.
Place a table fan atop the bucket lid to take measurements and cut it out using a cutting knife. Fit the fan into the hole and insert the plug into the power outlet for electricity.
Switch it on and cold air will start blowing within minutes, keeping you cool in the scorching heat.
I came across this homemade air conditioner while browsing videos on DIY air conditioner projects and decided to try it because it’s super easy to build.
In this DIY air conditioner, a styrofoam ice chest serves as a primary component, whereas the fan blows air via DIY duct systems. Most supplies needed to create this homemade air conditioner can easily be found in your garden shed or storage.
Materials You’ll Need
Steps To DIY Ice Chest Or Cooler Air Conditioner
Create an outline by setting one point of the pipe on the fore side, ideally the base. Take the other end of the pipe and draw an outline on the top side of the cooler.
Use a cutting tool to cut out the outlined portions before taking the aluminum tube and sliding it into the fore hole, while pulling it out from the cutout on the right-hand side.
Fit the rubber connector to the 2 apertures of the aluminum tube. Then, connect the PVC pipe (fluid conveyance) to one aperture of the rubber connector and the blower motor to another end.
Use a caulk to seal the 2 holes on the ice cooler so that water doesn’t leak out of the unit. Then, put ice in the case and position it atop the lid. Finally, insert the plug of the blower fan into the electrical outlet, turn it on, and enjoy the cool air.
Quite similar to an evaporative cooler, this DIY air conditioner blows cooler air than fans. Not just that, but it also adds moisture to the room, which makes this mini evaporative cooler a perfect option for people when they are short of ice.
Instead of an ice cube or a frozen bottle, you will have to use wet sponges to make this AC.
Materials You’ll Need
Steps To DIY A Mini Air Conditioner
Separate the lid from the plastic container and trace the outline of the fan on it before grabbing a paper cutter to cut the outline. Use a glue gun to smear glue or adhesive to the CPU fan or the computer fan, fit it into the hole, and set it aside.
With a soldering iron, create multiple, preferably 54 small holes in the plastic box. Next, pour cool water on 3 sponges and place them inside the box.
Connect your fan with a 12 V battery and your DIY cooler (air conditioner) is ready!
Yet another DIY air conditioner that I find easy to make is the milk carton air conditioner.
Whenever your AC starts malfunctioning, this DIY air conditioner will keep you comfortable by supplying cold air. Only a few supplies are needed to build your own air conditioner, which you can procure from a local store.
Remember, this homemade air conditioner won’t lower the temperature of your entire room but will keep you cool, provided you place it as close to you as possible. Therefore, it won’t be the right choice for cooling large spaces like living rooms, dining rooms, and so on.
Materials You’ll Need
Steps To DIY A Milk Carton Air Conditioner
Put the milk carton horizontally on top of a table while placing the computer fan on its base to trace its outline. Use a paper cutter or a knife to cut out the outline and insert the computer fan.
Take glue and spread it around the computer fan to seal gaps, and connect the fan to a 12V AC adapter. Fill the milk carton with small and slender ice cubes because the aperture is small, so the large ones won’t be able to pass through it.
Lastly, switch on the computer fan and enjoy your time in the cold air.
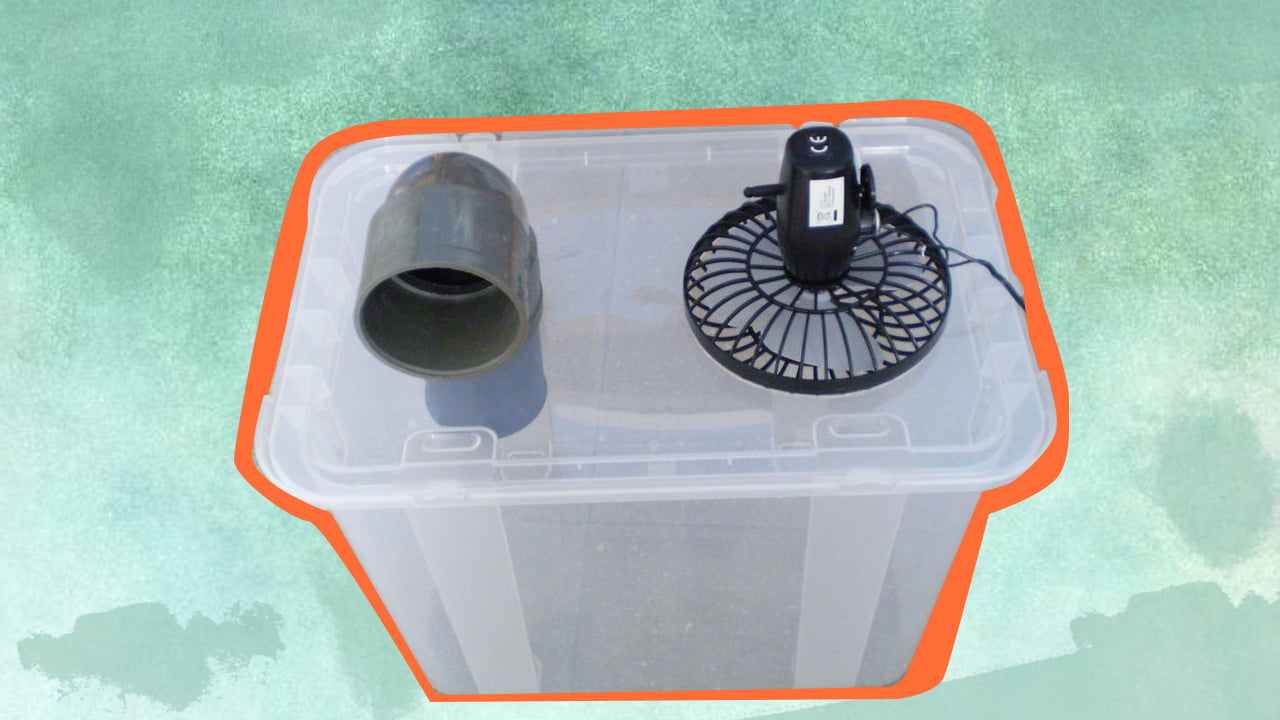
A styrofoam air conditioner is an excellent alternative to HVAC systems, so you can build one for your space without much fuss. This DIY air conditioner relies on ice cubes to cool a space, so you’ll need tons of them to beat the heat in summer.
Materials You’ll Need
Steps To DIY A Styrofoam Air Conditioner
Take the fan and position it in the middle of the lid of the polystyrene box to trace its outline for creating an aperture. Cut out the traced area using a knife and trace the outline of the PVC pipes by placing each of them on two sides of the cutout.
After cutting the outline, slide the pipes into their respective holes and remove the lid to fill the box with either frozen bottles or ice cubes. Fasten the lid and fit the fan on the cutout.
Turn on the fan and cool air will blow through the PVC pipes to make your space cozy and comfortable. Remember, the more ice you add, the longer the styrofoam air conditioner cools your space. That is why I suggest keeping a few more bottles in the refrigerator for future use.
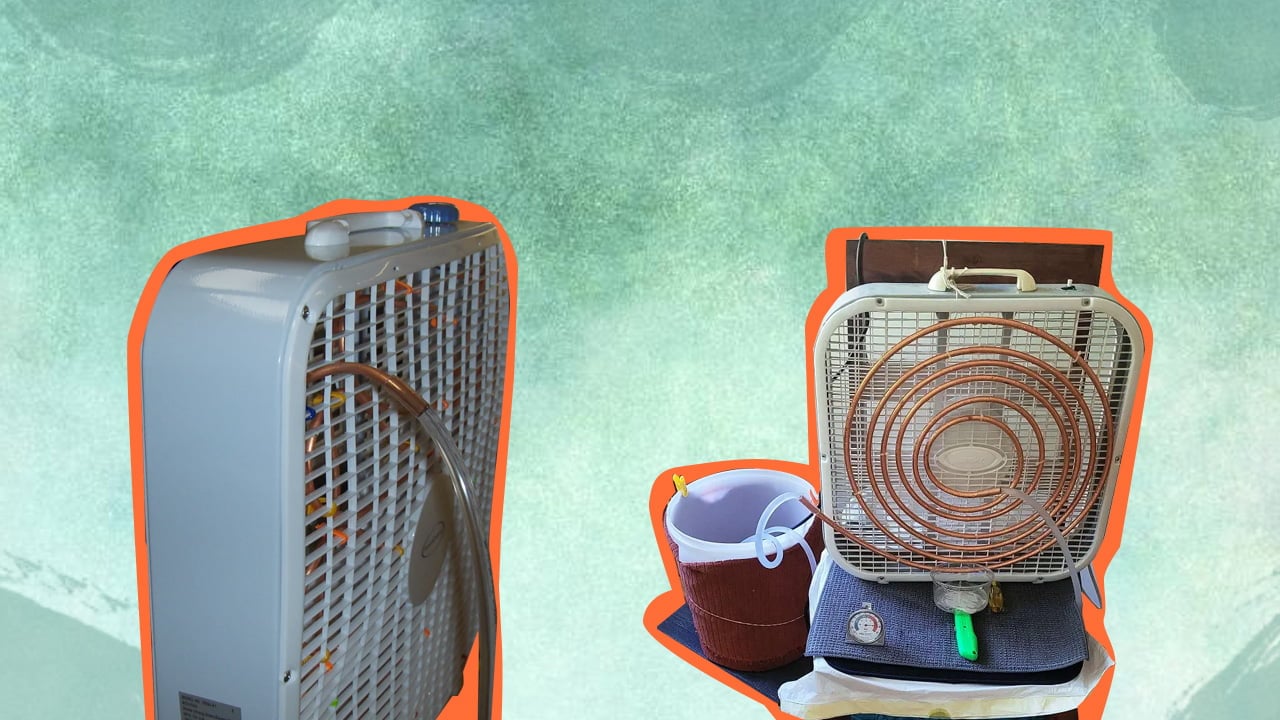
A copper coil DIY air conditioner works well for small spaces like garages or kitchens.
Such a homemade air conditioner runs on electric water pumps that pump water via the coils. Unlike other air conditioners, building a copper coil model is slightly a challenge; therefore, I suggest you go for it only if you’re a pro at DIY tasks.
Materials You’ll Need
Steps To DIY A Copper Coil Air Conditioner
Insert copper tubing into the outer casing of the fan or the grid by forming loops around it. However, make sure to leave at least 2 feet of tubing on both ends.
Use zip ties to attach the copper tube to all 4 edges of the outer casing of the fan. Then, take the loose ends of the copper tubes and attach them to the plastic tubing using hose clamps.
Now, take a water pump and attach one end of the plastic tubing to it. And position both the other half of the vinyl tubing and the water pump in the cooler.
Fill the cooler with ice cubes and cold water. Finally, switch on the pump to check whether cold water is flowing through the pipe.
Is your standing fan virtually useless in keeping your room cool from the heat produced by your computer or other electric appliances? In that case, a personal USB cooler will be a practical addition to the space.
Materials You’ll Need
Steps To DIY A Personal USB Cooler
Create an outline of the fan by placing the CPU fan over the plastic bowl, and cut out the outlined area using a cutter or other equipment. After that, cut out a hole for the thread spool by outlining it on top of the bowl. Repeat this procedure 4 times because you will have to attach 4 thread spools.
Spread a generous layer of glue on the thread spools before inserting them in the holes. Also, apply it to the fan and then attach it to the cutout. Hold the USB cable and slice the protective end to reveal two wires, which you will have to connect with the wires of the fan.
Fill the plastic bowl with ice cubes and attach the lid. The last step is plugging the USB cable into your laptop or computer and your own DIY air conditioner will blow cold air as the ice melts.
This DIY AC is small, but it cools a room better than a cooling fan. What’s interesting is that you don’t even need a lot of supplies to create this DIY air conditioner.
Materials You’ll Need
Steps To DIY A Small Desktop Cooler
Start by placing the fan atop the plastic bowl to trace the outline, which you will have to cut later. So, position all 4 PVC pipes on the 4 sides of the fan cut out to trace the outline.
Using a sharp object, cut out the outline you’ve made for the pipes. Then, attach the 4 pipes and the fan on the lid in their respective cutouts by applying glue over them.
Fill the plastic bowl with ice and turn the fan on after connecting its wires to the battery.
Tip
A DIY air conditioner will help you beat the heat on a super hot day by expelling hot air from your home and circulating cool air. However, it won’t be effective if you don’t do anything to prevent the sun’s rays from entering your space.
I suggest keeping your windows shut throughout the day until sunset to reduce humidity levels. Installing blackout curtains will also block sunlight to a great extent, keeping the room cool.
With so many simple hacks at your disposal, beating the heat this summer wouldn’t be that challenging. Although a DIY AC isn’t as functional as a standard air conditioning unit, it certainly cools a room to a great extent, making summers bearable.
Besides, homemade air conditioners don’t consume as much energy as a regular AC unit. This way, you won’t have to worry about mounting utility bills. So, try any one or more of these creative techniques to build your own air conditioner without spending a lot of money!