Expertises: Heating, ventilation, and air conditioning (HVAC), HVAC control system, Air conditioning, Humidiers, Dehumidifiers
Updated on
Inspiring Ideas for Modern Home
To install a portable air conditioner, first install the adjustable window seal kit while ensuring there are no gaps. Then, connect the exhaust hose to the back of the unit and the window seal kit. Finally, plug in the AC to the power outlet.

Portable air conditioners are the ideal choice if you need an AC unit that can be moved from place to place easily.
But that’s not their only advantage, as portable units are much easier to install than a window or mini-split unit. In fact, they can be installed in a matter of minutes with proper preparation and the right tools.
And this guide will help you learn how.
When it comes to air conditioning, portable air conditioners are an extremely popular choice for many people. Aside from being easy to carry, they offer several advantages that make them suitable for almost everyone. A portable air conditioner can be used to cool rooms and areas that lack access to central air conditioning.
Also, you can install a portable air conditioner in almost any type of space, including bedrooms, offices, studies, basements, etc. Additionally, such units are quite affordable compared to central air conditioning systems and mini-split units and do not require as much energy as a central air system.
Furthermore, they can work on standard electric circuits that are present in most homes, unlike window ones that have higher voltage requirements. Another reason portable air conditioners are such a popular choice is that most portable units offer multiple features that allow them to be used throughout the year.
For instance, many portable AC units come with a heat mode for winter and a dehumidification mode for rainy days. Some even come with a fan-only mode for better air circulation. And you can even control many of these features using your smartphone.
For a portable air conditioner to function optimally, it needs to be installed properly. Improper installation can affect its performance and can even cause damage to the unit in the long term. The performance can be affected because of air leaks which occur when the unit is not installed correctly.
Leaks can result in improper cooling and mold growth inside your home, which is a health hazard. And they can lead to maintenance problems, in which case the unit will require more frequent repairs as its parts will wear out more quickly.
On top of that, the unit will function less efficiently, meaning that it will consume more power and lead to higher power bills. In contrast, when your air conditioner is installed properly, it will ensure proper cooling and higher comfort levels.
Correct installation will also help ensure that the unit is functioning according to the manufacturer's specifications and recommendations. It can help extend the lifespan of the portable air conditioner and reduce maintenance and service costs. What's more, proper installation will prevent air and moisture leaks that can cause damage to your furniture and flooring.
As mentioned above, installing portable air conditioners is simple and much easier than a window unit. You can complete an installation in around 30 minutes by following proper do-it-yourself methods. There are just two important aspects to keep in mind when performing such installations, and these are the drainage and venting requirements.
Proper drainage is vital since hot air pulled into the air conditioner condenses when it reaches the evaporator coil and turns liquid. This liquid needs to be removed to prevent it from collecting inside the room.
Similarly, proper venting helps remove the hot air from the room so that it goes outside, allowing the room to become cool. Usually, venting is done through the window through which hot air can go outside, but if you have a windowless room, other methods need to be followed.
For venting, the first step is to install the provided window kit to block sunlight and prevent leaks. This will be followed by attaching the venting hose to the portable AC unit and passing it outside through the window through the space in the sealing kit.
Once that is done, you can plug in the portable air conditioner and test it to see how it runs. I've explained all these steps in detail below, but before that, you should understand why selecting the right location for the installation is vital.
One of the biggest advantages of portable air conditioners is that they can be placed almost anywhere in a room. In fact, for many people, this is what makes it a better choice than window AC units that need to be installed in a window. That being said, it is extremely important to consider where to install the portable air conditioner.
The location plays a significant role in determining how effective the unit is, its operational efficiency, and other aspects, like the need for frequent maintenance and repairs. Certain locations are much better suited for a portable air conditioner and will help the unit operate optimally.
For instance, a portable air conditioner placed on a hard and even floor away from obstructions such as furniture will deliver better cooling. Ideally, the distance between the unit and various objects, like furniture, plants, and decorative items, should be at least eight to 12 inches. I strongly advise against placing portable AC units on shelves, chairs, or desks.
Also, you should avoid placing such units close to electrical outlets and near windows that look outside. As for the power cable, make sure that it can reach the power outlet but is not too stretched out. Similarly, the vent or exhaust hose of the unit should be able to reach the window without stretching.
For best results, you should keep the vent hose as straight as possible. There are other considerations as well, such as the airflow in the room and the presence of other utilities like ceiling fans. Try to place the portable air conditioner in such a direction that the natural airflow works with it. Otherwise, the unit will have to work harder to cool the room.
When selecting a location for your portable air conditioner, keep in mind the following factors:
The unit should be placed somewhere with a power outlet close by for plugging in the air conditioner while ensuring the power cable doesn't get stretched.
If you're planning to use a portable air conditioner, I recommend placing it in a room with a window, as that will make venting easy. The vent hose needs to pass out of the window to let the hot air go outside. In the absence of such a window, venting will become more complicated.
Consider how the air naturally flows in and out of a room and place your portable air conditioner accordingly for the best cooling results. If you place the portable AC unit facing the direction from which air enters the room, such as a frequently used door, it will not be very effective.
A room can have many objects that can act as obstructions to the cold air coming from your portable AC unit. These can include furniture, decorative items, appliances like a clothes dryer, etc. Make sure that there is adequate distance between the AC unit and such obstructions when installing it.
1. Avoid Warm And Sunny Spots
Avoid spots that get direct sunlight or remain warm when looking for the best place for your portable AC unit. Doing so will ensure that the unit does not have to work harder than it needs to for cooling the room.
2. Look For An Unobstructed Space
As mentioned above, obstructions can block the airflow in a room and reduce the efficiency of your portable air conditioner. So, look for a spot free of any furniture or other obstructions.
3. Consider The Use Of The Room
The location will also depend on how you plan to use the room. For instance, if it is a bedroom, the unit can be placed at some distance from the bed while still being close to a window for venting purposes. On the other hand, if it is to be placed in a living room, it can be placed somewhere close to the center.

Once you have decided where the portable AC unit is to be placed, it is time to begin the installation process. But make sure you have the required tools and materials for the job and have taken the necessary safety precautions.
An installation kit will generally include everything you will need for installation, such as:
While installing a portable AC unit is much easier than a window one, you still need to observe certain safety precautions. Doing so will minimize the chances of accidents that can result in serious injuries.
1. Read The Manual First
The first step in installing a portable AC unit is to read the instruction manual properly. You should do this before anything else, as it contains the manufacturer's instructions regarding installation and usage of the unit. Different models can have varying instructions that need to be followed.
2. Get Some Help
A portable AC unit is quite heavy, which is why I do not recommend lifting it yourself. Check whether the unit has wheels that allow moving it to the required location. If not, consider getting help lifting it to avoid accidents and injuries.
3. Avoid Connecting The Unit To A Power Strip Or Extension
When using appliances like portable air conditioners, avoid plugging them into a power strip or an extension cord. Such units draw a lot of power that power strips cannot handle. That is why they should only be connected to a properly grounded electrical outlet.
4. Do Not Turn The Unit On Before Installation Is Complete
Before turning on your portable air conditioner, ensure the installation is complete. Check that the drain and exhaust hoses are tightly attached, and the sealants have completely cured. Also, make sure that the sliding window kit is installed properly and connected securely to the AC’s exhaust hose.
5. Keep Children Away From The Unit
Children should be kept away from appliances like portable air conditioners. Allowing children to play near the unit can increase the chances of serious injuries. Also, it can result in situations where the unit can get damaged.
6. Check That The Air Filter Is Installed Before Turning The Unit On
Make sure that the air filter provided with the portable AC is properly installed before you turn on the unit. The filter will protect the air conditioner from debris and help it last longer. That is also why you should clean the filter regularly and replace it timely according to the manufacturer's instructions.
7. Avoid Performing Repairs By Yourself
If there is a problem with your portable AC, do not attempt to repair it yourself. That can cause further damage leading to even more costly repairs. It is best to consult the manufacturer or take the unit to a heating, ventilation, and air conditioning technician for repairs in such situations.
Before installing your new portable air conditioner, ensure the area is ready for installation. Remove obstructions like furniture and appliances from the area and clean it properly. Similarly, clean the window through which the exhaust hose will go out since dust can allow gaps from which air can leak.
Check that the power outlet where the AC will be plugged in works properly, and get it fixed if it isn't. Once you are ready, it is time to start the installation process.
1. Installing The Adjustable Window Kit
After you have positioned the portable AC where it is to be installed, you will need to install the provided window sealing kit. These kits are compatible with most types of windows, including vertically and horizontally sliding ones.
For traditional windows that open and close vertically, the kit should be placed at the bottom and extended until it completely covers the window. In windows that open horizontally, the kit should be placed on one side and extended till it covers the window vertically.
Sometimes, the opening of the window may be smaller than the length of the provided kit. If that is the case, the kit will have to be trimmed. On the other hand, if the window has an opening larger than the length of the kit, the remaining gap will need to be filled with cardboard, plywood, or Plexiglass.
Once the window kit is installed properly, check to make sure that sunlight and air cannot pass through gaps in the window. You can find materials for filling such gaps at the local hardware store. After it is sealed properly, you can close the window and proceed with the installation.
Some sealing kits include foam or weatherstrips that can be placed between the window and the kit to prevent the entry of warm air and insects. And they may even contain screws that can make it easier to secure the kit in place.
Additionally, for security purposes, you can get a security lock to ensure that opening the window from outside is not possible.
2. Attaching The Hose
After installing the window seal kit, the next step is to attach the vent hose to the portable AC. Most portable air conditioners come with a connector at the back, so check whether it is installed. In case it is not, first install the provided connector before connecting the exhaust hose.
Then connect the window exhaust connector to the other end of the exhaust hose. This generally forms a part of the window seal kit. You will need to extend the hose until it reaches the connector present on the window kit. After attaching it, check and ensure it is locked into place tightly.
For best results, try to position the exhaust hose so that it connects to the window as directly and in as straight a manner as possible. This will ensure the airflow is not restricted and allow the unit to operate efficiently. According to some manufacturers, the hose should not be extended over nine feet.
3. Plugging The AC Into A Power Source
After the vent hose has been attached properly, it is time to connect the portable AC to a power source. Always use a grounded outlet for AC power plugs and sockets. When you plug the unit into the outlet, an indicator light on the AC unit will turn on. The unit will also have two buttons, one for resetting the device and another for testing it.
Press the button to test the portable AC when you first turn it on. This will check the installation for faults and turn the air conditioner off if it finds one. If that happens, the indicator light and the AC unit will turn off. Once it turns off, press the reset button to restore the appliance to its original state.
You can use the portable AC after it has been reset and turned on. But avoid using the reset and test buttons to turn the portable AC on or off, as they are only provided for testing to ensure the unit works properly.
The instructions to control the humidity levels and the temperature can be found in the manual, as can the instructions for the provided remote.
Sometimes, you may want to place your portable AC unit in a room that does not have a window. In such instances, ensuring proper venting can be a bit more complicated, but there are some alternative solutions available.
If you have a sliding door, it can be used for venting a portable AC unit, just like a window. You can use the window kit provided with the air conditioner and filler material required to block the gaps left out. But I would suggest looking for a specialized slider kit for sliding doors.
Such kits can cover the door completely, eliminating the need for filler material. But before you choose this option, it is essential to consider certain factors, such as security and ease of entry. Installing the sliding kit may prevent the door from opening properly and pose security risks.
It may be possible to use the ceiling for venting purposes, depending on where you want the portable air conditioner installed. For instance, venting through a drop ceiling is an excellent alternative for offices.
Special venting kits are available for ceiling venting, but you may need to hire an HVAC technician for such installations. Also, I recommend consulting the building manager to learn about air quality or safety issues when using a dropped ceiling for venting.
In some cases, it may be possible to use the exterior wall for venting purposes by creating a hole through which the AC unit hose can pass. However, this will require the assistance of a professional and is not the most simple of venting solutions.
In homes where the chimney is not in active use, it can be used to vent a portable air conditioner. But you need to ensure that the unused chimney is soot-free and its flue is open.
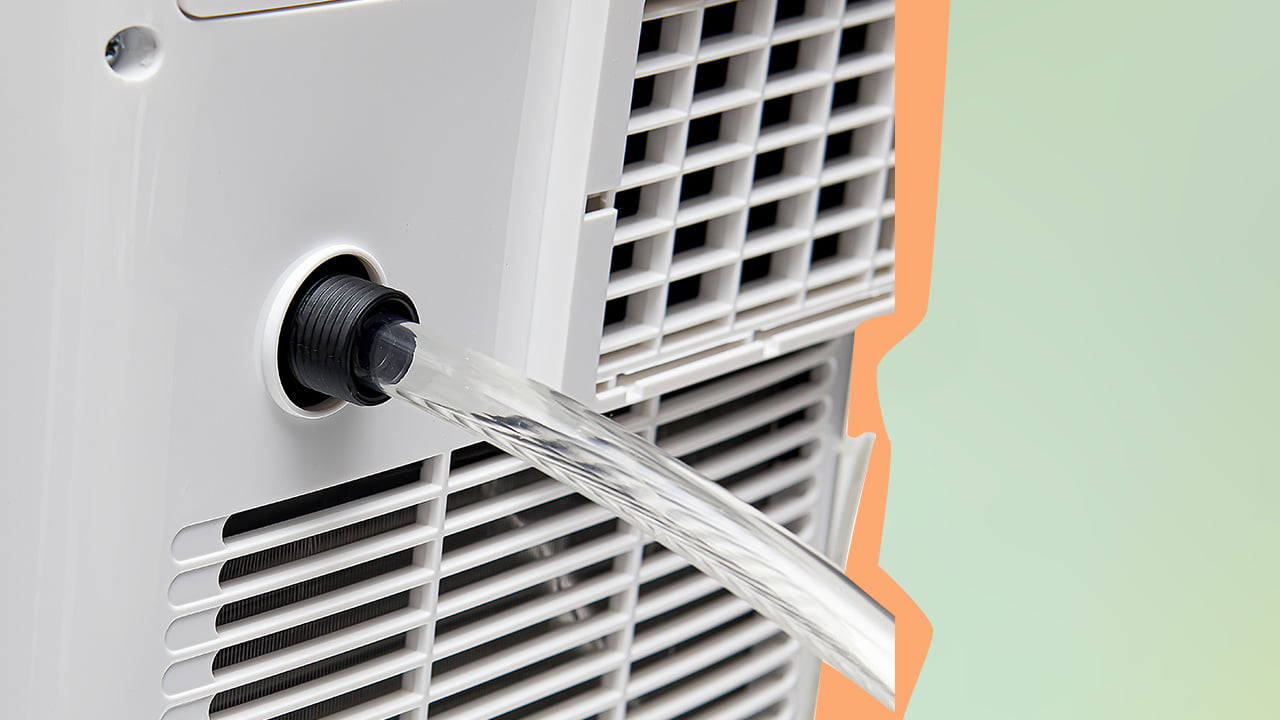
Leakage is among the most common problems many people face when installing a portable AC unit. It happens when warm air gets cooled and becomes free of humidity or moisture. This moisture passes over the evaporator coil of the unit and condenses into water. It is important to remove this water to prevent it from collecting inside the room.
Generally, leaks occur when your portable air conditioner is not installed properly and the drain hose has not been sealed tightly. Sometimes, they may even occur when the humidity inside the room is extremely high. In such instances, the drainage capacity of the drip pan of the AC unit may not be adequate to get rid of the moisture.
The water will collect in the drip pan and start leaking from the top, generally where the drain plug is located. But there are some ways by which you can deal with this problem.
When selecting a portable AC, opt for a self-evaporative one that removes warm air and water from the dryer vent hose. These machines do not need frequent draining, which is a huge advantage compared to standard portable AC units.
Leakage occurs when there is a gap between the exhaust system and the window kit, through which air and moisture can escape. You should ensure there are no gaps and that the hose is tightly connected to the window kit.
Other ways to reduce the level of humidity in the room include using exhaust or ventilation fans, relying on natural ventilation, and using a dehumidifier.
Just like a window air conditioner, a portable one requires proper maintenance to keep it in good shape. Proper maintenance will help your air conditioner function optimally and will go a long way in ensuring it lasts longer. Additionally, it can help prevent problems like leakage.
Cleaning And Maintaining Your Portable Air Conditioner
You should clean the exterior of your portable AC regularly using a damp cloth but avoid using materials like detergents as they can leave behind stains.
While you can clean the filters of the air conditioner, I find it better to replace them. However, you should stick to the manufacturer's instructions regarding its maintenance.
The condenser coils are among the most expensive components of your air conditioner and should be inspected regularly to ensure they are in proper working condition.
Always make sure that the exhaust hose of the unit is short and straight for maximum operational efficiency. This will also prevent the buildup of moisture and prevent it from going back inside.
Here are some of the ways by which you can deal with problems that may result in leakage.
The drain line that takes the water out of the drain pan may get clogged with dirt, minerals, and mold, preventing proper drainage. If that is the problem, turn off the air conditioner and use a wet/dry vacuum to clean the line. You can even consider replacing the line if the clog cannot be removed.
Drip pans made of metal are susceptible to corrosion and rust and can lead to leaks when they get damaged. To seal a damaged drip pan, you can use silicone caulk as a temporary solution, but it is best to get it replaced by an HVAC technician.
Another reason your AC may leak water is that its air filters may have become extremely dirty. Dirty filters can result in the freezing of the AC coil, and when this coil thaws, it can lead to leaks. You will need to clean or replace the filters to resolve this problem.
Tip
For best results, clean the air filters of your AC unit at least once every two weeks. Additionally, they should be replaced every three to four months to keep the unit in proper working condition. Smart AC controllers can be very helpful in this as they can notify you when the filters require cleaning.
Installing a portable air conditioner does not take much time or effort and can be undertaken easily. Just make sure to select the right location for the unit that can result in the best cooling performance while preventing problems like leakage.
Also, after the AC has been installed, it is crucial to maintain it properly so that it continues functioning efficiently and does not require frequent repairs. To do that, check that the exhaust pipe is straight, there are no gaps in the window, and the filters are clean.