Expertises: Painting, Art, Drawing, Pastel
Updated on

Inspiring Ideas for Modern Home
Just like Jack-O-Lanterns are one of the most recognizable decorative elements of Halloween, the Christmas tree and the snowman are staples of every December 25th. But, a snowman doesn’t restrict itself to Christmas alone, because a snowman is around until the snow is. And just like it doesn’t stick just to Christmas, you will be surprised that it also doesn’t need to just stick to snow to make us feel happy.

Yes, you can make a snowman with soft stuff like cotton or even white plastic cups! Unlike an actual snowman, a plastic cup snowman will never melt, and it does not need the chill of winter to sustain its form either. Moreover, it is very easy to make a plastic cup snowman and yes, quite cheap on the pocket too.
In a few easy steps, you can learn how to make a snowman out of plastic cups and make yourself and your little ones happy this Christmas.
There isn’t much you need to make the basic build of a snowman, and when I say there isn’t much, it truly is an understatement. All you actually require is a bucketload of plastic cups, say over 200 of those, and much more if you want to make it bigger than the average. To hold the cups together, you need a stapler and a whole lot of staples.
Think of all the shapes a snowman takes. Well, you thought of two, and that’s true. Either people build snowmen with one small ball and one big ball, the big and small here being relative in size to the innumerable small snowballs that go into the making of these balls; or shape the snowmen in an oblong fashion. The same shape applies to a plastic cup snowman.
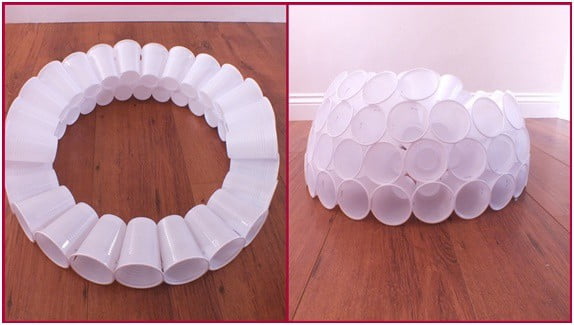
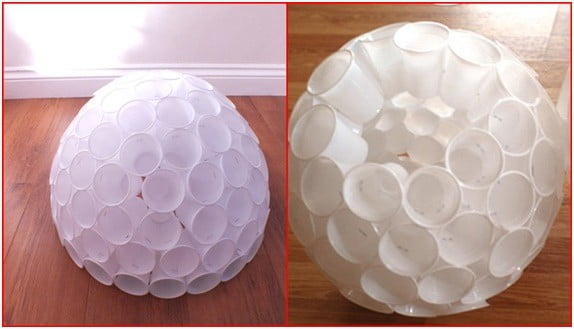
You need to make two parts for the snowman, one for the head, which will be smaller, and another for the body which will be at least 1.5 times bigger than the head. To create these spheres, you will need to take a bunch of cups and staple them together side by side till you have a semi spherical shape before you. Take more cups and staple them to this semi sphere to finish the circle. Once the circle is complete, take another set and start stapling it above this section, with the cups lodged a little deeper so that you achieve the round or oblong shape required. Apply the same rule for other layers, both above and below.
Even if you’re making an oblong shaped snowman, make the head as round as you can, and yes, considerably smaller than the body. Using fewer cups than before, you can staple them all into the shape of sphere and then attach the head to the body by stapling it.
Once you connected the head and body, cover this stapled area with a scarf.
The scarf, as is known, is just one of the decorative elements required to complete your snowman. So, for the eyes you can use paper balls or make the eyes out of woolen pom poms. Color the paper balls or pom poms black, with a small dot in the center, a different one for the eyes and a different one for the buttons. For the buttons you can of course use different colors, you are not restricted just to black. Once your eyes and buttons are ready, glue them to the cups.
You can add additional clothing to the snowman by using long strips of cloth or colored paper and stapling it with shirt like shapes over the cups on the sides. Moreover, you can use the cavity of the cups on the sides to attach twigs to the snowman for arms.
For the nose, you can either go with a real piece of carrot, chisel and smoothen it up to give it a neat look or make the nose out of a paper cone made from an orange colored paper. Use the colored paper for the adorable smile of the snowman too and glue this to the outer rims of the cups. Add a little blush to the snowman by cutting out small pink circles from a colored paper and attaching them to the sides of the face.
Using a hot glue gun is neater for the project as it does not show the seams of the snowman like a staple would. But, do not let your little ones handle the hot glue gun as it can be dangerous if used improperly and they might burn themselves with glue or worse.
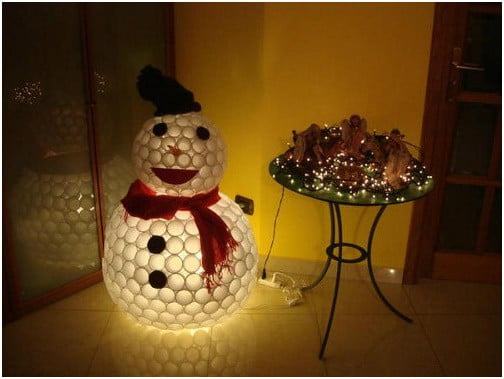
Use a bonnet or a bowler hat to complete the snowman. You can further illuminate it by placing a lamp in the center cavity of the snowman as it has an empty atrium chamber at the core of its body.
Photo courtesy socreativethings.com
If you don’t want to go with a look where the snowman shows empty cups all around it and it looks too unfinished for your taste, then you can use tissues and glue or staple them all around to cover the cup cavities. You can also use colored cloth pieces or cloth pieces with different patterns and glue them all around the body to give the snowman a full colorful costume.
And there you have it! Your own little snowman made of nothing much but some odd number of cups, some glue and staple, and miscellaneous things you don’t need to fret over much. Add a bell collar to this snowman and let it rock slowly and you can sing the jingle bell song with it and amuse your kids.