Expertises: Paint, Home improvement, Wood, Car, Painting
Updated on

Inspiring Ideas for Modern Home
Radiator leaks are messy and dangerous, so it's not surprising that people rush to the mechanic as soon as they spot a green puddle.

Whether your car is high mileage or not, the radiator wears out and breaks with time. Repairing a broken radiator can be an expensive affair if you consult a professional. But fixing a radiator leak at home is possible if you know the correct method.
There are many ways to fix a radiator leak, and we've selected a temporary quick fix for you. In this guide, we're going to show you how to fix a car radiator leak using epoxy.
If the radiator leak is severe, you have no choice but to make a trip to the mechanic to get it professionally repaired. But say you spotted a minor leak or a small puddle, taking quick action on your own can work just fine, too. Although it might not be a permanent fix, it's better than nothing for the time being.
Don't ignore the leak and continue to drive your vehicle because the car is prone to overheating since it lost coolant from the leakage. In the long run, driving with a broken radiator damages the engine and could be dangerous.
But a simple fix with epoxy can prevent further damage. This DIY method will help you save the cost of the radiator parts and the mechanic fee as well. At the very least, there won't be any leaks when you are ready to get the radiator professionally fixed.
In this guide, you will learn how to find the source of the problem- the crack in the radiator. Along with that, you'll see the correct way to clean the radiator before sealing it with epoxy.
When you notice leaks and puddles forming beneath the car, it's best to check the issue as soon as you can. Firstly, check if the puddle is made up of water or coolants. This can be identified by the color. In the case of a clear puddle, it is water, and if the puddle looks suspiciously green or any other color, it could be a coolant leak. Remember that coolant leaks indicate damage or cracks in the radiator.
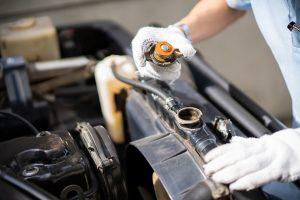
Now that you have figured out that the leak is indeed a coolant from a broken radiator, turn off the car engine. This is to make sure the engine cools down before you can inspect the parts. It also helps to reduce the pressure off the radiator and engine and is a general safety practice we recommend.
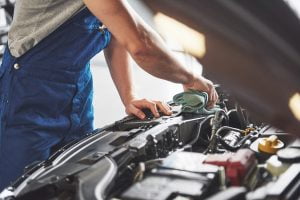
After the engine has cooled down, try to remove the radiator from the car. Modern vehicles have a different system that does not make the radiator accessible, and it takes an experienced hand to remove it.
But if your car is an older model, the radiator should be easy to remove without professional help. If the radiator does not come out, take other parts out of the way so you can get to the radiator.
Once the radiator is in clear view, look around to find the cracked or broken area. Next, you'll have to remove the rest of the coolant if you want to apply epoxy. So, drain the radiator either completely or up till the part where the crack is visible.
After this, clean all sides of the radiator to remove the chemicals. A brake cleaner should be sufficient to do this job. Take your time while doing this step because the epoxy will not bond correctly unless the surface is completely clean. An additional step would be sanding the surface, although it is not mandatory.
But sanding the surrounding surface will allow the epoxy to form stronger bonds that will last for a slightly longer time. Also, before you apply the epoxy, allow the surface to dry completely. This is because moisture or dampness can interfere in the epoxy bonding process.
Now you get to choose which epoxy you'd like to use for fixing the radiator leak. We've listed out a few of our favorites later in the article, so be sure to check that out. Upon opening the packaging, you'll see that the epoxy comes in strips, and you can break off as much is required for the repair.
Take a piece of the epoxy, press and rub with your hands till the warmth from your fingers makes it soft and pliable. The more you work with it, the warmer it gets, and you get a flexible piece of epoxy for repair.
Now, spread the epoxy all over the crack or broken area of the radiator. It's essential to cover the entire area so that it seals nicely, and the excess can always be removed before it dries up. It's alright if this process takes some time, but don't skimp on it.
The layering needs to be correct for the epoxy to be able to handle the pressure of the radiator. After the epoxy is applied correctly, allow it to dry and cure completely. It takes around an hour to dry, but the curing process takes 24 hours.
The next day, check the radiator and the epoxy. The epoxy patch should be fully cured and solid by now, but you can also check it once to see if it is secure. Next, replace the radiator and the other parts back in the car and see if there is enough antifreeze. Start the car engine and take a look at the now repaired radiator.
Let the engine run for a while so that the pressure builds up in the radiator. Then take a look at the epoxy repair if it is still firmly in place. The patch should be able to withstand the pressure without any leaks. Finally, clean up any messes caused by antifreeze, if any, and the car is ready to use.
The method which we stated earlier was applicable for the standard metal radiator, which most cars have. But what do you do when your radiator is made of plastic? In that case, repairing it takes a totally different method which we will elaborate on in this section.
Even though the process is different, fixing a plastic radiator at home is possible if you know basic welding. Besides, you are better off repairing it at home because professionals usually do not fix plastic radiators. They will probably suggest you throw the broken one out and get a brand new one that can dig deep in your pockets.
We'd suggest you try to fix the plastic radiator on your own and if there is an issue after a few weeks, get it replaced. One thing you should know before fixing the plastic radiator is that it can handle high temperatures of 94 degrees Fahrenheit and above.
So don't worry about exposing the radiator to heat, thinking it might melt. Secondly, after you finish the repair, the radiator should be able to hold hot and pressurized coolant without damaging the parts- that's when you know that the job is done well.
Again, cool the engine down so you can work with the radiator, then drain any water or solution till empty or beneath the break line. If the fluids from the radiator are not removed, they might spill while working. Next, clean and prep the area so that it is ready for repair work.
Now, use a heat gun to soften the plastic. As you apply high heat to the cracked edges, you'll notice that they begin to change the texture and look glossy. If the break line is too large, divide your work into 2-inch sections for easy welding. This way, you can finish one section of welding before tackling the next one.
During the welding process, try to create a V-shaped channel throughout the break line. Next, melt a nylon rod into this portion using a plastic welder. Essentially, we want the rod to melt into the hollow area completely.
We want to give you a heads-up about the fumes plastic welding creates. It can get a bit suffocating if you're not wearing the correct protective gear or there isn't enough ventilation. So, be sure to prepare these beforehand.
After the nylon rod melts into the gap in the plastic, remove the extra bits on the edges. Next, use the tip of the welder to join the nylon with the plastic radiator. You'll know it has been blended when they begin to blend into each other.
Once this is done, leave the radiator to cool for a few hours. Alternatively, if you prefer to work with epoxy instead of welding, plastic-specific products are available on the market. The method to fix the plastic radiator with epoxy will remain the same as mentioned for metal radiators.
Now that the method for fixing radiator leaks with epoxy is clear, it's time to look at some of the epoxy products available. Some of the epoxy products are specially designed for radiator repair, and many of them work equally well on metal and plastic. Here are a few brands we recommend-
Radiator Weld by J-B Weld is one of the strongest epoxies for repairing leaks in radiators. It comes in a complete kit with all the items you will need for mixing and applying on surfaces. The kit comes with epoxy putty, fiberglass cloth, sandpaper, and an epoxy applicator.
J-B Weld is also one of the oldest brands with over 40 years of reputation backing it up. Their quick seal product is sure to help beginners who are unsure about using epoxies on radiators. The good thing about this product is that there is no need to remove the tank or radiator from its sitting place.

This means the epoxy can be mixed and applied even if it is not removed from the car. Impressively, this epoxy can fix 4-inch long breaks or cracks perfectly. JB-Weld epoxy is durable and resistant to chemicals and heat and can easily handle temperatures upto 250 degrees Fahrenheit.
Moreover, this product is versatile and can bond plenty of other broken items like washer fluid tanks, water tanks, storage tanks, plastic radiators, composites, and PVC.
Next, we have another radiator repair kit which is a pretty good option by the brand Versachem. This product is versatile enough to work on both metal and plastic radiators. We appreciated that it could be applied to the tank or radiator without having to remove it in any way.
If the crack or break in the radiator is visible, you can apply this product directly after cooling the engine. Furthermore, this option can withstand a decent range of temperature- from 40 to 200 degrees Fahrenheit. So, you can rest assured that high temperatures will not damage your repair work.

When we read the back of the packaging, the product description mentions that it repairs gasoline and fuel tank leaks in 20 minutes. Also, there is no draining of coolant required with this product. All in all, this kit makes a good option when it comes to radiator repairs.
Finally, we have a flexible sealant called Optimum Black Gasket Maker by Permatex. This product comes in a tube packaging of 4 ounces and can be squeezed out through a nozzle. Actually, this option comes with two different nozzles so you can adjust the amount of product you need for the project.
What's different about this option is that it has a fluid-like consistency instead of a solid stick putty. So there is no need to warm up the product in your hands. It is ready to apply as soon as the tube is opened.
We like that this sealant is resistant to auto and shop fluids and vibration, making it the perfect choice for fixing a radiator leak. Not only that, but it also retains a lot of its flexibility after drying and is an oil-resistant adhesive. This indicates that it is strong enough to withstand the pressure build-up in the radiator.

Also, it can handle high amounts of heat, with a comfortable working range of -65 to 500 degrees Fahrenheit. Additionally, the product is sensor-safe, has low odor, and is non-corrosive, making it a great choice for fixing a leaking radiator.
So, that was our short guide on fixing a radiator leak using epoxy. Most of the aspects which people struggle with have been mentioned in the stepwise guide. Also, we know that not all car radiators are made of metal, so we decided to include a section about plastic radiators as well.
Along with the methods for repairing a radiator leak, this article also mentions a few popular epoxy brands. Although we think all of them are up to the mark, our go-to option is the Radiator repair kit by J-B Weld. We hope this informative guide helps you the next time you need to repair a radiator with epoxy.
See you next time, bye!
Related Articles