Expertises: Art, Painting, Drawing, Home improvement, Gardening
Updated on

Inspiring Ideas for Modern Home
Wondering how to work that clamp meter? We're here to help you with the ultimate guide, specially drafted keeping beginners in mind.

Let's just start by saying that operating a clamp meter is pretty simple once you figure out all the subtle mechanisms. Also, you're already halfway there if you know how to use a general-purpose multimeter.
But, then again, it's essential to know the minor differences between the two, which will help you decide better while testing and troubleshooting.
Furthermore, this nifty gadget benefits users in numerous ways and is the least complicated when it comes to handheld tools. So if you're a serious DIY-er or tech enthusiast, it's time you learned all about this super cool gadget.
Now without further ado, let's begin.
Long story short, a clamp meter is an advanced variation of a digital multimeter, but the primary points of difference between them are the design and capabilities.
The former has a jaw-like structure on the business end that enables contactless measurement of current and voltage. So basically, you can 'clamp' this top part around conductors (like a wire) to detect the current flowing through it.
That being the primary working principle, new age clamp meters perform multiple functions for measuring several quantities and come with features that simplify troubleshooting and analysis. But most importantly, they are equipped with safety measures for convenient use.
Since you neither have to plug testing probes to live circuits manually nor disconnect the system to record a measurement, clamp meters truly ensure safe applications overall. And that's why it's no surprise that they have become one of the indispensable tools in a technician's kit.
Before you begin using a clamp meter, it's critical to understand how it's different from a digital multimeter (DMM). Following are the key notable dissimilarities...
Firstly, a digital multimeter mainly measures voltage, but it has some current measuring capabilities. On the other hand, a clamp meter does just the opposite, meaning it's ideal for measuring current, but falls short when it comes to voltage.
Secondly, DMMs are high-resolution devices, calculating in units like millivolts and milliamps, whereas clamp meters only measure to the nearest tenth or hundredth. The latter usually works fine for electrical work, but don't expect minute measurements.
Lastly, DMMs are far more accurate and provide users with direct readings, but they're comparatively much slower and not that safe.
Therefore, it's wise to have both the tools at your disposal, though for certain situations, clamp meters are crucial.
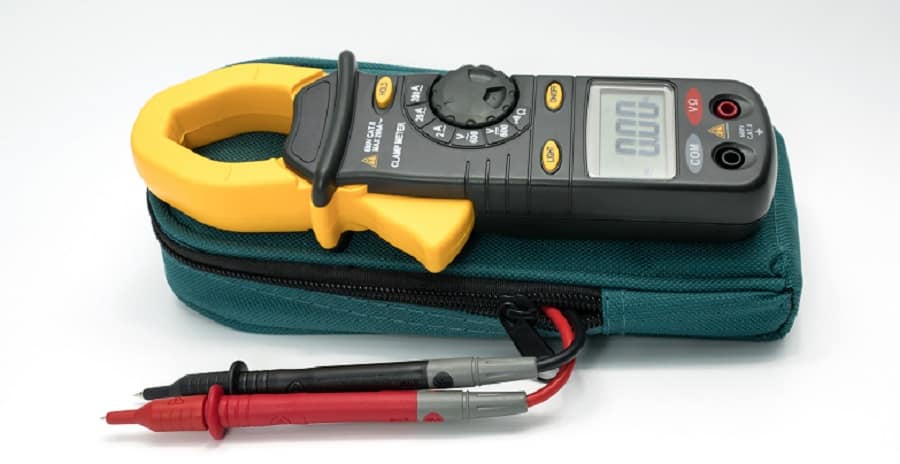
Before we get into the nitty-gritty of using a clamp meter, it's essential to learn about the basic components of the unit. Following is a list of major components commonly found on most clamp meters.
These are the components that you will usually find in most digital clamp meters. However, based on the model that you buy, the elements and functions may vary.
Since analog models are mostly out of use, we suggest investing in a digital model with multiple features and improved user safety.
Also, in the following guide, the steps elucidated are for measuring DC amps or AC amps only. For all other quantities, the procedure is similar, but you'll have to select the respective function on the dial.
Step 1: Turn ON the meter and remove the probes (if connected)
Step 2: Select the AC or DC function using the dial. At this point, the display should show a jaw sign, which confirms that the measurement is being recorded through the clamp (read the manual to see how your unit indicates this)
Step 3: Open the jaws using the side lever and insert the conductor through which the current is to be measured. Usually, technicians do this one-handed while they note the measurements with the other one.
Step 4: Close the jaws and level the conductor between the alignment signs inscribed on the top structure. However, If these signs are missing on your model, try to adjust the conductor to the center of the clamp.
Step 5: The display will now generate the appropriate reading. Users may modify the resolution as per requirements, but most meters do so automatically.
We recommend taking measurements from conductors that are adequately insulated. Do not measure around live wires as that could result in a fire hazard.
Some models also come included with a flexible current probe, which is used to measure current and voltage of conductors in tighter places that are inaccessible to the rigid clamp.
So first, connect the other end of the probe to the unit and then proceed.
The process after that is similar, with the only change being that you have to ensure the probe is correctly wound and then attached back to the meter.
Select the appropriate function (meters with this accessory usually have a separate feature on the dial). The display will then instantly show the corresponding data.
We want to ensure that you have a smooth experience using the tool from the get-go. That's why here a few tips for the first-time users that will come in handy while working on your initial projects.
Let's be real — clamp meters will pinch your pocket. Naturally, you'd want to ensure that yours lasts as long as possible.
How do you do that? First off, start by storing the unit in a secure place. It can be inside a drawer, toolkit, or car compartment. Also, you should keep the meter in a clean, dry area to avoid the risk of rust. Besides, ensuring the meter itself is clean is equally essential as dirt and grease will affect the accuracy of readings.
Furthermore, it's best not to put anything on top of the meter that would push the jaws out of alignment. In case they're not appropriately aligned, the magnetic circuit won't close. Although most digital clamp meters have self-aligning properties, it's better to be safe than sorry.
Do not, at any point, start using your meter to pry things apart. That self-aligning mechanism will only fix so much.

Clamp meters have become popular tools among professionals and DIY enthusiasts, primarily for two reasons - safety and convenience. That being said, clamp meters enable electricians to bypass the traditional method of cutting into a wire, and inserting test leads into the circuit to record in-line measurements.
Those jaws of the meter not only provide contactless functions but also allow users to work without compromising on safety. And the best part - it is not mandatory to shut off the circuit carrying current, which was otherwise necessary while applying old techniques.
On that note, we've come to the end of this comprehensive guide, and we hope you have all the information you need to get cracking with your new gadget.
So, take out your new tool and measure away. But if you get stuck with something, just refer to this guide for a quick fix.
Till next time!