Expertises: Art, Pastel, Brush, Drawing, Pencil
Updated on

Inspiring Ideas for Modern Home
Watercolor pencils are a unique medium of art that combines traditional watercolor painting and drawing, helping you achieve the best of both worlds. With the right tools and paper, you can experiment with various techniques using watercolor pencils, such as wet-on-wet, dry-on-wet, dry-on-dry, etc.

Although similar to regular colored pencils, watercolor pencils use a water-soluble binder (material) to hold the compounds in watercolor paint instead of non-water soluble oil or wax. The watercolor paints are encased in a pencil form that can be sharpened to create beautiful pencil strokes.
Moreover, the water-soluble binder makes it easy to glide the pencils over wet paper, but they’re quite difficult to use without water. So, it requires a certain understanding regarding how watercolor pencils work to achieve a seamless blend to enhance the fine details in your work of art.
Therefore, we’ve curated a step-by-step guide to introduce you to different watercolor pencil techniques and how to use them to create beautiful art. Read on!
So, you might be wondering - are watercolor pencils simply watercolor paint in pencil form? Well, not exactly. They are closely related media but use different techniques and require different supplies to achieve intense color. That’s why mastering the art of watercolor pencil doesn’t guarantee mastery over painting and vice versa.
However, these two media complement each other very well. You can enhance watercolor paintings by using a watercolor pencil tip to add detail. Similarly, you can improve pencil drawings by creating a background using traditional watercolor paints and a wet brush while drawing the subject with colored pencils.
Watercolor painting is one of the most difficult methods of painting, but watercolor pencil drawing can help you ease into this method. Unlike traditional colored pencils, these will help you understand how to work with pigment and water and how it moves across the watercolor paper.
The best watercolor pencils offer superior control compared to a wet brush - this benefit helps you add crisp lines or fine details, which might be difficult to achieve with a brush. Watercolor pencils also do better when it comes to adding a rough sketch (drawing) to a wet surface, unlike waterproof pens. Moreover, you can add texture to your work using simple pencil strokes since the watercolor pencil pigments provide a fine point while maintaining the watercolor effect.
Ordinary colored pencils are more difficult to work with due to their color being quite permanent, making it challenging to change the color intensity on wet watercolor paper. But as long as the surface is wet, the color applied with watercolor pencils can easily lighten or darken or mix with other colors using water and a brush. Using simple pencil lines, you can use watercolor pencils without water to take advantage of the sharp point and add better visual information.
And finally, watercolor pencils make little mess compared to other art media - all you need is a wet pencil, paper towel, water, and brush to get started.
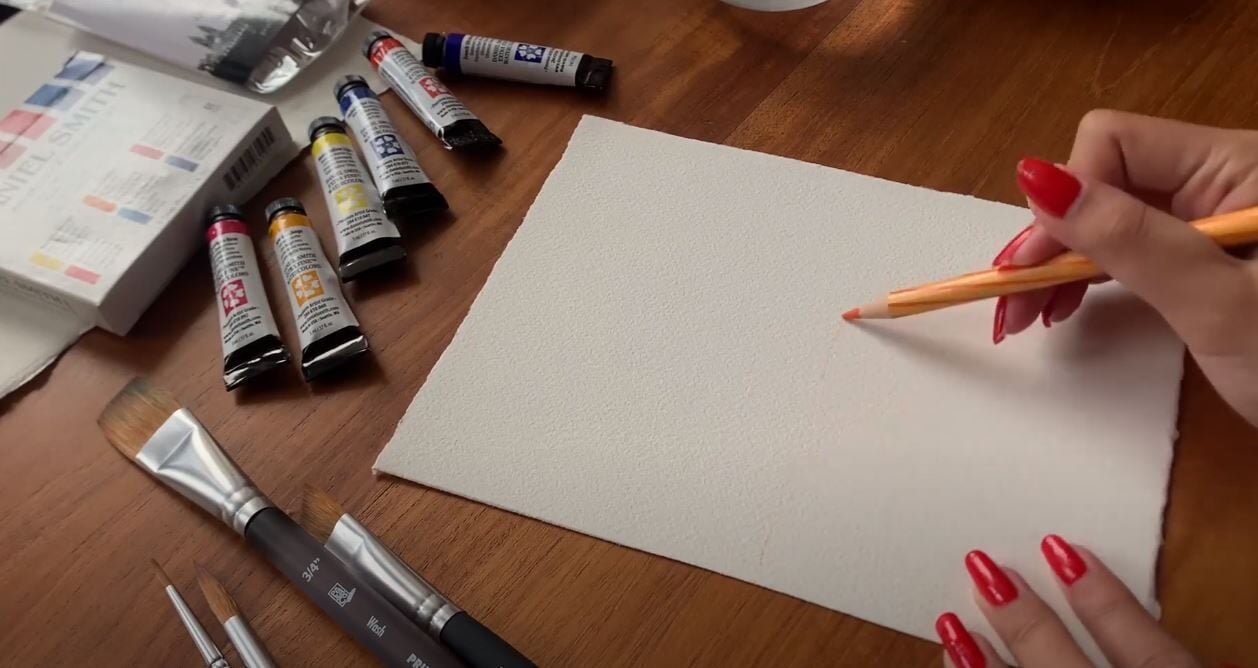
Watercolor pencil applications turn out best when you pair them with suitable supplies compatible with most watercolor pencil techniques. Here are the things you would require to help you get started.
If you’re a beginner, purchase a basic and affordable set with 12 watercolor pencils. While a set of 12 colored pencils might not give you a vast color range, you can blend them in layers or manipulate the color intensity to achieve various shades and textures. The beginner set watercolor pencils from Derwin can be a good fit.
If you’re an intermediary and have already worked with the basic 12 colors, you can purchase the Caran D’Ache Supracolor Watercolor pens (set of 30) for a better tonal range. These watercolor pencils provide softer watercolor pigment, making them more durable and blendable in the long run.
For professional and advanced artists with plenty of experience with watercolor paints, we recommend the Faber-Castell Albrecht Durer set, which includes 120 colored pencils. Such variety, coupled with the brand’s reputation for high-quality art supplies, will help you achieve optimal layering and blending results.
Watercolor papers are often made from cotton and nylon to ensure even thickness and a glossy finish. When purchasing watercolor paper, always go for sturdy, thicker paper compared to traditional thinner papers in sketching pads.
This is because thin papers wrinkle very easily and absorb a lot of water - so it’s a big no for a water-soluble medium like watercolor pencils. Briefly speaking, you need to consider these two factors: texture and weight.
You can typically find watercolor paper in three textures: cold press, hot press, and rough texture. Some prefer cold pressed paper due to its ‘tooth’-y texture - most watercolor artists use this since it helps easily create texture in their art.
Meanwhile, the hot-press watercolor paper has a smoother finish and enough thickness to hold water without wrinkling. Moreover, hot-pressed paper absorbs water much slower than cold-press paper, so you can experiment with more pigment on wet paper.
Rough paper, as the name suggests, is similar to cold press paper but has more texture.
Manufacturers mention the weight of the paper, especially the high-grade and good-quality ones. The most commonly seen weights are 90 lb, 140 lb, and 300 lb. This ‘weight’ is calculated by measuring how much 500 pages weigh in total. And since the thickness of the paper contributes to the total weight, the higher the weight mentioned on the paper, the thicker it is.
When it comes to choosing a brush, we recommend starting with a normal paintbrush to get the feel of it while blending the pencil colors on the paper. However, if you don’t want to dip the brush in water too often to activate watercolor pencil applications, a water brush may be the right choice for you.
A medium-sized paintbrush (round 8 or 10) is multi-purpose since it can cover a large surface area, aiding in beautifully spreading color while its tip can enhance the pencil strokes. Moreover, flat and medium-sized brushes like these are suitable for creating a background and abstract color effects.
But if you are big on details and fine lines, we recommend keeping size two and four brushes in your inventory.
Obviously, you’ll require plain water to activate a dry pencil and use different watercolor painting techniques on wet paper. But paper towels are also necessary for removing excess water and color from your water brush and paper.
We also recommend putting a border on watercolor paper using masking or washi tape before you begin drawing. This ensures you get a clean border and zero color leakage beyond it, giving your drawing a neat and professional look.
You’d need a good sharpener to spruce up your watercolor pencils when they become blunt to get fine pencil marks for easier drawing. However, you must be quite careful while choosing a sharpener since most watercolor pencils have quite soft tips that can break easily.
Some reliable watercolor pencil sharpeners we recommend are the Uni Color pencil sharpener (regular pencils) and the Kum No. 410 Magnesium (for larger Faber Castell pencils).
These materials aren’t compulsory for getting started with watercolor pencils, but they can make the process much easier and give you better results.
We recommend purchasing a good-quality graphite pencil (2B or 4B) for preliminary sketching. If you like ink rather than graphite, consider using waterproof pens for tracing outlines and creating bold, abstract art pieces.
Masking fluid is another optional supply that’s very convenient for blocking areas of the paper you don’t want to fill with color or want a relatively lighter color in. Applying a masking fluid is quite simple - you just have to paint it on the specific areas, let it dry, and color the rest. Then rub it off using an eraser when the artwork is complete.
Speaking of erasers, you wouldn’t want to miss out on kneaded erasers, which can be easily assembled and recycled - they are also great at erasing watercolor pencil marks.
Watercolor pencils are quite versatile regarding the different techniques and approaches you can take to get started. Here are the most common techniques you can experiment with:
Most artists who heavily use watercolor pencils draw first on dry paper and then add water after or between each coloring stage to create an ombre effect.
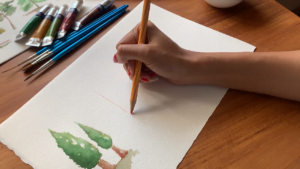
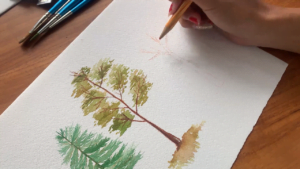
To begin, start lightly drawing your subject with a graphite pencil or a watercolor pencil in the dominant color of your subject. For example, if you’re drawing an apple, the dominant color is red. Very subtly outline the areas you don’t want to color or want to fill with lighter colors. Then, start coloring your subject - from the lightest to the darkest color or shading.
Finally, dip your brush into water, and remove the excess water using a paper towel. Then, start gliding the wet brush over the area with the lightest color - you’ll see that the lighter shades will transform into vibrant colors when you add water. Remember to clean the brush and dip it in fresh water before starting with a new color to avoid unwanted blending or too many layers.
Also known as the dry-on-wet technique, it requires you to brush a light coat of water on the watercolor paper to moisten it. Focus on the area you want to draw first instead of wetting the entire paper to avoid wrinkling and water spots.
Next, use a dry watercolor pencil and draw on the wet paper - you’ll see the same vibrant color as when you dip the pencil in water. The results last long in the dry-on-wet technique, and you won’t have to dip your pencil in the water continuously. But you must complete the drawing before the paper dries.
This wet-on-dry technique is quite literally the opposite of the previous technique. Here, you need to dip the pencil tip directly into the water instead of using a brush to apply water to the paper. This will result in a bold, dark color, but this wet effect won’t last as long - in the end, you’ll get an effect similar to that of normal colored pencils.
Remember to dry your pencil tips with a paper towel to keep them in good condition.
This wet-on-wet technique utilizes even more water. First, you’ll need to moisten the paper with a wet flat brush and then proceed with your drawing using wet pencil tips. You’ll need blurry lines, giving you the same effect as traditional watercolors. If you want varied texture and more vibrant pigment, this is the right technique.
Many art subjects call for layering techniques to achieve a gradient or ombre. There are two ways you can layer colors using the watercolor technique.
In the first method, you can apply one color, use water to activate it, wait until it’s dry, and then apply another color over it. This works like watercolor paints, where the underlying color pops through the second color to create a hue. However, it can also lead to harsh lines and visible color separation.
The second method includes using multiple dry watercolor pencils to achieve a gradient and then activating all the colors simultaneously. This is a more time-saving technique and helps you blend the colors seamlessly without risking hard lines or inconsistent paint.
Blending indicates the process of making smooth transitions between two or more colors. You can use a wet brush to spread the lighter hue into the darker one until there’s a seamless gradient.
Ensure you don’t start spreading the dark color first as that will cover up the lighter one, leaving you with no gradient.
There will be many instances where you’ll find that you’ve applied too much of a particular color, making it appear too dark or vibrant. In this case, you’ll have to be quick and blot the extra color with a paper towel or dry brush before the paper dries. This process helps you ‘lift’ a color - many artists also use a sponge to create light color for evanescent objects such as clouds.
Unlike paints, watercolor pencils may look different after you activate them with water. So, we recommend creating a palette (painting) or illustration board with tiny boxes for each color and activating them to get an idea of what you’re working with.
It is very important to prep the base of your artwork, even if you’re using professional watercolor paper that can hold sufficient amounts of water. This preparation will prevent unwanted warping or wrinkles on the paper while you work.
First, wet both sides of the paper and blot away the excess water using paper towels until it’s sufficiently damp but not dripping wet. Then, using a washi or masking tape, secure the watercolor paper on the table or any flat, hard surface, ensuring that the edges are all covered. Begin drawing when the paper is completely dry.
Instead of directly starting off with watercolor pencils, it is advisable to make a rough sketch of the subject or the entire drawing. This will help you mark areas where you want more color and areas that require minimal color - an outline will also help you achieve a neat look. You can use graphite pencils, waterproof pens, and markers for your preliminary sketch.
Once you mentally consolidate the idea of your artwork, simply fill in the color as you would with regular colored pencils - but you need not fill in every little space. Avoid coloring the areas you want less color in since the water will activate the surrounding colors, allowing you to create a lighter hue in this area.
However, you must be careful of the directions of your pencil strokes - these marks can later show up in the finished artwork. Keep in mind the texture you want for the subject, and use strokes that best complement it. You can also follow the direction of your preliminary outline or draw in one direction to maintain uniformity.
Now comes the most important part - activating the colors. Use a medium-sized wet brush and glide it onto your pencil strokes with particular attention to the shape and direction. If you want to remove the semblance of any visible stroke, work your brush more thoroughly into the color. But be careful - aggressively blending the color with water can pill or fray the paper.
When your first application is completely dry, add more layers of the same hue on the existing layer of color to add more depth and create contrasting effects, shading, or finer details. As usual, dip your brush in clean water before using another color to prevent unnecessary blending. Do this until your artwork reaches your ideal depth, transparency, and translucency level.
When you’re satisfied with the final product, let it dry completely. Keep it in a well-ventilated area to expedite the process. When dry, remove the washi tape and erase any color leakage into the border - and you’re good to go!
Using watercolor pencils might seem difficult at first glance, but following simple tricks and tips may help you get better results. These are:
When working with watercolor pencils, use fewer layers of color since too many layers can lead to a sludgy appearance that doesn’t dry quickly. A heavy layer of color can also result in uneven texture, blurring borders between the subject and background, improper blending, etc.
However, every pencil supports a different level of color buildup, so experiment with your watercolor pencils and see how many layers they can support.
It is often quite challenging to get rid of the pencil marks from your drawing, even if you blend it well with water. So, instead of trying to remove them, let the pencil marks give your drawing a texture that distinguishes it from traditional watercolor paintings.
Since watercolor pencils dry out more quickly compared to watercolor paint, it’s important to work fast when dealing with this medium. You should work especially fast after adding water to the paper to facilitate seamless blending.
You should only use watercolor paper with enough thickness to hold water and enhance the solubility of the pencils. Watercolor papers come in three variants (cold press, hot press, and rough texture), so you must choose the variant whose texture and finish best suits your subject. Although you can dip the tips of the watercolor pencils in water and use them on paper, you’ll still need a brush to further blend in the pigment. It is an important part of the process and the only way to activate the watercolor pencil marks. However, you can choose between different brush sizes. For example, a big-sized flat brush is good for spreading the pigment, whereas smaller brushes (size 2 or 4) are better for details. You can sharpen watercolor pencils the same way you sharpen normal pencils, but instead of using a regular sharpener, use a watercolor pencil sharpener that won’t break the soft tips. The watercolor pigment encased in the pencil can be easily broken, so you have to be gentle while sharpening. Of course! Most artists that use watercolor pencils as a medium follow it up with paints or waterproof markers to make their drawings appear more detailed. You can also create different patterns and textures by combining watercolor pencils with other media. It’s quite easy to store watercolor pencils. You just have to ensure they’re completely dry and store them in a cool, dry area away from direct sunlight and excess humidity.Watercolor Pencils Uses FAQs
What paper should I use with watercolor pencils?Can I use a brush with watercolor pencils, or can I just use water?How do I sharpen watercolor pencils?Can I use watercolor pencils with other watercolor supplies, such as paints or markers?How do I store my watercolor pencils to keep them in good condition?

Watercolor pencils are an inexpensive and less messy medium than traditional watercolor paint, but many people might be unaware of how to use them due to their relative novelty. That’s exactly why we've created such a detailed article on this medium!
Once you understand how watercolor pencils really work, you can create precise lines, varied textures, and seamless color blends using only one medium. And you’ll find affordable watercolor pencils in every local art store, so nothing stops you from trying this innovative and convenient medium.
Did you like our in-depth guide on how to use watercolor pencils? If you did, stick around for more informational articles about art and art products.
Until next time, goodbye!