Expertises: Architecture, Design, Art, Home improvement, Painting
Updated on

Inspiring Ideas for Modern Home
No one can complain of a dearth of DIY ideas, for the web is littered with all kinds of DIY project ideas. Instead of helping, the abundance of project ideas is causing confusion, so we have decided to pull DIY geeks out of the state of utter desperation by providing a list of 101 awesome DIY projects. It will excite a DIY aficionado so much that he/she will roll up her/his sleeves, plug in some music, get the DIY gear organized, and shut himself/herself in the crafts room to create the next masterpiece. Enjoy!

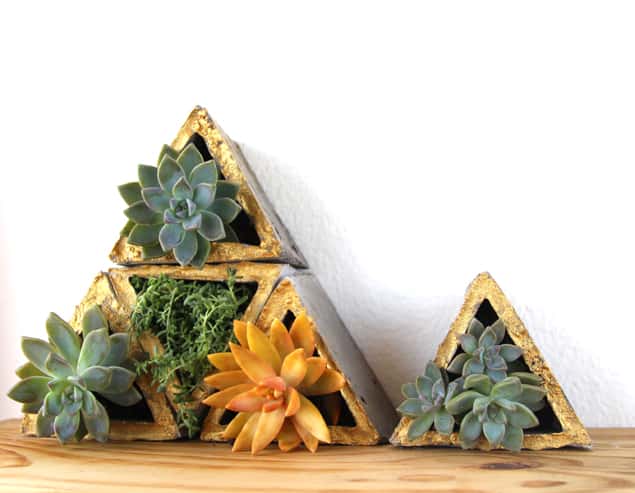
It is only when one starts looking around that the person sees how exciting the DIY world is. How many of us have ever imagined that something so mundane like a tetra pack can turn into such an awesome lamp? Making unexpected things from mundane, everyday objects is what makes DIY projects so exciting. The key to success in this project lies in the arrangement of triangular shapes made from a tetra box. To know how, follow the link below.
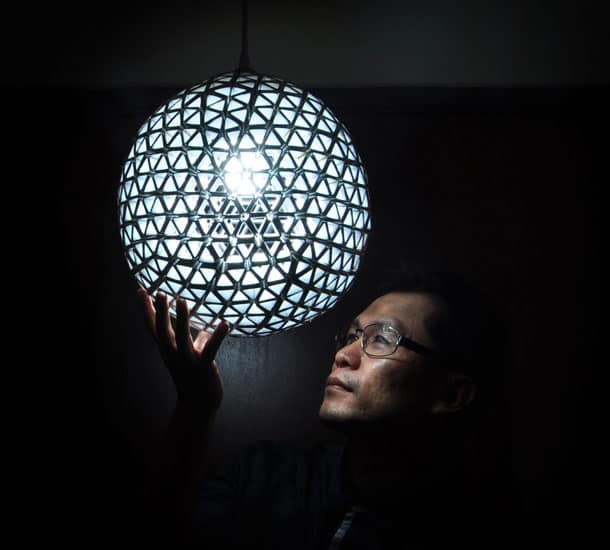

Source: EdChew
An artist uses blank canvases and crayons to make all kinds of artwork, but seldom does she use these two and turn them into a piece of artwork. To get this done, you need a canvas, boxes of crayons, glue, and a blow dryer. The first step in making this is to lay the canvas flat and then arrange the crayons in the shape you want. Afterward, fix the crayons on the canvas using glue. Let it dry for some time and when it is suitably dry, you should power up the blow dryer putting the setting to the maximum heat. Now move the dryer closer to the crayons making them melt and flow. The key to success in this craft is the flow of your dryer to get the desired shape, as shown below.
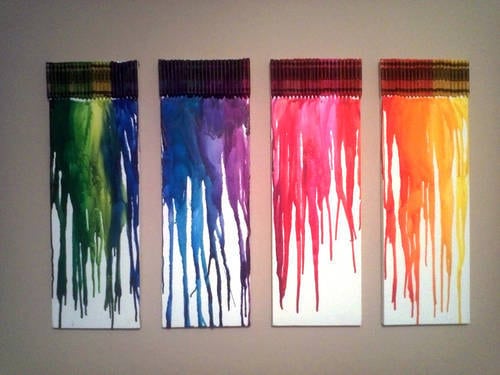
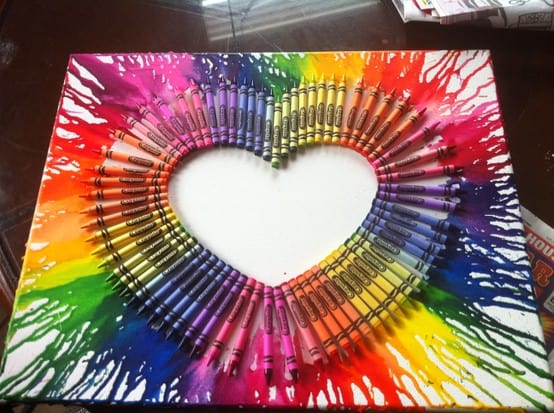
Source: College Gloss
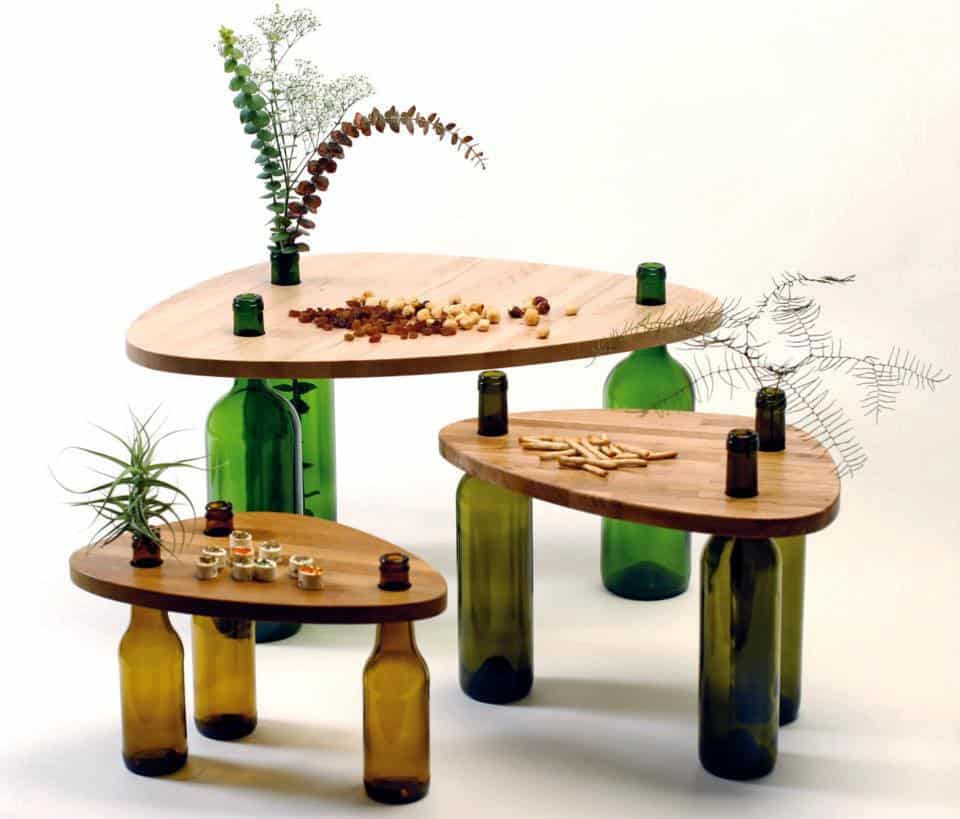
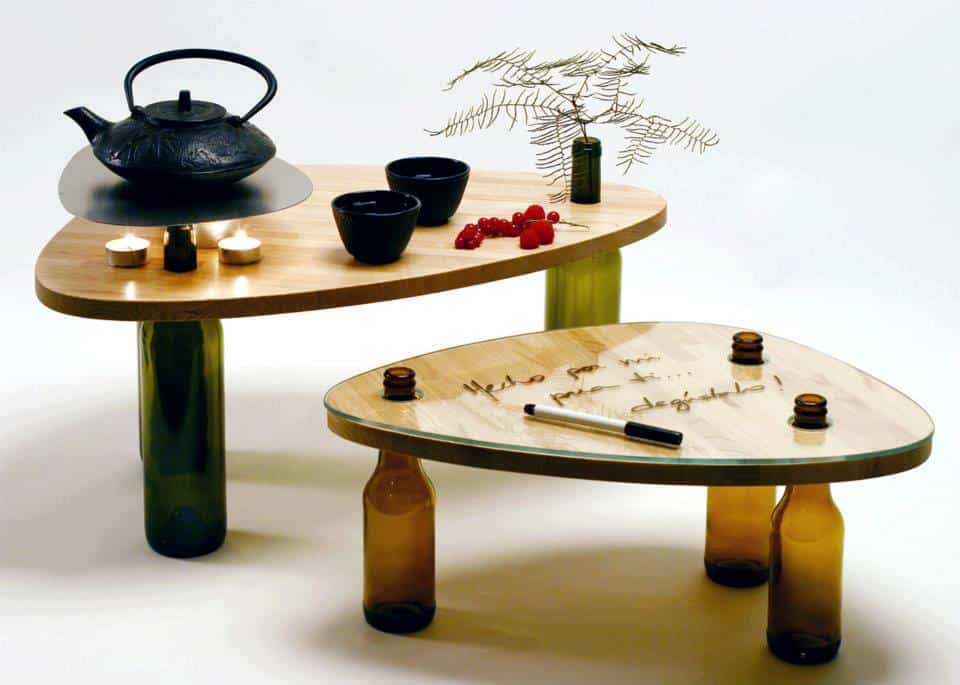
This is, perhaps, the most exciting wine bottle craft we have come across in years. The end result looks so classy and so chic that people will immediately lap up this project. It requires a set of wine bottles, a wooden board, and cutting, measuring, and drilling tools. The key to success in the project is the design of the wood board and how you balance it on a stand made of wine bottles.
Knowing how to cut a glass bottle is an essential skill that all DIY aficionados should know, for you will not be able to complete any DIY project that needs bottle cutting without it. Thus, you will not be able to upcycle your empty wine and beer bottles. You may want to follow the project link and/or steps shown in the following infographic to learn the art of cutting bottles without breaking them or hurting yourself.

Source: Homesthetics
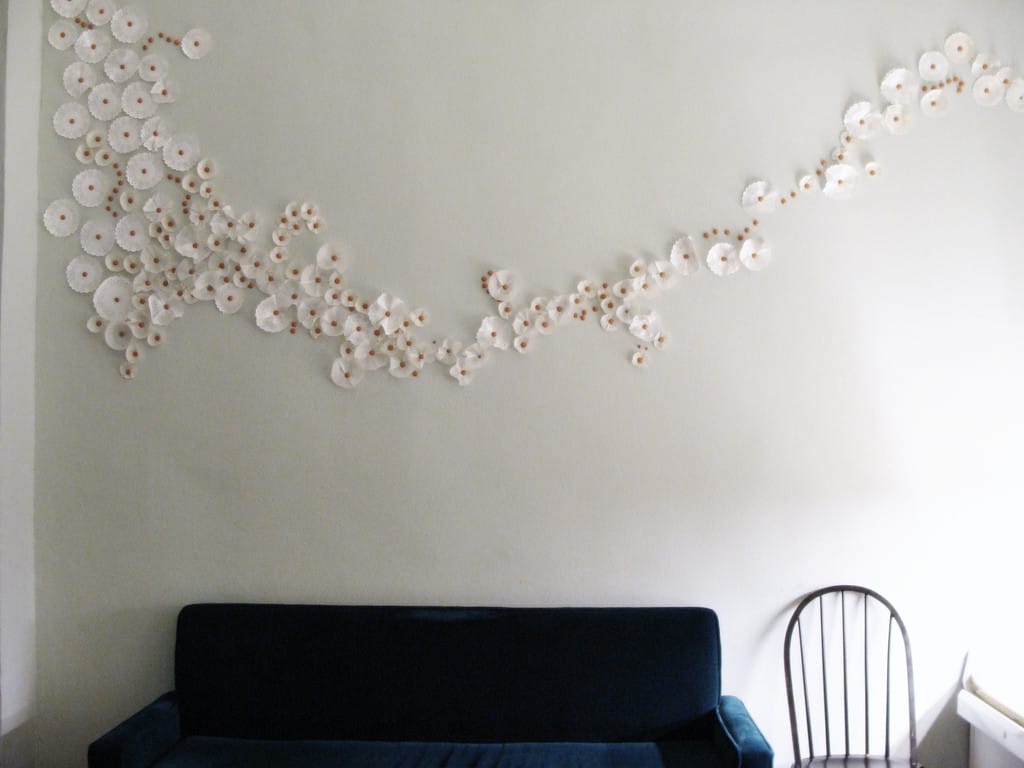
When converted into flowers and arranged in a flow, white crepe papers and orange thumbtacks can do magic on your wall. It is so simple to make, yet it adds glamour to an otherwise mundane-looking wall. The key to success in this project is how carefully one arranges various sizes of paper flowers to form a beautiful shape. You can give it the shape of a bird or whatever you want. You can choose the color of crepe papers and mix and match to get a different style, which will also depend on the layout.
Source: citypix
People often discard used-up toilet paper rolls, but then they are not DIY geeks and they do not trust their imagination. Fortunately, not everyone is like that so toilet paper art has been born like the one shown below. To make this art at home, a DIY enthusiast will need 135 toilet rolls, each cut into five sections. One would need a lot of free space in the craft area to execute it. The first step in the process will be to make small sections of the craft and then join them using a glue gun, as the tutorial suggests.
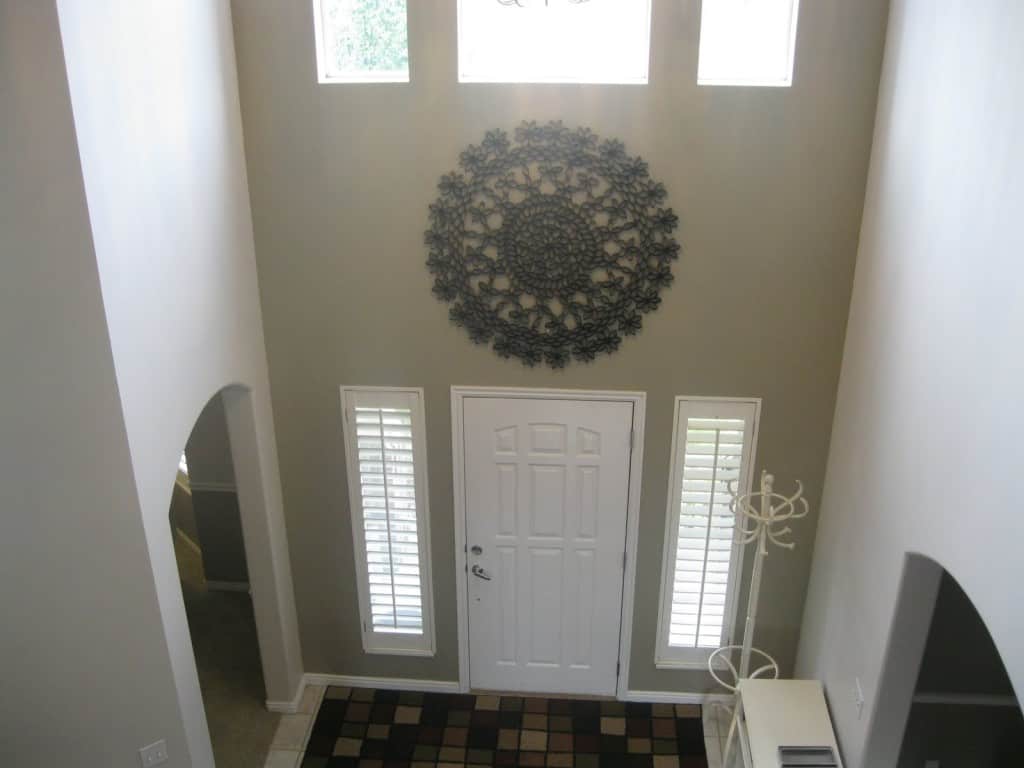
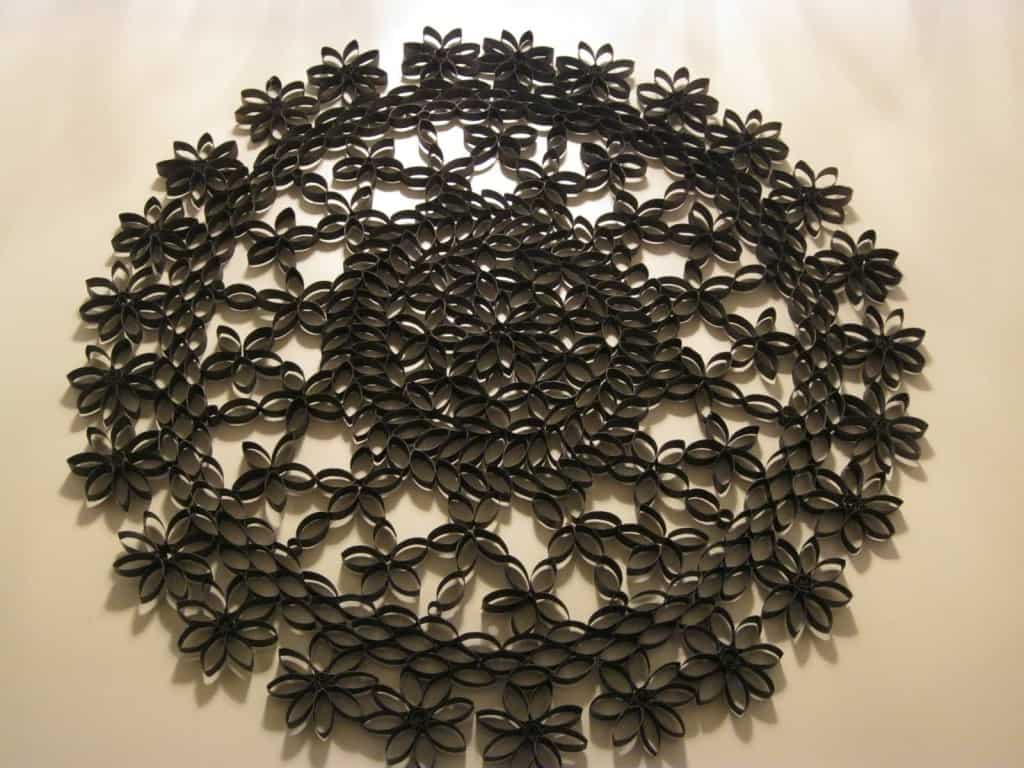
Source: Tibble Fork
Using a package of embroidery floss, a cork board, and some trim nails one can make an expensive-looking yet inexpensive string art to decorate a dull wall. The process is simple, but it takes some time. The first step is to make a template or layout on which you will fix the trim nails for colorful embroidery floss colors to move. The most crucial part of the project is to tie strings in such a way the colors give the illusion of flow. Check the project details on the link that follows.
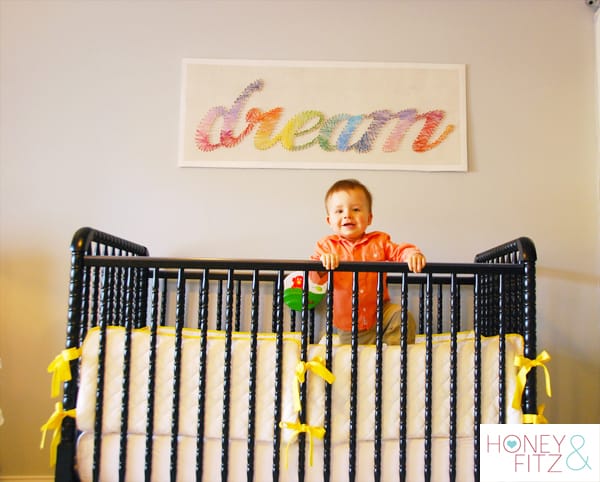
Source: Honey and Fitz
If going organic is your dream then what could be a better way to do so than by making your own bioproducts. This project talks about one such product. The requirement list for this project is pretty simple. You will need 235gm soap base to make 6 small soaps, soap colorant, 6 soap molds, something for grinding and crushing the ingredients, and pumpkin spice mix which shall contain 1/4 cup cinnamon, 1tsp nutmeg, 1tsp ginger, and clove. Once you have all this ready, follow the tutorial on the link below.
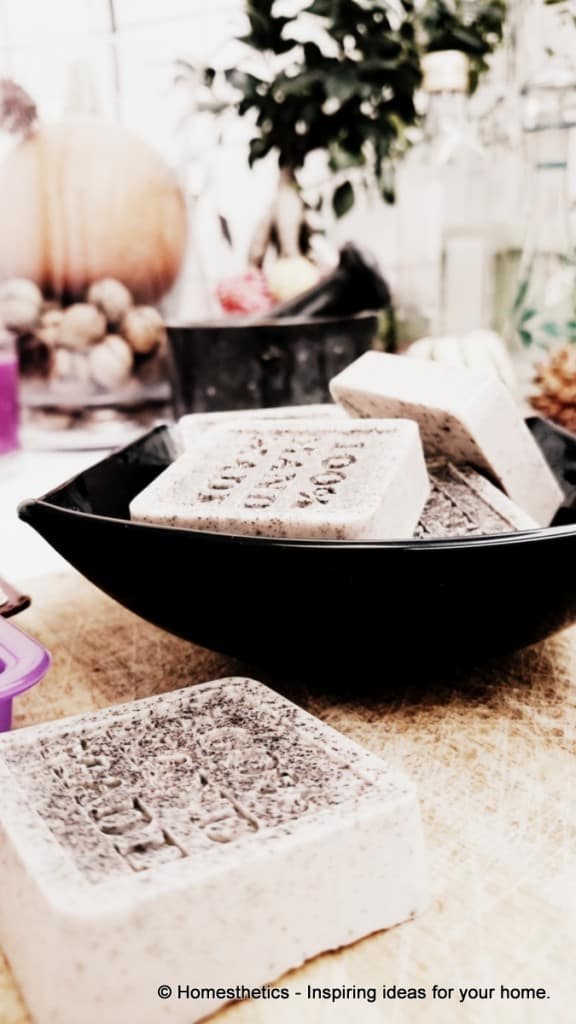
Source: Homesthetics
Nothing excites a gardening aficionado more than handmade things she can put in her garden and she can be all jubilant if the craft is represented by colorful mosaic stepping stones for the garden. The project is simple to execute and needs very few items. A DIY garden enthusiast will need a plastic vessel, mosaic tiles, craft paper, pencil or sketch, plier, PVA glue, and grout. The steps are shown in the image below. It is important to note that the shape and size of the stepping stone will depend on the shape and size of the plastic vessel, so select one wisely.
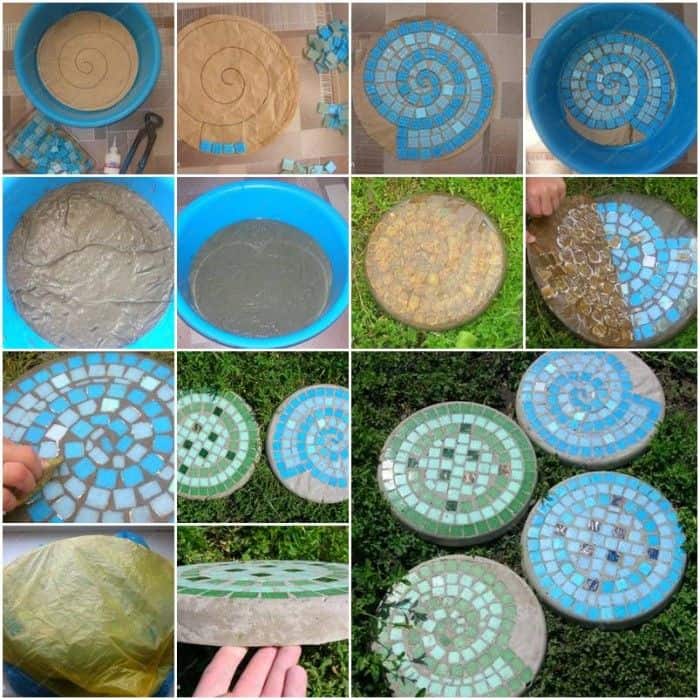
Source: iCreativeIdeas
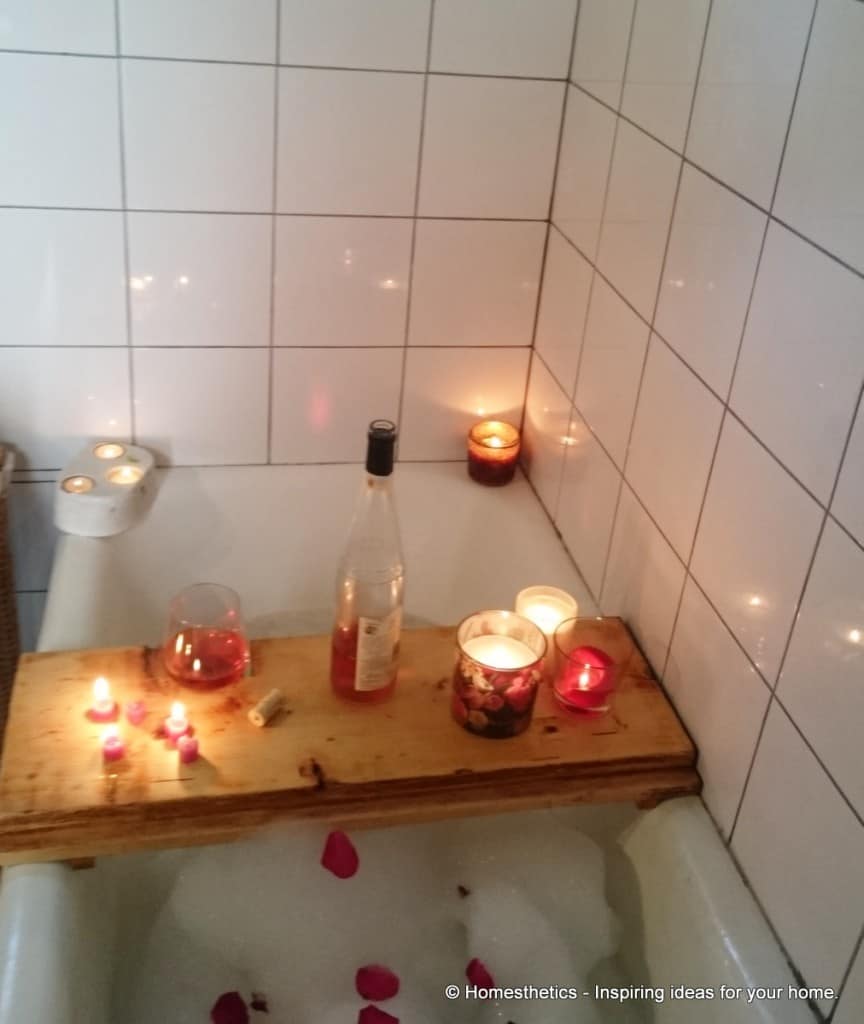
Lying in the bathtub, sipping red wine, and listening to music sounds like a perfect relaxation technique and if you are getting excited about it then it is time for you to take your DIY gear out and a piece of wood, as you are in luck today. The DIY project dealt with below will help you create a perfect bath caddy using reclaimed wood. Just follow the instructions on the project page.
 Source: Homesthetics
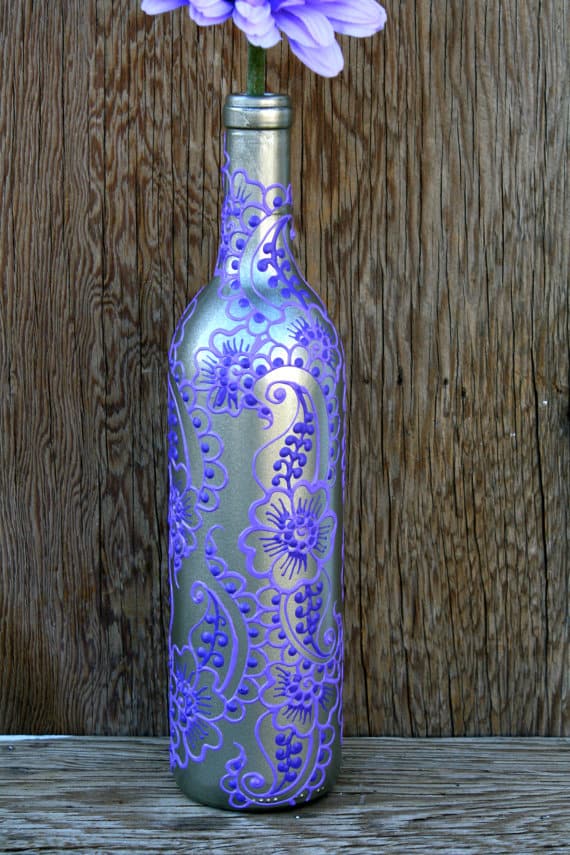
When a flower, natural or artificial, is placed in the silver-colored wine bottle with a heena-style painting on it, it brings oriental charm to the household. This traditional design wine bottle will look classy in your living room.
Glass painting may sound easy to some, but it presents an unsurmountable challenge for others, particularly when it involves painting complex patterns. The following video can help you learn the art and constant practice will help you master it.
https://www.youtube.com/watch?v=0MpNK87UtfM
Source: Homesthetics
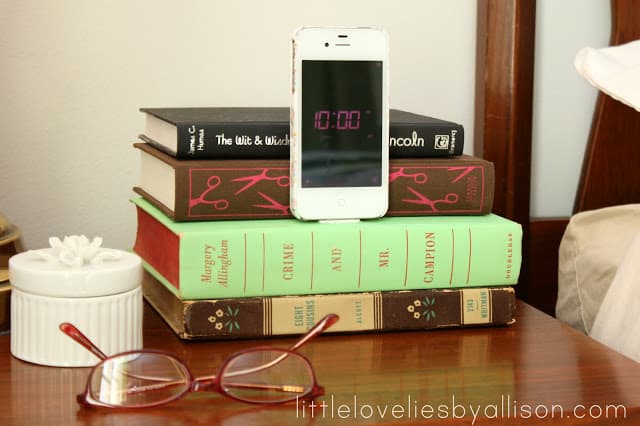
For someone who is into books, an iPhone dock hidden in a book will be exciting. The only cost one has to pay for it is the book which will be drilled and the pages which will be cut to make way for the cable. With the help of a drill, binder clip, scissors, knife, and ruler one can get an iPhone book dock like the one shown below. The key to success in this project lies in the accuracy with which you make the slot in the book for the charging cable.
Source: Little Lovelies
This is another exciting DIY project for men and women of letters. To make coasters like the ones shown below, a DIY enthusiast will need cork sheets or MDF board and large-size printed characters and then these will be cut from the MDF board or cork sheet using a sharp hobby knife. You may need to sand the edges to make the coasters smooth. The key to success in the project lies in the accuracy of cutting the characters.
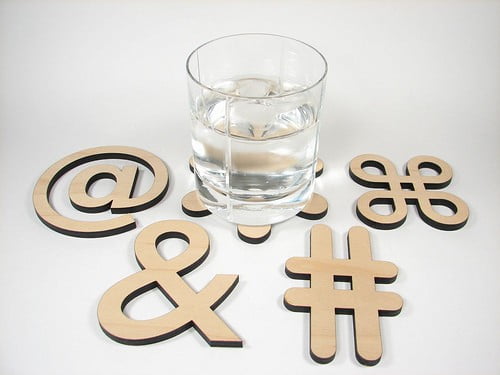
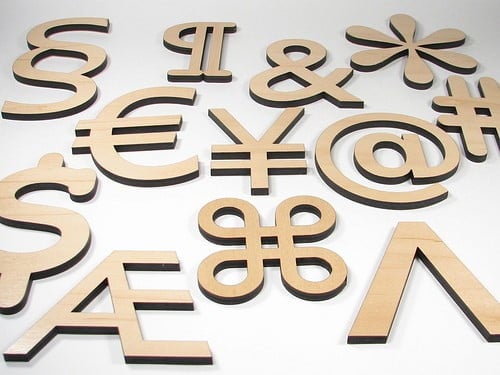
Source: Evil Mad Scientist
Love is spread by words, so it is always better to have meaningful words spread all around your home. This DIY craft does just that with the help of a piece of cloth, linen in this case, letter stencil, permanent marker, acrylic paint, and crafting tools. The first step is to measure your pillow and stitch a cover. Afterward, you can use the stencil and permanent marker to trace the message on the pillow, which will later be filled with acrylic color. The key to success in this project lies in the power of the message.
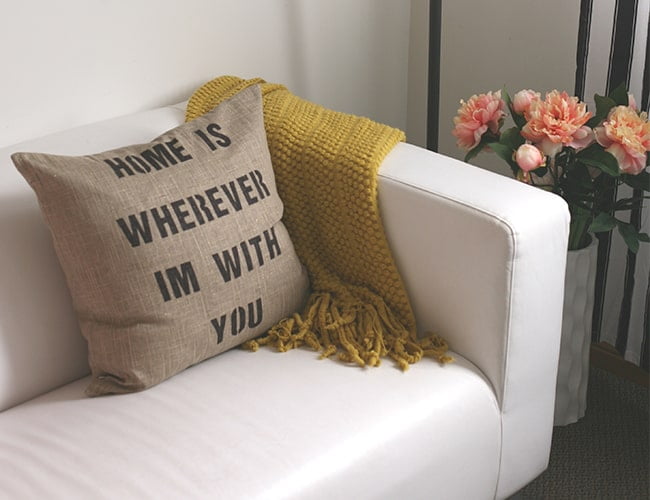
Source: Inspired by This
When it is Easter time, the first thing that comes to mind is beautifully designed Easter eggs. Each year people scan all kinds of sources to find awe-inspiring Easter egg ideas, but very few can beat pinata eggs. Making these eggs is easy. Apart from big chicken eggs, you will need some various colors of confetti, crepe paper of different colors, a roll of crochet thread to hang the pinata eggs with, glue, a paintbrush, and some toothpicks.
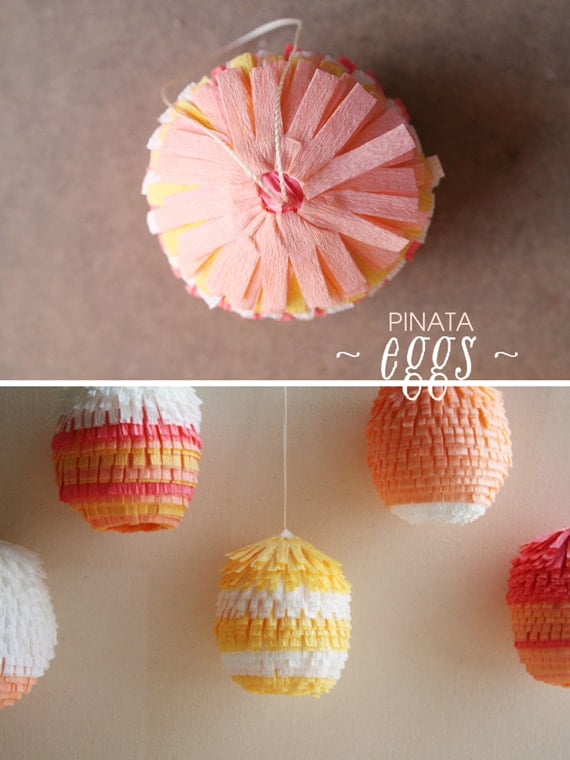
Source: A Subtle Revelry
How many of us have thought that the corrugated cardboard box that we are throwing away can be used to make a beautiful lampshade? Making this BoxHat lampshade could be a challenging project, but then the end product is equally rewarding. The key to success in this project lies in the way you cut corrugated cardboard to make parts of the lamp. There is just one shortcoming in this, the lampshade looks raw. You may spray paint it to make it more attractive.
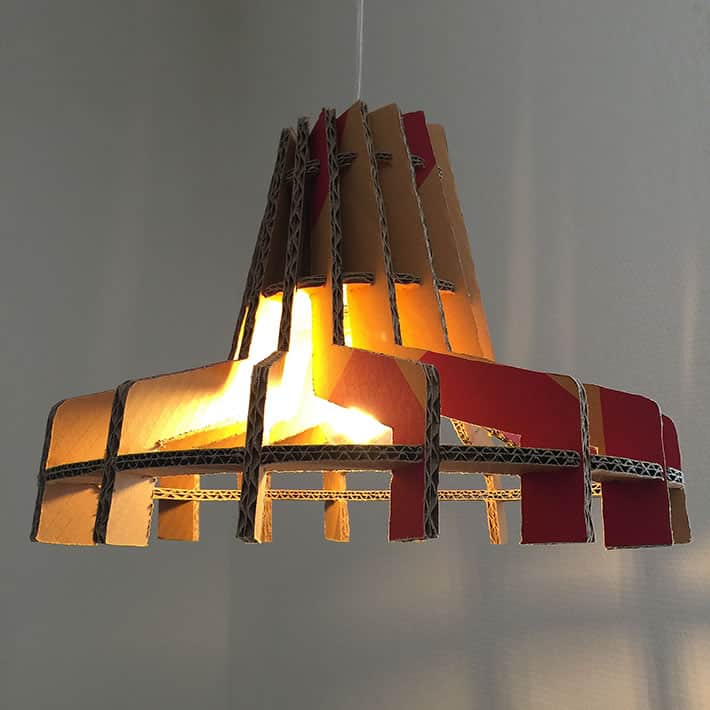
Source: UpcycleDZine
After the Easter Egg Pinata, it is time to make one more pinata, and this time with a photograph of your friend or family. To make this you will need a photo, crepe papers, white card stock or thick paper to make a box, masking tape, double-sided tape, confetti, candies to fill the box, a pencil, scissors, and a ruler. It must be noted that the photograph for the pinata should be as large as the front of the box. Once you have all that you need you can follow the step-by-step guide and create your own 3D photo pinata.
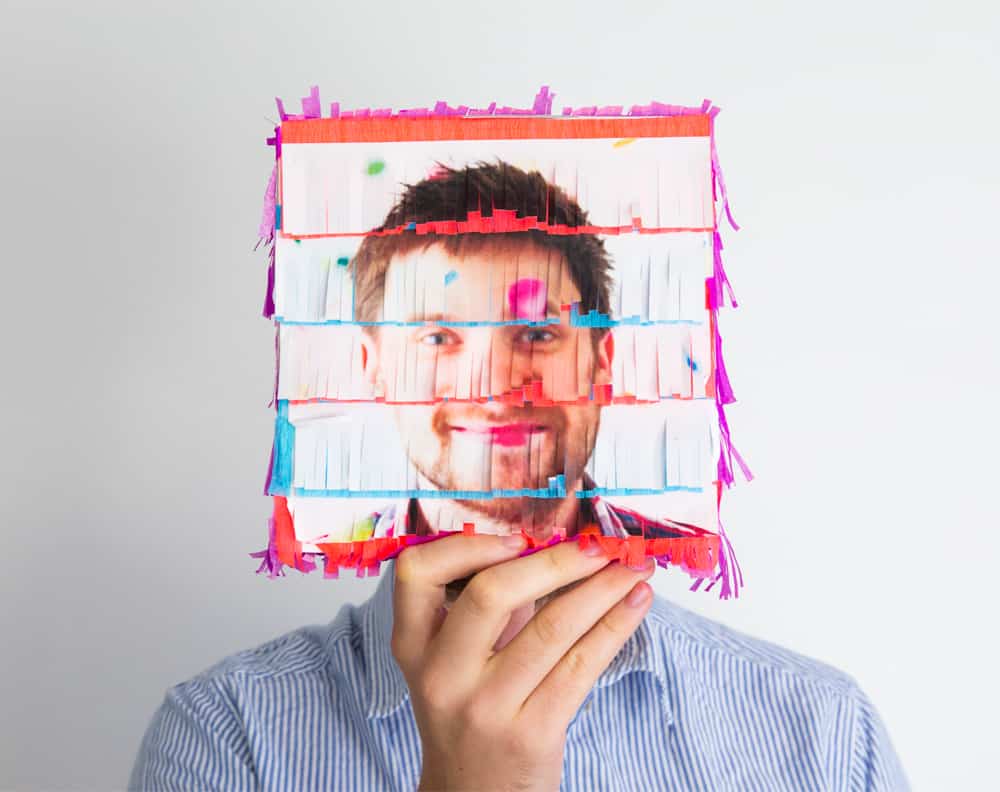
Source: Photojojo
With a little bit of imagination, a thin metal wire, dark-colored paper tape, red and orange nail polish, and needle nose pliers you can create a stained glass autumn tree that will force people to ask how you made it. The process is quite simple and it only involves twisting the metal wire to make loops for leaves and branches, covering it all with paper tapes, and applying nail polish to make stained-glass autumn-tree leaves. The key to success in this project lies in how you apply the nail polish to the loop and make the tree stand firm on the table.
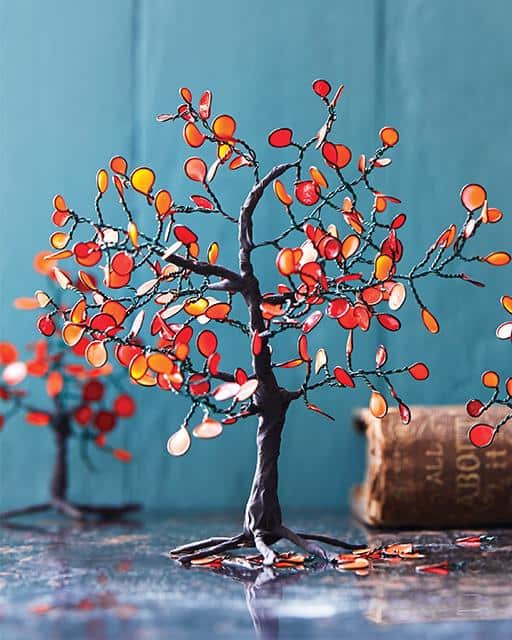
Source: Sweet Paul
A well-made paper craft family tree will surely attract the visitors’ attention and will display your family pictures in a proper context. It will also decorate an otherwise mundane wall. Some toilet paper rolls, paints, glue, and some family photographs are all you need to turn the toilet paper roll stash into a work of art. The key to success in this DIY craft is the organization and layout of the tree. Cut toilet rolls in small sizes for branches and open them up to make branches and the stem.
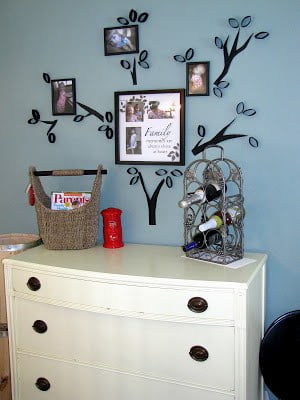
Source: No Dime Design
To create this beautiful butterfly chandelier you will need enough color papers to cut 136 butterflies from it, a butterfly punch die-cut or silhouette digital craft cutter, fishing line, 15-20 yards of ribbon, 14" metal ring, scissors, and glue. The key to success in this project lies in how evenly you hang the 136 butterfly pieces with the fishing line. Everything else is comparatively easy.
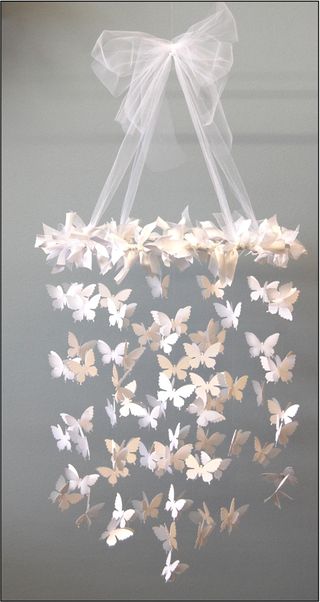
Source: Heartland paper
With some pieces of toilet paper rolls, glue, colors and a design layout a home decor aficionado can make a work of art that will be worth displaying, as shown in the image below. One can add variety to the art by adding different colors to the inside of the resultant design. A meta-shape can also be made by using colors and a proper layout so that a shape becomes visible when seen from a distance.
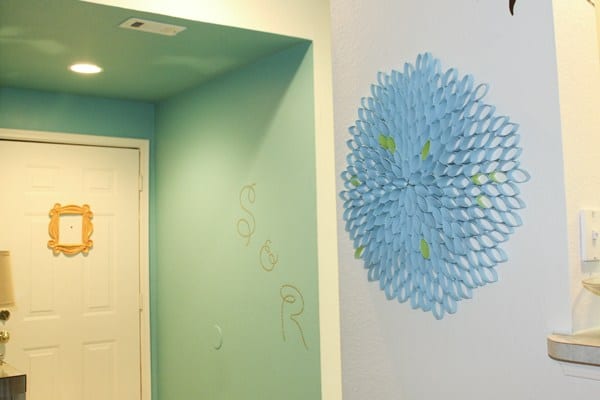
Source: Compartment Life
This DIY concrete candle holder is perhaps the easiest candle holder project. It will not take much effort on your part. To see this project through, all you need is a couple of glass candle holders, plastic ones will also work just fine, mortar, and a container to fill the mortar. You should be careful in choosing the container as this will be the shape of the resultant tea-light candle holder. The key to success in this project lies in the selection of containers and the quality of the mortar.
 Source: Homesthetics
Wood makes an excellent DIY material. It is sturdy, can carry weight, it lasts long and its aesthetic appeal is not something we need any convincing about. In this article, we have talked about using wood to make a candle centerpiece and now it is time to get to know how to create a wooden box centerpiece, which adds up to your decor while adding storage space to your dining table. It can be used to put fruits on the table. The project is simple to execute, but it will require cutting, drilling, and measurement tools.
 Source: Homesthetics
First thing first: no real fish scale has been used to make this art possible. The gorgeous wall art has been made using cardboard paper, gum, an MDF board, golden-color spray paint, and decorative trim as the main ingredients. The following design took 687 pieces of circles which were cut from 19 cardboards. Those were then stapled on a large MDF board. Afterward, the trim was fixed on all four sides before gold spray paint was applied.
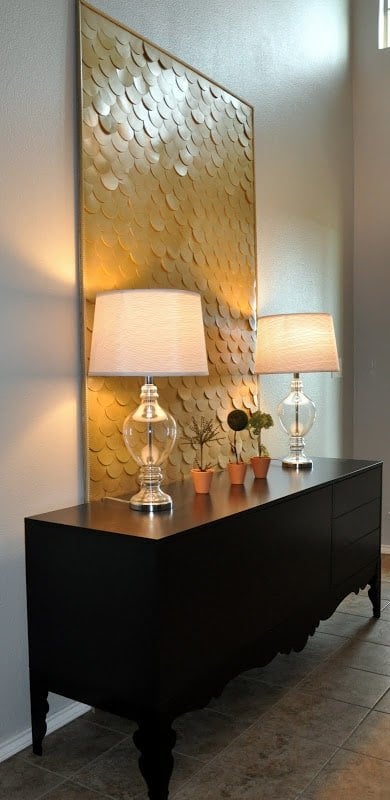
Source: Two Thirty-Five Designs
This string wall art may look complex, making it though is a simple affair. To do this, all one needs is a canvas, a roll of thread, some acid-free glue, gesso, acrylic paint, and a pair of gloves to perform the messy affair. After laying the canvas, mix some water in the gum to make it thin so that it will drip off the thread. The next step will involve dipping a yard or more of the thread, depending on the size of the canvas, and laying it on the canvas the way you want. After it dries out, apply a couple of coats of gesso followed by coloring the entire canvas using the color of your choice. You must allow some time between each step for the thing to dry.
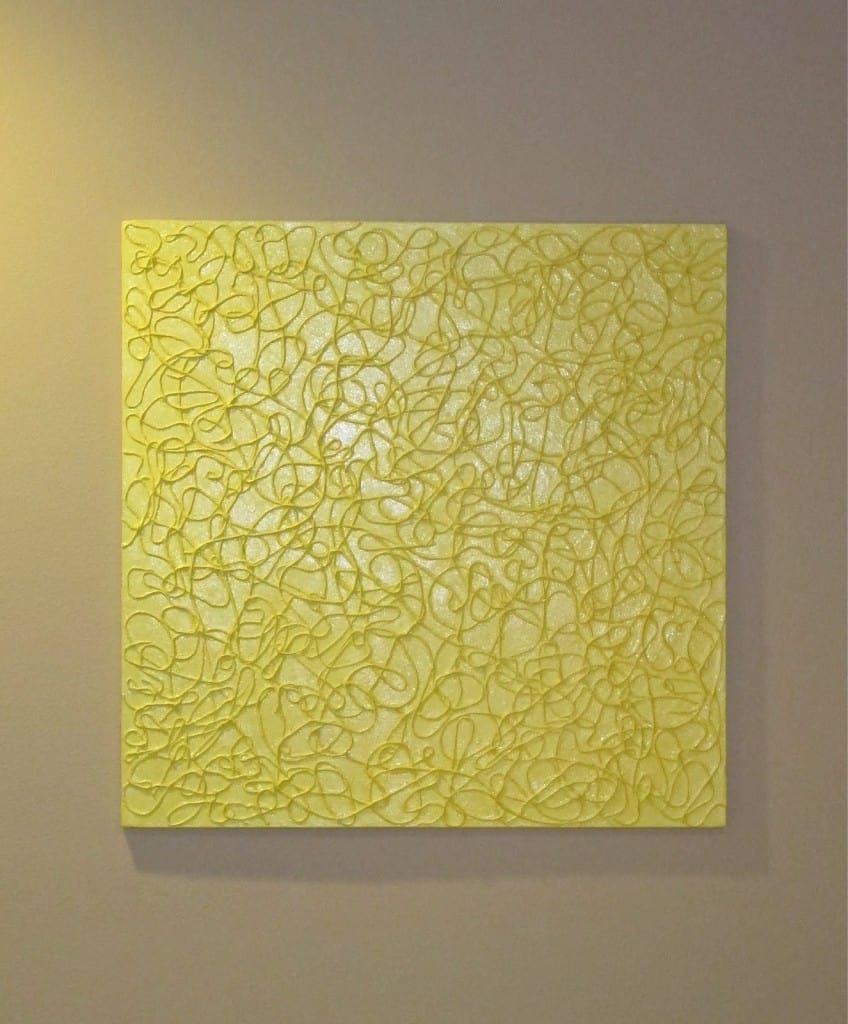
Source: BluKatKraft
There are all kinds of photo albums around, but none of those steal the show. The winner will always be the exploding box photo album. The design looks intricate, but actually it is easy to make. One just needs to follow a few basic steps. You will require a collection of photographs, 4 pieces of 4"x4" thick paper, a pencil, glue, scissors, and a ruler to get the most beautiful-looking photo album.
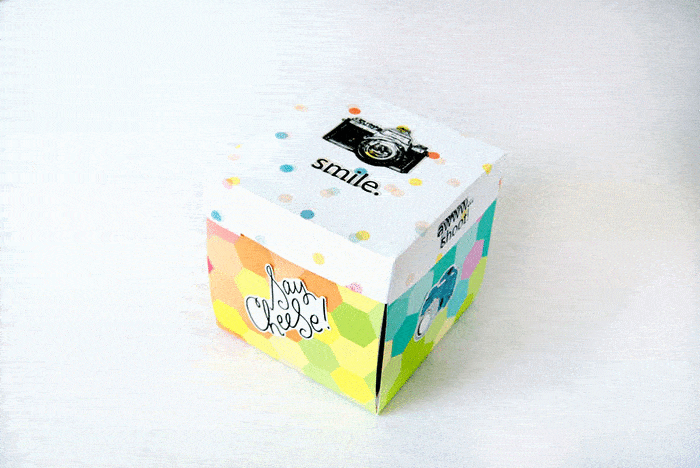
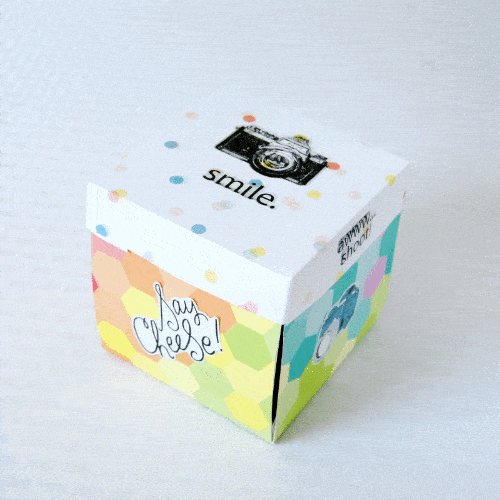
Source: Photojojo
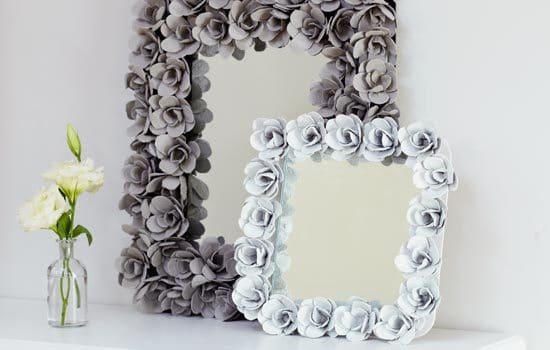
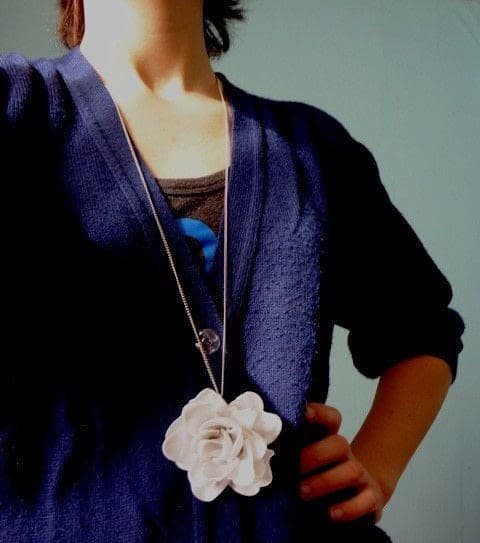
Roses can be made of egg cartons. If you do not believe it, you will believe it in a while when you see the steps involved in creating a decorative rose mirror made with egg cartoons. To make this mirror, you will need a mirror, a 3mm MDF sheet larger than the mirror, 12 egg cartons if you are going for a big mirror, but only 5 if you are going for the smaller one, glue, and some regular DIY tools. The key to success in this project lies in how you cut the carton boxes to make rose petals from it. You should keep in mind that the MDF board should be large enough to have at least 2-3" space around the mirror to attach roses.eg cartons
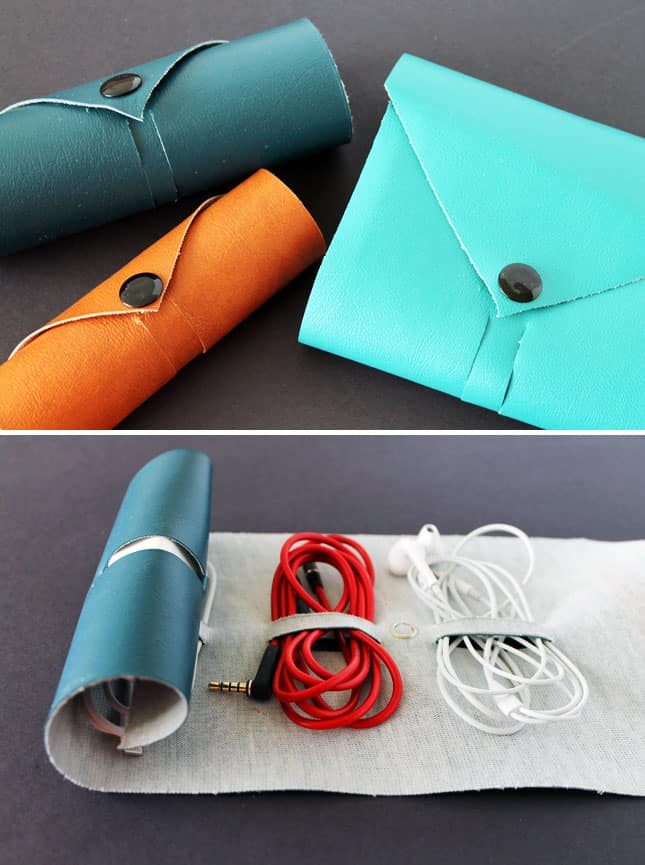
Cables are the unwanted byproduct of technology and managing it is a constant headache for modern society. There are a few solutions out there, but those are not as elegant as the one shown below. This is a pretty simple project. It requires only 1/4 yard of leather (or faux leather), snap buttons, and some regular DIY tools for cutting and measuring. The key to success in this project lies in the accuracy with which you cut the leather to make a loop for storing the charger and spaces between the loops.
Source: Brit+Co
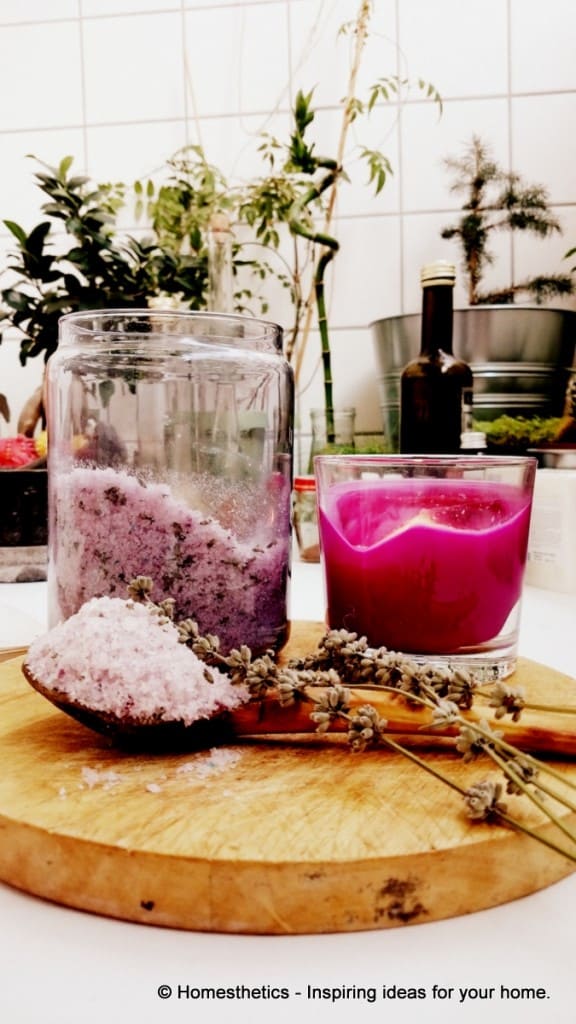
8 tbsp of sea salt when combined with a mixture of 4 tbsp of Epsom bath salt, lavender flower buds, and red and blue colorant, and when 5 drops of lavender essential oil is added to it, magic is created. The bath salt will be so soothing and refreshing that your bathing time will become the time to anxiously wait for. Follow the link to the project page and read the step-by-step guide to making the lavender bath salt.
Source: Homesthetics
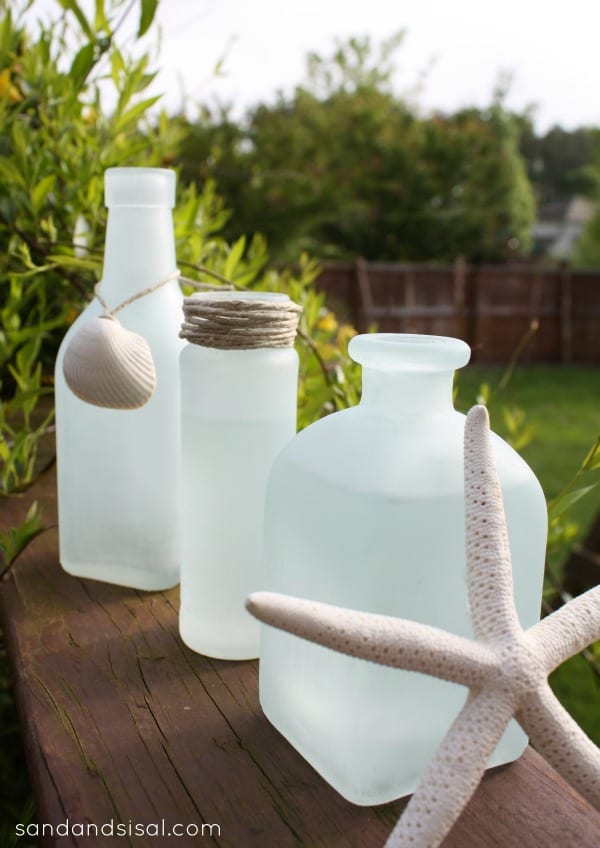
Pottery Barn sells some beautiful sea glass vases but the price tag is discouraging, particularly to DIY geeks who can make one such vase using a flat-tipped paint brush, rubbing alcohol, frost-translucent glass paints, and a glass vase or bottle to make your set of sea glass vases like the ones shown below. Although the one shown below has been painted in sea lavender color, you can experiment with colors and embellishments like twains, shells, etc., to give it a personal touch.
Source: Sand and Sisal
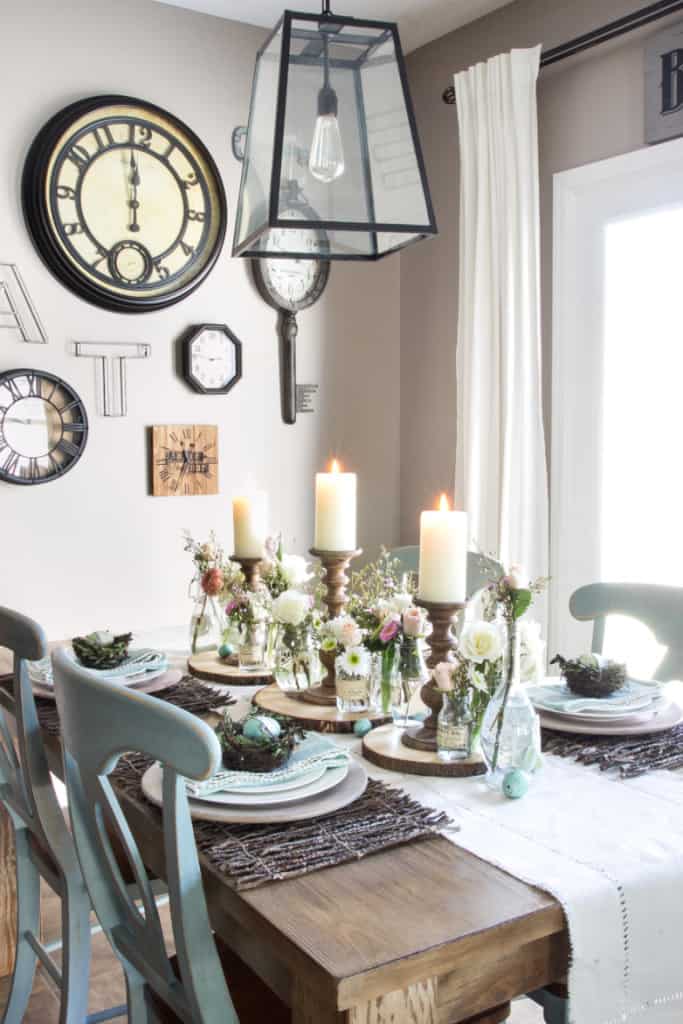
Easter is not complete with Easter eggs alone. No celebration is complete without a proper meal and when it is the Easter meal why not decorate the dining table in the spirit of Easter like the one done below? It will take some work, but the end result will be impressive. To get an Easter brunch table like this, things like lace-trimmed napkins in aqua, flowers, wood, multiple decorated Easter eggs, a table runner, decorative bottles, pillar candles, and white china are needed. Like in every other design, certain things can always be played around with.
Source: Bless'er House
Lights create and uplift the mood. Proper lighting and light sources accentuate any environment. And despite all the developments in modern technology in lightening the romantic appearance of a candle is not lost to mankind, particularly those into DIY. And it is also true that a DIY geek will not like to throw away anything out of his or her home, for they have a hope to convert it into a work of art. The following project gives one such hope to a small piece of wood that you might have kept in your store. The idea is simple and so is its execution.
Source: Homesthetics
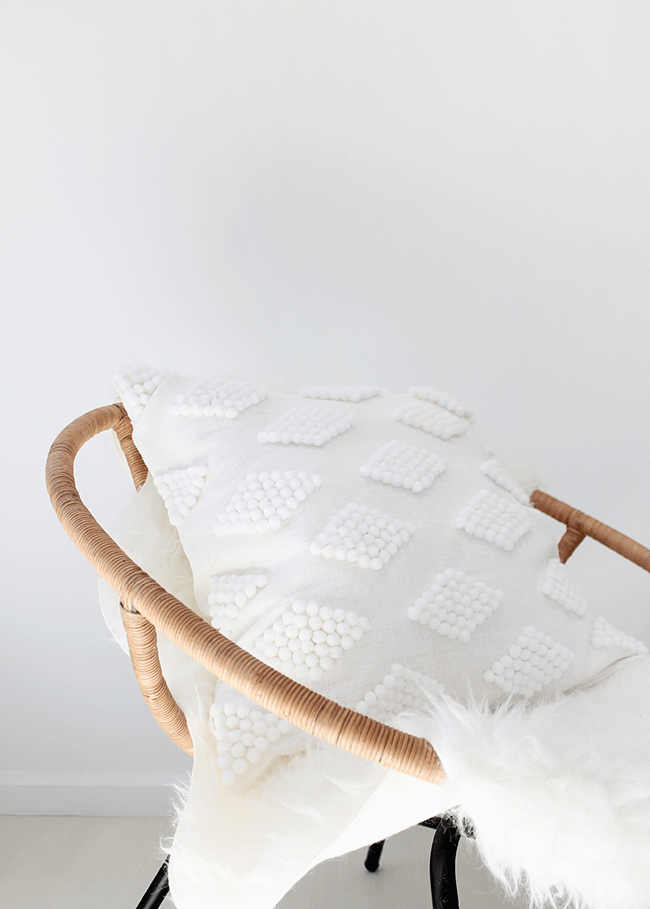
This exquisite-looking modern pom pom pillow is super easy to make. All it requires is a white pillow cover, a handful of pom-pom balls, glue to stick it on the pillow cover or needle and thread if you are a stitching kind, and a layout to fix the pom-poms on the pillow. You can give whatever shapes you want.
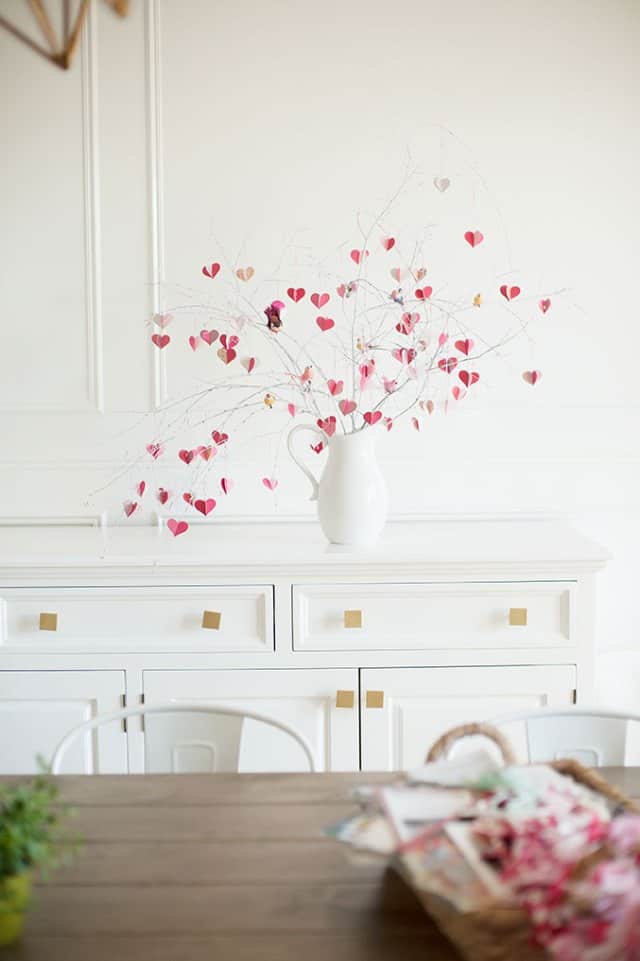
The Valentine’s Day version of this Scandinavian Christmas branch tree will help you woo your love’s object. The project looks complicated, but it is not that difficult to accomplish this. You just need some scrapbook paper in pink and red to cut hearts from, some glitter, pink and red baker’s twine, branches from your backyard, clip-on birds, a whiter pitcher, and white spray paint. The first step is sizing the branches, which will be followed by spraying them with white paint. Place it in the pitcher and clip the birds on it. Now in the final stage, you will need to cut some heart-shapes from the scrapbook papers and attach each heart to a piece of twine. Then hang each one of them to the branches. The key to success in this project lies in the uniformity with which you hang hearts and attach clip-on birds on the branches.
Source: The House That Lars Built
Talking of Easter, let's talk about cakes. Who does not like a delicious cake? Moreover, if it is a bunny-shaped cake the kids in your family will jump with excitement, making Easter even more fun. Making a cake like the one shown here is easy for a baking enthusiast. All one needs is an 8-inch cake round, some shredded coconut, sweetened, of course, jelly beans for eyes and nose, colored cardboard paper for ears, and colored tubs of frosting. Just follow some simple steps and the bunny cake will be ready for Easter.
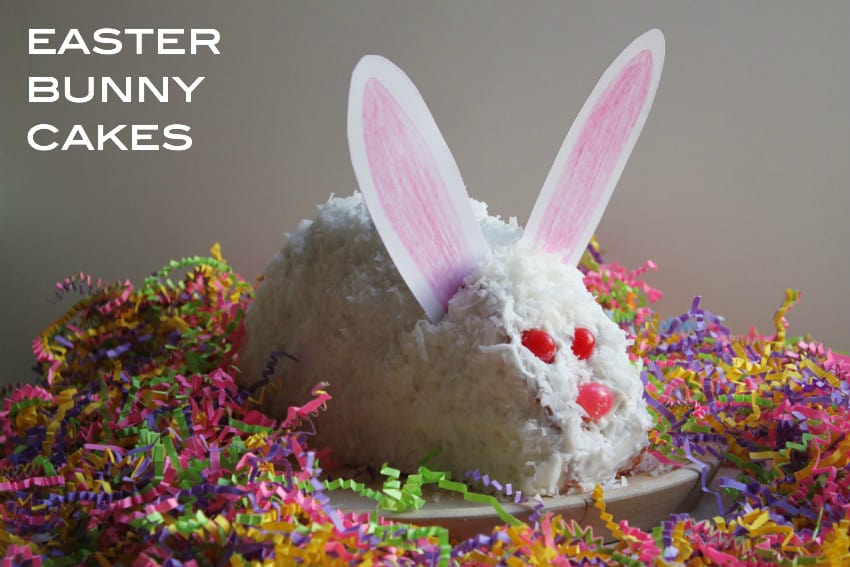
Source: Corner Blog
The sunburst mirror is a craze among DIY enthusiasts and there are quite a few ways to make one, but there will not be many sunburst mirrors that will look as classy as the one made by Catie. The mirror shown below gulped 100 kabob skewers, silver-color spray paint, a circular mirror base, and glue. The crucial step in the project breaking the sticks into sets of various sizes and a layout to position them as per the design.
Source: Catie’s Corner
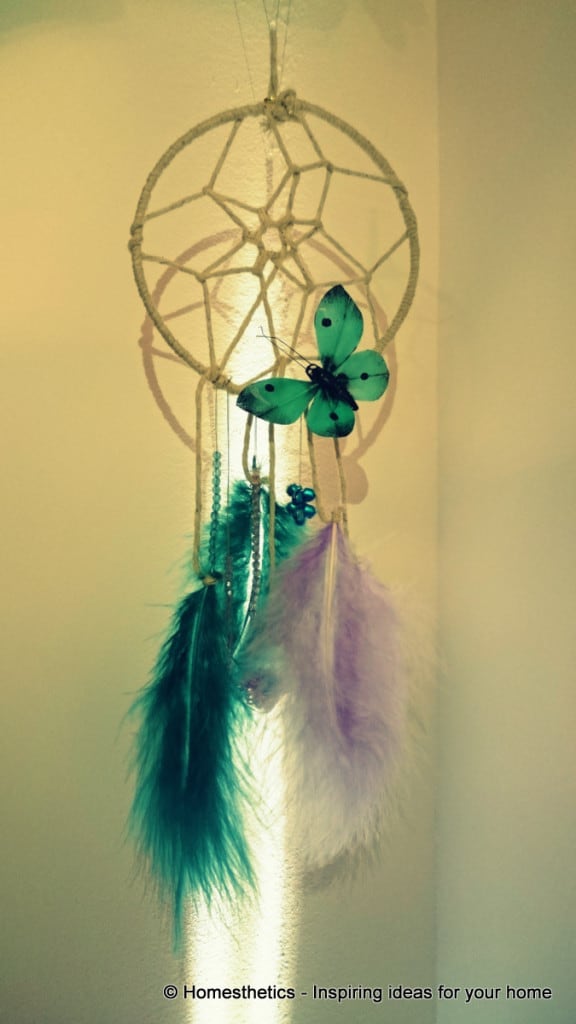
Ojibwe people believed that a beautifully nested dream catcher would trap the bad dreams, Bawedjigewin, in its intricate web while allowing the good ones, bawedjige, to come through. Like the Native American people of the past, many believe that a dream catcher can filter dreams to only good thoughts and dreams to enter the mind. This sounds exotic and so does its design, which has been beautifully detailed on the project page. Just follow the link and make your own beautiful dream catcher.
This Super-easy DIY tip is for those DIY geeks who want expensive-looking cutlery without forking out lots of money for that. This is one of the easiest and least time-consuming DIY hacks that you can find anywhere on the web. The requirements are quite simple. Apart from a set of spoons, forks, and knives, a DIY aficionado will need a can of molten metallic color. To get this you will need to dip the cutlery into the can of molten metallic color and let it dip dry for some time.
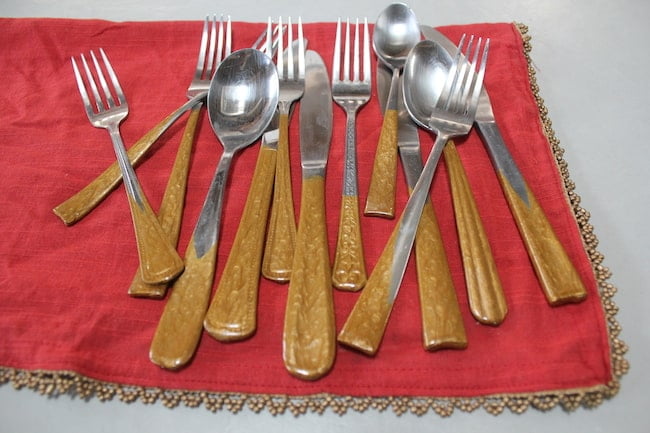
Source: Kara Paslay Designs
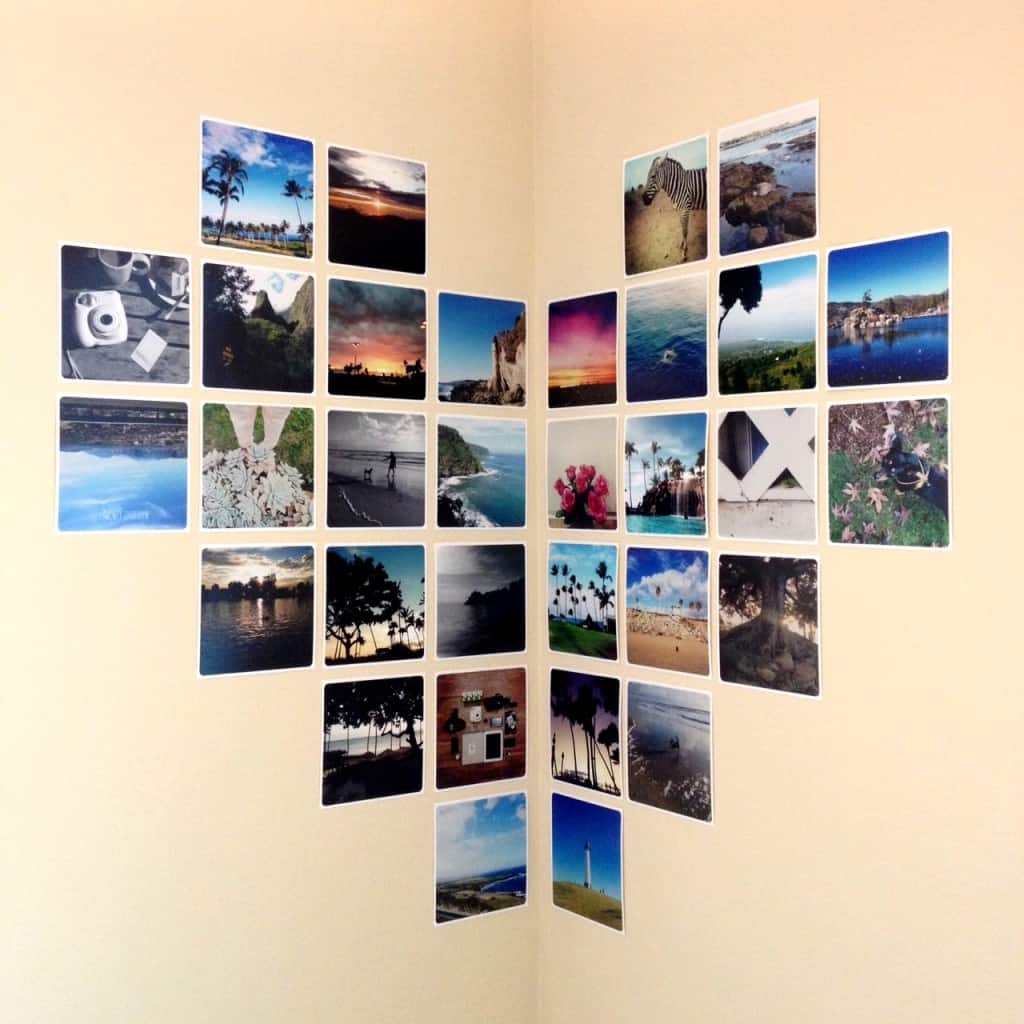
This DIY project idea will not only help you decorate a boring corner in your room, but it will also help you preserve and share the memories. The project requires a set of 32 4x4 photos and glue to fix it on the wall. The beauty of this craft lies in the uniform spacing between the photos and the white borders around the photographs which have slightly rounded corners.
People do not think twice before throwing out use-and-throw plastic spoons. They do not see any practical use of it and as most of them are not DIY geeks they do not know terms like upcycle. Plastic spoons and a bottle when passed through a DIY gaze turn to become a beautiful lamp like the one shown below. The craft is simple to execute. The key to success in this craft lies in the way a DIY aficionado attaches spoons to the bottle to form a fish scale-like layer on the bottle.
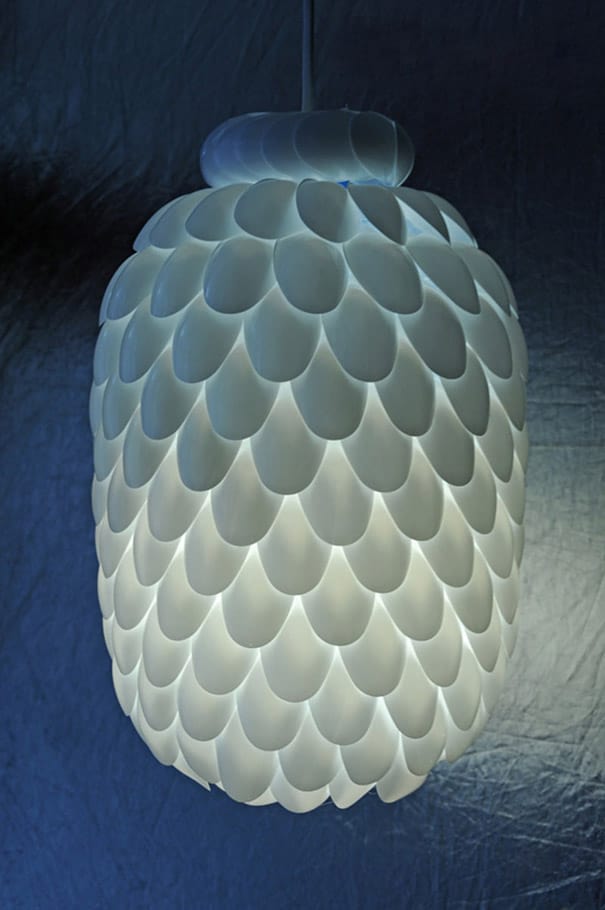
It is not only a lamp that can be made from plastic spoons. They can also be used as a beautiful pendant. This may sound counter-intuitive, but it will cease to appear so when you follow the steps given on the project page. The steps are simple to take, and all you require are 17 spoons of different sizes, a candle, and a needle nose plier. The key to success in this project lies in how well you mold a spoon into a petal.
Source: Cut Out & keep
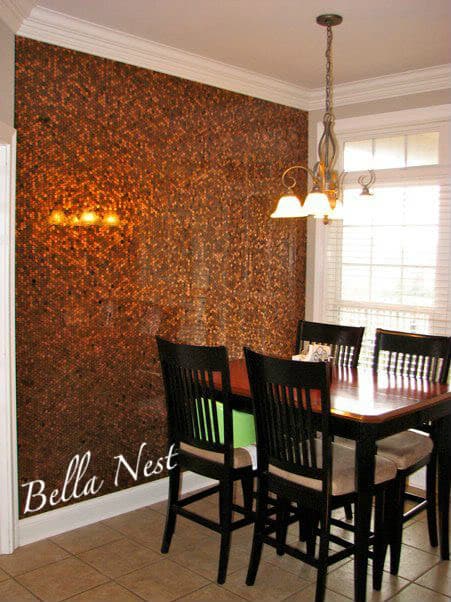
Although the penny has practically gone out of circulation and has ceased to be useful for financial purposes, it is not altogether useless. It can be upcycled to create a work of art that people cannot help but admire. This is a simple project but takes some time to complete and this one needs an MDF board, a lot of glues, and lots and lots of coins, the number will depend upon the size of the wall you will want to build. The first step in the project is arranging the pennies as a DIY geek will want to attach them to an MDF board using glue. One can even arrange it in a way to form a figure when seen from a distance. Then one should apply self-leveling epoxy to give it a cover. The key to success in this project lies in arranging pennies for the project. It took 19, 400 pennies to make the following penny wall, which measures 9x8 ft.
Source: Bella Nest
This is another project idea that uses pennies as a decorative item and unlike the previous one, this does not need so many. Yet the beauty of it is still mesmerizing. The idea is to create a penny mirror and again the number of coins one will need will depend on the size of your mirror. The project is pretty simple. All a DIY enthusiast needs is a large-sized mirror, a mirror mount, glue, and lots of pennies to form the frame of the mirror. One can also think of applying some kind of laminate once the penny is fixed in its place to give it a smooth feeling. Self-leveling epoxy will be a good option as well.
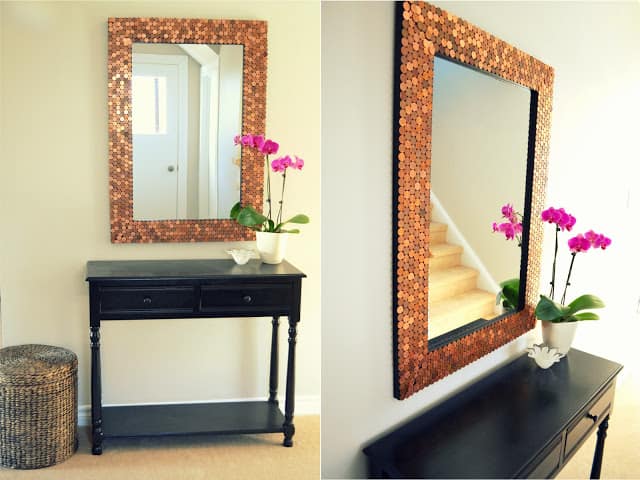
Source: Honey Sweet Home
There will hardly be anyone who does not buy shoes, but unlike most folks, DIY aficionados will prefer to create a killer craft from the shoe box rather than throw it away. With a little bit of help from scissors, glue, and different shades of spray paints you can use your shoe boxes in crafts that will blow anyone’s mind. One will also need to use a screwdriver and screws to hang the boxes on the wall. The key to success in this craft is the color coordination among the boxes and their alignment.
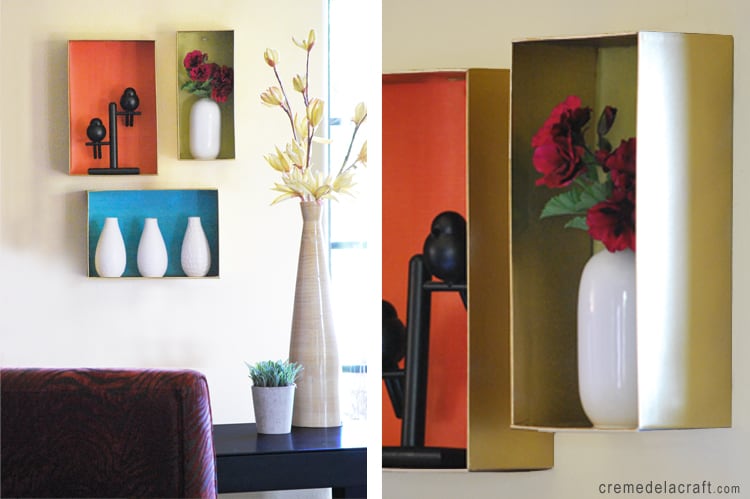
Source: crème de la craft
There are so many ways to paint one’s wall, but none of them will excite a DIY geek as much as doing her own thing on the wall. The creation gives more satisfaction than the result. Well, in this case, the result is equally satisfying. To get a wall like the following, all a home-decor DIY enthusiast needs is a hardboard to print a Moroccan-style shape on, which will function as a stencil. The Key to success in this project is the alignment of the shapes one will draw on the wall. For this, one may want to use a level to make a perfectly straight shape every time.
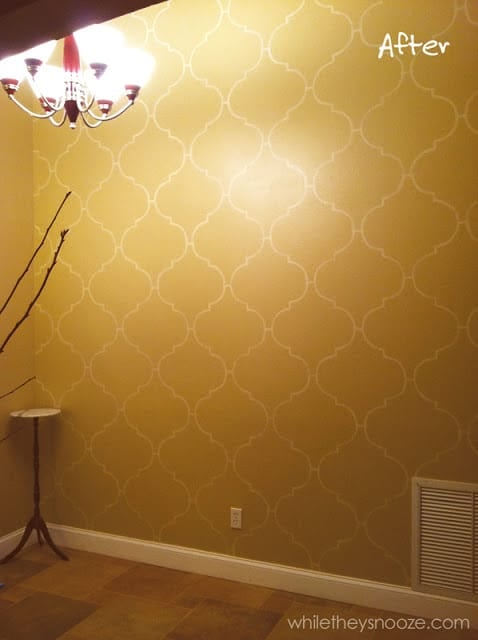
Source: While They Snooze
Upscaling the use of otherwise discarded products is at the heart of a DIY initiative. The following clock table that was made using a dart board and table bottom bought from the flea market is a conspicuous example of that. This project will require some work as attaching the top with the bottom, printing the clock design, tracing it on the tabletop, sanding it, etc., but the key to success in this craft is how neatly you trace the design of the clock on the tabletop and paint it.
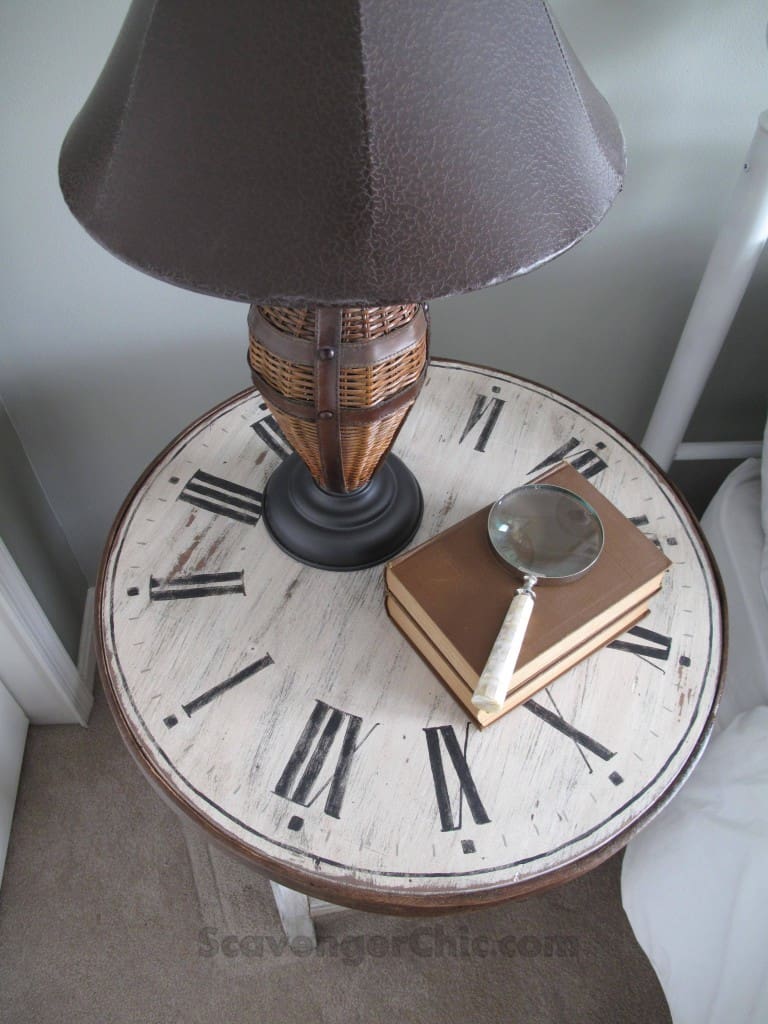
Source: Scavenger Chic
Generally, people throw away their old dinner plates and bowls, but DIY geeks turned those into bird feeders without much sweat. To get this, one would only require a plate, a bowl, a large carriage bolt, some washers, glue, and a nylon cord to hang it all. You may paint the plates to match your mood, but that is optional. The key to success in this craft is how you drill holes in the plate and bowl without breaking it.
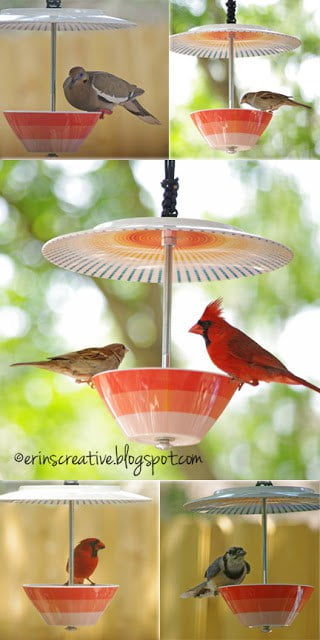
Source: Erin’s Creative Energy
This year's Easter decoration will look incomplete without this colorful wreath. To make it, you will need some patterned colored paper, glue decorative nest, Easter eggs, scissors, and a paper cutter. In this design, four strips were cut from 14 different types of papers, which were then glued in loops and afterward glued on the wreath form. 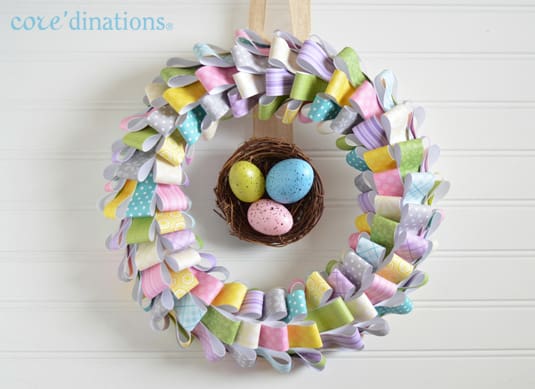
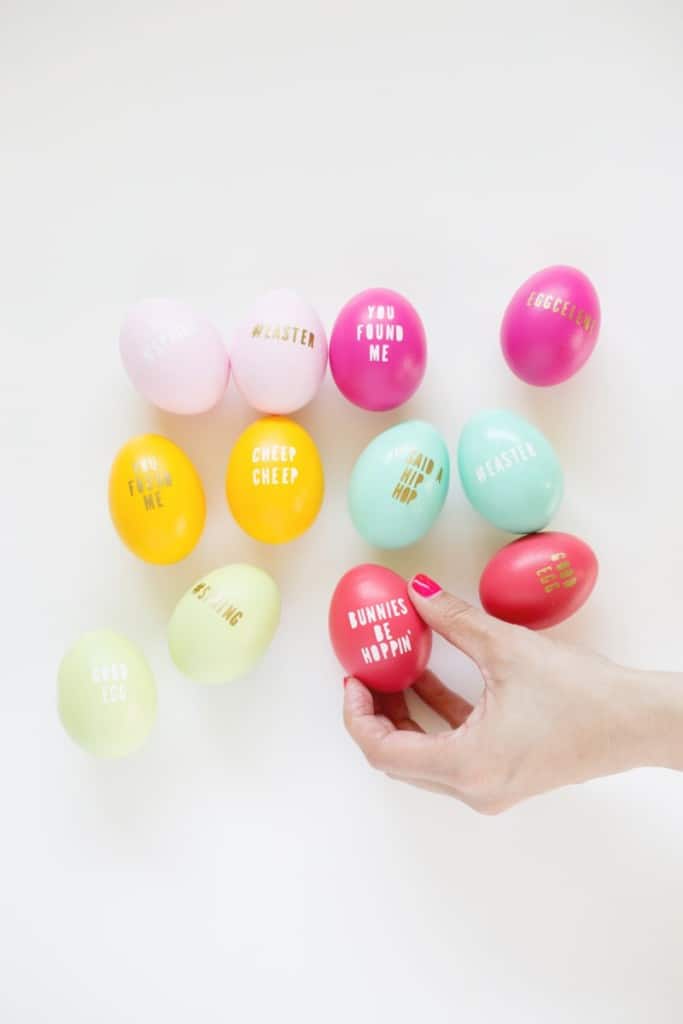
For the busy bee who lacks the time to make complex-designed Easter eggs, here comes a design that looks as exciting as it does complex, but requires a lot less time. All a person needs is to color eggs and let them dry and then write some pithy messages, which seeing the mood of the festivity, should be funny. The next step is to make stencils from the desired message and use it on eggs. One can also think of cutting out the letters of the alphabet and then writing the actual message with that.
Source: Lovely Indeed
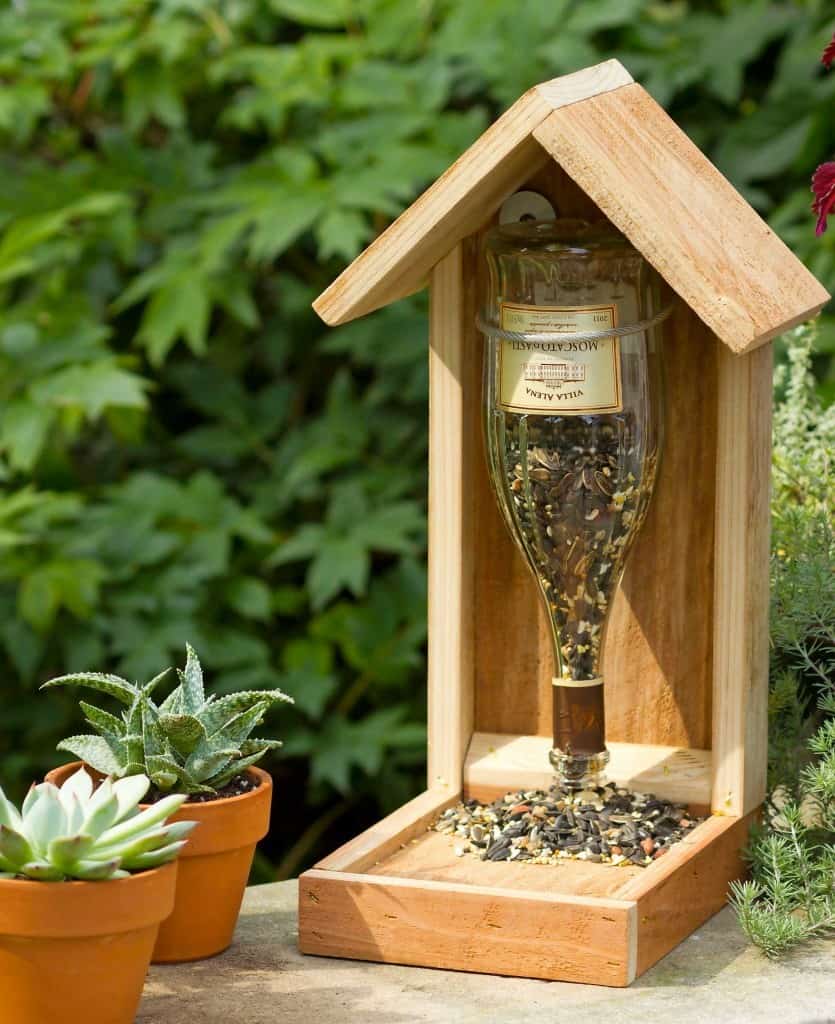
Wine bottles can easily double as a bird feeder and when some wood is thrown in, the feeder looks even classier. You can opt for a complex design but give attention to how the bottle is fixed in the small birdhouse.
Source: Momma Young At Home
Without a water body, a backyard looks so dry. This is an easy-to-make mini pond that can be placed anywhere in the garden or patio. For the following kind of mini pond, one will require a water container, some water plants, garden soil, plastic pots, pea gravel, and mosquito dunks. The beauty of this project rests in selecting the water plants. The project recommends having emergent, submerged, and floater plants.

Source: Birds & Blooms
With the help of different shades of pink cardboard, a paper trimmer, glue, baker twine, and a 12" cardboard circle you can create a spring wreath that will make any decor come alive. A DIY enthusiast will need to make 80 cones for this project which will be fixed on the 12" cardboard using hot glue. The direction of gluing cones should be from the outer edge to the inside.
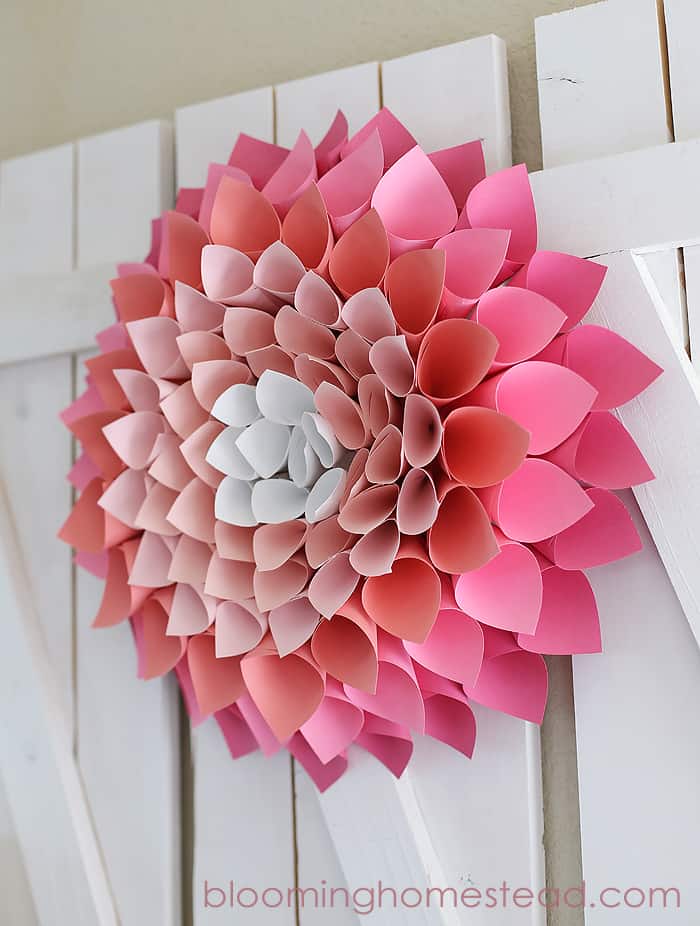
Source: Blooming Homestead
This is yet another exciting Easter egg project. This may look intricate, but it is relatively easy to make. For this project, a DIY geek will need one egg for the base, one hard-boiled egg for the top layer, colors, and glue. The first step is to color the hard-boiled egg and let it dry. Afterward, take the shell of that egg out by crushing it into multiple different sizes. Now the goal is to glue the bits on the other egg.

Source: Say Not Sweet Anne
For something to be classy, it is not necessary to be complicated. The following bookmark is so easy to make that even a kid can make it. The only step involved in creating this bookmark is the folding of a small sheet of paper in the shapes shown below. One can always add variety to it by choosing different types of papers or doing some drawing on the resultant bookmarks.
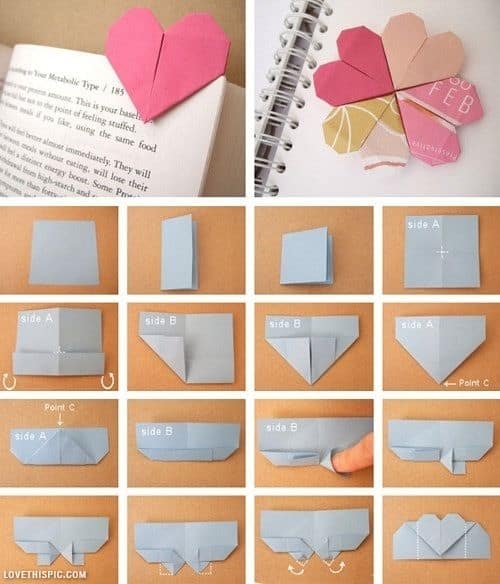
Source: Love This Pic
Another quite easy project to undertake is the making of a stripped glass using opaque glass paint and twine or tape. Just wrap the twine on the drinking glass where you would not like to apply paint and then spray opaque glass paint on it. Leave it to dry and remove the twine. A beautiful striped drinking glass is ready.
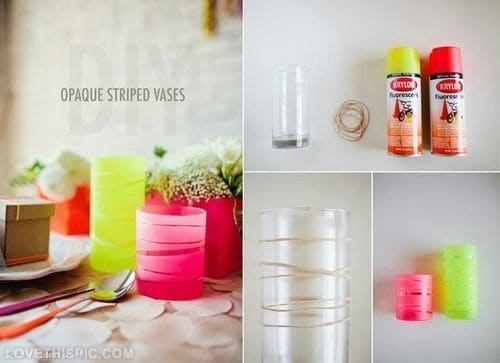
Source: Love This Pic
Yet another simple DIY project to undertake is the making of a photo frame using PVC pipes. Take PVC pipes of varying diameters, cut them into small pieces, and glue them together using industry-strength adhesive. To make this, one would need to use a rectangular wooden frame to give the desired shape to the resultant photo frame, like the one shown below.
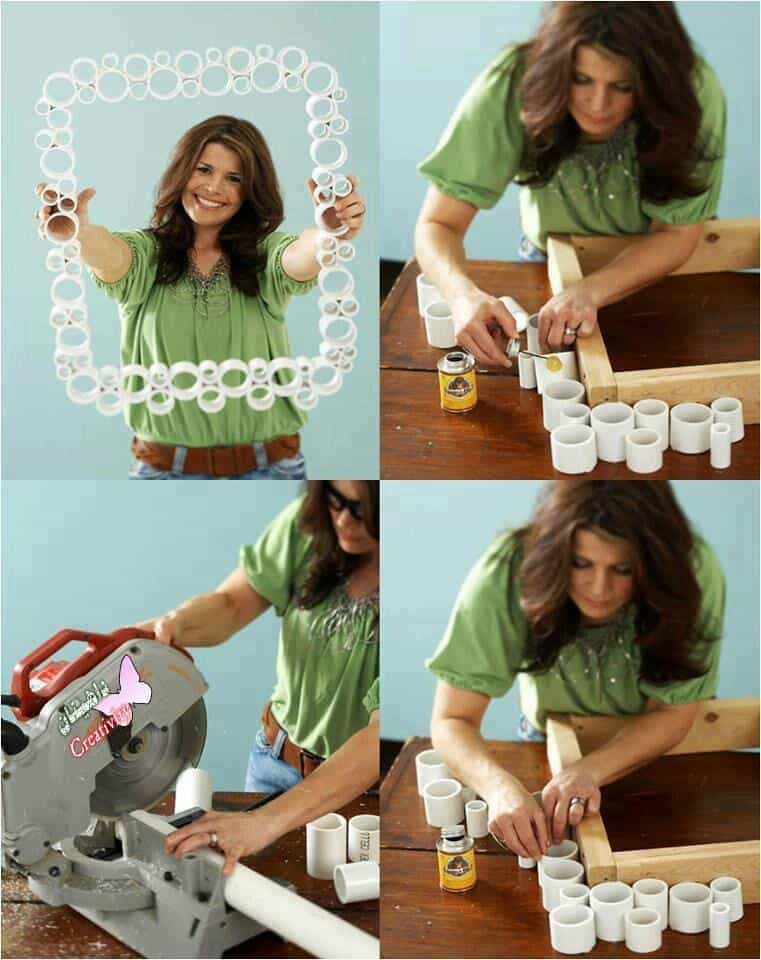
Source: Caca-faca
This set of hemp pendant lamps looks classy and to some, it may look like an outrageous DIY project, but then the project needs to be this exciting to make its way into the top 100 most beautiful DIY projects of all time. It must be noted that creating this project is not as difficult as it sounds. It will become suddenly easy when it is shared that the lines of the hemp string were wrapped around different sizes of bouncy balls, which were then inflated and taken out once their work was done.
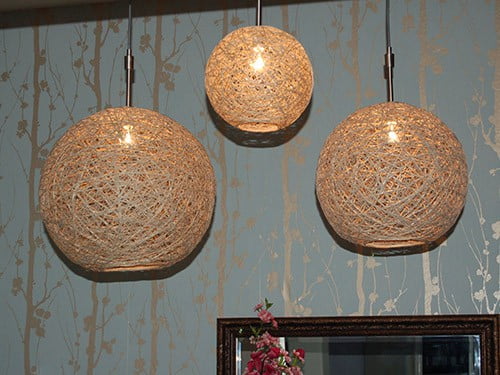
Source: Crafty Nest
With the help of a drilling machine, wood stains and screws, empty bottles and pine wood can create magic. The flower vase, as stated by the creator, takes less than one hour to make. The key to success in this project is the alignment of holes one will drill on the top of the flower vase for the neck of the glass bottle to go inside. The rest is just easy-breezy.
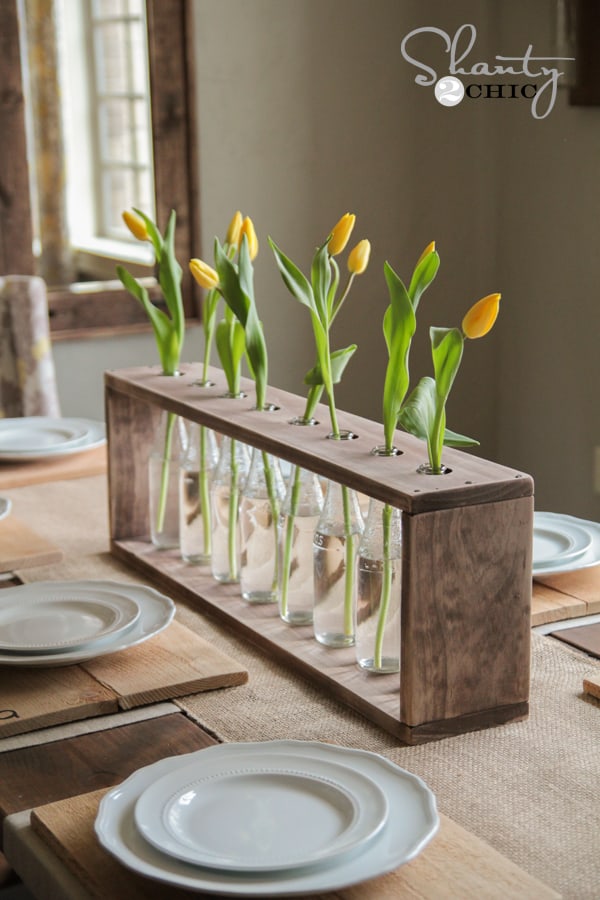
Source: Shanty2Chic
When the clay ribbon tool cuts the vertical lines on a glass vase wrapped in a sheet of 1CM-thick clay the result is as astounding as the textured glass vase the article is dealing with here. The craft is simple to execute but needs a therapeutic accuracy to produce a vase to flaunt. The supplies needed for this craft include a glass vase, air-dry clay, parchment paper, a rolling pin, a clay ribbon tool, and an X-ACTO knife. The key to success in this craft is how accurately the vertical lines are cut on the clay-wrapped vase.

Source: Homey Oh My
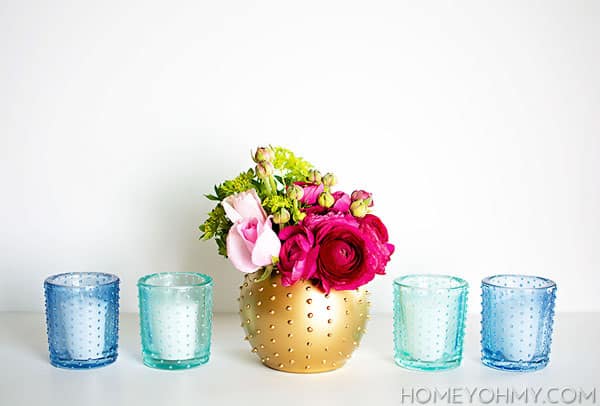
When one sees beaded glass candle holders, one goes wow. The supplies needed for this craft have been explained in the image below. The key to success in this project is how a DIY enthusiast makes a pattern with the paint dots on the glass. As explained, the glasses should be left to dry for 24 hours before applying a mixture of glass paint and gloss paint medium.
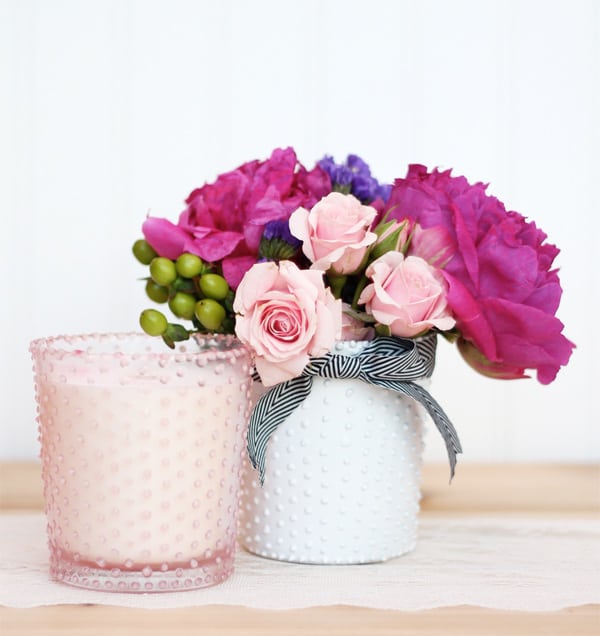
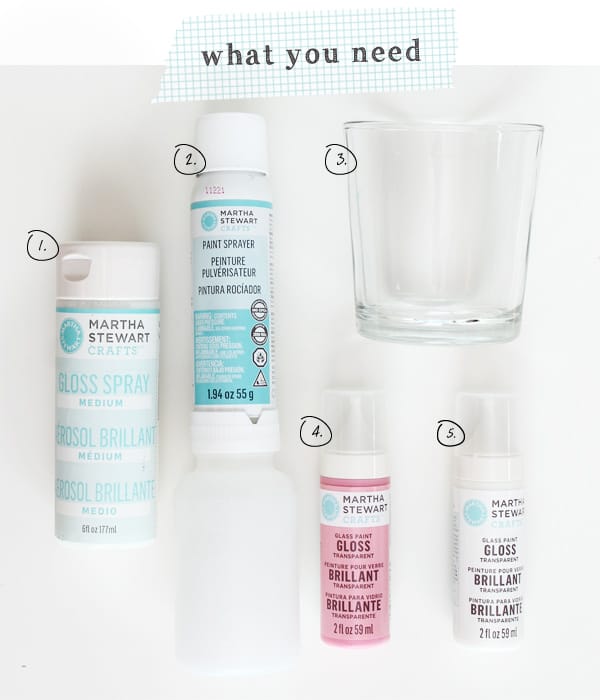
Source: Damask Love
Another Example:
Source: Homey Oh My
Talking of easy-to-execute crafts, we should focus on a super-easy wine bottle craft that will transform any empty bottle into an etched bottle. There are just a couple of steps involved in the project, the most important being to uniformly apply the etching cream on the cleaned-up bottle after fixing the stencil in place. After it is left to dry for 15 minutes, the wine bottle should be rinsed under running water. Now remove the stencil to get an etched wine bottle like the ones shown below.

Source: Saved By Love Creations
Another example of the itched bottle:
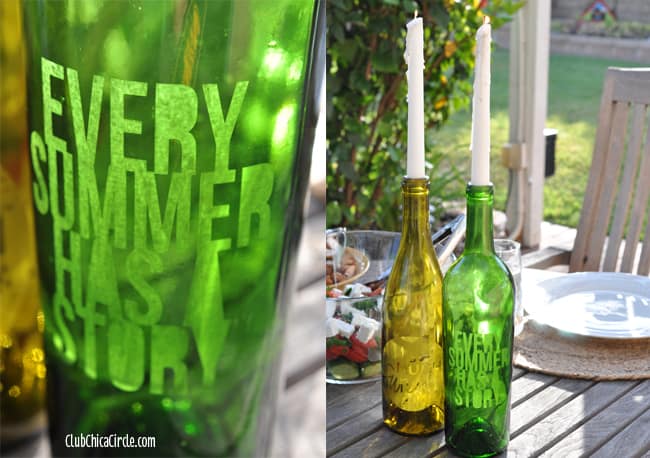
Source: Club Chica Circle
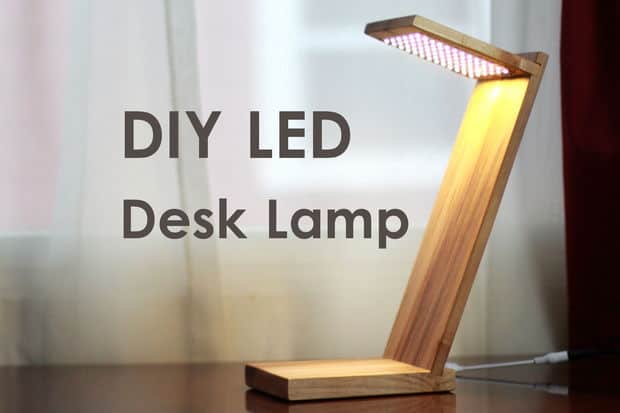
LED is environment-friendly, as it consumes less energy than the other light sources, so it is doubly efficient to make an LED desk lamp using an LED strip light cut into several pieces and wood blocks, maple wood in this case. It took 13 strips of six lights each to make the following LED desk lamp.
https://www.youtube.com/watch?v=TKBVx6QzTvE
Source: instructables
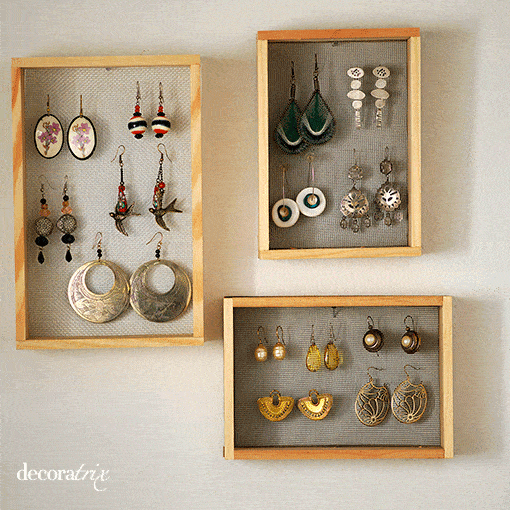
It is yet another simple yet attractive DIY project idea that any DIY enthusiast can execute. To make such a wall craft that doubles as a bracelet organizer, one needs pieces of wood or a wooden box, empty beer bottles, and something to hang it on the wall with.
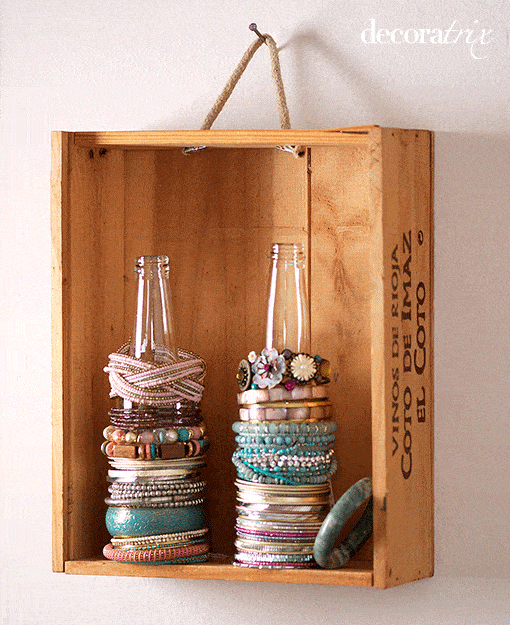
The idea can also be extended to creating a wall craft that serves the purpose of hanging earrings, for which, one will need to attach a mesh to the back of the wooden frame.
There is always a way to make mundane-looking planters into something exciting that will force people to stop and take notice. And this time all it takes is some outdoor colors and stencils to transform a boring planter into a work of art.
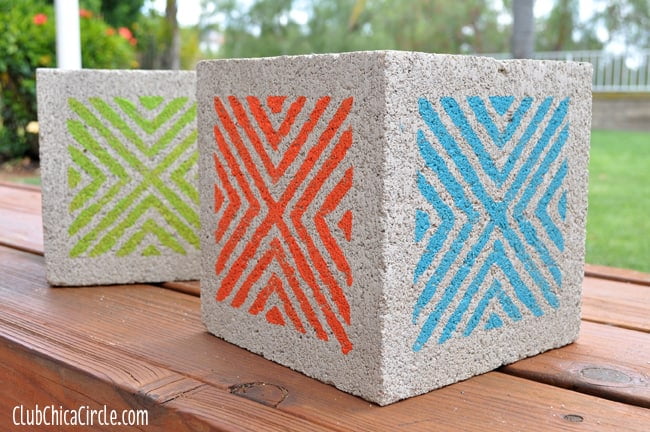
Source: Club Chica Circle
This is yet another exciting DIY project to upscale a corner table. The first step in the process is to strip the table of the paint using either chemical or 40-grit sandpaper. This is followed by sanding it with 80-grit and 120-grit sandpaper, respectively to get a smooth surface. The next step is to apply pre-wood conditioner and leave it to dry. In the meantime, one can color the rest of the table. This takes us to the next step of applying a vinyl silhouette sticker on the tabletop and painting it using white color. Take caution in getting the appropriate size of silhouette cameo for the tabletop.
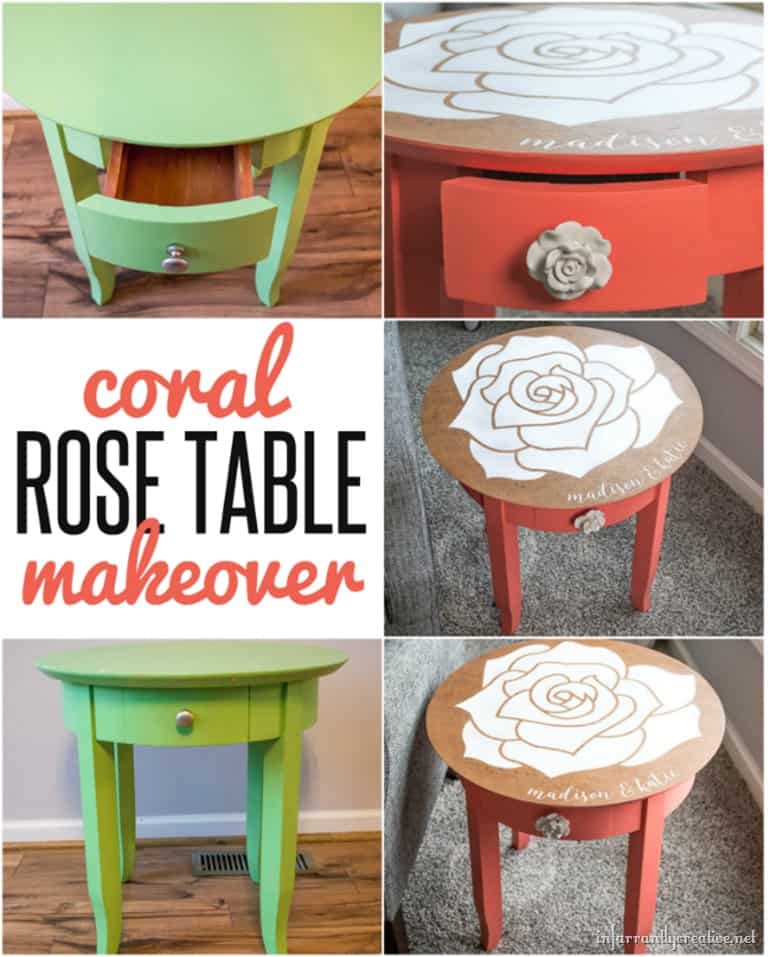
Source: Infarrantly Creative
A DIY craft does not need to be complicated for it to be exciting, and some of the project ideas that Homesthetics has shared in this series have proved it. The following wine bottle craft is very simple. All one needs is some empty wine bottles, white paint, and lace to decorate the outside of the centerpiece. The key to success in this craft is how the white paint is made to drip in the inside of the bottle.
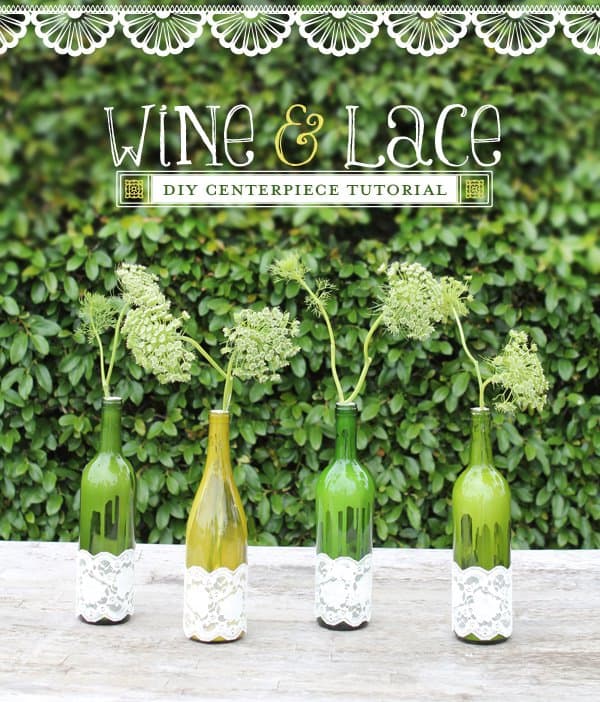
Source: Hostess with the Mostess
When one sees a shoe box, one is confronted with two choices: either to throw it away or to upcycle it into a beautiful storage box or a gift box. This project urges you to go with the latter option and your DIY soul will agree with it. Creating beautiful boxes like the ones shown below is not difficult. All you need is fabric, glue and embellishments, and cardboard in case you need to make your own box to start with.
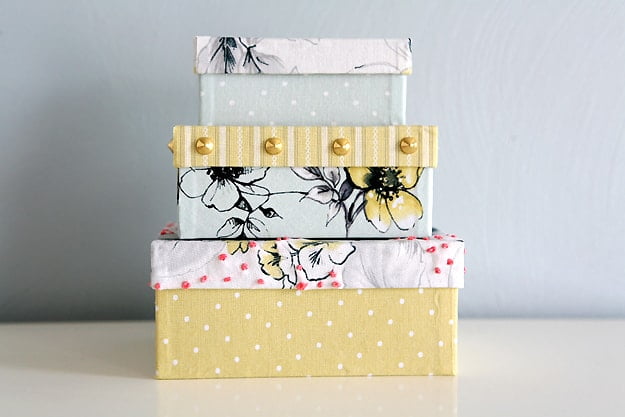
Source: Caught on A Whim
One of the classiest yet simplest to do DIY projects is creating a lace lamp. It just requires some old lace, an inflated balloon, wallpaper paste, and a tea-light candle. The first step is to soak the lace into wallpaper paste and then glue it on the inflated balloon. Once that is done, leave it aside for the gum to dry. Afterwards, prick the balloon and put the tea-light candle in the center and you have your lace lamp like the one shown below.
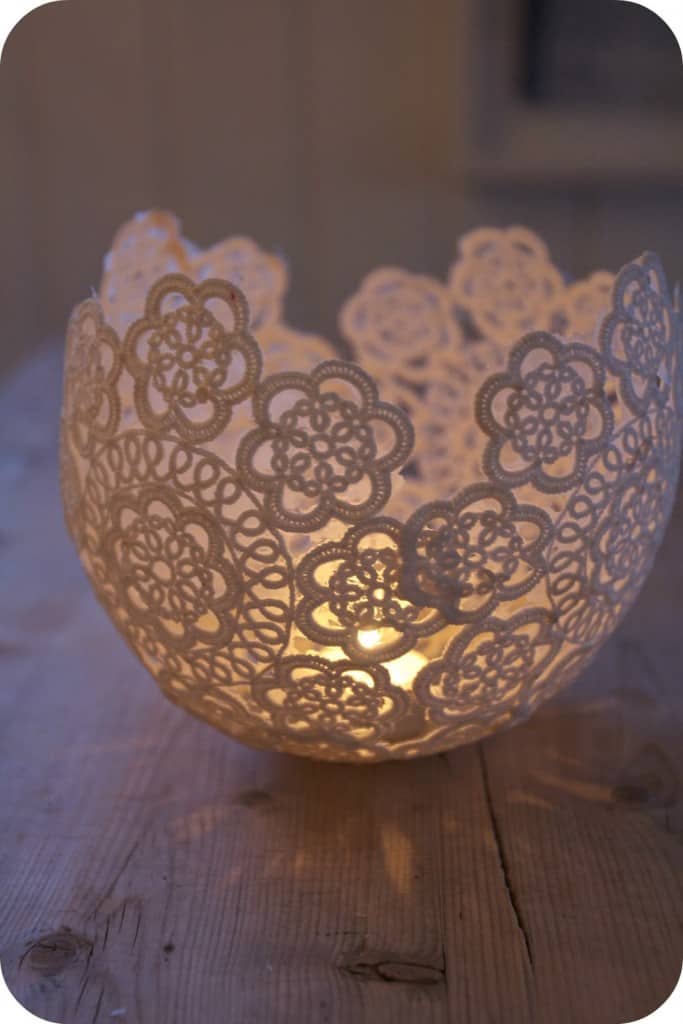
Source: Spirello
To create this personalized Instagram calendar one will need to get 12 pictures,card-stock paper, and a mini calendar, which, instead of buying, you can print on white cardboard. This way you will have full control of the entire process. You will also need glitter paper to decorate the cover of the calendar. To make it more meaningful, you may want to choose the pictures to resemble the mood of the month.
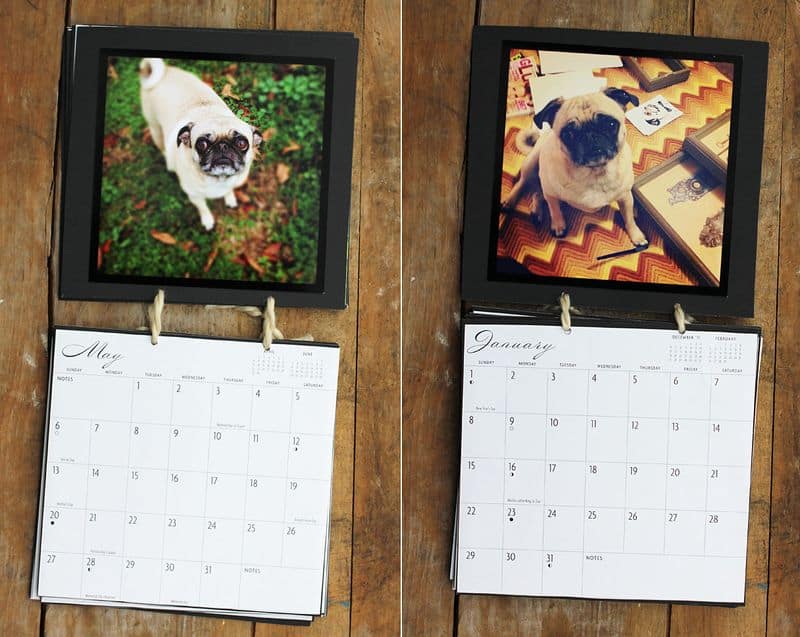
Source: A Beautiful Mess
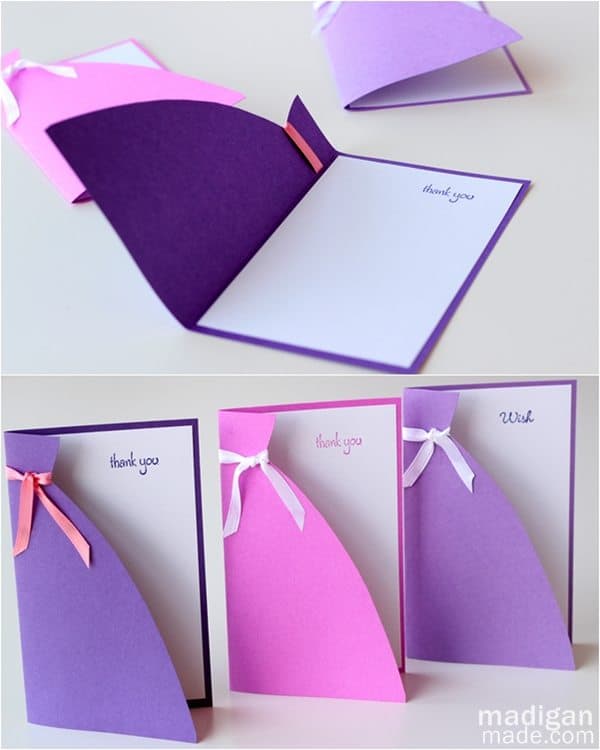
Another simple DIY project is making a thank you card or any card for that matter. You will only need a colorful card-stock paper for the front panel, white card-stock paper for the message, and a ribbon to decorate the card. You can either get a small stamp saying thank you made and use it with a stamp pad, or create one such text in an image editor and print it on the white sheet.
Industrial design lights or fixtures do not suit every taste bud, but if such things excite you then the following project is worth every penny you spend on it. To make this lamp you will need plumbing supplies like metal pipes of various sizes, splitters, couplers, connectors, flanges, elbows, and nuts as well as electrical supplies like power cords, light sockets, wire connectors, lamp wire, and vintage 60W bulb. Along with it, you will also need black spray paint, painter’s tape, 60-grit sandpaper, a screwdriver, a wire cutter, etc. This project could be time-consuming, but the end result is out of the ordinary. The key to success in this project is how you connect all the parts to make it stable and how you do the wiring for bulbs. You should be careful in taping all the wire joints to get protect against any accident, for the entire thing is made of metal.
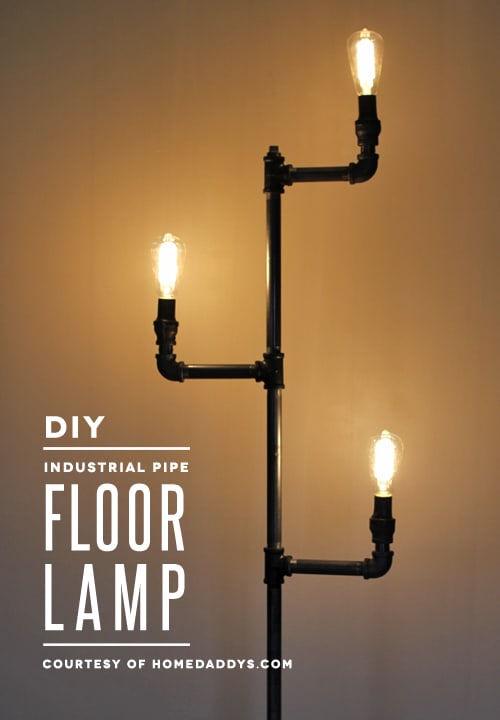
Source: How About Orange
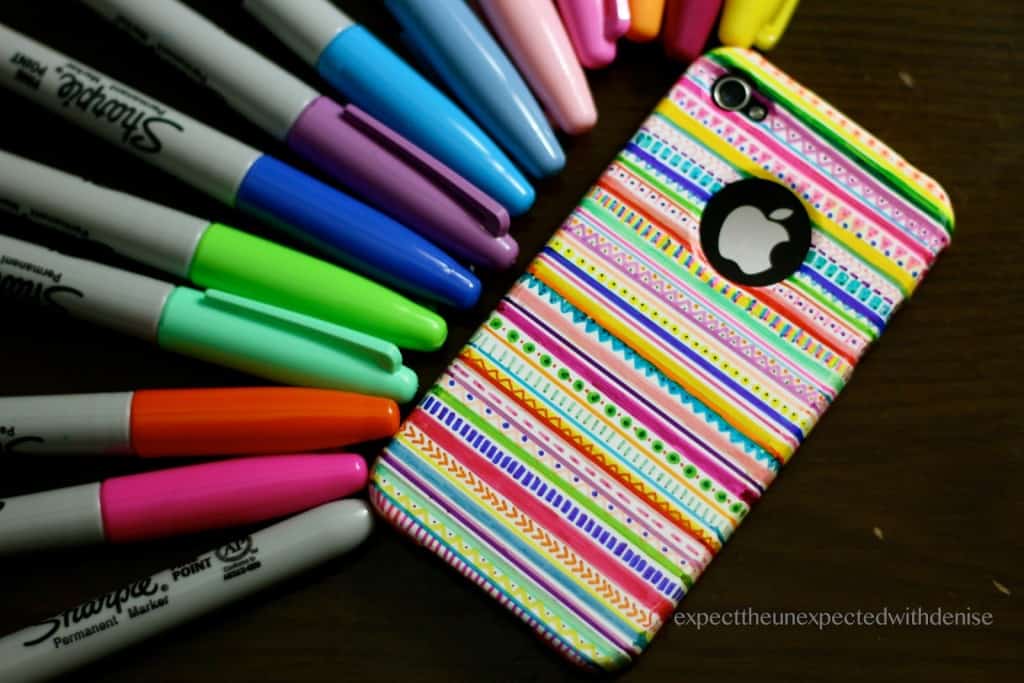
Personalizing the cover of your phone is the most common desire among iPhone owners and this craft is set to meet that need. To make this kind of iPhone cover, the things that one needs are a white iPhone cover, a set of permanent markers, and a tribal design for reference. The accuracy with which one mimics the design on the phone cover will define it in the end.
Frames play a big role in the life of a person who is disposed to collect artworks, for she understands how big a role a good frame plays in adding to the beauty of the painting. To make the following golden frame, a DIY enthusiast will need an ordinary frame, gold leaf or imitation gold leaf, metal leaf sizing, 1" flat artist brush, and a fluffy brush to smoothen the gold leaf. You must not use any glue or ModPodge. Only sizing suitable for metal leaf should be used.
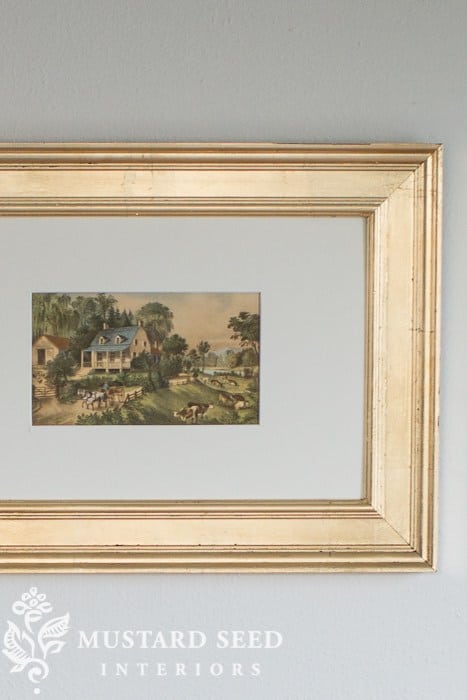
Source: Miss Mustard Seed
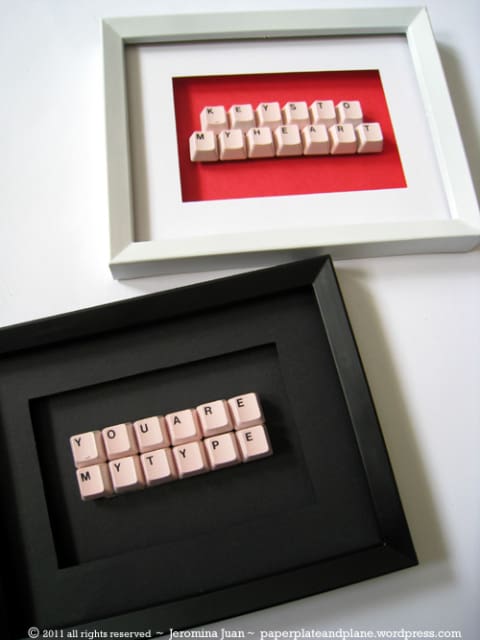
This is the sweetest use of your retired warhorse, read keyboard. You can take individual keys out from the keyboard and write a message with it for your valentine. Once the message is ready you can transfer it on a cardstock paper and then put a frame around it. There is a problem though, you cannot find two keys for one letter on one keyboard. To get that you may need to use some spray paint to quote the individual keys and then use a stencil to paint individual letters on each key.
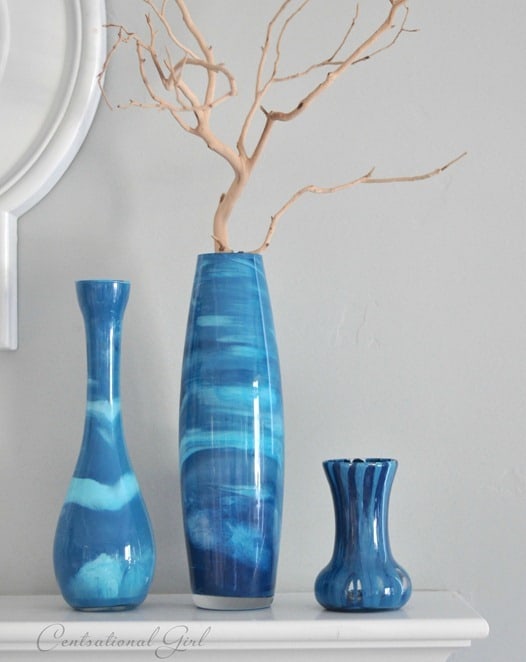
Creating swirl vases is a piece of cake. One just needs glass vases and some acrylic paints to get the effect. The idea is to first put a few drops of one color and slowly swirl the vase for the paint to dance at its tune and then add a few drops of another color and keep it swirling. Drain the vase with leftover colors after the entire area of the vase is covered with the paint. The key to success in this project lies in how slowly you let the paint swirl around the inside of the glass vase.
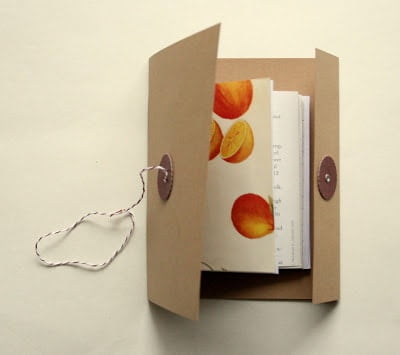
This DIY craft can be a perfect gift for someone who loves taking notes with pen and paper. To make this journal, one will need a sturdy cover paper, you may go for a cardstock paper, inside pages, baker’s twine, and two eyelets. The project is simple to execute. The only tricky part is attaching the eyelets and string to the diary.
Source: The Creative Place
With the help of some scrapbook paper, gum, Mod Podge and your family photographs you can convert an ordinary-looking metal star into a photo collage, which you can hang in your home. The key to success in this project lies in carefully cutting the photographs and paper in proportion to the sides of the star. The rest of the steps are pretty straightforward.
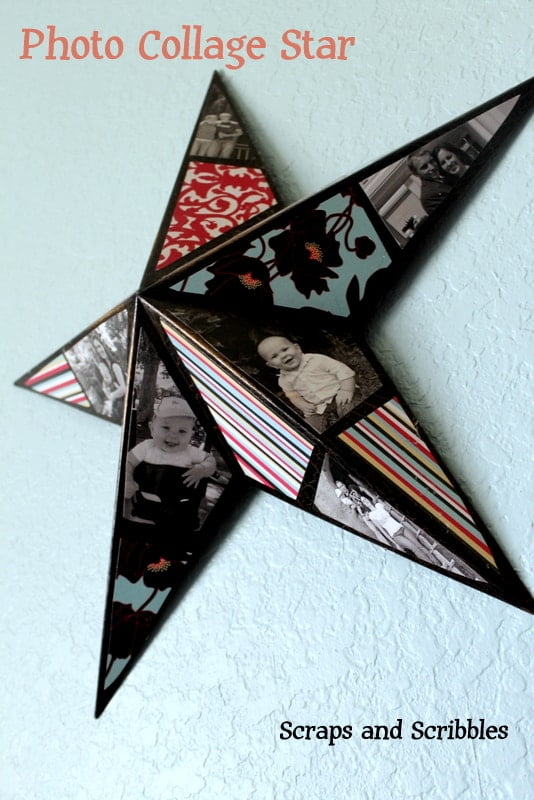
Source: Scraps & Scribbles
You can easily upcycle the worn-out fabric to make a coil bowl following the steps mentioned in this tutorial. To do that, you will need a long strip of fabric, cord, yarn needle, and scissors. The process is not complicated but it is time-consuming. You should begin stitching from the bottom. The key to success in this craft lies in the combination of threat and fabric as well as in the loops that you make with the yarn and needle.
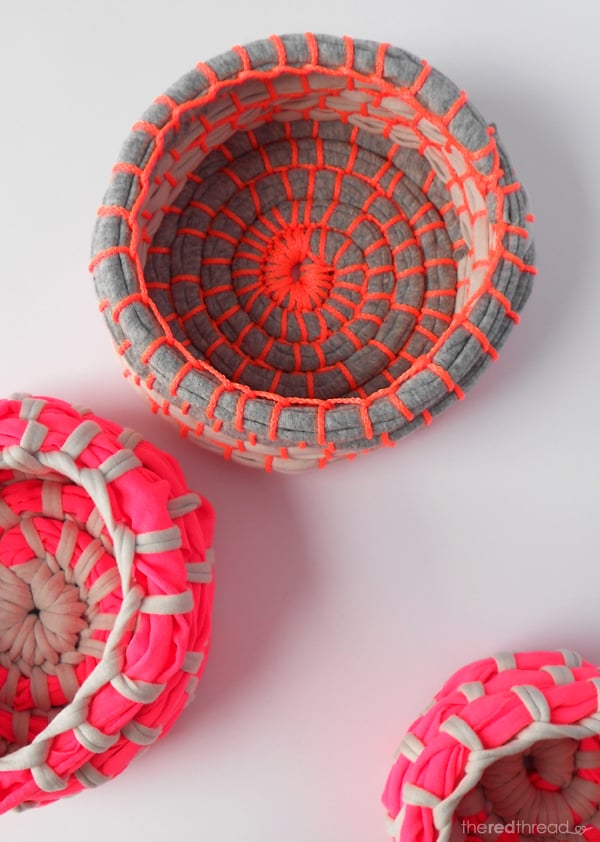
Source: We Are Scout
This is yet another simple DIY project that looks classy. This craft will transform your everyday umbrella into an umbrella that will attract attention and to do so all you need is waterproof colors and brushes of various sizes. You may want to use a toothbrush as well in the project. The key to success in this project lies in the interplay of splattered colors on the umbrella.
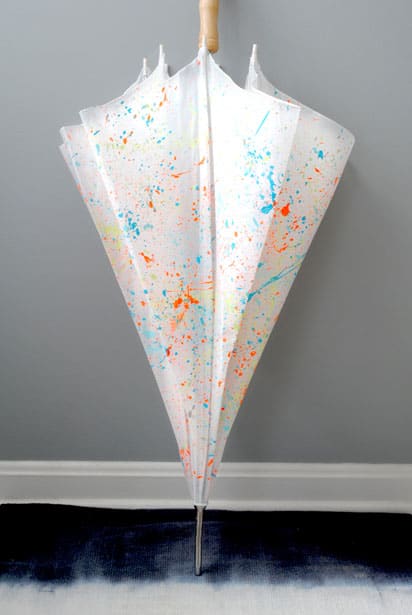
Source: Design for Mankind
If you are into stitching then this DIY project will surely be a treat for your smartphone. The candy-like cover sewn from upcycled fabric will not only protect your phone and organize your keys and credit cards, but it will also add fun quotient to your phone.
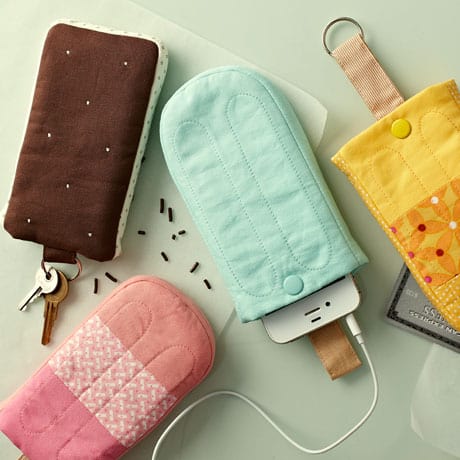
Source: Straight Stitch Society
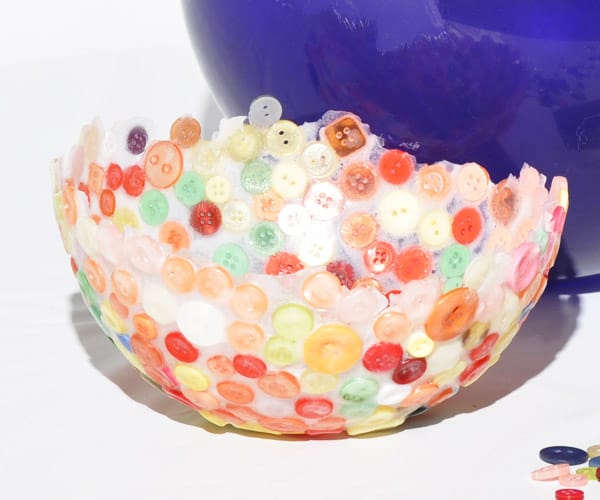
Balloon works well as a DIY tool, as you have noticed in a couple of projects the article discussed above. This one also needs the help of a balloon to come into being. To make a button bowl, you will need lots of buttons of various colors, an inflated balloon, a paintbrush and glue, Elmer’s or Tacky to hold all buttons together. The process involves applying glue to the bottom half of the inflated balloon and setting it to dry. Afterward, a second coat of glue is applied and buttons are attached to it. When the glue dries up, prick the balloon and presto: you have your button bowl.
Probably very few things will excite more the constantly-connected generation than a real-world artifact of something they encounter every day on the Internet -- Instagram. Creating this photo frame is very easy. All one requires is the colors used in the Instagram logo and a white cardboard to make a frame. The key to success in this project lies in the accuracy with which you reproduce the colors used in the Instagram logo.
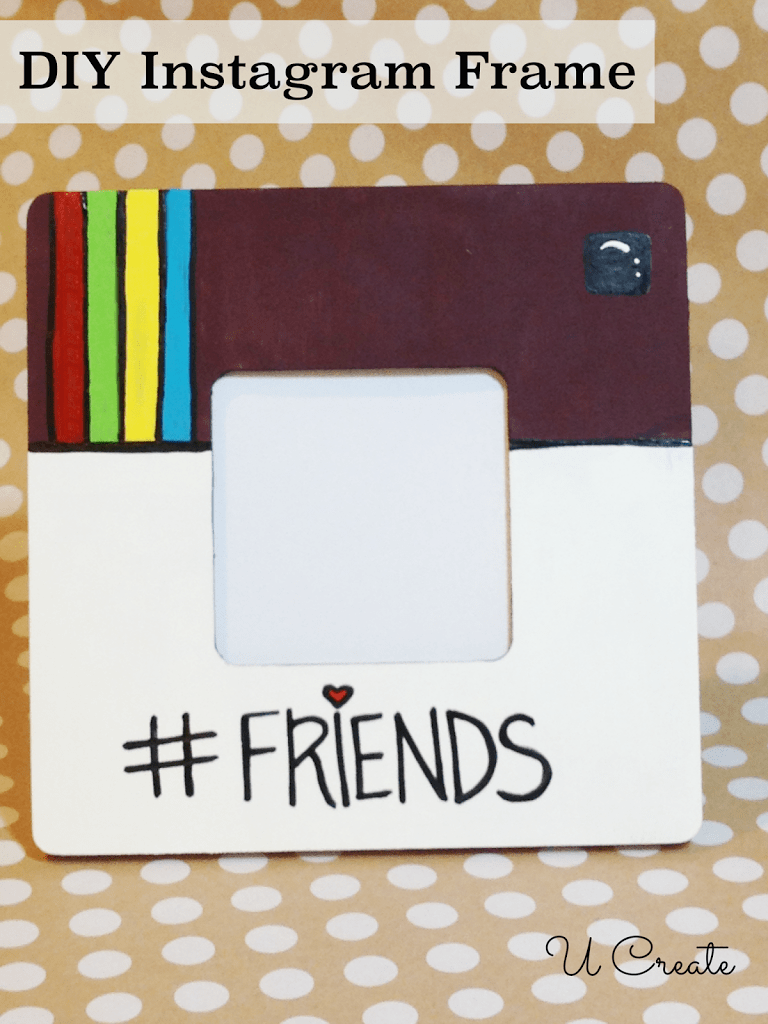
Source: U Create
This is yet another craft that uses balloons as a tool to make an awesome product. And like other projects, this also gives an output that leaves one astounded. To create a water balloon tea-light candle holder one will need some balloons, high-melt paraffin wax, a double boiler, and a cookie sheet.
Fill the balloon with water, put paraffin wax in the double boiler put it on the stove melt the wax until it reaches the temperature of 180 degrees Fahrenheit, and then dip the balloon till the water levels in the molten wax. Hold it there for a few seconds and then take it out. Dip the balloon again in and then take it out. Repeat the process for some time for the wax to stick on the outer layer to form a sufficiently thick surface. When the process is complete, keep it aside on a cookie paper to dry. Afterward, take it to the sink, prick the balloon, and remove the balloon. Now place a tea-light candle inside the candle holder, and you have your water balloon tea-light candle holder.
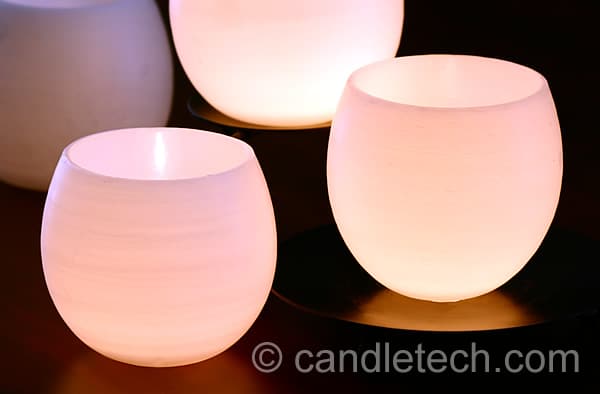
Source: Candle Tech
If you are short on time and really need some exciting bookmarks without spending much time then this is the perfect project for you. This project is so easy that even kids can do it without any adult supervision. All this DIY project requires are some colorful buttons, paper clips and glue. And the only step involved in the project is gluing a paper clip on the back of a button to get a button bookmark like the one shown below.
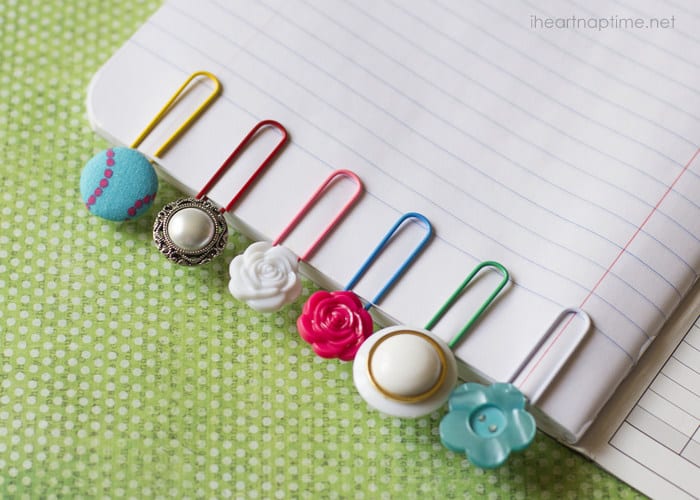
Source: The Inspiration Board
Some small pieces of paper, colors, and double-sided tape can bring life to your living room. You just need to cut lots of butterflies in various sizes and use double-sided tape to attach the butterflies to the wall to form a meaningful pattern, like the ones shown below.
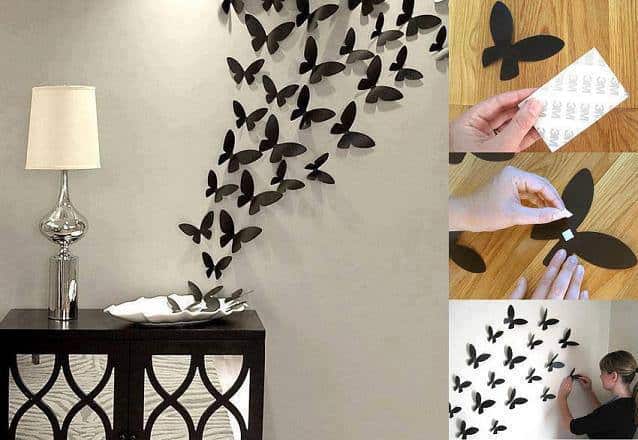
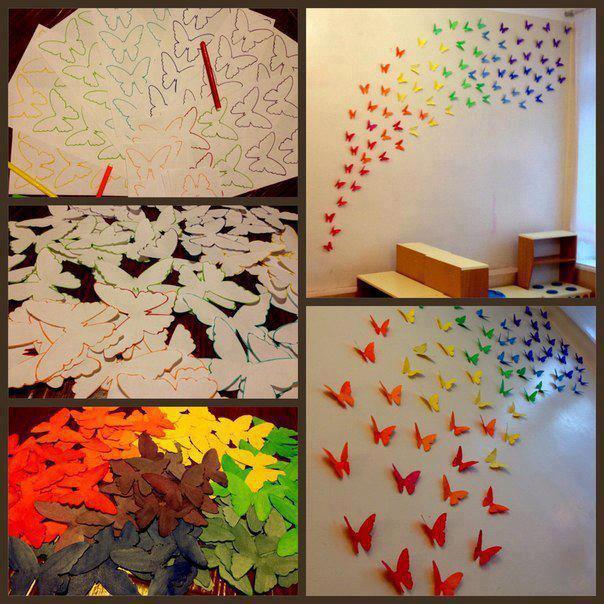
Source: Good Home Design
A set of jars with the help of a set of bright colors and decals can be converted into something that you will want to display prominently in your home. The idea is quite simple: take a jar, attach a decal of whatever kind you want, apply craft paint or spray paint of your choice, let it dry, and peel the decal off the jar to get a jar that will resemble something like the ones shown below, provided you have used the similar decal.
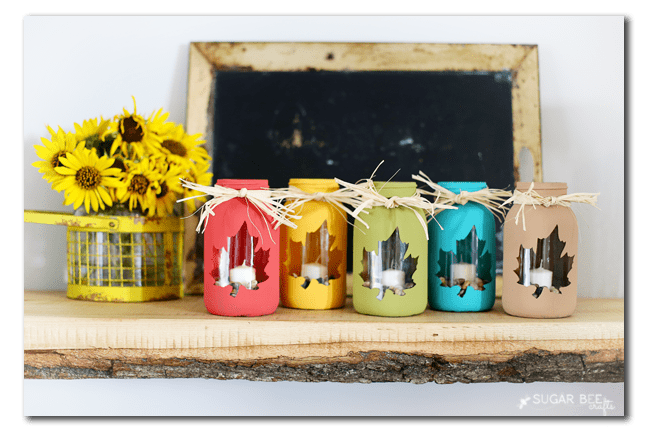
Source: Sugar Bee Crafts
It is not uncommon for a home to have a lot of empty cans and boxes which serve no practical purpose. For normal folks, this may pose a problem to deal with, for a DIY geek this means an opportunity. An opportunity to upcycle the cans and boxes and make something wonderful from it. With the help of wrapping papers and glue every empty can or box can be turned into a beautiful storage box like the following.
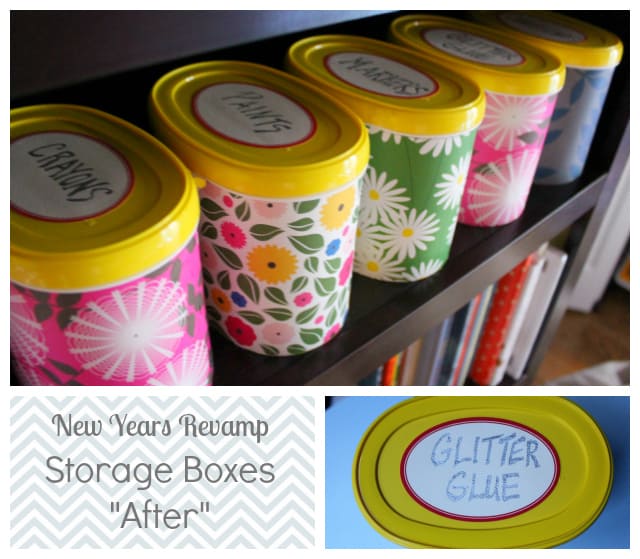
Source: Design Improvised
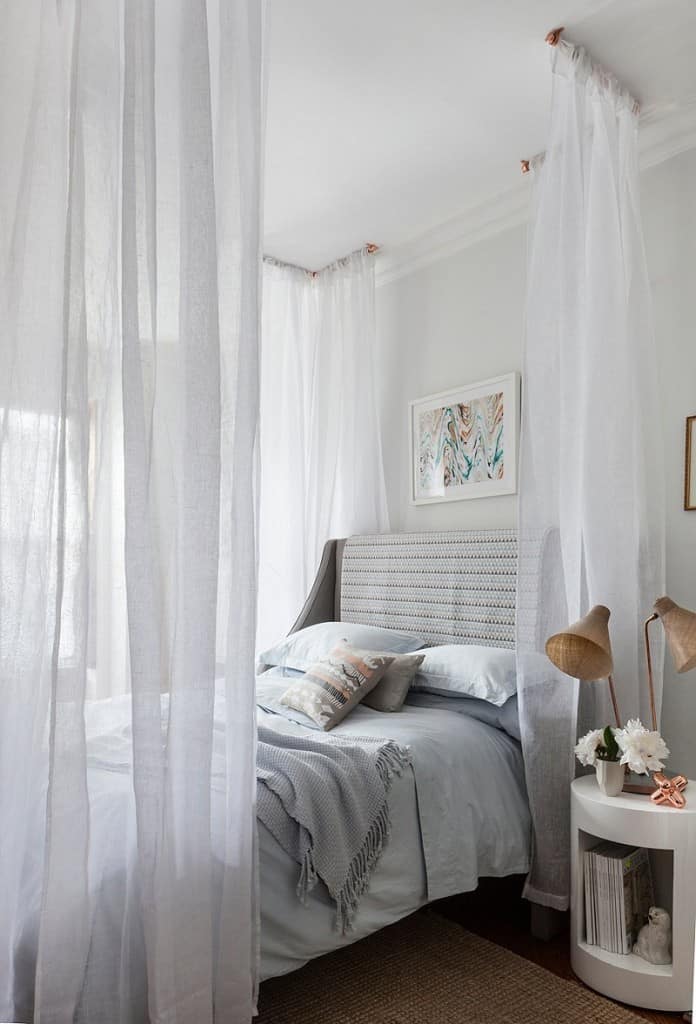
Creating a canopy bed that looks serene makes an easy-breezy DIY project. With the help of some everyday pieces of hardware that you can get from your neighborhood hardware store and some carpenter’s tools, you can easily create a dreamy canopy bed like the following.
This is a simple, straight-forward DIY project that requires only 1/2 inch pieces of PVC pipe, a circular mirror, adhesive to attach the pieces, and a piece of circular cardboard to use as a frame to attach pieces to make the inner circle, on top of which you will attach a mirror. The inner circle should be a little smaller than the mirror for the mirror to sit comfortably over the PVC pipe pieces. The key to success in this project lies in the pattern you make from the pieces of a PVC pipe and the inner circle.
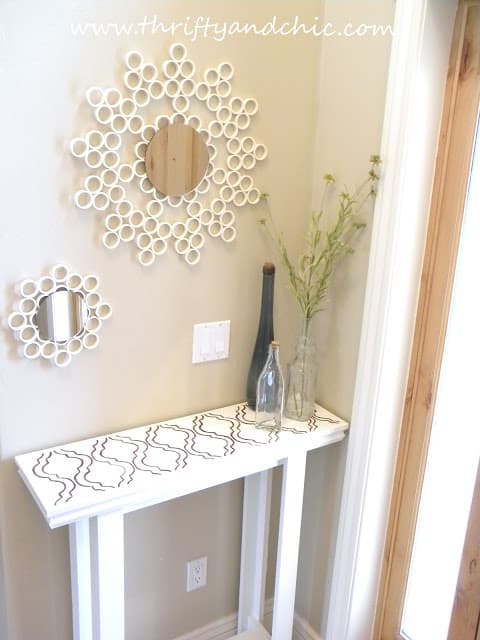
Source: Thrifty & Chic
This is a very simple DIY lampshade project. Just in a few simple steps, you will get the desired city-scape lamp. The steps include finding an outline of the city that you want to illuminate on your lamp, marking it on the lamp, and then using a needle to punch holes for the light to come out.
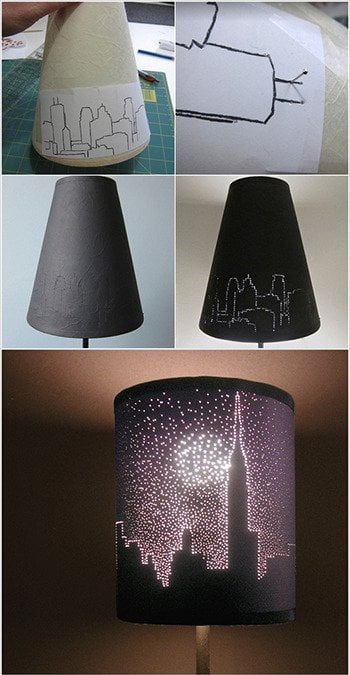
Source: Taringa!
This DIY lampshade project may not be as simple as the above one, but it still is very simple to make. The steps in executing this project involve printing Instagram photographs, measuring the size of the lampshade to ascertain how many rows and columns of photographs will be needed, which will also tell you the number of Instagram photos you will need for the project, lamination film matching the size of the lampshade and hot glue to attach pictures to the lampshade. The key to success in the project lies in how accurately you smooth out the lamination film to discourage bubbles from forming inside of it.
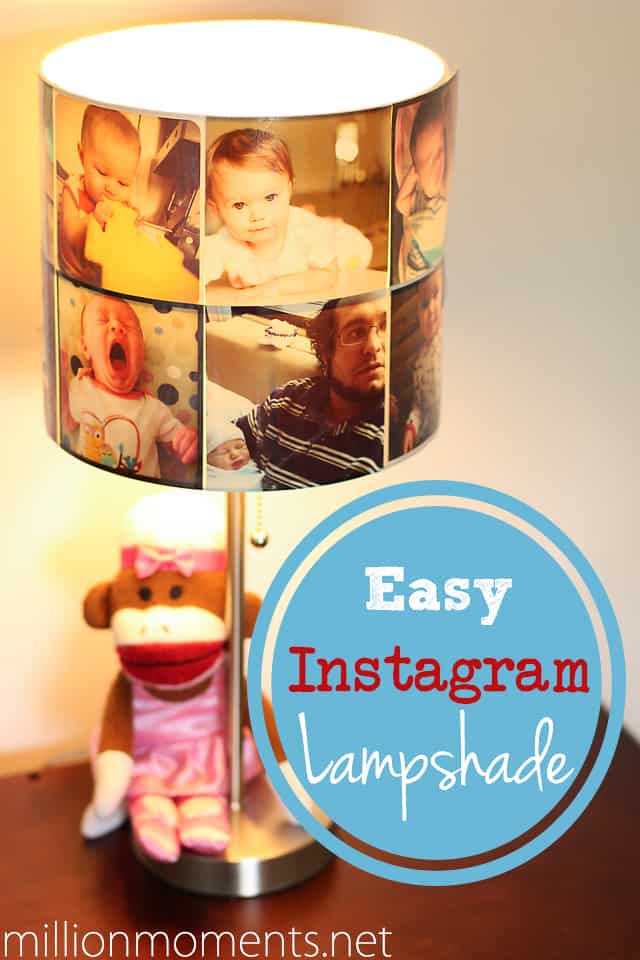
Source: A Million Moments
When shopping for DIY stuff, very few people will think of heading to a neighborhood hardware store to get hex nuts, and an even lesser number of girls will think of wearing nuts as a fashion accessory. The DIY project in question is going to change this perception. With the help of 3 strands of cotton butcher’s twine, 18 small brass hex nuts will turn into a bracelet that you will never shy from flaunting. The key to success in this project lies in how you braid the twine and arrange the nuts in it.
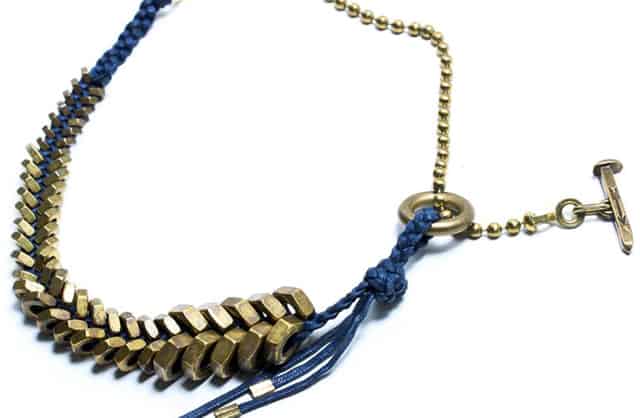
Source: Honestly WTF
With the help of a frame made of cardboard, the concrete mix can turn itself into modular planters that you can place wherever you want and in whatever shape. This is one of the simplest projects to undertake. Creating the basic structure of a unit of concrete planter is not difficult. The only thing that one should keep in mind is the strength of the concrete mixture.
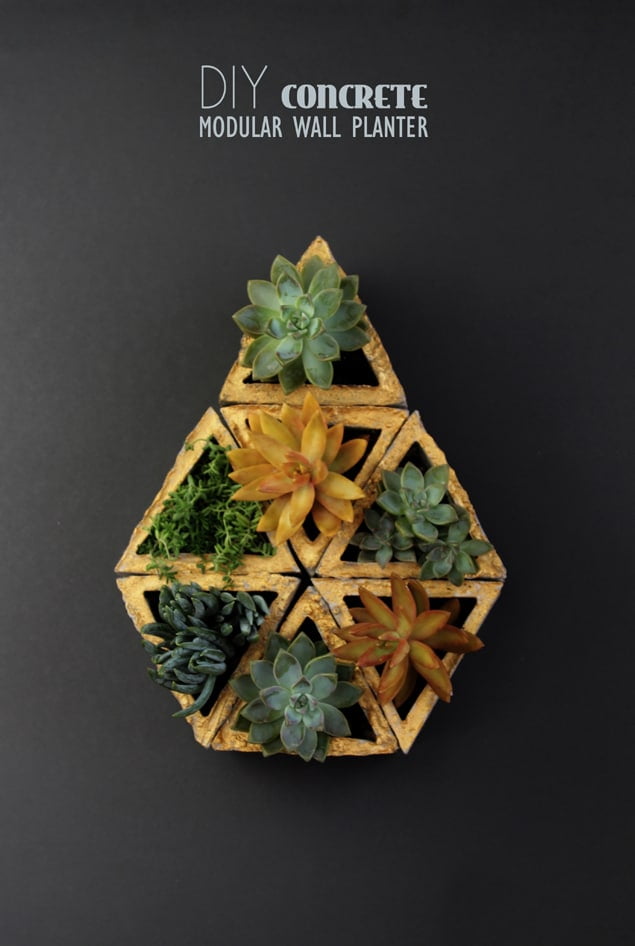
Source: A Piece of Rainbow
Any discussion on decorative ideas cannot be considered complete unless there is a space dedicated to quilling paper arts. These small paper pieces with the use of simple tools can create items that one cannot even imagine. With small small pieces of bamboo cane and quilling paper, one can create boxes without much difficulty. This will be a real test of your DIY mettle, for the creator did not share a step-by-step guide for creating a box like this, but if you are into quilling paper crafts then you may not require any instructions whatsoever. Just the below images are enough inspiration for you to take the project further.
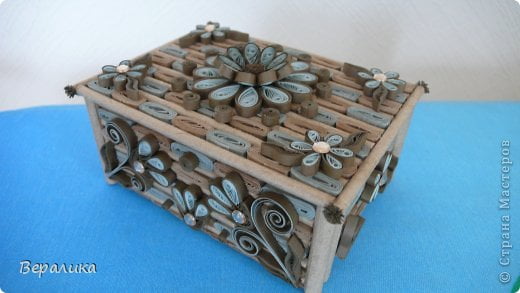
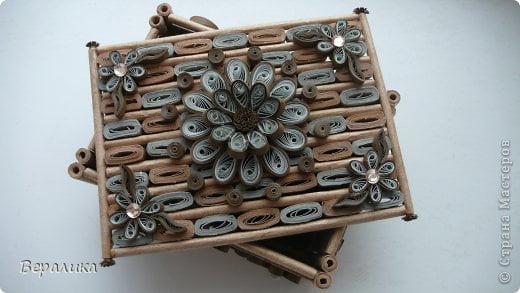
Source: Stranamasterov.ru
This incredible craft requires a floating shelf and some painting skills to come into being. In case you are not good at painting you can either go for a decal or a better idea would be to print a stencil on a cardboard and trace the legs of the table on a wall beneath the shelf and then paint it by covering the area where you do not apply paints using painters tape.
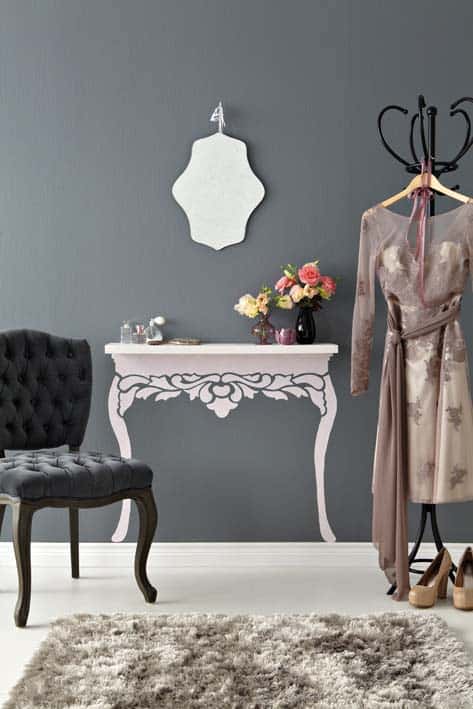
Source: Decoholic
Modern city life means living in small spaces, but the shrinking space should not shrink your dream. It rather intensifies it and fulfilling that need is one of the goals behind taking a DIY craft. The following project will give you a wall-hanging vertical garden that will not only save space but will make your place look attractive and fresh.
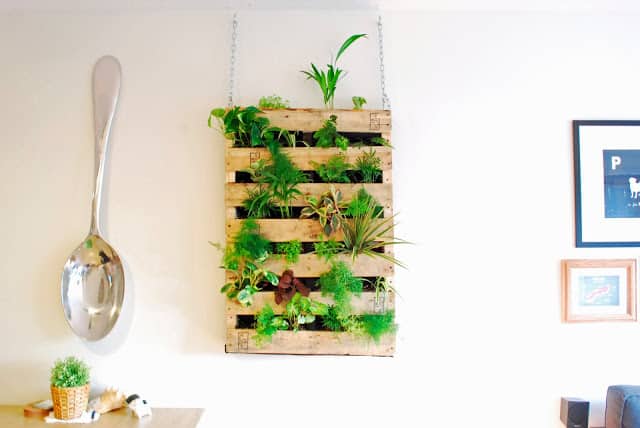
Source: The Brew
This is a fun project for your girl and it just requires some toilet paper rolls, paper, gum, colors, and some accessories to make the face-changing dolls more attractive. You will need two sizes of rolls for this craft. One will function as the outer layer where all the designing will go and another will be the inner layer where one will make faces displaying various emotions. The top layer of a doll will rotate to bring different faces in front. You should be careful when cutting the window on the top layer. They should be uniformly cut to give it a polished look, unlike what is shown below. You may want to sandpaper the window edges as well.
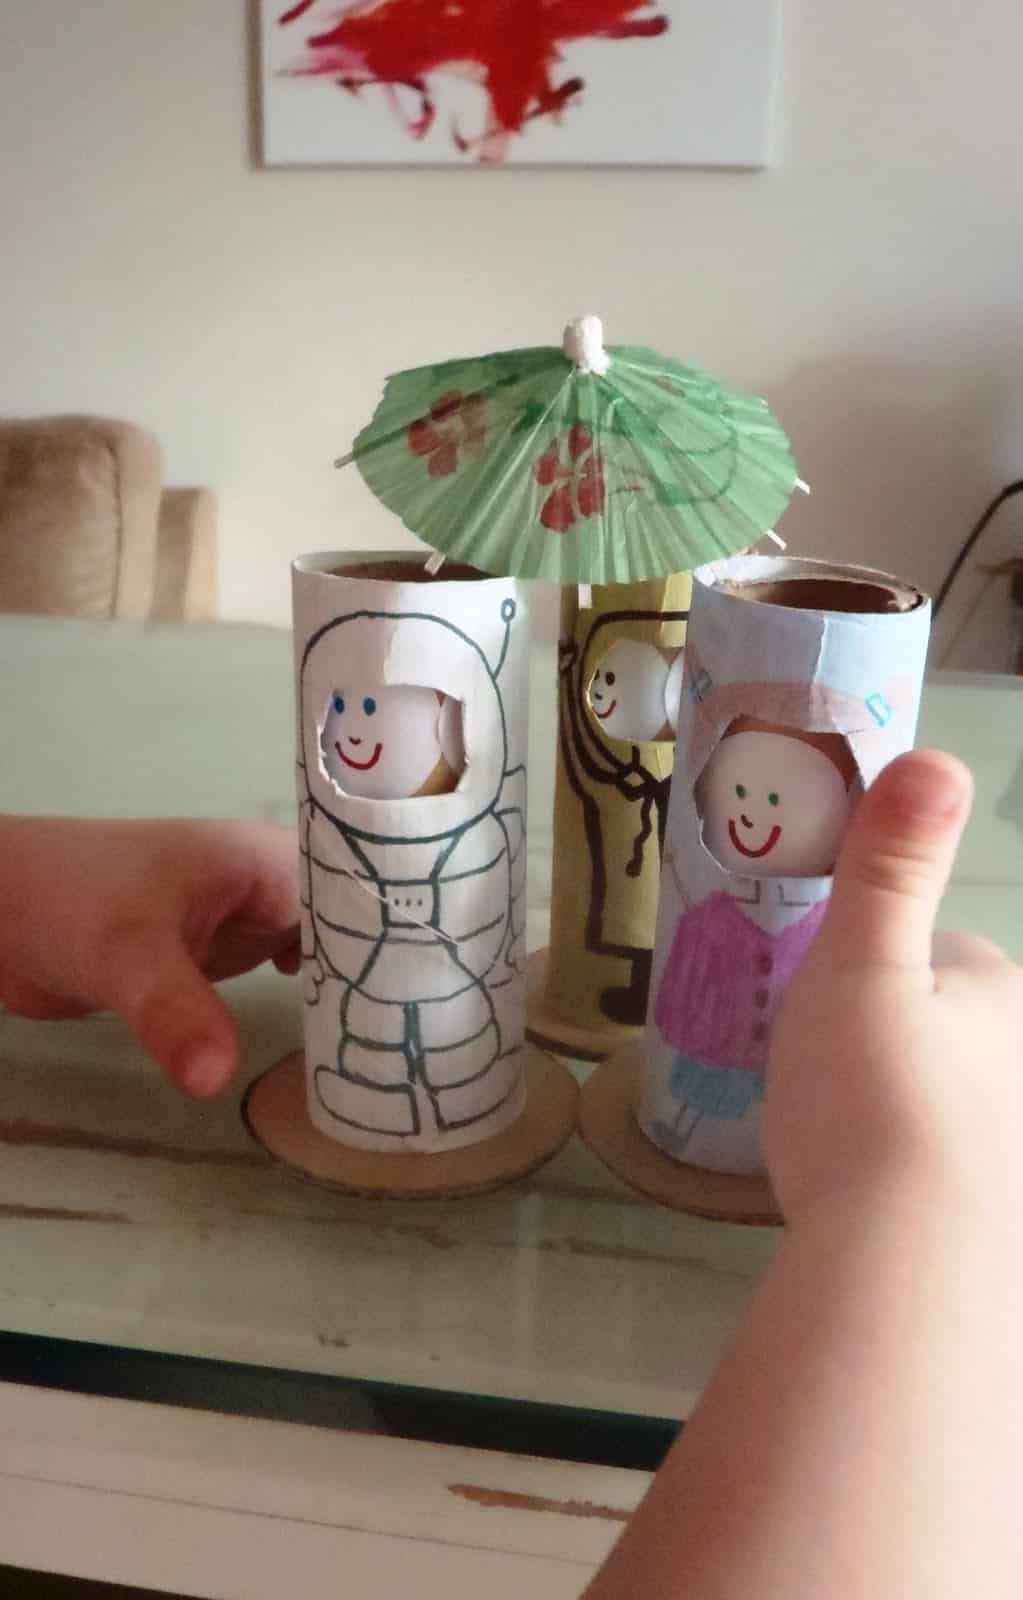
Source: A Little Learning for Two
It is always a good idea to store used-up toilet paper rolls. Those can be upscaled into many brilliant DIY crafts. One such craft is creating a circular photo-frame set to display any kind of photos in various sizes of rings, as shown below. The project is simple to execute and requires very few things. Depending upon one’s preference, the DIY enthusiast can either leave the outer ring of the resultant frame bare, as shown below, or color to add vibrancy to the rings.
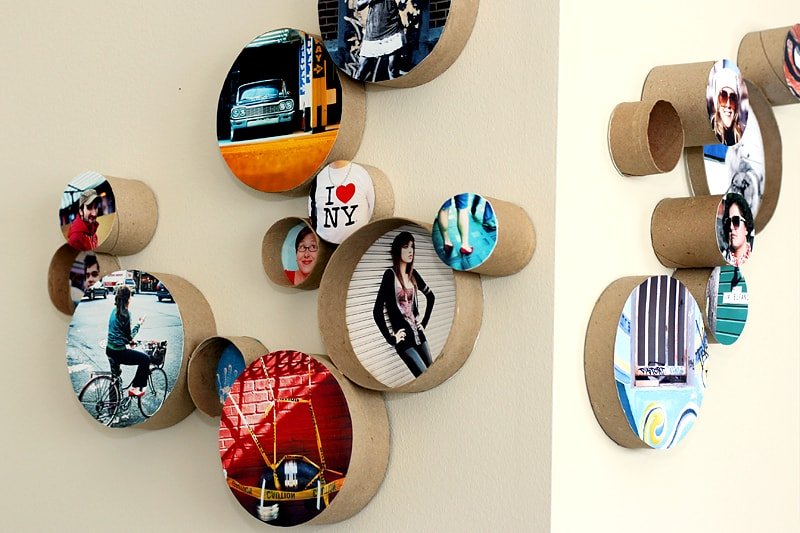
Source: Photojojo
More than you, your kid will be excited to know about this DIY project. After all, which kid does not like a car! Making colorful cars from toilet paper rolls is an easy thing to do. You just need to cut the rolls from the middle to mimic the inside of the car, color the rolls in attractive colors, add some graphics, make wheels using cardboard paper, and color them. Assemble all together using glue and pins. The set of cars is ready in no time. All you need is a driver for each car and a small toy will do a good job filling this role.
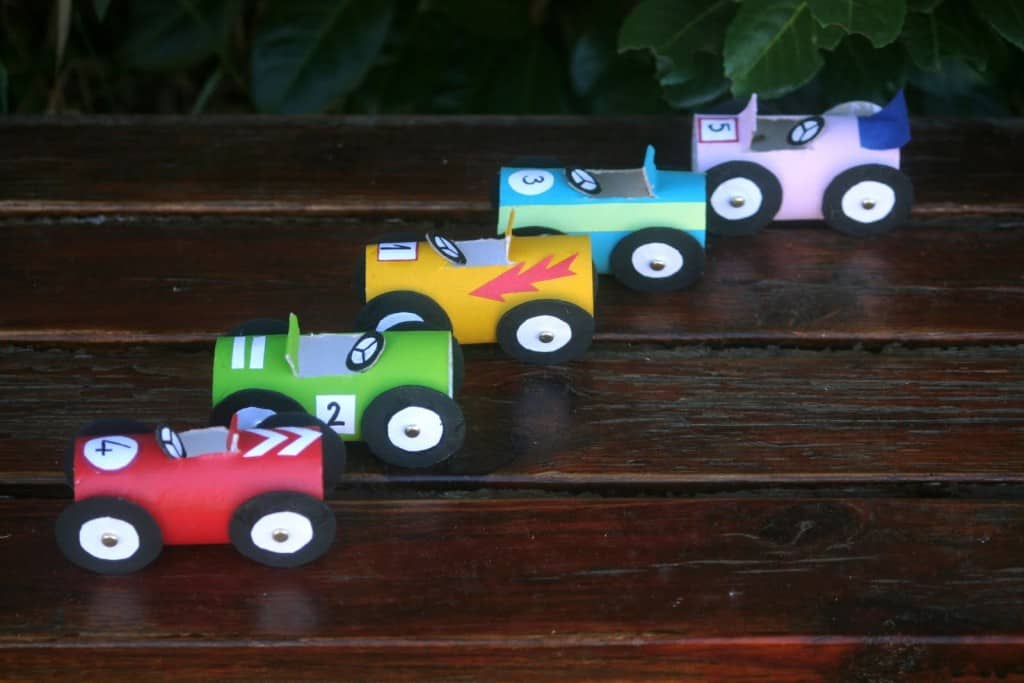
Source: Kifli és levendula
One of the most exciting things about any DIY project is that it gives you a beautiful-looking product at an unbelievably low price. Creating DIY chevron curtains is one such project. To make a curtain like the one shown below, a DIY enthusiast needs painter tapes, a color of choice, and obviously a curtain.
![]()
Source: While They Snooze
We hope you have found our curated selection of DIY projects of all time appealing and of interest to you and your household. We would love to complete this wonderful list with your very own creations so feel free to share your ideas and projects with us in the comment section below.