Andrew Beverley is an accredited acoustics specialist — AMIoA, ClearSound Acoustics Manager at John Atkinson Interiors — and reviews all soundproofing content on Homesthetics.
Anton Giuroiu is an architect and the founder of Homesthetics, which he has edited for over a decade. He practices at sculpta, the studio he co-founded, designing to a simple conviction — buildings are heirlooms, made for the present and left to those who follow.
Expertises: Architecture, Design, Art, Home improvement, Painting
&
Updated on
Most efficient ceiling soundproofing technique for both new and existing is to increase the mass and density of the ceiling, increasing sound absorption by adding insulation. This will reduce sound transfer through your ceilings through a combination of acoustic insulation, sound insulation clips, resilience channels, and soundproof panels, thus reducing sound transfer increasing acoustic comfort levels.
When soundproofing a home, many people tend to overlook the importance of soundproofing the ceiling. However, blocking, or at least reducing the sound from above, is important to create a peaceful indoor environment.
That’s why I’m here today to help you understand the different noises that your ceiling may be transferring and how to block them using sound-insulating materials. I will also tell you everything you need to know about building a soundproof ceiling from the ground up (read sky down).
How to Soundproof New and Existing Ceilings
What To Know Before Soundproofing Your Ceiling
Although you may be tempted to start with soundproofing your ceiling immediately, I’d ask you to hold your horses. That’s because there are a few important factors to be aware of before you begin, which will make the soundproofing optimally effective.
Firstly, let me start by introducing you to the types of noises your ceiling may transport to the rest of the room. Now, you may think that I’m being too technical, but trust me- this is the crucial first step to determining which soundproofing techniques will work the best for your needs.
Generally, there are two types of sounds that you should consider before soundproofing your ceiling:
1. Airborne Noise
As the name may have already told you, airborne noise is transported through the air until it reaches a solid surface like the floor or ceiling. Also known as acoustic noise, airborne sounds or noises travel through the vibrations created by the air-wave to reach the floor above you, and finally, the ceiling.
2. Impact Noise
Impact noise or structural noise is created when someone or something “impacts” a surface and creates sound vibrations that bounce off the surrounding surfaces from the point of origin. These vibrations ultimately hit the floor above you and travel to your ceiling through the structures in between, thereby making their way into your room if the ceiling isn’t properly insulated.
For instance, if you can hear the footsteps of your upstairs neighbors walking above you, it’s essentially the impact sound waves that you’re hearing.
However, keep in mind that not all noises in your room can be solved using ceiling soundproofing techniques. Your room may be impacted by flanking noise, which is picked by structures like the connecting points between your floor frame and walls. In such cases, effective noise reduction will require treating the wallsand floor.
Types Of Ceilings
Once you’ve figured out if you’re being troubled by airborne or impact noise (or both), it’s time to determine the type of ceiling you have. As such, most residential ceiling types are categorized into:
1. Solid Ceilings
A solid ceiling is typically made of drywall or plaster, and it’s generally easier to soundproof. Such ceilings are usually made from gypsum panels encased in paper, which make them a better acoustic barrier than ceilings made of hardwood, fiberboard, and hardboard.
Moreover, a single layer of a solid ceiling has more mass and fewer intermediary structures (such as pipes and light fixtures) between it and the floor. It also has inherent sound isolation properties, and it’s comparatively easier to add to its mass for reducing unwanted sound transfer.
Perhaps, the biggest advantage of solid ceilings is their affordability, which makes them a fit for all budgets.
2. Suspended Ceilings
A suspended or drop ceiling is a removable structure that uses a solid ceiling as its base and “hangs” from it. Drop ceilings are primarily used for aesthetic purposes, and these “sub-ceilings” have more room for accommodating structures like lighting fixtures and plumbing pipes. In hindsight, the presence of these fixtures promotes more sound transfer.
It’s generally more challenging to soundproof suspended ceilings, especially for people who don’t have the right tools or knowledge about their home structure. Besides, they aren’t as effective as drywall ceilings if less sound transfer is on top of your priority list.
Soundproofing Ceilings - All You Need To Know
With everything said and done, it’s now time for me to address the big question- how do you soundproof the ceiling? And let me start with a piece of good news, you can soundproof an existing ceiling as well as build a soundproof ceiling from scratch.
Soundproofing An Existing Ceiling
Soundproofing an existing ceiling includes both invasive and non-invasive methods, so you can choose the ones that best suit your needs and budget.
1. Design A Dropped Ceiling
Don’t get me wrong- I’m not contradicting the disadvantage of a dropped ceiling mentioned above by suggesting designing a dropped ceiling to reduce impact and airborne noise. Designing dropped ceilings below existing ceilings provides you with the opportunity to install more sound absorption materials for effective sound blocking through:
A. Installing Acoustic Ceiling Tiles
Acoustic ceiling tiles, when installed properly, can soundproof a ceiling by enabling sound absorption from the structures between the ceiling and the floor above. All you need to do is create a perimeter around the existing ceiling area using T-channels and L-channels to create a grid-like structure. Once this is done, proceed to install each tile using a strong adhesive, which will help absorb sound from the floor above.
Tiles with dB-ratings are also available which can offer excellent performance when combined with soundblocker strips. Acoustic hangers can also be used to reduce sound transference further.
Tip
Make sure you follow the instructions on the adhesive package for even application and the strongest bond.
B. Adding Mass To The Solid Ceiling
Adding more drywall or sheetrock layers can act as absorption mass for an existing solid ceiling, thereby reducing sound and facilitating better sound insulation. This technique can yield desirable results for both impact and airborne noise, which is why most homeowners employ this method before moving on to others.
For this, start by building a wooden frame on the ceiling and use it as the base for installing sound isolation clips or resilient channels. Cover it with another layer of drywall. You can even use two layers if you need more sound isolation, as impact noise reduction requires more depth and mass than airborne.
2. Use Sound Damping Methods
You can add mass-loaded vinyl (MLV) panels or apply dampening materials like Green Glue compound to your drywall ceiling. However, both these methods work best when used in conjunction with multiple layers compared to a single layer of drywall.
You won’t have to remove the existing drywall ceiling for this, as you can apply both these materials on it following the manufacturer's instructions. After this, place another layer of drywall on top and screw it in place. Finish it off by sealing the boundaries of the attached drywalls with acoustic caulk such as AC95 for maximum sound reduction.
The Green Glue compound or MLV will fill the space between the two layers of the drywall to prevent the transmission of sound waves and reduce vibration. Subsequently, it will convert the sound waves into other forms of energy, like heat energy, and dissipate it uniformly to “kill off” the noise.
And both these methods can be used to stop the transfer of airborne and impact noise without altering the construction of the ceiling too much.
You can also add an additional (third) layer of drywall on top with the same damping compound in between the second and third layers if the noise reduction isn’t satisfactory. This means you will end up with a double layer of damping compound.
But keep in mind that increasing the layers will make the ceiling bulkier, taking up more space and making the room look smaller. Hence, this technique may not be very suitable for smaller rooms.
Building A Soundproofing Ceiling
If you’re building a home or renovating your home, then here are a few methods you can try for effective ceiling soundproofing. Note here that most of these techniques will require the expertise of a professional, so make sure you speak with your contractor in advance.
1. Enhancing An Ordinary Drywall Ceiling
Although I’m all for installing soundproofing drywall ceilings to prevent noise transfer, I know that they can be a costly affair. And I’ve seen many homeowners use cost-effective techniques to make such ceilings decently soundproof, especially for reducing airborne noise.
One of the easiest ways to do so is to install a sound insulation material like mineral wool insulation or fiberglass insulation in the ceiling space. The latter, in particular, can achieve satisfactory results when used in thick layers. Plus, it won’t cost as much as mineral wool insulation.
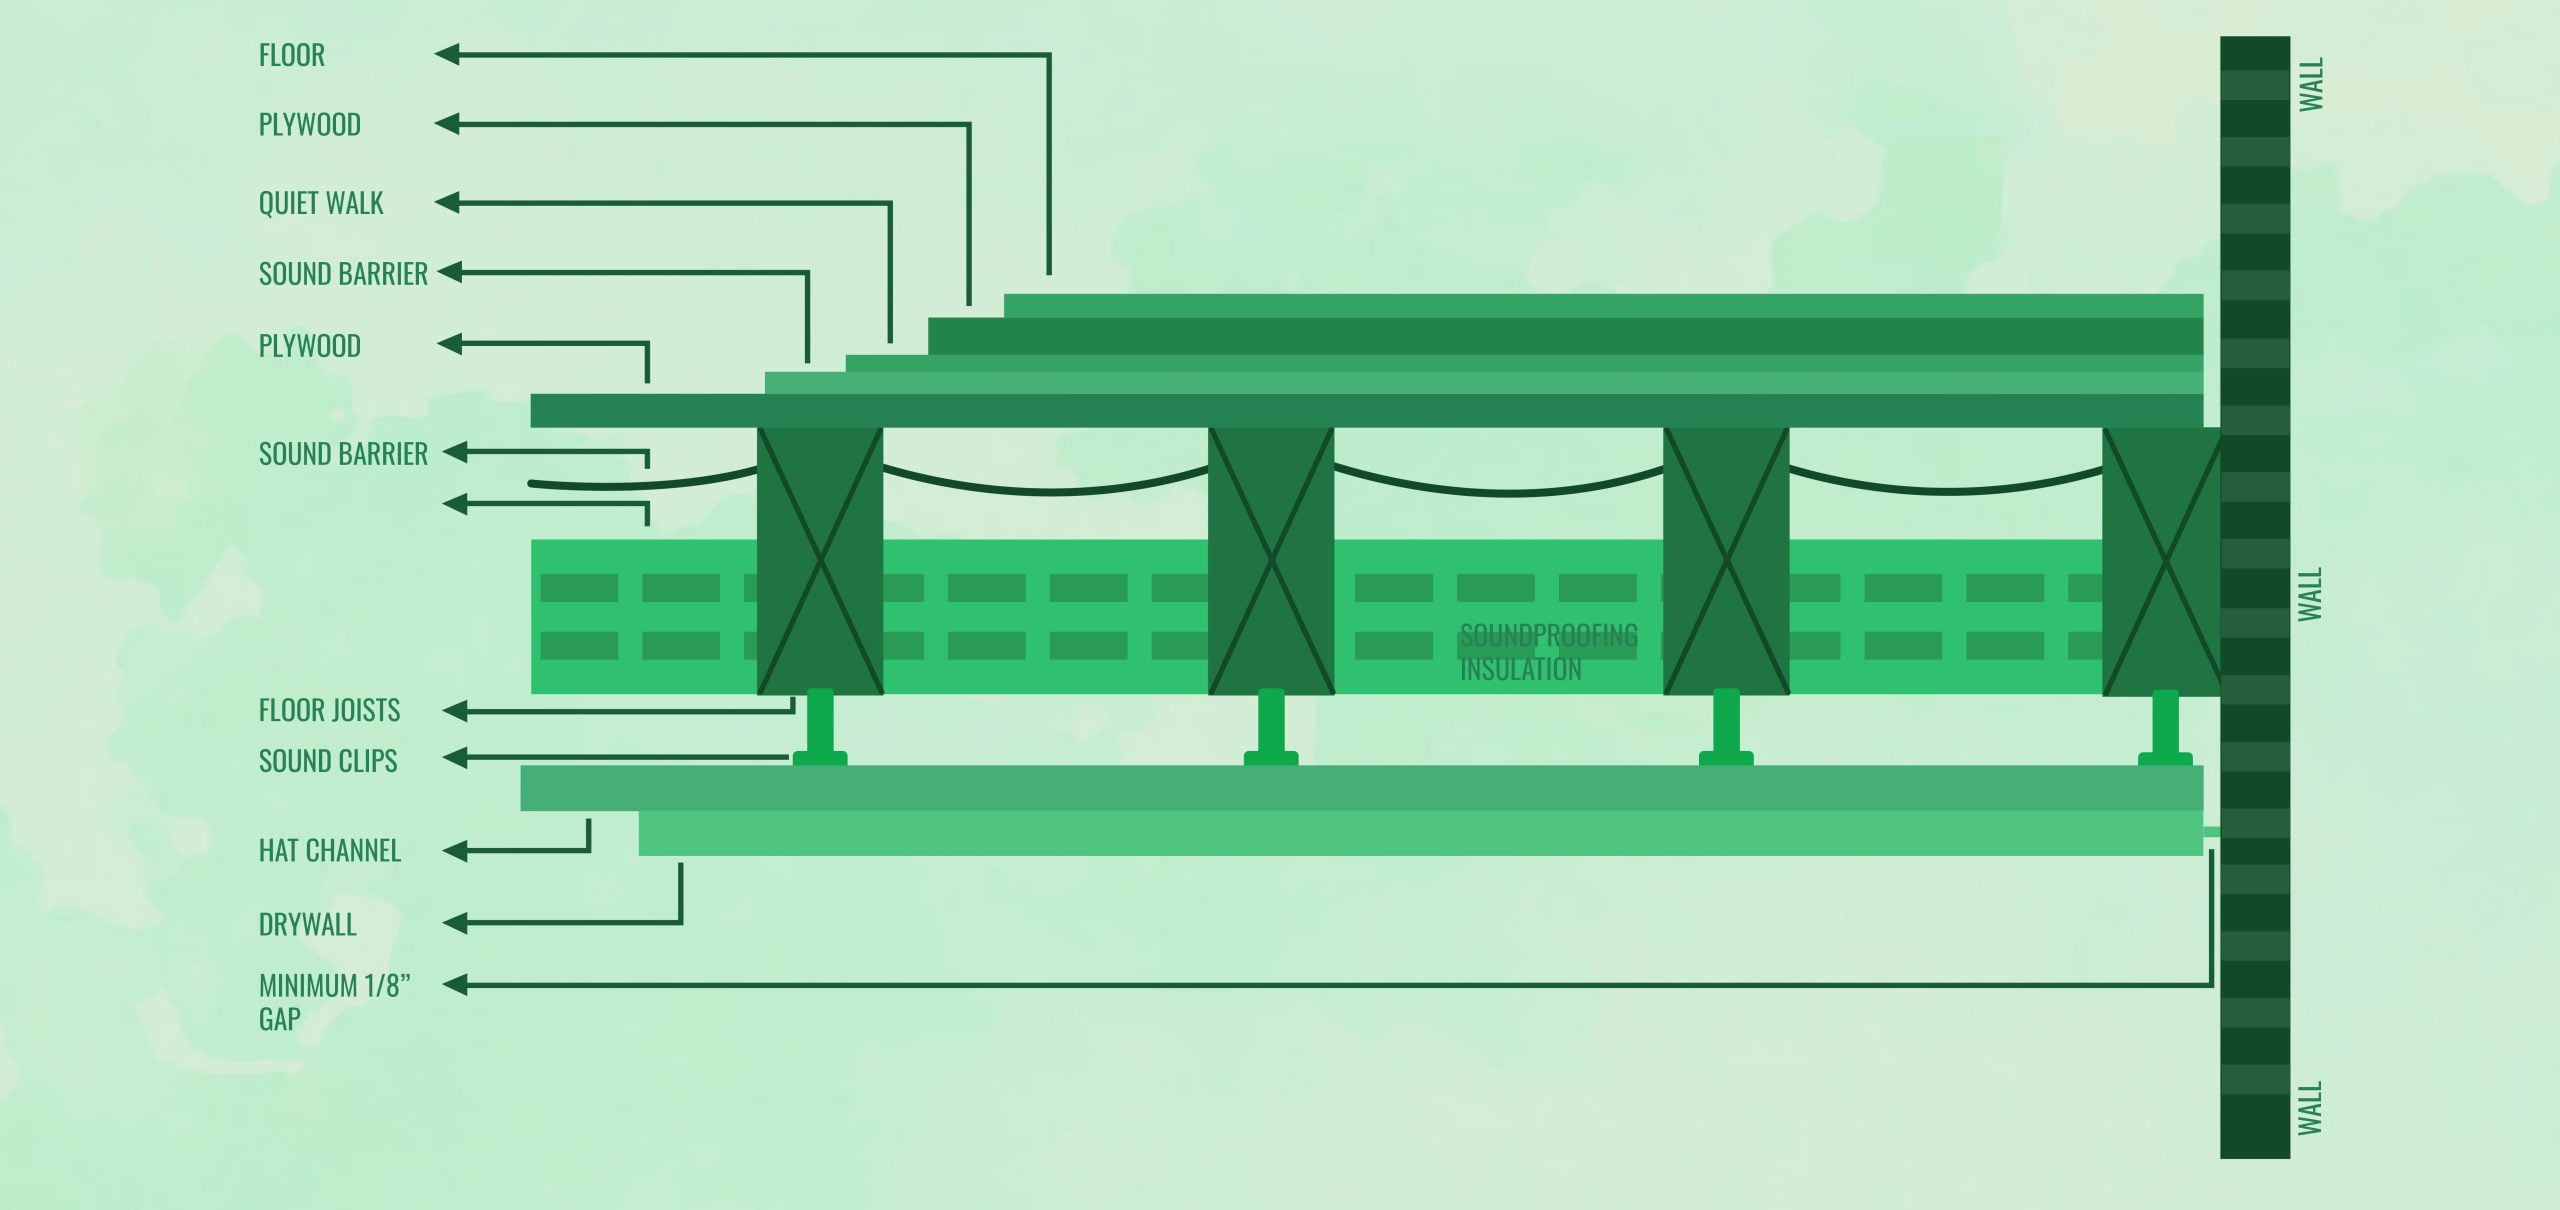
2. Installing A Decoupled Ceiling
A decoupled ceiling essentially involves installing a sound-insulated ceiling with a double layer of ⅝-inch drywall and a damping compound like Green Glue compound. This entire structure is installed using hat channels and high-resilience soundproofing clips.
However, the hat channels aren’t connected to the ceiling joists directly, as doing so can impact the ability of the structure to work properly. Instead, the hat channels are fixed using soundproofing clips, excluding the areas of the wall joists and drywall. For these areas, small screws are used every 10 inches apart to fix the drywall.
The contractors measure the total area covered by the wall joists and divide the hat channels into small pieces accordingly.
For the next step, the hat channels are positioned with the smaller ends pointing toward the joists and the bigger ends directed toward the floor. Then, the clips are used to attach the channels so that there’s no space between the attachments and the ceiling for sound transfer.
3. Attaching Floating Ceiling Joists
If you’re looking for a budget-friendly method to reduce impact noises transfer through a standard drywall ceiling, then floating ceiling joists may be the right solution. These constitute another way for designing a decoupled ceiling that’s fixed (and not hanging like a dropped ceiling).
Attaching floating joists requires the addition of a new joist between an existing pair of joists so that the former extends at least 2 inches below the latter. At the same time, an uncompressed sound-insulating material is used to stuff the gap between the pair of joists. And you’re done!
4. Soundproofing The Floor Above The Ceiling
Here’s an intensive technique to soundproof the floorabove the ceiling - start by removing the drywall ceiling above you to expose and remove the subfloor above it.
Next, apply a sound-damping material on the drywall layer and keep it aside. To prevent loudnoise transfer, I’d suggest preparing two layers of drywall with the sound-damping material placed between them for replacing the subfloor. You can use hat channels to install the newly prepared ceiling.
Aside from preventing airborne and impact noises, this method may be effective in reducing flanking sounds.
Some Other Tips
1. Check The Sound Transmission Class (STC) Rating
Whether you plan to soundproof your ceiling the DIY way or with the help of professionals, I’d strongly suggest figuring out the STC rating of the soundproofing materials you want to use. Simply put, this rating, measured in dB, will help you understand how effective the material is in preventing sound transfer.
The ideal STC rating range should be between 20 and 60 dB, with better ratings signifying better sound transfer prevention. You can also seek help from a professional to determine the anticipated complete STC rating of the completed soundproof ceiling. This way, you can change the technique or combine different soundproofing methods for the best results.
2. Replace The Duct Work
As I have mentioned earlier, drop ceilings leave too much space for accommodating fixtures and ductwork that transfer sound waves between the floor above and your ceiling. So, if feasible, try to replace the existing right ducting with flexible ducts or install affordable duct liners to help redirect the sound away from your ceiling.
3. Soundproof The Floor
You don’t need to employ invasive or expensive procedures for low-frequency noise transfer. If you can get access to the floor above you, try using simple hacks like placing a thick rubber rug with an anti-slip bottom to improve the sound absorption (acoustics) of the floor.
4. Seek Cooperation
No matter if you need to work on existing ceilings or build new ones, always make it a point to inform your upstairs neighbors about your plans. And apologize in advance for any inconvenience that may be caused in the process.
Ceiling Soundproofing Final Words
If you want to soundproof existing ceilings, I’d suggest starting with non-invasive techniques like adding acoustic tiles and adding extra layers to them. After all, why go through the hassle of tearing down a ceiling if you can soundproof it from the outside?
But if adding acoustic tiles or extra layers of drywall don’t work for you, it will be in your best interest to contact a professional for a hassle-free ceiling soundproofing experience. Besides, professional contractors will be aware of the building code regulations of your area, so you don’t have to worry about running into any legal trouble later.

 Reviewed by
Anton Giuroiu
Reviewed by
Anton Giuroiu