Expertises: Art, Pastel, Brush, Drawing, Pencil
Updated on

Inspiring Ideas for Modern Home
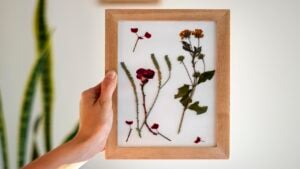
Framing is a cost-effective way of protecting a painting from external damage while adding a unique visual flair that complements it. With flush, recessed, or float mount frames, a painting can be hung on a gallery wall, ready to be viewed.

Leaving a painting exposed to the natural elements can damage it, causing its details to fade away and the paper to weaken.
One of the best ways to prevent this from happening and make your painting more presentable is to frame it. And by learning how to frame your own art, you won’t need to spend much money for professional framing. The services of a professional framer can be quite expensive, after all.
So, here’s how to frame your own art at home with basic supplies and a little practice.

Making art takes time and dedication, which is why most artists like their artwork to last as long as possible. Those familiar with watercolor painting know this well, as it tends to fade at an extremely rapid rate. Naturally, you would want to store the watercolor painting for future viewing.
But with custom framing, you won’t have to worry about losing your artwork to time. Frames made using acid-free materials can give your paintings a stable, unchanging environment where they can retain their beauty for the foreseeable future.
Simultaneously, you will enhance the visual interest of the painting and make it a part of your gallery wall. Certain frame materials lend themselves well to specific colors or paint textures, after all. For instance, you can use timber as a stand-in for card mounts when framing acrylic paintings.
Now, the gist of custom framing art is to use all the tools at your disposal to create a frame that will stand the test of time. The process itself is easy to follow, but it may require a few tries to get the hang of it properly.
And once you’re done making the frame, you will be inserting the painting in it and hanging the framed art to complement your gallery wall.
The materials you need can be broadly divided into two categories: supplies and tools. Each of these has a specific purpose that is critical to making the frame strong or visually appealing, so be sure to take note of these.
Wood is the most elementary part of the framing process and the most visually striking of all the supplies. Your choice of wood will determine the look and feel of the painting, so consider picking a type of timber that suits the artwork.
Tip
If you’re not sure about the type of wood that would fit the painting the best, consider visiting a local lumberyard. There, you can stack different pieces of wood, molding, and square dowels to find the preferred aesthetic.
Ordinary glue can’t hold wood well in the long run, so you will need glue made specifically for the purpose. Wood glue can be found fairly easily, so visit your local hardware store to purchase it.
Using wire brads or finishing nails becomes critical to holding your framed art and canvas stretcher together, particularly if the frame is of a thicker gauge. You can purchase these in a set online or purchase them separately from your local thrift store.
If you have a specific frame color in mind, then the wood texture alone won’t be enough to complete your frame. For this, you will need paint or wood stain to apply to the frame.
And like the choice of wood, you should think carefully about the visual synergy between the frame and the painting. That way, you won’t end up with a mismatched frame and artwork combination.
Paint or wood stain can be found in almost all hardware stores, online or offline, so feel free to purchase the shades you need.
To make the frame, you’ll naturally need to cut measured pieces of wood. This leaves splinters on the edges of the pieces of wood, which can both be dangerous and an eyesore.
Using sandpaper, you will be able to smooth those rough edges out and give the frame a cleaner appearance. Consider purchasing a set of sandpaper online or at your local hardware store.
You can opt for fiberglass, plexiglass, or no glass when framing a painting.
For acrylic paintings, in particular, you can choose not to add glass to your frame since it may detract from the inherent texture of the canvas. Of course, using no glass leaves your painting rather unprotected, which is far from ideal.
Both fiberglass and plexiglass are quite strong, and the choice between the two comes down to what you prefer. Something that plexiglass does offer over fiberglass is UV protection and extra durability.
You can find them on the market in glass stores or purchase them online. And to cut the glass of choice, you will need a glass cutter from a hardware store or online vendor.
Picture wire and metal d-ring hangers will help you hang your custom frames on the wall with a nail. You can find these at a craft store or charity shop quite easily.
For cutting wood into pieces, you will need a miter saw. A miter box saw serves the purpose perfectly, giving you precise cuts with little effort.
These are available on online marketplaces and offline hardware stores that specialize in wood craftsmanship.
You will be using a band clamp to keep the frame continuously steady when making the frame. Large hardware shops like Home Depot keep various clamps in stock for you to purchase.
Finishing nails need a hammer to attach them properly to the frame. If you don’t have one lying around already, you can simply visit the local utility store or flea market to pick one up.
You will need a tape measure or a ruler to measure both the artwork and the frame properly. Just like a hammer, you can find tape measures in most utility stores.
A box cutter or knife is not strictly necessary, as you only need one to size a mat properly. You can find one in a stationery or hardware store.

First off, you will need to ensure that the artwork is free of any blemishes, as they will be quite difficult to remove once framed. After all, taking the painting out once it has been framed will be a tedious process.
Simply use a clean cloth or brush to remove dust or dirt from the finished painting. After this, use the tape measure to find out the dimensions of the painting. This will allow you to gauge how much wood you will need for the frame.
Next, if your painting is on paper instead of a canvas, you may use a mat to make it appear more professional.
A mat, also known as passe-partout, is simply a thick piece of acid-free paper upon which your artwork will rest. It helps create a smooth transition between the frame and the painting, which can add to its overall aesthetics.
If you’re using one, you will need to size it according to the frame size. Note that the mat should be slightly larger than the painting for extra white space around your artwork. You can use a box cutter or a dedicated mat cutter for this. Alternatively, you can rely on a pre-cut mat for the same.
Once you’ve sized the mat board properly, you can set both the painting and the board aside for now.
Lastly, decide upon the type of mount you need, if any. There are three main mounting techniques: recessed mount, float mount, and flush mount.
The first of these is the traditional frame seen on older paintings, where the edge of the frame hangs slightly over the painting.
Next comes the float mount, the purpose of which is to add dimension to the painting through a gap between the canvas and the frame. These are notably difficult to build since creating the illusion of a floating picture is a complex task.
And lastly, there’s the flush mount, which is often seen in larger paintings. Here, the frame simply outlines the painting, with no additional overhangs or complex imagery.
Naturally, this is the least complex mounting technique, but it requires your painting to have some thickness to mount properly. And since this mounting technique is often used with canvases, you may not need a backing board for it at all.
Now that we’ve covered all the information about supplies, mounting techniques, mat boards, and tools, let’s start assembling the frame.
Frame assembly can be categorized into three main steps: cutting the wood pieces, joining them with an adhesive or nails, and sanding the frame. You may want to note that the difficulty of assembly is directly dependent on the type of mounting technique you choose.
For each of the following mounting techniques, you may want to use paint or wood stain right after cutting the required wood pieces. That way, you won’t have to worry about an uneven finish once the frame has been assembled.
Let’s go over the assembly process for the three mounting techniques.
This is where the painting measurements come into play. Using a miter box saw, cut the wood into long pieces according to the measurements of your painting, and sand the rough edges down. Consider using a pencil to mark where you need to cut the timber.
Flush mounts attach directly to the canvas, so you will need to align the pieces with your painting. All you need to do now is double-check to see they are aligned properly and stick them together using glue or nails.
Tip
If your painting is particularly large and heavy, you can use both glue and nails for a more robust finish.
Recessed frames hang over the painting, requiring you to cut wood pieces as edge pieces. These edge pieces will be located on the outside, the middle, the inside, and the top.
Their sizes are as listed below:
Based on the painting dimensions, you can vary their lengths as needed.
Use glue to stick the middle and inside edge pieces together, with clamps holding them, and let them dry. Next, attach the top piece that juts out a little more than both the pieces below it. This is the part that will hang over your artwork.
Repeat this for each of the four sides of your painting and wait for the glue to dry.
Before you assemble the pieces of wood, you may want to leave about an eighth of an inch as a buffer space. By doing so, you’ll ensure that measurement mistakes don’t take you back to square one.
Next, let’s frame the painting and get it ready for display. First, start by arranging the frame without glue to see how the pieces fit with the painting. It’s best to ensure that everything fits in nicely, and if it doesn’t, you can make adjustments as necessary.
Once you’ve ascertained the positions, remove the painting and begin the assembly. Start by attaching the pieces together using glue and nails. Once they have dried, flip the frame over to place the remaining elements.
Next, place the glass sheet in, followed by the painting and the mat board. Ensure that they sit in as tightly as possible before attaching the mat board to the frame with finishing nails. Staples work just as well if your mat board is thin.
Make sure that the different elements don’t move inside the frame at all before you decide to pick it up. After all, a broken frame after working so hard for so long is a devastating feeling. Once you’ve assured that everything is in order, you can finish the assembly by attaching a hook to the top of the painting.
And with that, your recessed mount frame is ready to be put up on the gallery wall!
For a float mount frame, you will need a ½ x 2-inch wood, along with a ½-inch square dowel. You can swap the latter out with a ½ x 1-inch lumber instead, as per your preference.
Start by sticking the bottom of the frame to the side piece and use clamps to hold them in place. Take care not to let any excess glue remain on the frame!
Leave about a quarter of an inch as error space, and cut the pieces as necessary. Now, you will need to arrange a dry fit using the frame, the painting, and the mat board or the canvas. Should the pieces not align properly, make adjustments as necessary.
Once that is done, the float mount will be ready for assembly. Using the same process as with the recessed frame, ensure that the wooden pieces are stuck well enough.
After that, it’s time to assemble the float mount. Lay your artwork into the frame and align it so that all the gaps inside are evenly spaced. It can take a while to place it right, so keep at it! Once you’re sufficiently satisfied with its placement, clamp it into place using an ordinary clamp.
Next, flip the frame over and nail the backing board or canvas stretcher into place. Ensure that the nails don’t penetrate the float space! Place the nails carefully before you drive them in.
And lastly, add a hook to the top of your frame to make it ready for display.
The choice of frame for each artwork will vary, especially if your technique leans in a specific direction. Recessed and flush mount frames suit traditional paintings, while contemporary styles are complemented well by float mounts. Another thing that matters when framing a piece of artwork is the overall visual style. Classical subject matter pairs well with gold-leafed or dark wood frames, while abstract and modern styles look better with plain frames. Old-style paintings benefit from a vintage frame, while contemporary styles require a different approach. Contemporary styles often use thin borders as their frames to put as much emphasis on the painting as possible. Some prefer off-white or white frames to remove as much attention from the frame as possible. The primary purpose of a mat board is to protect the painting from external harm. Unframed art pieces allow viewers to interact with the art piece without touching the artwork itself. Additionally, mat boards are an important part of the aesthetics of any picture. They can hide away hinges, art edges, or corner pockets that will be visible otherwise and detract from the overall quality of the painting. Framing isn’t limited by size. You can frame any unique-sized art, but the difficulty of doing so will increase with size. This is because both the weight and creation complexity of the frame will increase with size. And that’s where custom framing is more advantageous than ready-made frames. With custom frame art, you have more freedom to size the frame to fit the artwork perfectly. You don’t need to cut corners by doing so, allowing you to keep the artwork completely intact. Here are a few tips to protect your framed artwork from damage: Dry mounting is a process that permanently affixes artwork to the backing board. This involves the use of high heat and pressure to seal the edges of the frame, essentially preserving it for a long time. Something worth noting is that the process may damage the artwork while being exposed to heat and pressure. So, consider doing so for replaceable artwork, photograph, poster, or art prints over a precious piece when dry mounting.FAQs Related To Art Framing
What kind of frame should I choose for my artwork?Why do I need a mat board?Can I frame a non-standard-sized artwork?How can I protect my framed artwork from damage?
What is dry mounting?
Framing your art is the first step to ensuring that all the intricately painted details remain pristine for a while. It’s an important step for any artist practicing classical artistic methods.
Something to note about custom framing is that the do-it-yourself process can be lengthy, especially for recessed and float mounts. Though the construction may seem complicated at first glance, by repeatedly performing them, you will be able to create new frames at a rapid pace.
After you’re done making a frame, use a picture cord or two d-ring hangers to hang art frames on the wall. With that, your watercolor painting ideas will be preserved to be viewed in your ever-growing collection.