Expertises: Architecture, Design, Art, Home improvement, Painting
Updated on

Inspiring Ideas for Modern Home
A dovetail is a strong and reliable joinery technique that can be cut by hand or with a router jig. Manually cutting it involves marking the wood, cutting the lines, and then trimming the cuts on both the pin and tail boards before assembly. With a router jig, you’ll need to set up the jig and the router first and then cut the wood.

Joinery techniques like dovetails are crucial in any woodworking task, for they help to create complex furniture items.
On that note, you can create dovetail joints by hand or with the help of a routing tool, like a trim router or handheld router. Unfortunately, creating such a joint may feel a bit complicated for beginners, which is why we have made this guide that discusses the process of creating dovetails.
Read on to learn more!
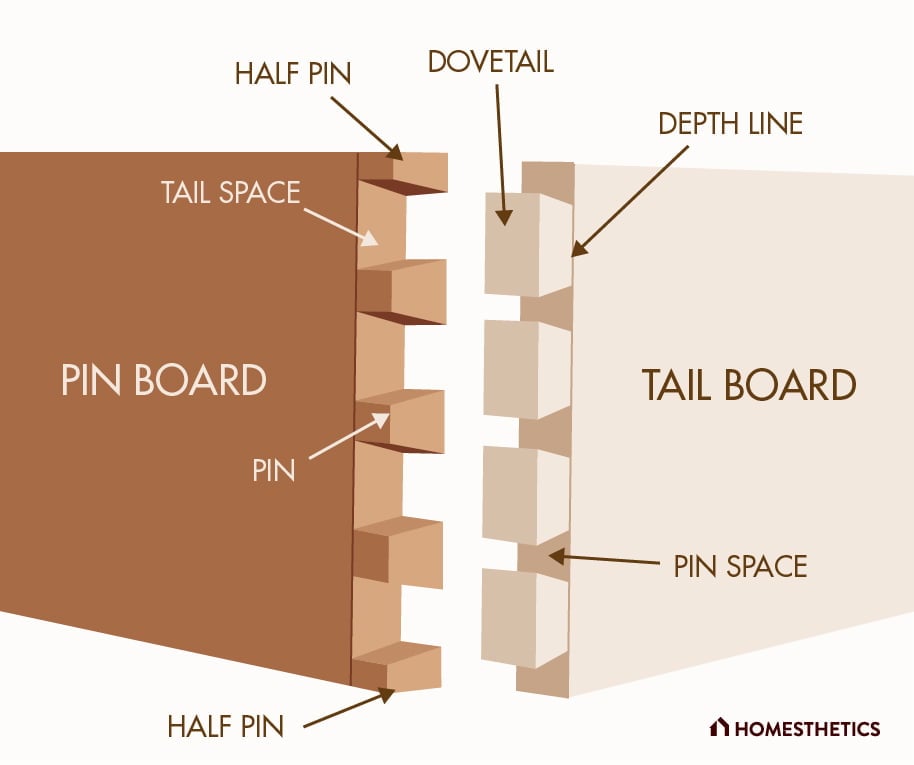
Before we get into the meat of the topic, let’s briefly discuss what dovetail joints are. For those of you who are new to woodworking, the dovetail is a joinery technique that has been used in woodworking for a long time. This traditional joining technique helps in connecting two or more wooden surfaces together using interlocking elements cut into the wooden surface.
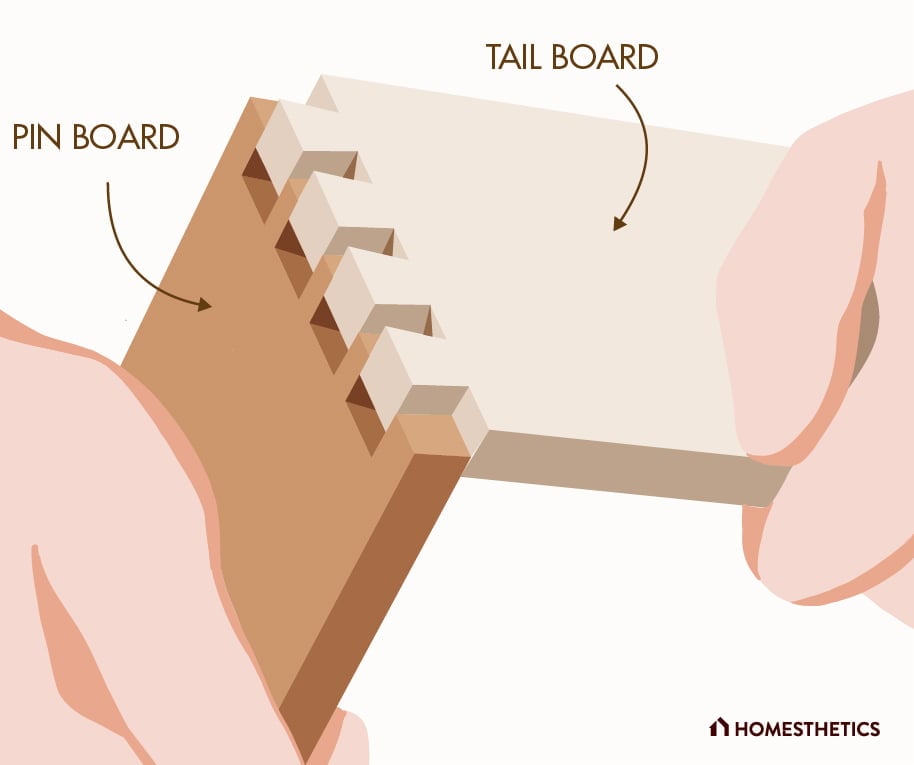
To be more precise, the woodworker creates a series of extended pins on the edge of one wooden board. On the other hand, a series of ridges or “tails” are created on the edge of another wooden board. These pins and tails are then interlocked to create the dovetail joint.
The pin and tail of a dovetail joint are shaped like trapezoids, and once they are put together, they do not come apart easily. Also, after it is glued together with adhesive, the joint requires no extra mechanical fasteners like nails or screws. The high tensile strength of the joint helps to secure it firmly in place and prevents it from breaking.
As we have mentioned before, the dovetail joint requires the woodworker to create trapezoidal pins and tails on the edge of a wooden board. Traditionally, these features are created on the face of a wooden board by hand using tools like saws and chisels.
Many woodworkers these days find using such manual tools to be dangerous and time-consuming. So, they prefer to use a router jig tool, which is more convenient by comparison. Drawing from experience, we can say that using router jigs is a much faster way to create dovetails than manual methods.
However, it comes with its own complexities since you need to use specialized tools in this case. If you are not well-versed with these tools, the dovetail joint will not be a satisfactory one. That is why we have discussed how you can create a dovetail joint using a router jig in a subsequent section.
For good measure, we have also discussed how to cut dovetail joints by hand here. You can create different types of dovetails using these two methods, such as single-lap and double-lap dovetails, through dovetail joints, and secret miter dovetail joints, among others. We have discussed these types in a later section, too.
First, let’s discuss how you can hand-cut a dovetail joint. For those who like simplicity, the manual approach is obviously better, provided that the process is performed correctly. You can follow the procedure we have mentioned below to hand-cut dovetails easily.
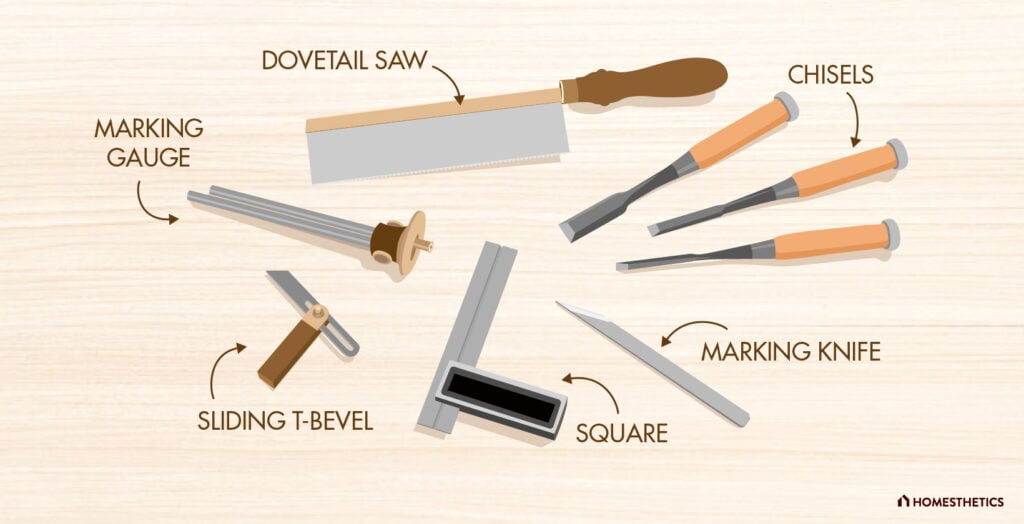
Collecting the necessary tools is the first step to hand-cutting a dovetail. In order to complete the task smoothly, you need to keep the following tools at hand:
Once you have gathered all of the above items, you can get started with the woodworking task.
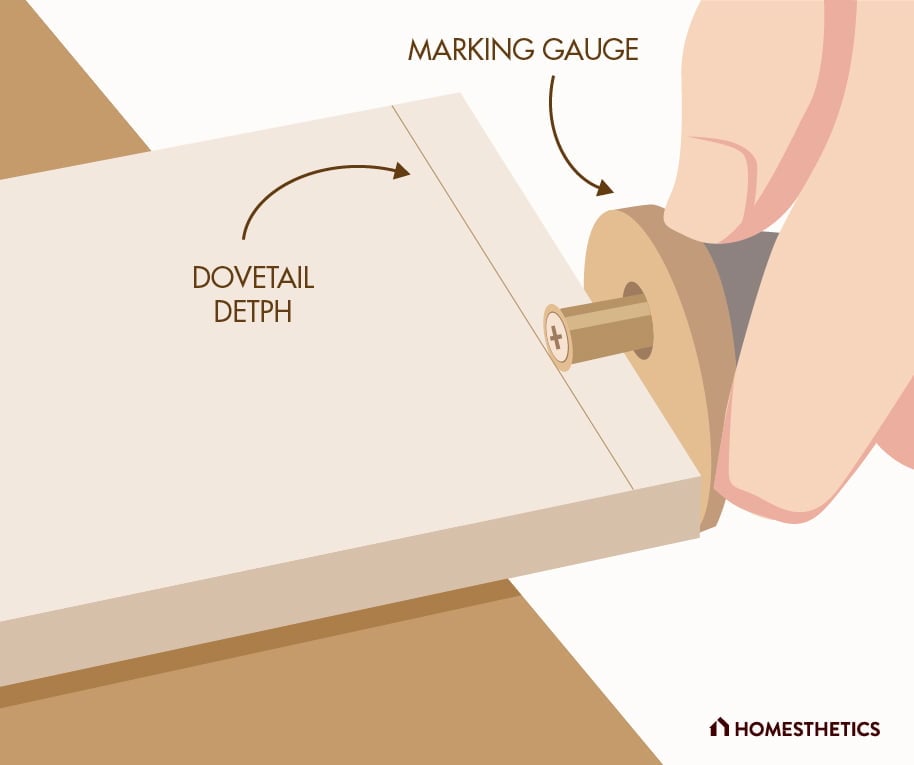
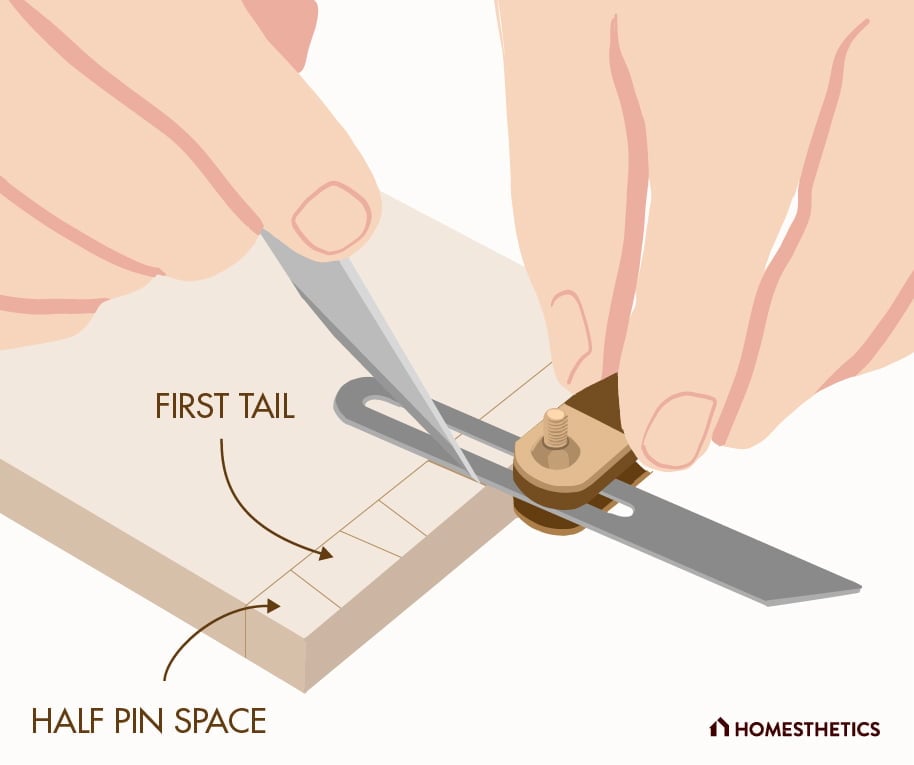
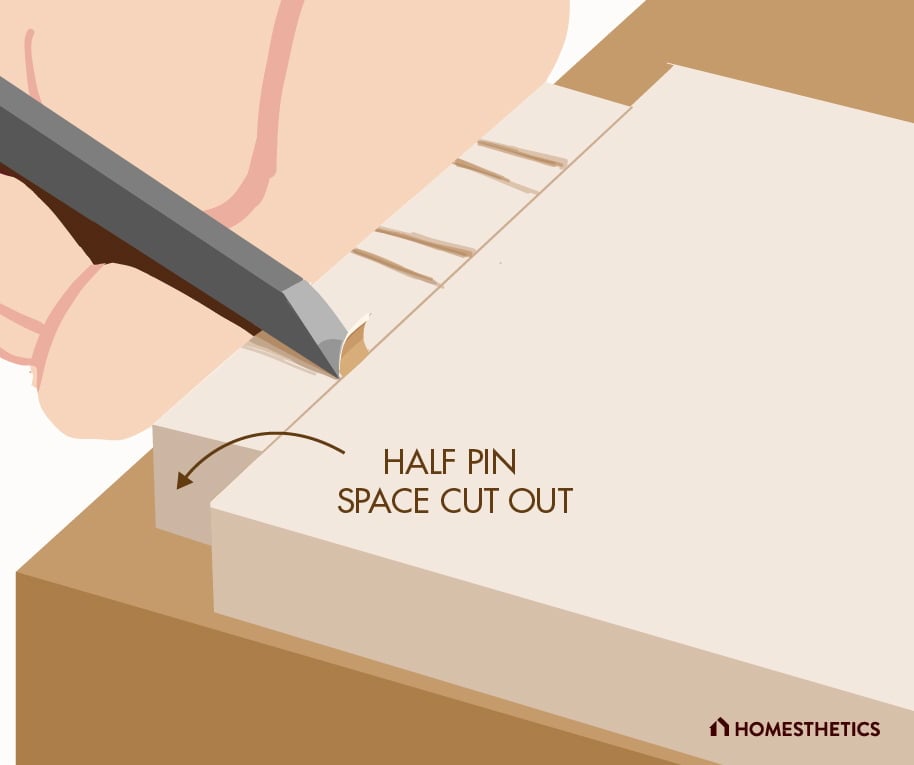
Using the marking gauge, mark the depth of the dovetail on the wooden piece. Then, using the sliding T-bevel and a marking knife, lay out the lines and angles of the dovetail. Also, make sure to mark half pins on the two side edges of the pinboard. After that, extend the lines across the edge and to the other face of the board using a square.

Now, you need to cut the board according to the marked lines using a dovetail saw. Make sure to cut the lines up to the depth line, and then chisel out the pin boards carefully. After that, you will need to chop off the wooden pieces from both sides.
In this step, you need to pare the cuts made on the board using a chisel. Clamp the wooden board and carefully trim the inner edges of the cuts to ensure a smooth attachment surface.
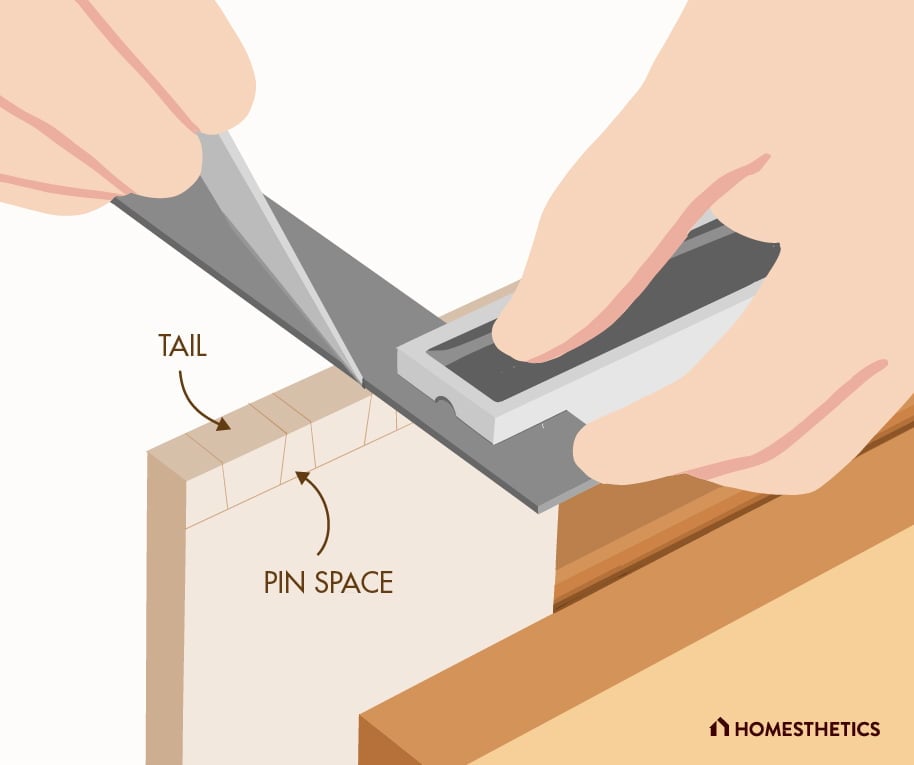
Now that you have cut one board, you can use it to mark the lines on the other one. For this purpose, place the cut board on the edge of the second one and mark the lines and angles on its surface using a knife. This is to ensure that the tails and pins on both boards complement each other.
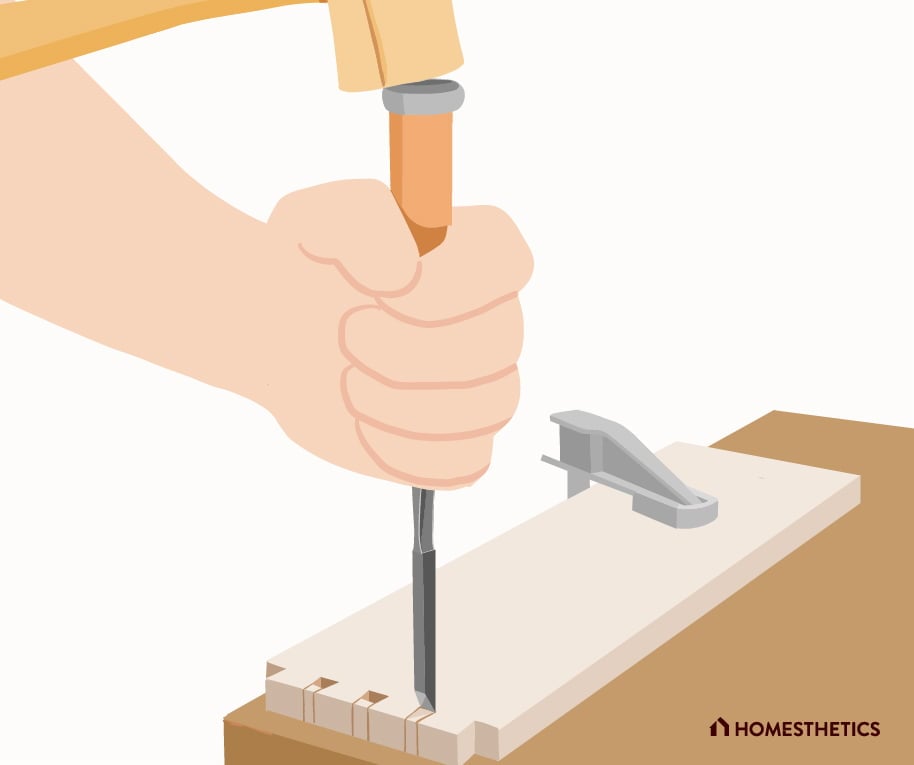
Next, you need to follow a similar procedure as mentioned in step three for cutting along the lines and then chopping the wooden pieces from the board. Then, you need to trim the cut using a chisel, as we have done in step four.
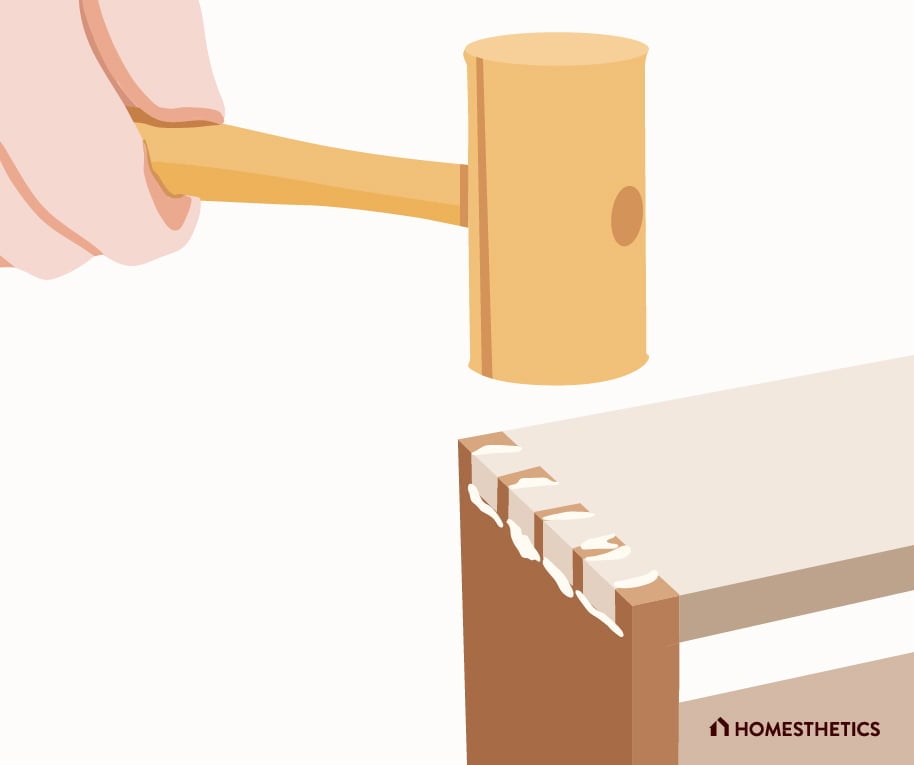
Here, you need to test joints to see if they are a good fit. If you are not experienced, you will likely get a tight fit or a loose fit on the first try, which is completely normal.
You can do some fine-tuning by trimming the cut edges further. When you achieve the perfect fit, you only need to lightly tap the boards with a mallet to interlock the pins and tails.
In this step, you have to apply glue to the joint and assemble the wooden boards. Once that is done, you can apply the finishing touches by sanding the joint.
Warning: Avoid using too much glue on the surface as that can block the joints, making it difficult to attach the boards.
Now, let’s talk about how you can create dovetail joints using a wood router and a jig. You can use a regular router or a trim router for this task. Also, make sure that the router jig is suitable for making dovetail joints. If you don’t use the right jig, then the cuts will not be consistent.
Furthermore, it is important to get a good router table for this task since that ensures a stable and supportive working surface. Apart from that, you need a few other tools like cutting guides and clamps to get started.
Once you get the above items, you can follow the procedure we have mentioned below.
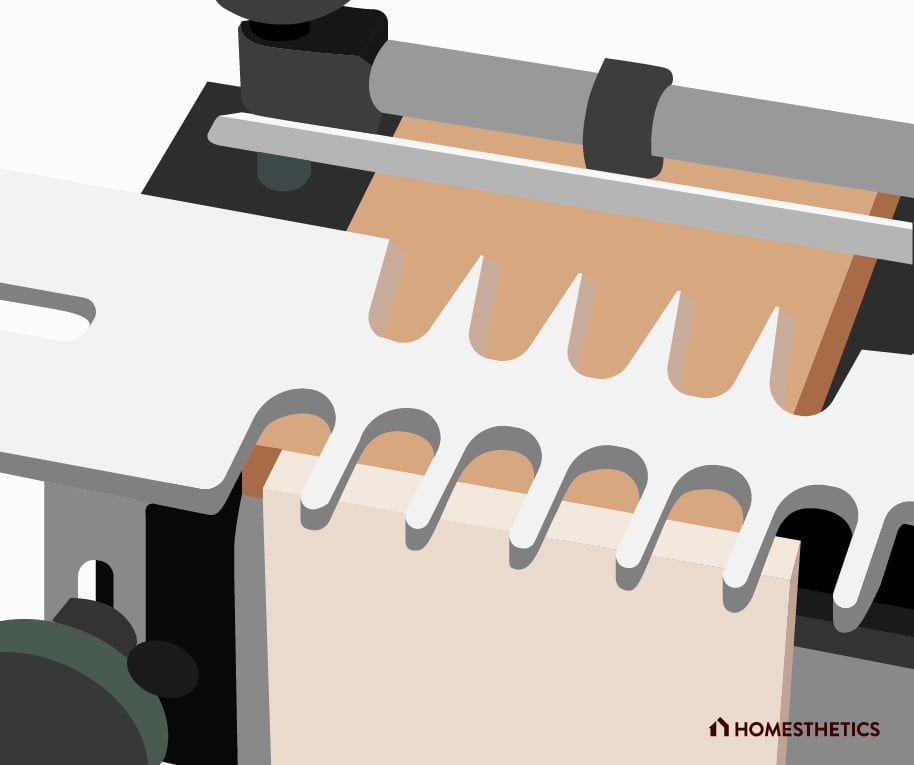
The first step is to set up the dovetail jig for the router, which can often be a complex and time-consuming task. You need to ensure that the jig is properly aligned and adjusted so that it can cut the joint accurately.
We strongly recommend you go through the setup instructions for the dovetail cutter jig before using it. Also, use tools like calipers to fine-tune the orientation and positioning of the jig.

Next, you will need to configure the router for the cutting task. You will need to select the proper router bit for the process, as that will ensure the consistency of the cuts. Then, you have to adjust the cutting depth of the router according to your preferences.
Here, you will need to mark the thickness of the tail boards and the pin boards using a square and a woodworking knife. For the best results, ensure consistency between the thickness of both boards.

Now that you have marked the wooden surface and set up the jig and the router, you can finally start cutting dovetails. Place the guide at the bottom of the router and simply move the tool in and out according to the metal guide. If your jig comes with guide bushings, then make sure to use those, as they can make the process easier.
On that note, a beginner is likely to make mistakes on the first try. That is why we would suggest performing some test cuts as practice before beginning the task. Based on our personal trials, we can say that this can considerably reduce the chance of mistakes and errors. So, once you are satisfied with the test cut, you can start making actual cuts on the wooden workpiece.
When you start cutting the wooden workpiece, make sure to cut the tailboard first. Once you have cut out the tails, you will need to mark the positions of the tail sockets on the pinboard. Make sure that the positions are consistent with the thickness that you marked earlier.
Following that, switch to the router’s pin-cutting bit and flip the metal guide to cut the pins. Then, move the router jig along the fingers of the metal guide to create the pin grooves.
After you cut the tail and pin boards, you will need to test whether they fit well. If it is a perfect fit, it will slide in easily, requiring only a few light hits from a mallet. But if that’s not the case, then further trimming and adjustment will be necessary.
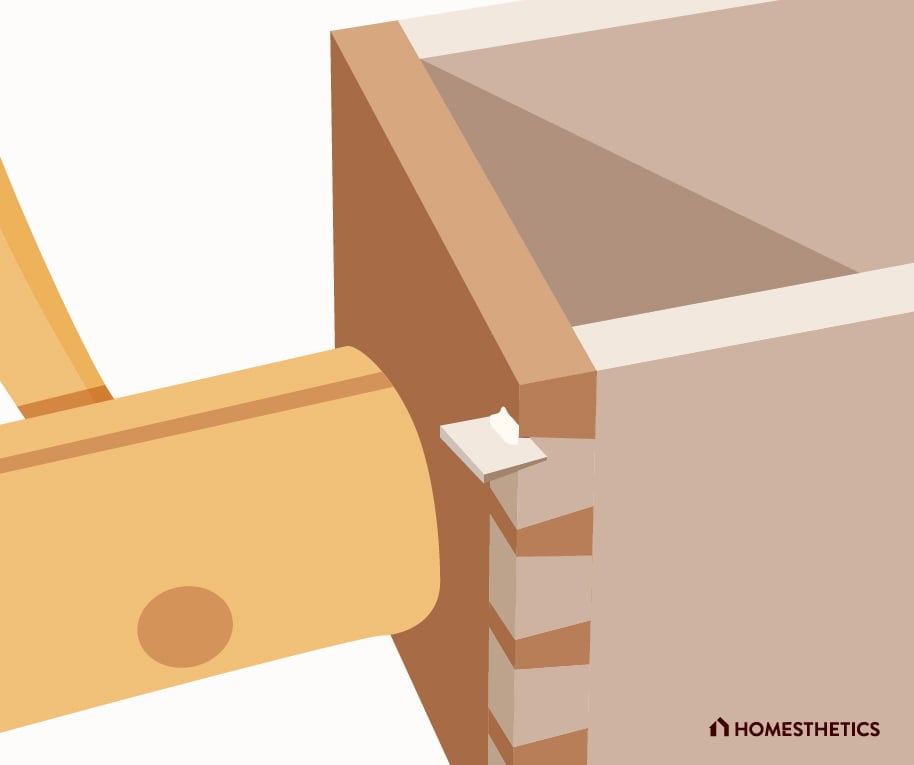
Once you are satisfied with the fit, you can assemble the joint by applying wood glue. Allow the adhesive to settle for a while, and then finish off by sanding the joint.
When creating a dovetail joint, it is important to determine its type since that decides the wood router and jig you need to use. On that note, there are different types of dovetail joints, such as:

The through dovetail joint is one of the most common types that is used by woodworkers today. Commonly known as the plain dovetail, it is the simplest dovetail joint that you can create. Here, the end grains for both wooden boards are visible. And while it is not necessary, many woodworkers prefer to cover up the wooden interlocking to protect it from wear.

Single-lap dovetail joints are commonly used for furniture items like drawers. In this case, the end grain of the joint is not visible from the front since the tails are placed inside sockets at the end of the board. Because of such a design, these joints are otherwise referred to as half-blind dovetails.

The secret miter dovetail joint is commonly referred to as the mitered dovetail joint or full-blind dovetail joint. That’s because the end grains of both boards are concealed from view. It is a bit difficult to create but is incredibly sturdy. As such, the secret miter dovetail joint is commonly used in heavy-duty cabinets and boxes.

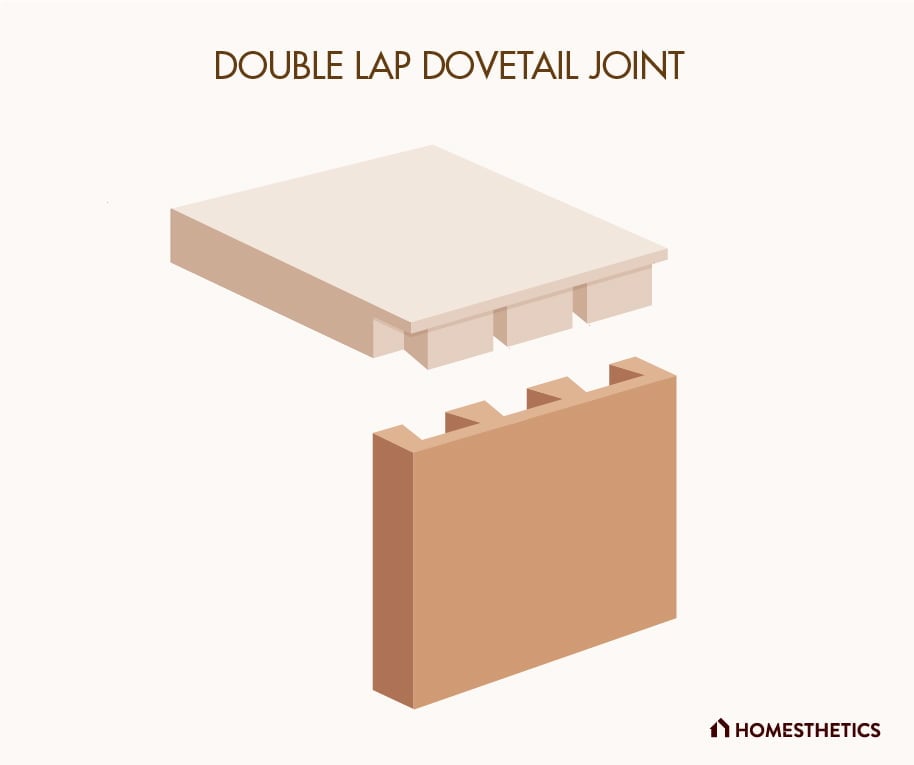
Alternatively known as the full-lap dovetails, these joints are very similar in design to the secret miter dovetail joints. But instead of concealing the entire joint, the double-lapped dovetail has a thin section of end grain on one of the edges. It is slightly easier to make than a secret-mitered dovetail.

The sliding dovetail joint is another popular type used by woodworkers. Such a dovetail joint is not placed at the edge of the board. Rather, it is placed within the field of one board, where the second piece is slotted in to assemble the joint. As a result, sliding dovetails usually do not require any chemical adhesive, making them easier to create.
How to use a router jig is something that many DIY woodworkers don't know based on our findings, even though they know how to use a tool like a trim router. That is why we have discussed how you can use a router jig properly in this section.
A router jig is a useful woodworking tool that is used to rout or hollow out a wooden surface for creating joinery, making custom moldings, and performing other woodworking tasks. With that in mind, the first thing you need to keep in mind is the compatibility of the jig.
Typically, a router jig will only be compatible with a particular type or brand of router. For instance, if you are using a handheld router, you cannot use a trim router jig with it. Instead, you will need to use a jig that is compatible with handheld models.
In that context, there are some brands that make versatile routers that are compatible with most common router types. Ideally, we suggest getting dovetail jigs from brands like Leigh Industries or Porter Cable since they come with detailed instructions for cutting pin boards and tail boards.
Speaking of instructions, you will need to go through the usage guide provided with the jig carefully. That way, you will get a clear idea about things like thicknesses and material types that can be used with the jig. In this regard, most router jigs should be used with a guide bush, which helps you to get better control over the cutting process.
The type of joint should also be considered when choosing a suitable jig since there are different types of jigs that can be used to create different joints. So, to create a dovetail joint, you will need a dovetail jig.
A dovetail joint is undoubtedly one of the strongest types of woodworking joints. Thanks to this aspect, you can create sturdy furniture items like a drawer, cabinets, storage boxes, and others.
With the guide we have presented here, you will be able to craft a hand-made or a router dovetail joint easily. And with enough practice, you will be able to craft some of the more complex joints, such as the secret miter and the double lap dovetails.
In this regard, we advise you not to rush through the process since that can create unnecessary complications. Make sure to invest enough time in cutting the joint, which will ultimately reduce the chances of error.