Expertises: Architecture, Design, Art, Home improvement, Painting
Updated on
Inspiring Ideas for Modern Home
The basic operation of wood routers is fairly straightforward, requiring users to understand feed and speed settings, feeding techniques, the importance of making small passes, and more. By employing advanced routing methods and avoiding common pitfalls, woodworkers can continue to use this power tool to great effect.

Wood routers are among the most versatile tools in a woodworker’s arsenal, making it important to delve into their workings and routing techniques.
Routers are employed for hollowing out specific areas in materials such as wood and plastic, creating channels or routes with a motor. Their versatility stems from the various routing techniques that can be executed using these machines.
In this comprehensive guide, we will explore router tips for beginners, maintenance, advanced routing techniques, pitfalls to avoid, and how to upgrade the machine.
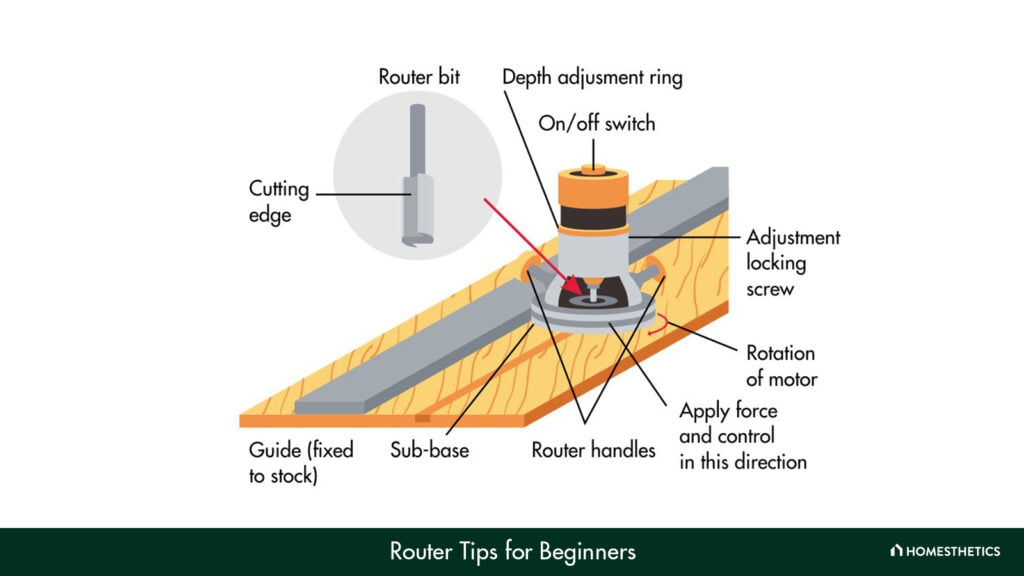
A wood router is a tool that consists of a rotating blade that protrudes from a flat base, which can rout more material effectively. The power tool draws its power from a motor, which can either be of the electric or pneumatic variety.
Carpenters and woodworkers can use a router to shape their workpieces to the precise degree that they desire and create smooth decorative edges and corners. Moreover, it can be used for carving out cut patterns and adding channels to slot in other pieces of wood. Thus, it can be used for both the creation and the finishing phases of a woodworking project, providing the user with a high degree of flexibility.
Of course, there are several types of routers that are made specifically to tackle a particular phase of a project better than others. While their basic function remains the same, certain design elements elevate their performance in a particular way. Plunge routers, combination routers, variable-speed routers, CNC wood routers, electric router, and laminate trim router tools are just a few examples of these router tools.
Modern wood routers, such as those made by Bosch and DeWalt, are a direct upgrade to the manual routing tool known as the router plane. In basic terms, these tools share the same working philosophy, as a router plane includes a wide base with a small blade protruding from it.
Being such a versatile tool, there are plenty of elements in a wood router that you must be aware of. Getting familiar with basic techniques such as feeding, speed settings, routing passes, and more can help you get started with routing quickly.
So, let’s look at the basics of router operation and a few tips to make your initial experience with the tool less daunting.
A critical consideration of the machine providing you with the desired finish is the rate of chips produced during the routing process. If the produced chip load is too small, the router bits being used will become duller too quickly. Conversely, an excessively high chip load creates a poor surface finish and may even cause damage to the router bit.
Managing chip load is a matter of optimizing the feed and speed settings of your wood router. By using the correct settings, you can control the chip load and keep your router bits intact for a long time.
Note that measuring the precise speed of the router bit can be rather difficult, which is why it’s usually better to measure it in RPM instead. With that in mind, use the following table as your guide to the most optimal router bit speed settings.
| Router Bit Diameter | Maximum RPM (+/- 10%) |
|---|---|
| Up to 1 inch | 22,000 |
| 1 to 2 inches | 20,000 |
| 2 to 2.5 inches | 18,000 |
| 3 to 3.5 inches | 10,000 |
Tip
If you do need the exact measurement of speed, you can calculate it using the following formula:
Router Bit Speed = Router Bit Circumference x Bit RPM
This will net you a result in inches-per-minute, which can be converted to miles-per-hour by multiplying the result with 60/63360 or 0.000946.
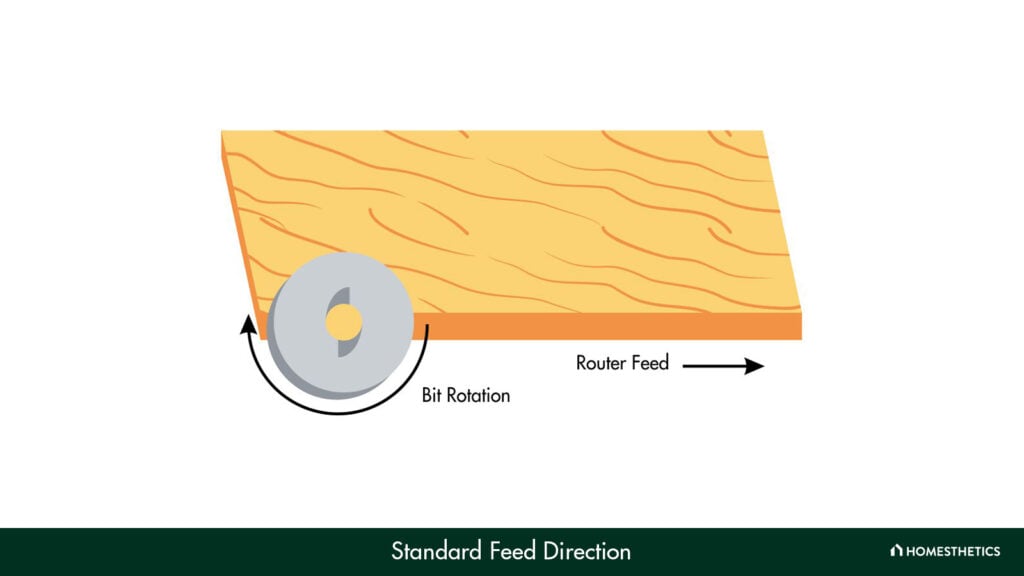
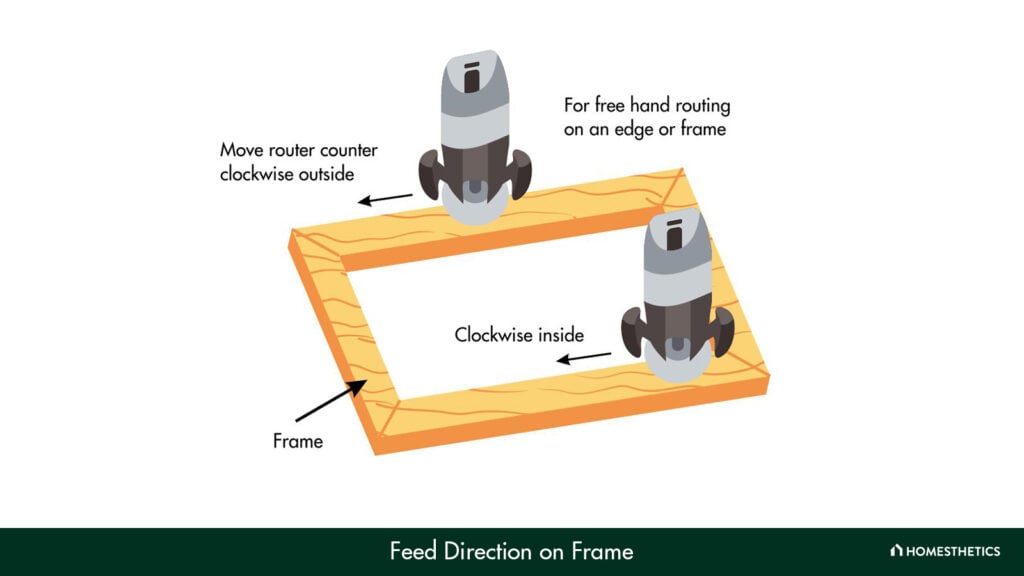
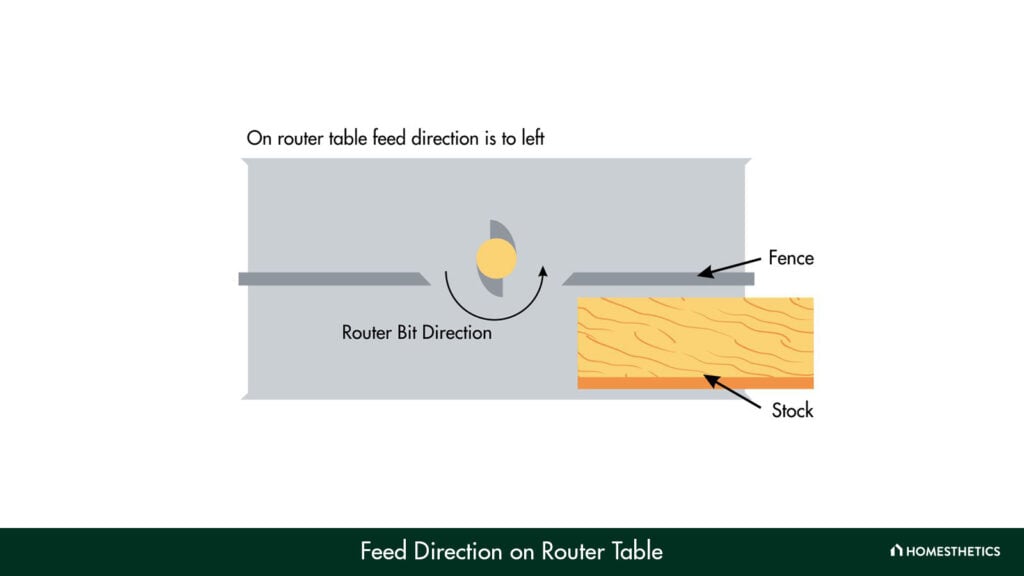
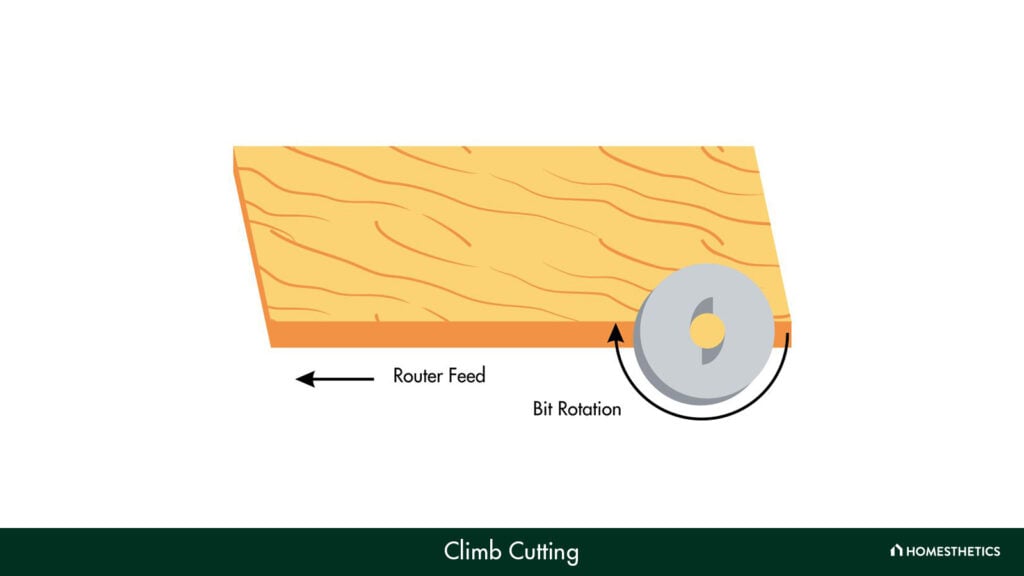
As a general rule, it’s always best to feed your workpiece in the direction that is on the opposite side of the spinning bit. This technique prevents the material from being forced or shot out, causing loss of control over the piece.
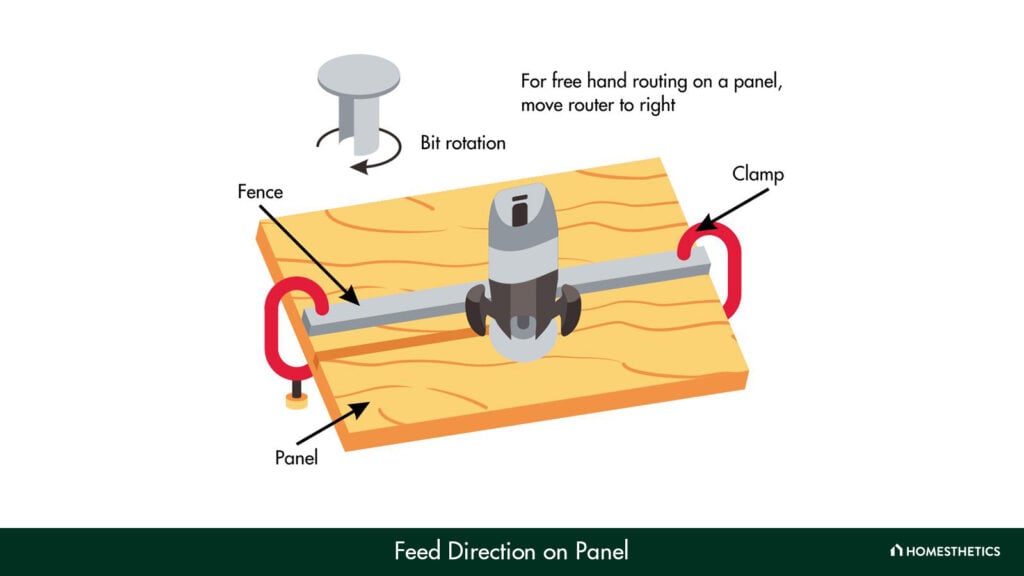
To find out the right feeding direction, you can use the right-hand technique. Curl your fingers and have your thumb stick out. Now, your thumb will either point upward for a router table or downward for a handheld router.
Adjust the position of your hand so that the curled fingers face the same direction as the cutting bit. Based on the position of your fingers, you can determine the spinning bit direction. And with that knowledge, you should be able to feed the workpiece through the blades without any issues.
Of course, keep the machine powered down while you determine the feeding router direction for safety.
A good rule to follow when routing is to refrain from cutting more than half of the width of the bit you are using. So, for ½-inch bits, you should not cut more than ¼-inch of the material with each pass.
Single large passes are almost always inferior to multiple small passes when it comes to cutting quality. Multiple cutting passes are safer and provide better results while ensuring that your bits don’t wear off as easily. Moreover, one pass causes the ability to make accurate cuts to suffer as well, as it is much more likely for the router to cut more than desired.
Lastly, small passes reduce the chances of kickback drastically, preventing your workpiece from harming you or the machine by the time you make the final pass or rotation. Needless to say, small pass routing is simply the better option.
A wood router depth stop has an adjustable rod and a rotating turret, which enable you to adjust the cutting depth of the router bit sticks. You can approach adjusting depth stops in one of two ways, as detailed below.
To cut a ¾-inch deep mortise and tenon using a plunge router, you can adjust the depth stop in the following way:
For making a cut that isn’t at ¼-inch intervals, follow these steps.
Using a starting ramp is always advisable, particularly if you are using the machine for pattern routing. Its role is to provide the router bit with a safe place to come into contact with the template before it can begin cutting.
Consider adding an exit ramp on the other end of the template for a safe exit as well.
While having a selection of router bits can be a good thing for advanced woodworkers, it’s not necessarily always so, particularly for beginners. There are a few varieties of router bits that can help you finish any project without any issues, eliminating the need for specialized router bits.
Additionally, let’s go over a few tips to maintain router bits and keep them working for a long while.
As far as the basic router bits go, there are eleven bits that you can rely on without any hesitation, grouped into three types. These router bits can cover nearly every carpentry need, making them a vital part of your woodworking arsenal.
Here are the three types of router bits, along with a brief glance at the eleven router bits.
The primary function of grooving bits is to help you create grooves, and the type of grooves they create is based on the bit tips. You can use straight bits for basic square-shaped grooves or V-groove bits for creating V-shaped profiles.
Primarily meant for creating notches into a material for durable joints, joinery bits can be a crucial part of your bit collection. These include the following sharp bits:
Edge-forming bits are designed to be able to sculpt the edges of the material, making them a useful tool for all carpenters and workshop owners. These include the following bits:
Creating smooth and chip-free cuts with regular bits can be a bit of a challenge. To overcome this challenge, you can consider using a spiral bit instead for higher cutting accuracy and better overall finish.
When it comes to spiral bits, you can choose either an up-cut bit, a down-cut bit, or a compression bit, based on what you need. Up-cut bits are better suited for creating mortises in wood, as they can drive wood chips out and away from the cutting surface. On the other hand, a down-cut bit forces the chips downward, which is more suitable for creating chip-free dados in melamine and plywood.
A compression bit has spirals that run in both the upward and downward direction, forcing chips to stay in the middle instead. This makes it better for edge routing when working with melamine or plywood, as the finish remains consistent on both sides.
Note that down-cut router bits are a poor choice for router tables as they tend to force the workpiece off the table.
If you want to save the setup time and effort, you can use a single bit and a custom-made baseplate to make four dados at once. Every baseplate side is farther away from the bit by a factor of 1/16-inch. This means that if one side is close to the bit, the next would be 1/16-inch away from it, the following one would be ⅛-inch away from it, and so on.
Begin by making the first cut space at the 0-inch setting, after which you can rotate the router and the baseplate. Doing so will enlarge the dado, and you can continue working with each side until you have the desired results. Alternatively, you can also make it so that the baseplate has smaller progressions of 1/32 inch or 1/64 inch to accommodate undersized plywood in dados.
Note that precise measurements are necessary for making an accurate baseplate. So, the best way to go about this is to make it oversized at first and then mount it upon the router.
Shaping thick workpieces is an inevitable part of carpentry, one that many beginners tend to struggle with.
You can make identical parts with a thick workpiece, which can be simplified by using a template and top-bearing pattern bits. While it may appear that top-bearing pattern bits cannot be used for thicker parts, this is not the case, as shown in the following steps.
Using the top-bearing pattern bit, work on the bottom half of the workpiece. By routing the bottom half of the part, you will be able to remove the workpiece from the template and proceed to the next step.
Install the bottom-bearing flush-trim bit into the wood router and adjust its height to match the surface of the pattern bit. All that is left to do is to finish shaping the workpiece.
Wood routers are tools that are inherently reliant upon precise routing methods for successful results. As such, the importance of precise routing methods cannot be understated.
So, here is a brief overview of the subject and how you can improve the results of your wood routing efforts.
Two feather boards are better than one for straight and smooth cuts, particularly when narrow moldings are concerned. And while it’s not feasible to try and feed the stock completely through, you can consider making the molding longer.
Leave some uncut wood at the end, which will serve as the handle for when you begin cutting. Once you have pushed the workpiece as far as you were able, simply switch the router off and cut the handle off.
You can use a router to join boards and make a long straightedge without any issues. For this, you can use an 8 x 12-foot plywood, along with an 8-foot x 1-inch x 1-inch aluminum angle, 8 feet of T-track, and commercial clamps for the T-tracks.
Begin routing the plywood to make it so that the T-track and the angle are flush with the surface. Glue the T-track onto the groove using epoxy adhesive, and drill and countersink holes in the aluminum angle. This will allow you to screw it to the plywood.
Now, clamp the board to make it so that the uneven edge hangs over the straight edge. Install a bottom-bearing flush-trim bit and begin routing.
Getting a miter joint to be perfect is quite difficult for many woodworkers, but it needn’t necessarily be so. Here are three tips that can make your miter joints nearly perfect.
Consider using a table saw or bandsaw to clear out the waste from the wooden material before routing. The efficiency of router bits, and chamfer bits, in particular, skyrockets when working on smaller workpieces.
You can make a zero-clearance opening around the bit to keep the workpiece steady and prevent it from tipping into the blades. This can be done by cutting the fences of your router table.
A backer board can be used to prevent blowouts from the router. Simply hold the backer board behind the workpiece while operating the machine and try leaving a spot at the end of the workpiece. Make a note not to shorten the length of your material, which may require you to adjust the fence or the height of the bit.
Squaring large table tops is a simple matter of using a large pattern bit with your router. To prepare for the task, use a table saw or a bandsaw to cut the surface top and make it as close to the final size as possible.
Now, use a piece of plywood or fiberboard as a guide, along with two adjacent factory edges that help you ascertain the cutting angles. Position the guide piece on a pencil marking that indicates where the table top will end, after which you can lamp one edge of the guide piece to the top.
Install a standard ½-inch flush-trim bit to proceed with the final step of the process and finish making the cuts.
Cutting tenons on rails can be made rather easy using a router in tandem with parallel guide blocks. These blocks are two pieces of wood that are connected by alignment pins.
Shorten the length of the rails until they are a couple of inches longer than the desired length. Use a ½-inch bit and mark how far the router table can cut from the edge of the baseplate, and then clamp the guide blocks onto the rail.
Once you ascertain that they are square to the rail, you can begin routing. Start by keeping the cutting depth of the blade at 1/16-inch less than the desired depth and begin making passes. Continue measuring the thickness of the tenon and lowering the bit depth until you are satisfied with the result. And lastly, finish by cutting off the waste pieces.
An additional baseplate for a router is always welcome, particularly when you use it often on larger surfaces. That said, it can be a little difficult to align the screw holes meant to fasten the baseplate to the router.
To make the job easy, you can use special cone-pointed screws. These are available in several thread sizes, and you can match them with the right nut to use them as baseplate screws.
Now, mark diagonal lines from one corner to the other and drill a small ¼-inch hole where the straight lines cross each other. Install the baseplate screws in the router table base and fit the baseplate over the bit by sliding it on. And lastly, you can softly strike the baseplate over the position of each screw, which creates a small divot for centering the drill bit.
Like shapers and other power tools, it’s important to avoid performing certain actions that may harm either the wood router table or the workpiece. Not only do such actions end up wasting time, but they may also damage either the router table or the material, neither of which are desirable outcomes.
Here are a few tips on what to avoid while operating a wood router.
A tear-out is something that no woodworker wishes to see while using a router. To avoid this, consider routing end grain edges before working on anything else.
Additionally, you can use a backer board and hold it up against the workpiece in order to align their wood grain edges at the end. Now, begin making the first pass through the workpiece and continue until you route over the scrap with the final pass.
Routing the workpiece profile on wider boards is generally preferable due to the safer and easier nature. Any shaped edges can then be cut off using a table saw.
Wideboards, such as those found in a door, typically don’t fit through planers and are difficult to flatten. You can flatten wide boards using a router, as detailed below:
Even newly purchased edge guides may end up failing to help you make an accurate cut, which can cause errors and frustration. That said, fixing edge guides is quite simple and can be done within a matter of minutes, as described in the following steps:
This will ensure that your edge guide produces no errors and helps you achieve the desired results.
If you are left wanting more with the existing router setup, you can easily upgrade it. Not only will it increase the efficiency of your cuts, but it will also help your router age rather gracefully.
Here is a list of a few quality-of-life upgrades for your routing machine.
A simple two-board groove jig can be all you need to finish even the most elaborate woodworking projects, which can be made by doing the following:
This jig can be set up on any workpiece, with its grooved edge in contact with the material. Its highly adaptive nature makes it suited for any groove or dado cut, which is ideal for any woodworker. Just ensure that its measurements are correct.
Tip
You may need to create variations on this specific jig based on the groove widths you work with, but they are rather simple to make.
A common issue with sleds and toggle clamps is that they may create a misaligned joint, which can be attributed to the ¼-inch thick base. The base tends to bend under pressure, causing the misalignment. To solve this, simply use a board close to the front of the sled, along with two top boards to bridge over the workpiece.
Leveling screw-hole plugs can be done very quickly, as shown below:
Within a few minutes, you can create a mortising jig that only needs a plunge router to assemble. Listed below are the steps for doing so.
A custom-made fence can help you operate a large raised-panel bit without worrying about your own safety or that of the workpiece. You will only need a large box that has a plastic top, along with a dust port, to create this fence. Close to the front of the box is a faceboard that can be adjusted up and down.
This large-bit box fence guide can be placed on the panel in a way similar to a feather board for smooth cuts.
You can use a two-sided template in order to prevent tear-outs on curved pieces. Simply turn the template over to cut along the wooden grain.
The primary disadvantages of a wood router include potential hazards and noise pollution. The operation of wood routers, especially with larger bits, can cause wood chips to scatter, posing a safety risk that necessitates appropriate protective gear. Moreover, these tools can be quite loud, often requiring the use of hearing protection during use.
The different types of wood routers include plunge routers, fixed-base routers, router tables, variable-speed routers, trim routers, etc. There are several subtypes of routers as well that are capable of tackling tasks that may not be possible with a normal router. Combo routers, for instance, can perform the functions of a plunge base router and a fixed base router tool without having to choose either.
Wood routers are highly versatile tools that can be used for a multitude of projects. Like any power tool, the router requires its user to understand the basics of its operation before moving to a more complex operation.
With the tips listed in this guide, you will be able to work using the power tool more efficiently and finish products with great results. Through regular upgrades and proper routing methods, you will be able to continue using your wood router for a long time.
When combined with the expertise of a seasoned woodworker, wood routers can be an inseparable part of any carpentry project.