Expertises: Painting, Art, Drawing, Pastel
Updated on
Inspiring Ideas for Modern Home
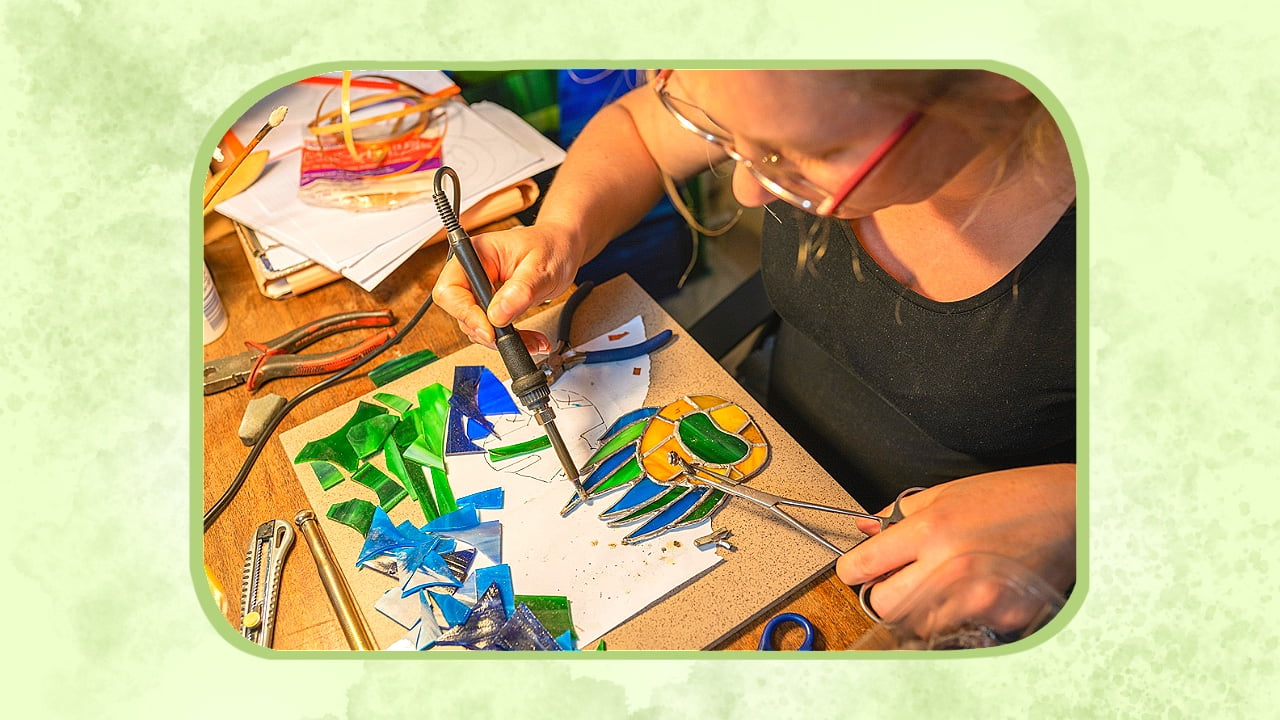
Soldering means sticking metals together by melting them at the joints. Since glass pieces don't stick together, you need to cover them in metal and solder those surfaces to achieve the final stained glass results.

Soldering is a critical aspect of creating stained glass. This is because, as an artist, you can only color a portion of the glass at a time. Then, you need to solder these glass pieces in a specific way to form a detailed image out of the solid colors.
As a beginner, I was intimidated by the concept of melting metals to seal them together. However, I learned that soldering was easy for a skilled stained glass artist.
I also understood the detailed instructions to do it effectively, and I'll share those steps with you today.
When you make your own stained glass designs, it's a hassle to get them soldered by someone else. Furthermore, if you get it soldered at a hardware shop, you might feel unsatisfied when you see the result. So, it's best to learn to solder your own artwork from the start.
Stained glass soldering can be broken down into four main procedures. First, you need to plan the design and cut the glass. Next, you should cover the edge of the glass in adhesive copper and gel flux. After this, you need to solder the pieces together. Finally, seal off the ends, and you’re done.
At the end of the day, soldering takes patience and practice. If you work at the right speed, you'll see excellent results as your skills improve. So, you can read the steps below to understand my soldering process.
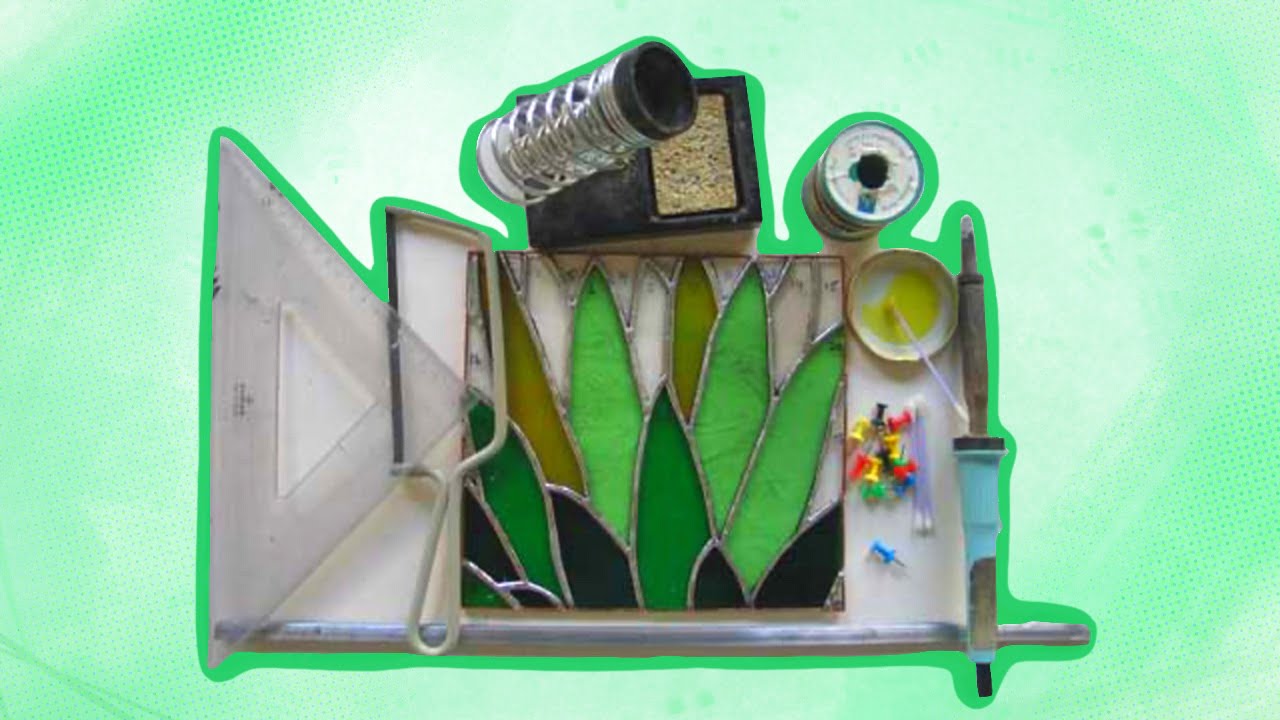
Things You'll Need
What You Need To Do
Step 1:

It's essential to plan the design first. You can create your own design or use a paper pattern online. When I follow a pattern, I note the dimensions of the glass pieces. This also gives me an idea of how much glass I need.
If you are a beginner, choosing a simple pattern with proportionally large pieces is the easiest. Doing this will help you learn the basics without getting caught up in the hassles of perfect measurements.
After choosing the correct pattern, you can trace it onto your glass sheet with a CD marker.
Step 2:
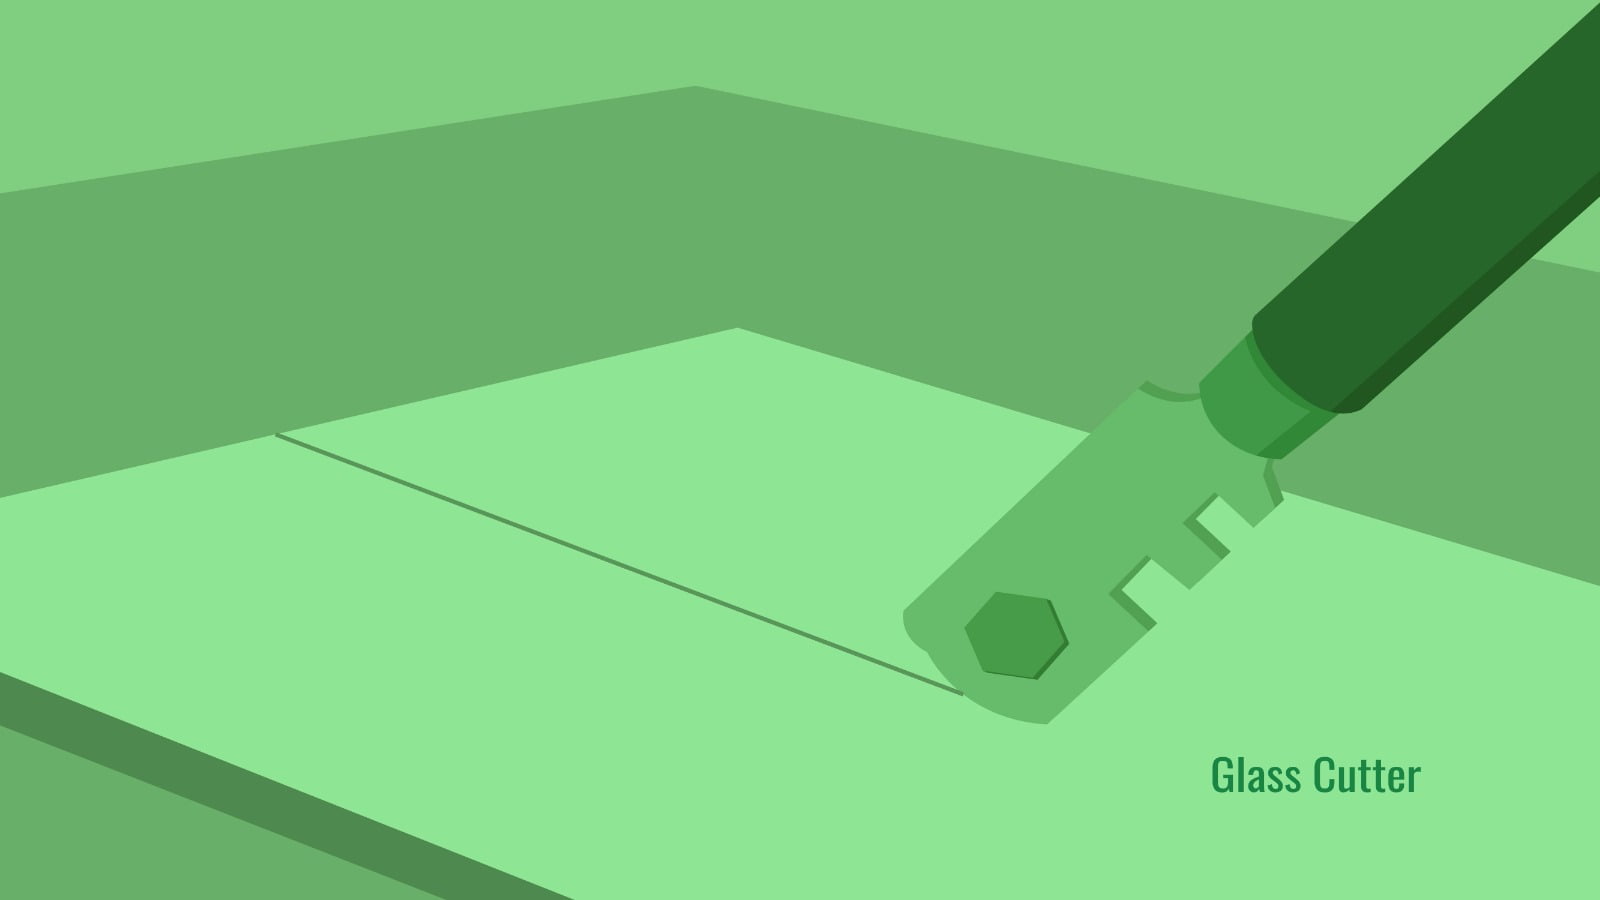
Now that you have the design you want, it's time to score the glass. Scoring will help you create a guideline for cutting the glass.
Before scoring, you should use paper towels instead of placing the glass directly on your work table. The towels absorb the excess force from your glass cutter and hold the glass in one place.
Now, use your glass cutter to make one continuous line across the glass. This precise motion is challenging to get the hang of at first. If you pause or hesitate while scoring, it is difficult to break the glass smoothly. However, your results will improve when you use a metallic ruler as a guide.
Step 3:
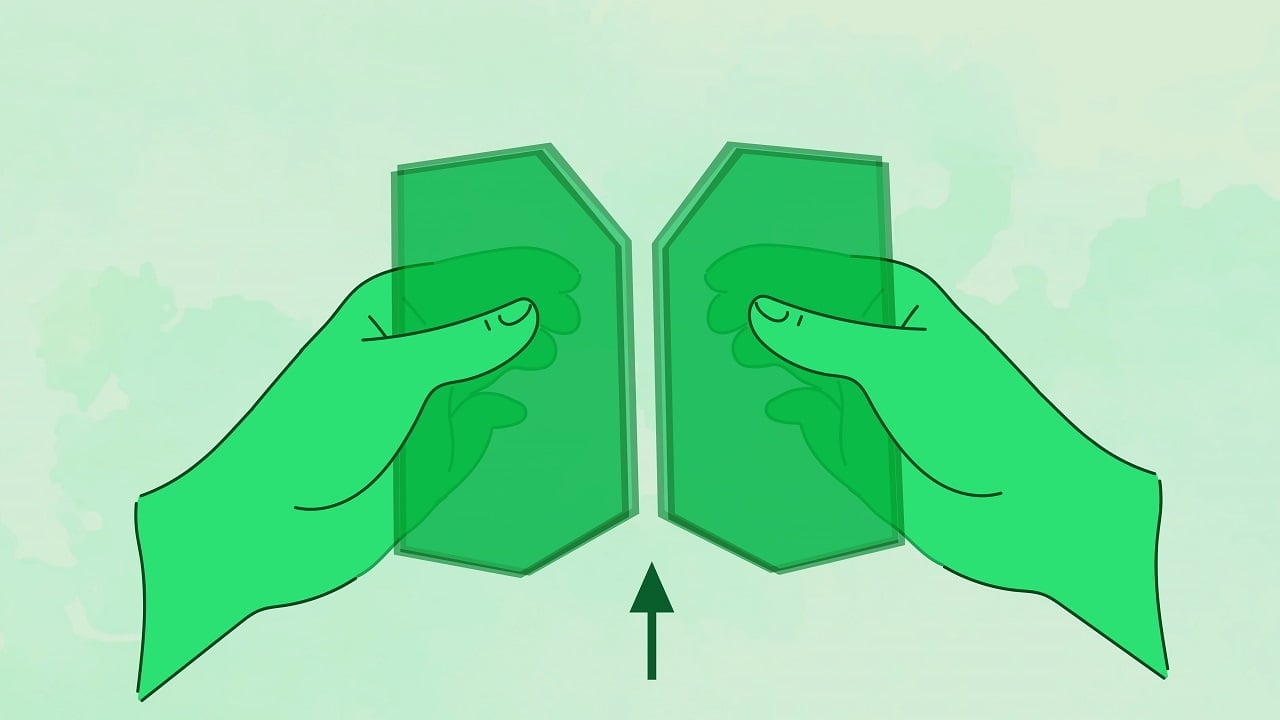
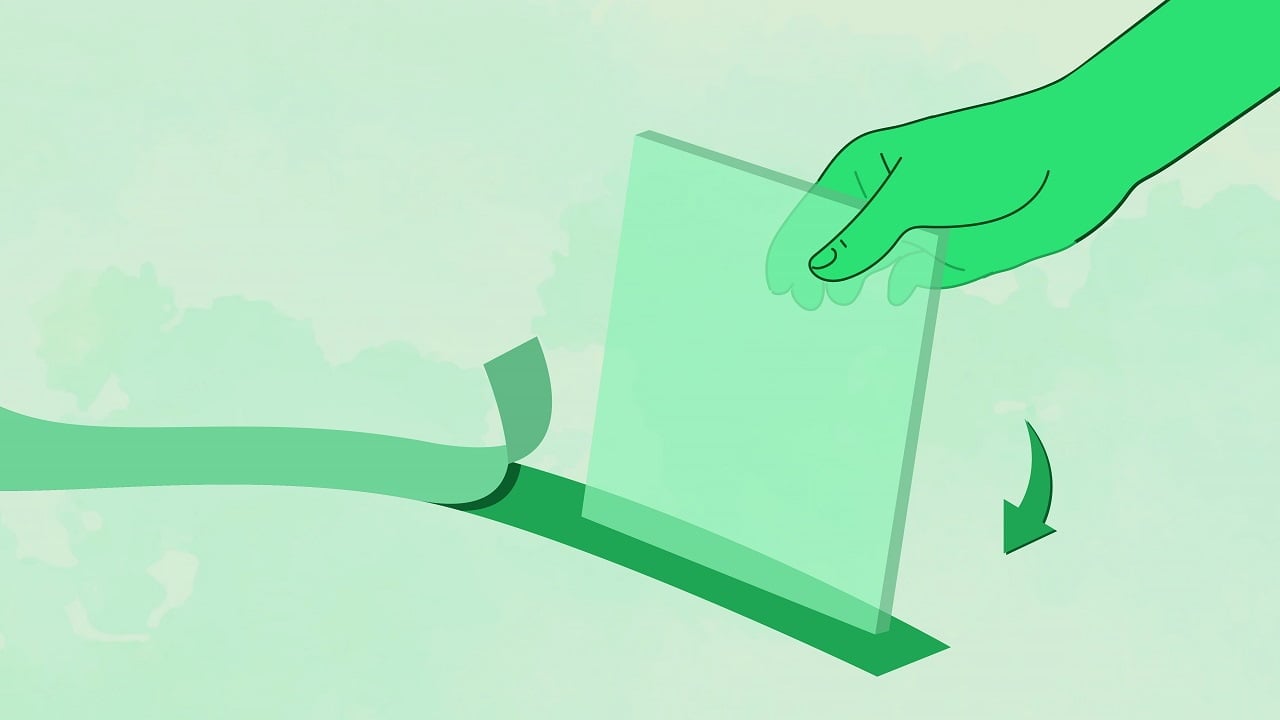
After scoring, break the glass along the straight lines you created. The best method to do this is by snapping them apart. To break the glass, Hold it with two hands, one on each side of the scoring line. If you have done it perfectly, the glass simply pops apart, and you have the necessary pieces.
However, do not be discouraged if you mess this up your first time. Irregular scoring can make things more challenging, but you can always use a broken piece for something else. Also, you can correct your old glass pieces once you have more experience with this.
For maximum safety, I always get rid of extra glass pieces after I finish cutting. So, your paper towels should've collected most of the shards earlier, but you can also wipe the glass down with a wet sponge.
Things You'll Need
What You Need To Do
Step 1:
Your soldering iron will take a while to heat up. So, plug it in before starting the next steps. Also, double-check that the iron is on its stand and not touching anything else.
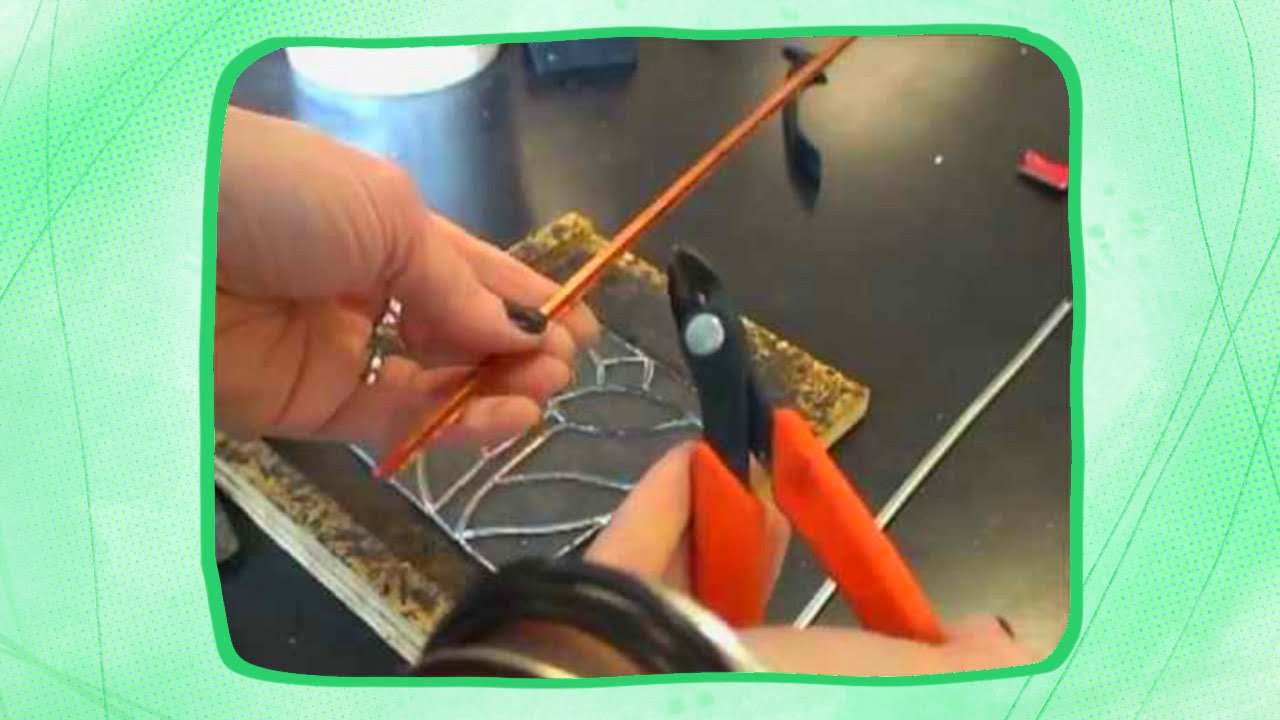
In addition to this, it's best to wear gloves. Both glass and copper have sharp edges, and the safety gloves will protect your hands if you get clumsy.
Another thing to ensure before you start is the stained glass pattern. Check whether all the pieces fit together or have some gaps between them. If you find gaps, take note of them to take additional care during soldering.
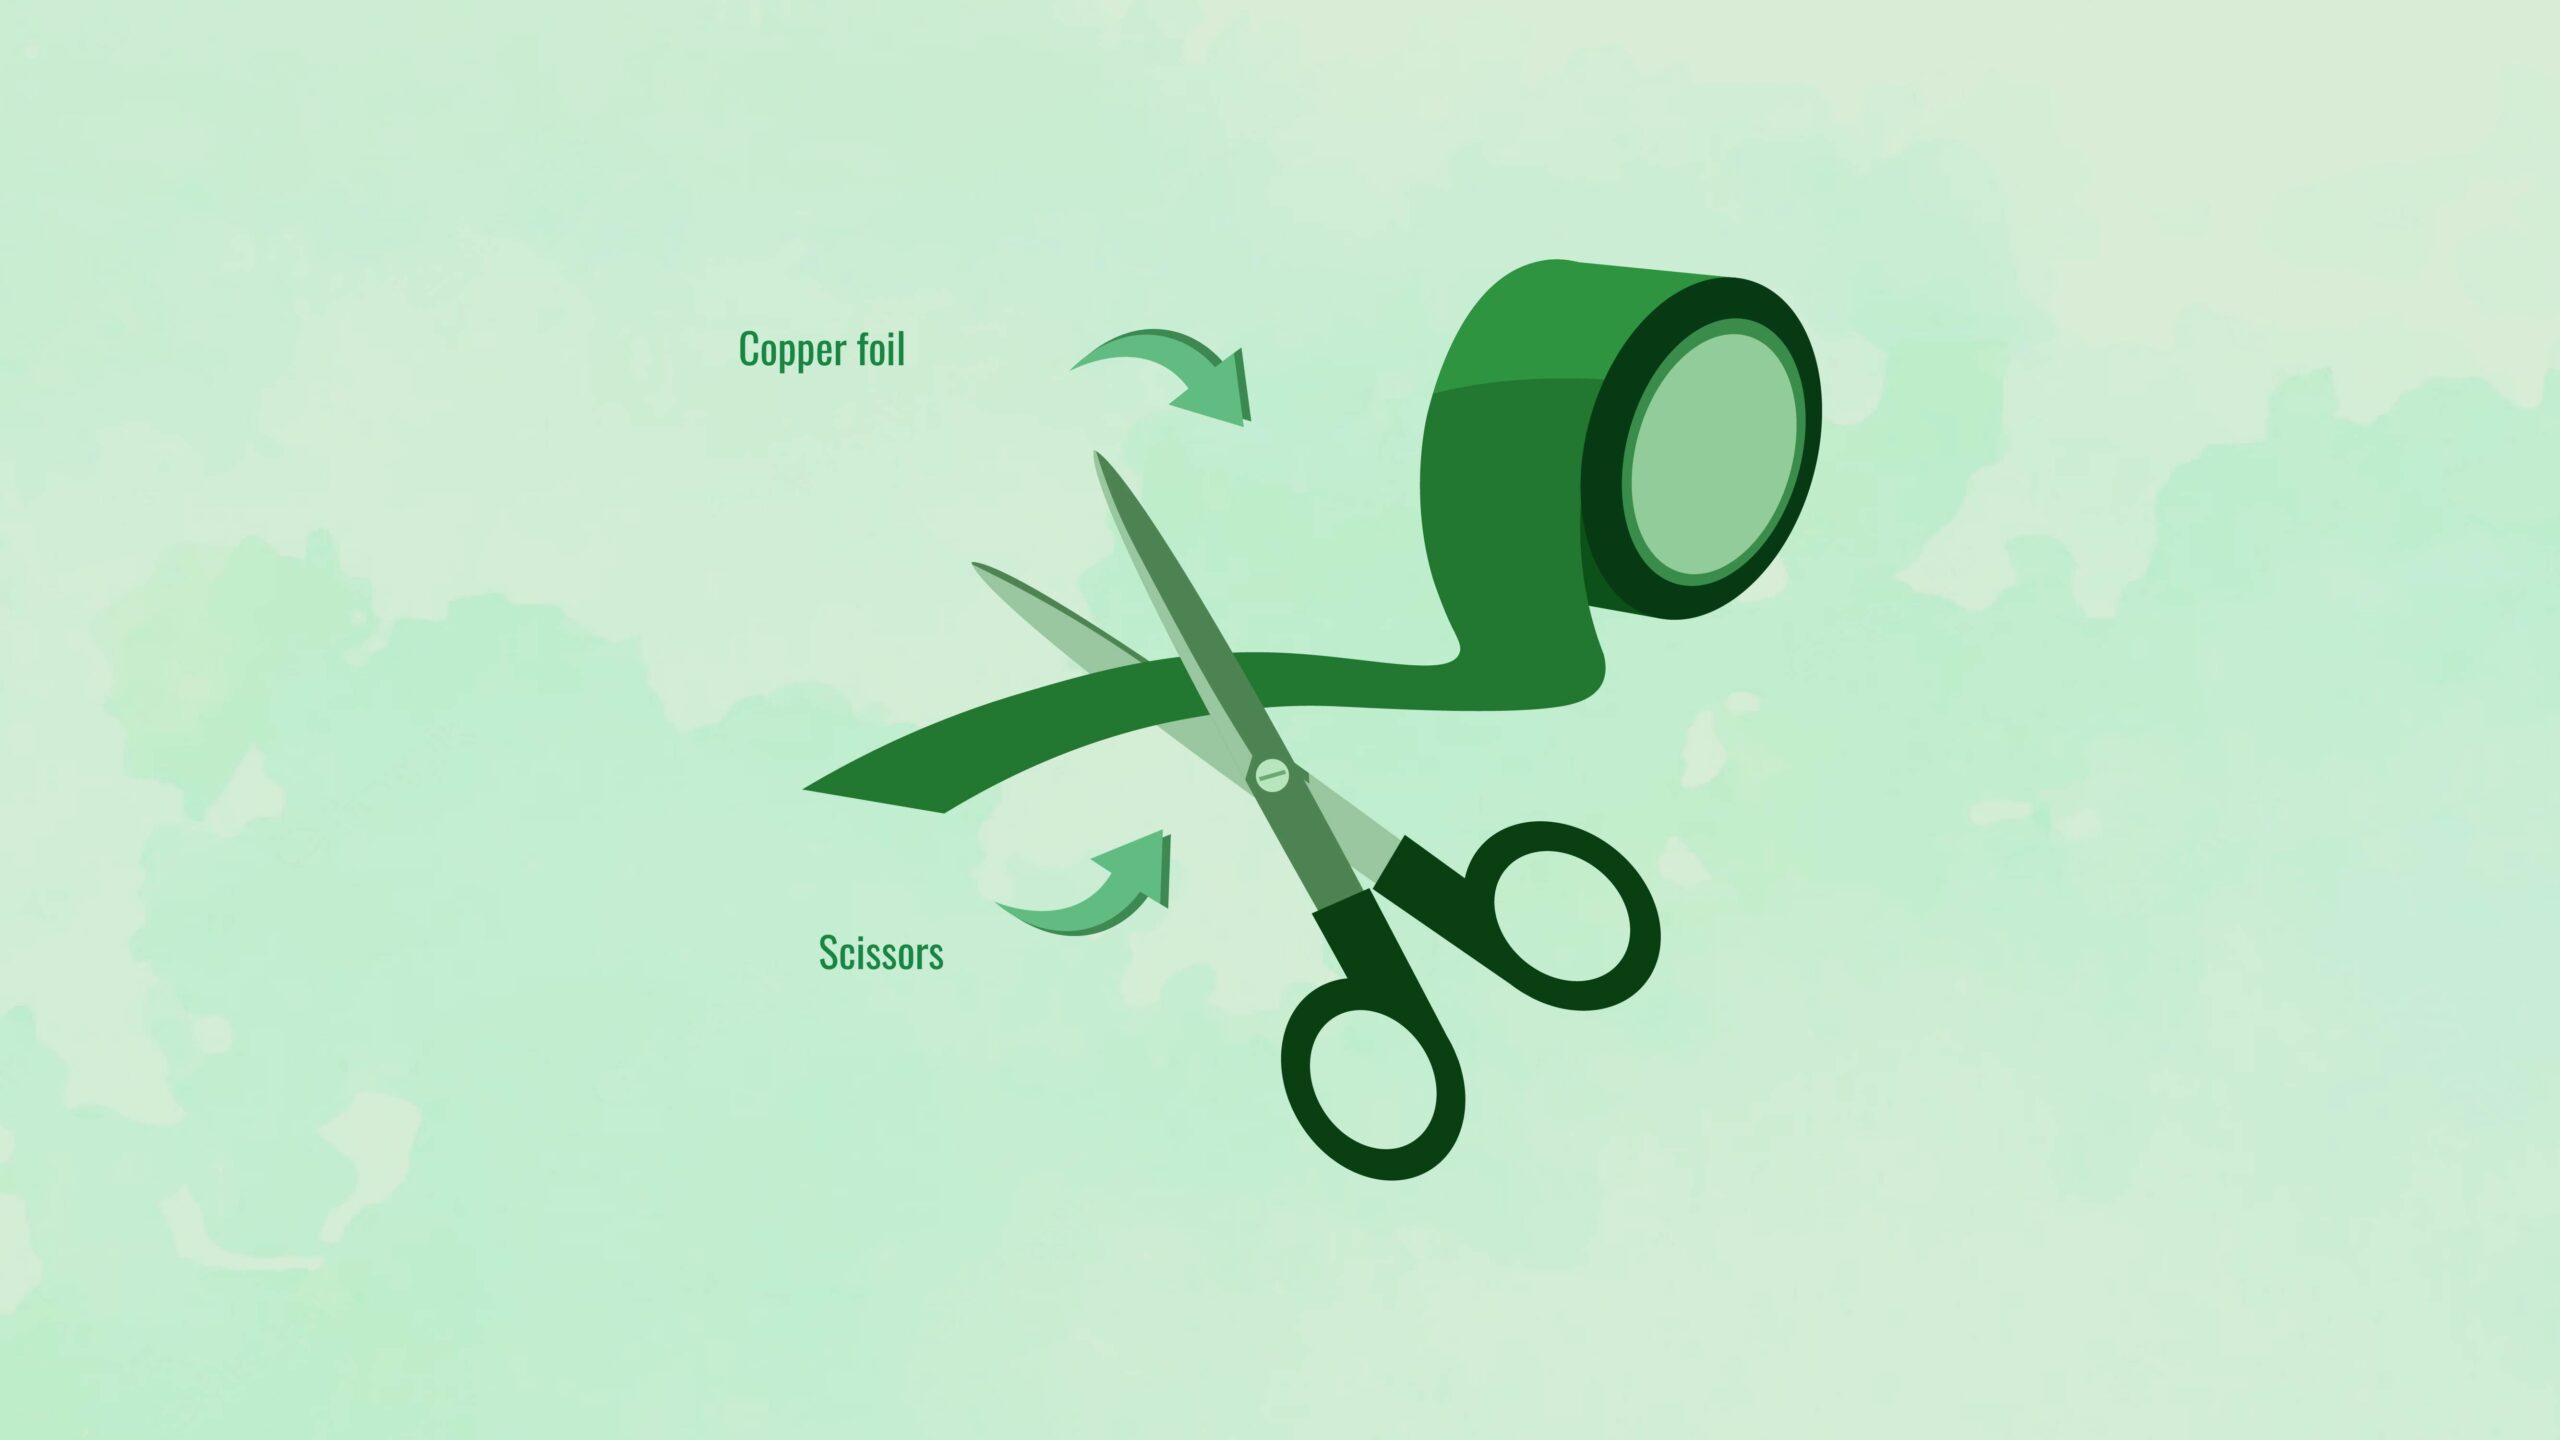
Next, cut the copper foil into strips that fit your glass pieces. I've found that the ideal length is 0.12 inches longer than the edge on each side. This will help you cover all surfaces that you solder. Now, you're ready to begin.
Step 2:
Remove the backing paper from the copper foil. Then, place the edge of the glass on the sticky foil side. For the best results, place the glass edge right in the center of the copper foil and make sure there are no creases. Now it's easier to fold the excess foil over the glass surface.
After arranging the copper foil, you can smoothen them further with a roller. If you don't have a roller, you can use a pencil or a piece of rubber. When the copper foil is smooth, you will be able to easily wrap the remaining glass edges without any issues.
Additionally, I've learned that it's best to double-check the copper foil seam before soldering. To do the same, pick up the copper foiled pieces and ensure there are no cracks or air holes. This prevents any problems in the following stages.
Step 3:
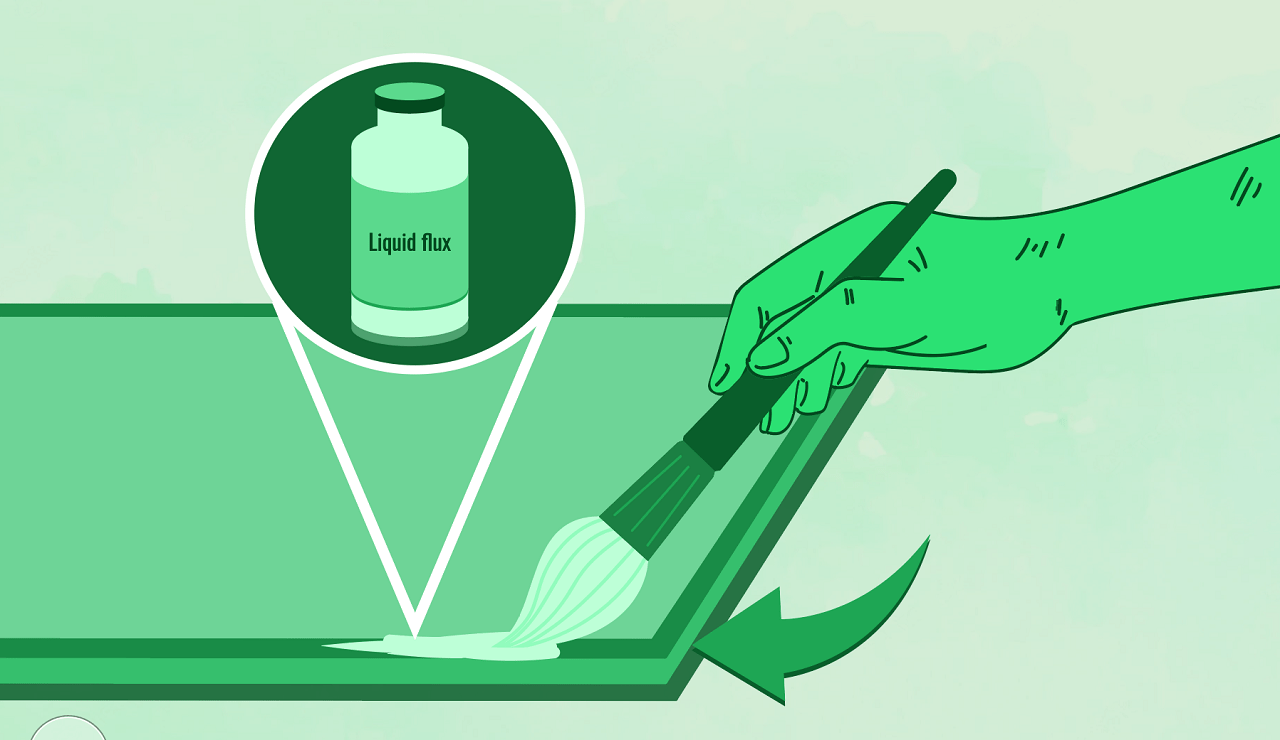
Coating the copper foil tape with liquid flux is the last crucial step before soldering. This paste flux contains alloy metals that seal the joints and make them waterproof.
You can compare some liquid fluxes online to choose the best one. Personally, I use tinning flux because it has a very similar composition to copper. This similarity makes the seals stronger.
After choosing, use a flat flux brush to coat all copper surfaces with one flux layer. Cover all edges of one face before turning the glass piece over and coating the rest of the copper foil. This can get messy, so I wear latex gloves and keep my workspace covered with newspaper.
If you're worried about evening out the flux, don't fret because you don't need it to be perfectly consistent. You just need to ensure that all of the copper foil is covered and that there are no noticeable lumps. If you use too much flux in big lumps, they will crack during soldering.
Things You'll Need
What You Need To Do
Step 1:
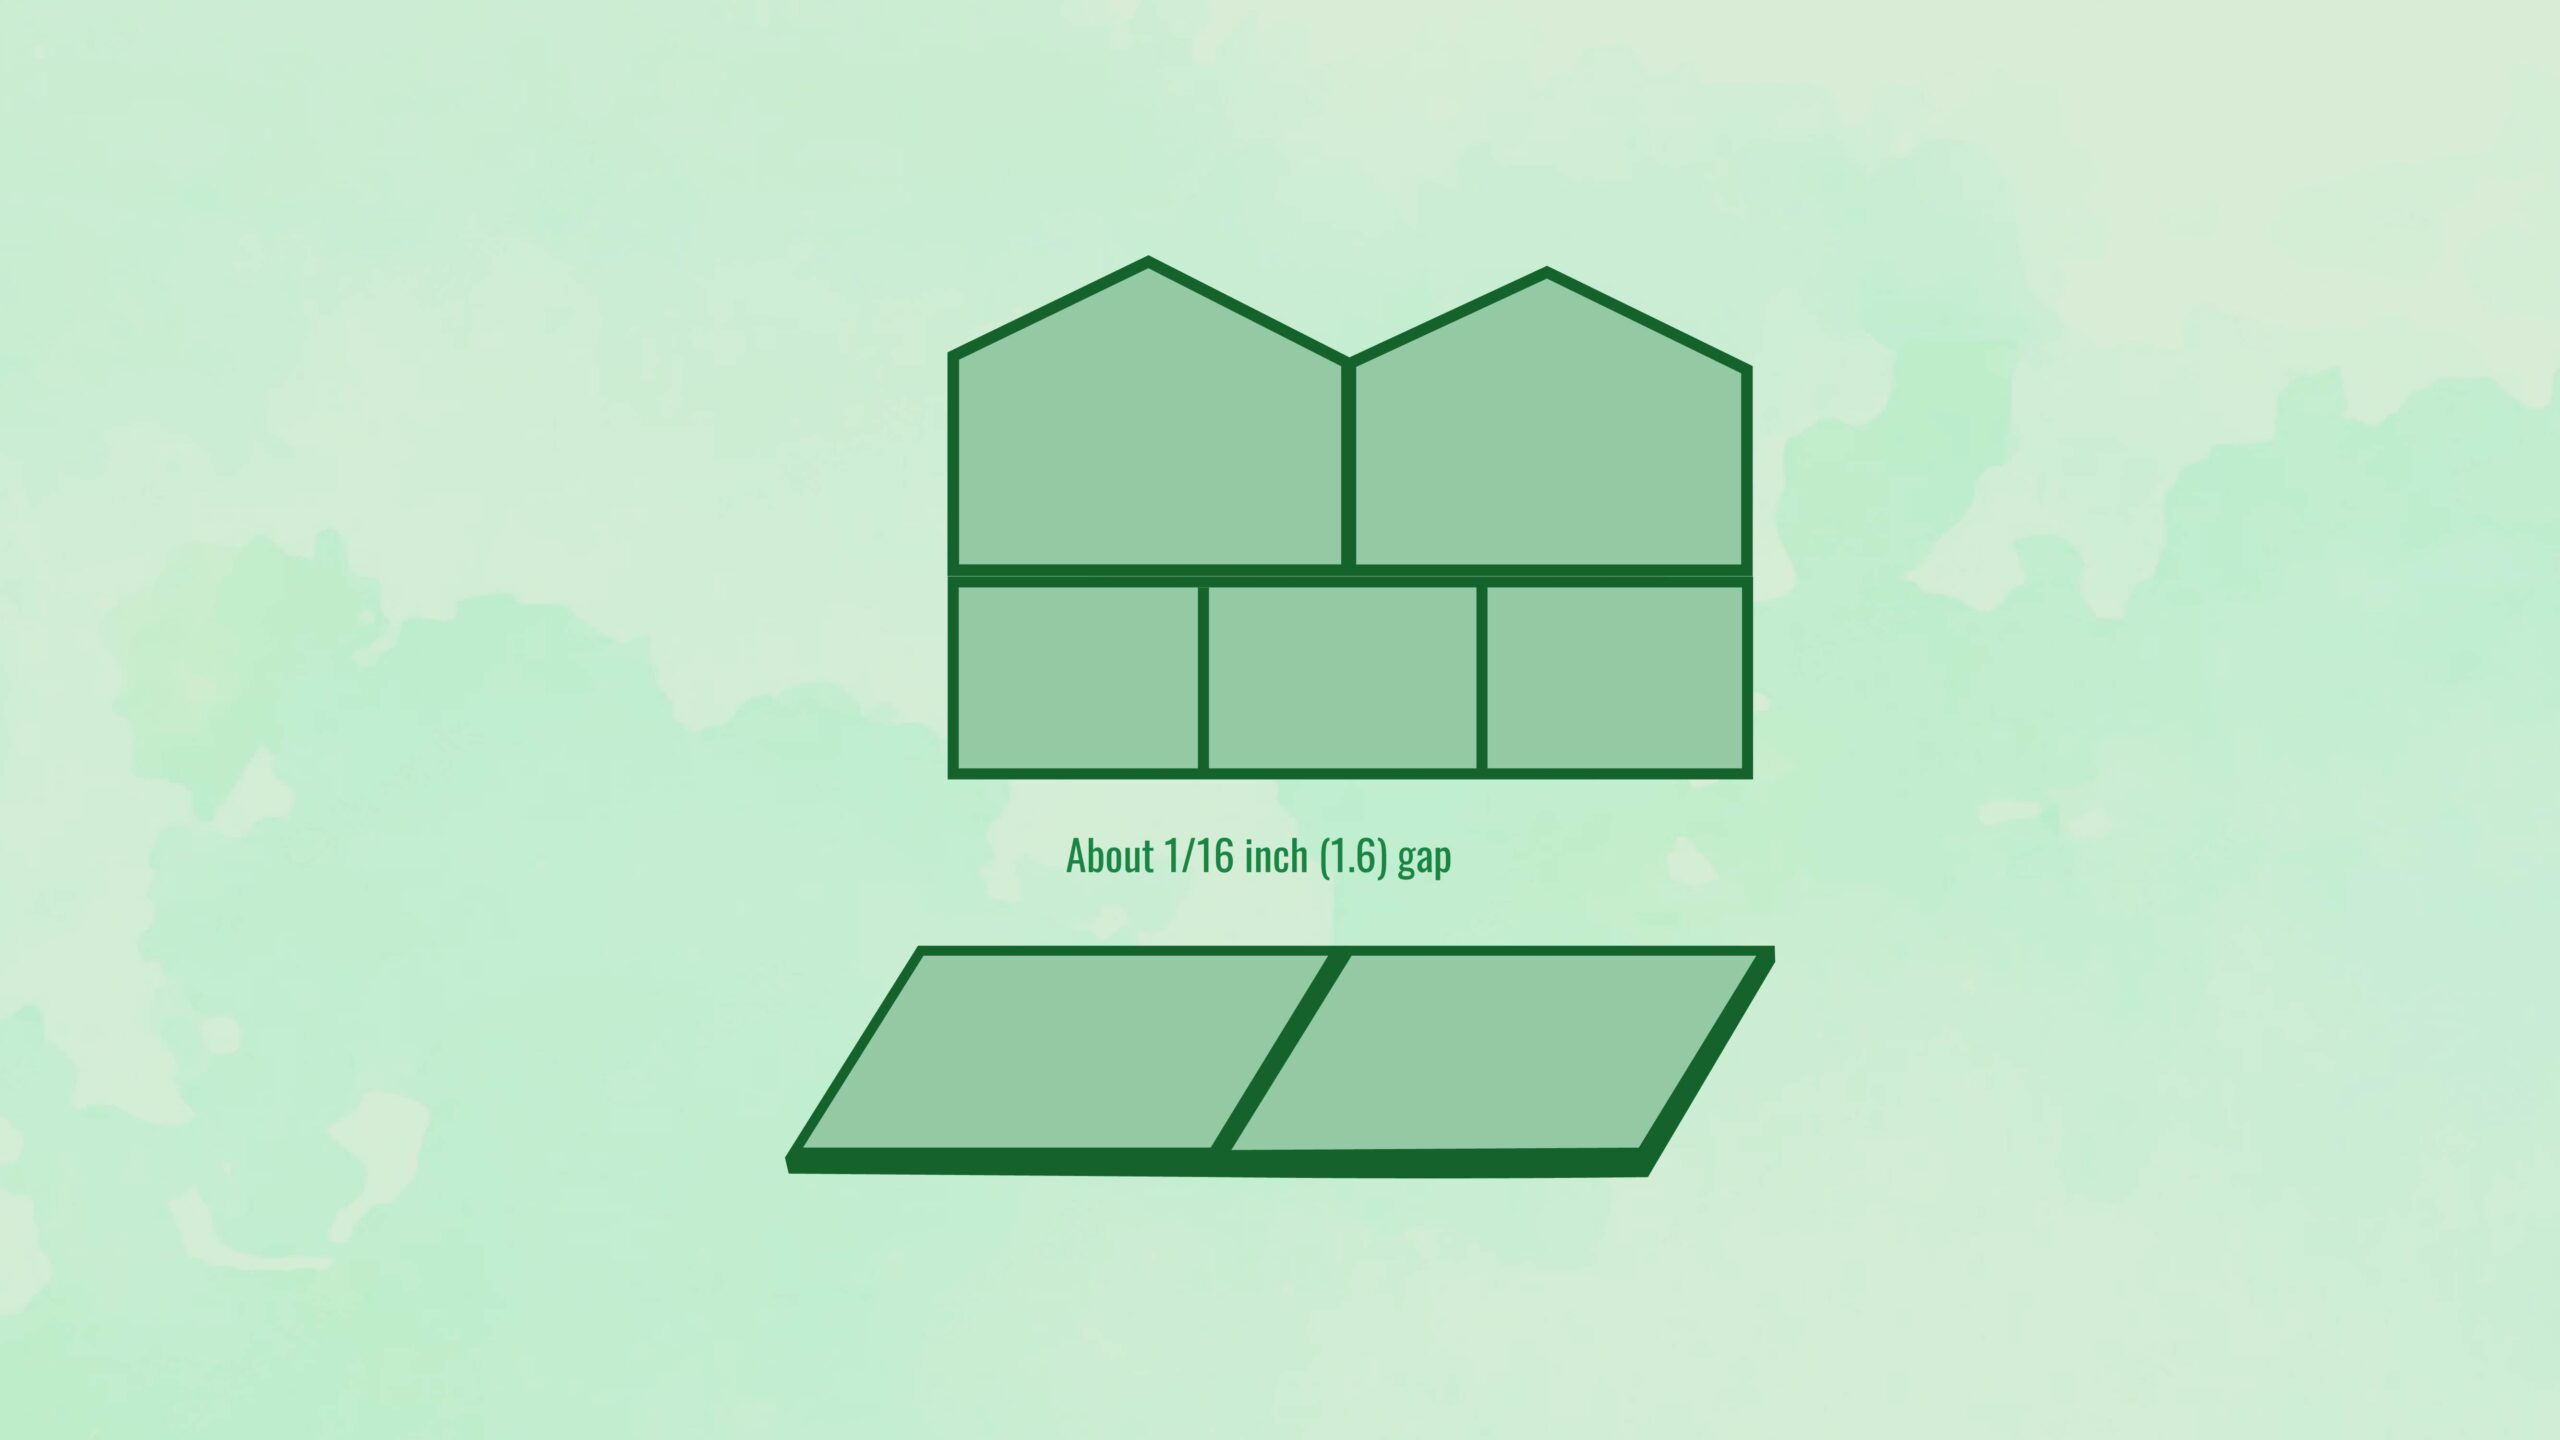
First, arrange your stained glass pieces on a metal table. I consider this safest for soldering because it is durable and acts as a heat-resistant surface. Also, because of the heat, don't use a towel under the glass at this stage. The cloth might catch fire.
When I arrange the glass on my table, I leave a little gap of about 0.06 inches between the pieces. When you do this, the molten metal will have a space to flow into and seal the joints firmly.
Step 2:
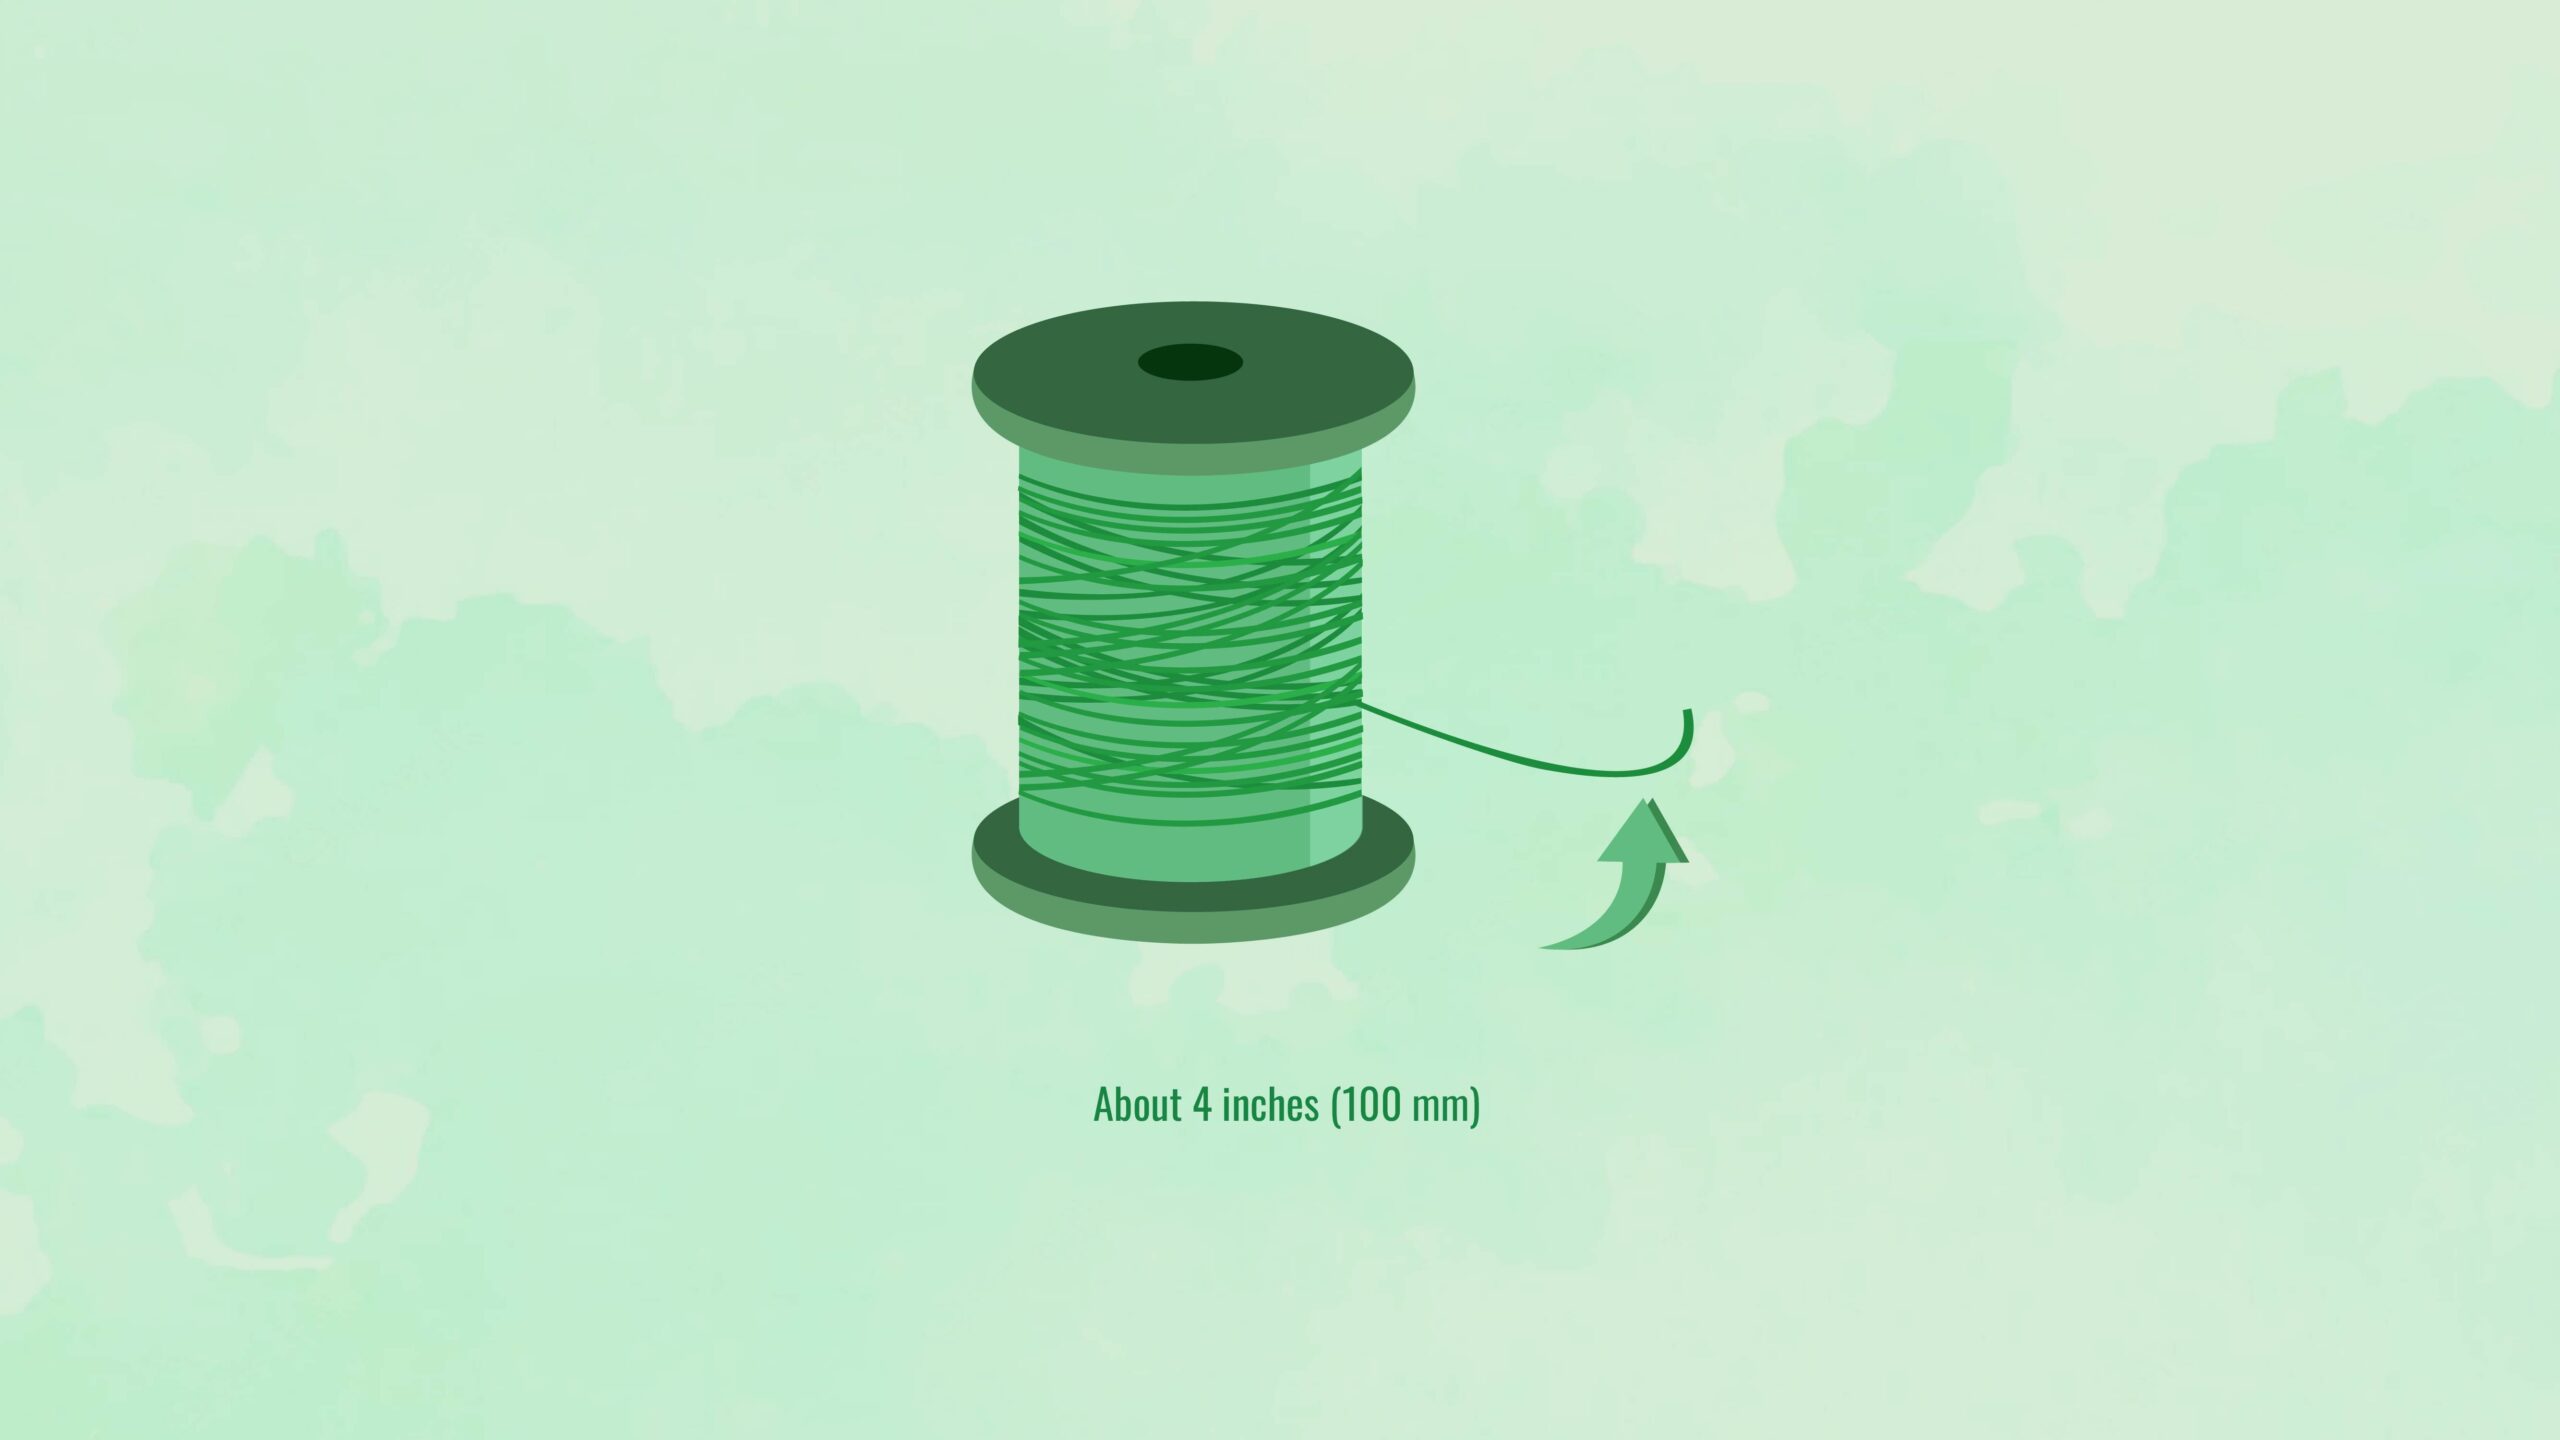
Now, put on your gloves and pick up the soldering coil. The gloves are essential because the coils are made of lead, which is poisonous; the gloves will protect you. However, you might have tiny scratches or cuts left on your hand after the scoring and cutting. Lead on these cuts will be deadly, so it's best to bandage any painful areas and cover them up.
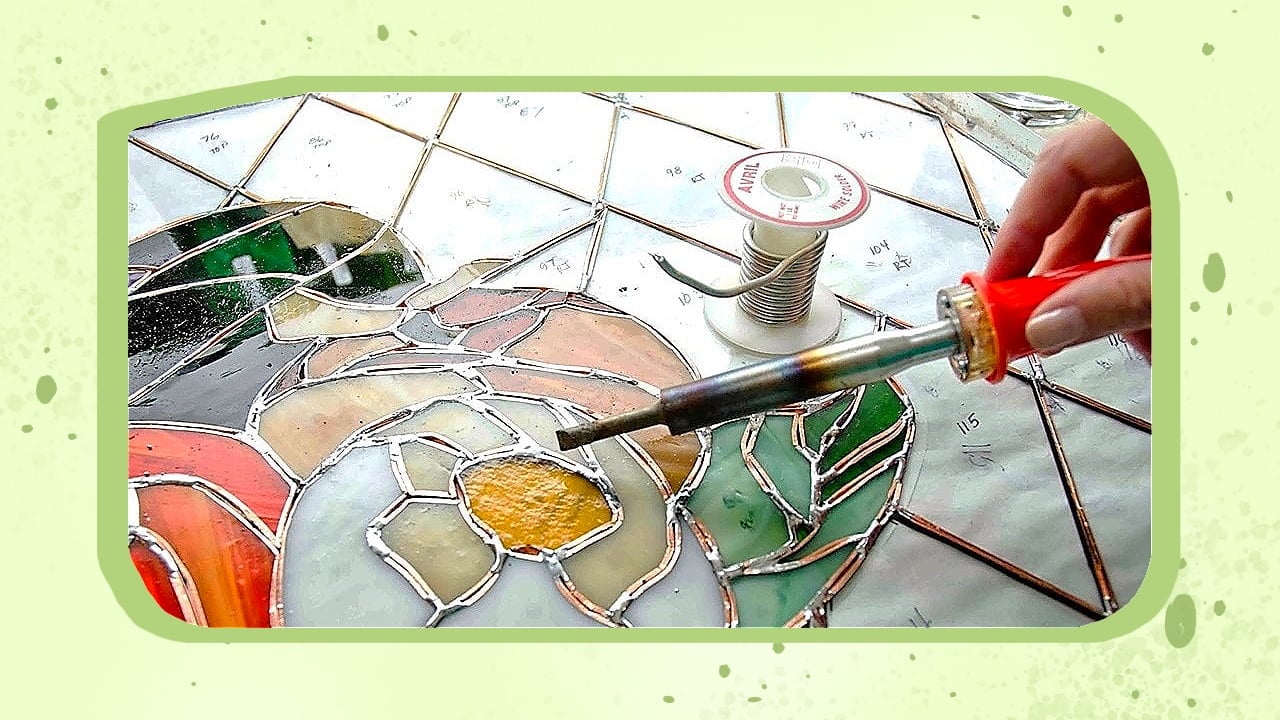
With your gloves on, unspool a 4-inch wire from the coil. I've learned that this is the ideal length for good soldering. It creates just the right amount of melted solder and is convenient to handle.
Step 3:
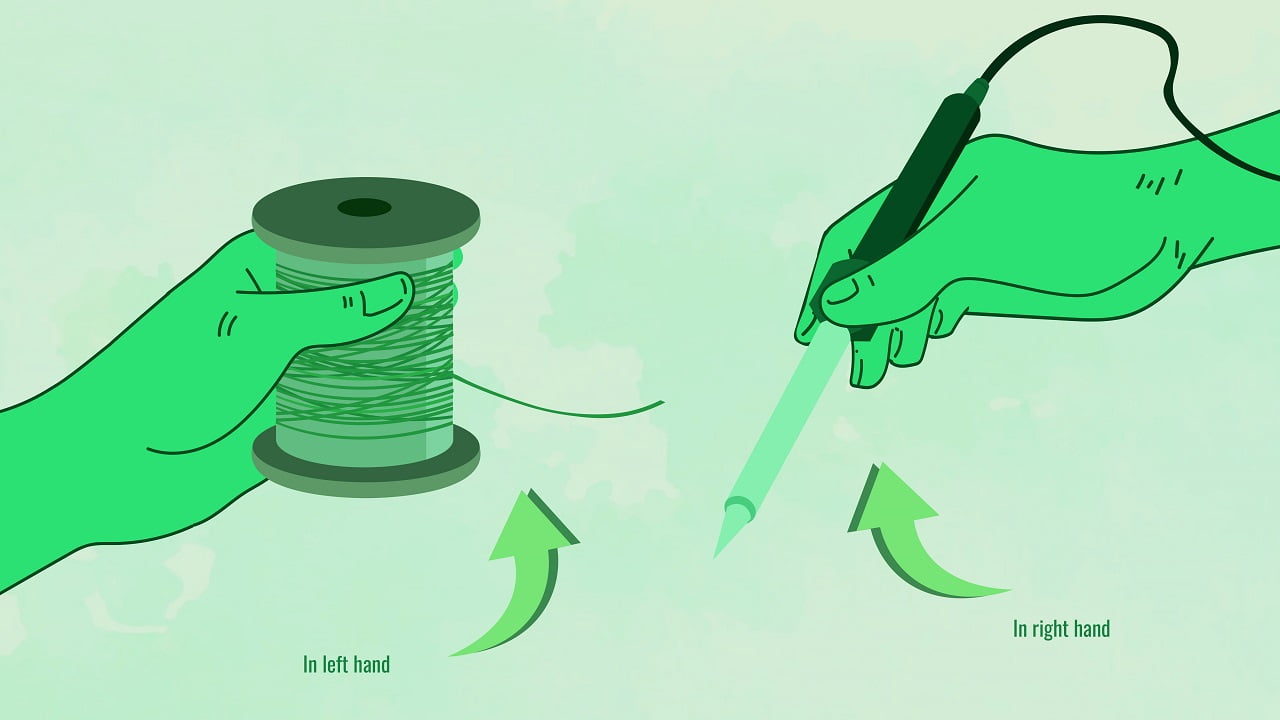
Hold the spool in one hand and your soldering iron in the other. When I was a beginner, I held the solder with my right hand and the wire in my left hand. As I gained experience, I understood the best direction for me.
Regardless of how you hold it, always remember to keep your fingers or body parts away from the soldering iron tip.
After you have the wire and iron, hold the extended wire over your glass pieces. Now, make it hover half an inch above the junction and parallel to it. In my experience, this slight gap between the wire and solder seam creates the most robust seal.
Step 4:
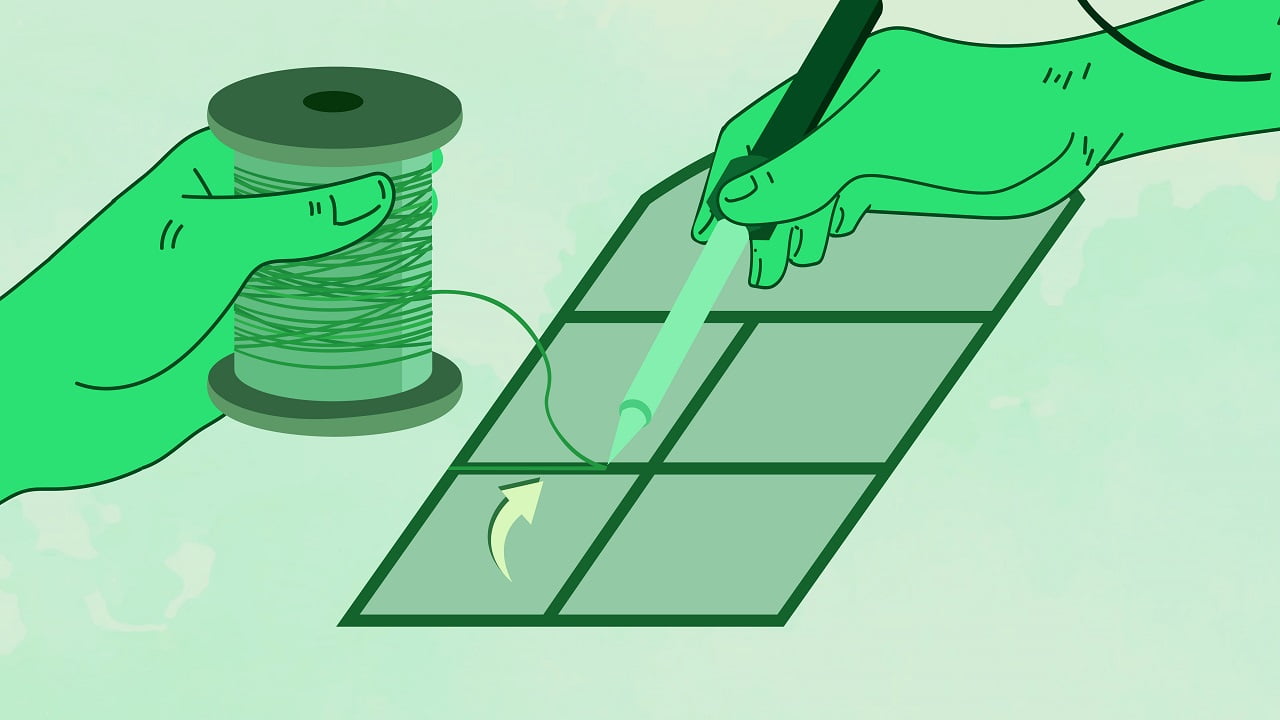
Now, touch the hot iron tip to the end of the unspooled wire. The iron melts the wire immediately, and the liquid drops into the gap between the pieces.
When I first began soldering, I thought I needed to solder the edge in one go, but it caused more issues. So, now I relax and take breaks as I create the soldering lines.
I'll teach you how to correct the mistakes people usually make in this step. For example, when you create too many beads, you can just make them even with the iron tip. You might leave drops of solder on the stained glass during this process. However, you can gently pry them away with your fingernails later, so it's no big deal.
You may also have left gaps between the copper edges in the previous procedure. You can correct those by holding the solder a little longer over the gaps. They fill up and seal naturally.
Step 5:
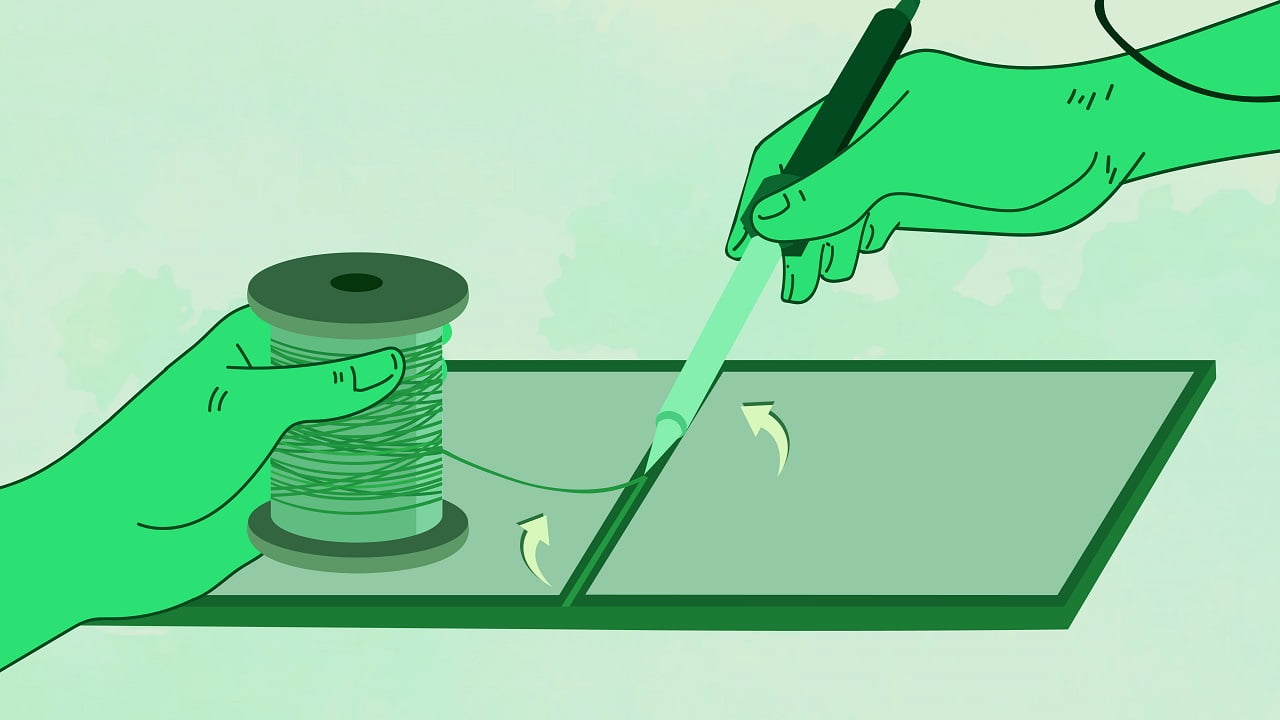
Now, it's time to solder the remaining glass. You should solder the next edge in the same direction. So, bend the wire and move your hands accordingly.
As you move along the edges, keeping a steady pace is vital. You need to do this at the right speed so that all parts of the solder seam are sealed without excess droplets.
Sometimes, I find it challenging to hold up the wire and manage the solder precisely for such long durations. To counter this, I've started practicing some upper-body warm-ups before I start, and I take breaks when my arms get tired. This helps me solder the panel properly.
Things You'll Need
What You Need To Do
Step 1:
You can border your solder with a U-channel came if you want to display the finished piece somewhere in your house. It also strengthens stained glass windows.
Before using the came, check your piece to ensure that all surfaces near the edges are more or less even. If you see a solder bead protruding more than 0.25 inches, file it down with a rough tool.
After smoothing the surfaces, hold your artwork upright. This is the position in which you'll hang it at the end. Holding the glass firmly in this position, slide the came into the right edge.
Sometimes I find that the came is too tight and doesn't slide easily. In this case, I use a flat tool or pencil to pry the came sides loose.
Step 2:
Now, you need to measure the came and cut it at the right place. For the measuring, you can use a small throwaway piece of came, usually an inch long. Fit it horizontally onto your piece at the top right corner. Then, raise your long came piece on the right side to meet the measuring came. Doing this ensures you measure the came's length from the right starting point.
Then, hold the long came firmly in its position and take out the little measuring piece. Fit it on the bottom edge of your artwork and slide it to the right so that it just touches the came. Now, mark this spot on the long came with a sharpie or a CD marker. Thus, starting from the top, this is the came length you need for one edge.
You can use a saw to cut the came at the spot you marked. Then, repeat this process to measure the correct amount of came for all edges. Also, while measuring the last edge, you need to remove the came from the adjoining side to measure it correctly.
Step 3:
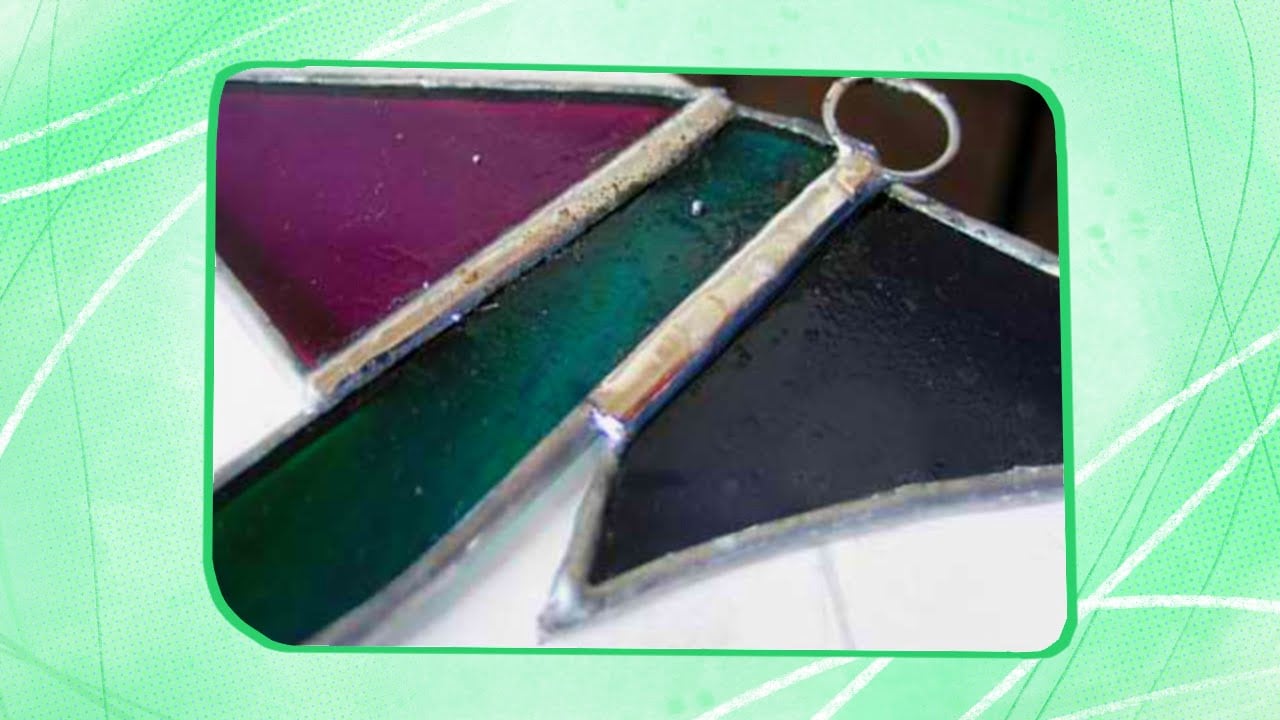
Now, it's time to solder rings to hold up your decorative stained glass. First, use your coil and soldering iron to attach a ring to the topmost point of the left came. Then, repeat this process with the right came.
After I've let everything cool down, I test the strength of the solder by swinging the came around by the jump rings. If they break or fall here, I need a stronger solder. I remember to do this because I don't want them breaking my glass artwork when I hang them later.
Once you have attached the rings sturdily, start soldering the U-channel came to your glass. Like you did before, apply a thin flux layer on the came. Then, add droplets of solder one at a time and quickly dab them in the gaps between came and artwork.
I've mentioned some error correction and safe soldering tips in the above steps, but I've learned some other things while working with stained glass. I consider these additional points for the smoothest work.
Firstly, I've learned that I need to choose my workspace wisely. I always solder in an open area or a room with plenty of ventilation. This keeps me safe from any gasses released when I melt all the metals, and I recommend you do the same.
I also keep my work table away from food and drinks. If your neighbor is having an outdoor barbecue, move your work to a place the solder smoke won't reach. This prevents your soldering from contaminating the food. It also keeps foreign particles out of your solder.
Further, make some preparations before you start. Before sealing the edges, cut a small wire and solder a few drops onto all the corners. This method is called tack soldering, and I do this to hold my glass design in place as I work. I also use it to maintain small pieces that get knocked out of place easily. If you want to keep the pieces arranged without tack solder, stick the glass to the table with double-sided tape.
Moving on, always keep a wet sponge handy when you solder the edges. As a beginner, I let my solder accumulate metal deposits, making the tool clumsy to handle. Now, I use a wet sponge to carefully wipe off excess metal every 5-10 minutes. It keeps the iron tip clean while soldering. Also, take care not to let the extremely hot solder touch your fingers when you do this.
Despite your best efforts, you might be disappointed with the soldering. You'll keep thinking about the irregular beading and what you could've done differently. However, resist the temptation of poking with that one edge to improve it. It might become messier, and all that concentrated heat in one place might crack the glass. Work on the rest of the glass and return to the issues with fresh eyes.
My first few soldered glass works were irregular and beaded. However, over time, I've experimented with different temperatures and solder poses. This is the best way to improve your technique because it is suited to your specific requirements.
I found it best to keep the soldering iron at around 700 degrees Fahrenheit and angle the iron straight in front of me to see where it goes.
However, you might discover a different method that works for you. Your materials and ambient temperature will affect your solder heat and speed. So, experiment with various temperatures and find the one that gives you the smoothest solder. As you experiment, you might also find that you work best when holding the solder like a pencil or a knife.
Also, invest in a good quality heat iron. As a beginner, it is tempting to select the most popular irons and use them blindly. However, some soldering irons have fluctuating temperatures. This will make your work challenging and frustrating. So, look at user reviews to determine which solder is consistent and has no cold spots. It will smoothen your solder to a great extent.
To solder the other side, you need to flip the artwork over without compromising the structure. In this step, the best lift method is to support the middle of the structure while you raise and flip it. Only lifting from the sides can weaken the solder in the middle region.
After soldering, I sometimes choose to fit a U-channel came on the edges. If you opt for came, leave about 0.25 inches of the copper foiling bare at the edges. You can melt this foil and solder it to the came later.
When you're not fitting came onto the piece, make sure every edge is soldered completely.
I've mentioned the materials I use in each step, but as we learned, the type and quality are also important.
When I started soldering, I found various materials advertised online with equal praise. However, with experience, I've learned that there is no one-size-fits-all solution for soldering equipment. I experimented with various tools, solders, and cames to find the best ones for specific applications.
So, I'm going to go through my choices for each step and let you decide on the one that's best for your work.
First, you need to cut the stained glass into perfectly shaped pieces. You can use different glass saws to cut, of which the three primary types are ring, wire, and band saws.
I usually use glass ring saws with a metal ring and a sharp outer edge. This ring spins fast and cuts the glass in any direction I move it, but these are expensive. On the other hand, wire saws are comparatively affordable and have a rigid wire blade. Finally, band saws have a diamond-tipped steel blade, which makes them quick and effective glass cutters.
After cutting the glass, you'll start soldering the pieces. Stained glass solder comes in 3 types of compositions. These are 40/60, 50/50, 60/40, and 63/37, with the numbers representing the tin and lead percentages, respectively. Solders with higher tin content flow smoothly. Thus, you can work with 63/37 solder at low iron temperatures and use it for decorative soldering.
All solder types above will cool and solidify at the same temperature. However, 63/37 solder melts with the most ease, followed by 60/40, and so on. So, you can experiment with your soldering iron preferences and choose accordingly.
Also, you can use different solder types for different tasks. 40/60 solder is best for filling the gaps between the copper joints because it solidifies the quickest and doesn't fall through to the other side. After sealing the gaps, use solder with a higher tin content for the rest of the artwork because it has a glossy finish and allows you to work slowly. If you need a darker solder, cover it with a patina.
In my experience, 63/37 is an effective stained glass solder for a beginner. This is because it goes from solid to liquid and also cools down instantly. So it will be easy for you to go back and smoothen any large beads or irregularities. Also, you can remove it quickly in case of a mishap.
Many beginners opt for lead-free solder. They do this because lead is toxic when inhaled, and avoiding it is relatively safer. However, lead has some advantages, like sturdiness and affordability. So, you can opt for it and take safety precautions.
I will also compare solid core, acid core, or rosin core solder. I've learned that solid core solder is the only safe option for glass soldering, and rosin core solder is for electrical appliances. If you use rosin on glass, it leaves ugly brown marks and emits toxic gasses. Acid core solder also has similar issues with fumes.
After you choose the solder type and finish working with it, focus on the came. U-channel came can be made of lead, zinc, or copper. Of these, I use copper the most because it's compatible with my copper-edged glass pieces. However, you can also use lead came when your artwork has curved edges. I know that some artists use zinc for silver-plated glass art.
Moving on, it's time to choose the rings to fit onto the came. I usually create sturdy loops of copper wire, and it's best if these wires are tinned. Also, I can start with a thick wire or loop a thinner wire several times. Doing this allows me to choose the size and shape of the rings, and it's the most affordable DIY option.
However, if you're a beginner, you can buy readymade, recycled copper rings. These will help you get used to the procedures without risking the safety of your artwork.
Tip
Keep rubber yoga mats or a rubber-layered carpet under your worktable and the surrounding area. Rubber traps glass shards and prevents them from spreading to your entire room. Also, it protects you from electric shocks in case of an accident with the soldering appliances.
That’s it for my guide! I hope you can successfully follow the above-mentioned steps to solder your first stained glass piece and create sturdy artwork. They always help me create long-lasting solders that complete my artistic efforts.
As you gain experience soldering, I encourage you to tweak these steps according to what suits you. You'll understand your personal preferences after working on a few projects. You can then opt for a higher temperature and different solder composition or skip some steps you realize aren’t needed.
The best advice I've ever received was to update my methods constantly. Even when I thought I'd nailed the perfect method, I experimented and discovered a faster or safer step. So, I recommend you to keep searching for new knowledge.
Regardless of experience, safety is always a priority. You can be the most skilled stained glass artist and still have an accident while soldering. So, be confident in your skills, but take all the necessary precautions before doing any soldering work.