Expertises: Art, Pastel, Brush, Drawing, Pencil
Updated on

Inspiring Ideas for Modern Home
To use watercolor tube paints, squeeze out some paint on a mixing palette and use a paint brush to mix it with sufficient water, depending on the shade and consistency you desire. Then, apply the paint on paper using techniques like wet-on-dry, dry brushing, glazing, splattering, or salt technique, stippling or dry-on-wet.

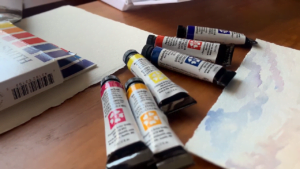
Watercolor paints in tubes have always been a popular choice when creating art. They are convenient and versatile, which is why both professional and beginner watercolor artists prefer using watercolor tubes.
You can easily squeeze out the paint from the tube and mix it with water to create a variety of shades and effects. Moreover, watercolor tubes are made by mixing pigments with honey (or glycerin) and gum arabic binder, which is why they stick together so well. In this context, I consider them the clear winner in the battle of watercolor pans vs tubes.
That said, what are the painting techniques that you can try out using this paint? And what materials and preparation are required for the same? In this article, I will try to answer all these questions and more. So, let’s begin!
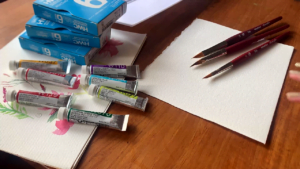
It is a no-brainer that watercolor paint tubes are one of the most important art supplies in this case. These types of watercolor paints are available in a wide range on the market, and you can buy several of them to create a variety of hues for your paintings.
However, only invest in a good quality watercolor paint tube brand for better results. And you should always read the label on paint tubes to get the right shade.
Artists need different kinds of brushes for painting, each serving a purpose. Hence, make sure to have all the brushes that you may need. For instance, you can purchase brushes with thin bristles for detailing, whereas you should invest in ones with large bristles to paint bigger sections of your painting. Again, quality is king, so keep that in mind as well!
You should use watercolor paper instead of traditional paper when using watercolor paints. This is because the former is designed in such a way that it absorbs water to stabilize the paint. Hence, they can hold the paint better on their surface.
Always keep a jar of water near you while creating any painting to clean your brushes from time to time. Additionally, you can use this water to dilute the paints to create lighter hues for your artwork.
Often, your shade choice might not be readily available on the market. In such cases, you can use a mixing palette to create colors on your own! All you need to do is mix the required primary colors using a paint brush on the pallet to create the desired shades.
Masking tape is primarily used to keep your painting still at a surface. You can also use this tool to create crisp edges or borders in your painting.
If you want to paint figures in your artwork, it is always a good idea to sketch it out first. For that, you will need pencils and erasers to draw on your sketchbook. It is advised that you only stick to the basic ones available on the market since you only need them to create a rough outline to adhere to.
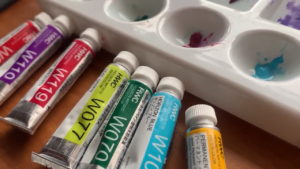
1. Squeeze Out The Paint On A Clean Mixing Surface
The first step is to squeeze out your desired paint colors from their respective tubes on a mixing palette. You can also use a mixing dish if you do not have a palette.
It is best to squeeze out only a small amount of tube paint when you begin this step. Doing so will allow you to understand factors like pigmentation intensity carefully. Once you have assessed such factors, add more paint as needed.
2. Add Water
You need to add water to watercolor paints for better activation while painting. You can use a clean brush, dip it in water, and then use it to mix the paint with water.
The amount of water you add to the paint depends on several factors, such as the consistency of the paint you wish to achieve and the intensity of the hues you want to create. For instance, add more water if you want your tube paints to have a thin consistency.
3. Mix The Paint
You can use a mixing palette knife or a clean brush to mix the water and paint effectively. Use circular motions to mix the two elements thoroughly. It is an important step, and you must ensure no clumps or dry spots in the paint mixture.
4. Test The Paint
Sometimes, the pigmentation and consistency of the paint on your mixing palette may differ from what appears on paper. Hence, it is best to test the paint on scrap paper first.
Once you apply a small amount of paint on the scrap paper, assess whether or not factors like the shade of the paint seem right to you. If not, you can add more water or paint per your needs to fix the issue.
As the name suggests, the wet-on-wet technique involves the application of a wet wash on the surface of your paper before you add paint colors to it. This technique can be used to create various effects like wood grain or water ripples and is a great way of using watercolor paint tubes.
Doing the wet-on-wet technique can help you blend colors more easily. Further, it facilitates the paint to spread across the paper much more efficiently. It is most commonly used to create soft and blended backgrounds in watercolor paintings. To apply the wet-on-wet technique using watercolor tubes, you can follow these steps:
Step 1
Dip your brush in clean water and stroke it across your paper. Ensure that the paper is evenly wetted and there are no dry spots. Alternatively, you may use a spray bottle to dampen the surface you wish to paint.
Tip
You should never over-wet the paper. Since your paper may get damaged after it reaches its saturation point, it is always a good idea to stick to only moderately wetting its surface.
Step 2
Squeeze out your paint and mix it on your mixing palette. You can use different amounts of water to achieve your desired level of consistency and add different shades of tube paints to get the precise shades you want to create.
Step 3
Apply the watercolor paint directly on the wet surface of your paper. You can add more colors to blend with the background as you see fit in this step.
Step 4
Once you have created all the textures, patterns, and designs using the tube paint mixtures, let the painting dry completely. Remember that wet-on-wet paintings can take longer to dry out because the paints and the surface are wet.
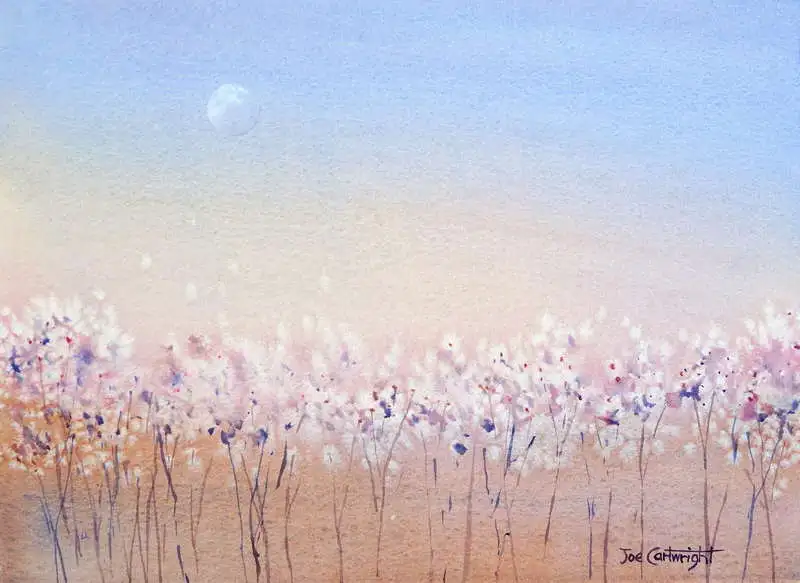
Example Of Finished Paintings Using Wet-On-Wet Technique

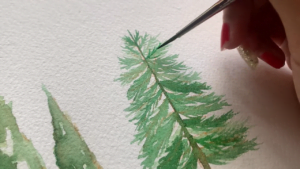
You might like the dry brush technique if you like creating rough textures in your paintings. It requires you to apply a small amount of tube paint on a dry brush and then stroke it to create a variety of textures and highlights in your artwork.
You get a lot of control over your brush movements with this technique. As a result, you get the creative freedom to create a range of effects - from light to dark aesthetics.
The dry brush technique is popularly combined with other techniques, such as the wet-on-wet method of watercolor painting. You can follow these steps to try the dry brush technique:
Step 1
Take a clean and dry brush. Dip it in a small amount of paint and remove any excess paint using a paper towel.
Step 2
Hold the brush at a slightly tilted angle and create light strokes on your watercolor paper. Ensure that you do not apply too much pressure while doing so to avoid microtears. Wait for this layer to dry.
Step 3
Once your first layer dries out, add the next layer of dry brush strokes. Keep adding layers until you have reached your desired textures or patterns in your painting. You can experiment with different kinds of brushes, tube paint tones, as well as with textures like toothpick scratches.
Examples Of Finished Paintings Using Dry Brushing
A richly colored surface can change the look of your painting completely - and that is exactly what the glazing technique helps you achieve. It requires you to layer multiple thin washes one over the other.
The glazing watercolor painting technique can help you create a strong depth in your artwork. It can also help you strengthen the complexity of color in your painting. You can follow this step-by-step guide to apply the glazing technique easily:
Step 1
Mix the watercolor tube paints thoroughly and clean your brushes. Add water to the paint mixture as per your consistency requirements.
Step 2
Use a large damp brush to apply the first thin layer of this paint on your watercolor paper. You can also use a sponge for application. However, make sure that you do not use too much water, or else you might damage the surface of your painting.
Step 3
Let the first layer dry out completely before adding the subsequent layers. Remember that you may need to add several layers of the same color to achieve your desired textures and gradients.
Step 4
Once the layers of your glazes dry out completely, you can add fine details to your painting. These include highlights, outlines, and additional colors for a bolder punch.
Examples Of Finished Paintings Using Glazing
More than washing and detailing is required to create an artwork that stands out. Hence, trying the salt technique with watercolor tubes is a great idea! It can help you create a unique texture and add an interesting visual treat to your painting.
When salt is sprinkled on the wet watercolor wash of any painting, crystalized patterns start forming on it. Since the salt crystals absorb water and pigment, a beautiful texture is produced. Here is a step-by-step guide to try out the salt technique with tube watercolor paint:
Step 1
Use a large brush to apply a wet wash on your watercolor paper.
Step 2
Add the salt crystals on the surface of your watercolor paper while the wash is still wet. You can choose your choice of salt depending on the texture that you wish to create. For instance, you can add coarse-grained salt to create rough textures or stick with fine-grained salt if you want delicate textures.
Step 3
Let the salt crystals sit on your painting until it is completely dry. This painting process can take several hours in this case since a tube of watercolor paint takes longer to dry.
Step 4
Once the paint dries, use a clean and dry brush to remove the salt crystals from the surface of your painting. Or, you can use your fingers (like how I do) to scrub off these crystals gently. Ensure that you do not apply strong pressure while doing so, or else you might damage your watercolor paper.
Examples Of Finished Paintings Using Salt Technique
If you ask me, the splattering technique is one of the best ways to create interesting and creative effects in your artwork. It requires you to spread random splatters of tube paints on your painting to create abstract effects.
Splattering can add textures and depth to your artwork and facilitate enhancing certain sections of the painting. You can use this technique to perform several tasks, such as creating an enticing background in your painting. Here is how you can use watercolor paint technique to try out splattering while painting:
Step 1
Pick the watercolor paint tubes that you want to splatter on your painting. Mix them with water to achieve the desired level of consistency in your paints.
Step 2
Dip a clean brush in this smooth mixture of paint and water. Lift it and hold it right over your watercolor paper.
Step 3
Use your free hand to tap or flick the brush. This will cause the paint accumulated on the bristles of your brush to splatter on your painting, thus creating your desired effect. Repeat the process with as many colors as you want.
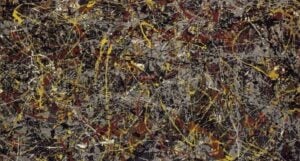
Examples Of Finished Paintings Using Splattering
Stippling is a popular watercolor painting technique where a professional artist is supposed to use watercolor paint to make small dots or paint marks to create various effects. I often use this technique with watercolor tubes to create several kinds of patterns.
The key to creating a wide range of designs using the stippling technique is assessing the perfect size of dots or marks your painting needs. For instance, you can vary the density and size of your dots and marks based on whether you want to create subtle or graphic details. Here is a step-by-step guide for trying out this technique with watercolor tubes:
Step 1
Take your watercolor paper. Sketch the area you wish to stipple on using a pencil.
Step 2
Squeeze out the watercolor paint from the paint tubes on your mixing palette and dip a dry brush into it. Ensure that the brush is small, round, and clean.
Step 3
Hold the brush at a 90-degree angle over the space you wish to stipple. Then, dab its bristles lightly to create small dots and marks on your painting. You can play with spacing and pressure while creating each dot to make various designs and patterns.
Step 4
Once you have added enough dots to your painting, use another (preferably dry) brush to blend certain areas to create a softer look.
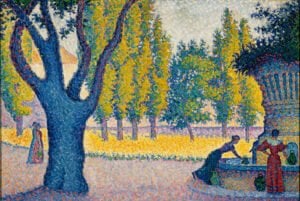
Examples Of Finished Paintings Using Stippling
As the name suggests, wet-on-dry requires applying wet paint from the watercolor tubes to your dry paper. You will like working with this method if you want to create precise details in your paintings.
The tube paints remain in place when applied on a dry surface because they are thicker in consistency and hold their position on the paper. As a result, there is no issue of bleeding or spreading in this case. Here is a step-by-step guide to using the wet-on-dry technique to create controlled details:
Step 1
Take a bit of paint from the watercolor paint tubes and mix the pigments on your mixing tray. Using a wet brush, lift this mixture off of your plastic or ceramic palette.
Step 2
Using the tip of the wet brush, apply the watercolor paint on a dry sheet of your paper. Ensure that your brush is not dripping with water and is just damp enough to work with.
Step 3
Create all the designs and effects that you want in the first layer of your painting - fine lines, edges, and so on. Let it dry before you add the next layer of watercolor paint to the tube.
Step 4
Keep repeating the process until you achieve your desired design.
Once you have tried out the various techniques you can use with paint tubes, it is essential to clean up too. Doing so ensures that the watercolor paints in tubes won’t get degraded due to neglectful maintenance. Further, cleaning your art tools after painting with watercolor paint tubes can also help ensure that your future paintings are not muddy or dirty.
1. Clean Your Brushes
The bristles of your dirty brush can get hard over time, making the process of painting way more inconvenient than it is supposed to be. To avoid this issue, cleaning all your brushes right after you paint your beautiful artwork is always a good idea.
To clean your brushes, rinse them with clean water. Use your fingers to gently remove any stubborn dried paint from the bristles of your brushes. You can also use a mild soap for a better cleanup. Once you have cleaned the bristles of your brush, reshape them.
2. Clean Your Palette
Since artists use their personalized watercolor palette a lot while creating any painting, it becomes crucial for them to remove the dried paint from its surface. Working with a dirty paint palette can lead to the residue of the dried paint and dust mixing with your fresh paint - thereby causing muddiness in your fresh paint mixture.
Using a paper towel, remove the excess wet paint from the surface of your mixing palette. You can use mild soap to scrape off the dried paint from your mixing palette and rinse it under water. Hence, it is a good idea to clean your mixing palette right after you are done with one painting session.
3. Clean Your Workspace
While most artists remember to clean their mixing palettes and brushes, they commonly forget about cleaning their workspace too. Painting in a dirty workspace can cause a strong negative impact on you, such as a lack of motivation, due to the accumulation of clutter around you. Additionally, dirty tables can lead to staining on your paintings as well!
Hence, it is best to maintain a clean workspace. Collect all your art tools and put them back in their storage places. It would be best to clean your workspace with a damp cloth in areas where you might have spilled too much paint, such as tables or floors.
1. Store The Watercolor Tubes In A Cool And Dry Place
The best way to prevent dried watercolor paint tubes is to store them in a cool and dry box with a tight lid. Since heat and moisture speed up the tubes drying out, it is best to keep them away from areas with direct exposure to sunlight.
2. Seal The Watercolor Paint Tube Caps Properly
If you want to work with fresh paints every time you use watercolor paint tubes, you must seal their metal caps properly. By doing so, you can prevent the moisture from getting trapped inside the tubes to a great extent. Tighten the nozzle properly to prevent air from entering the paint tube.
3. Place Your Watercolor Tube Paint Set In An Upright Position
Since we squeeze out the paint whenever we use watercolor paint tubes, it is best not to store them by placing them horizontally. Instead, stick to storing your tube paint set in an upright position. This way, you can minimize the chances of your tubes leaking.
Most of us who have been using watercolors for a while will have old, crusty paint tubes lying around the house. As watercolors don’t really have an expiry date, you can easily restore them with a few simple steps. You’ll need a little more patience while restoring old dried paints, but it’s worth it and can be done with only a few supplies. Yes, you can directly pick up paint from the tube while working on a spot color. You need to unscrew the cap, and lift a little paint from the tube with a wet brush. Just make sure that the brush is absolutely clean to avoid contamination. But we don’t recommend using this technique frequently as it may promote mold growth. After you use watercolor paint tubes, it’s pretty essential to store them properly to prevent mold growth and contamination. Remember to clean the mouth of your tubes with a damp cloth or paper towel to remove any excess paint that may get dried and clog the cap. To avoid the paints from cracking or getting separated, store the tubes in a cool, enclosed space and an airtight container. Properly stored watercolor tubes may last a long time and remain vibrant, which can sometimes be more than ten years.FAQs Related To Watercolor Paints In Tubes
How to restore dried watercolor paint tubes?
Can you use watercolor paint straight from the tube?How to properly store watercolor paint tubes?
Artists love experimenting with new pure paint sets. Hence, if you are bored of using watercolor pans, it is best to switch to paint tubes. Watercolor paints are semi-liquid, highly pigmented, and can help you add bold color punches to your paintings - unlike watercolor pan cake paints.
You can use watercolor tubes to paint pigments through several kinds of painting techniques, such as wet-on-wet, dry brushing, and so on. With watercolor tubes, you have the flexibility to choose between using a watercolor paper or painting on a watercolor canvas. Even though such paints may have a higher cost price, they are definitely worth every penny!
Summing up, the best way to use watercolor paints in tubes is to experience and discover your own style. Don’t shy away from experimenting with different shades and hues, no matter how bold it may seem for your comfort zone.
If you’ve found this guide insightful, don’t forget to give my article on how to paint glass a read.