Andrew’s experience in the acoustic industry started in the music industry, a part of the acoustic industry in which absolutely everything matters, every sound wave, reflection, echo, resonance or reverberation, all pieces of the puzzle Andew played.
Fast forward almost 10 years, Andrew finds himself specialized in acoustic construction for more than 5 years now, being the Acoustics Manager at Clearsound Acoustics.
Responsible for the design of acoustics design, acoustic supply and installation of specialized gear such as noise barriers to reflect or absorb the energy of the sound waves, using damping structures such as sound baffles for absorption, or using active anti noise sound generators Andrew is today a full-fledged acoustic expert, permanently learning, researching and improving his craft.
As a sheer idealist, Anton’s approach in architecture and content curation is tedious and meticulous this clearly reflects in his work here on Homesthetics with each and every article, after a decade of work on Homesthetics, the content creation guidelines still being improved every month.
Expertises: Architecture, Design, Art, Home improvement, Painting
&
Updated on
Soundproofing a gaming room using acoustic panels, mass-loaded vinyl, and other sound insulation materials like soundproof curtains can help you get the ultimate gaming experience. You can use various such soundproofing techniques for existing surfaces as well as when building a room from scratch.
Noise control and reduction when playing video games require much more than wearing the best gaming headset, especially if you have a dedicated gaming room. And thankfully, there are many soundproofing techniques you can use to keep outside noise from entering the room and inside noise from escaping outside.
Dive into today’s guide, where I will take you through the different methods for soundproofing doors, walls, windows, the ceiling, and the floor using soundproofing materials and through structural alterations. Do note that the field of acoustics is an extremely wide and complex, there is no "soundproof gaming foam" but there are simple enough ways to improve your acoustic gaming room performance in a DIY project, more on that, and others in the article!
How To Build A Soundproof Gaming Room
Whether you’re building a new gaming room or looking to modify the existing one, the following tips and tricks will come in handy in both cases. However, keep in mind that you may have to employ a combination of the soundproofing techniques mentioned below for optimum results.
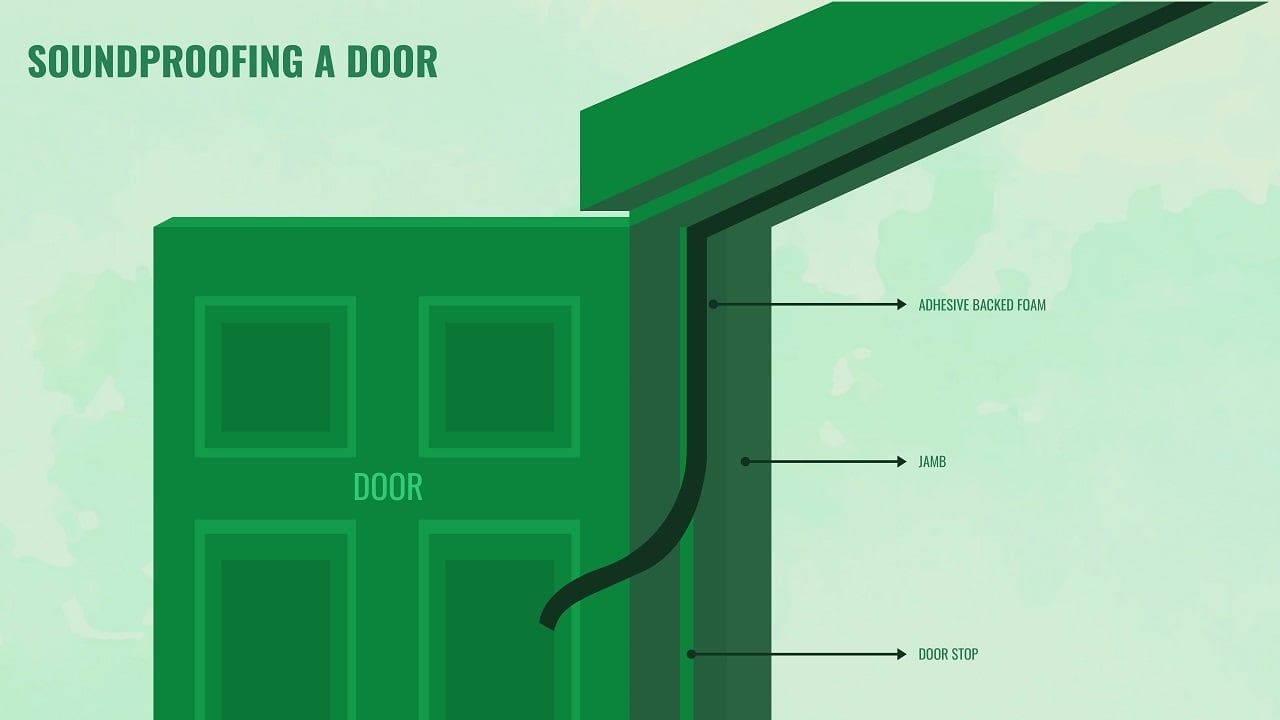
Soundproofing The Door
Just like with any other room, the door of your gaming room will be a central structure that will facilitate the entry and exit of sound. Hence, most gaming room soundproofing projects begin with soundproofing the door to absorb or block sound. And there are a few ways to achieve this:
1. Covering Gaps
Gaps around your door frame are the main culprit for sound leakage, but thankfully, you can seal them to reduce noise entering or leaving the room. For this, I’d suggest applying a weather-stripping seal on the door frame, so there’s no gap when you close the door.
After applying one layer of the seal, close the door and see if there are any remaining gaps. If there are, you will need to apply some additional layers till there are no visible gaps remaining.
As for the gap below the door (between the door and the floor), you’re better off using silicone door sweeps, which are generally easy to install, thanks to the adhesive-equipped design. Simply measure the gap and cut the door sweep as required, after which you can paste it below the door.
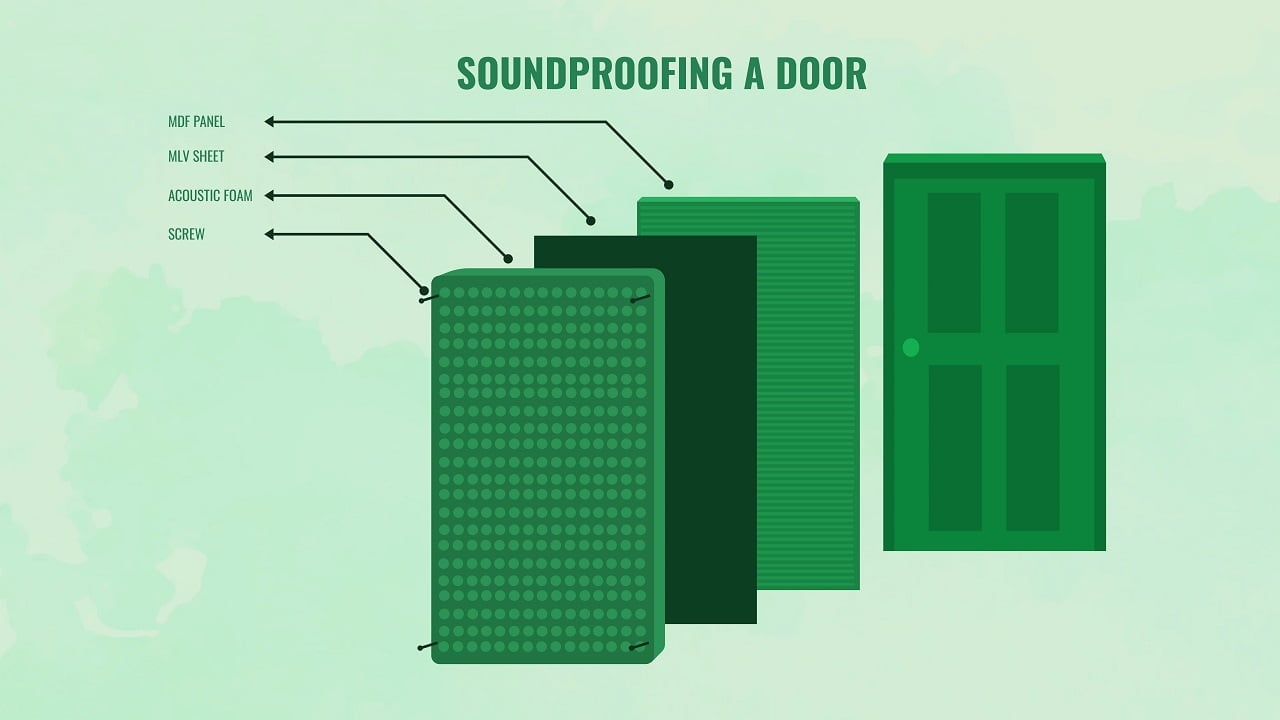
2. Adding Mass To The Door
Unless your game room has an all-metal construction, sealing the door gaps alone won’t do much good. Since most gaming rooms are, well, like the other rooms in a house with almost the same features as a bedroom or guestroom, the door structure tends to be hollow.
What this means is that there’s enough gap within the structure of the door through which sound waves can travel easily without losing energy. So, the sound will come out pretty loud from the other side of the door, even when it’s closed.
However, you can solve this noise problem by adding more mass to the door, thereby thickening its structure and “forcing” the sound waves to lose energy when they travel through it. And the easiest and cheapest way to do it is by hanging a thick moving blanket on the door using screws or textile adhesives.
Aside from acting as a barrier to unwanted noises, these soundproof blankets can render better sound absorption properties to the door. As a result, you will be able to prevent sound from entering and exiting the room, as well as reduce echo in the room.
Tip
Add at least two layers of different soundproof materials on a thin door.
3. Installing Acoustic Panels Or MLV
If you don’t want moving blankets to spoil the look of your gaming room and can spend a little more onsoundproofing material, then acoustic panels can be the way to go. Depending on your needs, you can find different variations of these panels that serve different purposes.
For example, textured acoustic foam panels can enhance your door’s sound absorption and deaden sound by transmitting the sound waves that hit it in different directions. Likewise, foam panels with flat surfaces are generally considered better for sound absorption and reducing echo. In other words, they help improve the sound quality or acoustics in your room- an advantage that will benefit gamers who don’t have noise-canceling gaming headsets.
As for the installation of these panels, you can use hanging strips, screws, or even adhesives depending on the material of your door.
Alternatively, you can substitute acoustic panels with mass-loaded vinyl (MLV) panels that are cut into the right sizes according to the door surface you need to cover. And feel free to paint over the panels with textile paint or wrap them in thick fabrics to enhance the décor of your room.
However, if you need to cover a lot of space, using MLV panels won’t be one of the most affordable options for soundproofing.
Soundproofing The Walls
Aside from the door, the walls of your gaming room can increase the noise levels by allowing outside noise to enter the space. Oftentimes, you can cancel out all the noise in the room by simply soundproofing the walls.
Again, there are multiple ways to soundproof the walls of your gaming room. While some of them may be more suitable for DIY projects (as you don’t need to take down the wall), others may require the assistance of professionals.
As such, I always recommend my readers to start with the non-invasive methods and follow them with the invasive ones if desired results aren’t achieved.
1. Adding Mass To The Walls
Just like you’d do with the door, adding mass to the walls can increase the density of the structure and prevent the transmission of sound waves through it.
You can use soundproofing curtains or soundproofing blankets for this purpose, but they are typically more suitable for blocking low-frequency noises. Aside from that, MLV panels may come in handy, too.
Not only that, but you can also install more drywall layers to the existing wall surface to increase its density. Although standard drywall does a decent job, I’d suggest going for soundproof drywall panels if your budget permits.
The important thing to remember here is that the more layers you have on the wall, the better will be the noise blocking property of the wall. However, this can be a problem for smaller rooms, as you’d end up losing a lot of space. In such cases, you’d want something more effective that does the job just in a couple of layers.
Tip
You can stack furniture near the walls as a temporary solution until you get your hands on the right soundproofing materials.
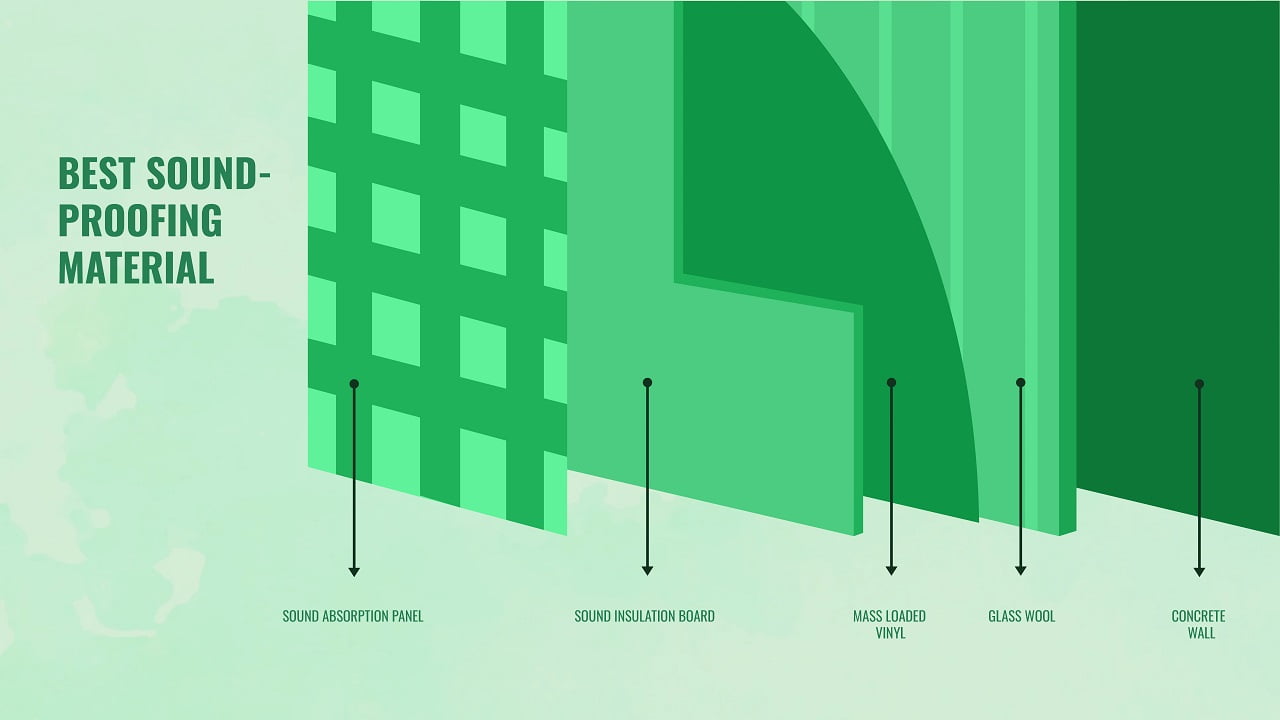
2. Installing Sound Dampening Materials
If you aren’t looking for blocking noise per se but still want to improve the sound quality in the room, soundproof foam panels or thick acoustic panels can be the best solution. They aren’t very expensive or heavy and can be easily installed without you worrying about them coming off.
Gamers who record live streams or podcasts of their gaming experience prefer opting for this method in addition to more effective noise reduction methods for clear audio recording.
3. Soundproofing Treatment For Walls
If you’re bothered by too much noise in the gaming room, then you may need to go for invasive soundproofing techniques involving adding sound-insulating materials inside the wall. And to speak the truth, there’s nothing better than insulating the walls from the inside to facilitate active noise control at all times.
Let me now take you through the best methods for building a soundproof wall from scratch.
A. Installing MVL Panels
Installing MVL panels within the walls is one of the most effective noise-canceling options you can employ. In this technique, the panels are directly screwed on the wall studs, after which the drywall layers are added to finish the wall assembly.
B. Adding Insulating Material Between The Studs
Another way to prevent your walls from transporting the sound to the entire room is insulating the space between the studs with a soundproof material like mineral insulation wool batts. Although you can do this on your own when the wall is still being built, make sure to wear gloves and a face mask, as the slivers can cause injuries and breathing troubles.
C. Decoupling The Walls
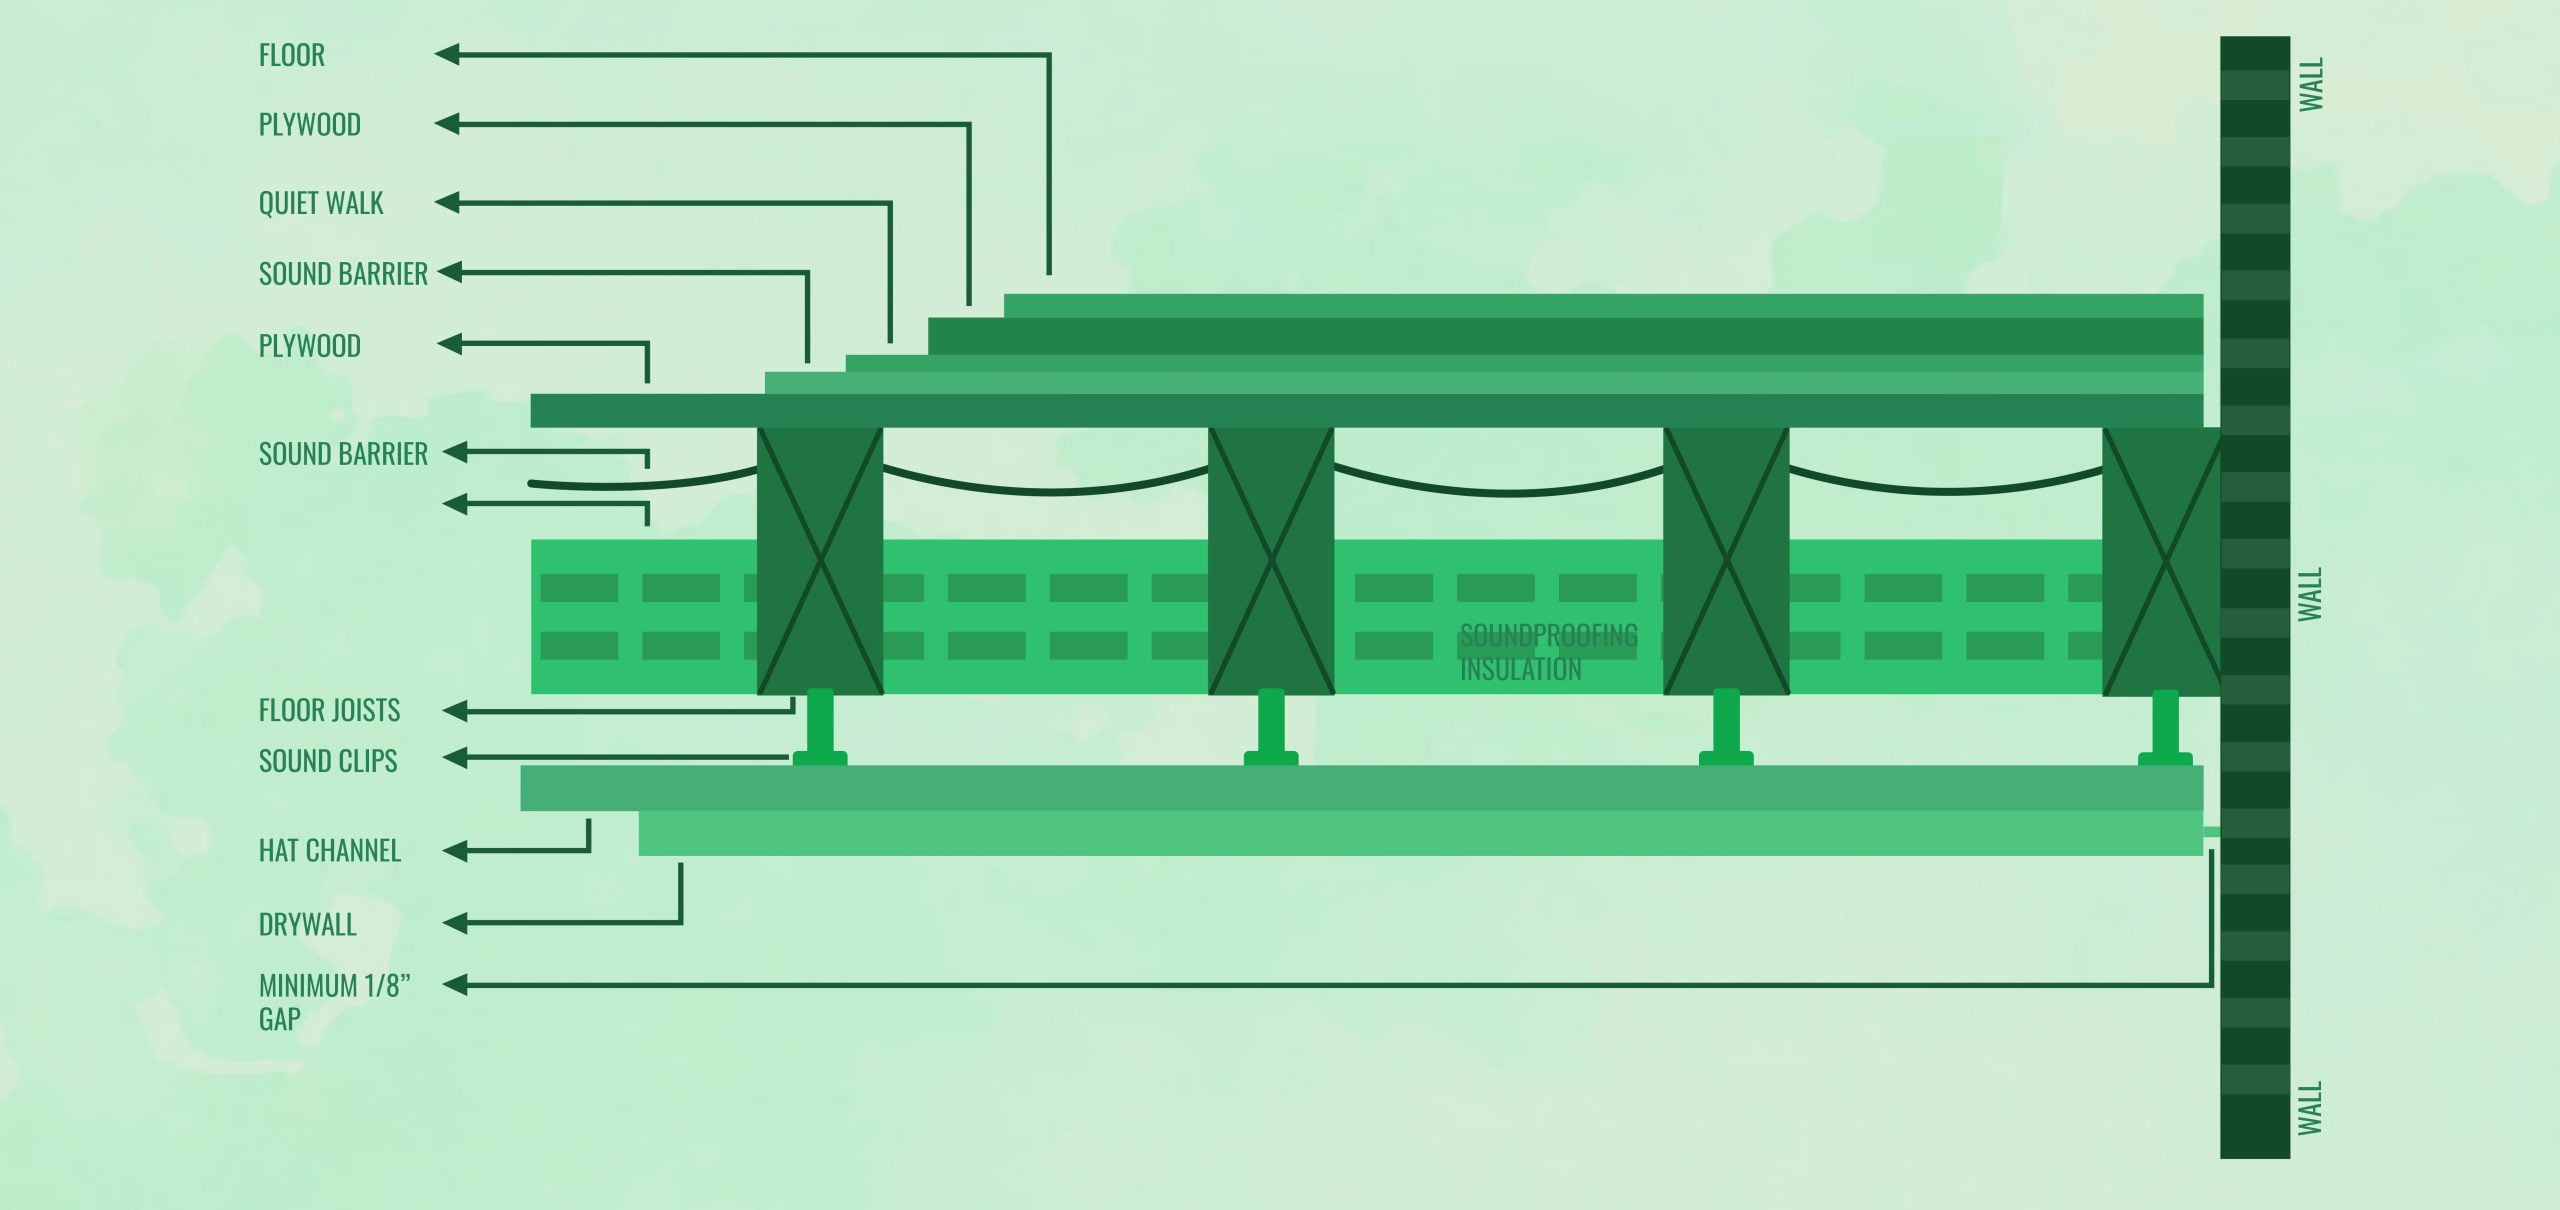
If you’re building a new gaming room altogether or constructing a soundproof box (or soundproof gaming booth, as it’s often called), then you can also try decoupling the walls. Simply put, this technique involves separating the external drywall structures from the inside wall using resilience channels and sound isolation clips.
By employing this technique, you essentially reduce the contact points between the internal structures of the wall, thereby blocking the pathway for sound transmission.
Soundproofing The Window Panels
Most gaming rooms have windows, which can add to the sound transmission property of the wall through their glass structure or gaps in the wooden frame. However, the good news is that you can easily tackle these problems the DIY way by hanging soundproof curtains on standard curtain rods.
The added advantage of these thick curtains is that they may aid the insulation of the room, making it more energy-efficient to cut down on your energy bills in the long run.
For cracks in the wooden frame, you can use any acoustic caulk to fix them. A better way would be to cut small pieces of acoustic panels and paste them on the cracks using the caulk for reinforced soundproofing.
In case of severe sound transfer, you may need to build an additional window frame with plywood panels and attach it to the main window frame. Furthermore, install soundproofing curtains on the new window frame to reduce noise optimally.
Soundproofing The Ceiling
A soundproof ceiling is extremely important for designing a soundproof gaming room, especially if the floor above it isn’t treated for soundproofing. And here are a few ways that can get you success:
1. Adding Insulating Materials
Sound-dampening materials like foam panels and even rubber mats can be installed on the ceiling of the gaming room to absorb any unwanted noise coming from upstairs. But my favorite way to soundproof ceilings is adding acoustic tiles, which also help elevate the look of the ceiling like nothing else.
The best way to go about the job is starting with chalking out a grid-like structure, covering the areas that are more susceptible to noise leaks, and adding the tiles using the right adhesive. But this method can become a bit expensive, especially if you have a lot of area to cover.
2. Creating A Dropped Ceiling
If your gaming room is spacious enough and you’re looking to change its décor, consider adding a dropped ceiling structure using standard drywall. Additionally, fill the space between the main ceiling and the dropped ceiling with some sound-insulating material, as any unused space of light and plumbing fixtures can become “sound transporters.”
Apart from that, you can insulate the dropped ceiling using foam panels or rubber mat pieces, provided they don’t add too much weight to the structure.
If you’re constructing the room from scratch, you can fill the gaps between the ceiling joists using soundproofing material as you’d do for the wall studs. However, I’d suggest seeking professional help for this, so speak to your contractor in advance.
Tip
You can also soundproof the floor above the roof using rubber mats, thick carpets, and rugs, or a wooden subfloor to reduce noise transfer between the floor and ceiling.
Soundproofing The Floor
The final step in designing a soundproof gaming roof is soundproofing the floor. Now, depending on how much sound transfer your floor facilitates, you can employ simple techniques like adding thick rugs and carpets. For example, placing EVA foam or anti-vibration mats can absorb high-frequency sounds, so your family members can stay undisturbed if you love playing video games on loudspeakers.
Although these may not block the noise, they can absorb the sound waves to prevent echo and improve the sound quality in the room. Apart from that, you can install a subfloor (floor underlay) made of MDF or plywood panels on the floor and use a soundproof sealant like Green Glue compound to secure it on the floor.
Additional Tips For Building A Soundproof Gaming Room
Here are a few things you can try to keep your gaming room from disturbing your family members and neighbors:
1. Design A Soundproof Housing For Your Gaming System
If soundproofing the entire room seems too much of a hassle, simply build a soundproof housing for your gaming system using soundproof drywall. Or, you can use standard drywall and reinforce the surrounding surfaces with any of the sound insulation materials mentioned above.
Just make sure it has enough room for you to sit comfortably inside in front of the system. And poke some holes in the wall directly behind the system to keep it from overheating.
2. Place The Speakers On A Foam Mat
Placing the speakers and woofer directly on a hardwood floor can make the room extremely noisy, as the sound waves vibrate through the wooden structure and amplify. So, use an acoustic foam panel or mat below them to absorb the sound.
3. Use Anti-Vibration Fan Mouths
Anti-vibration fan mouths can be very effective in reducing the fan noise of your computer, especially when the fans are overworking to cool the system. I’d strongly recommend implementing this trick if you play graphics-intensive games (like Nintendo Switch) for long hours.
Soundproofing Gaming Room Final Thoughts
With that, it’s time for me to wrap up today’s guide.
But it won’t be fair if I end it without providing you with one more pro tip: in case you need to use multiple layers of drywall, attach them using an acoustic sealant like Green Glue compound for the best results. You can even use this hack to substitute a single layer of soundproof drywall if it threatens to burn a hole in your pocket.

 Reviewed by
Anton Giuroiu
Reviewed by
Anton Giuroiu