Expertises: Paint, Home improvement, Wood, Car, Painting
Updated on
Inspiring Ideas for Modern Home
It’s true that geodes are one of the most beautiful geological creations. And what if we tell you that you can create one at home?

These rock formations have intrigued geologists and laymen alike because of the beauty that they present. There’s no doubt that they are one of the most enigmatic rock formations that you can come across. But it’s not easy to procure one for use as a decorative item in your living room.
However, you can make a resin geode, which, when done right, looks almost the same as a natural one. But in order to achieve the best results, you need to know how to make resin geodes the right way.
That’s why we have designed this guide with all that you need to know about making resin geodes. With our guidance and your creative instincts, you will be able to create a masterpiece in no time.
So, without any further delay, let’s check it out!
It goes without saying that resin geodes are not natural, but you can make them look like one with some effort. Natural geodes are rock formations that reveal enchanting forms once they are cracked open.
Resin geodes are artistic alternatives to natural ones. Because the resin is pretty soft when molten, it allows you to play with the patterns and experiment as much as you want. And when it dries up, it hardens to deliver a finished look.
Besides, you can consider putting acrylic gems, crystals, and glass globules to make the resin geodes look even better. And it will surely become one of the centerpieces in your drawing room and a conversation starter at every party. You can consider making it any shape and size that you want. It can be as small as a coaster or as big as a magnificent sculpture!
Unless you have worked with resin before, the material may seem a little intimidating.
But trust us- it is not very difficult to work with, and once you read this guide, you will have a fair idea about how to finish the job without much hassle. All that you need to do is remember a few important things and remain patient throughout the process.
On that note, here are the steps to make a resin geode.
Before you can go into the intricacies of making a resin geode, it is crucial that you be well-prepared. By this, we mean that you should keep all the required materials handy and prepare the workspace properly.
Once you have all the materials, it is time you begin with the process. The first step is to start mixing the resin and make sure that you strictly adhere to the instructions printed on the package.
Your safety and protection are also important, so make sure that you wear some protective gloves and an apron before working. Likewise, use a respirator and put on safety glasses to protect your face.
Other than that, we’d suggest laying a protective drop cloth on the work surface to ensure that it does not incur any damage. An additional pro tip: tape up all the sides of the canvas properly to ensure that there is no damage in case the resin starts to drip. Even if you see a few drips, just remove the tapes, and cleaning the surface will become super simple.
Moreover, ensure that the surface you are working on is completely stable and straight. If it is slanted, then chances are that the resin will eventually become lopsided.
Like most other DIY projects, making a resin geode also requires a good amount of planning. Before beginning with the work, we would suggest that you keep good images and designs of resin geodes as references.
Once you decide on the design, you can simply draw lines accordingly on the canvas to recreate the look. You will find fascinating images of resin geodes on the internet and can choose any that you like.
When you are taking the reference, ensure that you draw the lines and note which color to place next to the other. If this idea does not appeal to you, simply take the line reference and choose to put the colors more spontaneously.
After you are done creating designs outlines, you can simply use some acrylic colors to start painting on the canvas. We would suggest that you try sticking to the reference lines to ensure that the design is up to the mark.
During painting, you can choose to make some additions too. Consider putting metallic foils or trendy glitters into the mix.
Apart from foils and glitters, you can make other additions too. Some people like adding glass and crystals to their geode designs. If you plan on doing the same, remember that you make the additions only after the paint has dried up.
To make sure that the attachments are secure, use good quality craft glue. This will help the embellishments to stick to their place even after you add a layer of resin.
As we have already mentioned before, in order to mix the resin properly, it is an absolute must to read the instructions carefully. We would also recommend that you mix the resin in small bottles so that you can have more color variations and less wastage. You can either add paint or powder in these bottles to get the resin colored according to your choice.
Unless you want the colors to mix spontaneously, you have to follow some procedures. For that, make sure that you put the colors in different containers and apply them one after the other, only when the previous one has dried up.
But we know that there are some people who like the resin mixing naturally and love the unconstrained flow better. It is completely up to you about which method you want to go for. Just keep a wooden stick handy so that you can adjust the resin according to your requirement.
For making your resin geode even more beautiful, consider putting glitter-embedded layers in different parts of your canvas. You might be wondering why you should do it so late in the process. So, let us break it down for you.
If you do it earlier, the chances are that the sparkles will settle and not remain significantly visible. In order to keep the resin near the surface, it is best that you add sparkles and glitters in different batches and keep adding them in succession.
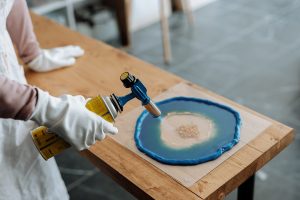
Besides making great designs, it is crucial to make sure that you maintain your work well. And for that, it is an absolute must to put a clear coat on your resin geode.
Apart from protecting your artwork, it also helps to add an amazing gloss to it. But keep in mind that if you have added a lot of glitters to the resin, adding a clear coat might diminish the texture of the geode. Keep this in mind, and decide accordingly! But rest assured that an effective application of a clear coat will help your artwork look even better.
In case you are making a piece of resin furniture like a table or a wardrobe, make sure that you apply a thick topcoat. This is essential for making the surface smooth and will help you prevent scratches from forming.
As John Keats had said, ‘a thing of beauty is a joy forever.’ This holds true for resin geodes as they can be turned into exquisite artworks that will add immense beauty to your home décor. You can try to imitate natural geodes with the help of resins, as we have already discussed, and add a dash of glitter and sequins to make them look better.
Get as creative as possible, and do not be scared of experimenting. Once you do that, you will see that the artwork is turning into something very similar to the natural geodes. And you can use the resin geodes to make tabletops or coasters, anything that you desire. As we said, let your creativity run wild!
After you are done practicing a few times, you can start experimenting with crystals. It is not a difficult process once you get the hang of it. There are 2 main ways of doing it.
Some crystals are big in size, almost as large as broken glass pieces. When you are dealing with big crystals, we would suggest that you put them on the surface first and hold them in place with the help of craft glue.
Once you are done fixing the crystals on the surface, pour the resin carefully to secure them properly.
On the other hand, if you decide to use smaller pieces of crystals, it is best to mix them with the resin instead of applying them separately. They will get fixed to the spots as the resin hardens over time. In this case, you can skip a step and get done with the artwork within a short span.
That’s all for today, friends!
Hope you had a great time learning about how to make beautiful resin geodes. We also hope that you will be able to implement the methods we have shared for the best results. Also, we wish you loads of good luck and that you have fun times with creating the resin geode.
Keep in mind that creativity is at its peak when you are enjoying the process. So, try to channel your energy to ensure that the beauty comes through. In case you have any more queries, reach out to us in the comments section below. And keep a watch on this space for more interesting reads.
Until next time, adios!
Related Articles
Sanding Epoxy Resin Guide 101 [All You Need to Know]
11 Best Epoxy Resin For Crafts [Reviews & Buyer’s Guide]
5 Best Epoxy Resin for Tumblers [Complete Tutorial]
11 Best Bar Top Epoxy [Reviews & Buyer’s Guide]
Waterproof Epoxy 101 [Is Epoxy Waterproof?]
5 Best Epoxy Wood Fillers [Review & Buyer’s Guide]
What is Resin and How It’s Used [All You Need to Know]
10 Best Epoxy for Plastic Today [Reviews & Buyer’s Guide]
Food Safe Epoxy Guide 101 [All You Need To Know]
What is Resin and How It’s Used [All You Need to Know]
How to Make Resin Jewelry 101 [All You Need to Know]
Totalboat Resin Epoxy 101 | Reviews + Buyer’s Guide
How To Make Resin Dice 101 [All You Need to Know]
Art n Glow Resin Review [All You Need to Know & Buyer’s Guide]