Expertises: Art, Painting, Drawing, Home improvement, Gardening
Updated on
Inspiring Ideas for Modern Home
For those who are new to the world of woodworking, it can be challenging to get started!

With a high price tag of both the tools and materials used, making a mistake can be costly. Especially when it comes to tools, they can help you attain a clean result. The only downside is the high price that they come with; every tool is an investment with its own learning curve.
When learning to use a tool, it is a good idea to know what exactly the tool is meant for. This helps understand where and how it can help you efficiently. But when it comes to the planer or jointer, it is easy to be confused about what they are used for specifically, as their purposes are very similar.
Read on to understand what tool you should use to get the job done.

The jointer or planer, as a woodworking tool, can be a great addition to your workshop to increase product quality overall.
Wood is not always a straight plank the way we see it on tables and shelves. It is uneven and warped at times. To achieve a clean plank of wood to work with for practical and aesthetic purposes, woodworkers use a jointer or planer.
Both share similarities in their purpose of shaping the wood; i.e., to smoothen it, utilizing the same mounted blade system on a rotary drum. With such a similar purpose and design, it can be challenging for a novice to realize the differences in these machines.
Alternatively, those who use pre-finished wood may not need either of these tools. Many choose to buy the S4S lumber, which basically means wood that has been smoothed out on four sides. As such, it doesn’t need to be prepped any further before being worked on. Additionally, you can have the wood pre-finished for you by the lumber before being delivered.
More commonly, the case is that the wood for projects is bought from a local lumber yard or warehouse, which means it will be raw and unfinished. Before you can work with this uneven wood for your project, it must be finished and smoothed out. This is where a jointer and planer would come in.
With that, we will now see what a jointer and planer is in more detail, with their strengths and weaknesses highlighted, and how they differ from each other.
Dealing with rough wood can be troublesome to create an even surface to begin working it into your project. A jointer is what many professional carpenters and woodworkers consider to be the first step in preparing wood for a job.
It is essentially a specialized tool to make a straight edge and square off the end of your board. This removes any warps, twists, and cupping in the wood, which is achieved by the blade system on a table that smoothes it out as it passes through the blade. It cuts the wood from below.
If you do not wish to use a jointer, the same effect can be achieved with a hand plane as well. Of course, it will require more energy and time. On top of that, it can be challenging to master this technique and still have the same quality result that a jointer puts out.
Using a jointer over a hand planer offers much more efficiency and quality when it comes to prepping your boards for work.
The wood is placed on top of the table and using safety paddles or push blocks it’s moved along the table. Blades protruding from the table surface cut the wood from below, creating a flat surface on one side of the board.
Another great feature is its ability to change the angle at which the wood is cut. Some projects may require the wood to be joined at different angles to ensure a secure, clean fit with other planks. Adjusting the initial cut’s angle will help you give an all-around snug fit when joining multiple pieces of wood.
The only downside to using a jointer is the thickness of the board is not always uniform. As the wood is being cut from below and simply being pushed along, thickness is not a factor that can be dealt with.
Besides that, it can only work on one side of the board. While it is still possible to use it to achieve flat surfaces on all edges, they will not be parallel to each other varying thickness throughout.
Regardless of these slight drawbacks, a jointer is still an essential first step to transforming the raw wood into a suitable plank to work with.
A closed-stand jointer is, as the name implies, a jointer with an enclosed base. It comes in different sizes of table tops ranging from six, eight, 12, and 16 inches. The enclosed base protects the motor clean from dust and debris.
Additionally, this enclosed jointer has more weight than others due to the enclosed base. Not only does it protect from dust, but the enclosure also decreases the noise level and vibration while using the jointer. The extra weight lends this type of jointer the advantage of having more stability as well.
Alternative to the closed-stand variant is the open-stand jointer. Compared to the closed stand, the open stand has no enclosure protecting the motor, as evident from the name. As it has no protection around the motor and base, it is messier and produces more noise.
A plus of using an open-stand jointer is the portability that it offers due to its lightweight. Where it shines in its ease of transporting it around, it lacks in its stability. The lighter weight of an open-stand jointer does not allow it to be as grounded as other jointers.
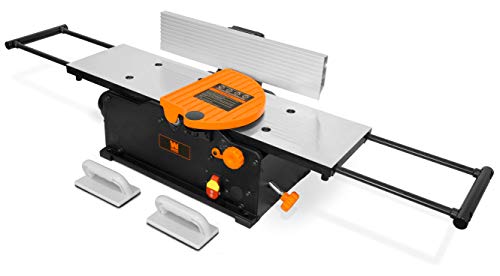
These jointers are essentially miniature versions of normal jointers. Due to their smaller size, they are able to be placed on workbenches and tables. The limit of the table length goes to six inches, with a light build, it does not give you much room to work on. With a light build, it does limit the benchtop jointer to more minor heavy-duty tasks as the stabilization is not the best.
Benchtop jointers are ideal for those who are short on space or need to move their tools around. Smaller projects or casual users will also benefit from purchasing a cheaper benchtop variant than larger joiners.
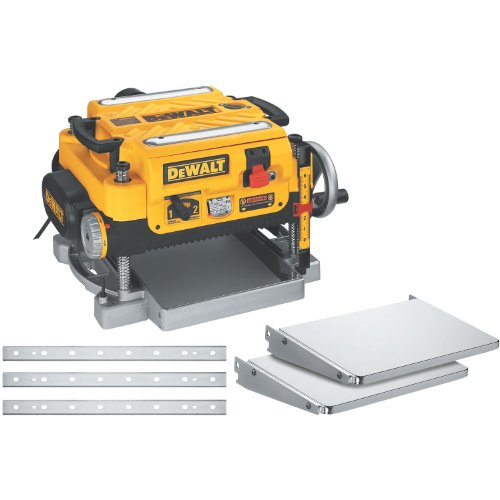
One of the more innovative variants of joiners is combining a jointer with a planer into one machine. Attaching a planer to a jointer is convenient as their purposes are similar and usually used in conjunction with each other. This is achieved by either placing both tools adjacent to each other or on top of each other. This stacked combination is known as an over/under combination.
An over/under combination jointer has a one saw blade mechanism. Switching between the planer or jointer configuration is just a simple adjustment of some settings. Alternatively, the side-by-side is a more straightforward setup of having a combination of tools just placed next to each other.
The alternative to using a combination of these tools in one machine over having separate ones comes manifold in space, convenience, and cost. Especially with an over/under combination, having it in one base and table saves space as well as energy switching between both tools. Additionally, the planer is attached to the jointer, so you save money on planer equipment as well.
Now that you have smoothed out your board on one side and have one edge squared off and ready, the next step would be replicating that on the other faces to get a completed plank.
A planer is a tool that steps in when the jointer is unable to achieve this replication across the remaining edges of the raw wood. The build of this tool differs from that of the jointer in the positioning of the blade system and control over the wood as it passes along the blades.
It has a bed or table which guides the wood underneath the saw blade. This wood is placed with the flat edge down and the edge which is to be finished facing upwards. Positioned above the table, the blade system has rollers to tweak how fast the board passes underneath.
Having control over the speed of the board passing through the planer is a great advantage when working with different types of wood. Some woods may require slower passes to get clean cuts, while others are softer and do not require slower speeds.

However, where the planer shines and stands out from other tools is the consistent thickness it gives. As long as the lower surface of the wood is flat, the entire plank will have parallel and smooth surfaces across. This smooth and even finish is only possible with a planer.
The downsides to a planer come mainly in the areas where a jointer is useful. For example, it can not deal with any abnormalities in the wood shape, from twisting or cupping to warps, on the surface. Additionally, it can not create square edges in the plank.
In order to achieve different levels of thickness, it is sometimes required to pass the wood through the planer multiple times. This does take up time and energy but gives great clean results in the end. It is definitely more convenient than doing the same job with a hand planner.
Planers are split into two types; the manually powered variant and the electrical variant. In the electrical variant, it saves energy and time, as the labor required to work them is significantly less as compared to the manual planer.
Manual planers demand more technical know-how and skill to use with proficiency and have a quality output. As it is handheld, it has a more significant learning curve and takes time to master. Additionally, it demands more time and energy to use. Overall, it is a more demanding variant when it comes to planers.
While it may be more demanding to use, a manual planer allows you to have more control over how the wood is shaped—as such, using a handheld planer can be helpful in projects requiring detailed work.
Just one step above a manual planer is a handheld planer, essentially a manual version with a motor that spins the blade. The entire machine is controlled with a handle to guide the spinning blade.
A downside to using a handheld planer is the fast rate of the spinning blade. The spinning blade can cause the planer to drift astray from the desired lines. A present mind is essential when using a handheld planer to keep the blade on track and have a smooth finish overall.
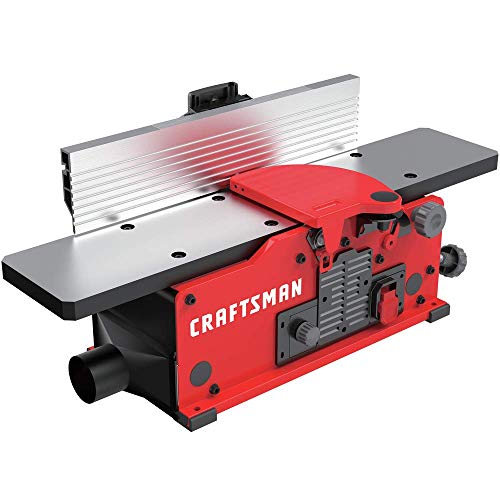
Similar to a benchtop jointer, a bench planer is sized appropriately to fit onto a bench or tabletop. This planer is a step up from handheld planers in terms of the size of the lumber it can handle.
A bench planer has a sturdy base to pass the wood along underneath the blade system. Electrically powered, it pulls the wood along through the blade system and gives an even finish and thickness to the board. There is little to no error in the output received with this planer as the blade is set at a specified height and mounted.
In the same way that the benchtop jointer is unstable, a bench planer is lightweight and, as a result, has less stability when being used.
One of the more heavy-duty planer variants, a stationary planer, is meant for heavy use. These types of planers have greater weight and a sturdier build than other planer types. With significant weight comes great sturdiness; it can be operated with great precision for more frequent users.
Purchasing a stationary planer is a significant investment as it is the most powerful electric planer available at a consumer level. The hefty price tag attached to it limits this planer to professionals or those with a large budget. It is definitely not a requisite for many working with wood; it is built just to cater to the needs of demanding jobs and projects.
A niche planer variant is the mold planer with the specific task of molding the wood to a particular shape using several planes. It is used to achieve a uniform design or profile along the board using specialized molding planes.
The resulting shape produced by a molding planer is dependent on the actual negative area of the molding plane, and this can make it a one-time use for the casual woodworker. As a result, a molding planer is usually used more by professionals or a particular field to produce multiple specific shapes.
Additionally, the set shape that a molding planer produces limits its usability to the general woodworker. While it can be used as a standard planer, it would be undercutting its potential. What’s more, the cost of a molding planer can be high, not to mention the required custom shaping of the molding planes to achieve the desired outcome.
From their design and purpose to their output, they can perform better at some tasks where the other falls short.
The first step in preparing wood for any project is with the jointer rather than the planer. This is because a jointer will give you the initial straight edge and corner that a planer needs to start turning the raw wood into a finished board.
Secondly, the planer will use that initial flat edge to make the other edges of the board parallel and have a smooth finish all around as well. It also makes sure your board is equally thick throughout.
Of course, there is the option of using just a planer as it can be purposed to do more than the jointer’s specific job. The planer is meant to level any type of wood to be parallel to the opposite side so long as it is straight. This means even pre-finished wood can be put underneath the planer and altered to be a precise thickness.
The planer has the advantage of altering the thickness of any board with precise measurement. This is as opposed to the jointer's singular use of creating a single flat edge and one flat face on the board.
When it comes to the variety in purposes that both tools offer, the planer does have the upper hand. One could go so far as to use the planer as a jointer if the raw wood is not too bent out of shape. In combination with other tools or a hand plane, you could cut out the need for a jointer entirely to create the squared-off edges.
However, the jointer is still an important tool to have as wood can be distorted if stored haphazardly. Moreover, having a jointer at the ready can restore any wood from being warped out of shape into a usable plank with little to no time and energy.
Furthermore, a jointer is a good idea to have if you are working with multiple boards to be joined together. A planer is not able to produce clean angles the same way a jointer does in creating squared-off ends on the board.
Another difference between these two tools is the price point that they come at. Jointers are usually less expensive than planers. For those putting together a woodworking shop, the cost is a significant consideration between choosing one tool over another.
However, this comes at a cost. On the one hand, the planer may have more long-term use for those using pre-finished wood. On the other hand, the cheaper jointer is excellent for restoring or cleaning up uneven and misshapen wood into workable boards and making clean squared edges.
Lumber can be distorted relatively quickly if it is not stored in a dry location. When lumber is damp or wet, it will seep into the wood and soak throughout it. What happens is the wood will dry at varying speeds depending on thickness and airflow in the location it is stored in.
When the different wet areas in the wood are dried at varying speeds, the wood will bend and twist. The different ways it is misshapen are known as warping, twisting, or cupping. All three are essentially the same in respect of being uneven and unsuitable for use, warping being the overarching defect in unfinished wood.
Twisting occurs when the wood grains at one end of the board dry faster and shrink, pulling the entire shape of the board towards one side. You can identify what lumber is prone to twists by seeing the direction of the wood grains at either end. If they are in opposite directions, the board will be more susceptible to twists.
Cupping in lumber happens more often in lumber taken from the outer edge of the tree. Lower-grade wood from the center of the tree will be more susceptible to cupping as the fibers are not as strong. When the fibers in the wood are dampened and dried, they begin pulling the edges of the board up higher than the center, resulting in a concave shape across the board.
Before we provide measures to prevent and fix warped wood, allow us to briefly explain the cause of warping. So, let’s begin.
Warping in wood is mainly due to moisture seeping into the lumber. The basic answer to the question of how to prevent warping would be to keep your lumber and unfinished wood in a dry and cool area.
However, warping can be caused by other factors like over-drying the wood if it gets wet. The more the wood has been dampened and dried, the more the fibers will break down. These weaker fibers are what cause the wood to become misshapen.
Additionally, the part of the tree that the wood was taken from has a role to play in the possible deformation of wood. The outer rings of the wood have stronger fibers and are thus less susceptible to bending.
As it gets closer to the center of the trunk, the fibers become less firm and have a higher chance of warping. This is the reason lumber taken from closer to the center of the tree is rated as lower quality.
To overcome this natural tendency to warp and cup, you can simply place it on a flat surface and keep heavy weights on top. This will ensure the wood has no space to cup or twist.
You can also choose to cure your wood to prevent any warping. While this is not a required preventative measure, it is an excellent optional precaution to take. Curing the wood by allowing it to dry properly before storing it away keeps warping from forming on the board.
Another optional preventive measure is sealing the ends of the wood. When it is cut, the ends of the board are more prone to warping as they are more exposed to the air and, as a result, dry faster. This is the most common area for twisting in planks and can be prevented with a sealed coating to keep moisture out or from drying quickly.
On the one hand, it is a good idea to dry lumber before storage and on the other hand, overdrying the lumber can cause warping itself. The over-drying of wood allows cracks to form, a much more complex problem to fix than a simple warp.
To fix warped wood, it is a simple matter of running it through a jointer. Of course, this depends on the severity and the type of warp as some can be more challenging to resolve than others.
For example, a simple cup warp can be smoothed out with little to no waste by shaving off the protruding elements of the board. A twist or wind warp is more difficult to restore to a proper board due to the unique and complex shape of the warp.
Between a jointer and a planer, the choice of what to invest in first is a hard decision to make. Depending on your woodworking skills, budget, and type of project being worked on, the choice varies for each individual.
With a more casual woodworker, the jointer can be used less due to its specific purpose. While it does have the benefit of smoothing out surfaces, it is too niche of a job to justify the investment.
An ideal choice for the casual hobbyist is the planer with its more versatile potential. Of course, the risk of having warped wood is ever-present. However, the availability of pre-finished S4S wood is a safety net that eliminates the requirement of purchasing a jointer.
Another perspective to consider is how often you will be working with wood. If you have more regular interaction with wood over long periods, investing in a jointer can be beneficial.
After all, wood stored over time is susceptible to warping, and the ability to purchase pre-finished lumber for every project can be costly.
At the end of the day, the tools you choose will stay with you for a long time if selected carefully. If you are on a budget and have a casual relationship with woodworking, then getting a planer before a jointer makes sense.
On the other hand, a jointer can be a good investment over time for more serious or long-term woodworkers with a light build. If possible, having both would be ideal; where one falls short, the other will make up for it.
Always keep in mind that the jointer and planer are like two sides of the same coin. They can work in tandem to create a beautifully finished piece of work that embodies the time and effort you spent working.
Till next time!
WEN 6550 VS 6552 [A Clear Winner?]
9 Best Benchtop Jointer for Woodworking