Expertises: Paint, Home improvement, Wood, Car, Painting
Updated on
Inspiring Ideas for Modern Home
Let’s be honest, alcohol ink and epoxy resin have taken the world by storm.

Along with vibrant artwork of alcohol ink, you must have also come across stunning resin masterpieces. Since both the compounds are compatible, those looking to experiment with epoxy resin must try their hands at alcohol inks in resin.
With oodles of bold pigments of alcohol inks in epoxy resin, you can create some breathtaking masterpieces and sell them online for thousands of dollars. That said, alcohol inks in the epoxy resin can be a bit tricky to work with, particularly for beginners. However, learning a few tips and tricks will help you get your grip on it.
Here are a few techniques that you can use to create stunning and eye-catching pieces. So, let’s jump right into the deets!

If you’ve been into DIYs for quite some time, we are sure you know what alcohol ink and epoxy resin are. However, if you’re a newbie, let us introduce you to the two art materials before diving into the techniques of combining them. So, let’s take a look.
If you already work with acrylic casting, you must be familiar with alcohol inks. With its bold and vibrant hues, alcohol inks add a touch of excitement to your artwork. Plus, it dries pretty fast and is moisture-resistant. Therefore, the creative opportunities are almost limitless.
The alcohol-based inks are highly pigmented and integrate with your artwork seamlessly. Be it textiles, scrapbooks, or stamping- alcohol inks can be used on a variety of surfaces. Additionally, alcohol ink paintings can be revived even after drying. So, you can change the pattern of your painting again and again.
Using alcohol inks to create stunning masterpieces isn’t challenging at all. In fact, alcohol inks are very popular among novices because they are easy to use. Also, it is compatible with non-porous surfaces. Overall, the bright pigments of alcohol inks are perfect to create free-flowing textures.
Painting surface, alcohol or blending solution, and ink - if you’ve got it all, then it’s time to let your creative juices flow. Although using alcohol ink isn’t a Herculean task, beginners might find it challenging. But, once you get the hang of it, you can create anything.
You already know that alcohol inks dry pretty fast. That said, you’ll have to be quick while working with it. While using alcohol ink, the first thing to remember is to mix it well. Simply adding water isn’t sufficient to mix it properly. Therefore, we suggest rubbing alcohol.
Also, make sure you choose the correct rubbing alcohol for your alcohol ink projects. That’s because the outcome will depend upon the percentage of alcohol you’ll be using. If you go with less percentage, your project may not turn out to be that great. Therefore, opting for 70% rubbing alcohol is common among DIYers.
Note that the temperature of your surroundings will also affect the evaporation rate of the alcohol. Besides, most manufacturers do not provide rubbing alcohol. Rather, they supply another blending solution identical to Isopropyl Alcohol (ISA) to improve blending.
With its bright, vivid, and bold hues, alcohol inks offer you endless opportunities to be as creative as possible. From ceramics to metals, you can use it on any surface to create marble-like artistic markings.
However, despite being versatile, Yupo paper is a popular pick when it comes to creating alcohol ink artwork. That’s because it is synthetic, waterproof, and has a buttery smooth, non-porous surface. Additionally, there are various techniques to use alcohol inks. So, let’s move on to learning about each technique...
Among all the techniques that we tried for using alcohol inks, this is by far our favorite. With its water-like consistency, you can create dripped and poured artwork pretty easily. Simply drop a few drops of alcohol straight from the nozzle of the bottle onto the painting surface. Additionally, remember to keep tilting your painting surface to blend the ink.
Note that you’re working with alcohol inks. Unlike watercolors, it will take slightly longer to dry. Therefore, leave it untouched for at least 24 hours. However, the outer edges tend to dry within minutes. Therefore, wait for a few minutes to drop your next color.
If dropping seems much of a task, then we’ve got another technique for you. All you need to do is take ink in a cup and dilute it with isopropyl alcohol and simply pour it on your painting surface. Leave it to dry. Additionally, you can even create great effects by blowing the poured ink with a straw. Alternatively, you can use paint pipettes too.
Those looking for alternatives to dripping and pouring can try their hands on the cotton bud technique. All you need to do is pour your favorite alcoholic ink shade onto a palette, dip a cotton bud into it, and move it across the painting surface. Although this technique is pretty easy, you must do it quickly and ensure even applications.
Additionally, those looking to create a transitional effect can add some blending solution.
If you haven’t yet tried using a paintbrush with alcohol inks, then now is the time to give it a try. Brushes work pretty well with alcohol inks and so, you can use any brush you want. If you’re looking for the one that blends better, then soft brushes are the best bet. Meanwhile, a coarse one would be perfect for adding texture.
Note that alcohol inks dry pretty fast. Therefore, you’ll have to work very quickly while using the brush, or else you might leave strokes or patches behind. We are pretty sure you wouldn’t want that to happen. Additionally, you mustn’t repaint any area. That said, this technique is best for those who are pro at DIY stuff.
If you’ve been searching for alcohol inks for creating resin Petri dishes, then this is the one for you. With vibrant colors and high-concentration formula, this alcohol ink gets along well with epoxy resin. Moreover, it is highly versatile and can be used for making resin swirls, epoxy resin painting, resin tumbler cups, and much more.
Why Did We Like It?
First things first, we were pretty impressed by the high-pigmented formula of this alcohol ink that makes it perfect for epoxy resin. They don’t spread much, thereby allowing you to control the formula with precision.
Moreover, we love that this high-pigmented formula is compatible with almost everything. From resin Petri dishes to glass painting, this alcohol ink will be your perfect companion in every DIY task.
Also, with so many shades, you can let your creativity flow and create stunning artwork. Be it sapphire blue, purplish-red, coffee, or white, Let’s Resin has got it all. Additionally, you don’t need to use it in large quantities. Simply pour a few drops onto the resin, and you’re good to go.
Moving on, we were pretty pleased by the packaging. Each alcohol ink was individually wrapped and secured tightly to avoid leakage. Plus, it features a push pin for easy piercing. Lastly, the inks stay true to their colors. Overall, Let’s Resin offers excellent value for money.
What Could’ve Been Better?
Considering its functionality and versatility, these alcohol inks are absolutely incredible. However, these inks aren’t UV-resistant. So, it might not be an ideal option for your outdoor creations. Other than that, this product is an excellent option to boost your creations.
This acid-free alcohol ink is an excellent choice for all craft lovers out there. With 24 highly pigmented colors, the creative opportunities are endless. More so, because it is easy to use. Overall, this fast-drying and permanent formula is a go-to option for all your DIY projects. So, grab this alcohol ink set and turn your imaginations into reality!
Why Did We Like It?
When it comes to DIY crafts and projects, letting your creative juices flow is the best thing to do. With its 24 brilliant hues, you are free to create whatever you want. From shallow to deep colors, this alcohol ink kit has it all.
Additionally, it offers versatile applications. Whether you wish to create sinking effects or make resin coasters and Petri dishes, this alcohol ink is versatile enough to do anything. With its high-concentrated formula, this alcohol ink sets better than the rest.
Moving on, beginners will appreciate the fact that these inks are pretty easy to use. Simply shake the bottle well, add a few drops to the resin molds, and you’re done! Plus, it features a quick-drying formula, so rest assured your creations will be ready within a few hours.
Another appealing aspect of this product is that it is 100% acid-free. Thus, you can use it indoors without worrying about the safety of your children and pets.
What Could’ve Been Better?
Although it offers excellent value for money, it emits a pungent odor. That said, we recommend you work outdoors or in a well-ventilated space. Moreover, customers have complained that opening the bottle is a messy task. Other than that, this product is an excellent option for all your epoxy resin projects.
Are you also mesmerized by the stunning waterfall and river tables that you see on YouTube? That’s what you can create using epoxy resin. Basically, epoxy resin is a two-part liquid that is mixed together in separate ratios. Once cured, it forms into a hard object.
Epoxy resin is highly versatile in its liquid form. That means you can pour it on molds of any shape and size and get a rock-solid object after curing. Thus, you can use it for creating waterfall tables, coasters, pieces of jewelry, countertops, and even flooring.
With countless pigments, dyes, and other additives, you can let your creativity flow on the molds or canvases. Plus, it is also helpful in fixing leaks and sealing worktops. All in all, epoxy resin is perfect for all those who love experimenting.
To begin with, epoxy resins have a working time of about 30 minutes. Therefore, once you’ve mixed them in appropriate ratios, start pouring them on your canvas or surface, or else they’ll harden up. That’s why we recommend you mix epoxy resins in small batches.
First off, you will have to mix resin and hardener together in a cup. To do so, you will have to follow the instructions of the manufacturer. Thus, make sure you go through the user manual properly before you begin working.
After you’ve poured the two liquids in specified amounts, mix them thoroughly. Initially, you’ll notice two different liquids. However, once you’re done, you’ll see nothing but a crystal clear liquid. Also, while mixing, don’t forget to scrape the bottom and the sides of the cup. Most importantly, do not rush; otherwise, you’ll end up with bubbles.
If you are preparing epoxy resin for countertops or coasters, you’ll have to add colors, glitters, and other such materials into it. So, pour a small amount of mixture into another cup and add whatever you want to. Also, don’t forget our pro tip - mix slowly for best results.
Now that you’re done mixing the epoxy resin, it’s time to pour it into the mold or any surface you want to add life to. Simply pour it onto the mold using a stick. Also, make sure you don’t overfill the mold.
When mixing and pouring is complete, it’s time to let the epoxy resin dry. Therefore, keep it for 24 hours in a properly ventilated room for your creations to completely harden. Once cured, take it out from the mold.
Ever happened that you’ve poured epoxy resin into the molds and ended up with bubbles? Fret not! We have some tried and tested tips and tricks for you.
The first and foremost thing that you can do to prevent bubbles from popping on your surface is to warm the resin bottle. But, before you rush to immerse it in a bowl of warm water, keep a few things in mind. Make sure the lid is tightly sealed so that no water gets into the resin. Next, wipe off the water from the bottle to avoid damaging your epoxy resin.
While dealing with epoxy resin for years, we learned to pour the thickest liquid last. Yes, that’s one of the tricks that prevent bubbles from pooping on the surface. So, you can try it too.
Also, make sure you mix the epoxy resin in the figure 8 motion. That’s because bobbing up and down will allow air to enter into the mixture, thereby forming bubbles. While mixing, don’t forget the bottom and the sides.
However, if you notice any bubbles popping up after pouring, a blow torch or a heat gun would be perfect for dealing with it. Simply wait for a few seconds after pouring and let the bubbles rise onto the surface. Once you get the sight of them, use a heat gun or blow torch to tackle them. But, make sure you do this carefully to avoid burning the surface.
Whether you’re a DIYer or a professional, this epoxy resin kit is perfect for all your needs. From Petri resin dishes, coasters to waterfall and river tables, this epoxy resin is versatile enough to let you create anything. Moreover, they are compatible with alcohol inks too. So, grab this epoxy resin kit and make all that you want.
Why Did We Like It?
More than anything, we loved the versatility of this product. Whether you want to revamp your kitchen countertops or make resin coasters, anything is possible with this epoxy resin kit. Although it features a superclear formula, you can add colorants if you want. Thus, creating resin Petri dishes or waterfall tables is easy.
Additionally, it is UV-resistant, so rest assured that your masterpieces won’t turn yellow even after years. Also, you can use this to fill gaps in your wooden furniture. Moreover, its durability is unparalleled, thanks to its heat-resistant properties.
With its virtually bubble-less finish, you can use it for molds as small as 4 ml. Unlike other epoxies, this product is odorless. Thus, you can work for hours without giving yourself a headache.
Lastly, the brand has friendly customer service that will readily assist you in times of need. Simply reach out to them through their contact number and get queries resolved.
What Could’ve Been Better?
Honestly speaking, this is one of the best epoxy resin kits we’ve come across on the market, mainly because of its versatility and functionality. That being said, this epoxy resin kit comes with an expensive price tag. So, if you’re not on a budget, this product is the best bet.
Here’s another premium epoxy resin kit that is a favorite among DIYers, contractors, enthusiasts, homeowners, and even designers. With this 1-gallon epoxy kit, you can transform anything you want. Moreover, it offers a wonderful sheen to your surface. Thus, you can use it on dull, lackluster furniture and transform them into eye-catching pieces.
Why Did We Like It?
To be honest, what caught our attention is that this resin cures crystal clear. Once cured, it adds a subtle gloss and shine to your objects. Therefore, you can use it to make your DIY pieces, old furniture, and other surfaces shine forever.
Although it dries crystal clear, you can tint it with coloring agents. So, feel free to use metallic powders, liquid dyes, glitter powder, and mica powder. Additionally, it is heat resistant up to 470 degrees Fahrenheit, making it a suitable option for kitchen countertops, river tables, and other renovation projects.
Moreover, using this epoxy resin kit is easy-peasy. Simply mix resin and hardener in 1:1 ratios and stir it well for at least 4 minutes. Those looking for proper instructions must check out their step-by-step instructional video on YouTube. Thus, this epoxy resin kit is quite beginner-friendly.
Lastly, this epoxy resin coating is food-safe. That means you can use it safely on surfaces that come in contact with food.
What Could’ve Been Better?
Overall, this epoxy resin kit is a versatile pick, mainly because it is user-friendly and highly durable. However, customers have complained that it produces bubbles on the surface. However, you can tackle this problem by using a heat gun.
Alcohol ink resin projects are all the rage nowadays. And so, when we came across one, our creativity couldn’t resist. So, we took the plunge into the sea of this fun trend. Initially, it might appear overwhelming but, with practice and patience, you’ll soon get the hang of it.
When it comes to alcohol ink resin projects, the creative possibilities are truly endless. Moreover, there isn’t any hard and fast rule that you are bound to follow while working with alcohol ink resin.
So, let’s cut the chit-chat and explore different alcohol ink resin techniques that you can use to create eye-catching masterpieces.
Before you begin bringing your imaginations to reality, prep the surface properly. For this, we recommend you cover the table or surface using a freezer paper.
With little working time, you already know that epoxy resin is pretty much unforgiving. So, gather all the supplies listed above to avoid darting off to other rooms every now and then. Next, put on the respirator to prevent inhaling the toxic fumes.
Pour hardener and resin in ratios mentioned by the manufacturer and mix them thoroughly, and ta-da! Your mixture is ready. Now that you know the basics, let’s dig into the techniques.
Petrified coasters are truly stunning pieces of artwork. If you’ve ever come across one, you know what we are talking about. The good news is that you can also create such stunning coasters. By dripping alcohol ink into the resin, the artist in you can trap the rainbow in the petri dish. So, let’s dive into the technique of creating eye-catching petrified rainbow coasters.
After getting all the supplies and taking safety measures, you will have to prep the silicone mold. To do so, you will have to clean the molds properly. So, make sure you remove all the dirt, dust, hair, and other impurities from the mold. If not cleaned properly, the impurities will settle in the resin during casting. Simply wipe the mold with kitchen paper or cloth before you begin with your project.
Next, you’ll have to use 96% isopropyl alcohol or rubbing alcohol. Leave it in a well-ventilated place for dying. Additionally, you will have to wipe the mold with silicone oil to prevent it from sticking.
The next step is to prepare the epoxy resin for pouring. The size of the molds will determine the amount of epoxy resin to be prepared. As a rule of thumb, mix 400 ml of resin for every three Petri dishes of a diameter of 10 cm. Also, we recommend you go for branded resins and not cheap ones.
Before you pour the resin into the mold, level your work table using a spirit level. Now, check the consistency of the prepared resin with the wood stirrer. If it’s still runny, we recommend you wait for a few more minutes.
When the consistency of the resin gets thick, pour it in equal amounts into the silicone mold. However, if you notice air bubbles, use a blow torch or heat gun to eliminate them from your mixture. Note that the instruction of the brand is important. Therefore, before you use a heat torch or a Bunsen burner, go through the instructions properly.
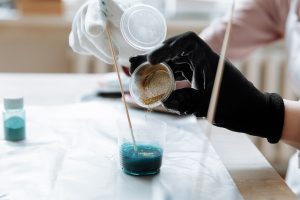
We’ve worked with alcohol inks, and that’s why we recommend you go for high-quality inks. To blend alcohol ink with epoxy resin, you will have to pour a small amount of epoxy resin into a disposable cup. To remove air bubbles, use a bunsen burner.
Now, drop a few drops of alcohol ink into the resin and keep stirring slowly to ensure even mixing. Also, make sure no air bubbles are formed while mixing alcohol ink with resin.
However, we’re creating rainbow Petri dishes. Instead of mixing alcohol inks with epoxy resin, we’ve got another way to use alcohol inks. We’ll straightaway drop the inks on the poured resin into the molds. However, make sure you do this immediately after you’ve poured the resin.
Truly speaking, you’ll get beautiful Petri dishes with a resin of thick viscosity. However, if you’re already a pro, you’re free to experiment.
Now that you’re done with pouring and dropping, you will have to cover the silicone molds. We cover them using a cardboard box or a plastic box. However, you must make sure that the box is spacious and shouldn’t come in contact with the poured resin and silicone mold. Store it in a safe place for curing.
Although it must dry within 24 hours, we strongly recommend you go through the instructions of the manufacturer. Generally, your petri dish must fully cure within three days.
We know you’ve worked hard to create this stunning piece and must be curious to see the outcome of your hard work. After leaving it untouched for three days, it’s time you remove your masterpiece from the molds.
Begin by carefully removing your coasters from the sides of the silicone mold. And ta-da! Your little masterpiece is ready. Place them on the coffee table or sell them online and make a few bucks.
Also, we’ve got a pro tip for you - Simply wipe silicone molds with silicone before pouring the resin mixture. This keeps the ink from spreading too much, thereby resulting in decorative color cells. This beautiful veining is known as lacing.
Do you remember the art and craftwork you did as a child in school? This will remind you of the same. Playing with chunky glitters is fun. Moreover, it is super easy to make. Thus, you’ll love this project.
We’ll be doing this in small molds. So, start slow! Mix a small amount of resin and hardener in a cup. Next, take another cup, add glitter, and a few drops of alcohol ink. For this, we used both fine and chunky glitters. So, mix the two glitters properly with the resin.
Go ahead and pour the glitter resin mixture into the cup. Keep stirring. Make sure no bubbles are formed.
Once you’re done mixing the glitter and alcohol ink with resin thoroughly, pour it into the molds. That’s it! Now, all you have to do is look for bubbles. Once you get the sight of them, use a heat gun to pop them from the poured resin.
After you’re done pouring, simply cover the molds in a cardboard box like the previous one. Now keep it aside. Since you’re dealing with small molds, the epoxy will cure fully within 24 hours. However, we strongly recommend you let it fully cure for approximately 48 hours.
After you’ve left it untouched for 48 hours, it’s time to unmold it. Simply remove the pieces from the molds, and your alcohol ink resin pieces are ready. They look pretty amazing, right? Also, remember to unmold them gently. Use it as a paperweight, pendant, or simple showpiece.
Let’s gear up for our next alcohol ink resin project. So, get your supplies ready and jump to the third project.
Similar to the previous project, prepare the epoxy resin mixture by mixing resin and hardener in appropriate ratios. Now go ahead and pour the epoxy resin mixture into the molds. Pop bubbles using a heat gun or a bunsen burner.
Once you’ve poured resin into molds, start dripping alcohol inks into the mixture. Drop pink colored ink and top it with a white one. Keep repeating this process to build six layers of both pink and white inks.
White is crucial for it will blend the alcohol ink with resin. Next, drop a different color into the resin molds. Once you’re done dropping your favorite colors, swirl the resin with a toothpick. However, remember you are swirling resin and not a cake batter. Be gentle!
After storing them safely for 24 hours, you must be curious to see the outcome. Gently remove them from the sides and take out your creation from the mold. You’ll be amazed at the stunning piece that you’ve created. Now, feel free to use it as a pendant, earring, keyring, or even hair clips.
To be honest, alcohol ink and epoxy resin are a winning combination. From creating resin Petri dishes to stunning pendants and keychains, you can experiment all you want. Also, alcohol inks are affordable alternatives to resin pigments. However, make sure you take safety measures while working on alcohol ink resin projects.
That being said, we come to the end of our informative guide. Hopefully, we’ve cleared your doubts and queries regarding alcohol ink and epoxy resin.
However, if you face any troubles while working on alcohol ink resin projects, you can reach out to us in the comments below. We’ll see you next time.
Until then, stay creative!
Related Articles
Alcohol Ink Art Tutorial [Alcohol Inks 101]
Sanding Epoxy Resin Guide 101 [All You Need to Know]
11 Best Epoxy Resin for Crafts [Reviews & Buyer’s Guide]
5 Best Epoxy Resin for Tumblers [Complete Tutorial]
11 Best Bar Top Epoxy [Reviews & Buyer’s Guide]
Waterproof Epoxy 101 [Is Epoxy Waterproof?]
5 Best Epoxy Wood Fillers [Review & Buyer’s Guide]
What is Resin and How It’s Used [All You Need to Know]
10 Best Epoxy for Plastic Today [Reviews & Buyer’s Guide]
Food Safe Epoxy Guide 101 [All You Need To Know]
What is Resin and How It’s Used [All You Need to Know]
How to Make Resin Jewelry 101 [All You Need to Know]
Totalboat Resin Epoxy 101 | Reviews + Buyer’s Guide
How to Make Resin Dice 101 [All You Need to Know]
How to Make a Resin Geode [Complete Guide]
Art n Glow Resin Review [All You Need to Know & Buyer’s Guide]