Expertises: Architecture, Design, Art, Home improvement, Painting
Updated on

Inspiring Ideas for Modern Home
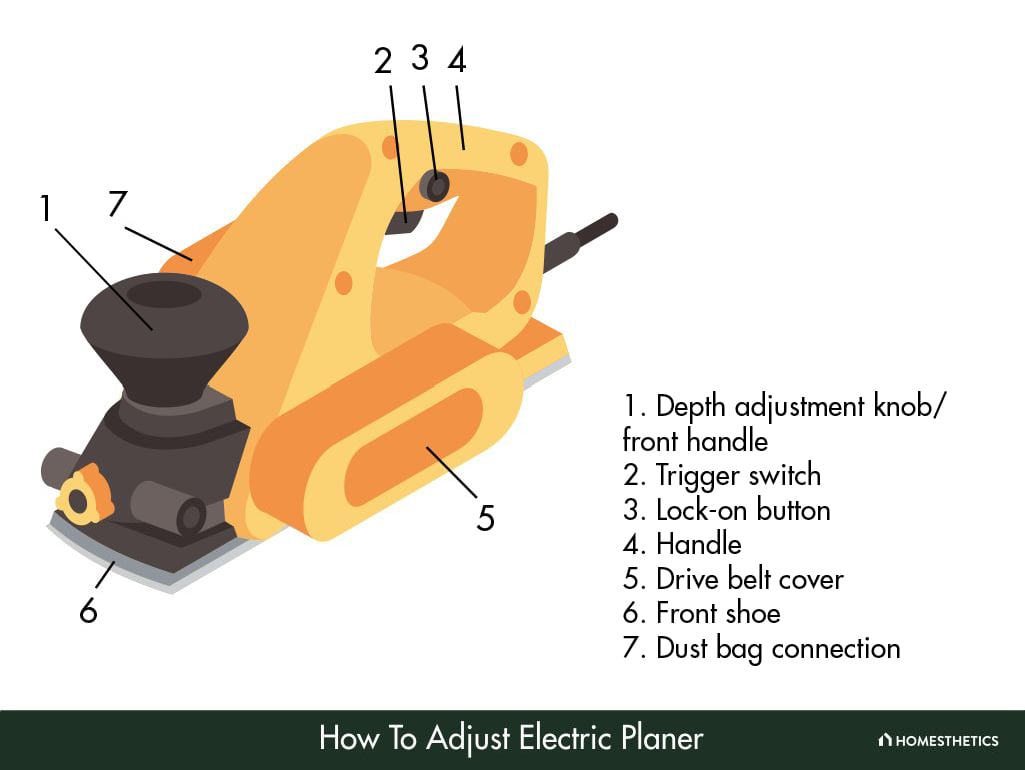
Adjusting an electric planer can be done in a few simple steps that involve checking and adjusting the positions of the blade. Through regular cleaning and maintenance, the planar can become a precise and reliable woodworking tool.

When smoothing a wooden surface with an electric planer, it’s important to keep the blades set correctly.
The blade alignment, cutting depth, and blade depth have a significant impact on the quality of your project. Adjusting them is the key to achieving a clean and seamless finish.
Here’s a complete guide on adjusting an electric hand planer to keep your woodwork smooth and prevent the planer blades from wearing out.
A poorly aligned electric hand planer can lead to a host of issues with your woodwork that can set your work back significantly. While these issues are solvable, it’s better not to encounter them entirely. After all, fixing any defects in your woodwork is a time sink of its own.
If the blades of your electric planer are not aligned properly, you can encounter the following issues:
A properly aligned blade will not run into such issues, giving you the desired result with minimal effort. An efficient tool is what precise woodwork needs, and a well-adjusted electric planer can fulfill the role well.
Even if you consider blade adjustment the safest possible thing, it’s still better to be cautious. Planer blades can be fragile, and they can snap off under pressure, which can lead to unfortunate injuries. Accidents do happen while in the workshop, so it’s always best to put on some protective clothing as you work.
At the very least, you should put on safety glasses and earplugs to protect your eyes and ears while working with an electric planer.
Let’s start the adjustment process by unplugging the device from the power socket to ensure there are no electricity-related accidents as you adjust the blade. After all, an electric shock or the blades turning on while working is far from an ideal circumstance.
Once you pull the plug from the power socket, you can safely begin the blade adjustment process.
Before proceeding to blade adjustment, you should check the length that requires adjustment. You can do this by checking if the blades are below the rear parking shoe and if they need to come out even further.
Use the blade depth knob to check its length. As you move the front knob to its highest blade depth setting, look how far the blade comes out. If the blades don’t come out at all or only protrude slightly, they need to be adjusted further until they are at the correct setting.
You can also check the condition of the blade during this step, as it forms an important part of smoothening a piece of lumber. Dull blades lead to wood surfaces being full of defects like rough grains and ripples as they tear through wood fiber instead of slicing through.
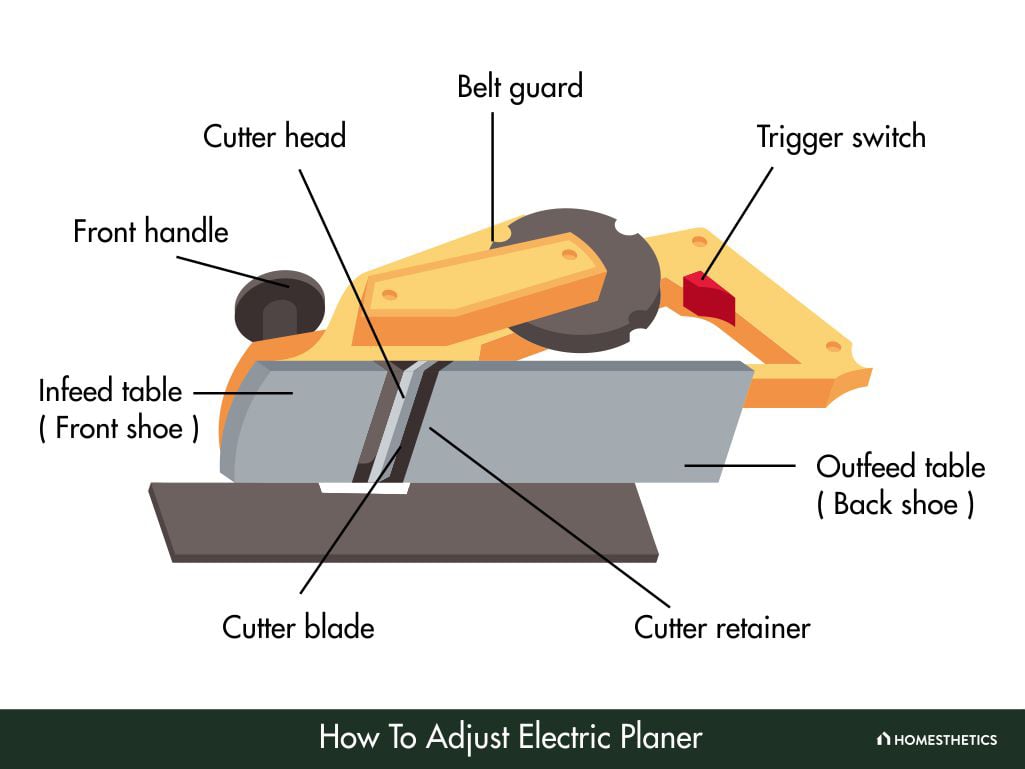
The working surface of the planer helps you set the blade depth properly, be it a table or a working station. Set the blades slightly above the rear of the planer, which is where the out-feed table is usually positioned. Ensure that the blades are parallel and at the same height as the working station or planer jig.
If the blades are too low or too high, they can cause the planer to gouge more wood out of a lumber plank.
Next, clean the blades and the area around them using a brush or compressed air. This can help remove any chips and debris that may be present around the blades, taking care of the clogged blades problem in the process.
Additionally, clearing the area around the blade holders before you begin working can help reduce the likelihood of the planer jamming.
A well-aligned planer is crucial to its success, as it can outright prevent issues like lines or unsightly marks from occurring altogether. This can be done by understanding how your planer cuts and the angle it works.
You will need a feeler gauge to align the blades properly. Use a wrench or screwdriver that works with your planer and use it to adjust the planer blades one by one. Take care not to misalign them, as even minute inaccuracies can lead to the tool becoming unbalanced.
Use the feeler gauge again to see if the planer blades have aligned well or not.
After aligning the blades, use the tool-specific screwdriver to undo the screws in the blade holders. You’ll need to turn the screws anticlockwise to the point where they come in contact with the end of the notches.
You can loosen or tighten the plates that clamp the blade holders in place to adjust the blade space. Be careful while doing so, as a poorly adjusted plate can make working with the planer difficult. Once you’re done, use the screwdriver to fit the gauge plate back in place with the screws.
Next, use a pencil and a ruler to set the blade correctly. Reset the planer blade depth to 1 mm and set the ruler to zero, after which you can mark the distance needed for precise cuts. Try to ensure that you don’t end up with the same length measurement on all edges.
Once everything’s been fitted back into place, it’s time to test the electric planer. Plug the machine into the power socket, feed the machine a plank of wood, and power it on.
For each pass that you make over the timber, check for any defects or unusual deformities left behind. If you spot a groove, snipe, line, or grains, you may need to repeat the steps listed above to fix the issue.
After all the adjustments are made, your electric planer is ready to be used again.
No matter how frequently you use an electric planer, you will need to maintain it periodically. Even when not in use, the device can lose its effectiveness over time because of aging.
Periodic maintenance can add years to the life of a power tool, making it more efficient and saving you money in the process. And while the nitty-gritty of electric planer maintenance may vary from one model or planer type to the next, the overall maintenance steps remain the same.
Here are a few tips you may use to maintain and extend the life of your power planer.
While storing a power planer, you must ensure that it receives no undue damage when not in use. If possible, try not to store it in a high place or on a thin shelf to minimize the risk of injury.
Additionally, ensure that the tool doesn’t come in contact with moisture at all. Not only can it cause the planer to rust over time, but it can also make it fragile and unfit for use. So, picking the right place to store is the only way to prevent the wood planer machine from rusting.
Friction is an issue that can lead to several undesirable outcomes when working with an electric hand planer. Too much friction can produce a lot of heat, which can damage the planer blades, blade holders, motors, cables, and electrical systems. Additionally, the more friction the blades encounter, the more power the tool consumes.
So, it’s important to lubricate the hand planer well before using it. While it’s not strictly necessary to lubricate the tool each time before use, it’s still a good practice to do so. This is particularly the case if you use the power planer frequently.
A good way to prevent rough cuts is to check the sharpness of the cutting edge before using the planer. Dull blades can be spotted easily with their rounded corners and smooth appearance.
You can sharpen your planer blades by using a sharpening stone. Simply swipe the stone against the straight edge several times until you see the cutting edge reaching the appropriate sharpness level.
Tip
Make sure that the pressure you apply with the stone remains consistent with each swipe on both sides. Such a way of applying pressure will allow the planer to perform as if it were fitted with new blades.
At some point, your planer parts will require replacement, which may include motor parts and blades. For this, you will need to find spare parts compatible with the model, as incompatible parts will either not fit well or work poorly.
Try to ensure that the planer parts you choose are the ones recommended by the manufacturer. This will help the device function as close to its previous performance after the replacement.
You can purchase electric planer spare parts directly from the manufacturer’s website or offline and online hardware stores.
Tip
If you’re replacing a crucial component like the motor, it’s best to leave its installation to a specialist. A specialist can ensure that your device doesn’t run into unexpected problems through proper installation techniques.
Here are several tips related to electric planer operation:
You can find other safety tips that can help your working space be as free of accidents as possible on the manufacturer’s instructions. These are model-specific tips that can help you cut lumber without risking injuries.
The cutting angle of an electric planer commonly lies between 45 to 60 degrees, although this can vary depending on the make and model of the tool. This angle is the orientation of the cutting blade relative to the workpiece.
A lower angle is preferable for softwoods while a higher angle performs better with hardwoods. Check the user manual for precise specifications for your particular model.
You can avoid uneven cuts or cracks while using a planer machine by considering a few factors. Firstly, adjusting the cutting depth to a lower setting is recommended for most surfaces, especially for achieving a smooth finish.
Secondly, be mindful of the pressure applied against the wood and ensure it is low and applied towards the front of the plane, while also moving in the direction of the wood grain.
Lastly, regularly check the condition of the planer blades and replace or sharpen them as needed to ensure optimal performance.
Adjusting an electric planer is a fairly straightforward process. With some vigilance and a little elbow grease, you can have the planer ready to work within a few minutes.
Of course, it’s worth mentioning that prioritizing your safety is the most important thing in the process. It’s always risky to work with dull or chipped blades, after all. Drawing from experience, a few safety precautions and operation tips can go a long way in keeping you and your planer safe from any mishaps.
If you run into any issues with the planner, you needn’t panic. The solutions to many troubles with these tools are usually fairly simple to DIY-solve, so keep calm and get to troubleshooting!