Expertises: Heating, ventilation, and air conditioning (HVAC), HVAC control system, Air conditioning, Humidiers, Dehumidifiers
Updated on
Inspiring Ideas for Modern Home
To clean AC coils, turn off the power and remove the cover of the condenser or evaporator unit. Then, wearing gloves, remove large debris by hand before spraying the coil cleaner. Leave the cleaner for ten minutes before rinsing it with water.

Air conditioner coil cleaning is part of the regular maintenance that should be undertaken at least once a year.
Dirty AC coils can affect the functioning of the system, reducing its efficiency and leading to higher power bills. Fortunately, cleaning dirty coils is one of those maintenance activities that can be performed without professional help.
And this guide will help you understand how to easily clean air conditioning coils. So, let's get started!
Having proper information regarding the various components of your air conditioner and their respective functions is vital when cleaning the coils. Air conditioners have several components, but three of these are the most important. These include the evaporator, condenser, and line set.
The evaporator is situated indoors over the air handler or furnace and controls the amount of refrigerant that passes through its coil. This coil has a larger diameter at the end, which results in reduced pressure and causes the temperature and boiling point of the refrigerant to go down significantly.
Usually, the temperature of the coil is much higher than the boiling point of the refrigerant. Because of this, the refrigerant turns into a gas that can absorb heat very well. It absorbs the heat from the hot air in your home before entering the condenser.
Once this happens, the humidity in the air gets deposited on the coil, and when condensation takes place, it goes into the drain pan at the bottom. Finally, the pipe attached to the pan discharges it as wastewater into the soil.
The condenser is the unit responsible for powering the entire cooling operation. Once the refrigerant absorbs heat from the hot air in your home, it goes back to the condenser. While doing so, it goes through the different coils surrounding the compressor.
These coils are cooled by the AC fan pulling air across them, and when that happens, the refrigerant cools down and reverts to a liquid state. At the same time, the compressor increases the pressure on the refrigerant, leading to a rise in its boiling point. The liquid refrigerant is passed into the copper line and reaches the coil, from where the process can begin again.
The line set comprises a couple of copper tubes that transport the refrigerant between the evaporator and the condenser. One insulated tube is larger and is known as the suction side or low side and carries the refrigerant from the evaporator to the condenser.
Then there is the other tube, which is smaller and is known as the liquid line or high side and carries the refrigerant from the condenser to the evaporator.
Debris, dust, dirt, and other pollutants can accumulate on the surfaces of your air conditioning coils due to factors like airflow, moisture, and tightly installed components. As more and more of these substances accumulate on the coils over time, it can reduce the heat removal capacity of your air conditioner.
In certain situations, the air conditioner coils can get so dirty that they can completely block airflow, resulting in higher energy bills due to reduced energy efficiency. Additionally, an air conditioner’s coils that have become dirty will cause the air conditioning system to work harder, reducing its operational lifespan.
It can also lead to component damage, which will require costly repairs. Here are some problems that can occur if you do not keep the air conditioning coils clean.
Accumulation of debris and dirt can put your air conditioning system under strain, causing various parts like compressors and fans to work harder. These will then operate at higher temperatures to make the house cooler.
Besides reducing the indoor temperature of your home and cooling it down, an AC unit removes humidity to make the space more comfortable. But if the coils are dirty, the efficiency of the air conditioner can be significantly reduced, and higher humidity levels can make it quite uncomfortable to stay in the room.
When dirt and dust build-up on the surfaces of the AC coils, they have to work much harder, and the heat transfer will be less efficient. This reduces the overall performance of the air conditioning system. And a malfunctioning AC unit can even harm the environment.
For instance, if the coolant is leaking, it can enter the atmosphere resulting in air pollution and posing a health hazard.
With the reduced cooling capacity of the heating, ventilation, and air conditioning system, you can expect higher operational costs. Thus, you will need to spend more on maintaining better indoor air quality.
If you have a blocked evaporator, the compressor has to run at higher temperatures, which can put the entire air conditioning system under stress. I would like to point out here that the compressor is among the most expensive items to replace in an air conditioner. So, keeping it clean can help ensure that it continues operating optimally without needing frequent repairs.
When various parts and components come under stress, the utility of your air conditioner is reduced, and the unit can suffer from breakdowns. In such situations, you will need to hire professionals, replace damaged parts, and may even need to replace the air conditioning system.
Air conditioner coils should be cleaned when they become dirty, but this can vary depending on various factors. These factors include how often the AC unit is used, whether there is a filter, the frequency with which filters are changed, the number of people in the household, etc.
I strongly recommend getting an HVAC professional to conduct an inspection at least once each year before the arrival of summer. The professional can perform maintenance activities, such as cleaning the air conditioner coils, changing the AC filters, and conducting proper tests to ensure the system runs fine.
The first thing to ensure when undertaking an AC coil cleaning project is that you have the right tools for the purpose. Fortunately, many of the items required for such a project are present in most households. The rest can be easily obtained from any nearby hardware store. Here is a list of the tools and materials required:
When using a coil cleaner to clean air conditioner coils, it is important to follow certain precautions since it is a chemical substance that poses a health hazard. Make sure to use a face shield, safety glasses, and chemical-resistant clothing and gloves. Also, having proper ventilation is crucial when working with a coil cleaning solution.
If proper ventilation cannot be ensured, make sure to use an organic vapor cartridge or NIOSH mechanical filter in a respirator. Also, remember that air conditioners operate at 240 volts, so you must turn off the power before cleaning.
As I mentioned above, in air conditioning systems, the condenser coils are located outside, while the evaporator coil is situated inside. The evaporator coil is mounted in a separate cabinet on top of the furnace. Alternatively, it may be placed within an air handler unit or the coil of the fan.
While air conditioner units can vary in their construction, they usually have an access panel that can be removed using a screwdriver or a nut driver. The condenser coils present in the outdoor unit go around the various components within the indoor unit and act as side walls for the condenser unit.
There may also be a coil guard protecting the condenser coils, or they may be completely exposed. In some units, the coil is covered by an outer protective panel made of louvered metal and may not be easily visible.
Once the coils are accessible, you can determine the best way to clean them, depending on the recommendations of the manufacturing company.

1. Turning Off The Power
Before doing anything else, turn off the power to the AC unit by disabling the circuit breaker, which will be located close to the unit in a small metal box. Depending on the type of circuit breaker, you may need to pull out the fuses or push a lever down to turn off the entire system.
2. Removing The Top And Side Covers Of The Condenser Unit
Use a screwdriver or cordless drill to remove the bolts securing the top cover, then do the same for the side cover. Keep the screws aside carefully, so they don't get misplaced.
3. Removing The Condenser Fan Assembly (Optional Step)
Whether you need to remove the condenser fan from the AC unit will depend on the model of the condenser unit. Removing the fan assembly will make accessing the air conditioner condenser coils easier, but it will require a great deal of expertise.
In some instances, it is possible to detach the wiring harness of the condenser fan from that of the unit easily without effort. But if the process seems too complicated, simply use a step stool to place the fan assembly on while cleaning the condenser coils.
4. Cleaning Up And Inspecting The Unit
Since the condenser unit is located outside, there may be leaves, sticks, hair, and other debris inside it, which will need to be removed. Make sure to wear gloves when doing so to ensure safety. Once the debris has been removed, check for problems like loose or damaged wires, broken pipes, or corrosion.
If such problems are present, you should call a technician to get them resolved.
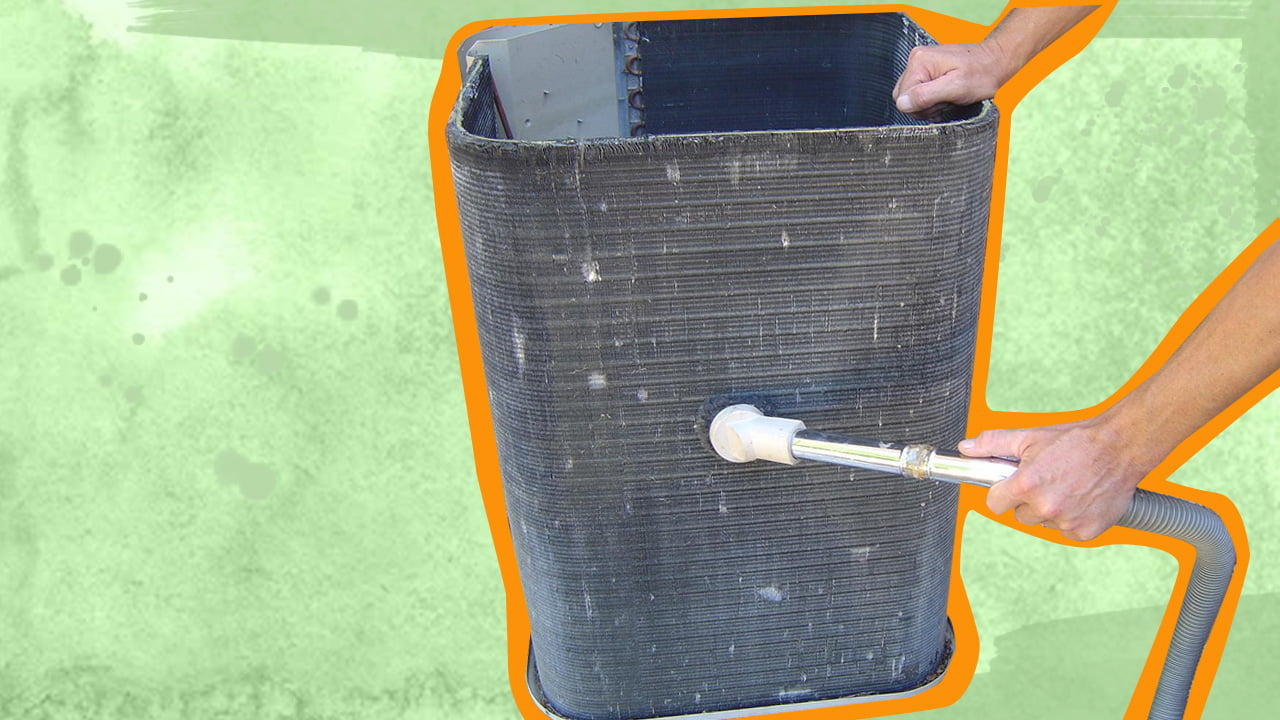
5. Using A Vacuum To Clean Up The Dust
After all the debris that can be removed by hand has been removed, it is time to use a shop vacuum to get rid of the dust that remains. Use the extension attachment to clean up all the corners and hard-to-reach areas properly.
6. Fixing The Fins
The heat exchanger of the unit has fins that can easily get bent or crushed. If that has happened with your unit, use a fin comb that has fine metal tines to straighten the fins. While this is not mandatory, fixing the fins can improve the efficiency of the unit.
7. Cleaning The Protective Grill
Debris, such as twigs and leaves, can get trapped in the protective grill located on the exterior of the AC unit. You will need to remove such debris by hand and then shine a light through the grill to determine whether it is clean or not.
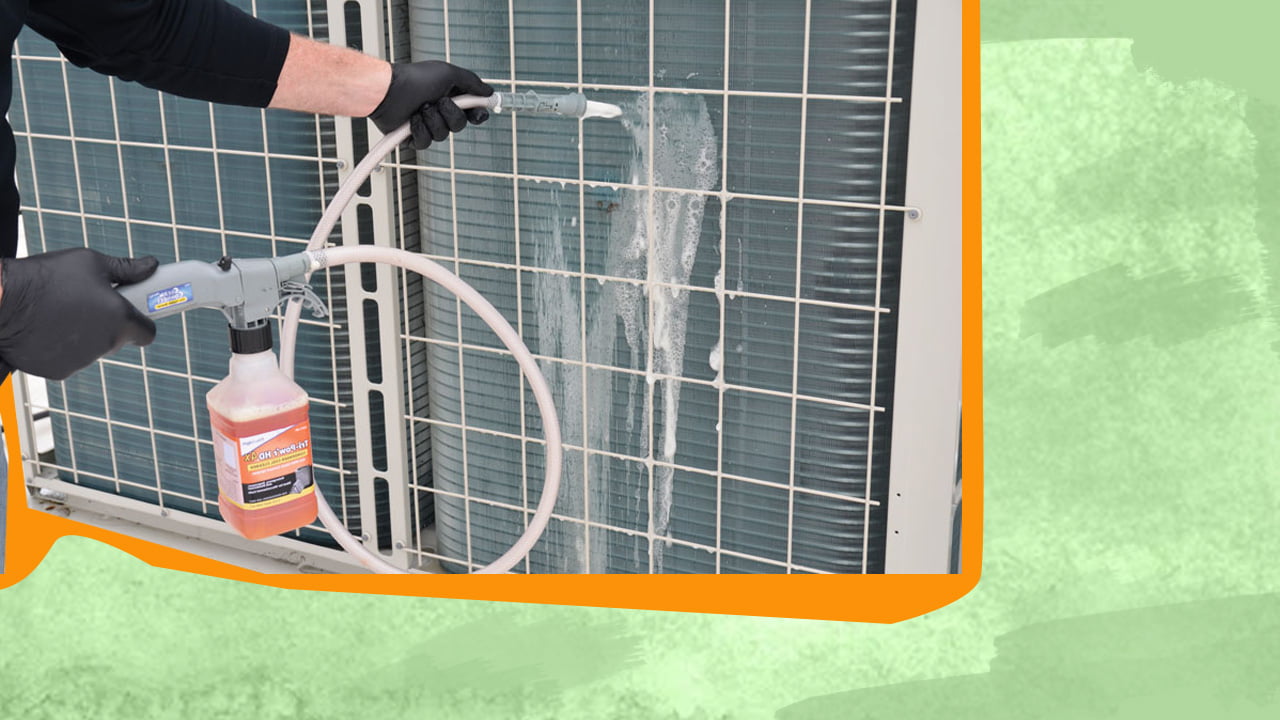
8. Using The Coil Cleaner On The Condenser Coils
After removing the dust from the condenser coils, use the garden hose or pressure washer to gently wash them down. Spray the cleaner within the unit, making sure to reach all four corners and even through the fins. Then, adjust the angle of the sprayer so that it releases a wide spray without too much pressure.
Once you’re done spraying, let the spray and water sit for about ten minutes.
9. Using Water To Clean The Spray
After five to ten minutes have passed, start spraying water using the hose from the inside out, working from top to bottom. Use the sprayer attachment and keep the spray wide to prevent any damage to the fins. Move to the other side after completing one side, and finally, wash the entire cabinet from the outside.
While doing this, avoid directing the spray inside the unit, as that can force the dirt and debris back inside the air conditioner.
10. Reassembling The AC unit
While the condenser coil is now clean, there are a few steps you can take to ensure that it remains clean for an extended period. One way is to prune shedding plants or deciduous trees growing close to the unit. Or you can install a mesh leaf guard over the unit to prevent debris from entering through the top.
Before reassembling the unit, let it dry out completely. Once it is dry, you can reinstall the fan and the side and top covers. Replace the screws and tighten them before turning the machine back on.
Now, let's look at how to clean the air conditioner evaporator coils located indoors.
Cleaning the evaporator coil is similar to cleaning the condenser coils, but there is one major difference. Since this coil is located indoors, you cannot use a garden hose to wash it clean.
1. Turning Off The Power To The Unit And Locating The Evaporator Coils
Turn the power off at the distribution board where the circuit breaker is located before you do anything else. To locate the evaporator coil, remove the access panel on the indoor AC unit by removing the screws that hold it in place.
2. Inspecting The AC Coils
The evaporator coils are within the air handler and appear as flattened tubes. You will notice that the evaporator coil assembly is shaped like the alphabet A. And the inner area of this assembly is where the maximum amount of dirt will have accumulated.
Tip
It can be easy to get confused about where the different components go, especially when undertaking such a project for the first time. I highly recommend photographing the inside of the assembly before removing anything. This will make it easy to return the components after the cleaning process.
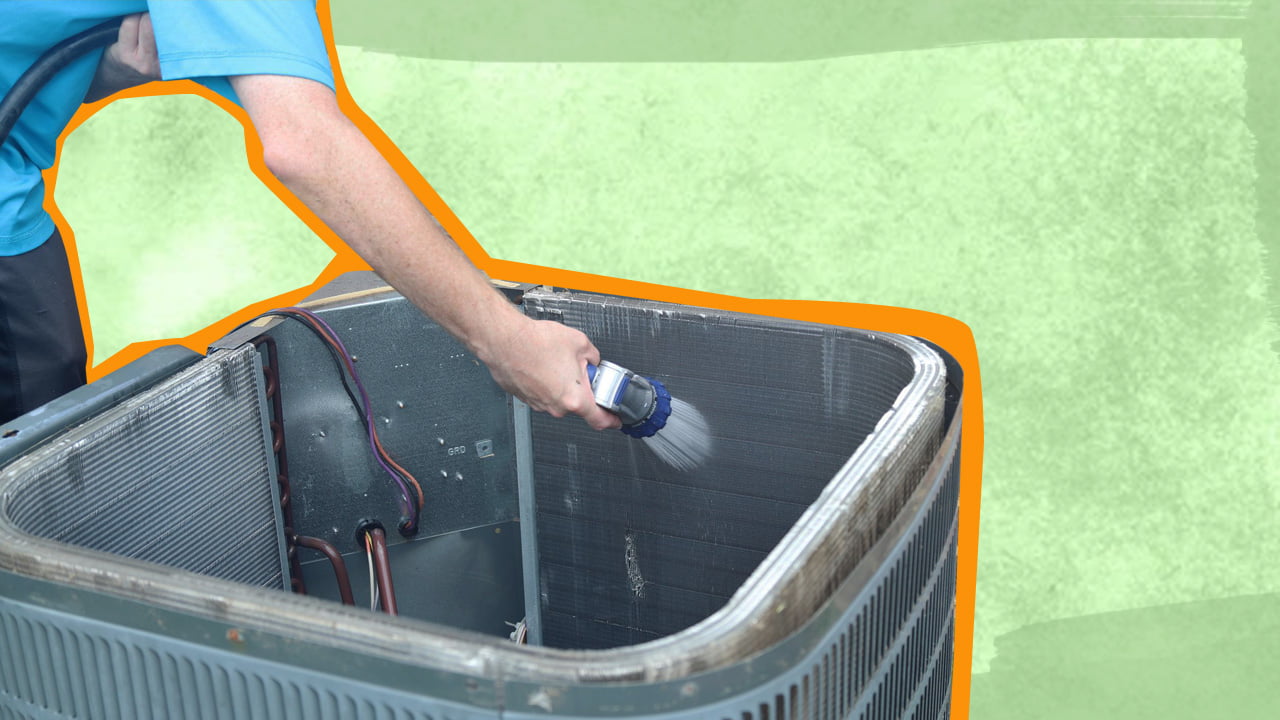
3. Cleaning The Coils Using A Nylon Brush
To begin cleaning, use a nylon bristle brush to remove large pieces of dirt and debris deposited on the coils. When brushing the aluminum fins, work from the top to the bottom while moving the brush along the length of the fins.
In this case, you need not focus on getting the coils completely clean and should just try to remove large chunks of dirt from the assembly. Once these pieces fall out, they can be vacuumed easily, but vacuuming the fragile fins can easily damage them.
4. Fixing The Fins
Similar to how you straightened the condenser coil fins, use a fin comb to fix them here as well. Just be careful when doing so, as the delicate fins are highly prone to damage.
5. Spraying The Foam Cleaner On The Coils
When spraying the foam coil cleaner within the evaporator coil assembly, use a large amount of the cleaner before leaving it for about ten minutes. If instructions are provided on the can of the cleaning agent, stick to them when cleaning the indoor evaporator coils.
After ten minutes have passed, use the nylon brush to remove the dirt particles and other debris left on the coils of the evaporative cooler.
6. Rinsing The Coils With Water
Once the larger dirt pieces have been dislodged, use a spray bottle to spray water onto the coils and rinse them properly. Avoid using a large amount of water, and use the shop vacuum on wet mode to remove excess water. You can do this multiple times until the coils are completely clean.
7. Putting The Coil Assembly Back Together
You need to let the coils dry properly before reassembling everything back, for which the access panel needs to be left open. Using a soft towel to dry the coils can help speed up the process a bit, but do not use a blow dryer, as that can damage the AC coils.
Once the assembly is dry, replace the cover and secure the screws back into place. Then, turn on the power at the breaker box and check how the system is running.
In certain cases, your air conditioning unit may not function properly even after cleaning the coils. In such cases, other solutions may be needed, such as replacing the coils.
However, replacing the coils of the AC unit will depend on the air conditioner model and can be quite costly. A better solution might be to replace the unit itself. The reason is that the cost of coil replacement, in addition to the cost of repairs and regular maintenance, will be more than the cost of a new AC.
And a new unit will be more efficient, helping you save money while providing better cooling with less energy use.
Alternatively, the AC coils may not be the problem, and there may be other reasons why the AC unit is not functioning properly. Such issues can include frozen coils, clogged condensers, dirty air filters, damaged compressors, etc.
If both the coils and other components are in good condition, other factors may affect the efficiency of the air conditioner unit. Houses that are not professionally sealed have air leaks because of which heat can enter inside, preventing them from being cooled properly.
Similarly, the roof or attic may not have been insulated for many years, allowing hot air to enter the house. Keep in mind that depending on when it was installed and the type of installation, insulation will deteriorate with time. So, you may need to get the insulation upgraded.
Knowing how to clean air conditioner coils can be handy if you want to improve the cooling ability of your AC quickly. But observing proper precautions is crucial when doing so, such as turning off the power before touching any electronic component and wearing protective gear when handling coil cleaners.
If you're unsure about the process, I recommend hiring an HVAC professional who, in addition to knowing how to clean air conditioner coils, possesses specialized tools for the job. In some cases, hiring such a technician may even be unavoidable, for instance, if the coil fins are so damaged that they cannot be fixed using a fin comb.
And such professionals can inspect the unit for other issues, so they can be dealt with timely, helping avoid costly repairs later on.
Related Articles
10 Best Dual-Hose Portable Air Conditioners
Best Portable Air Conditioner and Heater Combos
How To Hide Your [AC] Air Conditioner Unit?
13 Quietest Portable Air Conditioners
9 Best Ventless Portable Air Conditioners
Zero Breeze Mark II Portable Air Conditioner
Zero Breeze Mark II Portable Air Conditioner
Coway AP-1512HH Mighty Air Purifier Review
Can You Recharge A Window Air Conditioner?