Expertises: Art, Painting, Drawing, Home improvement, Gardening
Updated on

Inspiring Ideas for Modern Home
Our lives are unimaginable without the modern-day toilet. But do you know all about the intricate mechanisms within the system that ensure its proper functioning?

If not, you have arrived at the right place as we're here to inform you about the multiple components that make the toilet. While the tank is the primary structure that runs the system, you'd be surprised to learn that the toilet bowl, too, has some special parts that enable safe and hygienic use.
Therefore, we have created this guide to discuss the different parts of a toilet and how they work together to enable seamless operation.
Without further ado, let's get down to business.
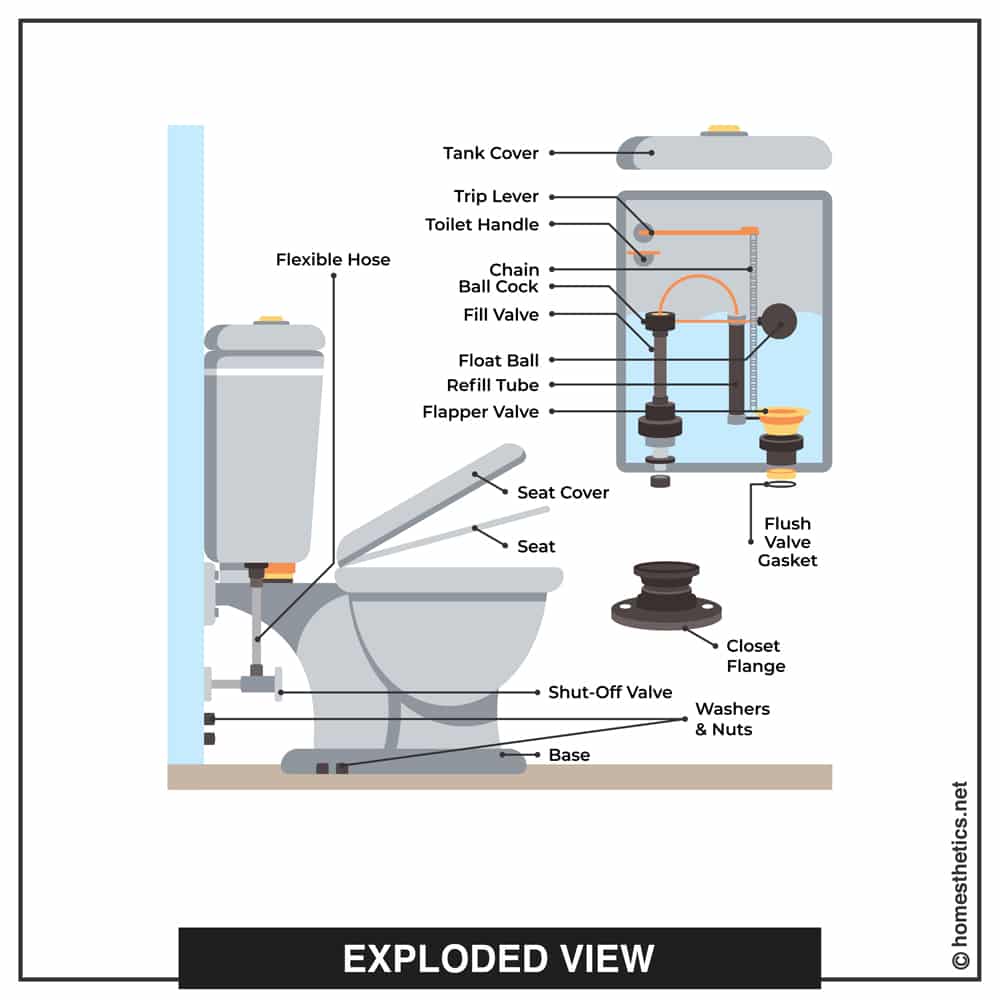
The first step begins with removing the lid or toilet cover. Put it aside and find out about the different parts inside the unit. That said, in the standard flush style models, the parts are usually similar. 95% of homes use this toilet system, so let's start discussing the different parts.
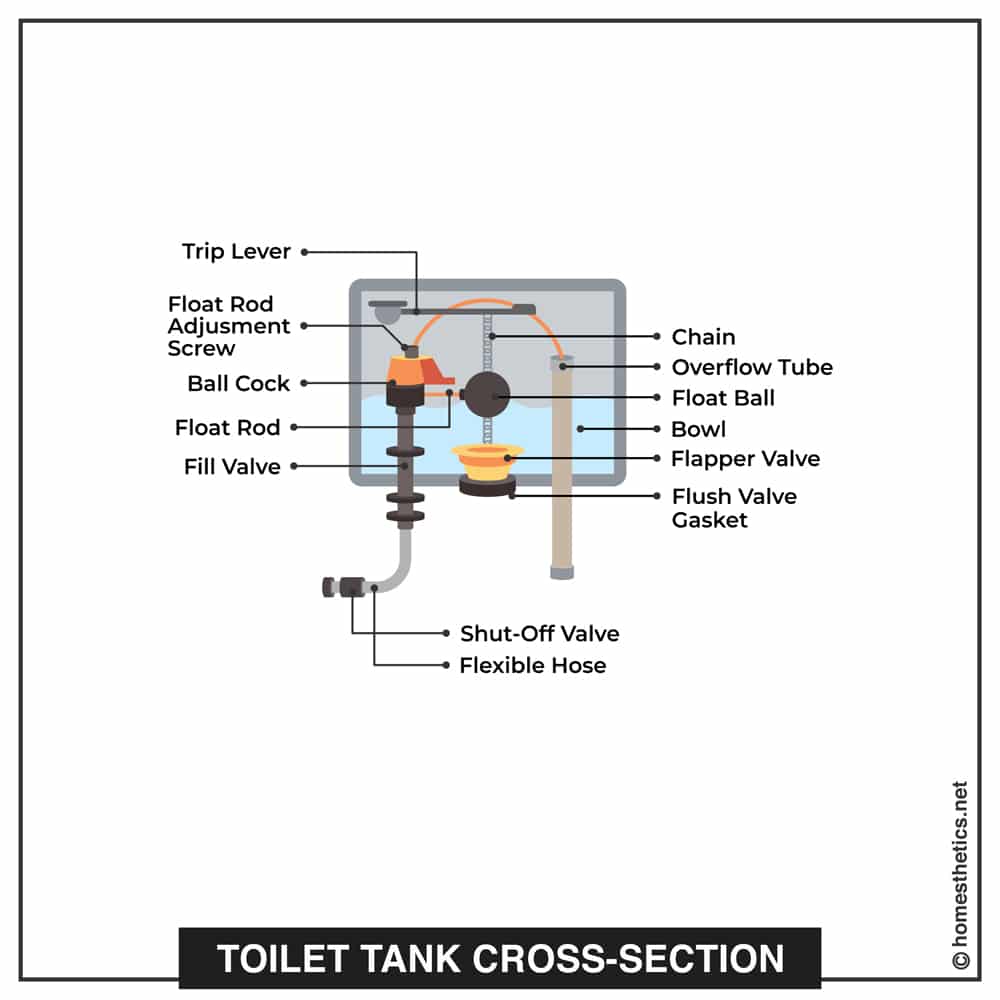
As evident from the name itself, the flush and handle rod are key components in the toilet unit that start the flushing action. If you look at the handle carefully, you'll notice that it's secured to a horizontal rod. Besides, the rod, in turn, is connected to a wire or chain.
With repeated use, it's likely that the handle may loosen with time. However, tightening the metal or plastic nut within the tank should fix things right away. Do not forget that this particular nut has threads in the opposite direction, unlike regular nuts. Therefore, you have to tighten it by making counterclockwise turns.
A lift rod extends horizontally from the flush handle and is linked to a wire or chain that reaches the tank bottom. Long story short, this rod and chain mechanism opens the flush valve, located at the bottom, allowing water to clear away the toilet bowl.
Usually, the toilet stops working when the lift chain breaks or is in a tangled mess. In this case, your system either fails to flush or cannot complete the flush. Depending on the damage, you may have to adjust or replace the chain lift.
When we talked about the lift chain operation, we basically meant the rubber flapper, intuitively positioned against the flush valve. (In older models, they may have a tank ball) While the flapper may not be clearly visible within a full tank, its function is understandable when you push the flush and observe the action that follows.
The flapper moves when the handle and chain mechanism access the valve, enabling the tank water to perform a vortex function in the toilet bowl. Over time, flappers wear out or get dislocated. Usually, when water keeps leaking into the bowl after a complete flush, it might indicate a problem related to the flapper. However, replacing the faulty part restores proper functioning.
The overflow tube, joined to the flush valve system, is a safety apparatus that prevents tank water from overflowing, in case the supply valve fails to close. When and if that happens, the excess water is channeled through the overflow tube and into the bowl.
If you have a 'running' toilet, it could be because of a high water level. Get in touch with a plumber to fix this issue as you don't want your toilet to use up all the water.
Flush valve refers to the metal or plastic contraption located at the bottom of the tank. Its primary function is to create an opening for the stored water to exit the tank and reach the toilet bowl. So, this is exactly what happens each time your press down the flush lever.
That said, the valve is usually attached to the upright overflow tube, and as such, is a part of a one-piece system. You'll also notice an O-shaped ring seal fitted around the valve end, beneath the tank. This component seals and supports the joint between the bowl and the tank.
The shutoff valve is a fixture, located outside the toilet, close to the floor. Usually, you can find it on the supply pipe on the left side, transporting water to the toilet. Primarily, this valve allows you to turn off the water supply while conducting an inspection or repairs.
However, not all models include shutoff valves. Nevertheless, it's a good idea to install this part as it may come in handy. Eventually, these valves stop working but you need not worry too much as you can replace them without spending much.
A steel mesh, plastic, or vinyl supply tube typically connects the shutoff valve and the supply tailpiece at the tank bottom. While the supply tube is pretty much a hassle-free part, it can malfunction when the system gets too old, or the joints loosen.
This is a prominently visible part within the toilet tank as you can see it at any point, without or without water. Basically, the supply valve has a floating structure that indicates the tank water level. So when the optimum water level is reached, the supply valve is automatically closed.
Usually, in older models, you would find a floating ball at the end of a horizontal arm, projecting from the supply valve. Whereas, modern systems usually have a float cup secured to the upright shaft of the same valve. Thus, you can adjust this floating part to modify the tank water level as per requirement.
The refill tube is a tiny, flexible component that runs from the supply valve and is secured to the overflow tube's head. The primary purpose of this small but integral part is to initiate short spurts of water in the bowl when the refill cycle is underway.
In short, it periodically replenishes the standing water in the toilet bowl. If you didn't know, then let's just say that this water helps keep the bowl trap secured against sewer gases.
The ballcock, also known as the water supply valve, is an upright contraption, typically mounted on the left side, within the tank. This is undoubtedly the most critical part of the toilet.
Simply put, the ballcock allows fresh water supply to replenish the tank after each cycle. Plus, it also shuts off the supply when the tank reaches optimum capacity. More often than not, issues in the supply valve prevent the toilet from functioning normally. However, replacing the system should sort out the problems instantly.
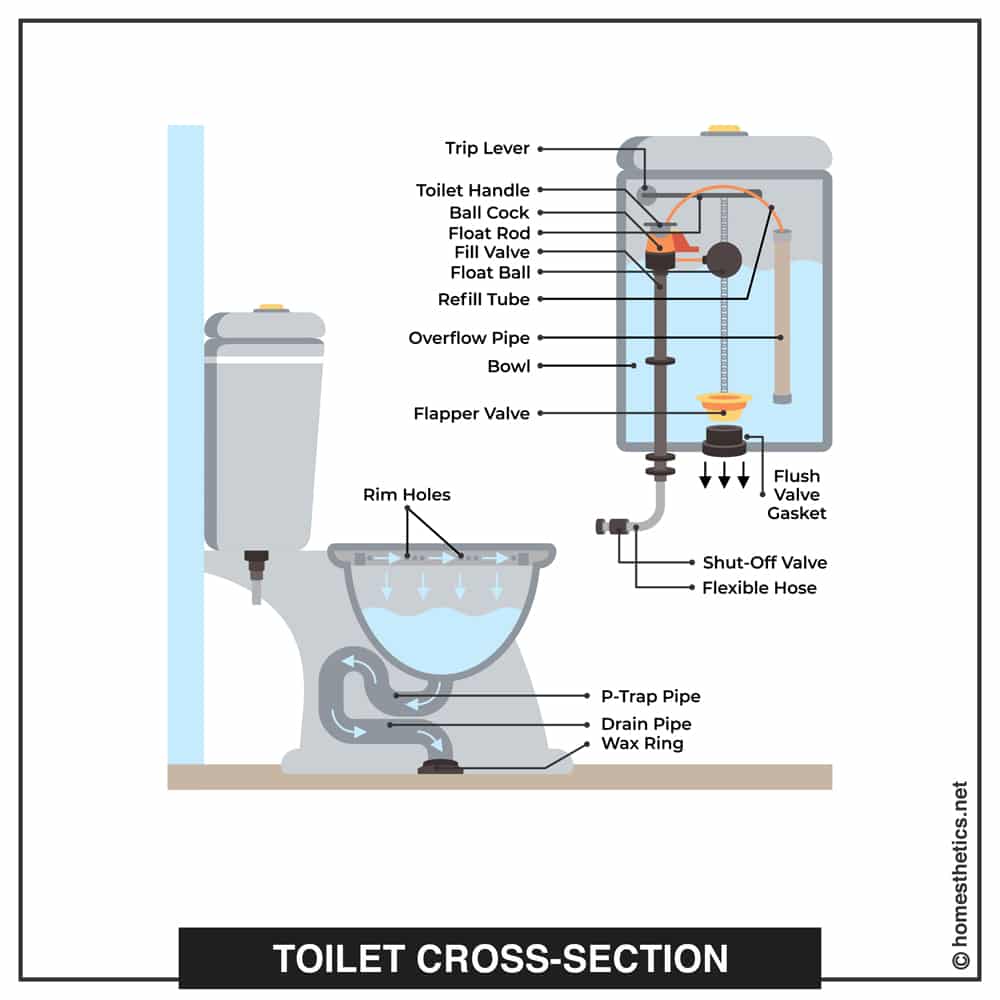
This part is separate from the tank but, of course, linked to it. Essentially, the bowl is where all the 'action' takes place. However, if you notice carefully, you'll find that the bowl segment, secured to the floor, includes a bent trap component. This curved part serves the same function as a sink drain trap.
Basically, this internal trap holds the standing water within the bowl and stops toxic sewer gases from entering homes. Therefore, the standing water at the bottom of the bowl is actually the top section of the drain trap structure.
That said, the trap, like all other parts, is not immune to problems. Generally, drain clogs may intervene with normal toilet functions, but you can take the DIY route to fix this minor issue. Even if you don't have to undertake any other repairs, you may, at some point, have to deal with clogs.
Usually concealed below the toilet bowl unit, a soft, flexible wax ring plugs the joint between the toilet bottom and the drain opening. Long story short, this wax ring creates a watertight and airtight seal at the toilet and sewer line connecting point.
Although rare, a wax ring may develop problems, and the most typical sign is water leakage around the toilet base while flushing. Therefore, it goes without saying, replacing a wax seal is altogether a messy affair. However, it's best not to delay the repair in such situations since it's unavoidable and may lead to extensive damage if left unattended.
That's all from us!
Now that we've come to the end of this guide, we hope you have a clear understanding of all the different parts of a toilet.
The main purpose of this detailed piece is to make you aware of the key components that make up the system. This way, you can locate problems in your toilet and immediately know what to fix.
Homeowners often overlook minor issues until they get out of hand. But once you know the toilet's basic mechanism, you can spot any issues early on and resolve them right away. Also, you can undertake the repairs yourself and save time and money.
On that note, we'd like to sign off. Till next time!
Related Articles
9 Best American Standard Toilet Right Now
8 Best Bidet Toilet Combos Right Now
13 Best Soft Close Toilet Seats
13 Best Septic Tank Treatments
7 Best [Macerating] Upflush Toilets