Expertises: Paint, Home improvement, Wood, Car, Painting
Updated on

Inspiring Ideas for Modern Home
When it comes to epoxy, we all make mistakes sometimes, don't we?

Mixing, pouring, and applying epoxy is not something you can experiment with. It is an exact technique using measured components, and anything slightly off can ruin the epoxy mixture. Each step needs care and precision because even a tiny flaw in mixing, ratios, or contamination in the tools can ruin the mix.
Today we decided to figure out all the common mistakes beginners make and compile them in one place. Along with highlighting the errors you need to avoid, we'll also be sharing a few easy methods to tackle them. So, the next time you face any of these issues, you'll be well prepared.
Without further ado, let's get started.
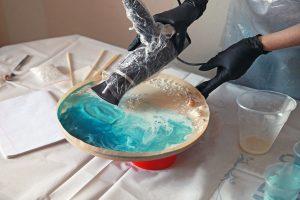
Most often, epoxies come in two parts in the kit and need proper mixing just before application. The mixing ratio is vital if you want an epoxy of the correct consistency. This is why companies mention the exact proportion in weight or volume on the packaging, which needs to be followed precisely.
Failing to mix the two components in the correct ratio results in the epoxy hardening too fast or slow, even sometimes not hardening at all.
Overmixing the epoxy leaves a thick sludge that barely pours over and would need to be thrown out. And if you undermix the epoxy components, the slurry will leave cracks and melted bits which are far from ideal. The mixture could also become hazy and opaque, so in order to prevent this, make sure you follow the instructions to the T.
We understand why so many people struggle with selecting the correct type of epoxy for their project. After all, there are so many types of epoxies available, all of which have entirely different purposes.
There are epoxy adhesives and bonding agents, casting compounds, fillers, molds, and many others. So, it’s better to read about the product before purchasing to avoid ending up with the wrong type of epoxy.
One thing we often ignore is taking the weather and temperature into consideration before beginning an epoxy-based project. Beginners might not know that epoxy is sensitive to extreme temperatures. So if you are in the middle of a frigid winter, chances are the epoxy will have trouble setting correctly.
The same is true for hot temperatures, too- the epoxy will either dry too quickly, forming bubbles or will develop cracks after drying. The best solution is to adhere to the temperature guidelines recommended by the company. You could either wait for a pleasant season or control the room temperature to match the guidelines.
Newbies might make the mistake of adding water to thin out the solution, but let us warn you before you make the same mistake. Make it a point to stay away from moisture when working with epoxy.
If you want to save the epoxy mixture, you need to treat water and epoxy as sworn enemies. It is also possible to have water lying in the container or mixing bucket, and that's something you have to check every time.
As we mentioned earlier, epoxy is pretty sensitive to all external factors, including dirt and dust sitting on your tools. Any of the grime or dust that you mix with the epoxy will show in the final product, and no one wants that! If possible, use fresh mixing buckets, containers, and stirrers. And if you already have these tools, clean them with acetone just before using them.
Needless to say, don't mix two different brands of epoxies, assuming they are all the same. All brands and solutions have their unique mixing ratio and composition. So, you will not get an even mixture if you add a different brand to the existing mixture. Not only that, it is not recommended to mix two different solutions from the same brand either.
You may already know that epoxies react with molecules in the air and harden to form strong bonds. So it goes without saying that when storing, nothing less than an airtight container will do. Also, epoxies have a shelf life; make a note of the expiry date before storing them.
It's possible to keep them at the back of storage shelves and remove them way after the expiry date. In such cases, you won't be able to use the epoxy anyway. And if you do, the solution won't mix properly because it would be partially hardened.
Sometimes after hardening, a sticky layer is visible on top of the epoxy. This isn't an irreversible problem and can be fixed quickly. Take some hot water and dip a soft sponge to soak. Wipe the sticky surface with the sponge and hot water, and the sticky layer should visibly reduce.
Working indoors will protect the epoxy from external dust and dirt. It will also help in reducing the sudden changes in temperature and humidity. Also, try to work in a moisture-free zone to prevent the formation of this sticky film.
Almost all epoxies are self-leveling and do not need manual assistance to set in place. But if you face a situation in which the epoxy is not leveling, the resin in the mixture is probably too little.
To fix this after the epoxy has cured, you'll need to sand down the uneven areas and add a second coat. And, if the epoxy is not yet cured, you can directly apply the second coat to the previous one.
If the epoxy is hardening and curing too quickly, that's not a good sign. Drying and curing are very precise, and quick curing means the polymerization of the epoxy is occurring way too fast. This happens when the temperature is too high, which leaves a substandard epoxy with cracks and haze.
To prevent this, keep the temperature constant between 68-77 degrees Fahrenheit (ideally).
One of the most common issues people face is the appearance of bubbles in the epoxy. These bubbles appear as a result of air trapped in the resin due to improper mixing. If the epoxy components are mixed too quickly, the air gets incorporated into the resin, forming visible bubbles.
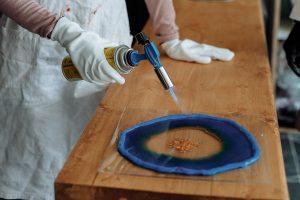
If you notice these bubbles before the curing process is complete, you can get rid of them easily. Move a heat gun quickly over the bubbles in intervals of 10 minutes. Once fully cured, the bubbles are difficult to remove, so try to identify and remove them before it is cured.
A porous surface will absorb the epoxy easily, so the second layer of epoxy might be required to get correct results. Also, make sure that the wooden surface is dry, smooth, and clean. And ensure the solution is distributed evenly across the surface.
Sometimes ripples and waves might appear while working with epoxy. If this problem arises, you'll need more than one coat of epoxy solution to fix it. Begin the process by applying a thin sealing coat. This layer should be thin enough to avoid and bubble or ripple formation, yet it must coat the surface all around.
The second step is to add the epoxy layer, which is essentially the same substance but in a thicker coat.
Imagine the outer layer of an orange peel. It has marks and dents all across the surface, and the orange peel effect on the epoxy layer looks very similar to that. This is definitely not the result one would expect since the ideal epoxy layer should be free of all marks, dents, ripples, or smudges.
This effect is the result of sudden temperature fluctuations; thus, the only way to prevent this is to work in a closed environment. If you find this effect when the epoxy is still wet, use a roller tool to even the upper surface.
If the epoxy has already been catalyzed and cured, you will need to scrub the imperfections using abrasive paper. To finish with a glossy look, spray a thin layer of epoxy on the surface.
Sometimes epoxy doesn't set, and you may scratch your head wondering what went wrong. Well, it could be one of several reasons. It could be an issue of incorrect curing, which we will discuss in detail in a separate section of this article.
Another reason could be working on a contaminated surface area. That is why it is essential to clean the work area and tools before mixing and pouring your epoxy solution.
The distinct feature of export coating is a shiny, transparent, and sometimes reflective surface that it leaves behind. A fully cured epoxy coat that looks dull and opaque indicates that something in the process has gone wrong. Most often, this happens due to changes in temperature and the conditions at your workstation. Increased humidity also causes this cloudy and greying effect.
Ever managed to safely store epoxy in a safe airtight container for later use, only to open it to find the color has changed? What does the color change mean? A few chemical reactions occur in the epoxy over time which creates a reddish-brown color.
It should be fine to use as long as the solution was sealed in an airtight container and the consistency is fluid enough to pour. The color change will reflect in the final product, so if that doesn't bother you, then it is good enough to use. 
You might face a situation in which the time required for the epoxy to cure has passed, but the resin hasn't hardened yet. Why did this happen? Here are a few things you can do to avoid this issue-
The most common error that causes the epoxy to remain wet is the incorrect mixing ratio. This means that one or the other component was too much or too little. The perfect epoxy needs to have a balanced amount of both resin and hardener to set as per the instruction manual. This is why the drying and curing time goes haywire if one or both are messed up.
The only sure-fire way to fix this is to remove the epoxy layer altogether and begin the process again. We know it sounds tedious, and it is. But there is no going back once the batch is prepared and laid out.
Beginners often make the mistake of using a completely different type of product which doesn't cure even after the recommended time has passed. Care needs to be taken when selecting the products for applying on a table of the countertop. If you are unsure, try asking someone who is familiar with epoxy DIY or check a few products online.
The good thing about checking online is that you get reviews from fellow epoxy DIYers, and you can learn from their mistakes. Another mistake people make is mixing products from two brands together. No matter how similar they may seem, it is never recommended to mix different brands since it almost never ends up well.
If the wrong products have been used, the only thing to do is remove them immediately. Do not wait to hope that the epoxy might cure if you give it a few more hours because it most likely won't. Also, it's no use adding a correct epoxy mixture over an incorrect one. Since the incorrect layer won't be set, you'll have to redo the process from scratch.
We've mentioned this before, but temperature plays a huge role in the correct setting of epoxy. If the season is cold or the room is set to a lower temperature, the epoxy takes a much longer time to cure. So, check for the climate. Are you in the middle of freezing winter? We can't argue with nature, but what we can control is the room temperature.
The best solution is to apply additional heat to quicken the curing process. Also, there are curing hardeners available on the market that are specifically designed to speed up the process for lower temperatures. Or you could just allow the surface more time to cure if none of the other methods are possible.
There is another issue DIYers complain about - glazed coat epoxy. Glazed coat epoxy is the cloudy, muddy, or opaque appearance of the final product, which can be disheartening to see. The epoxy glaze is incomplete without its transparent and shiny finished look, so many users try their best to avoid it.
The glazed coat look can occur due to a number of reasons, like humidity in the air or the formation of too many air bubbles. Most of the time, when the surface looks opaque and glazed, the curing is also compromised. Since the epoxy does not cure properly, the surface has a tacky finish that does not harden.
If the epoxy is exposed to some moisture or the workplace has a high humidity level, it directly impacts the curing and finishing. Small molecules of condensation react with the epoxy before it cures and creates a muddy, glazed look which we want to avoid.
In some cases, this cloudy appearance is irreversible, but there is a simple method that works most of the time. Try using a heat gun to melt the glazed surface and allow it to resettle naturally. A few applications of the heat gun should be enough to remove all the moisture from a thin layer.
Trapped air is another causal factor for cloudy epoxy. But it can be prevented by applying the epoxy coats in thinner layers. Also, you can use the same heat gun method to remove the trapped air. If there is no rush, wait for a warmer climate to apply the epoxy since thinner layers are easily formed in higher temperatures.
A glazed epoxy will not harden even if you give it extra time to cure. Sadly, the only thing you can do with tacky or sticky epoxy is to remove it entirely. Adding another layer in the hopes that it will be better won't work. So, remove the epoxy sand and clean the surface, and then start the process once again.
Over time, tables and countertops wear out and start peeling. Due to daily use and the action of placing pots, pans, or cutlery, they develop deep scratches. All of these issues can be fixed by adding a durable new layer of epoxy coating. Instead of throwing out that table or countertop, simply follow these easy instructions and get a shiny new surface.
Begin with removing the peeled-out wooden pieces and the deep scratches from the surface. A fine to medium grit sandpaper or abrasive sheet should do the trick. Work your way into the scratches and the peeled-off surface to create a smooth and even layer.
You can use the wet sanding technique, which includes dipping the sandpaper in water before scrubbing. This method removes the scratches without creating additional marks by rubbing the sandpaper. During the process, make sure you sand parallel to the imperfections since going against them might create deeper scratches.
After this, remember to clean the surface so that there are no dust particles left behind. The next step is essential, so do not skip it out of the process. Prepare a cleaning solution containing half part of the cleaner and half part water. Use this cleansing mixture to clean out any remaining particles that might be stuck to the surface.
After that, wipe the area to remove the last bits of the cleansing solution and leave the surface to dry. Once the tabletop is dry, give it a final polish and add a thin layer of epoxy to the top. This layer acts as a sealant and ends up drying to form a clear glass-like reflective surface.
Drying this layer completely will take no less than 24 hours, and you can check to see if it is still sticky. If it is still sticky, give it a few more hours before applying the next epoxy coat.
Most mistakes are easier to fix when the epoxy is still in the wet stage. If there is a visible ripple, bubble, or any other imperfection, it can be smoothened out with a roller tool.
The same is true of uneven layers- tools can be used to correct the level so that no areas are left too thin or thick. If there is any dust sitting on top, removing it in the wet stage is much easier.
Here we conclude our guide about epoxy mistakes and how to deal with them. Some errors like air bubbles on the surface and small ripples can be fixed fairly easily using heat. However, other issues like sticky and tacky epoxy need to be scrapped out and redone.
We made the same mistakes when we started out, so we know the struggle of getting it right! Keep a close watch for any of these mistakes for your next project and try to fix most of them before the epoxy cures.
Which of these mistakes did you face the most? Feel free to share in the comments below.
Until next time!
Related Articles
5 Best Epoxy Resin for Tumblers
11 Best Epoxy Resin For Crafts
The Difference Between Epoxy & Super Glue
What is Resin and How It’s Used
10 Best Epoxy for Plastic Today
How to Color Clear Epoxy Resin [Coloring Resin
How To Fix Radiator Leak With Epoxy+ Best Radiator Repair Epoxy
Epoxy Garage Floor 101 [All You Need to Know]
Mold Release Guide + Best Epoxy Release Agents
Surfaces Resin Won’t Stick to [All You Need to Know]
Heat Resistant Epoxy 101 [A Guide for High Temperatures]
Epoxy Cement Guide 101 [How to Repair Concrete with Epoxy]
How To Mix Epoxy 101 [Measuring & Mixing Epoxy Resin Guide]