
Updated on
Whether building a new house or fixing existing furnishing, we try to make sure that flooring and walls last a long time.

The question arises - how does one look after a wooden flooring or furniture and make the most of it? Well, a few obvious ways are to keep the wood clean, avoid spills, vacuuming often, and repairing whenever required.
However, there is another simple solution called epoxy paint which might be one of the best ways to maintain a wooden floor. Essentially, epoxy paint has two parts of coating - one part resin and the other part catalyst, which combine to form a hard and durable layer. This Paint can be used on concrete as well as all kinds of wooden surfaces like floors and tables.
In this article, we will tell you how to select the right kind of epoxy paint. We will also guide you on the correct way to apply it to your floors.
So, without further ado, let's get started.
Epoxy Paint For Wooden Surfaces
Commonly, people choose epoxy paints as an additional coating because it allows the grains of wood to shine underneath the durable coating. It also acts as a protective covering and keeps wooden furniture and floor free of pests, dust, and moisture.
Types Of Epoxy Paint
Epoxy paint is available in two varieties - oil-based and acrylic. Both of them have similar functionality and are chemically resistant and durable. They are also known to withstand temperature changes and extreme weather, making them an excellent option for coating outdoor surfaces.
That being said, there are a few differences between these two which we will discuss further.
Oil-Based Epoxy Paint
One of the biggest benefits of using oil-based epoxy is its ability to leave behind a film of layer, which creates an even surface. After you finish applying the coat and leave it to dry, a layer remains behind that can be sanded down easily compared to acrylics.
You know how wood develops small cracks and becomes porous over time? Well, this can cause moisture to seep into the wood and damage it from the inside. That's a perfect example of why you would use an oil-based epoxy coating. Since it stops moisture from entering the surface, it finds many uses in commercial and residential buildings.
Apart from that, it's perfect for covering roofs and floors to repel water and insects which ruin wood over time. Many people prefer to use oil-based epoxy to cover the flooring of places that are known to dampen over time. An example of this is industrial flooring that generates large amounts of vapor or steam or a bathroom with a constant flow of water.
Besides, you can use it on smooth or rough surfaces like plastics, metal, sheet metal, concrete, and wood. If you have a textured surface, a covering of oil-based epoxy paint evens out the surface without hiding the appearance.
Acrylic-Based Epoxy Paint
Acrylic epoxy paints are not often used because people prefer the qualities of oil-based ones. Nonetheless, these paints provide a smooth finish and contribute to the fresh and clean look of the surface.
The significant difference between acrylic and oil-based epoxy is that while the oil-based ones are resistant to water and chemicals, acrylics are not. That is why, even though they leave a smooth finish that is worth admiring, the surface will remain prone to water seepage. Not just moisture, but dust and termites can also penetrate the surface of the wood and damage it from within.
Another reason why oil-based epoxy paint is preferred is because acrylics tend to catch stains that cannot be removed easily. Also, applying it on uneven and textured surfaces does not give it a smooth touch since it gets absorbed into the top layer of wood.
On the other hand, oil-based ones sit on top of the surface instead, which gives many protective benefits.
However, if you are looking for a glossy and aesthetically pleasing finish for your wooden floors and tables, acrylic epoxy would be the best choice. Furthermore, it costs significantly less than its oil-based counterparts.
Epoxy Primer
Even though epoxy paints are durable and last for a long time, they might not stick to the surface properly under some circumstances. Sanding and cleaning might not be enough, and this is why a primer is commonly used before applying paint. A layer of acrylic latex primer evens out the surface, making it easier for the paint to stick to the surface.
Also, epoxy primers are available in several colors, so you can select one which matches the color of your wooden surface. While there isn't any issue with applying epoxy paint directly on wood, it is highly recommended to begin with a coat of primer first.
Benefits Of Epoxy Paint On Wood
-
Durable
If you are looking for a sturdy choice for coating your wooden floors and furniture, it doesn't get better than epoxy paint. Epoxy is a highly durable material that can be compared to the sturdiness of stone and concrete.
One or two coats of epoxy paint are enough to prevent minor scratches and cracks which might appear from rough use, like dragging heavy furniture. Even if you drop objects on the floor, the epoxy surface endures minor damages, and due to this, it is commonly used outdoors or for garage flooring.
-
Long Lasting
Epoxy paints make for a long-lasting option when it comes to wooden or any other floors and walls. They can last for decades without needing a retouch and extra finishing.
Often we find wooden planks peeling off at certain rugged places which are frequently in use. Also, concrete floors and walls can chip and crack over time leading small pieces to fall off. All of these issues can be comfortably solved with layering epoxy paint, leaving the walls and floors as good as new for years.
-
Protects Surfaces
It is quite resistant to most chemicals like gasoline, oil, making it quite useful in garage floors in residences and automotive factories. Furthermore, they prevent surfaces from developing stains from sudden spills, whether it is a chemical spill like bleach or a food spill like wine.
Epoxy paints are perfect for those who do not want to spend too much time and effort on maintaining floors and walls.
-
Appearance
One of the main reasons to get an epoxy coating is its attractive, glossy appearance. Just one coat gives the wood a shiny and smooth finish which is great to look at. This is why it is often used to provide a final finishing to wooden tables, cabinets, desks, bed frames, stools, working benches, among others.
-
Other Benefits
Since epoxy coatings are pretty durable, they do not require much upkeep and replacement for years to come. This ends up saving a lot of money in the long run, so in a way, they are pretty cost-effective.
Also, do not think for a minute that using epoxy means sacrificing your taste and creativity. These paints are available in a range of lovely colors, which can be bright and eye-catching or understated if you wish. If your surface is wooden, a suitable color can be chosen to enhance the natural look of the wood surface.
Disadvantages Of Epoxy Paint On Wood
As with any kind of paint, epoxy paint, too, has a few disadvantages to it. These are a few things you should know about before finalizing epoxy coating on your wooden floors and furniture.
-
Preparation And Application Time
Preparing and applying epoxy paint is a time-consuming process. Even before you start the application process, there are a few steps that must be accomplished. Whether the surface is wood, concrete, or metal, it needs to be clean and free of dirt, grime, and oil. If the solvents or grease are not removed, then the application will appear patchy.
As far as the application is concerned, epoxy paint takes the same time to apply as any other paint. But mainly, it is the drying time that is long and tedious. If you are planning to cover the room of one floor, know that you won't be able to use that room for a couple of days.
This is because it is essential to allow the first coat to dry completely before moving onto the next layer. It shouldn't come as a surprise if the painting job takes up to a week to complete.
-
Slippery
Even though epoxy paints deliver a high gloss and durable finish, they are known to be a bit on the slippery side. And, this is especially true of the oil-based ones who become prone to skidding and slipping when the floor gets wet.
The thing is, usually, epoxy paints are applied in kitchens or bathrooms where there is always a chance of water spilling. So, to combat this, textured flooring is placed before applying epoxy so as to reduce slippery floors.
-
Strong Smell
Epoxy paint emits an undeniably strong and pungent smell which might be difficult for some to inhale during the application process. Mixing and applying wet epoxy releases a lot of fumes that smell like strong ammonia. This is primarily found in the darker shades of epoxy, which tend to have more hardeners.
-
Difficult To Remove
We already discussed in a previous point that the application is tedious, and epoxy paint takes a very long time to dry. However, what's more difficult is to remove epoxy paint. Even though epoxy does not spoil easily, removing epoxy isn't easy for a layperson if you decide to change the flooring.
You might need to consider your options or hire a professional to remove the wooden floor of epoxy paint properly.
Best Epoxy Paints For Wood
-
Valspar Premium Clear Coating
This is an epoxy paint by Valspar, which is perfect for protecting your wooden or concrete floors with a smooth finish. Since this product is clear, it can be applied to any color surface under the sun and still look amazing. Sometimes, this option can be used on top of an existing older epoxy for an additional layer of protection.
Furthermore, this product claims to be two times stronger than an untreated floor and has bonding agents which stick to the surface with ease.
Pros
- Oil and chemical resistant
- Advanced bonding technology
- No color
Cons
- It might be difficult to apply
-
Rust-Oleum EpoxySheild
This brand is well known for creating durable paints for ships and shipping parts. However, the "EpoxyShield" is engineered especially for floorings and garages. Along with drying faster than other epoxy paints, this option also makes for a thick and protective layer after drying.
Moreover, it has an advanced gloss formula that leaves a light grey sheen on the floor. One container is enough to cover 500 sq feet of your wooden floor or garage.
Pros
- Durable material
- Dries comparatively fast
- Doesn’t peel
Cons
- Tedious preparation
-
Supercoat Epoxy Liquid Floor Coating
The following high-quality option for coating a floor or wall is the Liquid Floor Coating epoxy by Supercoat. This is one of the most affordable epoxy paints on the market. As with all epoxy, this also has two containers with resin and catalyst, which must be mixed manually before painting.
On the plus side, this product comes in various colors, making it easy to match with your floors.
Pros
- Long-lasting product
- Multiple color options are available
- Easy to work with
Cons
- Limited area coverage
How To Apply Epoxy Paint
In this section, we will lay out the four simple steps to apply paint to your wooden floors or furniture. But before we proceed, we recommend preparing a safety kit to stay safe while painting.
We mentioned earlier that while painting, wet epoxy emits ammonia-like toxic fumes which can cause trouble in breathing and create skin allergies. To prevent such occurrences, stay on the safe side by wearing a respirator mask, protective eye goggles, and rubber gloves. As an added measure, keep the windows and doors of the room open to improve ventilation.
Once you are prepared, begin with the following steps.
-
Sand The Surface
Wooden surfaces as they are do not pick up the epoxy paint easily, especially if they already have a varnish or finishing. So, the first step is to sand the entire surface with 120 - 200 grit sandpaper. This process should even out the surface and remove the unnecessary grains to create a smooth surface.
Next, vacuum the remaining dust particles that arise from sanding the wood. Some woods release oils upon sanding. So, you can also use a mop or damp microfiber cloth to clean the surface of any remaining dust and debris. Some oily woods like teak will need cleaning with a more potent solvent like acetone.
This step itself is long and tiresome, but it must be done to get a surface clear of bumps, blisters, and tears. Before you move on to priming and painting, make sure to tape the surface that you don't want to paint.
For this, a simple painter's tape should suffice to keep the paint in the designated area and avoid spills. If you are working with pieces of wood at your workstation, be careful to protect all other items at the table.
-
Apply Primer
As you already know, bare wooden surfaces are not the best at holding epoxy paint. We recommend applying a coat of acrylic latex primer before bringing out the epoxy. Use a roller to dip in the primer and evenly cover the entire surface from end to end. Although many people do not see the value of this step, it is definitely unwise to overlook it.
One coat of primer takes around 3 hours to dry, after which you can proceed with the second coat of primer. Applying 2 - 3 coats of primer should be more than enough to produce the best results. Agreed, there are extra hours spent waiting to paint, then drying. However, you aren't going to paint the surface every day.
So, it's worth spending a few extra hours to get a result that will last for years to come. Apart from that, remember that primers come in different colors, so select one that will complement the wooden surface.
-
Mix Epoxy Paint
Measure the resin and catalyst in two disposable containers, a plastic one with numerals to read the ratio will work just fine. Mix the two components in the correct ratio and stir for at least 5 minutes. If it isn't stirred well enough, the mixture will remain uneven and become a strange sticky texture.
To remove sticky parts, you can use a small piece of wood to turn around the edges of the container and continue mixing till it becomes a homogeneous mixture. It does not matter which component is added first as long as it is adequately stirred.
Also, if you do not have a piece of wood, just use any regular stirring divide made of plastic or any other stick. While mixing, if you begin to see bubbles forming in the mixture, it is an indicator of mixing the solution too quickly. Don't worry; this can be removed by heating the epoxy for a few minutes.
A quick note - do not mix the epoxy at a temperature below 65 degrees Fahrenheit since it won't mix properly.
-
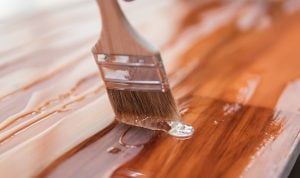
Apply To Wooden Floor
There are a few different methods to paint epoxy on wooden surfaces. If your surface is a floor, the most effective tool to use is a roller attached to a rolling pole. But, before you get the roller, check if it has a shed-resistant nap cover.
The best way to go about after mixing epoxy is to use it immediately. So, once your batch is prepared, cover the entire floor area in one go because epoxy hardens quickly. Make sure to avoid covering paint in portions because they will dry unevenly.
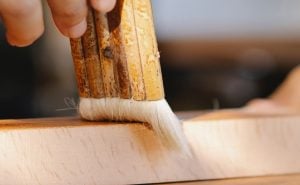
However, if you are working with individual pieces of wood or parts of furniture, then you will need a slightly modified method. Firstly, you'll need to pour the well-mixed epoxy onto the wooden surface. Again, this needs to be quickly worked into a thin layer before it hardens.
Then, take the help of a foam brush to spread the epoxy mixture towards all edges. If air bubbles appear on the epoxy layer, they can be removed by applying heat through a heat gun or hair dryer. Finally, allow the first coat to dry thoroughly for at least 4 hours before applying the next coat of epoxy paint.
Tips For Applying Epoxy Wood
-
For Floors
Begin in one corner, making your way towards the center, and end at the exit near the door. This will help you to leave the room and allow the epoxy to dry without stepping over it.
Also, don't apply the second layer before the first layer is dry. Doing so will not deliver the desired finish, and the epoxy layer might peel out or erode. So, to prevent scraping over and starting the tedious process again, it's best to give the room plenty of time to settle and dry.
Furthermore, do not order the exact amount of paint required for the floor. It will help you to keep a buffer in case of any spills.
-
Application Process
Apply immediately after mixing because the epoxy starts to set in one or two hours. If the resin and hardener mix is left exposed to air for a couple of hours, it will lose the sticky fluidity. Then, it will become impossible to pour and apply.
For painting with foam or sponge rollers, make sure to apply at least 3 coats of paint. One coat or two would be too thin since rollers efficiently spread out the epoxy into a fine layer.
-
For Painting Outdoors
If you are planning to paint the fences, roofs, or anything outdoors, consider applying a UV-resistant clear coating over the epoxy layer. This is necessary because epoxy can sometimes erode and get damaged in extreme temperatures. The harsh sunlight might ruin the layer and won't last as long.
Epoxy Paint For Wood Buying Guide
After following these steps, you can get a better idea of how to apply epoxy paint on your wooden floors or furniture. However, there are various things you must consider before moving to the painting part. Here we list a few pointers which we recommend you look through.
Factors To Consider Before Buying Epoxy Paints
-
Oil-Based Or Acrylic Epoxy
More often than not, when discussing epoxy coating for floors and walls, it is assumed that we are talking about the oil-based ones. They are the more popular ones out of the two for their numerous water and dust resistance properties and spectacular glossy floors as a result.
Projects which require a durable and foolproof option can opt for oil-based epoxy paints. However, they have a long drying time, and you won't be able to use the area for at least a few weeks.
If you want to stick to a lower budget, acrylic epoxy paints are the next best option. With acrylics, you do get the same sheen and finish, but they take more coats for the best effect. Moreover, if you decide to use water-based epoxy for concrete walls, there is a risk of concrete showing through.
This will lead to a finish that looks rather pale and lackluster. The reason for this lies in the composition of the water-based epoxy. Once the water evaporates during the drying process, it leaves behind a thin layer of paint that doesn't have much coverage or durability.
-
Surface To Paint
The surface which needs to be painted needs to undergo careful analysis before applying any kind of epoxy. The first thing to check is the texture of the floor. If the floor area is an uneven concrete garage floor, then evening it out will be necessary. The same goes for wooden floors, for that matter.
Freshly installed wooden panels and furnishings won't need much preparation, so you can simply vacuum and mop before applying the epoxy.
However, one factor which is often overlooked is the humidity in the floors. If there is moisture already in walls and floors, it must be removed before coating with primer and paint. If this measure is not taken, the surface will start blistering after a while.
-
Cost
The cost for paints varies across brands and epoxy types, but overall, good quality epoxy does not come cheap. The cheaper ones tend to be water-based epoxies which need extra coats to give a complete finish. You also need to include primer in your budget for almost the same quantity as the paint itself.
Also, you must note that specific colors are more expensive. For example, bright red epoxy paint is quite costly when compared to others. This is mainly due to additional pigments added to the paint for vibrant color. Another thing to note is that lighter colors will need more coats; thus, the cost will automatically increase.
-
Color
First of all, a basic rule of coloring floors and walls is that lighter colors do not cover as well as darker ones. Thus, the color you select will dictate the number of coats required. Also, the primer selection needs to be done along with the paint so that both of them form a harmonious layer over each other.
Skipping primer when using light colors like beige and off-white is not recommended. The reason for using a similar colored primer is to allow the color to shine without becoming muddled by the original grey or dark grey of the concrete.
Frequently Asked Questions
-
Is Epoxy Paint Waterproof?
Yes, it is entirely water and moisture-proof, which is why it is often used in traditionally wet areas like kitchens and bathrooms.
-
Does Wood Need To Be Sealed Before Applying Epoxy?
Yes, it's highly recommended to seal the wood before applying any kind of epoxy. Wooden floors are porous, prone to chipping over time and develop splinters sometimes. If you pour or apply epoxy on this uneven surface, it won't spread well and might form bubbles. So, the best solution is to apply a sealing coat to allow the epoxy to pour evenly.
Primers also do a great job of preparing the surface and making it easier to hold the epoxy.
-
Will The Epoxy Coating Be Slippery?
In the past, this used to be one of the major drawbacks of using epoxy on floors. Even today, there are many brands that tend to slip. Thankfully, there are slip-resistant options available in recent times. These paints have an added bumpy texture which creates a bit of friction to prevent slipping and falling.
-
How Do You Avoid Epoxy Floors Peeling and Splintering?
If there is any incidence of peeling and blistering, it's essential to discover how old the epoxy floor is. If the epoxy paint was applied within one year, there is sure to be a mistake in one of the application steps.
Firstly, it comes down to the basics of sanding and cleaning. If these steps are not followed, and oil or solvents are remaining on the floor, then epoxy is prone to develop blisters in those areas. Also, checking the humidity levels of the floor is essential because even after cleaning and sanding, trapped moisture can damage the wooden surface.
Final Words
So, here was an all-encompassing guide about epoxy paints for all kinds of wooden surfaces. From the different types of epoxy paints, benefits, and disadvantages of epoxies to the various helpful tips, all the questions you might have, are answered.
We especially hope the buyer's guide helps you get a better idea about what to look for before purchasing any kind of epoxy paint. Feel free to come back to the steps of "How to apply epoxy on wood" for preparation before you start painting.
On that note, we take your leave. See you next time with another informative article. Bye!
Related Articles
5 Best Epoxy Pool Paint | Buyer’s Guide and Reviews
9 Best Glue for Metal to Wood [Reviews & Buyer’s Guide]
9 Best Varnishes for Wood [Reviewed & Buyer’s Guide]
Sanding Epoxy Resin Guide 101 [All You Need to Know]
11 Best Bar Top Epoxy [Reviews & Buyer’s Guide]
Waterproof Epoxy 101 [Is Epoxy Waterproof?]
What is Resin and How It’s Used
10 Best Epoxy for Plastic Today
How to Color Clear Epoxy Resin [Coloring Resin
How To Fix Radiator Leak With Epoxy+ Best Radiator Repair Epoxy
Epoxy Garage Floor 101 [All You Need to Know]
Mold Release Guide + Best Epoxy Release Agents
Surfaces Resin Won’t Stick to [All You Need to Know]
Heat Resistant Epoxy 101 [A Guide for High Temperatures]
Epoxy Cement Guide 101 [How to Repair Concrete with Epoxy]
How To Mix Epoxy 101 [Measuring & Mixing Epoxy Resin Guide]
How To Harden Sticky Resin [Uncured Epoxy Solutions]
How To Fix Epoxy Mistakes [Tackling Common Epoxy Problems]