Owls are majestic creatures with a mystic allure and today these odd creatures are one of the most loved wild animals, slowly becoming a symbol for peace, calm and intelligence alike. The short adorable tutorial “Learn How to Draw an Owl “that follows is the fifth part of our Cool Things to Draw Collection that we highly encourage you to visit if you`re interested in sketching and drawing. More information on owls and the tutorial itself, after the break.
To further emphasize the educative process, fun owl facts for kids have been presented below, the points will cover various features from the way they hunt up to the title of a group of owls, cast a glance below.
More than 200 different owl species have been discovered to date.
Owls are active at night, nocturnal animals.
Interesting enough, a group of owls is entitled a parliament.
Most owl species are known to hung insects but a select group hunts small mammals and other birds as well, several owl species do hunt fish as well.
Owls use a set of powerful talons, their claws, to hunt, catch and kill prey.
A flat face and immense eyes are characterizing the face of the owl and to make things even more interesting, owls can turn their head 270 degrees.
Owls are farsighted, this basically means that they can`t see things close to their eyes properly.
Compared to other birds of prey, owls are very quiet in flight.
The owl uses the coloring of its feathers to help itself blend into their environment, camouflaging.
Barn owls are easy-recognizable by their heart shaped face.
Learn How to Draw an Owl
STEP 1 - one circle and one ELLIPSE
Easily enough the tutorial starts with one circled placed on one ellipse, both placed on the same vertical axis, each one with its horizontal axis.
STEP 2 - start shaping the body and draw the eyes
The body will now receive the bird's wings in different positions, its eyes will also be shaped.
STEP 3 - Start detailing the head of the owl
The owl`s head is not simply round. To bring forward the charm of the owl in this step preparatory lines for the head of the owl are being shaped.
STEP 4 - Detailing the head and the body
Our little owl now receives details on its wings and belly, the head receives here details as well.
STEP 5 - Beak eyes and more details
Things are getting there, detailing the eyes and placing the beak are now shaping the face. The body also receives additional detailing here.
STEP 6 - erase the construction lines and add more details
The construction lines are now gone, our little owl received its talons, claws and a cute hairstyle.
STEP 7 - place a branch under the owl and detail the eyes
Creating a little context is key. Pay attention to little details in order to humanize the petite creature. Here the eyes receive depth and a branch becomes the first background piece.
STEP 8 - add shades
The shading step is as always optional yet this helps one contour its drawing beautifully, providing depth, transforming a 2D volume into a 3D one.
STEP 9 - CREATE A BACKGROUND
Here creativity steps in. The entourage of your owl can be constituted of petite bird friends or simply a beautiful tree with a dense foliage. In the same manner flowers can be placed here and there.
STEP 10- Color The scene
Do not leave one spot untouched and make your drawing, your own. Drawing is a very beautiful process and so is coloring, do your best to mix the two in a phenomenal scene.
The owl is a little animal that will surely raise the interest of your little one and hopefully the drawing and coloring process of this petite mystical creature will be both creative and educative for all parties involved. What do you think? We would love to hear your opinion on the subject in the comment section below.
This feature is part of the "Things to Draw"Collection of drawings realized by Homesthetics Magazine in partnership with Designaissance Studio. The contents of the tutorial are copyright protected as it is the collection itself; if you are interested on sharing the drawings on your website or magazine please contact the magazine. Feel free to print or share the page for educative purposes as this is the definitory purpose of our mission with this collection.
A petite baby octopus constitutes the focal element in our next tutorial “Learn How to Draw an Octopus “, illustrated as a very positive, fun character with a really cute look; this tiny octopus is part seven of our Cool Things to Draw Collection that we highly encourage you to visit if you`re interested in sketching and drawing. More information on octopus and the tutorial itself, after the break.
Five educative interesting fun facts about the octopus have been presented below to complete the educational component of drawing and sketching, cast a glance:
The octopus is a marine animal that enters the mollusk category. The mollusk category includes soft bodied animals only.
The body of the octopus has no less than eight arms, each one bearing two rows of suckers, the rest of body is soft and its brain is highly developed.
The octopus spends a great deal of time hidden, camouflaged.
Most octopus reach 1 meter in length, about three feet long.
The octopus is known to be the most intelligent creature of the invertebrates, animals without a backbone.
Learn How to Draw an Octopus
STEP 1 - draw a circle
A simple circle and its two axes are the first simple step towards a cartoon octopus.
STEP 2 - completing the circle
The hat like shape that now appeared on the octopus is characteristic to the octopus and squid`s shape.
STEP 3- drawing its eyes
To highlight the circular attribute of the animal`s head the big, about to become, cute eyes, have been drawn on the edges of the head. A new set of axes highlights the slightly tilted head of the octopus.
STEP 4 - details to humanize the character
Octopus have no regular mouths nor do they have noses but in order to humanize our little character a bit we have drawn a mix between the two. The simple lines almost looks like a smile, a positive look.
STEP 5 - setting a direction for the arms
Simple lines will set the position and direction of the new arms. Short tentacles make a great fit with a big head, notice the cartoonist relation between the two.
STEP 6 - draw the tentacles
Simple cylinders constitute the tentacles now.
STEP 7 - detail the eyes with cuteness
STEP 8 - erase construction lines add shading and details
The octopus receives details on its tentacles and face, construction lines are erased and simple shades offer the drawing depth.
STEP 9 - create a context
The drawing is now ready to receive context and you have full liberty in this dimension. Get creative with simple elements and imagine a realm in which everything is possible.
STEP 10 - color the scene
Gaze for a moment at your drawing in black and white and prepare for coloring, you`ll enjoy every minute of it.
The process of drawing and coloring should be enjoyed by parents and children alike at the same table, numerous studies have proven that going through this process together can be highly beneficial for both parties. What do you think? How do you see drawing and coloring? We would love to hear from you in the comment section below.
This tutorial is part of the "Things to Draw"Collection of drawings realized by Homesthetics Magazine in partnership with Designaissance Studio. The contents of the tutorial are copyright protected as it is the collection itself; if you are interested on sharing the drawings on your website or magazine pleas contact the magazine. Feel free to print or share the page for educative purposes as this is the definitory purpose of our mission with this collection.
Zebras are animals known by any child, animals that help us define the letter Z in the alphabet, animals that have helped us tittle our pedestrian crossings today. They represent so much, they`re a powerful icon for the entire humanity thanks to their playful clothes. In a short adorable tutorial “Learn How to Draw a Zebra “ we will present this special character in a fun, educative light, this is the sixth part of our Cool Things to Draw Collection that we highly encourage you to visit if you`re interested in sketching and drawing. More information on zebras and the tutorial itself, after the break.
To enhance the drawing and coloring process, to highlight the educative component of the artistic environment, we have curated a list of fun facts about zebras that could come in handy, complementing the act with interesting knowledge.
Part of the equidae family, zebras are basically relatives with donkeys and horses.
Numerous theories have attempted to explain the zebras clothes and more are relating it to camouflage.
The wild zebra lives in Africa.
The common zebras are equipped with tails of around half a meter or 18 inches.
The pedestrian crossing wears the name of the black and white animal today.
To escape a predator a zebra would run from site do side when chased.
The eyesight and hearing of a zebra is highly developed, an evolutionary adaptation to its environment.
A zebra does not stand down to sleep, they sleep standing up.
A zebra`s diet consists mainly of grass.
One could find out the zebra`s mood based on its ears.
In 2005 in the animated film Madagascar a zebra entitled Marty stole the show.
Learn How to Draw a Zebra
Step 1 - one ellipse like shape and half a circle
The head of a zebra will be formed roughly in our first step with one ellipse like shape and one circle that would position the nose roughly. .
STEP 2 - detailing the head in perspective
To add the perspective dimension considering the axes built previously a nose detail an eye and two years have been drawn.
STEP 3 - shaping the body and highlighting directions
The zebra shaped here will be resting by a tree, this is how we`ve envisioned it and, as result, it resides under the horizon line. We will use the horizon line to roughly position the limbs of the zebra.
STEP 4 - shaping the limbs -drawing a book
Simple cylinders will form the limbs of our zebra, it will hold a book, it`s probably the Things to Draw Collection in which it was featured.
STEP 5 - detailing the zebra`s head
To highlight the great eyesight of the zebra and its attention to the wild things in nature we have equipped our zebra with glasses and curious eyes.
STEP 6 - erasing construction lines and drawing the mane
A zebra too has a mane and here it has been drawn proudly. The construction lines are gone, the cute allure of the animal surfacing.
STEP 7 - detailing the stripes tail teeth and EARRINGS
In the last step prior context and shading we have added the magic of the zebra, the stripes. The zebra`s glimmer in its eyes has been highlighted, an earring has been drawn for coolness and a tiny tail is now present.
STEP 8 - drawing the context and basic shading
The zebra is resting under a tree, reading happily in a green meadow, pretty far away from its natural habitat. Get creative in this step and create your own context, your own setting.
STEP 9 - coloring
It goes without saying that the sky is rarely purple and zebras are never blue but the realm of imagination and creativity is, happily, far away from our reality. Zebras do not wear earrings by choice nor are they allowed to read. Color your way through happiness and go wild with colors. There are no rules here.
A zebra is a character that our children have to meet in one form of another, the simple act of drawing can introduce in their life the concept of pedestrian crossing as a parallel, tying connections, helping them associate different things, helping them understand a little part of our world. What do you think? We would love to hear your take on the educational role of drawing and coloring and how you use it today.
This feature is part of the “Things to Draw”Collection of drawings realized by Homesthetics Magazine in partnership with Designaissance Studio. The contents of the tutorial are copyright protected as it is the collection itself; if you are interested on sharing the drawings on your website or magazine please contact the magazine. Feel free to print or share the page for educative purposes as this is the definitory purpose of our mission with this collection.
A splendid illustration containing one snail and sunflower depicts the natural environment in all its beauty. The tutorial "Learn How to Draw a Sunflower and a Snail "that follows is the fourth part of our Cool Things to Draw Collection that we highly encourage you to visit if you`re interested in sketching and drawing. More information about sunflowers, snails and the tutorial itself, after the break.
A few fun snail facts for kids and a few interesting facts about the sunflower have been featured below, these are here to sustain the drawing educative process. Cast a glance.
Snails are part of the gastropod mollusks, the family also includes sea snails, freshwater snails along land snails.
Snails can have either lungs or gills depending on habitat and species.
Snails without a shell are called slugs.
The giant African land snail reaches about 38 cm, about 15 inches. It can weight 1 kilogram, the equivalent of 2 lb.
The largest living snail species is entitled Syrinx aruanus and it can reach 90 cm, 35 in in length. The spectacular snail can weight 18 kg, 40 lbs.
The common garden snail averages 45 meters an hour making the snail one of the slowest creatures on our planet.
The mucus left behind is produced by the snail to reduce friction and advance faster. This element also helps the snail move upside down.
Snails live 5 to 25 years depending on the species.
In agriculture and garden snails are consider pests as they eat the leaves and stems of various plants.
The expression "a snail`s pace" describes a very slow and inefficient process where "snail snail" is commonly used when sending regular mail rather then electronic mail.
A few interesting facts about sunflower follow, stay tuned !
The flower head of the sunflower is actually made of tiny flowers called florets, this makes a large inflorescence. The central florets look like the center of a regular flower yet the outer florets look like simple yellow petals this forming the ensemble of the false flower. The whole act is brought on to help insects and birds see the sunflower easier, after pollination every tiny flower will produce the seed that we all know.
A sunflower can reach 3m in height, 10 ft and the head 30 cm, 11.8 in, in width.
The Guinness World Record for the tallest sunflower has been recorded in Germany for a Sunflower of 8.23 m, 27 ft.
A series of Sunflowers became famous after famous dutch painter Vincent Van Gogh painted them.
The flowers in the sunflower head are cluttered and each floret is oriented to the neighboring floret at the golden angle of 137.5 ° thus creating interconnecting spirals. The numbers of left and right numbers are consecutive Fibonacci numbers. Usually 34 spirals in one direction and 55 in the other are shaped, the largest sunflowers can create 89 in one directions and 144 in the other.
The sunflower is native to the Americans and Native American Indians were known to use it for food, oil, bread, medical ointments and dyes. Today Kansas is known as the Sunflower state. The sunflower is the national flower of Kansas and Ukraine alike.
Sunflowers are used to extract toxins like arsenic, uranium, lead from contaminated soil. Sunflowers were used to remove toxins from a pond after the Chernobyl disaster, similar projects were instated after the Fukushima disaster.
The sunflower head is not actually tracking the sun across the sky during the day, it is a misconception. The young flower buds do have a movement similar in behaviors and the process is called heliotropism but the mature flower points into a fix direction, commonly an easterly one.
Learn How to Draw a Sunflower and a Snail
STEP 1 - one ellipse and one circle
Draw one circle at the ground level and an ellipse that will become the sunflower gazing at the snail. The body of the sunflower can also be fixed here with a simple line.
STEP 2 - more circles and one more ellipse divided
Add two more circles for the snail, these will help you represent his body. The ellipses on the sunflower should be divided at this step to form the petals further on.
STEP 3 - shape the petals and detail the snail with eyes and a body
The petals have arrived and so did the rest of the sunflower. The snail now has a body constituted from the previously drawn circles. Two new circles will now look at the sunflower, about to form the eyes.
STEP 4 - humanize the drawing with faces
To form a three dimensional sunflower expression use construction lines aimed to articulate the round surface on which the eyes and mouth will reside. On the snail things are a little easier as his mouth is more or less in the same plane. His eyes should be now shaped with concentric circles in the spheres, circles earlier drawn. In this tutorial they kindly salute each other through a smile. Two leaves have also been added to the sunflower`s body.
STEP 5 - Erase construction lines and add details
In this step things become clearer. The eyes of the snail are being detailed along with the sunflower`s petal. The construction lines can disappear making things crystal clear.
STEP 6 - detail the scene
The beautiful meeting between the two happened in nature, we are to showcase this by adding additional elements into our composition. One more flower in the background, a bee and grass that grounds the scene joined the scene beautifully. Get creative and shape something unique.
STEP 7 - Add Shades
This step is optional yet the whole compositions gains depth and a bit of contrast when simple shades are added. The sunflower`s shade over the flower in the background makes the biggest difference here.
STEP 8 - color the scene
It is time to make things positive, colorful and cheerful. Take the brightest and happiest colors you have and color the piece and have fun in the process. Needless to say that the new artwork should at-least go up on the fridge if it`s not to be framed for the living room.
The beautiful scene is done and hopefully this process has been productive and educative for you and the little one alike. What do you think? We would love to hear from you in the comment section below.
This feature is part of the "Things to Draw"Collection of drawings realized by Homesthetics Magazine in partnership with Designaissance Studio. The contents of the tutorial are copyright protected as it is the collection itself; if you are interested on sharing the drawings on your website or magazine please contact the magazine. Feel free to print or share the page for educative purposes as this is the definitory purpose of our mission with this collection.
Seahorses are something unbelievable; part of the water environment the delicate creatures are unique for multiple reasons but their unique body shape makes them easy recognizable, today their presence in cartoons dedicated to the sea world being mandatory as it beautifully highlights the immense marine diversity of the seas and oceans. A cartoon drawing tutorial portraying the special connection between one male seahorses and one female horse in a cartoon shape follows, full of color and joy follows. The "Learn How to Draw a Seahorse" cartoon scene step by step tutorial is part of the Cool Things to Draw Collection that we highly encourage you to visit if you`re interested in sketching and drawing. More information on seahorses after the break.
Fun facts about seahorses for children and parents alike follow, ready to enhance the educative process of drawing and coloring.
In our world no less than 40 seahorse species have been discovered so far.
The seahorse prefers to swim in pairs with their tails linked together, they also swim upright and avoid predators by simulating the color of underwater plants.
There are few marine predators for the seahorse aside from crabs. The petite creatures are avoided because they are full of bone and indigestible.
A small fin on the back of the seahorse propels him forward, the fin can flutter up to 35 times per second. Even smaller pectoral fins positioned on the back of the head are used for steering.
The eating technique is rather special, they anchor themselves with prehensile tails on nearby corals and marine vegetation to use their elongated snouts to suck small crustaceans and plankton that passes by. They can eat things that are as far as 3cm away through this method.
Tiny fish and plankton are on the usual dinner menu of a seahorse. The eyes of a seahorse can move independently to survey its surroundings, not giving his presence away.
The seahorse has no stomach or teeth and as a result they have to eat almost non-stop to stay alive; as a result, seahorses can consume over 3000 brine shrimps per day .
The seahorses mate for life and they`re monogamous.
In our world only a few handful of species are known to have male pregnancy and seahorses are among them. The male carries the unborn , freeing the female to make more eggs straight away,the specie thus reproducing faster.
The seahorses engage in eight hour courtship dance rituals that can include spinning around, changing colors or swimming side by side.
The eggs released by the female seahorse are inserted in a special pouch on the male`s abdomen, around 50 eggs are involved in mating.
A male seahorse will carry the eggs until they hatch to release fully formed, miniature seahorses when the time is right. One mating can bring into water anywhere from 5 to 1500 young seahorses.
Learn How to Draw a Seahorse
STEP 1 - drawing circles and axes
A pair of seahorses are to appear on our blank piece of paper and we`re starting with two pairs of circles and their axes. Notice that our horizontal axes are not on the same line nor are the circles equal in size.
STEP 2 - shaping the body
The sculptural body of the seahorse ought to be materialized by starting with a line that describes it. We`ve used the tails to determine this line and we have linked the tails together from the very beginning.
STEP 3 - drawing faces
The snout has been customized for the sex of the seahorse and the female received a chic hairstyle. The eyes simply exude cuteness.
STEP 4 - Adding fins and hairstyles
Get creative with the hairstyles, anything can be designed. Fins on the backs have also been added here with ease.
STEP 5 - Detail the body and construct the tail
The little creatures receive new little fins that work as arms, the tail has also been constructed along the previously drawn line.
STEP 6 - erase the construction lines
The tiny creatures look even more adorable at this point. Detailing follows.
STEP 7 - Adding details and shadow
The little creatures receive details such as hearts on their belly and new lines on their fins. Shadows have also been added for depth and contrast.
STEP 8 - Drawing the marine setting
The marine world is versatile and infinitely beautiful. You can draw absolutely everything, we`ve chosen to draw a set of simple creatures that would support the love between the two.
STEP 9 - Start Coloring
The white piece of paper awaits your color. Have fun and make sure you ave this memory.
What do you think? Are your little ones fascinated by marine life? We would love to hear from you in the comment section below on drawing and coloring with your loved ones !
This feature is part of the “Things to Draw”Collection of drawings realized by Homesthetics Magazine in partnership with Designaissance Studio. The contents of the tutorial are copyright protected as it is the collection itself; if you are interested on sharing the drawings on your website or magazine please contact the magazine. Feel free to print or share the page for educative purposes as this is the definitory purpose of our mission with this collection.
A fairy tale forest scene that includes an owl, a tree, butterflies and a tiny Red Ridding Hood follows and yet the extraordinary main focus of the scene are the colorful iconic mushrooms contained. The magic setting will help you create miniature worlds in which everything is possible, there are no limits. The items portrayed are simple to draw yet the color enhances them a great deal making the scene vivid, full of life. The tutorial "Learn How to Draw a Mushroom" is a magical snapshot that can work as an educative instrument in drawing and coloring with your children, your family; it is the 10th tutorial in the Cool Things to Draw Collection that we highly encourage you to visit if you`re interested in sketching and drawing. More information on mushrooms and the step by step cartoon tutorial itself, after the break.
Forests are separate universes in which wildlife flourishes, natural biomes are being created with simply extraordinary relations between the elements. In the following rows fun facts about mushrooms are listed as a bonus in the educative process of drawing. Please note that mushrooms are just one element from thousands, millions in a forest. Mother Earth is unique to say the least.
Mushrooms are also entitled toadstools, they`re part of the fungus family and unlike usual plants mushrooms produce energy for themselves regardless of sun conditions, they require no sunlight.
Traditional mushrooms are a highly nutritious food source, most species contain a great source of B vitamins as well as minerals like copper and potassium, they contain little fat, carbohydrates and salt content, they`re quite unique.
The medicinal properties of mushrooms have been put to good use by Traditional Chinese medicine for centuries.
Numerous modern studies have proven that mushrooms are resourceful in medicine, they`re used in antibacterial, anti-inflammatory and antioxidant solutions. Mushroom are also used to reduce blood pressure, moderate blood sugar, reduce cholesterol, enhance the immune system as well as to reduce stress and help with the fight of numerous types of cancer.
Mushrooms contain up to 90% water.
In certain cuisines the mushroom is considered the meat of the vegetable world.
Most mushrooms grown for human consumption come from controlled, sterilized environments and the most popular mushroom type represents no less than 90% of the mushrooms consumed in the US, it`s entitled the White Button Mushroom. Portobellow and the brown version Agaricus Bisporus entitled Crimini are also popular edible mushrooms.
The world largest producer of mushrooms is China, the country produces more than half of all cultivated mushrooms in this world.
The term used for people that collect mushrooms with the purpose of eating them, in the wild, is Mycophagist. The act of collection can be referred to as "mushrooming" and "mushroom hunting".
In the world there are multiple highly poisonous mushrooms and some of them do look like edible species thus making the "sport" of "mushrooming" risky without proper knowledge.
In the world there are no less than 30 species of mushrooms that actually grow in the dark thanks to a chemical reaction called bio-luminescence that produce a glowing light similar to a foxfire. For centuries certain cultures have used these fungi species to light their path through the woods.
A colony of Armillaria solidipes that resides in the Blue Mountains of Oregon is believed to be the world`s largest organism, the fungus spreads over 2,200 acres (8.9 km2) and it is over 2,400 years old. A small portion the organism lives above ground as short-lived honey mushrooms but the mycelium, branch like vegetation, lives on.
Before synthetic dyes mushrooms were widely used to dye wool and various other natural fibers.The mushroom dyes are organic compounds known to produce powerful, vivid colors.
Learn How to Draw a Mushroom
STEP 1 - start small
Simple lines can easily shape the scene, we`ve started with two mushrooms and one tree. The simple lines are undulated one towards the other creating a feeling of coziness from the very beginning. The reverence lean is simple to make and from our point of view changes things a great deal. Needless to say that from step one things can and should look different on your piece of paper, thousands of shapes of mushrooms can be found in the world, be creative, natural.
STEP 2 - start the owl and position flowers
To give life to the scene early on the position of complementary elements has been drawn. Notice how the circles and their construction lines already reside in a simple composition that seems tied.
STEP 3 - draw a path and the red ridding hood
In step three we give our elements a scale by inserting human-inspired elements from fairy tales to which one can relate. The Red Ridding Hood walking on a path of small dimensions makes the setup huge, a fairy-tale setting. Flowers bloom here.
STEP 4 - detailing the owl and inviting a butterfly
Simple small step to make things cozier.
STEP 5 - Vegetation Flourishes
The tree now gains leaves and the grass surfaces underneath the mushrooms.
STEP 6 - Construction lines are being erased and mushrooms are being detailed
Certain details appear at this step, the flowers gain some leaves, the eyes of the owl are shaped yet the most important accomplishment is the mushroom level as these get a new shape and adorable spots.
STEP 7 - More adorable spots and details
Lines appear on the tree, leaves, flowers. Spots appear on the mushrooms and butterfly and adorable owl.
STEP 8 - Adding Shades
Contrast and depth through simple shades is now earned by our piece of paper.
STEP 9 - Coloring the scene
Everything gains color, everything becomes vivid and positive. In this step the most you are to have fun and enjoy the process as it simply brings joy.
A fairy tale scene drawing tutorial is something that each one constructs out of his imagination, there are no limits and we hope that you have found our setting interesting, educative, positive. We would love to hear your opinion on drawing and coloring with the family in the comment section below.
This feature is part of the “Things to Draw”Collection of drawings realized by Homesthetics Magazine in partnership with Designaissance Studio. The contents of the tutorial are copyright protected as it is the collection itself; if you are interested on sharing the drawings on your website or magazine please contact the magazine. Feel free to print or share the page for educative purposes as this is the definitory purpose of our mission with this collection.
Mickey Mouse is a celebrity today, the character changed the world, it made the mouse an entity that can now receive adjectives like cute and adorable from children, a group that might have never seen the animal in such a manner if it wasn`t for the cartoon character. The black and white show was followed by Tom and Jerry, a distinctive approach with a phenomenal success. These shows date back decades and yet they remain relevant, they are timeless, here to stay. The drawing tutorial that follows brings our own twist on a cute mouse in a scene that can be interpreted through numerous means as it portrays a mouse in a cat costume eating its cheese happily. The short adorable tutorial " Learn How to Draw a Mouse" is a fun twist meant to represent the mouse and cat under an educative light, it is the 8th tutorial in the Cool Things to Draw Collection that we highly encourage you to visit if you`re interested in sketching and drawing. More information on cats and mice after the break.
To further emphasize the educational role of the drawing tutorial fun facts about cats and fun facts about mice have been curated, learn more about these animals in the following rows.
Mice
The plural of the mouse is mice, the animal is part of the rodent order and it is a small mammal widely spread around the world.
Characteristic features for the mouse are the pointed snout, petite round ears and long tails with little to no hair.
In the world there are more than 30 species of mice.
The house mouse is the most common species that one can encounter, other common species that can be found near the house are the American white-footed mouse, the field house and the deer mouse.
The mouse is a nocturnal creature with poor eyes-sight to which they make up with good hearing and smell.
Numerous predators target mice, a few common ones are cats, wild dogs, foxes, birds of prey and snakes.
In the wild, the mouse is a herbivore that feeds on fruit and grains from various plants.
The tail of the mouse can grow as long as the body.
The whiskers of the mouse can sense changes in temperature, with the whiskers a mouse can also map its path with ease.
A complex burrow nestles the mouse, this always features a long escape route and long entrances. The petite rodent is very clean and tidy being known to have separate areas for food, sleeping and toilet.
A mouse eats at least 15-20 times a day and their home is always built close to a food source to avoid travelling long distance. Their food source is always 8 meters away or closer.
Mice and rats are the most used animals for experiments.
In Zambia and northern Malawi the mouse is a delicacy and they`re often consumed as good protein source.
In the wild a mouse lives up to six months due to the immense number of predators. In laboratories or grown indoors as a pet the mouse can live up to two years.
1928 brought to us the Micky Mouse of Walt Disney as the first mouse character in children cartoons, multiple popular mice followed such as Speedy Gonzales, Jerry from Tom and Jerry and Stuart Little.
Cats
Cats are by far the most popular pet in the world, at least 500 million domestic cats being recorded so far.
The connection between human and cats is at least 10000 years old.
To conserve energy cats sleep 13-14 hours a day and they`re adapted to hunt small mice and rats, being equipped with claws and teeth adapted to the practice.
One group of cats is entitled a clowder, the male cat is called a tom where the female cast is called a molly or a queen, petite, young cats are widely known as kittens.
Domestic cats weight from 4 kilograms (8 lb 13 oz) to 5 kilograms (11 lb 0 oz) yet the record for the heaviest domestic cat is recorded at 21.297 kilograms (46 lb 15.2 oz).
Known to be lethal hunters, cats walk their back paws in almost the exactly same place as the front paws in movement thus keeping noise and visible track to a minimum, sneaky predators.
Cats unlike mice have powerful night vision that allows them to see at level of lights six time lower than humans, this feature works extraordinary with the excellent sense of smell and powerful hearing.
The older cats are known to be aggressive towards kittens.
Domestic cats and especially kittens adore to play, chase toys and play fight. In their play kittens also practice their skills for hunting and fighting.
The average cat lives 12 to 15 years and they spend a large amount of this time licking their coats to keep themselves clean.
The feral cat is seen as a pest and a natural threat to native animals.
Learn How to Draw a Mouse
STEP 1 - draw a circle
Start small, draw a simple circle along with its horizontal and vertical axes.
STEP 2 - add new axes
These will help you determine one ellipse that is about to border the cat costume on the petite mouse.
STEP 3 - start drawing the costume
The ellipse is now here along with the teeth of the cat costume and its eyes.
STEP 4 - the snout surfaces
Mice are known thanks to their adorable snout, so differently portrayed by each legendary mouse character in cartoons. The snout of our mouse is cute and short.
STEP 5 - Draw the eyes
In cartoons the eyes are highly relevant, we`ve drawn them big here and they are to become very cute, soon.
STEP 6 - Add ears
The cat costume now receives ears.
STEP 7 - Drawing the Body
On the vertical axis now a second circle appears to determine the belly of the cat costume.
STEP 8 - draw the tail hands and feet
The petite mouse will have his hand happily positioned on the belly, grasping the cheese triangle with immense delight.
STEP 9 - Erase the construction lines and draw the cheese
The cheese surfaces after the construction lines have been erased, the eyes are detailed, stitching appears as well as a patch that makes the costume more humane.
STEP 10 - shadowing and detailing
Ears are now more detailed along with the cheese and tail. Shadows have also been added here and there to offer depth.
STEP 11 - Add more shades and detail the body
The eyes of both presences have been detailed along with the body, more shadows have been added.
STEP 11 - create a background
An epic illustration set the scene for the petite mouse portraying the set from which he chose his food. Be creative, feel free to improvise your own background.
STEP 12 - color the scene
It is time to have some fun, color the entire scene with as much color as possible. Don`t leave a spot blank, have fun in the process.
The mouse is and will remain a big presence in cartoons and your setting is surely worthy of being part of this movement. Feel free to add you drawing in the comment section below or email it towards us and we will add it in this article proudly. We would love to hear from you in the comment section below.
This feature is part of the “Things to Draw”Collection of drawings realized by Homesthetics Magazine in partnership with Designaissance Studio. The contents of the tutorial are copyright protected as it is the collection itself; if you are interested on sharing the drawings on your website or magazine please contact the magazine. Feel free to print or share the page for educative purposes as this is the definitory purpose of our mission with this collection.
In the Cool Things to Draw Collection a world-wide beloved character is the element of our first drawing tutorial : the deer, a splendid cartoon scene that can bring the memory of Bambi into the picture. The tutorial will help you learn how to draw a deer in her natural scenery with a simple step by step tutorial. The beautiful picture to draw in this tutorial can become an important corner in the creative development of a child as basic shapes are being depicted more realistic, with each step the image gracefully slipping into the world of fantasy. The tutorial starts with basic shapes and uses simple axes for construction, ending with the simple entourage of our deer, the natural habitat.
Use bright colors to bring your drawing to life along your little one and proudly display the new wall art piece.
A handful deer facts for kids might come useful before one starts the simple drawing tutorial with the little one; cast a glance below:
The beloved deer is in the same family with the moose, reindeer, and elk, all part of the Cervidae family.
A male deer changes his antlers every year.
The antelope greatly resembles the deer yet the difference is in that they have horns instead of antlers and horns unlike antlers are not grown and replaced each year.
Various species of deer have been hunted across time for their antlers, today the haunting legislation preventing this as much as possible.
The large male deer is called a "stag", the male deer is called a "buck", the female deer a "doe", a young deer a "fawn" and their entire group is called a "herd".
The long legs of the deer are adapted to their environment, a construct of evolution.
Deer are known to be great swimmers and jumpers alike.
All deer are born with white spots but they fade out usually within a year.
The first steps of the deer are taken in half an hour after their birth.
Hopefully the facts above have been found interesting so without further a do let`s dive right into the tutorial.
Learn How to Draw a Deer
STEP 1 - Draw one ELLIPSE and one circle
Simply start by drawing the horizon line and a construction ellipse that would describe the body of the deer . The head construction lines follow, a circle should be placed asymmetrically on the top right side of the ellipse, simple lines point the intention of future elements like the ears, big eye pointed towards us and the nose of the deer.
STEP 2 - Draw the ears and nose - start detailing the head
The deer will be greatly characterized by its beautiful and innocent look so immense attention was given to her expression. The eyes are big as a result and the head even features a sweet haircut. Follow the lines cautiously and keep in mind that everyone's' results will be beautiful and quite different.
STEP 3 - Finalize the head lines and proceed on the body
The body lines should first and foremost depict the legs position as these might raise the biggest difficulties. Take your time and find the right look infused with naturalness. An eye contour has been illustrated as well.
STEP 4 - Add a tail to balance the body and shape the legs
To ensure that the legs are well balanced on the torso a small cute tail should be added. Start detailing the eyes to bring the beautiful drawing to life.
STEP 5 - Finalize the legs and detail the head -erase the main construction lines
Once you`re satisfied with the legs and the body is shaped you can add the beautiful to-be-white spots, powder the nose and add glare to the eyes of this extraordinary creature and erase the construction lines.
STEP 6 - place your deer into its natural HABITAT
Start contouring the main element with vegetation of different kinds and a sun. Here the scenery can be changed extraordinary, creativity coming into play. The happier the décor, the better.
STEP 7 - Add simple shadows
Depending on where you`ve positioned the sun one ought to place simple shades now, these can be a highly educative lesson for the little but moreover they offer great depth to the drawing, something that really brings the deer forward from that lush vegetation.
STEP 8 - color your drawing
Get coloring ! Your beautiful artwork is now ready to receive color and here too the individual should get creative as possible. Enjoy this splendid moment and do not stop till the artwork is complete.
The simple act of drawing is a great way to relief stress, a simply extraordinary method of encouraging the development of the child`s physical, cognitive and emotional abilities. Drawing is an acknowledged technique used to share knowledge with the little one, each drawing being an opportunity to share interesting facts about the chosen topic and art itself.
What do you think? We would love to hear your opinion about this swift tutorial in the comment section below.
This feature is part of the "Things to Draw"Collection of drawings realized by Homesthetics Magazine in partnership with Designaissance Studio. The contents of the tutorial are copyright protected as it is the collection itself; if you are interested on sharing the drawings on your website or magazine please contact the magazine. Feel free to print or share the page for educative purposes as this is the definitory purpose of our mission with this collection.
In this brief tutorial one will learn how to draw two of the world's most beautiful elements : the butterfly and the flower. Colorful, vivid and full of joy in sculpted shapes, the tutorial "Learn How to Draw a Butterfly on a Flower" is the third part of our Cool Things to Draw Collection. We strongly encourage you to cast a glance on the whole series if you are interested in drawing and sketching. The tutorial on how to draw a flower and how to draw a butterfly as well as some interesting things about the butterflies, after the break.
Drawing can be highly educative and it could play an important role in the development of the little one as the act itself boosts physical and cognitive development whilst encouraging social interaction, creativity, autonomy and confidence. Use fun facts about butterflies to raise the interest of the little one, these facts cover multiple points varying from their life-cycles to their diet to keep things interesting, cast a glance below.
Check out our range of fun butterfly facts for kids. Learn about the life-cycle of butterflies, their wings, what they eat and much more. Read on and enjoy a variety of interesting information.
Butterflies are insects and their life-cycle is split in four parts as they evolve from egg to larva - caterpillars to pupa - chrysalis to the butterfly adult status.
The butterflies have their own special glues with which they stick their eggs to leaves
Most caterpillars consume plants, they`re herbivores.
Mature, fully grown caterpillars find a suitable twig or leaf that they like before shedding the outside layer of skin to reveal a hard skin also known as chrysalis.
From a chrysalis an adult butterfly will eventually emerge; it will wait for a few hours for its wings to be filled with blood and dry properly before taking the first flight.
In the adult stage a petite butterfly can live from a week to a year, depending on the species.
The butterflies has four wings, four colorful wings with unique patterns realized from tiny tiny scales.
Butterflies feed on the flower`s nectar.
The feet of a butterfly contain taste receptors.
The exact number of butterfly species is unknown yet scientists estimate somewhere in between 15000 and 20000.
Bird-wing butterflies have larger, angular wings and are known to fly in a similar way to birds.
The Monarch butterfly is known for its long migration, traveling a great distance that sometimes exceeds 4000 km. The female will lay eggs once it reaches the destination and a new generation of monarchs will travel back to complete the circle.
Learn How to Draw a Butterfly on a Flower
STEP 1 - draw axes and sketch the first volumes
An ellipse and one offset on two axes will shape the beginning of the flower where two ovals will form the wings towards us, these will be backed by two offsets to form the third and fourth wing.
STEP 2 - draw an additional ellipse and split it
The new part will be naturally sectioned into smaller pieces only to form the petal further on.
STEP 3 - shape the flower petals
Once the petals are shaped, the flower awaits the butterfly to shine, its sculptural presence being very close to perfection.
STEP 4 - erase the flower construction lines and give attention to butterflies
The construction lines will disappear to surface your epic flower drawing. The butterfly can receive its petite beautiful body and with new construction axes additional butterflies drawn in two dimensions will join our drawing.
STEP 5 - detailing butterflies
Get creative with the new axes and shape the butterfly creatively, differently, showcase diversity at different scales. The construction lines of the first butterfly are now gone.
STEP 6 - shaping wings
We have now drawn the bodies of the new butterflies and each butterfly received a different set of wings. The most sculptural presence is naturally the butterfly drawing in three dimensions.
STEP 7 - detailing the drawing - create a context by drawing more flowers
All the construction lines have been erased and to emphasize the drawing various flowers have been added, once again all the flowers are different to highlight the naturalness of the natural environment.
STEP 8 - intricate flowers and butterfly wings
To complete the drawing, patterns are required on the wings of the butterflies, these will define them from various other insects, these will give them authenticity and sheer beauty in their habitat now enhanced by more vegetation. Be creative, use different shapes and whatever motif crosses your mind. Do your best to make each butterfly different and have fun in the process.
STEP 9 - add color
A butterfly without color would not be complete. Pick your wildest colors and complete your drawing.
What do you think about the exemplary butterflies above? We would love to see your butterfly drawing in the comment section below.
This feature is part of the "Things to Draw"Collection of drawings realized by Homesthetics Magazine in partnership with Designaissance Studio. The contents of the tutorial are copyright protected as it is the collection itself; if you are interested on sharing the drawings on your website or magazine please contact the magazine. Feel free to print or share the page for educative purposes as this is the definitory purpose of our mission with this collection.
Doodling is one of the most creative ways to spend time in moments of great boredom. Doodling can often help you relax seamlessly whilst passively improving your artistic skills, slowly developing the creativity and design lines indirectly. Needless to say that doodling can be done passively, without involving thinking, a great way to enhance your multitasking in an epic manner. In the following article we will present a fast doodle defined by density and diversity, one that captures creativity in a spectacular shape; the tutorial "Learn How to Doodle "that follows is the second part of our Cool Things to Draw Collection that we highly encourage you to visit if you`re interested in sketching and drawing.
A few tips on doodling will be featured here before we get to the tutorial itself; feel free to skip these if you are an experienced doodler just searching for inspiration.
At one point or another everyone will shape his own style of doodling so do your best to surge inspiration from all possible sources in the search of incredible. You`ll surely find a line that you`ll love and in the attempt to replicate that type of design, your own style will emerge. Doodling might take a while to actually look exactly like you expect it to look but worry not, practice and practice, results will surface.
Always focus on your drawings, follow your instinct, do not worry about the opinion of the ones around you on your doodles.
Learn from your mistakes and use them as guidelines in future doodles, they`re part of your work of art nonetheless.
Draw what you see around you caricatured if you`re short on inspiration. Try to copy simple items and add your own twist.
Doodling is based on either simplicity or on density. Small or huge the doodling should be. Density can come from the number of items and their scale not from details on the items themselves. Play with the scale.
It is not uncommon to find yourself doodling the same composition over and over again. Do your best to think out of the box and stretch your goals and creativity; reinterpret the design, add new elements or change it altogether.
Doodles can be simple patterns or complex compositions with multiple focal points. Play, experiment.
The doodles are supposed to look super fun by default, cartoonist and childish and expressive are great ways to describe them.
Real life items should appear only with your own twist, caricatured, with a cartoon look. Plant legs and arms on mundane items, noses and mouths and even a cool hairstyle can be considered.
Do not copy the doodles of another artist, surge inspiration but once you start doodling close all sources of inspiration and draw from creativity.
Draw stuff that you love. Cool things to draw like personalized animals, plants, items that you like, you are familiar with and are actually personal can become extraordinary characters in your little scene.
Don`t use an eraser. Doodling is about movement and flow, if you have wronged something to your opinion try to transform the mistakes into an advantage without spending time to make it perfect. It should feel free and fun, not perfect. The doodling scenes are perfect for each and everyone, there is no universal truth.
The reality should be distorted if it is to appear in your doodles. Monsters and creatures of fantasy are common elements. Come up with your own characters and sculpt creativity and authenticity in your artwork.
STEP 1 - Start with a simple element
In doodling it is recommended to fill spaces naturally. Finish the element before starting with a new one. The first element can take a simple but characteristic position like a corner or the center of the page. Notice how the first element below resides in the lower left corner but the eyes are pointing towards the page, to what is about to be unveiled in the blank space.
STEP 2 - doodling is all about creativity
The second creature is a small cat-raccoon inspired genie that serves an ice-cream with floating arms, It can also be a balloon with cat-like features. A doodle should never explain itself.
STEP 3 - add new elements - diversity is key
Plants appear now along with the previously mentioned balloon. Shape whatever comes to mind while doodling and keep things creative.
STEP 4 - maintain a direction
To keep things tied together and have a structure maintain a simple direction in the early stages. Don`t worry about the rest for now, tie one element to another .
STEP 5 - shape a beautiful odd universe while doodling
The whole should not make sense but the unity and the contents will surely mean something to you in one way or another. Even if it`s just a memory or an instinct shape, it is tied to you and it has memory.
STEP 6 - more of the same - reinterpret simple items
The flying carrot has now a counter-part in the drawing, a smaller rocket that flies around. A happy octopus lurks the scene and everyone seems happy.
STEP 7 - diversify and add more elements
Simply add elements and have fun while doing so, an aviator bird now gains attention in the scene.
STEP 8 - New stalker smiley face joins the scene
A new mushroom has grown into the clouds and a stalking smiley face does the job of smiling in the scene.
STEP 9 - continue until there is not blank space left
Simply continue to add elements until there is no space left. Dinosaurs, owls, flowers, ghosts, slices of pizza and even more happy clouds can have a good time in your scene. Enjoy the process.
STEP 10 - Color your doodle
Color it all or simply add accents here and there. Shading should be addressed too if one attempts to create depth into the scene. Make no mistake, any color can be used on absolutely any shape, it doesn`t have to be real or anchored in reality in any way. You direct everything.
The tutorial of a doodle naturally is not a tutorial per-say as the entire act of doodling, the construct of creativity has no rules and should be in no way guided. One ought to search for something beautiful in his mind only, in his desires and childhood dreams, creativity lies in each and everyone. Do your best to achieve the incredible and doodle or sketch as much as possible. Drawing is one of the most beautiful activities that one could do.
What do you think? We would love to hear from you in the comment section below.
This feature is part of the "Things to Draw"Collection of drawings realized by Homesthetics Magazine in partnership with Designaissance Studio. The contents of the tutorial are copyright protected as it is the collection itself; if you are interested on sharing the drawings on your website or magazine please contact the magazine. Feel free to print or share the page for educative purposes as this is the definitory purpose of our mission with this collection.
The rustic industrial design style is one direction that gathered many followers in the last couple of years due to its unique appeal and raw sensibility. Textures that lack color are becoming subjects of bold dark contrasts, mixing and matching different elements with an industrial edge on a modern contemporary design line whilst preserving things to a comfortable cozy relaxed stage that defines the style.The fascination for it is one that is understandable for me as an architect. There is something difficult to describe about the sensation such a space creates and generates around you. It is a space filled with creativity and uniqueness, a space where rules do not exist but a constant balance between elements that leads to a particular design. We do not have a recipe for How To Create A Rustic Industrial Design Line In Your Home, but some constants easy recognizable in this direction which we find easy to follow and definitive for the creation of such a space. Cast a glance at the ideas showcased below and leave your valuable feedback in the comment section at the end of the article.
1.Find inspiration and decide on the MAGNITUDE of the designed space
2. Choose pieces with a ANTIQUE industrial look and turn them elegant
3. mix and match materials with a raw natural appeal-steEl, LEATHER, ceramics
4. find old pieces of furniture and recondition them
5. be creative and recycle everything-here an old wooden chest has been transformed into a cozy reading space
6. wire and metal are the key elements
7. apparent materials such as a brick wall represent the foundation of an industrial design
8. mix and match objects with different textures and uses- an old wooden wheel cart, mason jars and green glass bottles, a contemporary painting
9. create one of a kind pieces of furniture
10. dark tones ILLUMINATED properly add elegance to any decor
11. recycle and use big pieces of old wood
12. try and create a general theme to your decor
13. create industrial lighting fixtures
Would you choose the rustic industrial style for your home or do you find it a little bit too bold for your taste? We would love to hear your ideas in the comment section below.
Origami is a form of art with Japanese roots that calls to action every artist in each of us. By simply folding a few sheets of paper with caution you can create magnificent tools that will fuel your creativity beyond limits. Further on you will be witness to a detailed guide on how to create a colorful rainbow DIY crane curtain that can transform your interior in an unspeakable manner.
Whether you plan to give your office studio a really unique asset, use it to decor your childs room or simply have a family DIY project for the living room, we invite you to consider this unique magnificent design idea. Imagine how colorful, transient and ephemeral can become the kitchen-dining room, hall -living room, hall-office transition wall if it would be to be boosted by such a creation.
We are going to start by explaining a detailed image in 19 steps that describes the process meant to aid you in creating the multitude of cranes needed for the project.
Step 1
Simply start with a standard sheet of paper from which you cut a square. Next, fold the square in half on diagonal.
Step 2
Fold in half from right to left diagonally again.
Step 3
Now just spread the pocket out from the inside and fold to make a small square.
Step 4
Your paper should look similar to this now. Turn it over and proceed to step five.
Step 5
Fold Point B onto Point A, while at the same time folding the paper crease inward so that point C is touching point D.
Step 6
Step 6 is really the tricky part. Fold the left and right corners toward the center line along the red valley line and next fold the top corner along the blue valley line.
Step 7
Please not that the fold from step 6 has been realized only to create a certain creases. Your paper should look like this now.
Step 8
Next, open the pocket by pulling the bottom corner up and fold inward along the crease. Some creases might become inverted.
Step 9
The figure should now look like this. Be careful to score the edges and corners clearly, this will aid you. Now turn the paper over and repeat Step 6, 7 and 8.
Step 10
Fold in the lower flaps made in step 9 . Now you have the base already. You are already at the half of the road and the rest is an extremely easy downhill. Proceed!
Step 11
Make sure that you have the right side up and valley fold on the dotted lines by using the top layer only.
Step 12
After step 11 the figure should look like this. Now just turn over.
Step 13
Just repeat step 11 here. Do not give up,a piece of your curtain is almost done.
Step 14
Simply reverse fold at the dotted line to form the head now.
Step 15
Slightly and carefully open the side up and bring the head part up as shown .
Step 16
Bring up at this point and press down. Do the same to form the tail on the other side.
Step 17
Reverse fold at dotted lines to form the beak. You can customize the length of the beak.
Step 18
Bend the winds down into the desired position. You can bow in from the bottom.
Step 19
Congratulations! You have learned how to make an origami crane successfully. You are a doer and we are proud to have you as a reader! It has been an extraordinary process. Now all you have to do is to repeat over and over, you will eventually learn to do it without the guide.
Choose the color/s that you want to be included in your DIY Crane Curtain, purchase the colored paper, think about the density of cranes used and about how much you will have to work for it. It is not easy, you should have at least 80-100 of these to create a graphic diy crane curtain, some might settle for less. Create an origami day at work and ask everyone to relieve their stress into a dozen of these creations, same tactic can be applied in the family meeting as well, it is a great bonding opportunity .
Take note that even if we have chosen highly colorful ensembles/curtains for this short guide, pastellate colors, black and white, shades of gray or simply and brilliantly recycled magazine, papers, envelopes and so on can make a great job. The last three paper sources would also come free in most cases so they are worth considering.
It all depends on your design line, the desired end result effect and design taste in general. You should not dodge this amazing project just because you do not like the color, keep an open mind and get creative, there are no excuses for not being extraordinary.
Below we will attach two more step by step images that can help you create paper cranes in a different manner .
Below a fourth explanatory image has been showcased. Please note that the crane in the guide below is far easier to realize but a little less graphic so make sure you know what you are getting into. You don't want to create 100 cranes of this kind and be disappointed by the result.
To help and encourage you even further on creating your origami master piece we have showcased below a video that helped us create our own little cranes. We invite to watch and follow the thorough explanation provided.
We invite you to leave your valuable feedback in the comment section below and send us an email with your DIY crane curtain project or simply a few origami cranes that you've created. We would be delighted to showcase your artwork here.
Memories are a precious thing to preserve and time leave sits mark upon us and allows us to lose bits and pieces of those wonderful memories. Luckily today's technology offers us multiple methods of recording the happy moments of your lives and to keep them safe. Photography is one of them and we all have photos of our childhood and of our loved ones lining somewhere around the house in one form or another. Today we are talking about DIY Photo Display Wall Art Ideas as a means of exhibiting our past for everyone to see it. We have encountered over 40 ideas on how to creatively display your photography in beautiful ways that can emphasize any interior decor and that will hold a special meaning to you and your family. There are multiple ways of arranging photo frames on a wall depending on the chosen room, wall space, dimensions and overall room composition.
But photo frames are just one way to go and might cost you more thn you are willing to invest in such a project. But there are lots of DIY ideas that offer the same results or even better ones at a lower price. You just have to seek for creativity and inspiration and to be willing to do some crafty work in order to obtain the intended result. We especially love the heart arrangements and the tree of life photo display. You can choose to add your photo in a jar to obtain a panoramic effect or to use string lights to empower your arrangement.Another wonderful idea is transferring photos to wood pieces for a vintage decor. So which idea to you find appealing? We invite you to get inspired from our collection below and to share your thoughts and ideas in the comment section or on our social platforms.
A DIY enthusiast knows that great possibilities for DIY projects are found in materials and resources that can be manipulated with ease and have a long life span. Denim crafts as a result are items of great importance in DIY thank to their materiality, strength and versatility; needless to say that an individual discards clothes rather often and as a result the resource is easy to find.
25 Unusual Cool Ways to Upcycle Old Denim Into DIY Projects have been showcased underneath; cast a glance at the gallery and tell us in the comment section below what you are doing with your old jeans when they`re not useful to you anymore?
A simple functional DIY project with a great impact in terms of decor is the building of a simple, small shelf. It can be as simple as you desire, a saw, nails and a hammer might be everything you require for something practical yet the more of a statement you are making through its presence the more complicated it gets. A shelf can be a visual stimulus as well as a practical solution for extra storage and the crafting process offers you insane freedom over the process as you can mix and match lovely materials into easy diy shelves in minutes.
Simple ideas in graphic scenarios follow and we invite you to cast a glance over the gallery and pick your favorite.
1. Tree Branch Shelf
The materials required are flexible as the wood manipulation can be realized through multiple means yet the result is extraordinary regardless. Whether you are going to place this in the hallway or the mudroom make sure you match it with your existing color pallet and design line for truly awesome results. The naturalness of wood both processed and natural, organic is extraordinarily balanced and graphic.
2. Farmhouse Style Shelves
The farmhouse style translates into experience, simplicity, naturalness and extraordinary charm. You can emphasize this chic atmosphere with contemporary elements today just like you would with items with memory. Pick up a set of corbels and help them support your shelves with the right design language.
The graphic values of industrial design can be created through simple means, pipe shelves using reclaimed wood can be of great help and the color washed off a wooden piece can be customized to complement your design line through simple means. The option is also highly practical as it occupies little space and it returns decent open shelving storage.
Letter storage is as one would imagine a highly customizable craft, an endeavor that you envision and materialize however you see fit. Simple projects could materialize the words "HOME", "LIVE" or "LOVE" yet far more complicated projects can be fulfilled thanks to the easiness wood can be processed.
Modular and scalable process that can spice up a lot of modern interior designs through color, texture and practical storage. Above one`s sofa would be a great spot to plant them as they will keep your favorite book at your grasp.
A collection of mugs is highly graphic and one ought to display it proudly rather in the kitchen or a living space. Show them off and emphasize your setting.
Super simple adorable project with high practicality as it can be moved around, painted in any color and still remain utterly efficient and inexpensive as a craft.
Naturally the window should not be blocked by shelves yet with glass shelves it is a different story as they`re easy to install, they are practical and in no way do they obstruct light. It is recommended to add transparent small items or plants to the newly designed shelves .
Shelves can become pure art, they can shape memories for the little ones and present an extraordinary fairy-tale land. Craft with love in wood and use petite decor accents to highlight the extraordinary.
The means to process big blocks of wood might not be to the hands of an amateur yet the enthusiasts will surely know that this is an easy project. It uses textures and volume to shape a practical art piece beautifully.
The wood outer shell containing impeccable white works brilliantly in simple decors and thanks to its modularity it can be adapted to any wall space at multiple scales.
Floating shelves can be extraordinary inexpensive yet graphic and one can plant them on any sturdy wall. Use them to your advantage and allow your items to flow freely in your decor.
A shelf for memories is utterly important in the living area and where the fireplace mantel is not an option wood might carry your pictures beautifully, seamless.
The plywood pieces can be cut with a miter-saw in minutes and assembled rapidly with glue, awaiting your books with greatness, defying gravity beautifully.
16. build corner floating shelves
In a corner floating open shelves can provide storage for your heirlooms, tailor them beautifully.
The natural setting has much to offer and wood is one its finest offerings. A wooden trunk can support all your shelves, all your items.
via bookshelves.tumblr.com
Great opportunities arise with wood for open shelving, one ought to tailor the design of choice through all means possible and we trust that the list above helps. How do you use shelves and open shelves and did you craft in this area lately? We would love to hear from you in the comment section below.
The years of a teenager are something special, quite particular that require great attention, it is the time to manifest, creatively, it is time to seek and take on interest, it is a time in which design can help. Design is everything that surrounds us, it inspires an ambiance, it sets a quality standard, it evokes emotion, it is simply able to change everything and all. The right ambiance for a teenager is key as it can help them get creative, feel free, feel open and honest about their interest and beliefs.
Help your kid go through this by himself with an open, free attitude, help him shape his universe. A selection of teenage boys room designs serves below as an example, cast a glance, certain elements might come in handy.
1. airy Timeless-industrial bedroom
smvision.net
A minimalist showcase can easily become a timeless scene that one could build on. The masculine comes from the raw materiality and elegance in the color scheme. Use wood with steel and drop black for highlights. Balance things out through geometric patterns.
2. the bedroom design of a music enthusiast
vk.com
Rock and roll might be a recurring element in the life of a teenager thus making the guitar and record collection items of great importance in his decor. The expression of passion could be showcased through numerous means but one`s passion for music should never be contained.
3. The bedroom of a sports fan
in.pinterest.com
The sport is a theme that can be expressed in the teenager`s bedroom through color, wall art and collectibles. Scale your bedroom gradually and create your own version of a hall of fame for your favorite sport and idol; don`t forget to practice the sport as well.
4.The elegance of vintage industrial
digsdigs.com
Pastel colors support a grand elegance further highlighted through patterns and iconic vintage elements. Bring forward distinguished simplicity and entertain it with a clutter-free airy ambiance.
5. The love for music in a bedroom
interiordesignfuture.com
A noble-elegant wall color can be used to bring forward your favorite band's posters and album collection, choose each element wisely and treat it like a queen for it to dominate a decor defined by authenticity.
6. embrace a basketball theme
homesdecorideas.website
One of the most popular sports, basketball can offer one`s bedroom great collectibles, memorabilia. It can also help one sculpt memories worth framing, worth showcasing. Make your bedroom your own.
7. vintage tailored for coziness
es.pinterest.com
Faux bricks combined with light wooden flooring and vintage furniture is a recipe, a recipe for success. Add cozy light bedding and the setting will become surreal.
8. Black and Yellow
Yellow and black are the colors that create the biggest contrast two colors can make. This contrast can be used to draw the viewers attention channel towards interesting points in your home, highlight through color.
9. use open shelving for an airy ambiance
teenvogue.com
The open shelving functions differently by taking an open stance, it communicates the contents and their organization, it invites interaction and requires attention. Open shelving can also be used to force the one to become organized and honest. There are numerous ways through which design lines can be brought forward beautifully yet the industrial-vintage themes do work best.
10. construct a cozy study area
isgif.co
The simple ought to be pursued whether you enjoy a small or large spatiality. Floating desks in cozy wooden textures can help the teenager enjoy a small space differently in a graphic, warm, airy manner.
11. the modern take on a desk
barriodepalermo.blogspot.com
The minimalist design line can work to one`s advantage with ease yet it requires the high maintenance of a clutter-free impeccable decor.
13. Color through pop art
afroartmedia.co.ke
Movie posters and superhero characters could be great additions to the study area of a teenager, encourage the freedom of expression and authenticity
13. motivational QUOTES
digsdigs.com
The motivational quote or wall decal might not be everyone`s cup of tea but "Just do it" is a simple example of why it works for some. Choose something inspiring, choose something that anchors in a family itself, a moment in which the teenager said something fun, something that became unforgettable.
14. bold acts great results
za.pinterest.com
Black on white supported by wood is something that works, something that encourages the modern and traditional alike. In this bold setting any color can become support, in the example above yellow does not pop, it rather elegantly highlights. Notice the amount of light that floods the space.
15. the grey and the black
theuncommonlaw.ca
Gray and black are taking the world by storm everyday due to the immense elegance and nobility that simply sculpts everything near them, use them wisely, use them to bring forward things of great beauty, things of meaning.
16. chalkboard creativity
dekoloji.com
A fun way to say "get out" or "have fun" without actually saying is the chalkboard. It is today a mean of communication between self and creativity, a way to express yourself, adopt it, construct.
17. barnwood closet sheltering
pinterest.com
A sliding closet is a great addition to a bedroom`s practicality but through the right means it can also be a great addition to its aesthetic values. A barn-wood wall brings memory into the picture and it acts as an accent wall.
18. airy makeshift close
round-two.me
Open hanging shelves are graphic on their own yet when display your collection proudly is completely something else. The modern look can be nestled in any design line and it is a great addition for small and big bedrooms alike!
What do you think about the collection curated above? We would love to hear your feedback on the subject in the comment section below !
Concrete is by far the most used composed material, from regular construction projects to decorative small items. Our topic for today is DIY Concrete Ideas For A Chic Minimal Design Line.Casting concrete or cement in different shapes and sizes is such an easy task nowadays more and more people choose to take on such creative DIY projects. From concrete coffee tables, elegant sculptural cast bathroom sinks and all sort of accessories and flower pots, there is a wide variety of ideas and crafts to draw inspiration from. We have gathered a selection of different wonderful DIY Concrete Ideas which we have found appealing. We invite you to cast a glance at the gallery showcased below and to choose your favorite concrete project to start this summer. We would also love to hear your ideas and see your own concrete projects so feel free to share them with us in the comment section placed at the end of the article. Enjoy!
1. Concrete lamp filtering light trough raw texture
2. Vegetables bowl exuding a natural vibe
3. curved fruit bowl perfect on any table as a decorative item as well
14. DIY Concrete Ideas-the simplest of table lamps
15. a sturdy chopping board made out of concrete
What is your take on DIY concrete projects? We would love to hear your opinion for don't hesitate to leave your feedback in the comment section below.
The most common materials for insulating a pellet smoker are insulation jackets, blankets, and cement boards. All you need to do is line up the insulating material, mark it and wrap it around the smoker, ensuring all gaps are sealed.
Having the best insulated smokerallows you to enjoy tasty food from burgers to beef brisket.
But what if you spend hours cooking turkey in your smoker, and it turns out half-cooked? Insulating your pellet smoker can save you from the embarrassment of serving half-cooked food to your guests.
However, not everyone knows how to insulate a pellet smoker– so if you’re among them, this guide is for you. Read on to know more!
Why Should You Insulate Your Pellet Smoker?
Before getting into the “how” of it, let’s understand the “why” of it. Sure, insulating your pellet smoker helps maintain a consistent temperature in the cooking chamber, but there are other benefits too. Take a look:
1. Properly Cooked Meal
Since insulation retains heat in a smoker, it cooks food evenly and does not leave any bit raw. That way, food cooks comparatively faster and has a rich and smoky flavor. If your pellet smoker isn’t insulated, you might have to settle for semi-cooked food.
2. Cook In Any Season
It’s difficult to enjoy a good barbeque in winter because the cold temperature doesn’t let the pellet smoker heat properly. Therefore, most people find insulating their smokers highly effective during cold months.
But the reality is insulation can help you cook more efficiently in any weather. Irrespective of whether it’s summer or winter, an insulated smoker will always perform better than a non-insulated one.
3. Conserves Fuel
When a smoker is insulated, it doesn’t allow much heat to escape, thereby preserving fuel. As such, the more heat it retains, the faster your food will cook, and less fuel will be used.
4. Reduces Risks Of Burns
Not only do insulated smokers cook food faster than non-insulated ones, but they are also safe for use. Insulation blankets prevent the outer walls of smokers from heating too much. This reduces the risk of your kids or pets accidentally burning themselves by touching the smoker.
Types Of Smoker Insulators
Knowing the different types of smoker insulators is important to find the best one for your device. As such, there are four different types of pellet smoker insulators, which are as follows:
1. Insulating Jacket
Insulating jackets are the most convenient and stress-free option for smoker insulation. But the only problem is that finding custom-fit jackets for your pellet smoker is challenging. Made of aluminum-covered fabric, this type of insulation is highly effective for vertical smokers.
Most manufacturers make jackets for smokers they sell, so it will be easier to find a perfectly-fitting jacket than other insulating materials. Another noteworthy aspect is that they are easy to use, so you won’t face trouble installing them on your smoker.
2. Insulation Blanket
Much like insulation jackets, insulation blankets can be simply wrapped around smokers to save them from heat loss. They are also made from aluminum-covered material and are ideal for both vertical and horizontal smokers. Unlike insulated jackets, insulation blankets have an aluminum layer beneath the fabric.
Also, you don’t need to find a custom-fit blanket for your smoker– that’s one area where insulation blankets are superior to jackets. Insulation blankets are highly versatile because they are designed to suit most pellet smokers.
3. Welding Blanket
As the name suggests, welding blankets were initially designed to keep workers safe from sparks resulting from welding. These insulators are made from heat-resistant, inorganic, fibrous material, which can withstand temperatures up to 2500°F. However, we suggest checking the maximum tolerance limit of your welding blanket before using it.
Welding blankets score high on versatility and can safeguard both smokers and grills. So, no matter which barbecue stove you own, a welding blanket is a reliable insulator. Furthermore, welding blankets are of three types– fiberglass, leather and felt.
To help you pick the right one, here’s a quick rundown of the three varieties:
A. Fiberglass
Featuring woven fiberglass fabric, these welding blankets can effectively retain up to 700°F of heat and safeguard your smoker against cold temperatures. The best part is that these high-quality insulators are relatively affordable, which is why they are an excellent option for people on a budget.
B. Leather
Leather might seem an odd choice for insulating your pellet smoker, but surprisingly, it is quite effective. This type of welding blanket is fire-resistant and can keep the surface of your smoker cool.
C. Felt
Made of carbon felt, this welding blanket repels flames and can sustain temperatures up to 1800°F. It is thick and rugged, so rest assured that it will last for many barbecue seasons.
4. Cement Board
Cement boards are composite sheets made from fibers fortified with cement. They usually have two components - a fibrous core and fiberglass or paper-based covering. These boards are great for insulating the top part of your smoker.
However, if you want your smoker to retain more heat, use cement boards with insulation jackets or blankets. And the best part is that cement boards can be used inside smokers, which makes them an ideal choice for the firebox of the smoker.
How To Insulate A Pellet Smoker?
So far, it is clear that smokers are of two types - vertical and horizontal. Let’s now understand how to build a insulated bbq smoker of both types.
1. Insulating A Vertical Smoker
As the name suggests, vertical smokers have a vertical orientation and may be either square or cylindrical-shaped. They are also known as cabinet smokers or box smokers owing to their build and can be operated using different fuels such as charcoal, propane, methane, etc. Since they have doors that open sideways, it is feasible to insulate only their bodies.
A. Materials Required
Here’s what you’ll need:
Insulating material (insulation jacket, thermal blanket, etc.)
Knife or box cutter
Screwdriver
Aluminum tape
Measuring tape
B. Line Up The Material
Line up the insulating material against your pellet smoker from top to bottom so that the whole body is covered. But don’t forget to leave space for the door, as you wouldn’t want the material to interfere while opening and closing the door.
C. Mark The Material
Mark the insulation material where you want to slit it to accommodate the handles of your smoker. Also, don’t forget to mark other areas to make sure that the smoker fits snugly in the insulation jacket.
D. Insulate The Smoker Firebox
Wrap the insulation material around the smoker and place it on top to ensure that heat is secured inside while cooking. You can keep the material a little loose on this part to allow more flexibility.
E. Seal Gaps
Once you are done, carefully inspect the smoker to check for gaps in the insulation material. You must make sure that every part of the smoker is covered because even tiny holes will lead to heat leaks.
2. Insulating A Horizontal Smoker
Coming to the second type of pellet smokers, horizontal ones are quite similar to standard barbecue grills. They have a large horizontal grill to place food inside and a lid to cover it, so heat doesn’t escape.
To insulate these smokers, avoid using insulation jackets as they aren’t very efficient. Welding and insulation blankets can work wonders for smokers because they withstand heat better.
You can follow the same steps as vertical smokers to insulate horizontal ones. But keep in mind that the temperature in the corners of a horizontal smoker varies. So, it becomes even more important to distribute heat evenly. Therefore, you can use an insulation blanket on top of the smoker to retain heat in the cooking chamber.
How Much Does It Cost?
There are numerous ways to insulate a pellet smoker, and the total cost of insulating depends on the size of your device and the type of material you choose. Also, a number of tools are needed to install the insulation material. Some tools can be found in your garage, while you’ll have to buy others from a local store.
Those on a tight budget can opt for water heater blankets, plywood, or old welding blankets. They provide low to medium-heat security, and you can buy them for $20 to $40 to insulate your smoker.
But if budget is not an issue and you can shell out some cash, we suggest buying insulation jackets or blankets. An average insulation blanket costs between $30 and $150, depending on the material and quality. Also, you must invest in a high-quality insulation material because it will retain heat excellently and last for the coming years.
How To Insulate A Pellet Smoker FAQs ?
How To Regulate Temperature In Your Smoker?
Regulating the temperature in your smoker might seem daunting, but it’s a pretty straightforward task if you know the right technique. Note that different regions of the smoker heat up differently, so approach the smoker accordingly when you want to regulate its temperature.
To regulate temperature, you’ll have to open its dampers and vents to allow better airflow. As a rule of thumb, don’t open its lid, as it can disturb the cooking temperature, preventing your smoker from cooking food efficiently.
Is A Smoker Better Than A Furnace?
For people who are wondering, “is a smoker better than a furnace,” let us tell you that both have their own pros and cons. While furnaces can cook food faster than smokers, they fail to add as much flavor and richness as the latter. But smokers are less efficient during winter, as they need higher temperatures to cook, which is difficult to attain on chilly days.
So, yes, it can be said that smokers are better than furnaces in terms of flavor and efficiency; but when it comes to speed, furnaces are superior to the former.
Can Smokers Be Used When It’s Raining?
Yes, pellet smokers can be used outdoors when it’s raining; however, you must avoid using them in heavy rain. At times, chilly winds accompany mild showers, so you must keep your smoker under a tent or other shelter to protect it from water.
How To Insulate A Pellet Smoker Verdict
Farm-style BBQ ribs, chicken, beef briskets, or Alaskan salmon– pellet smokers allow you to cook tasty meals outdoors, which you can enjoy with friends and families. But if the food isn’t as flavorful as you want or is semi-cooked, it can rain on your parade.
Therefore, insulating your pellet smoker is a must to enjoy rich, flavorful food. In addition, it can significantly reduce cooking time, allowing you to use your smoker all year round. Hence, you can host barbecue parties not just in summer, but also in winter and monsoon.
Checkout our next article on how to clean a smoker grill easily and efficiently without creating any mishaps.
So, if you are wondering whether buying an insulation material is worth it, think no more. Get a jacket or blanket for your smoker right away!
Sure, it may sound easy, but choosing the right screw to create long-lasting joints and hold particle boards together is challenging. Of late, Kreg has emerged in popularity, but which Kreg screws should you choose for joining particle boards together?
This guide reviews the three best options that you must consider. I have also provided a buyer’s guide to help you make the right choice.
Premium Zinc Pocket-Hole Screw: 1 1/4 inch coarse thread...
Sturdy Wood Screws: Square drives are easy to drive without...
What we like
Self-tapping auger eliminates the need for predrilling
Comes with rust protection
Holds the joints strongly without splitting particle boards
Large diameter steel shank adds to their durability
What we don't like
Cannot be used outdoors because they aren’t weather-proof
Unable to decide which pocket hole screw you should choose for your DIY projects? The Kreg Zinc Pocket Hole Screws could be a perfect pick for your needs.
These 1 1/4” pocket screws are supplied as a pack of 500, so you can use them in multiple projects without having to order another pack in the near future. Each of the pocket screws is constructed of carbon steel, so they are resistant to rust.
Featuring coarse-style threads, the #8 thread screws are ideal for use on softer woods like plywood, oak, cherry, maple, hickory, ash, birch, poplar, walnut, and mahogany, along with particle board. What’s more, the coarse thread screws sport self-tapping auger tips, so you won’t have to predrill holes on the board to make room for them.
All screws boast a steel shank of large diameter, which makes them highly durable. That said, though ideal for a variety of indoor projects, the Kreg Zinc Pocket Hole screws aren’t meant for outdoor uses.
Unlike drywall screws, they have a maxi-loc head, meaning the underside of their head is flat. Hence, they hold pocket hole joints perfectly without causing the wood to split when you drive screws into them.
Not to forget, these zinc-coated screws are 1.25”, which makes them ideal for joining particle boards of about 0.75”.
The screws come with a washer head that prevents them from overdriving into particle boards. Besides pocket-hole machines, they are compatible with the Kreg pocket-hole jig, so you won’t have to splurge money on such tools. And what makes them popular among professional woodworkers is that they are engineered explicitly for pocket hole joinery.
Long story short, if you’re looking for an affordable alternative to stainless steel screws, these Kreg Zinc Pocket Hole screws will fit the bill.
Material: Carbon Steel | Exterior Finish: Zinc | Screw Size: 1 1/4" length | Number of Screws: 500
3-Layer Blue-Kote Coating: Pocket screws are perfect for...
What we like
Three anti-corrosion layers protect screws from rust
Needle-sharp edges eliminate the need for pre-drilling
Case-hardened steel prevents damage to the screws
Self-tapping tip doesn’t split particle boards
What we don't like
Comes with an expensive price tag
The Kreg Blue-Kote Pocket Screws are blue in color and have square drives like wood screws that keep the bit in place, preventing them from slipping while driving.
What distinguishes this screw set from other Kreg screws is the three-layer anti-corrosion coating. When compared to others, these screws can resist rust 400 times better than zinc-coated screws. So, rest assured that they won’t rust despite being exposed to elements for a length of time.
However, this doesn’t mean that the screws cannot be used indoors. Owing to their functionality and sturdiness, you can use them for a variety of indoor projects, like constructing furniture.
Every pocket screw is made of case-hardened steel, so neither will they bend, break nor snap. Like most Kreg pocket screws, these screws feature flat-bottom heads so that they sit firmly in pocket holes.
You can use a Kreg pocket-hole jig or any other pocket-hole machine for drilling pocket holes on the particle board. Or, you can simply insert the screw with a screwdriver into the surface, thanks to the self-tapping tip.
Adding to that are their coarse threads that drive aggressively into whichever surface you drive them in. Over and above that, you can use these screws to drill pilot holes for other screws, so they are highly versatile.
Each of the Kreg Blue-Kote Pocket Screw packs comes with 50 screws, which is less in quantity compared to my previous recommendation. So, if you’re planning to join multiple pieces of particle boards to construct furniture pieces, you’ll have to order in bulk.
One noteworthy aspect of these screws is that they go inside particle boards and hold them very well. So, whether you use them in railings, patio tables, or benches, this screw pack from Kreg won’t disappoint.
All in all, if you don’t mind spending a tad bit on screws, the Kreg Blue-Kote Pocket Screws would be a worthy addition to your toolkit.
Material: Steel | Exterior Finish: Blue | Screw Size: 2-1/2" length | Number of Screws: 50
Premium Zinc Pocket-Hole Screw: 1-inch fine thread screws...
Sturdy Wood Screws: Square drives are easy to drive without...
What we like
Zinc coating resists rust
Smooth shank keeps the joint together tightly
Self-tapping tips tap the hole as they are driven
Square drive keeps the bit in place
What we don't like
Screws aren’t weather-proof
On the hunt for fine thread screws for your next DIY shelf or cabinet construction project? Then the Kreg Zinc Pocket Screws would be a perfect pick for joining particle boards for cabinets.
Similar to the SML-C125 - 500 Zinc Pocket Hole Screws, these screws are coated with zinc so that they don’t corrode due to exposure to moisture and oxygen. However, you must not use them outdoors because they are only resistant to rust. They won’t be able to withstand the damage caused by other natural elements.
In addition to that, the brand supplies these screws in a pack of 500, so you can complete multiple cabinet construction projects without ordering another pack.
Woodworkers usually prefer these #6 fine thread screws for attaching frames to furniture, including wood frames, because of their great holding power. Furthermore, the pocket hole screws come with a type 17 auger tip that self-taps their own pocket hole without causing the wood to split.
On top of that, every screw has a square-drive head that is perfect for 1 1/2” particle boards. As such, the bit won’t slip when you make efforts to drive them in the particle board. Interestingly, their large diameter smooth shanks coupled with flat-bottom heads ensure a tight joint. However, if you wish to enhance the longevity of your creations, consider using wood glue to bond the pieces.
As is expected, these screws feature case-hardened steel, which means they’re highly durable. That means they wouldn’t snap or break despite the heavy load.
All things aside, the Zinc Pocket Screws have a dry-lubricant coating that reduces driving torque and are finished in a bronze color. Besides Kreg Pocket-Hole jigs, they are compatible with various other jigs, so you won’t have to buy a new tool.
Material: Case-hardened steel | Exterior Finish: Zinc | Screw Size: 1” length | Number of Screws: 500
Things To Keep In Mind Before Buying Screws For Particle Board
Shortlisting the top three screws from a plethora of options wasn’t an easy task. So, if you’re still confused about which screw to choose, know you’re not alone!
That’s because there are plenty of factors that you need to consider before buying screws for particle boards. To help you pick the right one, I’ve shortlisted a few important factors and discussed them in detail in this buyer’s guide.
So, without any further delay, let’s check them out!
1. Material And Coating
Mostly, particle board screws are constructed of stainless steel or only steel– both materials are highly durable, extremely tough, and resistant to impact. This means that screws made of these materials won’t bend or break, despite exerting pressure to drive them in the particle board.
On top of that, many screws feature a top coating that lends extra protection to them. As such, such screws are resistant to corrosion, which makes them ideal for exterior use. Screws that are coated do not rust even if the particle board is submerged in water or exposed to oxygen.
So, when buying screws, make sure you check whether steel/stainless is coated or not and decide accordingly.
One thing to mention is that most people prefer using metal screws over drywall ones because of their superior holding quality. So, if you’re wondering whether you can use metal screws for particle board, the answer is yes!
2. Size
By now, you probably know that screws vary in size and length, so when shopping for them, don’t forget to check the two aspects. That’s because the size is the only thing that will determine if it would correspond to the width of your particle board or not.
Like, screws that are 2.5” would be ideal for joining particle boards that are 1.5” thick. Therefore, take into account the size of your board whenever you’re purchasing screws for your projects.
As a rule of thumb, add one inch to the breadth of the particle board you’ll be working on so that you buy the right size screw.
3. Tip
The tip of screws could either be blunt or sharp. While you can go for any of the two, I suggest going for the latter so that you won’t have to go through the hassles of pre-drilling holes in particle boards.
Top Kreg Screw For Particle Board Verdict
Whether a seasoned DIYer or a novice woodworker, having the right screws at your disposal is essential to complete your projects with ease. Just make sure you keep a table saw or circular saw handy and know how to cut particle board.
Now that you know the top three options from Kreg, were you able to choose one?
Though all three options from Kreg hold particle board joints exceptionally well, my favorite is the SML-C125 - 500 Zinc Pocket Hole Screws. They are durable and don’t really need to be overdriven into the particle board.
Nevertheless, if you’re looking for screws that are weather-resistant, the Blue-Kote Pocket Screws are a better choice. That said, I shall call the curtains for the day!
When you set up an above-ground lawn irrigation system, choosing a sprinkler head that fits your needs and keeps your lawn well irrigated is very important. While an impact sprinkler can water large areas, a rotor sprinkler covers a smaller area. Both have advantages and disadvantages that you should be considered before purchase.
The main motive behind installing the best impact sprinkler for low pressure is ensuring that your lawn is irrigated properly with minimal water wastage.
But before that, you must decide which kind of sprinkler head would suit your needs. You can visit any irrigation manufacturer’s website and look for various kinds of sprinklers.
However, today I will be talking about the two most common sprinkler heads that are mostly used in households: impact sprinklers and rotary sprinklers. I will discuss how they work and highlight their advantages and disadvantages, so keep reading!
What Is An Impact Sprinkler Head?
Impact sprinklers have a simple functionality. The force and momentum of the sprinkler is generated by the flow of the water comes out of the spray head. That’s why it’s important to know how many gallons per minutes the impact sprinkler uses before installation.
The water flow will move an arm of the sprinkler, eventually altering the water pattern. And the force of the arm make the sprinkler head rotate to ensure distribution of water.
However, the arc rotation might be narrow or wide according to the variations in the model. The smallest arc size available is 22.5 degrees. As such, you can easily buy a model that suits your desired radius of coverage.
Most of the spray sprinklers have a radius extending from twenty to over hundred feet. And this range depends on two factors: the pressure of the water and water restriction.
Pop-up sprinkler heads use more water to ensure complete coverage and they reach greater distances compared to other types of sprinklers. This can be advantageous or disadvantageous depending on the geography of the lawn. Some ground types demand a lot of water on a regular basis, whereas slopes or places with a lot of mud will struggle with such a strong stream.
A basic fundamental behind the working of this sprinkler head is that you can install this anywhere in the field, and it will irrigate the desired area without any hassle.
Moreover, the pattern of water coming out of the sprinkler head is precise and steady. But sometimes due to the high water speed, the sprinkler may appear wobbly and unstable. Lastly, impact sprinklers can be loud at times and require frequent maintenance.
Impact rotors are built in such a manner that they can cover huge areas quickly and conveniently. The in-built hammer will act like a spring because of the force exerted by the stream of water, causing desired volume of water to shoot through the nozzle.
It is returned to the flow casing by the spring mechanism, generating an impact that gently rotates the head of the sprinkler. The water jet then causes the hammer to move once again, resuming the cycle.
Since the water pressure is not restricted in any way, an impact sprinkler can easily cover large distances. Impact rotors are quite popular due to their wide area coverage. So, if you have a large lawn, you can easily water the entire lawn without much hassle.
This will allow you to water a larger area within a very short time. The configurations of these pop-up spray heads can be easily adjusted to manage the direction and distance for convenience.
Advantages Of Impact Sprinkler
1. Works With Well Water/Hard Water
Due to the low number of components and the basic head design, an impact sprinkler head will ensure consistent flow of water even with hard water. You need not worry about its longevity in terms of performance.
2. Area Coverage
It has a high water flow and can cover huge areas that extend up to 45 meters in spray radius. This will allow you to effectively saturate your property during summer months.
3. Affordability
You can choose from a wide range of models. But owing to its simple design, even low-cost variants can suffice for most applications.
4. Usability
These sprinklers are designed to be user-friendly, making it suitable for first-time users. Plus, they can be readily adjusted adapt to your irrigating requirements.
5. Care
Since these sprinklers flaunt a basic design, they require less maintenance and endure a long time.
Disadvantages Of Impact Sprinkler
1. Noise
Due to their functioning mechanism, impact rotors can be noisy. The impact sprinklers make a very peculiar sound. Due to the working mechanism where the hammer hits the region at the back of the plate , the sound of the impact sprinkler might sometimes annoy you.
2. Water Pressure
Impact sprinkler might not work properly under lower water pressure. These sprinklers require a optimum water pressure to perform properly and generate an arc-like spray pattern, water homogeneity, and cover a wider area.
3. Arm Rotation
Impact sprinklers may use more water than a rotary sprinkler head to ensure a consistent operating pressure for a continuous stream of water. This is because their arms require a strong water flow to rotate properly.
What Is A Rotor Sprinkler?
Since rotor sprinkler spray heads operate using internal gears, they are also called gear drive sprinklers. These kinds of sprinklers have an enclosed-body design and are more expensive than impact sprinklers.
All the gears are built-in and are hidden from our sight, so it becomes very difficult to tell how it exactly works. Gear drive sprinklers propel the sprinkler across its arc pattern using an internal system (a gear) rather than an arm.
Due to this design, the sprinklers work smoothly without shaking or wobbling. Additionally, gear drive sprinklers are sturdy and reliable due to their intelligent design.
It isn’t easy to find gear drive sprinklers or any variant you want. After all, the gear driven rotors are pretty new compared to the impact rotors that have been in the market for quite a long time. If the variety and demand for rotor sprinklers increase in the coming times, then their availability will also increase accordingly.
How Does It Work?
Although rotor irrigation devices are simple to set up, it's crucial to understand how they function. They're a straightforward system to comprehend, which makes troubleshooting a breeze. Water enters the sprinkler from the main water source in a rotor irrigation system. The water is filtered and then sent via a turbine.
The stream of water enables the rotor to spin and the gears of the sprinkler to revolve. As such, water flows through the sprinkler and into your garden.
Another important component of rotating sprinklers is the radius reduction screw. The screw is what holds the nozzle in place.
Many individuals may turn this screw in the mistaken belief that it will assist each sprinkler share the same spray patterns. The screw instead may be used to either extend the area the sprinkler can cover or lower the diameter the nozzle can spray. This screw should only be used to adjust the sprinkler radius.
Advantages Of Rotor Sprinkler
1. Less Noise
Since it is powered by an inner mechanism, this sprinkler produces no "impact" noise. You can expect most rotors to have a quiet operation.
2. Larger Area Coverage
These sprinklers can cover large areas ranging from 20 to 84 meters in radius, which is even larger than the coverage area of impact sprinklers.
3. Less Water
They throw water precisely wherever you need it in the volume you specify, wasting the least amount of water.
4. Highly Effective
Usually gear drive sprinklers are more efficient than other kinds of sprinklers. However, based on your demands and intended use, choosing the proper sprinkler type is critical.
5. Uniformity
Since the spray heads rotate at a constant pace, it may offer precisely level water distribution throughout a particular area. Even at high pressure, it will provide a more uniform output.
6. Low Water Pressure
Rotor sprinklers work best with low water pressure. To water your lawn, multiple nozzles protrude from the ground and the sprinkler heads revolve at low water pressures ranging from 30 to 50 PSI.
7. Rotation Speed
Same speed of rotation is maintained in both the backward and forward orientations.
Disadvantages Of Rotor Sprinkler
1. Effectiveness
Due to the smaller water droplets, the water might drift in case of high winds.
2. Might Tilt
If the gear driven rotors are set in pop-up style, then they will eventually sink or tilt. Moreover, they will spray excess water on the turf areas nearer to the sprinkler. Water might not reach to the distant sections, creating dry patches.
Which One Should I Choose?
Though impact sprinklers can evenly cover the lawn, nowadays, rotor sprinklers have become quite trendy due to their sturdiness and consistency. Companies producing irrigation devices are coming up with more and more varieties of rotor sprinklers that will suit you and your lawn.
Due to its larger radius and capacity to a larger area, the same-size gear-driven rotor may outperform an impact sprinkler. Gear driven rotors are a better option if you want to add an extensive irrigation system for your lawn.
They provide much better control over the flow of the water, and the expensive ones can easily surpass the performance of any classic impact sprinkler. A rotor sprinkler design is incredibly effective and saves water while maintaining a rich green lawn all summer.
If homeowners don’t want an immaculate lawn or a full irrigation system solely for good grass, they can use a decent hosepipe and impact sprinkler all year.
Using a sprinkler that is constructed on a raised platform makes it easy to transfer it to the different parts of the garden, allowing you to divide it into zones and ensure there are no dead areas. Impact sprinklers will spray water quickly in a full or half circle pattern, allowing you to water your entire yard rather rapidly.
Even if you have to physically transfer the hose pipe and sprinkler to the other zones once or twice, the water stream consistency will still be the same.
Impact Sprinkler Vs Rotor Final Words
Both sprinkler systems will do the work. However, you must choose between automatic irrigation and manual irrigation systems. Nowadays, the cost of the gear driven rotors and different nozzles has decreased dramatically, and various components for a sprinkler system are widely available online.
Therefore, changing your watering strategy to add a true watering system with a regulator and rotor nozzles might be the best long-term strategy for your home.
Water sprinklers help in good irrigation by ensuring a wider coverage for your lawn, but they can also increase expenses. Following my simple methods to monitor how many gallons per unit time your impact sprinklers use can solve these issues.
The only affordable method which ensures my lawn gets proper watering, even with low water pressure, is using an impact sprinkler. Hence, investing in an impact sprinkler for low pressureon the market has immensely increased my water coverage with its advanced nozzle and spray patterns.
However, when I initially used an inefficient impact sprinkler for my garden, my water bills rose and got really expensive. That is when I started monitoring my water usage.
What Are Impact Sprinklers?
Before using a water sprinkler to water your lawn or garden, it is essential to be aware of the know-how and their technology. Researching to determine how many gallons per minute my impact sprinkler used has drastically reduced my expenses.
Impact sprinklers are small irrigation devices that rotate and turn with the help of a rotating arm and spring pin. The sprinkler propels in full and part circle motions to provide a more comprehensive water cover for your house lawn.
Using a garden hose to water my garden has been challenging, but switching to an impact sprinkler has been the best decision. The sprinkler head can spray water across a large radius, and the sprinkler system is easy to access, whether above the ground or below.
Many impact sprinklers offer varying features depending on the water pressure, angles, and patterns of water projection. Some companies even manufacture sprinklers that are safe for kids and pets, making them a responsible choice for every household.
Tip
Read the instruction manual before using an impact sprinkler, and never use chemicals while watering, as they can disperse into the surrounding areas.
Different Types of Impact Sprinklers
When buying a brass impact sprinkler for myself, I was faced with different types of sprinklers that I needed to choose between. On average, there are three major kinds of sprinklers on the market. They are:
1. Oscillating Sprinkler
This type of sprinkler usually has a horizontal-bar shape that moves back and forth, covering a large lawn radius with each sprinkler head. Oscillating sprinklers are constructed to emulate a real shower of rain.
Moreover, they can also turn into a part circle and thus are usually used for small and medium-sized lawns. I found quite a few of these oscillating sprinklers in local gardening stores.
2. In-ground Sprinkler
This kind can be expensive since it needs to be staked in the ground to spray. But though it is pricey, it is quite advantageous, especially for people with a large family or many pets. I found out that this system is designed with features that retract each sprinkler head into the ground when not in use.
However, from the customers’ reviews I have skimmed through, I’ve seen that its mechanical design can cause problems like jams and clogs. So, before you install these, consider talking to an expert.
3. Gear-driven Rotors
This system has sprinkler heads that are more suitable for an expansive area. Not only do they cover a large radius, but they can also turn into a full and part circle. I found that gear-driven rotors are beneficial to increase even distribution of water across a vast site.
However, they are different from the traditional impact sprinkler since they do not include the arm which helps a sprinkler turn. Also, note thatdifferent sprinklers use varying gallons per unit of time, depending on the water coverage, sprinkler head, or water pressure.
How Many Gallons Of Water Does An Impact Sprinkler Use?
Going back to my main concern, having sprinklers can be very wasteful if you do not know how much water the sprinkler currently uses. Besides high water bills, water waste through improper lawn sprinkler usage is detrimental to the environment and violates both regional and state water restrictions.
However, there are many resources and techniques that will help you calculate how much water each sprinkler head uses every hour, minute, or second.
Keep on reading as I share some ways to determine the average water usage quickly and efficiently.
1. Gallons Per Unit Time
The average water usage of any irrigation tool is measured in terms of Gallons Per Minute (GPM). I discovered that once I calculated the GPM, it was easy to convert it into Gallons Per Hour (GPH) by multiplying the number by 60. Then, to calculate the overall water meter usage, add the GPM of each sprinkler.
Moreover, I also calculated the inches of water a brass impact sprinkler would spray over time using the collection method. I used this method by putting out containers to collect water for ten minutes while the sprinkler ran.
But how do you gauge the potential water bill with this seemingly elaborate process?
To estimate the water bill, the water volume has to be measured. And since gallons are a measure of volume, finding the coverage area of the location and the inches of water the sprinklers produce is sufficient.
2. Other Methods To Calculate
There are also other ways to calculate the Gallons Per Minute (GPM) or Gallons Per Hour (GPH) according to your water pressure. But the most popular one is as follows:
Place a deep, plastic container on the ground and turn on the sprinklers. Aim each sprinkler in such a way that it sprays sufficient water into the container. This is an important step since varying water pressure determines the reach height.
Before doing this, I examined the interior of the sprinkler to see if theimpact sprinkler trip pin is not working. If the trip pin of your sprinkler is faulty, you may need to separately buy another to replace it.
After letting the sprinklers run for ten minutes, I poured the water into a plastic container that measured one gallon. Thus, this is the quantity of water the sprinkler sprays every ten minutes. Further, this number can be multiplied by six to find out the gallons per hour.
Another method of calculating how much water the sprinkler uses is surveying the water meter before turning on the system. This water meter should be located near the place where the water supply line to your home begins.
Write down the number on the meter and turn on the sprinkler system. Make sure that no other water source is allowed to flow.
After ten minutes, check the meter reading and write it down again. The difference between these two readings indicates how many gallons per ten-minute usage. Then, multiplying by 6 gives you the hourly calculation.
How To Choose An Impact Sprinkler For A Lawn?
Every brass impact sprinkler has a different set of features that sets it apart from others. When it comes to me, I require a sprinkler that can suitably adjust to the low water pressure of my home. For this, I look for the PSI requirement of a sprinkler that tells me whether it is compatible with my water system.
Besides PSI, there are several factors one should consider when buying an impact sprinkler. These are:
1. Flow Rate
To continue my discussion with PSI (pound per square inch), the flow rate of a sprinkler is calculated based on the PSI itself. It is also directly related to the water pressure of the central home system and the sprinklers. If the sprinkler is required for a larger area, consider purchasing sprinkler systems with a higher flow rate.
Tip
It is crucial to keep track of the weather before using a sprinkler. High winds and extreme temperatures are detrimental to the flow rate.
2. Adjustable Pattern
Impact sprinklers spray water in a full and part circle. Some sprinklers have adjustable systems that allow users to adjust the circle, arc, trajectory, and water pattern. Thus, look for models with a diffuser pin to adjust water distance.
3. Timers And Automatic Shutting System
Timers and automatic shutting systems are features that are an ideal match for people looking for self-regulating devices. However, impact sprinklers with integrated features like these can be pretty costly.
But I really wanted a system that could run and stop independently. So, I purchased shutting valves and a timer to add to my impact sprinkler. Now, it saves me a lot of time.
4. Distance
Before buying a sprinkler, measuring the area that needs irrigation is essential. This helps in determining what sprinkler radius may be suitable for a particular location. I always check whether it has an adjustable distance in case I wish to water a larger area.
5. Warranty
Like every device and irrigation tool, warranty is a critical issue to consider when purchasing sprinklers. Different manufacturers provide varying warranties based on the material and durability of the product.
For example, some manufacturers offer a five-year warranty for their brass impact sprinklers and a two-year warranty for the plastic ones.
6. Price
Price is a significant factor when it comes to investing in irrigation tools. Although impact sprinklers shouldn’t be too expensive, it is good to invest in one with superior quality. I believe the best way to make this decision is by calculating the budget available.
However, remember that your lawn may require more than a sprinkler to cover the area effectively. The more sprinklers, the higher the budget for purchasing them should be.
How Many Gallons Per Minute Does An Impact Sprinkler Use Final Thoughts
The concept of an aluminum or brass impact sprinkler has revolutionized the irrigation industry with easier accessibility and time-saving features. However, to ensure better usage, maintaining impact sprinklers is crucial.
I regularly check inside the sprinkler to see if there are any deposits or mineral buildups. These buildups can cause potential clogs and blockages, so I clean them thoroughly whenever I find them. Moreover, I also make sure to check each head to see if they are loose or broken. If they are, I immediately replace them.
That is all on how much water an impact sprinkler uses. I hope my detailed guide and personal experience help you operate a sprinkler.
If you like similar informational guides and reviews, I suggest you read my article titled “Impact Sprinkler Vs Rotor”
That said, I’ll be signing off now. Until next time!
An impact sprinkler trip pin may stop working due to misalignment, obstructions, incorrect pressure, or other damaged parts. But you can resolve the problem if you re-adjust the pin, use the correct water pressure, clean the part, or repair/replace any damaged components.
If you ask me, I’d say that impact sprinklers are a worthy upgrade over conventional watering systems. With a good impact sprinkler for low pressure, you can water your lawn at any time.
Of course, there are a lot more advantages to using impact sprinkler heads, such as increased versatility and watering range. However, it is a machine, and like any other machine, it can encounter issues at times. And one of the most annoying issues you can encounter is a malfunctioning trip pin.
That’s why I have expanded on this issue here, so read on if you want solutions!
What Is The Impact Sprinkler Trip Pin?
If you are not very well-versed in impact sprinkler heads, you might not know what the trip pin is. That is why I have briefly discussed it in this section for your convenience.
A typical impact sprinkler head consists of several parts, such as the impact arm, bearing washer, arm spring, solenoid valve, trip collar, trip pin, and others. If you have ever wondered why sprinklers pulsate, then the answer is the impact arm. Likewise, the trip collar helps in fine-tuning the watering range and so on. Checkout what pulsating sprinklers are in this exclusive article to know more.
In that context, the trip pin is of particular interest because it allows the sprinkler head to oscillate when in use. So, if it stops working or becomes damaged, your impact sprinkler will get fixed in one direction, thereby reducing its usefulness.
The trip pin is usually located at the base of the sprinkler head, just below the trip collar. Under normal circumstances, it is aligned downwards, which helps to rotate the sprinkler. On that note, it works in conjunction with the other moving parts so that your sprinkler can distribute water evenly throughout the garden.
Why Has Your Impact Sprinkler Trip Pin Stopped Working?
In order to fix the problem, you’ll need to identify the cause behind it first. There are several reasons that can cause the trip pin to stop working, as I have discussed below.
1. Misaligned Pin
A misaligned trip pin is the most common and obvious cause of this issue. As I have mentioned before, a trip pin is normally aligned in a downward position. But due to frequent usage or external impacts, the pin might become displaced from its original alignment. This jams the oscillation mechanism, which ultimately causes the sprinkler head to become fixed in a single direction.
2. Incorrect Water Pressure
An impact sprinkler requires a moderately pressurized water flow for normal operations. So, if the water pressure becomes abnormally high or low, then the sprinkler head will not be able to rotate properly.
If the water pressure is considerably higher than the acceptable range, it will strain the trip pin and the trip collar. That will subsequently damage the pin, which will cause the sprinkler head to stop oscillating.
On the other hand, if the water pressure is too low, the stream will not be able to apply enough force on the impact head to rotate it. As a result, the trip pins will not be triggered, which will prevent the sprinkler head from rotating.
3. Obstructions
If any object or debris becomes lodged inside the trip pin (or any other part, for that matter), it will jam the component and prevent it from functioning as expected. In other cases, the foreign object will cause unnecessary friction between the sprinkler parts, which will eventually wear them out. And once that happens, your sprinkler head will stop working.
4. Damaged Parts
I have already stated that the trip pins work in conjunction with other parts of the sprinkler head. So, if any of these components were to become damaged, it would consequently affect the normal functioning of the pin.
How To Restore The Normal Functions Of A Trip Pin?
Based on the underlying reason, there are several ways to fix malfunctioning trip pins. I have discussed each of these solutions in detail below, so keep reading.
1. Adjust The Trip Pins
In case the pin has become misaligned, you can restore its normal functions by simply re-adjusting it back to its original position. The pin can be easily adjusted with the help of a flathead screwdriver. All you need to do is tighten the pin with this screwdriver, and once it is back in proper alignment, the sprinkler head will start to rotate again.
Warning
Be careful not to tighten the pin too hard, or else it might break. You will then have to replace the broken pin entirely, which can be a lot more problematic.
2. Ensure The Correct Water Pressure
If the problem is due to unusual water pressures, then you will need to adjust it with the help of a pressure gauge.
Generally, impact sprinklers operate at a pressure of 50 to 60 PSI. However, not all impact sprinklers operate within the same pressure range, so make sure to check the documentation that comes with the product.
When the pressure is above or below the recommended range, you can first try to adjust the pressure of the faucet or tap. If that doesn’t make any difference, you will need to install a pressure regulator at the water source to make the necessary pressure adjustment.
3. Clean The Sprinkler Parts
In case the pin or any other part of the sprinkler has become obstructed with dirt and debris, you should clean them to restore normal functions. If you gently rub the sprinkler parts with sandpaper, you can remove any loose dirt. But if the debris is stuck inside the components, you can flush them out with a spray of water or a cleaning solution.
4. Repair Or Replace The Other Parts Of The Sprinkler
When the problem is due to damages in the impact head, sprinkler valve box, washer, or any other component, then you’ll need to troubleshoot them individually. For instance, if the arm spring has come loose, you can adjust it with needle nose pliers. Or if the impact arm has become bent or damaged, you will need to replace it with a new one.
Impact Sprinkler Trip Pin Final Words
The problem of a malfunctioning impact sprinkler trip pin can be resolved fairly easily on your own. However, if you are feeling a bit unsure about going the DIY route, you can always seek help from a professional.
In this regard, periodic maintenance can prevent this problem from appearing again.
Many users have asked me about how many gallons per minute an impact sprinkler uses. And the answer is - quite a lot! That’s why it is important that you have an adequate water supply to handle the load, or else these problems will become frequent.
Pulsating sprinklers or impulse sprinklers are lawn maintenance devices known to create a natural rainfall effect to cover larger areas. Broadly, there are five types of sprinklers with specific features, so it’s essential to choose one carefully for your gardening needs.
Every gardening enthusiast can agree that watering large areas is a challenge, especially if you’re working with animpact sprinkler for low pressure.
As a result, you may have considered getting a pulsating sprinkler (a.k.a. impulse sprinkler) for your lawn. However, nowadays, there are different types of pulsating sprinklers available on the market, catering to various needs.
On that note, I have curated this brief yet informative guide on pulsating sprinklers and how they work. Read on…
What Are Pulsating Sprinklers?
A pulsating sprinkler or impulse sprinkler is a lawn maintenance device used to spray water over a large area. The five common types of sprinklers are - impulse, oscillating, traveling, rotary, and stationary.
Pulsating or impulse sprinklers offer gentle and slow watering as the water is not directly sprayed on the grass but upwards into the air. As such, they disperse water uniformly on the ground, making the sprinkler ideal for watering private lawns, golf courses, landscaping, etc.
Who Invented The First Pulsating/Impact Sprinkler?
In 1933, Orton Englehart, a Glendora, California citrus grower, invented a horizontal action impact drive sprinkler and patented it two years later. Thereafter, he sold the design to Clem and Mary La Fetra, who distributed it under the brand Rain Bird.
How Do Pulsating Sprinklers Work?
Pulsating sprinklers feature a single jet, and most models can be adjusted for watering in partial and full circle patterns. You can further adjust the distance of the throw, allowing you to cover a larger area while watering. I especially like how a freestanding impulse sprinkler can be connected to any type of hose.
Moreover, you can find two main types of these sprinklers on the market.
First is the sprinkler with a spike base, ideal for areas experiencing high water pressure. This type of sprinkler features a sturdy base, offering greater stability while handling strong water force. As such, the sprinkler is less likely to flip over while throwing the water at longer distances.
Another category is the pulsating sprinkler with a sled base or H-base. These are more suitable for watering smaller areas experiencing low water pressure.
Lastly, pulsating sprinkler heads are another “pop-up” option for in-ground systems. You can detach them before mowing the lawn.
Tip
No matter the type of impulse sprinkler you use, I always recommend low water pressure to prevent any damage to smaller plants and grass.
What Are Pulsating Sprinklers Made Of?
Most pulsating sprinklers are made of metals like stainless steel, zinc, brass, aluminum, and bronze to prevent corrosion. Some components may be made of plastic as well.
Additional features allow the user to adjust the impact sprinklerand the stream of water it releases. You can choose to spray water in a fine mist form or a full jet. I use this feature a lot to customize the watering strength according to the type of plants or grass I’m handling.
You may also find baffle plates in some sprinklers that help adjust the height of the water. As such, you can conveniently water smaller plants and bushes below low-hanging trees.
Benefits Of Pulsating Sprinklers
I prefer pulsating/impulse sprinklers over other types because they are the most effective in covering larger areas. Plus, they can operate well in low water pressure while dispersing more water per hour.
Moreover, these sprinklers are low-lying with single jets dispersing water. The spring-loaded arm releases water with high force. This mechanism offers adequate wind resistance, meaning the weather conditions will have to be extremely windy to cause any harm to the sprinklers.
How Much Do Pulsating Sprinklers Cost?
Depending on the manufacturer, materials used, additional features, coverage area, and more, the price of pulsating sprinklers varies widely. However, if your lawn is on the smaller side and you do not require many features, I recommend going for budget-friendly options.
Pulsating Sprinklers Conclusion
Pulsating/impact sprinklers imitate the natural effect of rainfall, and hence, they are a must-have for gardens, lawns, or any large area of grass and plants. Plus, they are a non-intrusive alternative to furrow irrigation which requires you to dig trenches.
Overall, I highly recommend investing in a high-quality pulsating sprinkler system to water your lawn quickly and effectively. For further information on impact sprinklers and how to fix and maintain them, I suggest checking out my article, “impact sprinkler trip pin not working.”
To ensure complete 360-degree coverage, the head of an impact sprinkler pivots as water runs through it. However, you can adjust the spray pattern, water pressure, and arc of an impact sprinkler by changing the position of the hose faucet, deflector shield, diffuser, pin, etc.
This is because they provide a higher level of coverage than other types of sprinklers. However, one downside of impact sprinklers is that they can be more difficult to adjust. In this article, I will explore how to adjust different elements of impact sprinklersto get the ideal trajectory and strength.
How To Adjust Impact Sprinkler
A. Adjusting Sprinkler Coverage
Your sprinkler system is one of the most important tools in your lawn care routine, but it is only effective if it is properly calibrated. Let me tell you about a few things that I do to fine-tune my sprinkler.
1. Adjust From The Source
Changing the flow of water that comes from your sprinkler system can be accomplished by turning the hose faucet from the attachment either clockwise or counterclockwise.
If you turn down the flow of water coming out of the faucet, the sprinkler will only cover a smaller portion of the yard. Increasing the water pressure, on the other hand, will make the stream stronger and cover more ground.
Tip
When you wish to prevent fragile plants from being damaged by a violent blast of water, use a lower water flow than normal.
2. Turn The Diffuser Pin
A huge screw is used as the diffuser pin, and it is secured to the bottom of the sprinkler head. To reduce the area that is covered by your sprinkler, simply turn the pin until it is positioned above the nozzle.
This will accomplish the desired result. Turning the pin counterclockwise will result in a stream that is more concentrated and will travel further. Alternatively, you can remove the pin entirely.
When the diffuser pin is inserted, the stream is fragmented, and as a result, it is spread out in the form of a fine mist or spray. The amount of water sprayed will be less concentrated if the pin is allowed to protrude further beyond the hole.
3. Move The Deflector Shield Up Or Down
Changing the trajectory of the watering stream of the best impact sprinkler on tripod can be accomplished easily. You can try rotating the square piece of flat metal on the sprayer head ( next to the pin that diffuses the water).
You can move this either clockwise or counterclockwise. The stream will be diverted into a lower arc when it strikes the downturned deflector shield, which will make it ideal for watering grass and plants.
This is an excellent method for ensuring that your plants are receiving the proper amount of hydration that they require without wasting any of the water that you provide them.
Tip
Maintain an elevated position for the deflector shield if you are attempting to water your entire yard or garden. By doing so, the water will be able to move in a more upward trajectory and cover more distances.
4. Change The Spray Radius With The Friction Collars
Adjusting the motion of the sprinkler head is accomplished by rotating the metal clamps located at the bottom of the sprinkler head. The watering range is reduced in proportion to the proximity of the collars to one another.
The trip pin is a thin metal component that is located at the bottom of the sprinkler head. As the sprinkler revolves, the trip pin will oppose the collar clamps, making the sprinkler turn in the opposite way.
Warning
Ensure that the trip pin does not move outside of the range that you have chosen for the sprinkler. If not, a part of your porch, deck, or garage may get wet while watering the bushes outside your house.
5. Flip The Trip Pin-Up For A Complete 360-Degree Cover
If you have a lawn sprinkler system, you may want to consider flipping up the trip pin for 360-degree coverage. By doing this, you can ensure that the sprinkler system is watering your entire lawn evenly.
In addition, if you have any plants or shrubs in the center of your lawn, flipping up the trip pin will allow the sprinkler to reach them more easily. To flip up the trip pin, simply lift it until it reaches the sprinkler head.
Doing this will enable the sprinkler to water radially. As a result, you will save time and water by ensuring that your sprinkler system is operating efficiently.
6. Adjust The Dial For The Distance Control
One of the great things about impact sprinklers is that they can be easily customized to fit the specific needs of your lawn. If your model has a separate distance control dial, you can simply turn it to the right or left to get the desired spray distance.
The approximate distances should be labeled to ensure the right coverage. In case there is no distance control dial in your impact sprinkler, you can adjust the spray head by changing the water pressure, deflector shield, and diffuser pin.
By experimenting with these three variables, you should be able to get the perfect spray pattern for your lawn.
B. Choosing The Right Setup For Your Lawn
One of the important aspects of maintaining a healthy lawn is ensuring that it receives adequate irrigation. While rain can provide some moisture, it is often not enough to keep grass and other plants lush and green.
This is where sprinklers come in. By evenly watering the lawn, sprinklers help to ensure that plants receive the moisture they need to stay healthy. However, it is necessary to learn how to maintain your sprinkler.
1. Choose A Source With Ideal Pressure
It is imperative that you use a water supply that offers at least 15 pounds per square inch (psi) of pressure. When the water pressure isn't high enough, an impact sprinkler system won't have the necessary force to do its job.
If your sprinklers are not adequately watering your garden or do not appear to be releasing water at a rate that is extremely high, use a different irrigation type.
You can know the psi you are dealing with by calling the water provider or by utilizing a pressure gauge located over the end of a garden hose. Both of these options are available to you.
The water flow in the majority of residential areas is typically in the range of 40 to 60 psi on average. If, on the other hand, you acquire water from a well or pump, the cost may be less for you.
2. Select The Right Water Sprinkler Head
Plastic and metal are the two most common materials that are utilized in the production of impact sprinkler heads. Plastic heads are lighter than metal heads, which makes it easier to move around using a moderate water flow (about 20-40 psi). Metalheads are durable enough to withstand higher water pressures, but they do tend to be priced slightly costlier than their plastic counterparts.
Metal sprinkler heads are not only more resilient, but they also have a longer lifespan and fewer problems over their lifetime.
When searching for an impact sprinkler system, it is a good idea to seek the advice of a professional in the field of home renovation or gardening. This is especially needed if you are unsure which sort of head would be most effective for your property.
3. Clean The Sprinkler’s Head Regularly
If a brand-new sprinkler has ceased to function as expected, it may only require a thorough cleaning. Take the sprinkler head off of the base, and disassemble the nozzle and the swivel bearing within. Scrub each component using a bottle brush and hot water to eliminate any dirt or mineral buildup that might be preventing the sprinkler from functioning properly.
A weak stream with regular water pressure is one of the most common indications of a filthy sprinkler. Other symptoms include failing to rotate, turning to one side, and stopping.
The sediment and heavy mineral deposits collected on the inside of the sprinkler head can be removed with a solution that consists of vinegar and warm water.
General Tips
Adjusting your water sprinkler is not as daunting a task as you may think. There are several tips that can help make the process easier and ensure that you get the most out of your sprinkler system. Know more on what are pulsating sprinklers really are here.
Take a picture of or note the individual settings for the impact sprinkler head as soon as you have it configured. This will help you remember where those settings need to be in order to water each area.
Next, the movement of an impact sprinkler often results in coverage that is more even across broad regions. To lower the power bill or if you are attempting to keep plants alive in a hot and dry environment, this might be a better option.
To maintain the efficient operation of the sprinklers, you should promptly replace any broken or misplaced parts that you detect. And if you are wondering why sprinklers pulsate, it is generally because of the fluctuating water pressure.
How To Adjust Impact Sprinkler Bottom Line
Impact sprinklers are an important part of your irrigation system. They provide even water distribution and can help you save money on your water bill. It is important to adjust the impact sprinkler so that it provides the best coverage for your landscape.
Follow these simple steps to adjust your impact sprinkler and get the most out of your irrigation system. And if you want to know more about keepingutility pumps fish safe and other topics related to pumps, read through my blog.
Take care!
A utility pump is used to pull water from one location to another. Additionally, it is versatile enough to be used for a variety of applications, including draining pools, construction sites, ponds, and hot tubs.
Be it transferring water from one place to another or draining water pools - utility pumps can come to your rescue.
You can use them for moving water from basements and crawl spaces; and transferring water between tanks. In this blog post, you will discover why you need utility pumps, how to select the best utility pumps, and what the difference is between utility pumps vs. sump pumps.
Why Do We Need Utility Pumps?
Utility pumps are versatile tools that can be used in different ways. Whether it is a pond, a pool, a blocked sink, or any other enclosed place, a utility pump can come in handy.
Water pressure can be increased with the use of utility pumps, and water can be transported at a greater pressure than with merely gravity feed. This is especially true if a utility pump is connected to a rain collection system or water storage cistern.
In many cases, the groundwater around a home is not a problem. However, if the water table is high or there is poor drainage, water can accumulate in places like stairwells or window wells. This can lead to several problems, including mold growth and foundation damage. A utility submersible pump can be used to remove water from these areas, and you should also know some pumps are designed for depths of several feet.
How To Choose The Right Utility Pump For Your Needs
Are you having drainage issues on your property and looking for the best utility pump to solve the problem?
Choosing the right utility pump can be daunting, but we are here to help. There are many factors to consider when choosing a utility pump, including the type of water you're dealing with, the size of your property, the motor selection, and your budget.
A submersible utility pump is a good option if you are dealing with clean water. Submersible pumps are designed to be submerged in water and are ideal for draining swimming pools, ponds, or other small bodies of water.
The size of your property is also an important consideration. You may need more than one pump if you have a large property with extensive drainage issues. Conversely, if you have a small property with minimal drainage problems, a less powerful pump may suffice.
Finally, consider your budget when choosing a utility pump. Choose the best pump for your needs and budget to ensure that your drainage problems are solved once and for all.
Tip
If you're dealing with dirty or sewage water, you'll need a sewage or trash pump. These pumps are designed to handle solids and other debris, and they are ideal for removing water from basements or other flooded areas.
Sump Pump Vs Utility Pump
Basically, a sump pump is placed in a pit or sump at the lowest point of your house. There is a float switch in the sump to prevent flooding. The sump pumps are triggered whenever there is excessive water in the sump. Utility pumps remove standing water from low spots and fill ponds.
Moving on, you should know that a sump pump is one type of submersible utility pump. In order to pump water and stop it from destroying the framework, flooring, and furniture, builders set up sump pits and drains. Water enters the sump via the subfloor drains and is immediately pumped through the sump pump and into the sewage system.
As a rule, sump pumps are installed vertically, with the intake hole situated as close to the ground as practicable. This ensures that the pump can draw large amounts of water from the sump. The water in a sump pit can be lowered to within an eighth of an inch with the help of sump pumps.
2. Standard Switch
The float switch is a standard component of sump pumps. As the water level rises, the float switch will move upwards and activate the sump pump. The switch will remain on until the water level of the sump pit has dropped to an acceptable level. In more advanced models, this is handled automatically by an inbuilt sensor.
3. Output Connector
Most sump pumps include a one-inch or larger diameter output connector that is threaded for simple connection to the tubes that lead to the sewage system. Some models of sump pumps have an adapter that lets you use it to drain water from pools and ponds by connecting it to a garden hose.
4. Lift
The lift of the sump pump should be high enough to send the water several feet upwards to the drain. Since a traditional utility pump can only raise water a few feet, this is crucial.
Which One To Pick?
Sump pumps are typically used to get rid of standing water from the sump basin, which one can find in the basement of their property. The water is pumped out of the home and away from the foundation to avoid flooding.
Utility pumps, on the other hand, are versatile tools that can be used for a variety of tasks around the home. You can drain pools and spas, remove water from ponds and aquariums, empty clogged sinks, and even irrigate garden hoses.
There are several ways to power a utility pump. Direct and alternating currents are the two main types of electricity, and utility pumps can be powered by either type. Gasoline-powered utility pumps are also available, and these are typically used for outdoor applications.
Hydraulic utility pumps are powered by fluid pressure, and these are often used in industrial settings. When choosing a utility pump, it is important to consider the application and select a pump that will be able to meet the specific needs of the job.
Which Switch Type Should You Select?
Submersible pumps often have a switch that activates the pump whenever the level of water in the sump pit reaches a specific level. There are three typical types of submersible utility pump switches.
1. Float Switches
The majority of submersible utility pumps include a float switch. Typically, the float is linked to the pump's housing by a pivoting arm. As the water level of the sump pit increases, the float will rise and start the pump.
At the predetermined level, the swing arm deactivates the pump as the water level decreases. The swing arm deactivates the pump at the predetermined level as the water level decreases.
2. Diaphragm Switches
Some submersible utility pumps are equipped with an internal diaphragm switch. The pump is turned on because of the increased air pressure that pushes on the diaphragm when the water content in the sump pit rises. As the level of water falls, the air pressure reduces, and the switch opens, shutting off the pump.
3. Mercury Switches
Mercury switches utilize a small amount of mercury contained within a glass vial to function. At the vial's end are two wires. The pump functions when mercury is in connection with the wires.
Typically, the mercury switch is encased in a float ball located at the end of a brief electrical connection. When the water increases, the float ball rises, and mercury within the switch finishes the circuit to activate the pump.
These switch systems are all dependable. However, as with any mechanical device, all three switches are susceptible to failure. Routine inspection, testing, and maintenance are required to maintain the dependability of your sump pump.
Final Words On What Is A Utility Pump
A utility pump is an important piece of equipment for many homes and businesses. By understanding the different types of pumps available, you can select the right one for your needs. Keep in mind the centrifugal force, flow rate, power source, and inlet size of the pumps while choosing an option.
Also, if you want to know more about these water pumps, read our blog on “Who makes utility pumps?” We hope this guide has helped make the process a little easier.
Until next time!
Various brands like Superior Pumps, Wayne, and Simer are known for producing quality and user-friendly utility pumps. So, you can choose between them depending on your engine preferences and water removal capacity.
Utility pumps are perhaps among the most important devices that aid water removal during a sudden pipe leak or burst. Hence, it doesn’t surprise me that many households are opting for them today.
But with so many brands out there, how do you choose the right one? Let me help you make that decision.
Why Do You Need A Utility Pump?
Some people may think that utility pumps are only used for industrial or commercial purposes. However, this isn’t exactly true. So, what is a utility pump, after all, and who needs it?
A utility pump is a portable device that’s typically used to transfer or pump water from one place to another in case of a leak or flood. As such, these pumps are used for residential, industrial, and commercial spaces to drain excess water should the need arise.
Homeowners, in particular, may use a utility pump to drain away water from their basement or garden in case of a major plumbing leak. Aside from that, it can help them remove water accumulated over pool covers or similar surfaces.
Utility pumps can also be used as pressure washers, as they can increase the outgoing water pressure up to 40 PSI. Just connect them to a nozzle-equipped hose, and you’re all set!
Tip
Utility pumps generally shouldn’t be operated for more than 24 hours at one go, and some models might have a lower operating time. Always ensure that you stick to the time provided in the manufacturer’s instructions, as overrunning the pump can damage it permanently.
Who Makes Utility Pumps?
There are many brands manufacturing these pumps, the top names being:
1. Superior Pump
True to its brand name, Superior Pump has been one of the top utility pump manufacturers in the US for over a century now. It uses high-quality materials like copper wiring and thermally protected split capacitor motors that last a long time without burning a hole in your pocket. Moreover, each utility pump has a removable intake screen to facilitate easy cleaning.
You will find a variety of utility pumps on the brand website with different engine power and housing material (thermoplastic and steel). Plus, all pumps are certified for safety by the UL.
2. Wayne
Wayne is another brand that I came across while searching for the best submersible utility pump. As such, its utility pumps have a durable corrosion-resistant construction and feature the brand’s Multi-Flo technology for facilitating side or top discharge, as required.
The Wayne WaterBug utility pump is one model that can be used in both residential and commercial spaces, thanks to its high water removal capacity.
3. Simer
In my personal opinion, Simer caters to the section of buyers looking for affordable utility pumps for emergency water removal. Most of the models feature a housing made of thermoplastic and metal for optimum durability. Not only that, but they are also compatible with most garden houses and are highly portable.
Who Makes Utility Pumps Conclusion
You will find different types of utility pumps on the market depending on their power source.
For instance, there are centrifugal pumps that use centrifugal force to generate the required velocity and rotating impellers to suck in and force liquid out of a valve. Then, there are magnetic pumps that employ a magnetic or electromagnetic drive to move liquid.
So, do your research before choosing the best one for your needs. And check out my guide on “can I use a utility pump as a sump pump?” to learn more about the application of these devices.
Utility pumps are multipurpose water pumps for removing standing water from swimming pools, basements, or aquariums. They are mostly available as gas-powered or electric units, having an intake hose and operating at a higher output than sump pumps.
A utility pump is essential for residential and commercial applications, with the best utility pumps helping resolve plumbing issues quickly. But to get the most out of a utility pump, it's important to know how they work, which is the purpose of my guide today.
In this article, I talk about the various water pumps on the market to show how do utility pumps works and how pumps are different and explain their mechanism.
What Are Utility Pumps?
Utility pumps are categorized under transfer pumps that move water quickly between two locations, such as for gardening applications. You can use these submersible pumps to irrigate the garden or lawn or drain excess water from washrooms and swimming pools.
The main advantage of utility pumps is their affordability, which is why they find use in large-scale plumbing projects and help drain standing water from a specific area. Now, the basic principle behind how these pumps work is the same despite the different models…but more on that in the next section.
How Do Utility Pumps Work?
Utility pumps are connected to big tanks while the hose is connected to the drain, which makes it easier to pump water from the tank into the drain. But for more high-end models, the cost of operations is high, and you might need specialized skills to use it.
The main purpose of utility pumps is that they are great for repairing purposes and prove useful for fixing leaks, preventing fires, and replacing burst pipes. To understand how utility pumps work, I have listed the top submersible pumps below, along with utility pumps powered by gas and electricity.
A. Submersible Utility Pumps
Thanks to their greater portability, a submersible pump helps remove standing water, fix drain wells, or empty clogged sinks. These submersible pumps fit even in tight spots, like crawl spaces or window wells, and remove standing water by pumping it outside.
But the speed at which such utility pumps operate depends on the inlet size, which determines whether it is suitable for quickly moving large amounts of water. Also, you can use submersible pumps equipped with a float switch since they automatically turn the unit off/on when the water level changes.
The only thing to remember is that the water must not contain solid items because it will cause utility pumps to malfunction. This is why they aren't used for sewage cleaning purposes.
B. Utility Pumps With A Power Source
Based on the type of task, several utility pumps run on a power source to remove water.
1. Direct Current
A direct current utility pump is predominantly used in boats for pumping water from the bilge. Although they are available in multiple sizes, the power supply varies between 12 and 24 volts.
2. Alternating Current
The utility pump found in your home possibly runs on a 120V AC and comes in handy to discharge water from swimming pools, draining ponds, or de-watering low spots. But you should be careful about electric shocks when using these utility pumps, so always plug them into a GFCI outlet.
3. Gasoline Pump
A gasoline-powered utility pump is more powerful than a portable pump and removes 4 times the amount of water than many utility pumps. That's why they are used for commercial purposes and even pass small solids due to their large discharge hoses and reinforced solids.
To use these water pumps for removing water, place the unit close to the water body before attaching the suction hose, discharge hose, and suction lines. I also recommend attaching a check valve and suction strainer when the water contains a lot of debris.
The trick is to ensure that the various hoses or pipes are straight and short to pull water effectively. Then add high-quality fuel and fill the priming port of the pump with water prior to starting the engine.
4. Hydraulic Utility Pump
A hydraulic utility pump proves useful in areas where electricity is unavailable, so you use the hydraulic take-off from a tractor or vehicle for removing water.
5. Transfer Pump
A transfer pump can be gasoline or electric-powered and help resolve drainage issues by moving water from one location to the next. But for this utility pump to deliver the best results, I suggest attaching a foot valve accessory for filtering debris while placing the pump on a sturdy foundation.
After that, install the discharge pipe and suction hose to the pump before attaching a garden hose adapter. Ensure all the connections are secure and direct the discharge hose away from the pump before turning it on.
What Are Sump Pumps?
There is another type of pump known as a sump pump which is also quite popular for residential purposes, especially to prevent flooding. In this section, I will provide an overview of a sump pump which usually lies below the ground level and runs on electricity.
The primary purpose of a sump pump is to prevent water levels from increasing beyond safe limits inside your home. You can keep these pumps in the basement while connecting them to the drainage system to expel water using the drain pipe and a large piston.
They are mostly of two types - surface pumps and submersible pumps, with the latter proving useful in winter regions prone to torrential downpours.
A common type of submersible sump pump is the trash pump, especially useful when the water contains debris like sand or leaves, rendering a utility pump ineffective. All you need to do is attach the hose and place it away from the pump to remove water from basements.
These sump pumps have a high-quality impeller that uses centrifugal force to push water out through the large outlet, inlet, or hose along with the debris. They are, however, costlier than a utility pump, but the additional expense is worth it to remove dirty water.
The best part is that you can use a sump pump continuously for greater efficiency in removing water.
The basic difference between a sump and a utility pump is a sump pump can prevent flooding in the basement to keep you safe. But for all other water-related issues, it would be best to use a utility pump, given their affordability.
Thanks to its small size and multiple outlets, you can place a utility pump anywhere around the house. This means instead of one hose expelling high water pressure, there are several outlets to make the task easier.
I believe that a utility pump has more use in a residential space and is easier to install while being more energy-efficient.
In comparison, sump pumps can be used in homes and commercial spaces like construction sites, but they are more challenging to install due to their larger size. It would be best to install sump pumps beneath the foundation of a home or office space for the best results.
But sump pumps are suitable for heavy-duty tasks, such as extracting water from sump pits that are several feet high. They are also more reliable and can quickly remove water from a large area.
How Do Utility Pumps Work Conclusion
It makes sense to have a utility pump at home, considering you can't use it interchangeably with transfer pumps or sump pumps.
These low-cost units are ideal for upgrading your home through DIY means while ensuring your family's safety. Since it's not easy to constantly watch the pump, you can opt for electric-powered units with an auto shut-off function.
So, whenever the water heater or other in-house appliances malfunction leading to plumbing issues, use the utility pump to resolve the problems quickly. And if you liked reading this guide, check out another article where I answer the question - do you need a permit for a retractable awning?
Tip
Despite submersible utility pumps being available on the market they can't tackle water more than a few feet deep. You can use sump pumps in such situations to pump out flood water or for more deep-seated applications.
Sump pumps can be a long-running, non-portable and permanent solution to removing water from places where water fills up frequently. In contrast, utility pumps are portable and versatile water-removing devices that can be used in a variety of situations.
No matter where you live, you will likely run into spillage at one point or another. And this is where you can put the best utility pumpsor sump pumps to use.
The trouble is, it can be confusing to know which is the right pump for your specific use case. So, to help you gauge which type suits your needs, I’ve reviewed both a sump pump and a utility pump.
Sump Pump
Sump pumps are small pumps that are placed below ground level in order to remove water from places where the liquid can’t be drained. The pump uses a piston to redirect water into a drain pipe, reducing the water level and keeping the area dry. Usually powered by electricity, these pumps are primarily used as an anti-flooding measure and are directly connected to sewer systems.
You can also find sump pumps powered by solar energy if you wish to rely on a cleaner energy source.
Advantages Of Sump Pump
1. Dries A Particular Area
During my time testing the sump pump, it was apparent that the effluent pump is meant to be used in specific areas to prevent flooding. Basements are an obvious place where the pump can be used, but it needn’t be limited to below-surface areas. You may also use them as pond pumps, if need be.
Say a portion of your home is being rebuilt from the ground up, a place where water can damage the construction process. A submersible pump can be put to use to dry the area and keep the construction going smoothly.
2. Keeps The Soil Stable
Something I noticed about the drying capabilities of a submersible pump above the surface is that it can maintain the dryness of the soil. This can be particularly helpful in a construction site, where dry soil can add to the stability of the building. After all, if the soil isn’t dry enough, water damage can lead to serious structural issues for the building.
3. Switches On Automatically
Most submersible sump pumps have built-in float switches that rise with the water level. Once the switch has risen to a certain point, the pump will turn on automatically and begin pumping out the water automatically. So long as the switch hasn’t reset its position, the pump will stay on.
More advanced submersible pumps use an automatic sensor to keep the area dry without requiring a dedicated float switch.
4. High Power
Since sump pumps operate in below-ground locations that are typically the lowest point in a home, they have an appropriately high pumping power. Sump pumps can move water through a pipe several feet above to push it into the drainage system, in stark contrast to most other sewage pumps.
5. Adaptable Pipes
The output connection in sump pumps are purposefully designed to be able to connect to drainage pipes easily. So, you can connect it to a garden hose as well if you wish to redirect the water to a nearby pond or swimming pool.
A diameter that is no less than an inch can be found on most sump pumps, which enables this adaptability.
6. Alerts You About The Water Level
Sump pumps often come with water alarms and features that stop airlocks, making operations smoother and easier. And since they are powered directly by a home’s electrical system, these pumps don’t require any priming before they are ready to be used.
Disadvantages Of Sump Pump
1. Relies On Electrical Power
Something I noticed immediately while using a sump pump is that power outages become a major issue. If you live in an area with heavy rainfall, there’s a good chance that your electricity will go out for quite a while. And since sump pumps rely directly on your home electrical system, they can be rendered useless until power is restored.
During severe weather storms, it could be days before the power comes back on, leaving your basement filled with water until then.
2. Needs A Pit
Sump pumps are installed below the surface, necessitating an opening in the earth under your home, called ‘sump pits’. There are two main issues that stem from this: the effort required and the risk of Radon gas entering your home.
Having a sump pit in your basement to accommodate a sump pump can lighten your wallet significantly and be quite unsightly as well. Regular maintenance can help reduce the visual distraction, but I found it to be not quite as effective as I had hoped.
And lastly, there is a chance that the soil under your home has Radon gas trapped, which may release as the pump is being installed. The gas is a significant health risk and can seriously damage your lungs, so be sure to have the soil tested for radon before installation.
Utility Pump
A utility pump is a portable pump that is small and compact in design. Unlike sump pumps, utility pumps do not laser-focus on one specific objective and cater to various uses instead.
Most utility pumps workwithout needing to be submerged, and thus, they have a wider use case. Their typical applications extend to agriculture and horticulture, construction sites, food processing and service, power generation and more.
The output pressure of utility pumps is quite high on average to cater to each use case. And furthering their versatility is the presence of an inlet connection, as well as a garden hose discharge pipe.
Advantages Of Utility Pump
1. Can Be Used In Enclosed Spaces
Since they don’t need to be submerged, utility pumps can be used in a variety of areas, including enclosed spaces. A utility pump can remove standing water from places like ponds or pools. This is particularly useful when you need to empty clogged sinks that are filled with water.
I was able to use a utility pump to remove rainwater from stairwells and window wells to check what is a utility pump’strue performance test.
2. Boosts Water Pressure
A utility pump is generally quite high-powered, which helps to increase water pressure in a rain harvesting system or water cistern. This, in turn, allows water to be pushed further than what would otherwise be possible.
This application of automatic pumps can be paired with a garden hose to create extra pressure, creating a simple DIY contraption for pressure washing purposes.
3. May Not Need Electricity
So long as you have fuel available, the pump can operate independently of your home’s electrical system. Gasoline-powered utility pumps are particularly powerful, even among other utility pumps, being able to move more water than a typical electric pump.
You may find commercial establishments using large gasoline-powered pumps for this very reason.
4. Can Remove Large Amounts Of Water
Utility pumps can be used to clear out large amounts of water from areas that are prone to flooding. Owing to their higher power output, utility pumps can be used for both large and small-scale water removal.
And with certain models, small debris isn’t an issue as long as the inlet screen remains clear of debris. Some utility pumps can be used as sewage pumps as well.
5. Portable
Utility pumps are typically highly portable, allowing you to move them from one location to another freely without issues. These devices don’t need to have a space dedicated to them to work properly, and the extra mobility can be useful in certain situations.
6. Versatile
There are three chief types of pumps with a unique use case for each. These include gas-powered pumps, transfer pumps, and submersible pumps, the latter two of which can be powered by electrical or solar power.
Gas-powered pumps are typically used in commercial areas, while transfer and submersible pumps can be seen in residential applications. These can be used interchangeably for the most part, save for specific circumstances. For instance, a submersible utility pump is used to remove a large amount of water, an application where a transfer pump can’t be used.
Disadvantages Of Utility Pump
1. Cannot Be Used Continuously
If you need to keep your pump on continuously without stopping, utility pumps may not be able to perform as well. Sometimes, a pump may be needed to remove water from multiple places for hours on end, which a utility pump may struggle with.
2. Can Be Difficult To Repair
Certain kinds of utility pumps, such as submersible utility pumps, can be difficult to repair due to the presence of a seal. This is because the seal can corrode over time, making it difficult to repair the device to a satisfying degree.
Sump Pump Vs Utility Pump Conclusion
Sump pumps and utility pumps have specific use cases, and though they largely perform the same function, rarely can they be used interchangeably.
If the pump doesn’t need to be moved from where it’s needed, sump pumps can effectively remove water. These water pumps can be put to use in basements and crawl spaces where water fills up quickly after heavy rainfall, proving to be a more permanent solution.
As for utility pumps, they can be used in most scenarios that don’t demand continuous usage. They can be transported freely and may require no electrical tethers, giving them a wider set of applications than sump pumps.
At the end of the day, your specific requirements determine which pump suits you the best. And so, I’d advise you to gauge your situation and choose accordingly.
Orbit offers a wide variety of impact sprinklers to choose from, including models with adjustable arcs and flows. Rain Bird's impact sprinklers tend to be more expensive than Orbit's, but they offer superior performance and durability.
Both Orbit and Rain Bird offer high-quality products, but there are some key differences between the two brands, and this is where I am going to discuss them. Price is usually one of the first things people think about, but it's important to remember that cheaper doesn't always mean better.
Orbit
Orbit Irrigation Products is a Utah-based supplier and manufacturer of irrigation products for residential and commercial applications. With over 2,000 products in their catalog, they offer a comprehensive selection of options for every need.
Their product line includes sprinklers, timers, valves, and even low-volume and micro-irrigation products focused on water conservation. Overall, Orbit is a trusted name in the industry, known for its high-quality products and commitment to customer satisfaction.
Orbit Sprinkler Review
When talking of watering lawns and gardens, nothing beats the orbit impact sprinkler which is known to be the best impact sprinkler on tripod. This sprinkler, which can be set on a movable tripod, covers an area of up to 85 feet in diameter. Their coverage can be varied from a small arc to a complete circle depending upon the time.
It features a deflector shield that can be adjusted to change the distance and an anti-backsplash arm that can help with spray patterns and area coverage. Water droplets can be adjusted in size by turning the screw on the diffuser.
Orbit Impact Sprinkler Features
1. Area Coverage
With a spray radius of up to 85 feet, the orbit sprinkler will cover a large area quickly and efficiently. The Orbit sprinkler can be set to a full circle to cover an area of up to 5,670 sq. ft. This makes it perfect for large lawn areas or even plantation farms where one is growing flowers.
2. Durable Built And Design
Orbit sprinkler heads are designed to conserve water and improve the effectiveness of watering your yard. This can drastically reduce your water bill and contribute to environmental protection at the same time.
Moreover, you should know that this one sports a solid zinc construction. Plus, the body is lightweight, making it easy to maneuver around the yard without having to worry about damaging delicate plants.
3. Adjustable Coverage And Anti Backsplash
The spray and water coverage may be easily adjusted from a partial area to a full 360° watering radius, and the distance can be adjusted up to 80 feet. It is equipped with an arm that prevents splashback. You may adjust the stream by utilizing the deflector shield and the diffuser screw, and the spray distance radius can be changed to anywhere from 20 to 42 feet.
Further, the tripod base can be adjusted between 16-37.5 inches in height, and you can use it as needed. The 1/2" male threaded impact head is ideal for use with the deflector shield and diffuser screw.
Hence, the product is perfect when you need to give your plants a little extra watering but don't want to overwater and create a muddy mess.
4. Affordable
Orbit sprinklers are a great option for those looking for an affordable way to water their lawns. When compared to other brands like Rain Bird, Orbit sprinklers are significantly less expensive.
However, just because they are less expensive does not mean that they are of lower quality. Orbit sprinklers are made from high-quality materials and are designed to provide years of trouble-free operation.
Pros
Easy to install and use
Comes with an adjustable arc head
Lightweight
Helps in watering long shrubs and reaching all layers of gardens
Has a zinc impact body which makes it more durable than other brands
Features a patented swivel connection which allows for 360-degree rotation
More affordable than Rain Bird
Best for small or medium-sized lawns
Cons
Only one year of warranty offered
Rain Bird
If you're looking for a sprinkler for the irrigation system, you have probably heard of Rain Bird. Professionals and homeowners have come to rely on its high-quality sprinkler devices.
Rain Bird Corporation, with headquarters in Azusa, California, was founded in 1933 and has since then manufactured and supplied the largest selection of irrigation devices. As such, the brand’s products are used on golf courses, farms, sports arenas, commercial properties, and homes in over 130 countries around the world.
Rain Bird Impact Sprinkler
The Rain Bird Impact Sprinkler is a high-quality sprinkler that is perfect for a variety of watering needs. The heavy-duty construction can withstand even the most demanding watering needs, and the brass fittings add an extra level of durability. Overall, the Rain Bird Impact Sprinkler is an excellent choice for anyone who wants a reliable and easy-to-use lawn sprinkler.
Rain Bird Sprinkler Features
Rain Bird is inspired by the original Rain Bird impulse sprinkler, patented in 1933, but updated with the precision and longevity of today's innovation.
1. Built And Design
This sprinkler is made of brass, bronze, and stainless steel and will outlast any similar product made from zinc. It is designed with a water flow that goes straight through it for enhanced dirty water efficiency (irrigation canals, ponds, high-mineral content, etc.).
2. Wider Coverage
It provides great coverage and can be set to a full circle (360 degrees) or a partial circle (anything from 20 degrees to 340 degrees). The pattern can be adjusted indefinitely after installation. Stream length can be adjusted anywhere from 20' to 41' with the adjustable deflector flap.
That is not all; it covers a wide range of areas that can extend up to 5200 sq. ft. This durable Rain Bird sprinkler offers broad coverage to provide consistent growing outcomes year after year, making it the perfect choice for use in lawns, gardens, and planting beds. And it is hugely used in farms as well to keep the crops healthy.
3. Warranty
Rain Bird sprinklers are some of the most durable on the market, and they come with a warranty to protect against defects. Two to five years of warranty is a good investment because it ensures that you'll be able to use your sprinkler for a long time.
The warranty also covers parts and labor, so you would not have to worry about paying for repairs if something goes wrong. Plus, the company has a good reputation for customer service, so you can be confident that all your problems will be taken care of.
4. Classic Impact Sound
Rain Bird sprinklers have been a traditional favorite for generations. Their impact sound assures you that your yard is getting the water it needs for healthy growth.
They come with a variety of nozzles to custom fit your watering needs, and the Rain Bird warranty guarantees your satisfaction. With proper installation and care, Rain Bird sprinklers will provide years of trouble-free operation and be an integral part of your irrigation system.
5. Instruction Guide
The Rain Bird Sprinkler comes with an instruction guide that will help you to properly install and operate your new sprinkler. This guide covers everything from unboxing and assembling your sprinkler to choosing the right settings for your lawn. It also includes a troubleshooting section in case you experience any problems with your sprinkler.
6. Sprinklers Valves
The valves manufactured by Rain Bird are of exceptionally high quality, and they are capable of providing flow control, internal openings, and straightforward control of irrigation systems. Sprinkler valves made by Rain Bird are meant to maintain the product's integrity and are hence made of brass or glass-filled nylon, depending on the model.
As a result, they have become a favorite among professionals working in irrigation and golf course maintenance all over the world. But one potential thing to be aware of with regard to a Rain Bird sprinkler system is that it only rotates in one direction. This can be problematic if your garden is long and narrow, as the water may not reach all areas evenly.
Pros
Top-of-the-line irrigation device
Made of high-quality materials such as brass and bronze and sports a stainless steel construction
Highly durable
Comes with a warranty to protect against defects
Easily adjustable
Installation is simple
Has an adjustable sprinkler head spray pattern
Sprinkler head made up of brass
Cons
Requires more water pressure to function properly
Orbit Vs Rainbird Impact Sprinkler FAQs
Do sprinkler valves from a professional irrigation business differ from those sold at Home Depot?
The models of valves and controllers sold at hardware stores like Home Depot and those sold at a professional irrigation business will be very different.
The sprinklers and controllers sold at Home Depot are of inferior quality to those sold by reputable organizations that source their inventory from irrigation suppliers. But they are easier to use for homeowners. Therefore, it is suggested that sprinkler controllers be purchased through vendors rather than big box stores.
Are impact sprinklers better than those with rotors?
Because they are made of bronze or brass, impact rotors can be more expensive than the newer plastic sprinkler heads. However, they are more long-lasting and can typically be used for many years without needing to be replaced. They also have a lower maintenance requirement compared to plastic rotors.
Which one is better: wobbler vs impact sprinkler?
When it comes to watering your garden, you must be wondering about wobbler vs. impact sprinkler and which one to choose. Both have their pros and cons, so it’s important to choose the right one for your needs.
Wobblers are less expensive and easier to set up, but they’re not as efficient as impact sprinklers. They also do not deliver as much water pressure, so they are not ideal for large areas. Impact sprinklers, on the other hand, are more expensive and require a more advanced setup, but they are much more efficient. They also deliver higher water pressure, making them ideal for larger lawns.
Moreover, sprinkler impact heads are dependable because of their unobstructed water flow and resistance to clogging, even when used with muddy water or recycled water from ponds and canals. There are many sprinkler heads to choose from to throw water perfectly well and have a healthy lawn.
What happens with sprinkler heads at extreme temperatures?
Sprinkler heads sit in the ground and usually come with quartzoid bulbs that are susceptible to bursting in extreme temperatures. You will then have to replace it or get it repaired.
To get a bit more into the deets, freezing temperatures (anything below 32 degrees Fahrenheit) can cause pressure build up in the sprinkler head, making it prone to cracks. Similar leaks and cracks can occur when the water is too hot as well. So, never let the temperature go beyond 135 degrees Fahrenheit.
Orbit vs Rainbird Impact Sprinkler - Which One Is Better For You?
Performance is important when it comes to lawn irrigation, and Rain Bird definitely has the edge over Orbit in this department. Its products are simply more reliable and efficient, meaning your lawn will stay healthy and green even during the hottest summer months.
That being said, Orbit is considerably cheaper than Rain Bird, so if you're on a tight budget, then it may be the better option.
Ultimately, it depends on your needs and what you are looking for in a sprinkler system. I have looked at both Orbit and Rain Bird impact sprinklers and outlined the pros and cons of each type so that you can make an informed choice.
Hopefully, this article has helped to simplify the process of choosing a new sprinkler system for your home or lawn. At the end of the day, both Orbit and Rain Bird offer quality products that will get the job done; it just comes down to personal preference.
Wobblers are better suited for moderately sized grounds or enclosed spaces thanks to their efficiency and uniformity. On the other hand, impact sprinklers can be used for larger areas due to their significant range and low cost.
Those who have a garden know how difficult it is to keep it watered. Luckily, with a wobbler or impact sprinkler for low pressure, your watering woes can be resolved.
That’s why I have compared these two sprinkler heads today. They are much better at watering your plants than traditional drip emitters. As such, you can preserve the beauty of your garden for a long time.
So, if you want to know which one is the best for you, then read on!
What Is A Wobbler?
To start things off, I will be looking into the Wobbler sprinkler head. It was originally introduced as Xcel Wobbler, manufactured by the brand Senninger, which is a well-known name in the field of irrigation systems. As such, the Senninger wobbler sprinklers are the most popular.
This particular type of sprinkler head produces rain-like droplets that resist wind and evaporation. And it is built with off-center rotary action technology that allows it to operate at lower pressures.
Advantages Of The Wobbler Sprinkler Head
1. Provides Uniform Distribution
The wobbler sprinkler head provides a much more uniform coverage compared to traditional drip irrigation systems. Thanks to the off-center rotary action, it can distribute consistently sized droplets over a large area without any issues.
Also, the wobbler technology enables it to maintain a uniform pattern, meaning that you don’t have to worry about parts of your garden getting no water.
2. Efficient Water Usage
The droplets distributed by wobbler sprinklers actively resist wind drift. This means that the droplets won’t spread out beyond the operational area, which reduces water wastage. Besides, they have been designed to operate at low pressure, which means that you can cover your entire lawn with relatively less water.
3. Highly Versatile Application
When compared to existing drip systems, the wobbler sprinkler heads are much more versatile. So, they are used extensively across yards, lawns, gardens, nurseries, and turfs.
Not only can a wobbler be used for watering purposes, but it can also be used to control insect growth and provide frost protection. Furthermore, it has minimal impact on the soil structure despite the large droplets, which makes the area ideal for germination.
4. Durable Build Quality
To ensure a prolonged lifespan, the wobbler sprinklers are made from high-impact, engineering-grade thermoplastic materials instead of metals. As such, they are incredibly strong and damage-resistant, which means that you can use them for a long time without any issues.
Disadvantages Of The Wobbler Sprinkler Head
1. Expensive
Because of the high-quality materials used and the versatile features, it comes with a relatively high price tag. That can act as a deterrent for many homeowners, especially those who have a limited budget.
2. Difficult To Set Up And Maintain
Compared to a traditional irrigation system, the wobbler sprinkler features a much more intricate setup. This makes the installation process a lot more complicated and time-consuming. Likewise, the sprinkler head is difficult to maintain and repair due to the same reason. So, if you encounter any issues with it during usage, you might have a lot of trouble fixing it. Even performing periodic maintenance can be a headache.
What Is An Impact Sprinkler?
Now that you know about the wobbler, I will be discussing impact sprinklers in this section. An impact sprinkler is one of the most commonly used sprinklers, featuring a rotating head that disperses water. On that note, you can choose between the Orbit vs. Rainbird impact sprinkler, which are two of the best brands available today.
The head is pivoted on a bearing, which makes it free to rotate. This bearing is located on top of the threaded nut that is used to attach the head to the pipeline. An impact hammer present on the head strikes the water stream, and the force of the impact helps to rotate the sprinkler around.
Advantages Of An Impact Sprinkler
1. Highly Adjustable Design
Typically, an impact sprinkler head comes with a set of nozzles that allows you to adjust the water flow rate as per your requirements. In addition, the head features an adjustable stop, which allows you to choose between a part-circle or full-circle operation.
2. Cost-Effective
Compared to the wobbler or any other sprinkler head, the impact sprinkler is a lot more affordable. This is because it does not have a complicated design like the wobbler, nor does it require skilled personnel for its installation.
On top of that, it does not require electricity to operate, unlike many other sprinkler heads. Therefore, you can save on energy costs, which further enhances its cost-effectiveness.
3. Easy To Use And Maintain
Due to its simplistic design, an impact sprinkler is much easier to use than wobbler sprinkler heads. It is quick and easy to assemble, and there are no complex moving parts that you need to be careful about.
As such, it is a breeze to maintain the sprinkler head periodically. And if there are any issues with it, you can troubleshoot them on your own. Just disassemble the parts, identify and fix the problem, and put them back together - simple!
4. High Coverage Area
Impact sprinklers are designed to spray water over a fairly large area, which makes them a perfect choice for large, open spaces. In fact, they might have the greatest range among all types of sprinkler heads, which makes them extremely useful for irrigation purposes.
Disadvantages Of An Impact Sprinkler
1. Not Always Suitable For Low Water Pressure
If you plan to use an impact sprinkler for your lawn, then you need to make sure that the pressure of the water supply is high enough. These sprinkler heads do not work that well when the water pressure is low when compared to wobblers.
2. Relatively Noisy
The impact sprinkler is noisier than other sprinkler heads. This is due to the water stream striking the impact hammer. Unfortunately, there is no way to get around this problem, so you have to deal with the noise. However, the noise is not very loud, so it should not bother you unless you are in close proximity to it.
Wobbler Vs Impact Sprinkler Conclusion
Both sprinkler heads have their own strengths and weaknesses, which makes them suited for different use cases.
If you have a moderate-sized lawn or have an enclosed space such as a greenhouse, I would suggest going with the Wobbler sprinkler head. Also, it is suitable if you live in an area with low water pressure. It has a decent range and provides uniform coverage.
On the other hand, if you own a large yard or an irrigated field, you can go with impact sprinklers. Its exceptional range and low cost mean you can cover the entire land area without issues.
Does the smell of wet earth, freshly watered plants, and the desire to be surrounded by greenery appeal to you?
Although gardening may appear complicated, we assure you that with the right ingredients and lots of patience, you too can have a beautiful garden. However, it's essential to discuss certain aspects of mulch, vital for flower beds and vegetables.
You may have often used the substance without knowing what it does or noticing the available varieties. As a result, a working knowledge about mulch and its various types will help you take better care of your leafy friends.
In our guide, we've also highlighted how it differs from compost, the conditions you can use it in, and most significantly, why you need it. So, let's not waste time – grab your shovel, bring out the cart…
BENEFITS: Drainage, enhances appearance, water retention,...
Everything to Know About Mulch
What Is Mulch?
The primary question we need to answer before delving into the intricacies is - what is mulch? It's a type of substance you use with the soil to help in your landscaping needs. Furthermore, it provides the platform for your vegetables and flowers to blossom and is an integral part of the garden.
While certain types of mulch are better at water retention, some other varieties may improve your soil or control weed. To make the correct decision, you need to have a clear idea of your purpose and then get to work. Moreover, there is a type of mulch for every need and, therefore, you don't need to worry.
Why Should You Use Mulch?
In modern-day gardening, using mulch is no longer a choice but a necessity. Mulch provides the first layer of protection to the soil and keeps weeds and termites from harming the plants. It has excellent water retention properties and maintains the earth at an optimum temperature that proves to be the most suitable for plantation. Moreover, you have much to choose from depending upon the goal you've in mind.
For instance, you can use glass mulch for decorative purposes, while organic mulch enriches the soil with nutrients as it disintegrates with time. You'll develop a better understanding once we discuss the types, so let's start without further ado.
Rubber Mulch is highly useful, given its environment-friendly properties. It mainly comes in handy should you wish to follow the golden principles of - reduce, recycle, and reuse. In that regard, you can use it for growing plants, but for the best results, we suggest you use it as a material for outdoor flooring.
The main ingredient of the mulch is the rubber available from tires after it has been reduced to scraps. You can also use buffings, in which case you would have to scrape the rubber from semi-truck tires provided it hasn't been retreaded. Irrespective of your choice, the not so organic substance does have its use in organic purposes.
One of the benefits is that rubber is much better at insulating the soil from heat than wood mulches. Moreover, because of the non-porous property of rubber, the earth doesn't lose valuable moisture, and the mulch allows water to reach the deeper layers. Likewise, it slows down the growth of weeds to keep your garden in prime condition.
But that's not all, and there are advantages outside gardening as well. For instance, rubber mulch is highly recommended as a material for the construction of children's playgrounds. By employing rubber mulch instead of wood mulch, the area becomes safer given the elastic nature of rubber, which wood lacks. Children can, therefore, run about and play without being restricted by injuries.
Meanwhile, given the high lifespan of the material, you will get a reliable output for years to come.
Our next recommendation for you is bark mulch, which is derived from the bark of trees. It's an entirely natural ingredient, and professionals carefully choose the bark from conifers like pine and fir, which have several excellent characteristics. Firstly, it's pleasing to the eye, and what better way to take care of your property than to use an ingredient supplied by mother nature herself.
You can use the bark chips to provide a striking contrast, but essentially it helps the garden to flower, thanks to the exceptional growing properties. Therefore, you don't have to worry about the soil losing moisture due to its fantastic retentive qualities, which keeps the garden in prime condition.
You'll love the fact that as the bark disintegrates with age, it nourishes the soil with nutrients to provide much-needed longevity. But there are certain aspects where it doesn't fare well, and one of these is the delicate nature of the substance. While it's more comfortable for you to work with, it can be moved around by wind and rain, which could be an inconvenience.
Similarly, it's too fragile, and you may find that the bark is starting to splinter. To counter the problem, you can try to get bark mulch in a shredded format if you don't feel like working with chips. It may retain its properties better, such as ensuring more moisture retention, while the small size helps it degenerate faster for soil improvement.
If you're looking for an affordable option, then you can't go wrong with hardwood mulch. The reason it's a money-saving option is that it's mostly made up of material that has been thrown away. In that regard, old wooden objects or the leftover stuff after you've trimmed a tree work like a charm.
Besides, it's readily available, and a polite word with your neighbor may present the opportunity to get some for free. All you need is to look for hardwood material that's been shredded into mulch, and you can use it for your garden or landscaping jobs. It's ideal for use with plants that don't require much acid to maintain their condition.
You can scatter hardwood chips around the plant and leave it alone while it slowly disintegrates into an alkaline form. Furthermore, you can complement the mulch with fertilizer to increase the amount of acid for other plants. But it would be best if you were careful about the level of acid since it can harm the plant in too much quantity.
Meanwhile, there are a couple of things you need to keep in mind when choosing hardwood mulch. With time, you'll see a noticeable change in the material, and once it turns grey, you'll have to rake and turn it. It means you'll have to start thinking about alternatives and stock up on a fresh pile of mulch since it will last for two years at most.
People are reluctant to use hardwood because it offers the perfect breeding spot for termites. So, having a hardwood garden that borders your home isn't advisable, and you might have to consider other options.
One of our top recommendations for you is hemlock mulch, but there's no need to be worried as we aren't talking about the poisonous substance. For those wondering, the toxic version of hemlock is a kind of bush having distinctly big leaves and a purple stem.
We are interested in the mulch that comes from hemlock trees, and the common misconception has led to unwarranted criticism of the material. You'll notice that it's a type of hardwood mulch and includes most of the same characteristics and disadvantages.
However, certain benefits, such as the presence of various tannins present in the trees, help keep your plantation safe. It stops bugs and insects from digging into the soil and harming your plants.
Moreover, we enjoyed its aesthetic properties, and hemlock mulch acts as a pretty material to use in your garden. We should also mention that it doesn't have a long lifespan and suggest you stock up on the material if you notice signs of deterioration.
We often find ourselves looking for the perfect material when it's actually in front of our eyes all along. If you're vigilant enough, you can make suitable mulch from fallen leaves that are scattered all over your lawn. As a result, many people prefer using leaf mulch since it's highly affordable and readily available in large quantities.
It doesn't involve a lot of hard work and most significantly delivers a fantastic performance. So, what are the steps you need to follow after you've made up your mind to use leaf mulch? For starters, get a rake to gather all the leaves once they have descended from the trees.
After you've covered all possible areas and gathered as much as necessary, you'll have to shred the leaves to turn them into mulch. To get the best results, you can use a shredder, a leaf blower with vacuuming function, or a mulching lawnmower based on your convenience.
It would help if you shredded the leaves since it offers a smooth passage for air and water to keep the soil healthy. Likewise, it ensures your plants will bloom, and you'll have a flourishing garden in no time.
It's important to note that you shouldn't use a thick layer of leaf mulch, which may have harmful side effects. The thickness could prevent air water from reaching the soil, and the mulch will fail to serve its purpose. Moreover, if water does manage to seep in, it certainly won't have an escape route, leading to rot and fungus growth.
It would be best to start with a thin layer of leaf mulch and observe the results. If you're happy, you can use the remaining leaves to make compost and further enhance the quality of your garden.
Sometimes the least likely substances can also be used as mulch, and we bet you had never thought of glass for your gardening needs. The primary objective of glass mulch is for decorative purposes for which the glass is recycled and tumbled down to remove sharp edges.
You can place it in most areas, but it looks best when used in combination with rocks and pebbles to create a stunning appearance. Even if you don't, it's not a worry since the many types of glass and the mixing of colors provide a distinctive look compared to other mulch.
The downside to choosing it is that you can't be afraid to loosen the purse strings. It's one of the costlier options, and in comparison, organic mulch will seem like a bargain. Moreover, the most crucial thing to consider is that you need to have plants that can thrive in rocky or hard soli.
We suggest you add a layer of cloth between the mulch and soil to prevent the glass from sinking too far in. But rest assured, you won't face any challenges if used with the right plants, thanks to the fantastic water penetration properties which nourish the soil.
If you're looking for an alternative to using rubber mulch, you can't go wrong with lava rock mulch. It's also known as pumice mulch, and the primary advantage of using it is that it allows for uninterrupted water flow. Furthermore, the material doesn't absorb the water, and all of it goes into the soil to provide the most suitable conditions for flowering.
Another attractive attribute is that it ensures the ground stays warm, much like rubber, but the principle involved is different. While rubber is an insulator of heat, lava rock mulch spends much of the day absorbing heat, which it then uses to keep the plants warm at night.
Besides, it helps to retain moisture, and, in that case, you can add a layer of cloth beneath it to protect your plants from weed. What we liked most about it is the robust nature, although it's considerably lightweight, and you can quickly move it to your favored spot.
However, be wary of dropping it in your yard where you might use a lawnmower since it doesn't yield easily and could damage your machine. It would help to keep an eye out on whether there's too much mulch between the rocks. Such a scenario could prevent air and water from reaching the soil, which may prove detrimental to your plants.
Red mulch is quite common, and even if you haven't used it yourself, you may have seen it in someone's yard. For those who are still confused, it's the bright red material that's scattered around the yard, and it's derived from different substances. So, it provides a lot of variety, which is sure to please most buyers.
In some cases, certain types of bark mulch could've got a reddish appearance, having been harvested from red bark trees. However, the stuff that's used explicitly as red mulch has been dyed for the purpose. It is obtained from the same place as hardwood mulch and is gathered from leftover substances found on construction sites.
The downside is that since the materials come from construction sites and certain unusual substances are used as dyes, it's not suitable for growing plants. We recommend you use red mulch for other purposes but abstain from applying it to the soil. It tends to leak toxic chemicals deep into the ground, which hampers growth and causes irreversible damage.
As the name suggests, enviro mulch is an eco-friendly alternative and is exceptionally convenient to use. It has similar properties to bark, hardwood, and wood mulch, but it has an added advantage, which is why it's a favorite among gardeners. Enviro mulch is predominantly made up of recycled materials that include everything from old wood, paper, cardboard, and most things derived from trees.
Moreover, it's dyed like some of the other products, and therefore you get a lot of variety. You can use it for decorative purposes, while biodegradable materials ensure the soil is healthy to provide suitable growing conditions.
The most significant aspect is that the positives of enviro mulch far outweigh the negatives like using recyclable materials, which cleans up the surroundings. Besides, it goes back into the soil with time, and since it's readily available, it proves to be an affordable option.
Types of Dyes
We've covered the types of mulches you can use, and during our analysis, you're likely to have picked up that certain products are dyed. Due to the availability of a range of colors, you can get mulch comprising red, black, green, and blue, which adds to the aesthetic beauty. But you might be wondering whether dyed mulch is suitable for your plants?
So, to assist you a bit more, we've decided to discuss why mulch is dyed and the types of dyeing it's subjected to. You'll get to realize whether dyeing is necessary or if ultimately organic products are the way to go. Let's find out.
Vegetable Based Dye
Vegetable-based dyes are derived from various plants to provide the color, much like in earlier times. People mostly use it for gardening, and since it's an eco-friendly product, you won't have to worry about your plants' health. Moreover, not only does it look good, but it offers the perfect solution to leaching issues.
Even if the material used to make the dye tends to leach, there's no need to be concerned, as it's beneficial for the plants.
Iron-Oxide Based Dye
One of the most common colors used for dyeing is red, and, in that regard, iron-oxide is the predominant material. The characteristic red color is made by combining iron and oxygen, leading to an iron-oxide formation that's used for dyeing. Iron-oxide is nothing more than rust, which is why the mulch has a similar hue.
Over time as the material disintegrates, it percolates into the soil and proves beneficial for the plants. It provides access to more iron, and if you've plants that need more metal, you can't go wrong with iron-oxide.
Carbon Based Dye
For mulch that has been dyed black, the critical component used is a carbon-based dye. The color for the material is obtained by incomplete combustion of several items, which gives rise to a compound called carbon black. You might wonder if it's suitable for plant growth, and barring one component; the answer is no.
The only product that does stand out is vegetable oil since it doesn't have any harmful effects on the soil. As a result, carbon black is obtained as a by-product of it and allows you to use it specifically for plants that grow food.
With time, it starts to break down and thereby releases carbon into the soil, which has much the same effect as charcoal. Additionally, in certain situations, black carbon acts as an effective medium for coloring food packets and trays.
Dye It Yourself
If none of the above products appeal to you, then you can take a chance by dyeing the mulch yourself. While it may seem like a lot of work, we assure you that dyeing mulch is not that difficult while being cost-effective.
You need to watch out for the quality of the mulch and check to see if it's starting to fade. If yes, it's time to add color and revive the mulch to its former condition.
To do so, you need to have a clear plan of how to go about things, and the best place to start is with the dye. You'll have to keep in mind the types of plants you've to choose the most suitable color. Furthermore, we recommend picking a dye similar to the one you had to attain a consistent shade.
Keep An Eye On The Weather
Not only will it make your garden look better but also help to rejuvenate the mulch. Meanwhile, one of the most important things to take into consideration is the unpredictable weather.
Don't dye in wet weather as it will render your work ineffective and if there's a rain forecast, wait for a couple of days. The ideal weather for dyeing is to have clear skies and bright sun for a minimum of six hours, which will help the dye set. So, once you spray it onto the mulch, it needs to dry, and any moisture will prove detrimental in that regard.
Take Proper Protection
It would best if you didn't dye on the sidewalk or driveway since the hue is designed to last a long time. Don't rush but instead take your time because you can't remove the color from the surface if you miss your mark. For that, we suggest you pick a spot which isn't used frequently and won't matter if it gets a little color.
Moreover, you should use a tarp and cover any objects nearby, which you might hit for added protection. It's essential to ensure that the area is adequately sealed and mix the dye to get a consistent coloration. Proceed to add it to the sprayer and check that the nozzle is fine.
Finally, maintain a distance of six feet, spray it onto the mulch and keep going until you cover all the chips or shreds. Try to stick to a uniform distance because swaying forwards and backward could affect the intensity of the color.
Common Problems
Now, you may be experiencing specific problems in your backyard, and for that, it's vital to know the types of mulch that work best. Consequently, we've highlighted the most common problems below to discuss which variety will eliminate the issue and the reason behind the excellent performance.
Weed
Weeds are a recurring problem in most gardens, and if you're not vigilant, it could damage your crops and leave your yard barren. Getting rid of weed requires effort, but it isn't impossible and what you need is teamwork. No, we're not talking about asking for help but using a layer of materials to complement each other that will solve the issue.
For starters, you can lay down layers of cardboard, fabric, and newspaper to stop the sunlight from reaching the soil. It will help to cut off the primary source of light for weed and keep your garden fresh. But for more safety, we suggest you pick up a stock of organic mulch such as hardwood or bark mulch, which works well with moisture.
Moreover, organic mulch forms the perfect habitat for little insects and microorganisms which feast on the weed. The insects move about and reach every nook and cranny to dig out the weed from the mulch or soil.
Bug Invasion
It's crucial to note that if you plan on using wood mulch, ensure that it isn't in contact or close to the walls of your house. The main problem with wood is that it attracts all types of bugs, who will find your home to be a comfy place.
Furthermore, of all the insects that turn up, you need to be particularly careful regarding termites, which can eat through the wood in no time. To bypass the problem, you can opt for organic or non-wood types of mulch like leaf or enviro. You may also try out lava rock mulch, which provides a striking contrast with the color of your home.
Not only can you enhance the beauty of your home, but the curb also looks appealing while there won't be any need to worry about termites.
Deep Mulch Gardening
We thought it's important to talk about deep mulch gardening, without which the guide would be incomplete. First and foremost, it's also known as sheet mulching and is an incredibly efficient method whereby you don't need much maintenance. After adding the mulch, you can let it be and watch as it nourishes the soil for several years.
All you need is to pick an area in your garden where you wish to grow flowers or vegetables. Next, add all organic substances, mainly those derived from trees, such as paper, cardboard, straw, or leaves, and pile it up on the designated spot. Keep going until you form a pile close to a foot tall that will pump the soil with nutrients.
As a result, it's an efficient way to rejuvenate the soil, particularly in an area that formerly compacted and was unsuitable for growth. With time, the ground becomes softer, and as leaching begins, the nutrients from the top of the pile seep underground.
You can use most types of mulch for the purpose but try to add elements that are easier to breakdown. In that way, the soil will replenish faster, and you can get to work with your plantation sooner. The most challenging part of this method is to gather the components as the pile has to be a foot high.
But rest assured that you will see fantastic results if you put in the time and effort. Meanwhile, rather than waiting for the pile to be high enough to start work, you can simultaneously soften up the ground with your gardening tools. Therefore, as soon as you have the necessary elements, you can pile it up and get to work.
Differentiating Between Compost and Mulch
Another area we must cover before signing off is the difference between mulch and compost. These are two of the essential components you need for gardening, and while they may appear similar, there are some striking contrasts. You must know how the two materials are unique to get a better idea of your gardening needs.
Straight off the bat, compost provides the perfect environment for bacteria, and you'll find the tiny critters crawling around in large numbers. The ideal conditions for the bacteria are created as soon as the components start to decompose under controlled temperatures.
It will please you to know that compost doesn't require much effort to make, and people have been known to add grass, manure, or garbage before allowing it to disintegrate in a large pile. Moreover, compost functions similar to mulch, as both materials are combined with the soil to enrich it with essential nutrients.
Compost allows the plants to flourish, and you may even spread it across the surface of the soil for noticeable results. But there's a slight difference given that the primary purpose of mulch isn't to replenish the earth as much it is to protect it. Consequently, mulch isn't mixed but added to the visible surface of the soil and helps to maintain the temperature.
It keeps the plants safe from weeds and retains water, which proves vital to their survival. One of the most critical factors for using mulch is its decorative properties, which compost lacks unless you like having bacteria adorn your garden. It's available in several excellent colors, which serves to enhance the overall look of your lawn.
What to Do?
Meanwhile, compost helps store the nutrients in the soil while mulch releases the nutrients only after it starts to decompose. If you're looking for a quick solution to enrich the ground, then you need to use compost because mulch takes longer to disintegrate. Besides, only organic mulch like enviro, hardwood, and bark serves to provide nutrients, so you need to be careful about which material you choose.
What you can do is use both compost and mulch to have the ideal gardening experience. Rather than trying to use one material to serve multiple purposes, you should focus on the strengths of each of these products. First, apply the compost to enrich the soil before adding mulch to the top layer to protect the surface.
The compost will add nutrients, and with time, the mulch will also assist in that regard. Also, based on the advantage of both materials, you'll get a potent combination to provide the best flowering conditions. The garden will be well protected from weeds and will continue to germinate consistently.
Final Words
We've reached the end of our guide, and hopefully, you've got a better understanding of mulch.
It's essential to consider your budget, the surrounding environment, and the prevailing weather conditions before deciding on the kind of mulch you need. But rest assured that mulch is exceptionally user-friendly, and the numerous options will surely please you.
It’s always about being the best at what we do, isn’t it?
We get how difficult drawing hands is, and every artist who wants to excel with their skills HAS to practice it. Art, indeed, is a powerful tool of imagination, communication of ideas and emotions, and brings out the best in those who appreciate it. Even if it isn’t your desired art career, you shouldn’t undervalue it as a contribution to your skill set, and the relaxing, calming effect of the drawing process on one's mind.
But, how do you do that drawing hands? Where do you start?
We will give you a hand.
You start by drawing from reference. We don’t learn, unless it’s from the best. So, we took it upon ourselves to dig out the best possible sources for hand drawing references (hint: we’re good at what we do), and we weren’t surprised.
Enough suspense, here’s a list of five best hand drawing reference photo sources we could find on the internet.
Whenever we look for any image-based research, Pinterest catches our attention the most. Because that’s what Pinterest is about - it’s a community of millions of users, who use images to spread information and educate each other.
We did a search on Pinterest for hand pictures, and we found hundreds of results, all for you to delve into. Some of these were just drawings, others were photographs of actual hands, and we think both work equally well to be used as reference material for artistic purpose.
Oh, and yes, it’s absolutely free (and hopefully always will be). You just need an active email ID to be a member of their community. We’d suggest that you sign up, or Pinterest will keep on pestering you to do so.
After you sign up, you may consider making your custom board featuring just hand photos, your pick of the litter.
If you have a hard time figuring out how to use Pinterest, there are plenty of guides online that could help you understand how it works and how you get started.
This has to be one of our personal favorites too, and we hope that will be true for you too, after we tell you how awesome it is.
Easy to use, diverse in its tools, and absolutely free.
You could start with their ‘hands & feet tool’, which helps you practice hands and/or feet, on the website itself. Just decide what you want to draw, hands or feet (or both), along with the model’s gender, and a time interval for which you want to draw. You could set a custom number if you’re practicing hands on a faster routine, or a slower routine.
Better than that are figure drawing generators and slideshows for gesture poses, with customized settings that you can choose as per your needs, based on the kind of stuff you need to draw.
But do you want to study human limbs? Line of Action is the pick for you. We kind of understand that hands can be really tricky to draw, so you should save this link in your bookmarks for all future references.
Additionally, a lot of artists are generous enough to share their works, and if you have a hard time learning just from photos, you can learn from humans. Though we suggest you don’t just copy from them, but there’s no harm in being inspired. After all, we want you to be the best at what you love to do.
In all, Line of Action is perfect for you to especially it takes care of your pace of learning too. It balances between just hand pictures and real artists who do the same thing that you want to practice.
Disclaimer: the name is a little misleading. Not everything is what it looks like.
This extremely popular art community has existed since as early as mid-200s, and now we know that old, is indeed, gold.
True, there are many such websites out there, but nothing comes close to DA. If you visit DA, and search for something such as “hand drawings”, you will be taken aback by how much you can find. Some of these photos are taken from other sources, some are from the artists. You could spend hours scrolling through the content you find it.
We believe that DA stands out purely in terms of the quality of search content you can find here.
How it’s a stronger community too, is because you can leave comments on posts, give your feedback and ask questions, and people really seem to value it. You can even personally get in touch with people, asking if they have something more to offer.
But if you’re new to this form of art, you shouldn’t hesitate being on DA. Many artists also share their practice pieces on DA, because well, it isn’t exactly a professional portfolio. It’s like a complete community - welcoming everyone under the sun.
There are a lot of other gems too, all for you to explore. One of them is the DeviantArt groups. You can join the ones that focus specifically on human anatomy, hand drawing and the like.
So yes, if you don’t already have a DA account, there isn’t really anything that stops you. It’s a place of artists, for artists and by artists.
It is really that obvious, isn’t? What don’t you get at Google.
Google Images has a plethora of great art you can look at, and take inspiration from. A lot of these pictures are subject to US copyright law, so you can’t claim them as yours. But like we always say, inspiration knows no barriers.
With Google you can actually find specific types of photos, even within the larger category of hand-photos. You could look for hand poses, or close-ups for fingers, bent hands or pronated hands. Why this is possible, is because Google finds you everything on the database, as a collection of multiple sources.
You’re more likely to find most of your desired pictures on Google itself, but if you don’t you can always look for other search engines such as Yahoo, or Bing. DuckDuckGo, as well, as its own image search results.
But nonetheless. Google remains to be our top choice in terms of search engines for images such as hand-pictures. It is after all, the largest search index on the web, so you’ll alost find everything you need.
We wanted to end the list with Proko because it is a great resource for reference photos, and beyond.
Proko gives us a Free Model SamplePack, to download from their website. We didn’t look into it too much, and thought of leaving it for your exploration.
It also offers ‘Free Lessons’, on titles such as “Human Figure Proportions – Average Figures – Dr. Paul Richer”, “How to Draw Balanced Poses”, “Drawing Measuring Techniques”, “How to Shade a Drawing”. There are many more such lessons that you can check out under their “free lessons” section.
After watching their videos, you can go ahead and implement them right away.
But then if you feel these free sample packs are not enough for you, and you want more of them, they offer ‘poses for artists’ that you can purchase. They’re not that expensive either, and constitute a set of around 1500HQ images. You’ll be gazing at all of them from multiple angles, various poses, holding a variety of objects. Perfect for practice, we think.
Some of their more premium resources are worth checking out too, as per the reviews we saw. You might get some package deals that come with some discount. These single packs are more than enough for you to spend months practicing hand drawing, casual sketches and even hand gestures.
Wrapping It Up
In conclusion, it’s not just the practice that matters, but the smart kind of practice. Working from reference is perhaps the best way to learn, and we believe that is just what everything is about - being the best at what we do.
We hope this list helped you in furthering your attempt at success.
What is cel animation? Is it still relevant after the advent of 3D and digitalization?
Cel animation is the traditional cel animation, hand-drawn animation technique that involves drawing and painting objects on celluloid (cel), a transparent sheet. Nearly all the cartoons in the pre-1990 era were created using cel animation.
One of the aspects of this technique is that it requires incredible attention to detail and an organized team of people with varying skill sets. Cel animation is not used much these days, as animators rely on computers.
2D animations still rely on many of the techniques and parts of the cel animation process, though most of the work is done digitally.
To give you a better understanding of what is cel animation and how to use it, we have addressed it in three parts – materials, process, and transition to digital animation.
What Is Cel Animation & How to Use It
Materials Used in Cel Animation
The first thing you need to know about cel animation is what the materials you will need are? Being a technique that was invented a century ago, it relies less on materials and more on human skill. And since there was negligible technological development back in the day, these materials are rudimentary.
1. Cel
As the name suggests, cel animation needs a cel or celluloid. It is a transparent plastic sheet – you draw on the front and paint on the rear side of it. It is the raw material of the cel animation process.
Cel has seen an evolution over the years:
The first half of the 20th century saw the use of actual celluloid, made from camphor and cellulose nitrate. It was flammable and tended to wrinkle, yellow, and generate toxic gases with time.
Cellulose acetate replaced actual celluloid, as the former was more chemically stable and safer than the latter.
It was discovered that cellulose acetate is also not ideal for the preservation of cels. Hydrolysis released acetic acid over time, thereby deteriorating the cels.
Cellulose acetate was eventually replaced by polyester, which did not require any plasticizers.
Today, computers are capable of carrying out entire animation projects, eliminating the need for cels.
2. Paint
Now that we have talked about the raw material for cel animation, it is time to discuss the primary tool – paint, or as animators like to call it, “cel paint.” Cel animation uses an opaque and heavy gauche, acrylic, or similar type of paint. Paint is applied on the side of the cel opposite to the inked drawing, to avoid brush strokes.
Just like the plastic sheets, the paint has seen an evolution. Colorists used to paint the characters, and special artists used to paint the backgrounds by hand. Nowadays, the painting tasks are completed digitally on a computer using specialized software packages.
Cel Animation Process
If you want to use Cel Animation, you need to know how it is done. It can be a bit challenging for beginners to get it right as the learning curve is a bit steep. Make sure you understand the animation process and the steps involved to get better at it.
The Cel Animation process is time-consuming, expensive, and tedious. It involves a large team of people with specialized skills to complete cel animations. We have divided the meticulous process into three large parts:
1. Communicate the Idea
Everything starts with an idea! A good idea is a prerequisite for good cel animation. Here are the steps you need to follow to communicate the idea:
An animatic is designed to check if the film’s timing works.
After approval of the story and timing, artists create characters and backgrounds.
Actors lend their voices to the lines in the recording studio.
Animators lip-sync the characters using the vocal tracks.
The director creates a dope sheet using the animatic and soundtrack. The dope sheet contains the timing of the sounds, movements, and scenes.
2. Draw and Paint the Cels
Once the idea has been communicated, the real work begins. It is the lengthiest and most intricate part of the entire process. Drawing and painting the cels involves the following steps:
Lead animator creates rough sketches of a scene’s keyframes (extremes of action).
Assistant animator cleans up these rough images, creating in-between drawings if needed.
The rest of the action (between the extremes) is drawn on separate sheets. The number of drawings is determined from the dope sheet.
After all the drawings are completed, a crude animation is done using a pencil test to detect any missing lines.
After a successful pencil test, the cleanup artist traces the rough sketches to ensure frame-to-frame consistency of the lines.
The inker transfers the cleaned-up drawings to the cels.
Cels are transferred to the paint department; special background artists paint the backgrounds.
Painted action cels are placed in front of the background cels in the photographing process.
3. Film the Cels
The final part of the complicated process involves filming the cels. This is where all the action starts to take shape. It can be done in the following order:
The camera person gets all the inked and painted cels. The backgrounds with matching cels are photographed according to the dope sheet.
Synchronize and edit the vocal tracks, music, processed film, and soundtrack.
The final film is transferred to the lab, which makes a project print or puts it on video.
If you are using digital equipment, all of these steps can be done on the computer before publishing the film.
The Future of Cel Animation and 2D
Cel animation and other forms of 2D animation prima-facie have a somewhat uncertain future. Can you use these techniques for any of your future projects? Is it viable to rely on these processes in the dynamic and challenging digital environment today?
1. Cel Animation – A Thing of the Past?
Is Cel animation a thing of the past or can you use it today as well? You can very well use it, but we don’t see why you should. With more powerful digital tools at your disposal, going through the long and tiring cel animation process is not feasible.
If you don’t want to take our word for it, take a cue from Disney. The last Disney-produced film that used 100% cel animation was way back in 1988. With “The Little Mermaid” in 1989, Disney started using the Computer Animation Production System (CAPS). CAPS was an efficient tool to lower the animation costs without compromising on the quality.
Today, most of the animation projects undertaken by reputed studios like Disney are completed using dedicated software packages, allowing for higher productivity at lower costs. So traditional cel animation is a thing of the past with close to zero practical uses today, except for students who want to explore traditional animation techniques.
2. Is 2D losing out to 3D?
It is not only the materials of cel animation that have evolved over the years but also the scope of animation projects. The 2D era was nearing its end with the onset of the 21st century, as the world of animation reaped the perks of a 3D perspective.
It would be incorrect to say that 2D has no place in the animation industry today. While 3D has undoubtedly become vastly popular, you can still find a decent number of 2D animation projects.
Animators’ preferences are subjective – some still prefer drawing sketches by hand to digital software, some still prefer 2D to 3D animation. 2D animation may not be as widely used as it was before we got introduced to 3D, but it is still going strong.
Disney’s “Winnie The Pooh” in 2011 was their last 2D feature, meaning that they have switched to 3D for all their projects since then. Japanese award-winning Anime films still use 2D animation with no plans to venture into 3D animation soon.
Most of the children’s cartoons are still developed using 2D animation. We don’t see that changing to 3D anytime soon. So it is safe to say that 2D animation is here to stay and it is not losing out to 3D animation.
Summing It Up
An animated feature would typically need over 100,000 cels. Cel animation used to be the only technique animators could use in the 20th century. There are far better tools and software packages in an animator’s arsenal today. Cel animation can still be used for small-scale projects that are not created for commercial purposes.
It is a tradition that animators across the globe value and learn from to this day.
Although we use staircases every day, we know little to nothing about them. However, that is about to change. In this article, we will not only talk about the different staircase designs and the materials used to construct them, but we will also introduce you to the common terms used when talking about stairs.
We believe that after going through this article, you will have enough knowledge to decide which staircase suits your home the best.
So, are you ready to begin your Staircase 101 class and learn everything you need to know about stairs? Let us begin, then, shall we?
Common Staircase Terms
Although this section has almost every conceivable term relating to staircases, we are quite sure that most of you are already familiar with some of these. In that case, feel free to skip over to the ones you have not heard of.
Steps Of A Staircase
You can think of this as a single unit of the staircase. Each of these units is made of a tread and a riser.
Tread And Riser
The Tread is the part you step on. On the other hand, the riser is the vertical portion between two consecutive treads.
Since a picture is worth a thousand words; we will not give you boring definitions about Tread Depth and Riser Height. Just have a look at the image below if you are interested in these terms.
A Simple Illustration Demonstrating The Tread Depth and Riser Height
Nosing
Now, a nosing is a part that may or may not be present in a staircase. In fact, many staircases do not have even have this part. But, quite a few building codes make it mandatory to have stair nosings.
So, what exactly is a nosing? It is the part of the tread (if present) that protrudes over the riser beneath it.
Do nosings have any benefits? Yes, of course. They are a requirement for many buildings because of their anti-slip properties which help in increasing pedestrian safety.
A Flight Of Stairs
A continuous series of steps which are not interrupted by a landing or a platform is known as a flight of stairs.
Length Of Flights
The number of steps in a flight is its length. In case of commercial or assembly buildings, there is a requirement for the number of steps in a flight. It is limited to a maximum of 16 in a single flight.
Stringer Board Or Stringer
A stringer board or stringer is what provides support to the treads and risers of a standard staircase. In most cases, you will find three stringers. Two of the stringers will be on either side of the tread, while the last one is in the middle. If the treads are wider than usual, then more stringers are added as necessary.
Winders
In case of Winder Stairs, there are some steps which are wedge-shaped. These steps help in changing the direction of the staircase. Needless to say, Winder Staircases do not need a landing.
The stairs take a 90-degree turn in a Single Winder Staircase. On the other hand, it turns by 180 degrees in a Double Winder Staircase. We will cover more about these types of stairs in the next section.
Staircase Landing
A staircase landing is a flat area which separates two flights of stairs. In case of Straight Stairs, the landing is called Intermediate Landing. Staircases which bend can have a Quarter Landing (the angle between the consecutive flight of stairs is 90 degrees), or a Half Landing (the angle between the consecutive flight of stairs is 180 degrees).
While Quarter Landings and Half Landings are where the staircase changes direction, another benefit is offering a place to rest. This is especially useful if you are trying to move a heavy object up the stairs.
Balcony
In case of a staircase with an open landing or upper floor, that area is typically a balcony. If the balcony is long enough, it might need multiple newel posts to support the length of the railing.
If you are still unclear about the balcony of a staircase, take a look at the illustration below. The Arched Staircase flows up to a balcony on the first floor.
This type of stairs creates a mesmerizing floating effect. It seems as if the treads have nothing below them. In fact, floating staircases do not have risers. Moreover, they typically have a single stringer which provides support on one end of the tread. In some cases, there may be more than one stringer board present, but the number of stringers is always less compared to a standard staircase of the same width.
Some floating staircases entirely omit the handrails for an even more dramatic effect. Now, this impractical design philosophy cannot be implemented everywhere as building codes might not allow it.
Spandrel
When there is no other flight of stairs below, the triangular space underneath is known as the spandrel. This area can be used as a storage space as shown in the illustration below.
A Unique Storage Solution For The Spandrel
via nengen.club
Staircase Runner
Although a Staircase Runner is not a structural part of the staircase, it not only elevates the safety but also adds a touch of luxury. These runners are nothing but carpeting for the staircase.
While some runners are directly nailed or stapled to the steps, others might be securely held in place by a stair rod.
Distinguishing Staircases According To Design
In this section, we will talk about the various designs of staircases, ranging from Straight Stairs, Half Landing Stairs to Single Winder Stairs, Spiral Stairs and more. So, read along to find out everything you need to know about the different designs.
Staircases With A Straight Flight
Staircases with a straight flight – these are perhaps the most common form of staircases you will come across. They are the simplest to construct and can save you a fair amount of cash compared to the more complex staircase designs.
In this category, you will find the Standard Straight Stairs, Half Landing Stairs and, Quarter Landing Stairs. We will talk about them in a lot more detail.
When it comes to the construction, these types of staircases follow a simple rule – the number of treads must be less than 16 in a single straight flight of stairs. However, do not let its simple construction fool you. These staircases are extremely popular in modern, minimalistic homes.
Let us now find out more about the different types of staircases with a straight flight.
Types of Staircases With A Straight Flight
Straight Stairs
Now, this is the simplest form of Staircases with a straight flight. However, simplicity is not a bad thing. In fact, it is surely the most functional and convenient to use. Since there are no turns, it is simpler to carry heavy items up the staircase.
We have already mentioned that a single flight of stairs cannot exceed 16 treads. So, what if the next floor is at a height where it is not possible to create 16 treads without making each tread unnaturally large?
Sure, you can create a straight staircase with a quarter landing or half landing. But, what if you want to keep it absolutely straight, with no bends? Well, you can create an intermediate landing like the one featured in the illustration below.
Just like the rule for the number of the treads in a single flight of stairs, there is also a rule for the minimum depth of landing. And that should ideally be equal to the step length and the depth of a single tread.
Even if your plan does not require a landing, you should include one. It will surely make things even more practical and convenient.
Half Landing Stairs
Next up is the Half Landing Staircase. You must already be familiar with this type of stairs. These are most commonly found in apartment and tall office buildings.
In the previous case, the landing flowed along with the staircase. However, in this case, the landing changes the direction of the flight of stairs by 180 degrees. It is almost like taking a U-turn, albeit in the upward direction.
Although Half Landing Stairs are not as convenient as Straight Stairs, they save a lot of space. That is why they are the staircase of choice for buildings with multiple floors.
This staircase also has rules for the dimensions of the landing. And in this case, the depth of the landing must be longer than the whole tread width of a single flight of stairs.
Finally, we have Quarter Landing Stairs. Unlike its Half Landing counterpart, the landing changes the direction of the flight of stairs by 90 degrees. While they are not the staircase of choice for tall buildings, they make perfect sense in a house with two or three floors.
A Staircase With A Quarter Landing
via www.tolet.com
Compared to the Straight Stairs, they take up less space and are almost as convenient to use. In fact, they are more practical compared to a standard straight staircase without an intermediate landing.
Now, Quarter Landing Stairs do not have to be limited to a 90-degree shift. If you want it more akin to a Half Landing Staircase, you simply need to add another quarter landing. Just check the illustration below in case you are not familiar with Double Quarter Landing Stairs.
A Floating Staircase With A Double Quarter Landing
via www.houzz.co.uk
When it comes to the size of the landing, it is identical to that of the Half Landing Staircase. In other words, the depth of the landing must be longer than the whole width of the tread of a single flight of stairs.
Winder Stairs
Winder Stairs, as its name suggests, have a winding design. Instead of a landing, which breaks the flow in the case of straight stairs, Winding Staircases have wedge-shaped treads.
Hence, there is no need to construct a landing of any sort in this case. While the obvious downside is the convenience and practicality, this design concept surely has a few benefits.
For starters, it looks a lot cooler, wouldn’t you agree? Moreover, it saves space compared to a Straight Staircase. How, you ask? Well, the wedge-shaped treads are smaller compared to a standard landing. Moreover, since each of these treads rise vertically, you save even more space.
Sure, carrying heavy objects up the staircase will be quite tricky. But if the vertical climb is not much, it makes perfect sense. Another potential downside to Winder Stairs is the cost to build it. The more complicated the design, the more specialization it requires. And thus, a grandiose spiral staircase will be much costlier compared to its straight counterpart.
So, what are the different kinds of staircases which fall under this category? Winder or Winding Staircases generally comprise of Single Winder Stairs, Double Winder Stairs, Arched Stairs and last but not least, Spiral Stairs. We will cover all the different types in the next section.
Types of Winder Stairs
Single Winder Stairs
Single Winder Stairs are staircases where the angle between the first flight and second flight is 90 degrees. They are quite similar in construction to the Quarter Landing Stairs featured above.
In fact, the only difference is where the flight of stairs bifurcates. In case of the Single Winder Stairs, you have wedge-shaped treads, while the Quarter Landing Stairs has a landing.
When it comes to designing the staircase, it is better to have the winder treads in the beginning compared to the end. Why, you ask? Well, having the wedge-shaped treads earlier make it visible and thus make it more convenient to walk up, especially if you are moving a heavy object.
A Single Winder Staircase
via www.ebizbydesign.com
Double Winder Stairs
Next up is Double Winder Stairs. If you want to compare this to one of the Straight Staircases, then the Half Landing Stairs and Double Quarter Landing Stairs would be closest to its design, especially if you observe the top-down views.
Unlike the Single Winder Stairs, this staircase has a 180-degree turn. Moreover, they are more compact than the former.
Double Winder Stairs can be divided into two categories - one with a smoother passage of winder treads from turn to turn and another with a more abrupt passage. Of the two, the staircase with the smoother passage is surely the more convenient to use.
As its name suggests, the flight of these stairs resembles an arch. These staircases exude a premium feel, and you will find them in many high-end homes. Just take a look at the illustration below. These Arched Double Stairs look stunning, don’t they?
When compared to the Winder Stairs featured earlier, these do not have any straight treads. Instead, all the treads are wedge-shaped. However, none of the treads taper as much as the ones found at the junction of a Single or Double Winder Stairs.
Needless to say, these types of staircases are really complicated to build and can only be done by experts. All the basic details of Arched Stairs are curved. That makes the construction not only tedious but also quite costly. Then again, that is the price you pay for opulence.
Spiral Stairs
Among all the different staircase designs, Spiral Stairs are surely the most photogenic. Don’t believe us? Just take a look at the illustration below. It looks stupendous, doesn’t it?
Top Down View Of A Surreal Spiral Staircase
via boredpanda.com
Unlike Arched Staircases, which are usually found in high-end homes, spiral staircases can be both simple and luxurious.
Small Spiral Staircases have a central vertical post like the one featured in the image below. This vertical post acts as a support for all the treads in the flight. If you observe the treads of a spiral staircase closely, you will notice that all of them, except for the last one, are wedge-shaped and uniform in size.
A Simple Spiral Staircase With A Central Vertical Post
via www.britishsc.co.uk
Spiral staircases cannot be ascended or descended as quickly as a traditional staircase due to the corkscrew design. Additionally, the space-saving structure often doesn't pair well with larger spaces or more traditional décor.
Compact Stairs
Compact Stairs are built with one thing in mind – minimizing space. These staircases are most commonly found in tiny homes where saving space is of utmost importance.
A Space Saving Staircase
Source Unknown
Although these stairs save a lot of space, they sacrifice convenience and practicality. They are quite hard to climb and surely not suited for old people. Moreover, it is almost impossible to go up while carrying heavy items.
Some of these compact staircases have unique treads like the ones featured in the illustration below. The treads you see here are known as “goose steps.”
A Compact Staircase With Goose Steps
via staircasedesign.xyz
Building Materials For Stairs
In this section, we will focus on the various materials which are commonly used to construct staircases. While some of these materials lean towards practicality and durability, others are more aesthetically pleasing.
So, which of these materials will be perfect for your staircase? Read along to find out.
Wood
Although wood is not a popular choice of material in tall buildings, it is still one of the most traditional and affordable staircase materials in private homes.
Now, do not be fooled by the affordability aspect of wood. In fact, some high-end, luxurious homes sport wooden staircases made with opulent materials. Just take a look at the illustration below. It looks absolutely stunning, doesn’t it?
A Luxurious Arched Wooden Staircase
Concrete
When it comes to practicality and versatility, concrete reigns supreme. Concrete staircases can be installed quickly and are durable enough to last a lifetime. Moreover, it can be easily shaped to your desire. In other words, it is quite easy to make a complicated arched or spiral staircase using concrete.
However, concrete alone looks quite mundane. But once it is plastered and topped off with premium materials like stone or granite, it will surely be fit for any luxurious home. Just take a look at the illustration below. The concrete staircase topped off with marble treads looks mesmerizing, doesn’t it?
A Luxurious Concrete Staircase With White Marble Treads
via pinimg.com
Glass
Nowadays, many modern homes and commercial spaces use glass staircases to create a contemporary vibe. And thus, glass has gained a lot of popularity, especially in the 21st century.
Some of you might still feel that glass is not a sturdy material. However, that is not entirely true. Sure, some forms of glasses can be quite brittle, but new varieties of glass have emerged that are easily capable of holding a large amount of weight.
The main downside of having a glass staircase is the maintenance cost. A single day of use can ruin the appearance, and thus, it must constantly be cleaned to keep it in tip-top condition.
A Modern Glass Staircase With Stainless Steel Railings
Source Unknown
Metal
Although not a popular choice for commercial building interiors, metal staircases are often used in private homes. While they are robust and durable, metal stairs do not age well if they are not properly maintained.
While metal offers quite a bit of flexibility when it comes to the design, the cost can easily shoot up depending on the complexity. Thankfully, metal stair components can be readily purchased for a low price. However, going down that route means that you do not get many options when it comes to the design.
A Contemporary Spiral Metal Staircase
via makaan.com
That brings our Staircase 101 class to an end. Whether you are an expert builder, aspiring architect or someone looking to remodel your home, we hope that this article has helped you in one way or another.
If you have any suggestions, do let us know in the comment section below. We would love to hear from you.
While both pumps are designed to move water, they are not interchangeable and have different functions, which is why one cannot generally use a utility pump as a sump pump.
Do you have utility pumpsin the house? A lot of people do but don't know much about its functions.
If you are using a mechanism to pump water or using a garden hose to water plants, then they could have a utility pump attached. Also, these pumps are used to prevent flooding and check the water flow at a construction site.
Here, we're going to discuss if using a utility pump as a sump pump is a viable option.
What Is A Utility Pump?
A utility pump is a device that is used to transfer water from one location to another. You can put it to use in multiple watering applications, such as watering your lawn or garden, and draining water from the pool or bathroom. It can further help in removing standing water from construction sites, pumping water out of the swimming pool and clogged sinks, and so on.
Utility pumps come in a wide variety of designs, each with its own set of pros and cons. And if you want to learn more aboutwho makes utility pumps and if they are a good choice, then check out my other blogs.
What Is A Sump Pump?
It is a device that is used to remove water, collecting in a sump basin. These are installed in low-lying areas and spaces with drainage issues. It is used to keep the basement dry or pull water from the crawl space that has accumulated around the foundation of a house. The pump is usually powered by electricity but can also be solar-powered.
There are two types of sump pumps: submersible sump pumps and surface pumps. Submersible pumps are designed to operate while submerged in the water, while surface-mounted pumps are not.
The float switches are usually mounted inside the sump pit, and it rises and falls with the water level. As the water level rises, the float switch activates the pump, which then pumps water out of the pit and away from home.
Difference Between Sump Pumps And Utility Pumps
Most people don't know the difference between a utility pump and a sump pump, but it's actually quite important.
In the event of floods, a submersible pump is an invaluable tool. But if you don't need that level of safety, a simple utility pump will do the trick. It's more practical and cost-effective than a sump pump, and it can solve any water-related issue.
The typical location for a sump pump is at the basement level or sump pits, while utility pumps are often placed strategically around the exterior of a building. Typically, sump pumps will cover a larger area and be more dependable than utility pumps.
In most cases, utility pumps can save you money and energy over sump pumps.
Further, a sump pump isn't always the best option when you have a leaky roof. A sump pit with walls higher than 20 feet can be too tall for utility pumps. Also, finding and installing a sump pump to avoid basement flooding can be challenging.
Moving on, DIY home renovations and new buildings can both benefit from the low price of a utility pump. In addition to being necessary when putting in a well or a pool, sump pumps are a great addition to any home improvement project.
When Should You Use A Submersible Utility Pumps Instead Of A Sump Pump?
Most utility pumps can be used as a discharge pipe and for a variety of purposes, including draining swimming pools, removing water from basements, crawl spaces and irrigating gardens.
Utility transfer pumps can be a great alternative to a sump pump in some situations. These pumps are typically less expensive than most sump pumps. They can be used around the home where additional water pressure is needed, making them versatile tools to have on hand.
Warning
Make sure that the utility pump you select is designed to handle the job. Some utility pumps are not meant for sump applications and could be damaged if used incorrectly.
Utility Pump As A Sump Pump Final Thoughts
Many utility pumps can come in handy for a variety of tasks around your home, but they should not be used as a replacement for a sump pump. And remember because utility pumps are not typically waterproof, be sure to use a sump seal or other means of protection to prevent leaks.
I hope this article has been helpful in informing you about the importance of installing a sump pump in your home. Also, know more about utility pumps and are utility pumps fish safe by checking more of my interesting reads.
Until next time!
Joyful summer décor awaits you. Aromatic scents and thousands of colors are at your disposal in this cheerful cozy season ready to delight you and your guests wherever you are. With this happy though in mind we are sharing underneath 12 mesmerizing beautiful and fresh summer table decoration ideas that are able to transform a festive entertaining into a memorable dinning experience.
Whether it is a special occasion or a simple launch in the summer you have the opportunity to experiment with floral arrangements and naturalness. Use simple elements from your household in the arrangement and seek inspiration in nature where, design with organic elements resides and do your best to emphasize and embrace greenery .
Summer Table Decoration Ideas
#1 Barn Background With Impeccable Teal Pink and White Stripes
#8 Dine Between Vine Rows in Breathtaking Scents and Lush Greenery
#9 Yellow and Blue Dinner Table Setting Idea With Small Flowers
#10 Flowers in Colorful Centerpiece Nestled in Natural Setting
#11 Small Wooden Box Doubling as a Centerpiece in Beautiful Table Setting
#12 Transparent Airy Table Setting Beautified Through Teal
Table settings are a highly particular and highly personal decoration that few pay attention to despite their monumental importance in festive dinning. We would love to hear in the comment section below how do you organize your table setting.
Have you been redecorating recently? If you have installed new affordable windows and replaced your old window shutters with better ones, then you have plenty of material for lots of DIY projects. Here I'm going to show you How To Repurpose Window Shutters In Your Home in some pretty awesome ways. Your only limit is creativity as you will soon see the window shutters can be turned into furniture pieces with ease. DIY enthusiasts and amateurs can make wonders with these pieces as they`re super graphic all on their own, cast a glance in the gallery that follows and surge inspiration.
Make a closet by using only 6 window shutters
Add a few shelves and you are good to go, a super shabby chic dresser has been created !
use the old window shutters to create new bookcase for your living room
the window shutters can be easily repurposed and turned into barn doors
add the shutter in the bathroom and use it as a toilet holder
A really simple and inexpensive project that will surely turn heads. Shabby chic at home.
These DIY crafts are really unique don`t you think ? We invite you to use your imagination and creativity and reinterpret these with new, interesting methods of re-purposing window shutters at home !
Whether you are an artisan, a creative individual that loves DIY projects or you simply recycle and creatively repurpose some old objects from time to time, you ought always to seek inspiration. Creativity has deep roots in experiences and memory and with this thought in mind we are trying to serve and feed your imagination, fuel your creativity. Ahead are lying 10 creative examples of household items repurposed; we found them useful and hope you will too.
1. Door Repurposed Into a Temporary Coffee Table
Teal Door Transformed Into a Quite Large Temporary Coffee Table
image via phantasticphinds.org
2. Old Boxes Used as Shelves
Simple, Classic and Widely Used The Wooden Boxes are Evoking a Rustic Vibe
image via bomeng.org
3. Eclectic Shelve Ensemble Obtained Throughout Creativity
Eclectic Shelve Ensemble Obtained Through Creativity
Elegant Dining Table on a Farm Shaped Out of An Old Door
image via phantasticphinds.ro
10.Door Coat Hangers
White Door Transformed Into a Coat Rack With a Rustic Scandinavian Look
image via phantasticphinds.blogspot.ro
If you’ve been following the game development scene of late, you’ll notice that the community is hyping up pixel art - a nostalgic throwback to the games developed between ‘80s to mid ‘90s.
However, the fact that the graphics follow this design pattern does not mean that the effort or realism takes a step back. Hence, you’ll need a total understanding to have the best of both worlds.
Aseprite comes into the picture here as it satisfies all the requirements - it gives you a wonderful way to blend the nostalgic artistry of pixel art with the graphic design and animation tools that we have today. Without further ado - let’s begin with our reviews of the best Aseprite tutorials on the market today!
The tutorial starts directly with action, rendering a pixel sphere step by step, an absolute godsend when you want to add complex shading effects to your characters, objects, scenes etc. With this tutorial, you get to know in depth about how shading can add another dimension to your art and game scenery.
The tutorial uses a simple colored approach render the classic sphere and adds a dimension to it just like that - teaching you shading mechanisms used to add depth and texture to a simple ball.
Congratulations on deciding to get started with Aeseprite - it's one of the best decisions you will take when it comes to working with pixel art. However, since there are practically tones of tutorials out there, you should be aware of the fact that most of them are either too trivial to qualify as tutorials, or too complex to understand by the absolute beginner.
Hence, it only makes sense that a tutorial which slots in somewhere in the middle would be the most recommended - and that is exactly the case with this tutorial. MortMort gives you enough background to understand what’s going on, but also has you going with making your own art in the form of layers. You will learn to break complex characters into simpler figures.
Further, it isn’t exactly in the middle, in that MortMort provides some information about the complexity Aseprite can handle, so you’re prepared to make your own designs in no time. Tons of examples, comprehensive review of the tools, and a direct comparison with Photoshop (which is the most popular tool here) - what else does a beginner need?
Sprite sheets is an amazing concept which completely transforms the depth and breadth of capabilities which Asepbrite has, since Asepbrite has pulled off making an intuitive and easy method by which you can integrate Sprite Sheets into your art. This tutorial by ETOSurvival helps you through integrating Sprite Sheets into your own work in a very easy manner.
The primary example taken by ETOSurvival throughout the tutorial is creating a four-dimensional cycle of the walking path of a certain character. The combination of all graphics onto one single image makes organizing all the game contents much simpler and reduces the file size of the game - it works as a handy compression technique!
One of the top tricks suggested by ETOSurvival is that you can make changes to a character on the move by editing the sprite sheet and hence saving the edited file. This reduces the overhead of having to manually update the character as it moves in animations all through the length of the game.
MortMort is a truly prolific creator of tutorials for people who want to pursue game design or pixel-based art, and hence another of his tutorials finds its way in this list. However, this tutorial is definitely not beginner-oriented - this tutorial is all about upping the bar by using the brush tool in the same way that professionals do it.
After the tutorial ends, you will have advanced knowledge of how to accelerate your working methods, but ensuring that your art comes out looking as publish-ready as it can be at the same time. The first thing you learn is tile painting - which is a wonderful technique, and the use of it depends all on you - the more you experiment, the more you’ll learn.
Next up, you see the ink settings covered in some detail, which is great because it’s one of those things about Aseprite which take some time to master. The real use of ink settings comes into the picture when you want to add shade to sprite sheets, or create textures which have subtle gradients or blending of colors going on in the artwork.
If you’ve gotten the hang of the tutorials above and feel comfortable in designing somewhat realistic objects, you should now move on to designing characters and animating them as well. This is perhaps one of the most important and difficult parts of designing a video game. Good characters improve the overall impression of the game, regardless of the complexity.
With this tutorial, you will learn how to design and implement an entire character on a 32x32 pixel canvas. You will be going through a number of basic techniques, wherein you will first design a silhouette and then move on to adding details to the character - typically, this is where beginners end up wasting a lot of their time.
This tutorial borrows a lot of basic concepts from what is taught in art school, specifically considering figure drawing wherein charcoal outlines are drawn first before filling in the details.
MortMort is back at it again. This time, he goes into some depth about the importance of anti-aliasing, which is a crucial part of designing any video game. However problematic and difficult it may appear at first sight, MortMort does a brilliant job of getting down to brass tacks and explaining the process of anti-aliasing and how to integrate it within your work.
Your work will only seem like it’s “in” the screen so long as you don’t apply anti-aliasing. To add that extra level of realism, it’s crucial to understand how graphics work, and how you can use them to your advantage, making your artwork seem truly realistic. Here, you understand the value of each and every pixel - anti-aliasing causes smoothing of jagged lines.
This smoothing effect translates into the illusion of a form, which is then responsible for the appearance of another dimension (i.e. depth) to otherwise two-dimensional images. It is not easy to master this topic, however, if done right - it can translate your game art/pixel art to the next level. MortMort also showcases a number of best practices for sprites in the tutorial!
Sadface_RL may not be the most popular pixel art tutorial channel on YouTube, but this tutorial is surely one of the most important ones out there when it comes to pixel art. It touches upon the subject of tiling, which is extremely important in the context of creating ground/background images.
Fun fact: the usage of tiles began as an effort to produce a number of background images while using very little computer memory. Computer memory is no longer a problem, but at the same time, this particular technique has remained a part of many pixel artists’ toolkit. There are a few rules with tiles, such as perfect wrapping in both directions.
Aseprite has a number of options you can configure to make tiling easy, and following the tutorial will teach you exactly what to do. Duplicating certain images vertically or horizontally is one good way to start - using the Tile Mode option on Aseprite makes tiling intuitive and effective.
TutsByKai’s tutorial on how to employ the tile mode methods you’ve learned above will help you understand how to create a stony texture using Aseprite. The Tiled Mode can help you create much more realistic textures and scenes in very little time, and also saving the computer a fair bit of memory when it comes to high-density scenery.
The basic premise in play here is that you need to learn how to create backgrounds using Aseprite’s Tiled Mode. Hence, the best way forward is to start with a basic sketch of the stones, while making sure that the design fits the entire area of the grid - and there’s no problem if the design goes out the edges.
You will generally see pixel artists and game designers speak of hiding the grid behind. This “hiding the grid” business is nothing but making the seams of the tiles disappear so the image appears as one coherent whole. You should mold the shading as per the location of the light source where the highlights are right above the shadows which have darkest colors.
TutsByKai appears on the list again, but this time, he brings something completely different to the table - a concise yet effective method to draw a wonderful little pixel house. Aseprite doesn’t make it particularly difficult to come up with methods for drawing objects, but watching this tutorial will give you certain insights which you won’t find anywhere else.
The end game here is to be able to draw objects quickly and with a reasonable level of accuracy as well. The method itself is not that complicated too: you start with the basic structural outline of the exterior, first drawing the roof and then moving on to completing a basic outline of the entire house.
Then, the next step us to draw up the doors, which should be followed by the windows. The details are to be dealt with next - details such as roof tiling, embellishments to the windows, etc. Texture expansion is best achieved by copy-pasting and operations such as rotation and flipping all done in conjunction - mastering this will save you a fair bit of time!
HeartBeast appears on our list for the first time, but the tutorial itself will teach you loads in one, decently-sized tutorial. Run cycles are an important part of any animator’s toolkit, and in Aseprite you have full opportunity of using these run cycles to the fullest extent possible. Working in pixels makes run cycles a bit more important, too.
An animation which actually has the “look and feel” of something having components in motion only need 8 frames, whether you believe it or not. This is made abundantly clear by HeartBeast while going over the basics of the 8-frame run. There are a number of things you can learn from the tutorial, from the way the ground is designed to the motions of objects.
Run cycles can be understood as basic units of an animation - they can easily be used to add a number of personality traits and quirky expressions to all the characters you have. The ground staying constant all through the cycle is one other important takeaway - watch the tutorial to know more.
If you’ve gained enough experience in working with all the tools and techniques which have been reviewed above, JebbyGD will show you how to change gears towards the next phase of design and development in Aseprite. There are tons of options in the toolbar, and this video mainly serves as an introduction to all of these options.
Changing colors and sprite sizes of objects and characters is a breeze with Aseprite - you wouldn’t have known this before unless you did a fine job playing around with all the tools. In terms of what else you can alter, the options are almost endless - from color curves on the pixels to creating your own custom brushes on the go.
You can also generate text very quickly with the help of a few options - check this tutorial out once you know you’re comfortable with all of the previous tutorials.
For those long-time, Digimon and Pokemon fans DYA Games brings an Aseprite tutorial video where they create the Charmander sprite and then animates it.
However, this is not a complete tutorial in some respects as it’s a time-lapse video, to begin with, and has no voice-overs where the creator explains every single step that he/she takes.
But, the video is pretty easy to follow nonetheless, and it can be the perfect introductory video for beginner Aseprite users as well, to show them all the various things that you can do with the platform with just a bit of practice.
The video also goes into showing certain Aseprite tools and techniques like onion skinning as well as anti-aliasing, which helps to get smoother edges and cleaner animations. DYA Games creates Charmander from out of a silhouette and goes on to show every single step that one needs to follow to get the result just right.
Making clouds or even some fancy cigarette smoke animation is perhaps one of the primary steps that a beginner needs to get the hang of making, before venturing further into more advanced animations.
Making some accurate smoke animations can indeed add that little bit of extra spark to your work.
And this tutorial from TutsByKai will help you to create your very own smoke for either a chimney, a campfire or some other form of magical art.
In terms of an RPG, necromancers and fire sorcerers can be equipped with some smoke animation to create a sort of a menacing allure about them and allow the player to remain thoroughly engaged to the character’s progression in the story.
The tutorial shows a very interesting method where the animator uses onion skinning to create motion between frames.
It teaches that starting with simple shapes when the animation process is always the best, as it will allow you to get used to the method and help you experiment with all the available tools.
This is another amazing and yet beginner-friendly Aseprite tutorial video from TutsByKai where the creator shows one in great detail how to go about making a pixel art house using the various features of the platform.
Now, routine and practice are important when it comes to mastering certain aspects of this designing platform. And those are precisely the things that TutsByKai stresses on in the video.
By showing a few designing methods and procedures which you need to incorporate into your routine, the creator goes on to suggest that once you get the hang of them, making pixel art houses will be a cakewalk.
The video starts by making an outline of the roof and then drawing the skeletal body of the house. It then follows up by putting in the doors and windows before moving onto the details such as the roof tiles and window trimmings.
Bringing It All Together
Today, you’ve seen how to go from zero to hero in pixel art/videogame design by using Aseprite, which is one of the easiest and most intuitive design tools there are. Especially when you consider 8-bit art, there are very few tools which help you explore this new art form. Once you get started, you’ll know just how easy it is to make wonderful art with it!
Hope you enjoyed reading about these tutorials - now go and watch these, and get started with learning this new semi-retro art form. Have fun creating!
Today's society has placed women among men an equals, leading successful businesses, taking take of their families and home. But we are the more delicate, needy and prone to stress and over-exhaustion so we deserve to have a small piece of heaven in our bedrooms through design and a general serene atmosphere meant to relieve stress and relax our bodies and minds.
Designing a women's room is a very complex task. The possibilities are endless and multiple combinations generate different possibilities of the same idea.Today we have inclined towards a calm, floral fresh design line where small accents do count and change the hole ensemble. A touch of pink,a shade of silver or gold, a glass flower vase filled with wonderful roses and delicate white string light pendants will absolutely transform your bedroom into an oasis of relaxation and serenity. We invite you to browse though the 14 Lovely Girly DIY Room Decor Ideas gallery below and to leave your valuable feedback in the comment section placed at the end of the article.
1.String pendants in a delicate composition
2. Fun accents like a chalkboard used as an ever-changing painting
3. Your valuable fashion accessories exposed
4. Elegant composition that adds femininity to your interior design
5. Choose wisely where exactly to add pops of color
6. Flowers and glass is a wonderful must combination
How does your perfect refuge look like? We would love to hear your opinion on this subject in the comment section below.
Leaf by leaf flower by flower we sculpt the ambient in which we reside, the backyard and sanctuary in which we seek peace and calm. In your backyard you are the architect and the design handling nature in all its beauty to a state of equilibrium. Countless possible and infinite combinations cannot be defined nor followed as recipe towards a beautiful garden, seek inspiration and start planting, it will be one of the most rewardful activities you will ever do.
Cast a glance at the beautiful and attractive gardening design ideas showcased below and surge inspiration from the wonderful greenery setups tailored. We would love to hear your opinion in the comment section below.
Fairy Tale Gardening Design Ideas
#1 Beautiful Iron Forged Decoration Sheltering Three Different Planters
#15 Multiple Planters Nestling an Entire Bonsai Farm
Beautiful and attractive gardening ideas are born from creativity and experience more than anything else. The items surroundings are opening up endless possibilities for the creative mind; think twice before throwing something away and always donate or reuse the items that you`re no longer using.
Free painting softwares are the bread and butter for a lot of the professional digital painters out there.
From Photoshop to Corel Draw to the FireAlpaca, there are a lot of easy to use applications that help artists digitize their inspirations and concepts amazingly well.
However, out of all of them, Krita is the one that has been growing in popularity off-late.
And though the software is incredibly versatile and user-friendly, there are some aspects of its features which tend to have a strict learning curve.
A lot of beginners and even some professionals do struggle here, and this is precisely where video tutorials come in clutch.
The guides that we have listed out for you today are incredible, to say the least, and will help you grasp the various facets of Krita in no time at all.
For a lot of the digital painting beginners, when it comes to Krita tutorials, the more detailed the lessons, the better. And in our experience, we are yet to find a more immersive guide than what Phil Waclawski provides in his Krita Basics.
A professor as well as a master of the Linux OS, Phil Waclawski in this hour-long guide (more like a presentation in front of the ‘Phoenix Linux Users Group’) talks about the various advantages and functions of Krita.
As Krita is primarily a Linux based software (one of the very few painting apps that work outside Mac and Windows) not many artists are all that familiar with it, and neither with the OS.
So, even if you’re not all that used to Linux, you can still learn a lot about the Krita applications as Phil Waclawski provides a very thorough guide on it.
He covers almost everything about the Krita from brushes, to strokes, to color management as well as providing a short tutorial on how to create and manage open documents.
However, the presentation doesn’t just cover Krita, but also digital painting in general. It’s an amazing tutorial for budding artists, especially for those who are familiar with Linux.
There is a very popular YouTube channel called Mart’s Struggle with Drawing, which primarily deals with making easy to follow and interactive tutorial videos on digital painting for beginner and amateur artists.
Learning a new painting software from scratch is never as easy as it sounds. From learning how to use the new brush features, as well as the coloring and the stroke textures, a lot of time goes behind just familiarising oneself with the basics.
And when it comes to brushes, digital painting is absolutely pointless without the right kind. Hence, to help out the beginners with their brush struggles, this youtube channel has created a 10-minute long video on all the Krita basics and brush applications.
However, one amazing aspect of this tutorial is that it doesn’t cater to beginners alone. There are certain facets of it, which can be very appealing to a lot of the adept users and artists.
So, even if you’re familiar with or rather proficient with the Krita painting software, there are few new things that you can pick up from this tutorial.
Image special effects and layering are perhaps one of the hardest features to grasp on any digital painting software.
Now, Photoshop’s layer panel was not only the most-used feature but also the bread and butter for a lot of the professional graphic designers and artists out there. Being able to create a lot of effects while either editing a particular photo or painting an illustration is essential for any commissioned art job.
Krita has its own versatile, and fantastic range of layering and effects features as well. And this tutorial video from GDquest will help both the amateur and professional get up to speed with Krita’s layering tools and applications.
And though the video is just 6 minutes long, it’s incredibly detailed and will be able to help you to work through the material considerably fast. It will also provide you with an idea on the complete concept of layering and which kind of combinations will bring about the desired effect.
For intricate and detailed art pieces learning how to accurately layer on effects is vital in achieving the desired results. And the sooner you learn the basics of layering, the faster you can pick up Krita.
This is another amazing Krita tutorial video for beginners. This ‘how to get started’ guide is kind of like a personalized lesson from the YouTuber who makes this otherwise complicated drawing software look and feel as easy to use and as user-friendly as possible.
She will teach you every single basic of Krita and help you dive into it right away and inspire you to experiment with the brushes and strokes and help you to learn them the more you use them.
However, experimenting with brush strokes are one thing, and having complete control over the application is another. The next phase of Jenna’s video is on how to get a complete grasp of Krita and its various applications.
From helping you to learn how to create documents to managing your brushes and alter the layering settings along with the opacity, her tutorial covers a lot and teaches them rather effectively.
The video is 15 minutes long but does an amazing job in instilling the right amount of inspiration within all budding artists.
Additionally, do keep in mind that even though her video is on the Windows-based Krita, the lessons are applicable to all platforms.
Human anatomical features, especially the human hair, is one of the hardest things to accurately represent on any digital painting software.
This fact is also true for Krita, and this is precisely where this tutorial from Johnnybevo comes in.
The video deals with certain tricks one can use and the basic concept behind representing human hair digitally. One such amazing trick is to not look at human hair as individual strands but more as a complete object.
However, even if you’re considering it to be a single object, the final representation should not look bland. It must feel realistic, and that is one of the things that Johnnybevo tackles in this video.
The tutorial will help you gain a complete grasp of the different layering and special effect tools that will help you make hair, which is incredibly detailed and aesthetically pleasing.
The 18-minute long step by step guidance will get you up and going at trying your hand at representing this human anatomy as accurately as possible.
Digital work on such genres are a bit different than the rest of the subjects out there. So, if you ever feel like getting into drawing the human anatomy, this tutorial is a must watch.
Now, looking at Douglas Lopes’ channel and some of his more popular videos, not many will be able to readily believe the fact that he is quite new to graphic designing.
With just a few software tips and tricks, Douglas is able to conjure up some of the most intricately designed and detailed game assets and stock images which can capture anyone’s attention in an instant.
There are a lot of such tutorial videos on his channel; however, this 25-minute long guide is the one which we absolutely adore.
This video shows him painting a rock from scratch which has a kind of a sigil inscribed atop it. Such stock imagery is important when it comes to creating the perfect aesthetic element for RPG games, which has a somewhat medieval and fantasy setting.
The Witcher, Divinity, Dragon Age, etc., all these games depend on such stock accessories to help provide the gamer with an incredibly immersive experience.
Douglas in the video does the complete designing in Krita and explains the entire method of creation from using the toolbars to the brush settings and stroke modes to make it as easy to understand as possible.
This video from Mart’s Struggle with Drawing is just amazing when it comes to teaching one how to effectively deal with the various documents once scanned onto Krita.
A lot of beginners don’t know this, but Krita is an amazing platform where you can import your scanned drawing and very easily digitize them, with the help of the various toolkits.
However, one problem many users have is that after they get their art scanned, they often don’t know what to do next, and which necessary steps to follow to perfectly digitize their work. And this is precisely where this video guide comes in.
It charts out a detailed guide for those who still don’t have the hang of using Krita and creating artworks there from scratch.
Mart in the video will teach you how to efficiently work on top of a scanned drawing. The video is very detailed for a 6-minute tutorial, where he will also be showing you how to use this line of work as a sort of a template.
This type of digital painting can come handy for those who still prefer traditional painting over digital.
This video tutorial is more for the adept Krita users who already have a solid grasp on making art images on Krita and want to try their hand in animation.
For those of you who didn’t know, Krita isn’t just a simple painting program; it supports a lot of 2D animation making features which you can utilize to really show off your skills.
When you first learn to animate something, it’s always best to start with something that is very simple.
The YouTuber in this video shows a very easy animation, which is honestly not all that hard to replicate. In this 22 minute long video, he goes onto animate a ball and goes through the entire process of it in an easy to follow manner.
So, all he does in the animation is to make the ball bounce a couple of times. And across the entire guide, he will teach you not only the entire formatting process but also how to start a new document and create frames as well as the position along the way.
The resulting bounce motion is actually very smooth, and you will have the opportunity to learn a lot from this very simple guide.
Making a self-portrait is honestly a very fun activity, and there are many digital painters out there who try to make a digitized copy of their face for recreational purposes.
So, when it comes to learning how to make a graphic painting of your face, this video from Sycra does more than just cover all the basics.
Sycra has been publishing Krita based digital painting tutorials for some time now, and in this guide, he goes over some fun and exciting ways to make a self-portrait from scratch.
However, the video is not as detailed as one might like it to be. Sycra doesn’t show the step by step process of the painting method, but he does explain all the methods along the way and talks about everything that he is doing.
And as the video is in real time and narrated, you can indeed learn a lot from it. The tutorial is also very easy to follow, but you will have to practice all the steps on your own and experiment with the techniques which he shows so that you can make the most out of what he is trying to teach you.
Blending modes is another fantastic feature in Krita that will allow you to do a lot of cool and unique things to make your art stand out from the rest of the crowd.
Often times, when people hear the word ‘blending’ and ‘digital art’ in close succession, they think of Photoshop and photo editing.
What they don’t realize is that with certain blending modes artists can do a whole lot more than edit a particular image. However, learning how to blend accurately is not all that easy a task, and for that very reason, GDQuest has a guide which teaches blending from scratch.
The 12-minute video shows that if you’re feeling adventurous with your art, you can do so much with Krita blending and make something very unique and spectacular.
Blending might not be ideal for everyday use; however, the basics that GDquest goes over is easy to grasp and implement, and it’s a skill we believe would be helpful in the long run.
There are certain real-world scenario sketches that would look just magnificent with the perfect amount of blending.
Not all digital painting software will help you make a comic book page as easily or even as effectively as Krita would.
So, if you want to start your very own webtoon series or even a manga for that matter on Krita, then this tutorial video from David Reboy will help you get started on the right foot.
David, in this video, creates a full comic book page from scratch. This video is amazingly detailed as well: it’s about 2 hours long, and he goes over every single facet of what he does in great detail.
However, he provides no narratives with the video, and though there are written texts, he does speed up certain parts of the video to make it shorter and much more engaging.
Even with the lack of the narrative and the sped up parts, the video is not going to be all that difficult for anyone to follow. You can very easily follow David’s process and try and mimic what he is trying to do and customize the workflow and the various brush settings to your liking.
Not many Krita tutorial videos will be able to teach you the basic software fundamentals as effectively as this one from LearningByDoodling.
Hence, in that respect, this guide is quite unique and will help you to draw perfect shapes such as squares and circles very easily.
Drawing, solid, and uniform shapes on Krita can be rather difficult without the proper ‘tools and feature’ know how.
Sure, drawing such shapes are a piece of cake with a pencil and paper, but on a digital platform, it’s a completely different ball game altogether.
So if you’re looking to get into some serious digital designing, then this video is going to be able to help you out the most. It will show you not only to create perspective grids on the software, but also to sketch out incredibly accurate shapes in near-perfect perspective.
A 20-minute long video for drawing a box might seem rather excessive to many, but to us, it just goes to show how in depth the creator has gone to help out his audience the best he can.
The video talks extensively about the importance of perspectives and shapes, and how best one can go about representing them.
This is a very helpful time-lapse video from Griatch, which is just amazing in helping out both amateurs and professionals in getting a complete grasp over the coloring formats of Krita.
Accurately representing the colors of human anatomy such as skin and hair, and making them look realistic on the digital platform can be a rather complicated task to achieve.
And learning to finish a particular drawing, with the right coloring and blends is one of the toughest things for beginner artists.
This time-lapse video doesn’t particularly have a narrative or a detailed description per se; however, you learn the methods by watching and trying to mimic the movements. It will allow you to have a thorough grasp of the various tool choices and learn how to perfectly mix colors for skin tones.
But, if you’re looking for a guide that comes with a narrative, this video will not be able to serve your needs at all. But we still think that you should give it a watch, because the methods are really very easy to follow, and can help provide your art pieces with the much-needed finesse that can capture anyone’s attention.
Here is another brush tutorial, but this time it’s by GDquest, and it primarily deals with mixing colors with brushes.
Every digital painting software works a bit differently, especially when it comes to mixing colors. Now, Krita has a lot of ways by which you can mix colors to get the desired shade, and this is precisely why it is so very versatile.
Once you get it down to the workflow and get used to the customizing options, mixing paint with brushes in Krita is as easy as it gets.
But learning how to do it can take a considerable amount of time; however, this detailed tutorial guide will help you to grasp the concepts faster, and inspire you to experiment with the colors and mix them whichever way you want.
The entire video may not be useful to you, as it does deal with the complete coloring method in general and you may need to just discard away the things you will not be working with.
This tutorial by Sara tepes is a really fun and engaging introductory video to this amazing digital designing platform.
It offers a very brief yeat a surprisingly detailed introduction to Krita, with small explanatory lessons on how the various tools work.
In just 12 minutes the video covers a lot about the platform and can be an excellent follow up guide to those who just got into Krita and trying their hand out at some of its features.
And since you get through this tutorial fast and quick, you can then immediately get to pinpoint some areas of the GUI you have problems grasping and need to lay more emphasis on.
With so many videos on Krita, one might honestly be surprised to know that GDquest is not a Krita only community or channel.
They have a lot of videos on several platforms like FireAlpaca, 3ds Max, Krita, etc. And this 7 minute long video on how to learn painting in Krita is one of the many gems that’s present on their channel and website.
The video shows, how to start a digital painting on the software. It teaches the use of the several Krita brush tools , along with how to swap out colors fast and effectively.
It will all help you learn how to flesh out your ideas immediately or even when traveling, as Krita is a very flexible program and has a variety of user-friendly features which any beginner can take advantage of.
David Revoy simplifies the whole process and concept behind lieart amazingly well in this video.
Now, what a lot of beginners and newcomers are not aware of is that, lineart is one of the initial styles and drawing methods that one should learn before venturing further into more complex sketch works.
Practicing lineart gets you more comfortable with the software and you slowly start to become more and more adept with some of the Krita tools which are available to you.
The video shows that the best way to get started on it is by tracing scanned drawings digitally first. And then once you are done scanning the entire image, you then move onto a new layer and then start to paint all on your own.
This creates the much needed confidence which in the long run will help you grow as you experiment.
Final Thoughts
When starting out on a new digital painting software, learning the new tool settings and the brushes are the most challenging part of it. But we hope that our list of tutorials today will help you out with Krita and all its various applications.
Spending time outdoors is an essential crucial part of a healthy lifestyle, one that eases the mind and delights the senses. And when it comes to your own backyard, the entire idea of a floating deck comes as a solution to how you can organize a small corner outside that will complete your backyard design whilst serving as an entertaining, relaxing space, the ideal vision for a summer night spent with friends and family. The simple structure of a floating deck confers an airy fresh vibe to your yard and offers all the necessary space you desire to organize an outdoors dinning area or a pallet lounge zone with little trouble. You can even take the idea further and build the deck around a majestic tree without it being connected to your actual house or terrace or, why not, around a round pool or Jacuzzi with the sole purpose of ultimate relaxation.
As you will see in the gallery presented below, wood, especially pallet wood is the main material utilized due to its beautiful texture, adaptability to any type of structure and exuded warmth. Recycle old wooden pallets to create the most beautiful deck without spending a fortune on building materials and taking the environment into consideration. In time, the natural tone of the pallets will gradually fade, transforming itself into an incredible grey-greenish tone that will accentuate even more the greenery surrounding it. Invest time into creating your special corner an feed your imagination with the following 15 Stunning Low-budget Floating Deck Ideas For Your Home.
#15 backyard emphasized through a deck and potted greenery
What do you think about the chosen topic? Feel free to share your ideas in the comment section below.
Have you often wondered how you can design and paint your 3D models?
With digital sculpting, you will learn how to design different characters for animation and video games. Sculptris is a free software program for 3D sculpting and design.
The interface is user-friendly and straightforward, so it's a good option for newbie designers to learn the basics of digital painting.
There are some excellent free tutorials to help you get started in Sculptris. There is a wide range of features, tools, and texture patterns which are offered by Sculptris, which makes it entirely professional for free software. You can customize the brush size and style according to your needs.
You also have the option to transfer OBJ files, which are supported by Sculptris or you can start creating your models from scratch. This program is based on dynamic tessellation, which refers to creating a 3D mesh structure that is made of triangles.
If a 3D model, has a low-triangle count, then it tends to look coarse, but the opposite can also take place. There are programs which can subdivide your model for making multiple triangles which will give a smoother look to your model. Sculptris usually covers the model with wireframe mesh just when it's required to fix the problems by reducing or smoothing.
Let's look at the 15 best free Sculptris tutorials!
Best Free Beginners Sculptris Tutorials
1. Sculptris Basics
If you're looking for a clear introduction to the various available tools and brushes on Sculptris, then you should watch this tutorial.
John Maksym analyzes several tools, their functions, uses, and the different customization options for better control and flexibility. It will be an excellent starting point as you'll get a run-through of all the features available within Sculptris. The artist gives you an overview of all the brushes, along with a demonstration of their uses.
Not only does he covers lessons on sculpting, but he also focuses on the details related to painting your model. Maksym emphasizes only on the technical features in Sculptris and avoids focusing on the general art concepts. This tutorial will be suitable for those who have experience in the field of art and want to start using Sculptris.
2. Sculptris Digital Sculpting Tutorial
In this video, artist Ryan Kittleson gives a brief introduction to Sculptris. You will be able to learn the basics that will be required for you to start sculpting your models.
The topics which are covered in the tutorial are- Import the reference image, navigate the environment, configure the program settings, and use of various brushes to create a structure of a monster.
Do you want to know the various types of tools that are available for sculpting?
In this tutorial, there is a detailed discussion of the several tools available in Sculptris and a walkthrough on how they function.
Plus the artist also provides a few essential tips that will help you to progress by bringing your concepts to life. If you follow the tips, then you will be placing more focus on the design and its overall shape then on the intricate details from early on.
When you watch this twenty-minute video, you'll be able to understand what you can accomplish with Sculptris. You'll also get a clear picture as to why several artists prefer sculpting.
3. Combine Objects In Sculptris
Here you'll learn a useful technique of combining different objects to create more complex 3D models. This technique will help you to make such models quickly without deducing it from just a single primitive.
The video demonstrates the process of bringing multiple objects to a particular scene and then how you can combine them for making sculptures at the same time. You can use this method for both primitive and compound shapes.
Once you're clear with this concept, then you can create complicated scenes with a broad range of objects. If you have exciting ideas and a sound processing computer, then there will be no limit to what you create Sculptris.
4. How To Create Brushes
With this video, you'll learn how to create customized brushes for using it in Blender and Sculptris. These brushes are made using the GIMP image- editing software, which is an open-source program.
The artist Johnny Bevo explains this versatile process in a simple manner. You can add unique textures to your work for that sense of contrast and style by creating customized brushes. There is a significant number of things that you can make as you experiment by combining the custom brushes.
5. Model A Cube
From this video, you'll learn how to use the grab tool to manipulate a sphere, to make a cube-like shape. You can use the form either as a primitive for your upcoming Sculptris project or some other program, like a game engine.
This will be a good project for acquainting yourself with the technique of shaping digital clay and the main features of Sculptris.
It is essential to learn the basics to help you create more complex models. For instance, in 3D modeling, you can even create a dragon after you learn to form a cube.
6. Make A Female Head
At the beginning of this tutorial, Underground Education introduces the dynamic level-of-detail or the dynamic tessellation, which is a powerful feature in Sculptris.
With this feature you'll be able to maintain the topology or the geometric structure of the model, as you increase or decrease your number of vertices that are present. This brief demonstration revels the flexibility of the workflow in Sculptris.
If you want to transition to intermediate sculpting, then you need to continually practice the skills which have been highlighted in this video. We advise you to practice sculpting of the human head, for those interested in character art. This will help you to create the integral feature (human head) of your models.
Figure modeling might be a challenging skill to master, but for an aspiring 3D artist, it is the key to sculpting some great models.
7. Spider Hair in Sculptris
Sculpting hair can be a daunting task.
In this video, artist Borodante shows the entire process of making hair, and it will be a hilarious and informative watch at the same time. There are plenty of useful techniques that 'you'll be able to learn from this video. The tips can be used for the original art of 3D sculpting and for understanding the Sculptris workflow.
The video also highlights the importance of keeping the objects separate, as it will simplify the process of sculpting clothes or hair as different meshes.
The artist is open to making mistakes as he continues to experiment with different techniques in the video. It will be helpful for beginners to understand the process of trial and error that an artist has to go through for learning different skills. When you make mistakes 'you'll be able to acquire a new set of useful skills eventually.
If you want to mimic the techniques used by Borodante, then there is a link given in the information section for tool presets and free custom brushes.
8. 3D Modeling With Sculptris
Here is another video that gives you a detailed demonstration of every single tool used in Sculptris. The artist focuses on showing you the process of creating several objects from the ground up. This tutorial will help you understand the step-by-step creation of a female bust, horned 'creature's head, and a small dragon.
This video will be an excellent guide for a novice and those wanting to brush up on their skills for 3D sculpting. The artist explains the intricate details in a simplified manner, which makes it easy to follow the video.
If you want to watch a tutorial that is fun and informative at the same time, then you'll love this one. There is also a Q&A with the audience, which will help to clear out many of your doubts and guide you through creating a creature-like 3D model.
9. Piggy Bank in Sculptris
In this tutorial, you'll learn how to create a piggy bank. The techniques that have been used to make the pig can be applied for sculpting any quadrupedal creature.
With the completion of the brief modeling demonstration, the artist moves on to create a texture map and also paints the model with various material and tools in Sculptris. The video also shows how you can export the newly made piggy bank in Unity3D.
Finally, you'll learn how to customize the standard shader in Unity to match the model that was made in Sculptris. If 'you're interested in game asset creation and game design, then you should watch this video. This is a brilliant example of how you can create game models and then transfer them to the most popular indie game engine.
10. Texture Painting A Monster Concept
The process of creating 3D sculptures can be complicated, but the practice is the only solution to getting it done real quick. It is challenging for even a skilled artist to pull out an idea from their imagination and to create the image in three dimensions.
To bring a model to life does not end with sculpting, as you also need to paint it correctly. However, texture painting is less challenging than modeling or sculpting.
If you know how to paint miniatures for different board games like Warhammer or Dungeons and Dragons, then you'll be at ease while painting 3D models.
With this video, you'll also get a clear understanding of the required workflow for completing your painting work in detail. The process of painting is quite similar in most of the 3D sculpting program. You should apply the strategy of starting with an opaque base coat before you get into the details.
You can use multiple brushes with different opacity levels for adding exciting features to your models.
11. Sculptris to Zbrush Basics
From this video, you'll learn how you can bring your models from Sculptris into Zbrush.
It covers the vital steps that you need to take while converting your model for editing purposes in Zbrush. If your design has several objects, then you'll have to split them into small portions. And then turn the triangles of the object to quads using the DynaMesh tool.
The tutorial covers the technical aspects, so it will be an excellent guide if you're familiar with Zbrush and you want to learn the simple interface of Sculptris.
From the demonstration 'you'll be able to understand the distinction between sculpting in Sculptris and Zbrush. And why the experts of Zbrush choose to use the features of Sculptris to create their base models.
The second half of the tutorial covers the topic: QRemesher, which is a new feature in Zbrush. If you're an artist who prefers creating smoother geometry, then this tool will be an excellent substitute to DynaMesh.
12. Texturing & Texture Painting
Here's another video with a brilliant introduction by John Marksym for making game assets in Sculptris. After completing a brief demonstration on sculpting, the artist also shows you how to create a layered effect by using a variety of pre-made textures. You can create a realistic and complex appearance for the models by using multiple brush sizes and level of opacity.
After showing you the process to export the model and the texture map from Sculptris, John also demonstrates how to import them into Unity3D. And the process to include the assets in a particular scene of a mobile game.
Finally, you'll learn how to play with the standard shader, the lighting, and the camera to help you adjust the look of the assets. We recommend this guide for anyone interested in full asset creation and game design.
13. Sculpt Tangled's Pascal
The video runs like a speedpaint tutorial, but as you learn to use the Sculptris interface, you'll be to follow the process carefully. Pascal is a fun and super easy character for sculpting.
When you practice creating models like Pascal, it will be an excellent way to improve your skills as both a character designer and a digital sculptor.
The process of emulating the work of experienced artists is a long-standing tradition within the field of art, which gives ideas for your creation. The tutorial also has a soothing tone being played in the background, which makes it a relaxing way to focus on your artwork.
14. Sculpt John F. Kennedy
If you want to learn the workflow and procedure used by a professional digital sculptor, then you should watch this video by artist, Richard Kapuaala.
You'll understand how the artist focuses on the general shapes and proportions, and then moves into the specific details. To get an accurate representation of your image, you'll need to focus on the overall placement and shape of the skull.
Final Words
These tutorials will help you create your 3d models by setting the fundamentals correctly for you. For every person who is new to a particular field, there is going to be a starting point. And Sculptris is one of the programs that will help you experiment and learn the different tips and tricks for making some stunning artwork.
But, you need to give yourself some time to learn the skills and practice the exercises religiously.
Till next time!
A small home represents a challenge and an opportunity alike, it is the place you are to soon call high-maintenance as well as cozy and warm. Small spaces require custom solutions, solutions tailored for you and your home and to help you in this interior design endeavor we have prepared a list of small kitchen hacks, this includes smart multi-purpose accessories as well as tiny customization tricks that can make the whole organizing process easier; you will learn how to organize things that are often overlooked in the planning process and how to use residual spaces to your advantage.
Emphasize your home, optimize your kitchen and enjoy the coziness and warmth of your small home in full comfort with the small hacks that follow.
25. IKEA rails under a shelf can nestle your cutting boards
26. Organize a deep drawer for vertical silverware storage
27. Narrow cabinets can be planted all around the home
These small storage spaces emphasize functionality a great deal, accommodating items that otherwise would not be stored in bigger storage options. All homes have inefficient corners, gaps, put them to good use today.
34. Find convenient little things to make your life easier
Source Unknown
What do you think about the efficient ideas presented below?Feel free to share your thoughts in the comment section below.
A small portion of string can beautifully sculpt an installation, a piece of wall art or a Christmas tree decoration to beautify your splendid holiday. Wire art sculptures and wire wall art are known today in design thanks to their amazing naturalness and organicity as well as for their immense accessibility, ease of use and versatility, the little element can shape something extraordinary in minutes and the unimaginable in hours, weeks as numerous artists have previously showcased.
A selection of unique wire art pieces lies below, cast a glance and surge inspiration.
Wire Art Sculptures
1. Craft a Fender Guitar
A simple swift shape that can be used as a thematic decoration or as a simple beautiful diy gift.
A simple process with great results, extraordinarily idea to materialize with children, family, loved ones.
You only need a rock, copper wire and some colorful beads to create this exemplary wire tree, something so simple to craft yet so powerful, easy wire art at its best.
DIY wire art with simple elements from our reality can sculpt extraordinary mini-settings that would nurture the creativity of little ones. Play along, nourish their creativity with wire art ideas and you will be amazed on how much it will boost their morale.
Color creates contrast with white and black and this simple fact gives birth to extraordinary art pieces. The naturalness of the black wire surely stands out yet it`s the perfect balance of the over -all scheme the thing that really stands out.
An artist can experience great moments with wire and string in its artistic endeavors by simply changing the pencil with a different mean like string and wire.
Break a pattern with something simple; above a simple power line with doves has brought a really cool, natural element in a very cozy and elegant woodish atmosphere thus creating a wonderful balance.
String can function like a structure and textile can work as skin, needless to say that with these two into the picture, light becomes an interesting element.
Have fun with a small, simple, adorable birdy shaped with wire, the element can become a prize, a really cute wire art figurine that will surely be loved by little ones !
Wire art sculptures can be extraordinarily easy or complex but regardless of difficulty, in a matter of minutes, everything can be changed. How do you see this spectacular pieces of art, do you see wire art sculptures as special sculptures? We would love to hear from you in the comment section below !
Pottery is an art of using ceramic materials to mold into artifacts, tableware, stoneware and porcelain to name a few. Many people take up ceramic art as a hobby or master the skill as a way of making a living for themselves. The Chinese are one group of people who take ceramic or porcelain making and pottery painting more seriously and to a higher level. Through a few documentaries, many of us learned how to cover up a once broken ceramic tableware with pottery painting skills. Ceramic making involves the use of clay and other relevant materials. With ceramic materials, the modeling clay is molded by the hands while spinning in a circular motion into whatever object the potter desires to create. The bare hands are constantly exposed to mud, dirt, clay and in some cases animal or cow dung. So this art requires the artist to always have his hands immaculately clean when he is not at work. Finger nails must be always clipped and kept low to avoid as much as possible fungi and bacteria from taking up residence. Here are 16 examples of pottery art and ideas you can use for your own do it yourself pottery painting at home.
15 Do-It-Yourself Pottery Painting Ideas
#1 This pottery painter is simple creating a lot of dots to form a pattern
This just goes to show you don't need to be a professional to get started on your love for painting your ceramics. A simple idea of using a strong bright color on a -lain white ceramic ware will do.
#2 adding humor and fun to your pottery painting
Try including the kids into your pottery making ideas, a great starter skill for them to learn and with their appreciation for such art, you may have to bother with them disregarding or destroying it.
#3 unique ways make your pottery painting more versatile
Redesign that plain coffee cup into a two colored pattern. Just use crepe paper to cover the part you don't want painted in case the paint spills over.
Unless you have knowledge and experience in pottery painting, can you tell this is a plate at first or second glance? Me neither.
#9 multicolored pottery painted canister for home use
Can be used for decorative or functional purposes.
#10 pottery painted tea pot depicting a place by the sea
Using words to bring your tea pot to life is just as creative as using paintings. Better yet painting a memorabilia on your ceramic tableware to always remember an important event in your life.
#11 express your feelings on your flatware using pottery painting
Now here is a great gift to give to that special little person in your family or even at a kindergarten school event.
#12 heart shaped pottery painting plate purely for decorative purposes
A Valentine's day gift maybe? Very artistic skills demonstrated here which I am sure is not for beginners.
#13 A lady bug tea pot designed from pottery painting
This red and black pottery painted tea pot speaks for itself in terms of how brilliantly creative one can get when taking up the skill of pottery painting.
Here is a pottery painted piggy bank to teach your kids how to save their little pennies.
Just love those pottery painting do it yourself ideas. Go ahead and share yours in the comment section below if you are a pottery painter or lover of ceramics and porcelain.
An old boat is not an easy item to come by these days but just in case you will we have showcased 15 insanely beautiful and creative ways to reuse old boats in design lines, all unique, all authentic, all able to motivate you to start hunting old boats.
Cast a glance at the gallery below and notice how these can be used as doorway decorations, outdoor kitchens, swing beds indoor or outdoors alike and even coffee tables or fishing ponds.
#1 old boat used as a side table in the living room
A boat used as a decoration is from the very beginning something special, something unique, it would be a waste to come across such an item and not to take advantage of the effort and energy put into it, of the great deal of experience gained through time. What do you think ? We would love to hear your opinion in the comment section below.
Awnings protect you and your family from rain and bright sunlight, allowing you to utilize your outside spaces at any time of year. However, a permit may be necessary based on where you live and how you intend to utilize the awning. You should research to see if there are any building permit regulations you must be aware of.
Retractable awnings keep the direct exterior of your house cool and shady, even on a hot summer day. Whether you want to cover your patio or the yard, they are perfect for covering any area of your house.
However, a gray area in this aspect is whether you need permission to install a retractable awning. Since the rules and regulations vary in every region, you should reach out to the homeowners association, local government, or anyone else who can give you a clear idea.
Check Out The Rules In Your Area
Before you decide to install a retractable awning, I’d suggest always checking for the permits that are available in your area or state. There are several places where you directly need permission from the local government before making any major change to your house.
If you have an old home or you’re a member of a homeowner’s association, you can easily look into the rules and regulations of the area. These regulations are intended to ensure safety, give some uniformity in the look of houses in a community, and encourage inhabitants to appreciate it.
Different Permits For Different Situations
You might need permission based on two factors: where do you live and how are you going to use the awning? There is no specific answer to getting the permit for the awning installation.
However, there are certain situations where you don’t need permission at all:
If you’re just replacing or repairing your awning
If you’re installing the awning within your property
If the shade structure of the awning does not trouble your neighbors
If rain does not fall directly on nearby houses as a result of your awning
How To Get Approval For Installing A Retractable Awning
Before installing an awning, you should contact the building department or town hall to know the rules and regulations for installing an awning in your area. Make a list of questions you need to ask, like what shade structures and sizes are allowed in your locality.
If you get approval verbally, then don’t rely on it. Try to get written approval from the concerned authorities. In most cases, you have to pay a certain amount of fees to start the installation process. And the cost can vary according to the area in which you live.
Tip
You might have heard of the ‘grandfather clause.’ If you have an old home built way before the current rules were set, you need to ask about the grandfather clauses to know your limitations to the changes that can be made.
Do You Need A Permit For A Retractable Awning Final Words
Yes, you need permission before setting up an awning in your condominium or any other community commercial properties.
Awnings are an amazing way to turn your open space into a canopy-like structure where you can enjoy your time with your family. But it's not unusual for neighborhoods to have previously decided on awning proportions, design, color scheme, and materials.
So, whenever you plan to have retractable awnings installed on vinyl siding, I suggest you apply for a permit from the Homeowner's Association or any authority handling such matters.
If you’ve found this guide insightful, I’d suggest you give my informative guide on “How Do Utility Pumps Work?” a read.
A retractable awning can be attached to the exterior of your home to protect the patio from extreme weather conditions. However, I recommend installing a retractable awning on vinyl siding only after determining the required type of awning.
Retractable awnings are ideal for homeowners who wish to enjoy the outdoor view without committing to a permanent outdoor structure.
And the best part is - installing a retractable awning is much cheaper and requires less space than building a fixed structure. Hence, usually, homeowners with smaller gardens and patios opt for awnings.
Now the question arises - can you install a retractable awning on vinyl siding? The answer is “yes,” and here’s how you can install it yourself…
How To Install A Retractable Awning On Vinyl Siding
Step 1
Use a tape measure to determine the length and location of the awning. Ensure that you measure up to 7 to 8 feet from the deck or patio.
Step 2
Take a pencil and make marks every 2 feet, and connect the dots with chalk.
Step 3
Thereafter, use a stud finder to locate the exterior wall studs. Accordingly, mark the location of each wall stud along the vinyl siding.
Step 4
Now, along the chalk line made previously, place the 2-by-8 board to use as a header board. Then, you can drill holes into it to mark the location of the studs.
Tip
Since you’ll be using a power drill for this step, I recommend wearing safety gloves and other protective gear.
Step 5
Fix the holes with lag bolts and use a socket wrench to tighten them.
Step 6
Measure the awning and mark the location of the soffit mount brackets. Now, use these measurements to place the mounting brackets on the header board.
Step 7
Place the mounting brackets at the location of the wall stud on the header board. You’ll also need to pre-drill a hole on the flat mounting surface for this purpose.
Step 8
Next, insert the awning brackets over each hole along with a lag bolt. Again, use a socket wrench to tighten the bolts.
Step 9
Finally, install the awning cover on the roof brackets and insert the bolts from the bottom. Secure the brackets with a socket wrench, and you’re done!
Why Should You Get A Retractable Awning Installed
If you’re still on the fence about installing an awning on a vinyl siding house, let me tell you that doing so can reduce energy costs significantly.
This is because most retractable awnings are installed strategically to reduce the amount of direct sunlight entering through your doors and windows. Plus, an awning can provide shade to your outdoor AC unit and protect it from extreme weather conditions. As such, your house will remain cooler and more comfortable, keeping your AC bills under control.
Similarly, motorized awnings can effectively reduce the surface temperature of your deck and outdoor space. So, your pets won’t burn their delicate paws while walking outside. Any furniture in the deck/patio will also benefit from the extra protection, ensuring they last longer.
Can Retractable Awnings Be Installed On Vinyl Siding Conclusion
Now that you have an awning cover outside your house, I further recommend installing a bird netting to keep birds out of the retractable awning. Consequently, your awning motor will be safe from all the pecking while keeping the clueless birds out of danger.
Birds always look for sheltered and covered areas like an awning for nesting. Luckily, there are many ways to keep birds away from your awning like keeping fake predators like owls, using bird spikes, a motion-activated sprinkler, and bird control products.
With the best retractable awnings available on the market, you can easily enjoy your time with your family under the cool shade of your patio. However, you might not be the only person enjoying the shade. You may find birds trying to make nests in the awning frame, hood, or fabric.
These critters can be a nuisance and, sometimes, even cause damage to your retractable awning. But don't let them ruin your fun evenings. I have researched some ways through which you can keep the birds away from the retractable awning and enjoy your "patio" time.
Deterrents To Keep Birds From Building Nests In Your Retractable Awning
You might wonder - “are retractable awnings worth it?” - Well, the answer is yes. But you will need to take the necessary precautions to keep birds away, preventing them from building nests.
The concept here is that if they are deterred from building a nest in a comfortable space, they will move along and find a new safe corner. Here I have discussed a few ways to go about this:
1. Choose A Cassette Style Awning
Birds that live in retractable awnings usually do so on the squared anchoring bar beneath the fabric rolling tube on versions with exposed bars. Whenever you plan to have retractable awnings installed on vinyl siding, I suggest getting a cassette-style awning so that the birds don't have space to build their nests.
2. Bird Spikes
Installing clear acrylic bird spikes can be a good way to keep the birds away. You can easily mount them all along the top of the square mount bar of the awning or any covered flat locations on your property.
Rest assured these spikes are not sharp enough to hurt the birds. All they do is prevent them from landing.
3. PVC Tube Along The Square Bar
To prevent birds from living in your awning, you can easily insert a 1.5" diameter plastic pipe (normally used in plumbing work). The length of the pipe will take up the space required for the birds to build their nest.
4. Install A Scare Device
You can install various scare devices like fake predators to keep the birds at bay. A rubber snake or an owl, for instance, works great as a bird deterrent.
I’d suggest using the bobblehead versions to scare the birds away. And make sure to frequently change the position of these devices so that they look real.
5. Use Your Awning Often
This method of keeping the birds away from the awning is the safest and most effective. Identify the times of the year when birds are more active in building nests and try to use your awning more frequently during those times. Through these actions, the birds will get the idea that the awning is frequently used, meaning they cannot build their nest there.
6. Use Bird Netting
Installing a bird netting over your awning can make it easier for you to keep the birds away from it and prevent them from building nests.
Tip
Always ensure that the mesh netting is compatible with the dimensions of the awning. If birds accidentally get inside the awning and can’t get out of it, they might die in there and cause you more trouble.
7. Use A Motion-Activated Sprinkler
Another good idea to prevent the birds from entering your awning is to use a motion-activated sprinkler. The sprinkler can easily sense when a bird enters the awning and spray water on them to scare them away. However, you need to install this device in a place where birds frequently build nests, and not where people sit.
How To Keep Birds Out Of Retractable Awning Final Words: Avoid Attracting Birds To Your Backyard To Build Nests
Like every other animal on the planet, a bird is in search of food, water, and shelter. If you have bird amenities like a bird bath or hanging bird feeders, the flying species will be attracted to your house and build a nest whenever and wherever possible (your retractable awning, for example).
Listening to the chirping of the birds can be relaxing at times, but when they build a nest in your awning, it can be a mess to clean up the surroundings. With some of these simple remedies I have listed above, you can easily keep pigeons, sparrows, and other small birds at bay.
Retractable awnings pare worth investing in as they provide ample shade for your patio or deck and protect it from all the natural elements like rain, sun, wind, and snow. They are easy to use and store away, making them last longer.
While on the lookout for the best retractable awnings, I’ve come to realize that people are still very much unaware of their pros and cons.
Hence, many people aren’t sure if retractable awnings are worth it. But after extensive research and using a couple of them, I have compiled the pros and cons of purchasing a retractable awning. Here is a summarized list of all of them.
Pros Of Retractable Awnings
1. Retractable Awnings Can Cut Down On Energy Costs
The main reason I purchased a retractable patio awning is for providing shade to my deck from natural sunlight. This made the outdoor space more comfortable. Besides, the initial cost to purchase and install retractable awnings is less when compared to the cost incurred for other backyard amenities.
The retractable patio awnings helped me save significant energy in the long run. Aside from the outdoors, the shade can cool down the inside of your house, meaning air conditioners don’t have to run for long to keep you cool.
Besides, an awning can help make the cooling of your AC more effective, helping you save money on your power pills.
Tip
Make sure to get your retractable awning installed by a professional who knows his way around it. Doing it the DIY way can result in errors and the retractable function of the awning not working properly.
2. They Have A Longer Lifespan
Non-retractable awnings do fall on the cheaper side of the spectrum, but they do not last as long because they are more likely to be damaged by bad weather conditions like rain, high winds, or heavy snowfall. You can easily fold them and store away to keep them from getting damaged.
Besides, sun exposure affects everything just like it does affect humans. When the fabric on the awnings is exposed to the direct sunlight for extended periods of time, it can end up being bleached and faded. Non-retractable awnings cannot be retracted, so the chances of the fabric being ruined due to sunlight are much higher.
3. They Protect Indoor And Outdoor Furnishings
Purchasing retractable awnings helped significantly in protecting my outdoor furniture. But that’s not all, as they also shielded the furniture inside the house from the elements, especially sunlight.
Since the shade will also extend to the interior of your home, the furniture near the door and windows won’t be exposed to excess heat and sunlight. This, in turn, will protect all indoor and outdoor patio furniture from getting bleached due to sun exposure, fading over time, or getting cracked.
Some Other Things To Keep In Mind
1. Retractable Awnings Are More Expensive
Retractable awnings are expensive compared to other awnings like the manually operated ones. Hence, make sure you factor in features like durability and water-resistant fabric to make the most out of them. You may even go for remote control operation for ease of use.
I’d recommend getting retractable awnings only from a reputed company so that you have greater peace of mind about its quality.
2. Cleaning And Maintaining A Retractable Awning
All types of awnings require cleaning and maintenance on a regular basis. Since retractable awnings have many foldable joints, the probability of dust and grime accumulating in the corners is high. This means you will have to clean the retractable awning frequently to help it function optimally.
Furthermore, water from rain can accumulate on the roof fabric of, which, in turn promotes unhealthy mold growth. You will also need to clean the metal parts of the awnings to ensure they stay free of moisture and debris and function efficiently.
3. Replacing The Electric Sensor Can Be Pricey
There are two main kinds of retractable awnings: manual and motorized. Motorized retractable awnings cost quite a lot, but they are more convenient to use. A lot of motorized awnings come with their own remote controls that make it easy to operate them, while others have sensors that cause them to retract automatically when it rains.
Certain electrical awning sensors can be obsolete, so you may need to manually retract the electric awning. To make sure that the electric awning works efficiently, its sensors have to be replaced periodically, which ends up adding to the expense.
Retractable Awnings Conclusion
Given the utility and durability of an retractable awning, I’d say it can be a worthy addition to your outdoor setup. These models also come in various colors and sizes so that you can choose the right one for your preference.

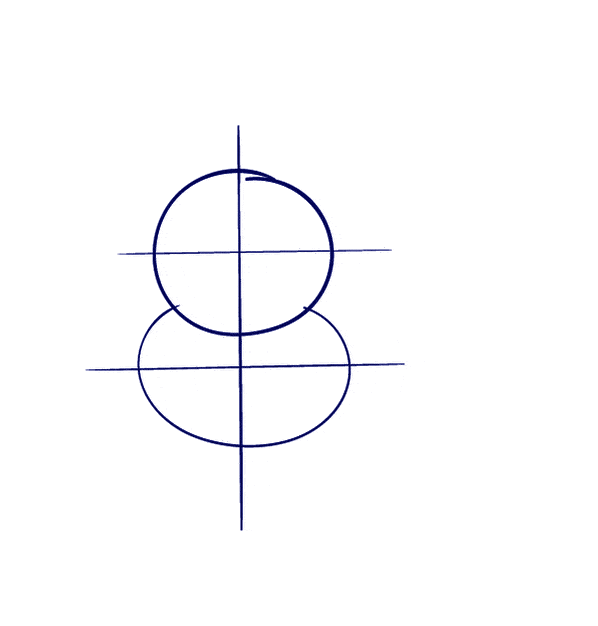
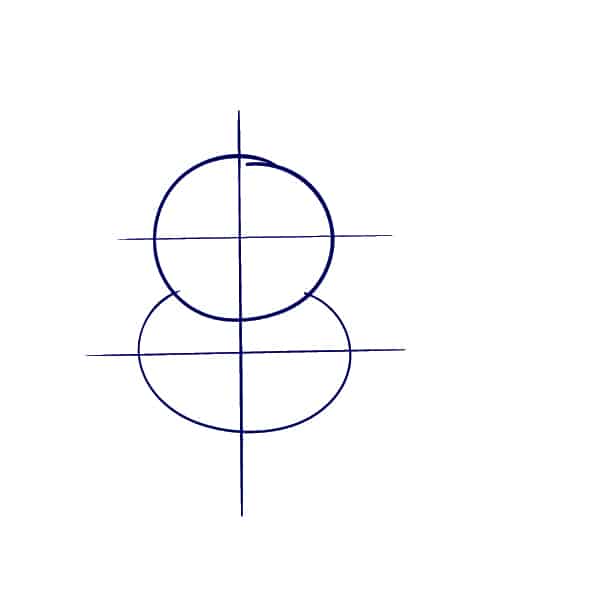
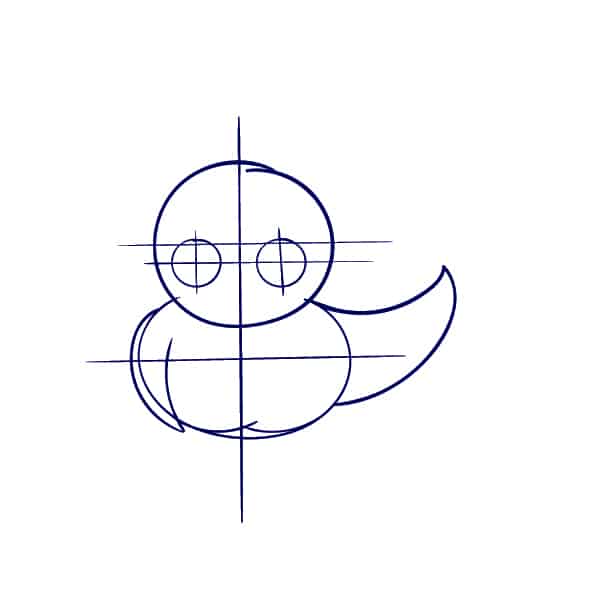
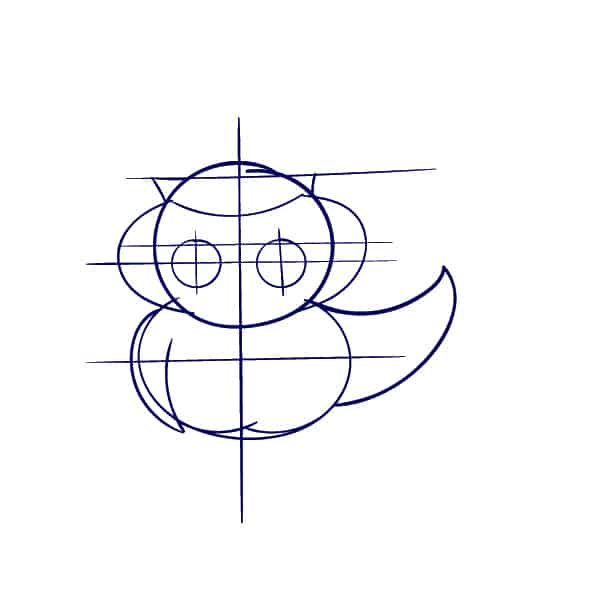
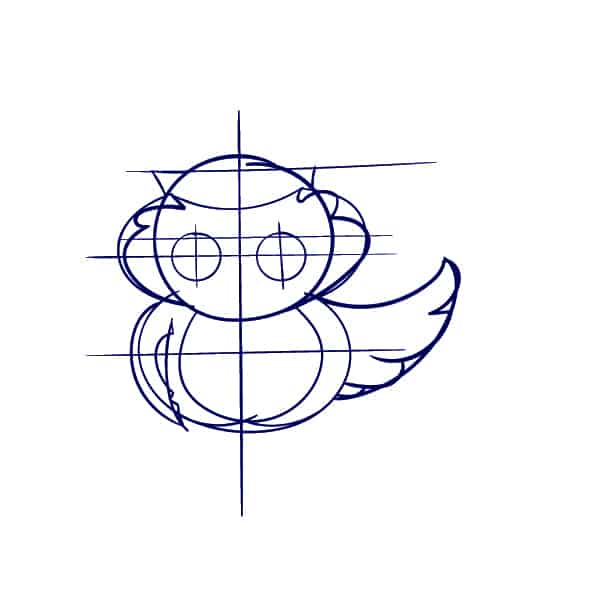
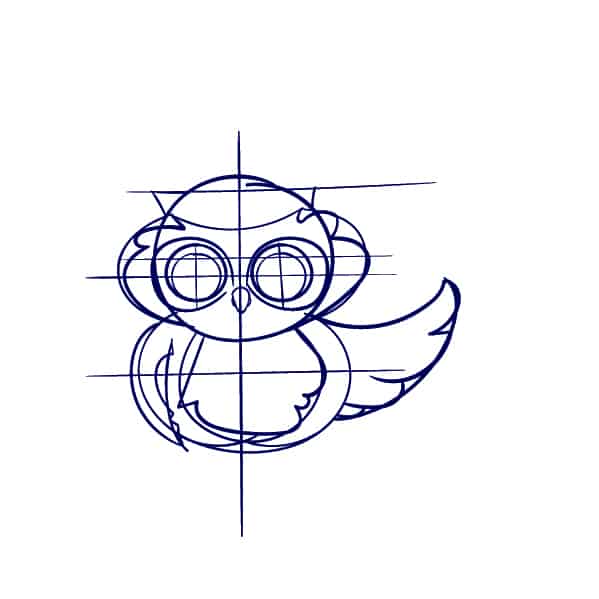


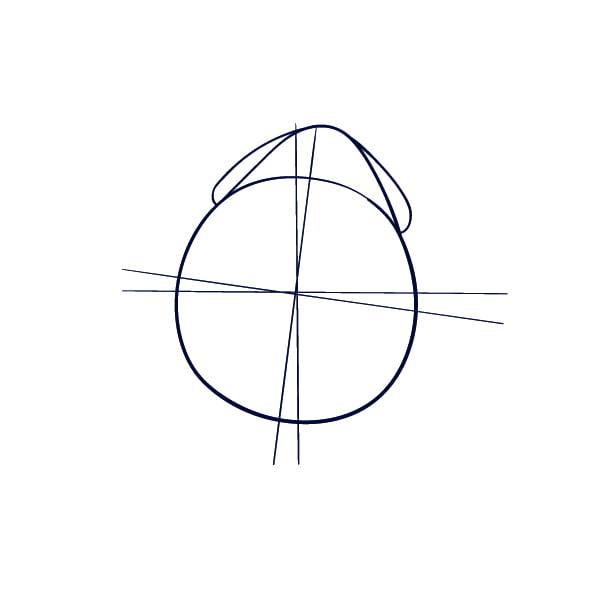
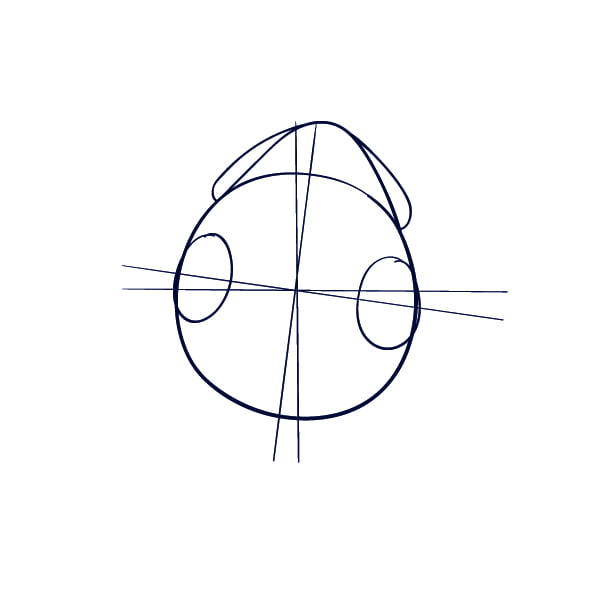
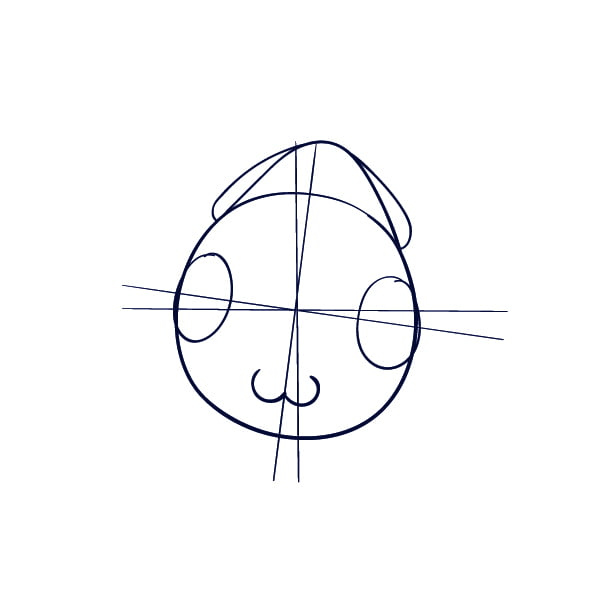
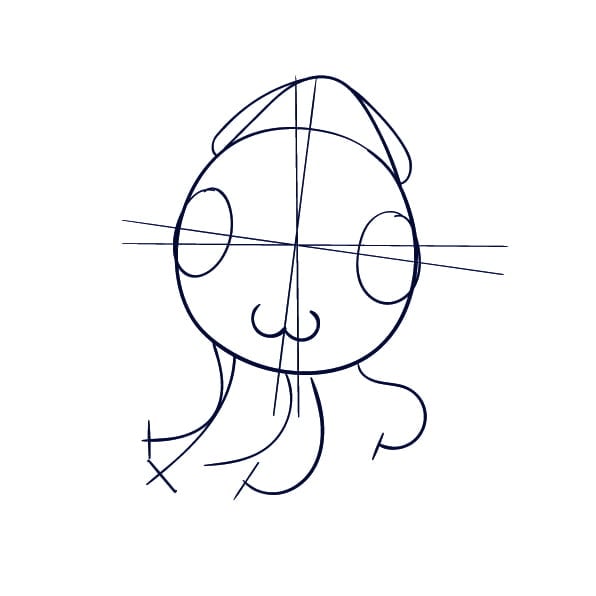
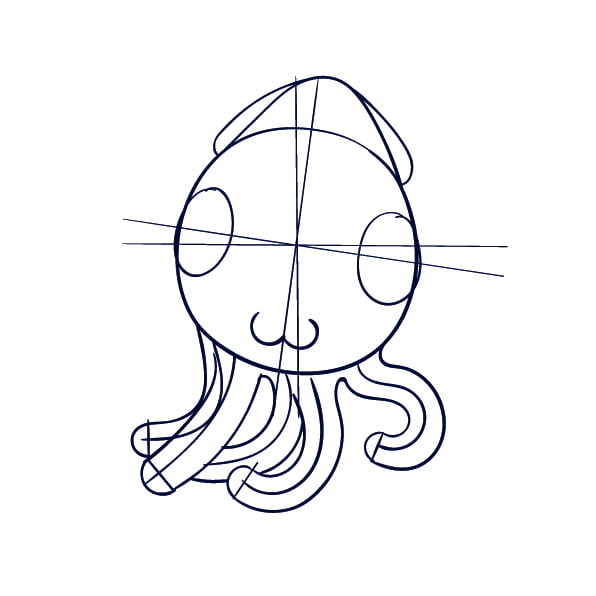
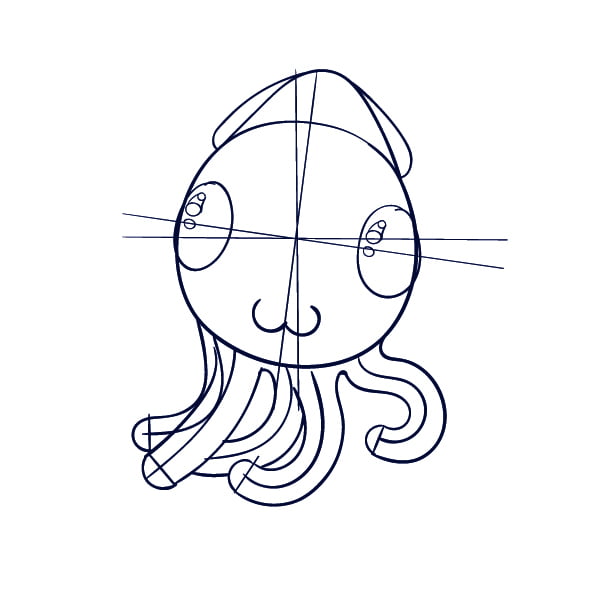
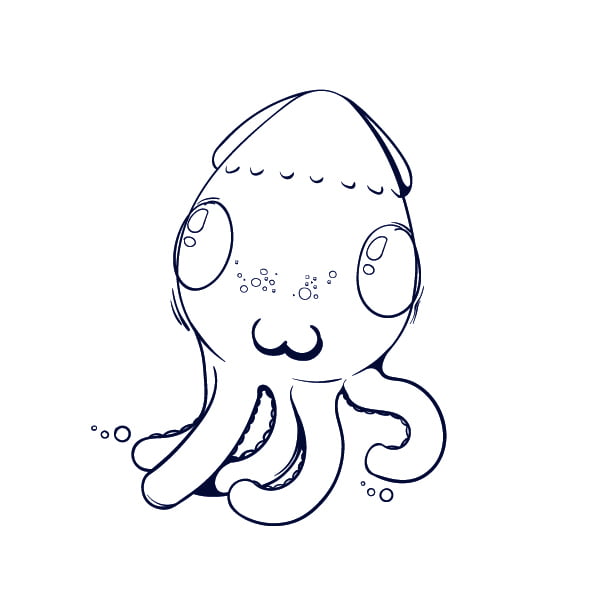
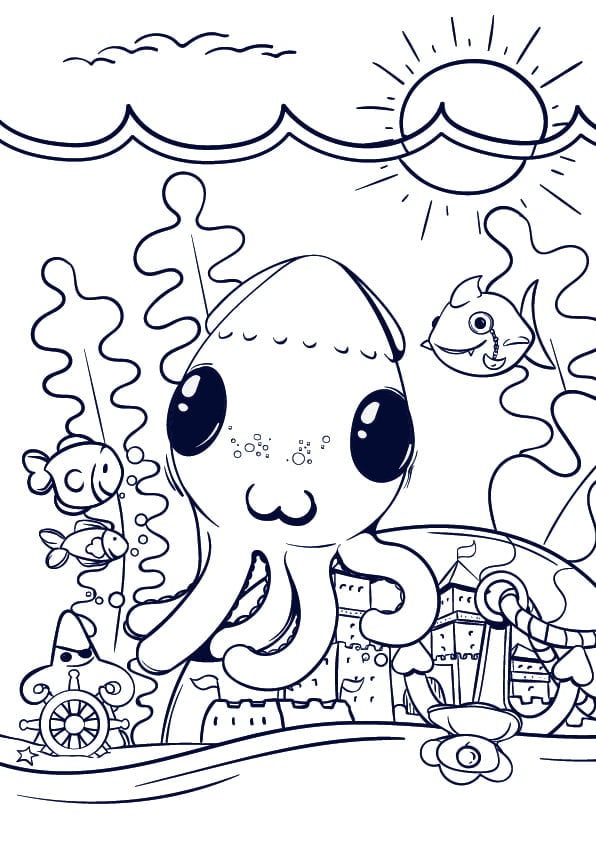


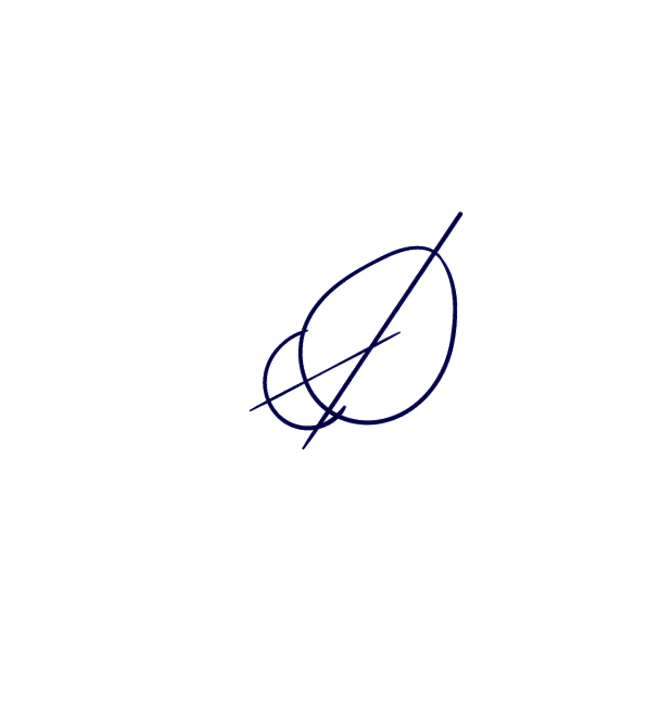
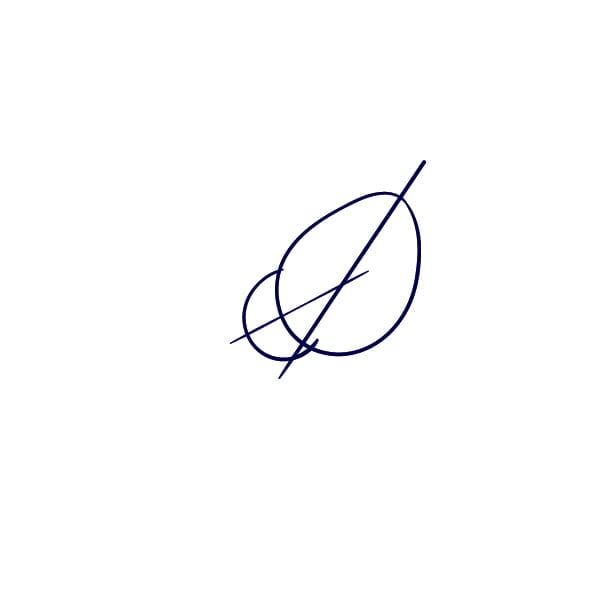
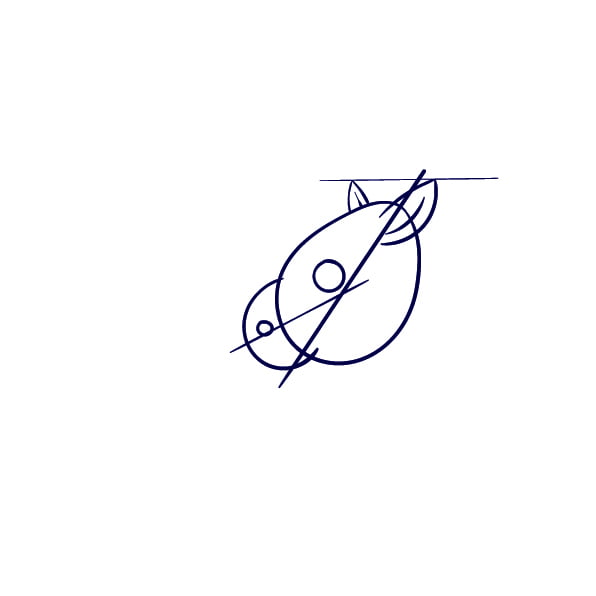
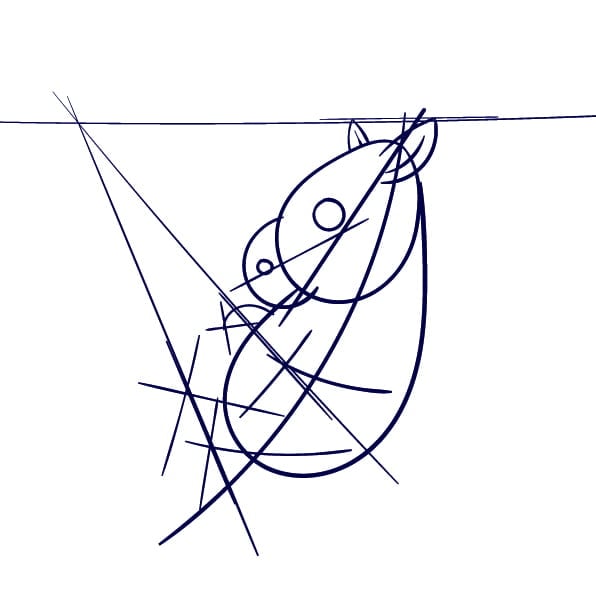
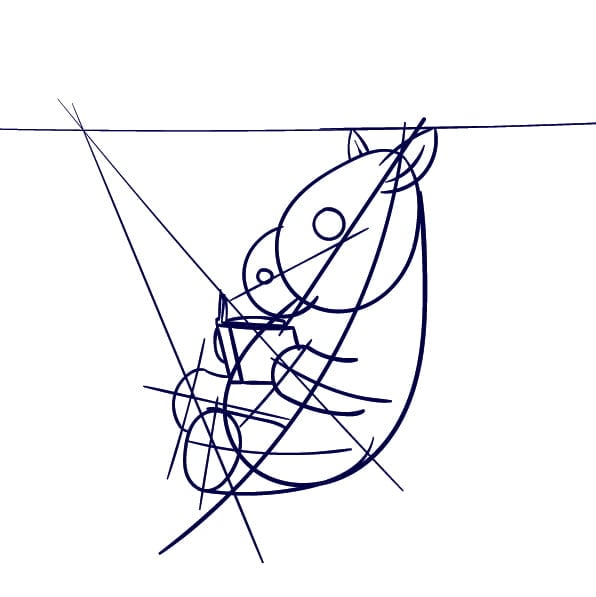
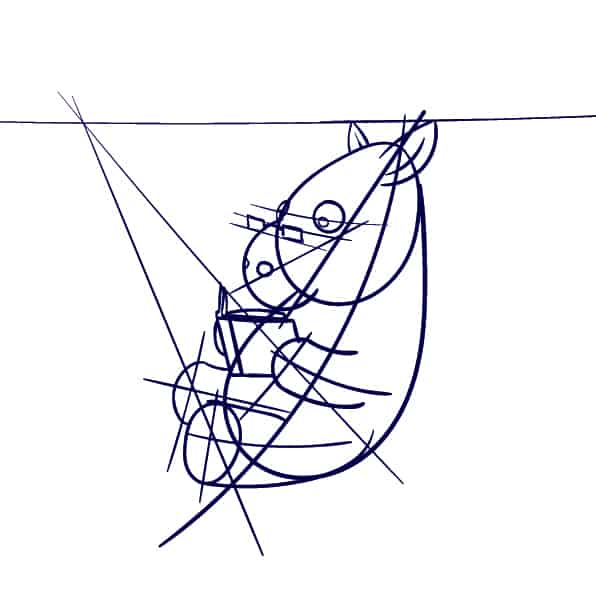
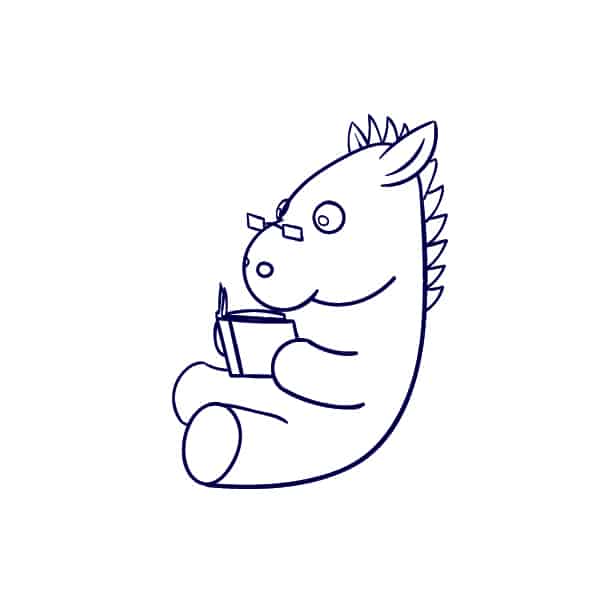

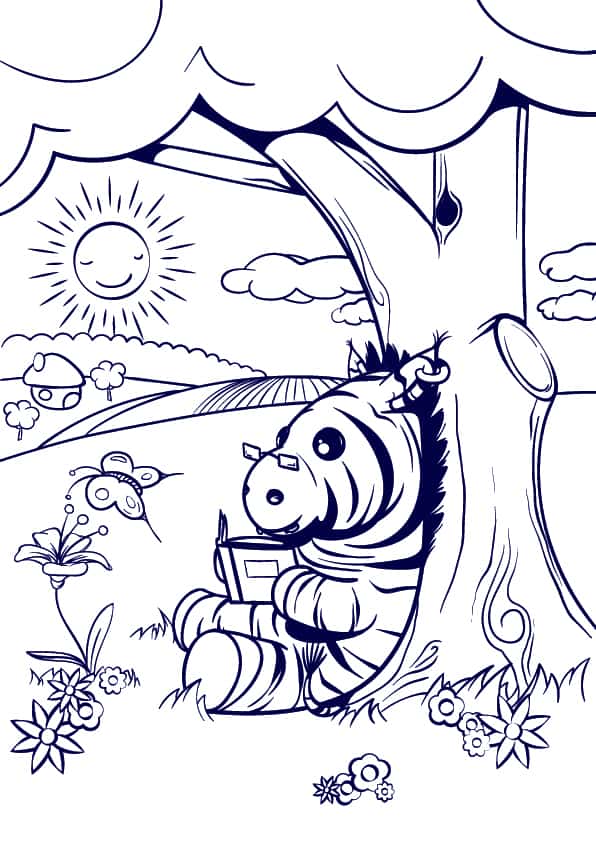
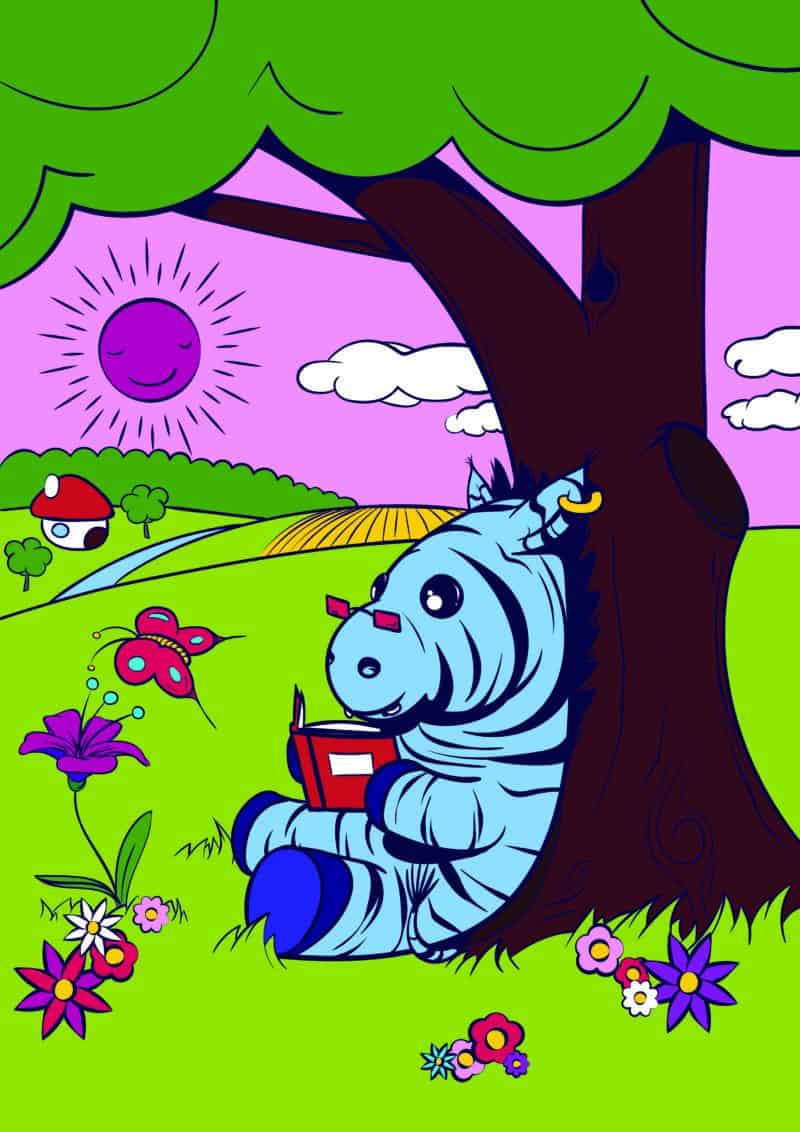

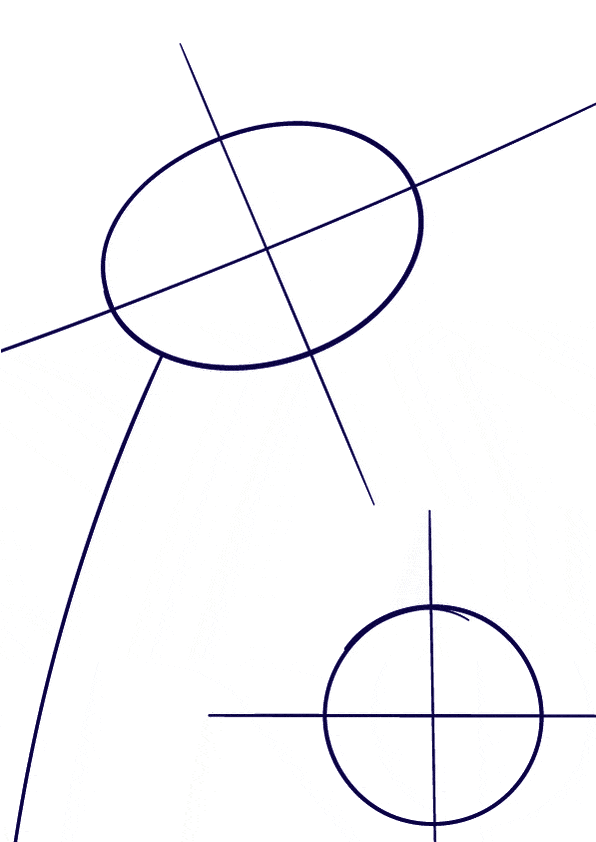
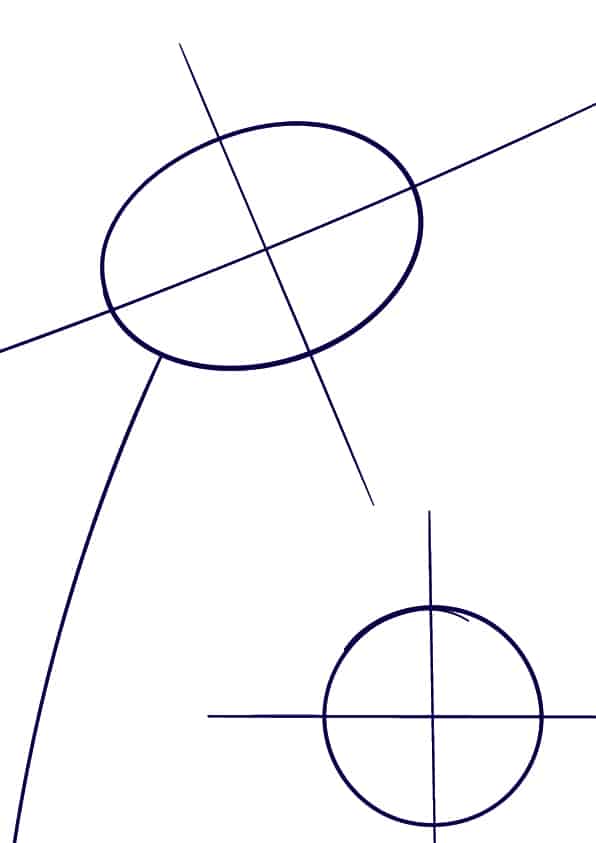
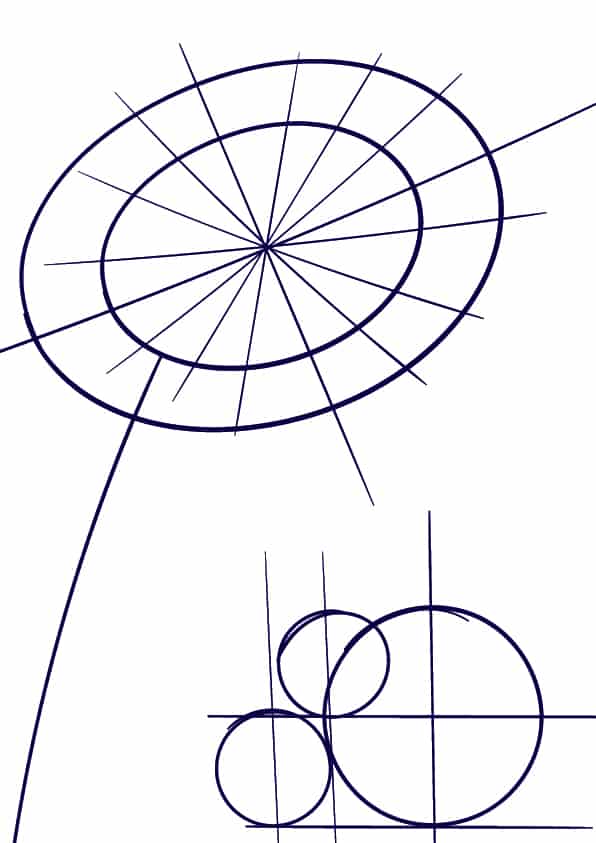
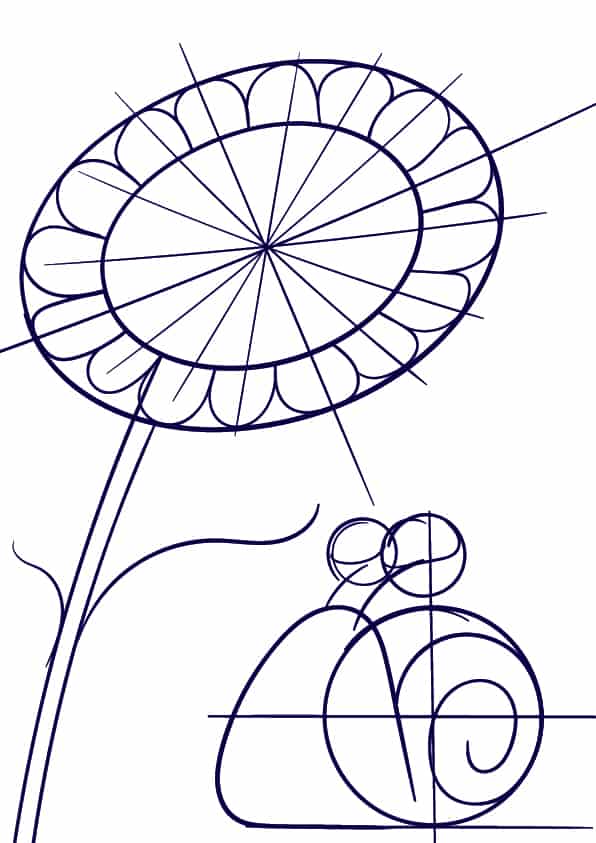
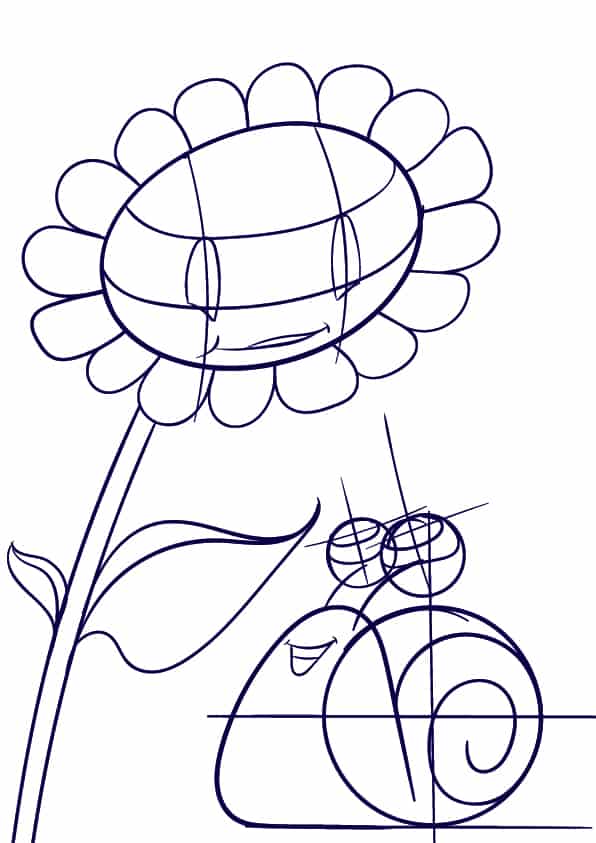
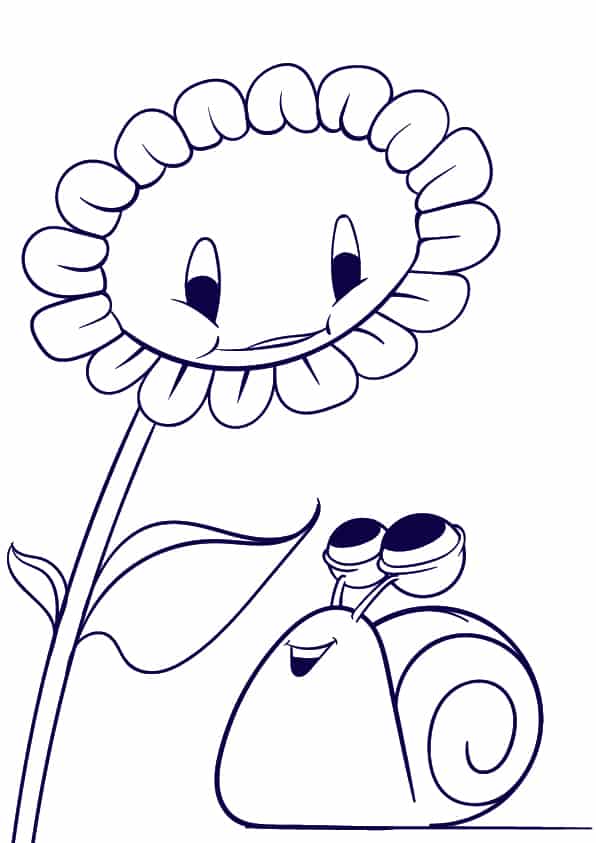


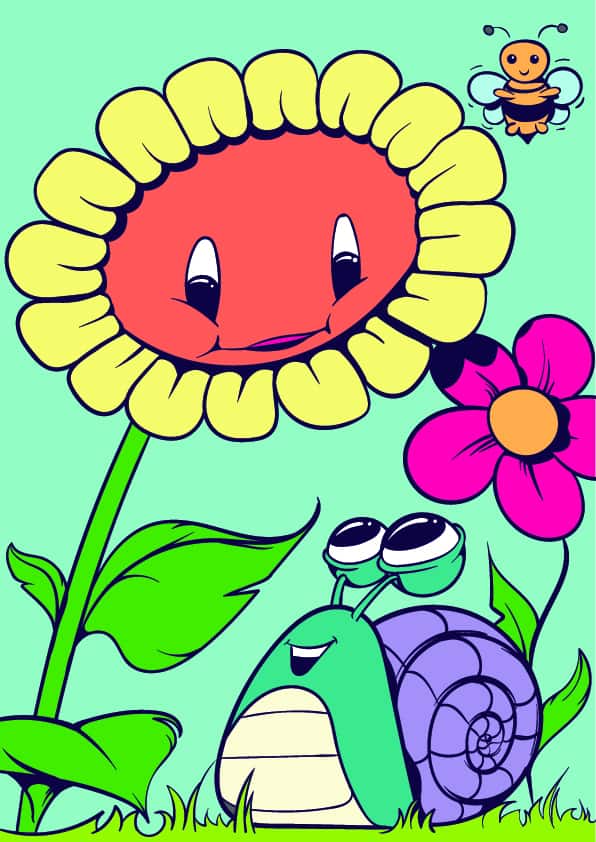

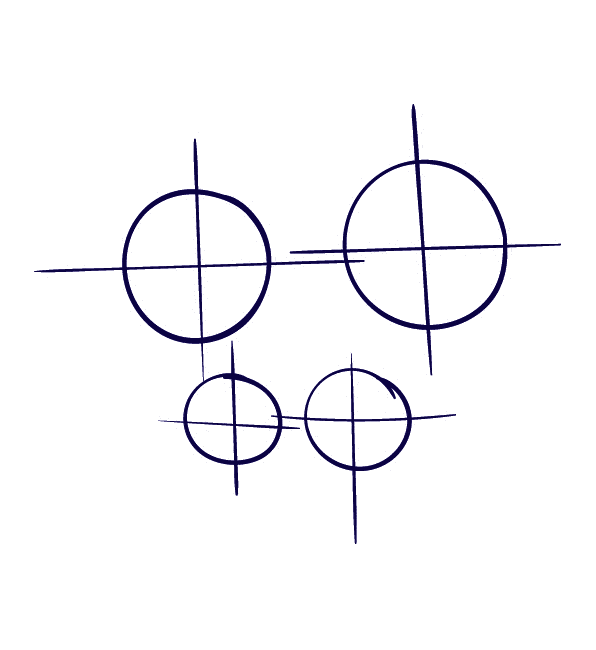
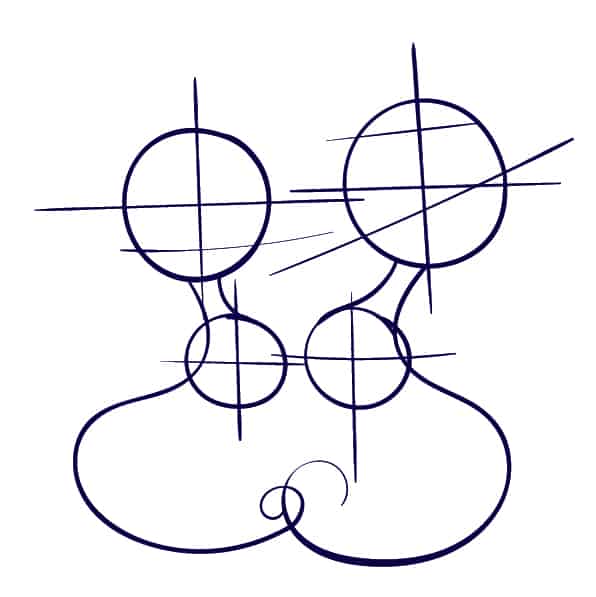
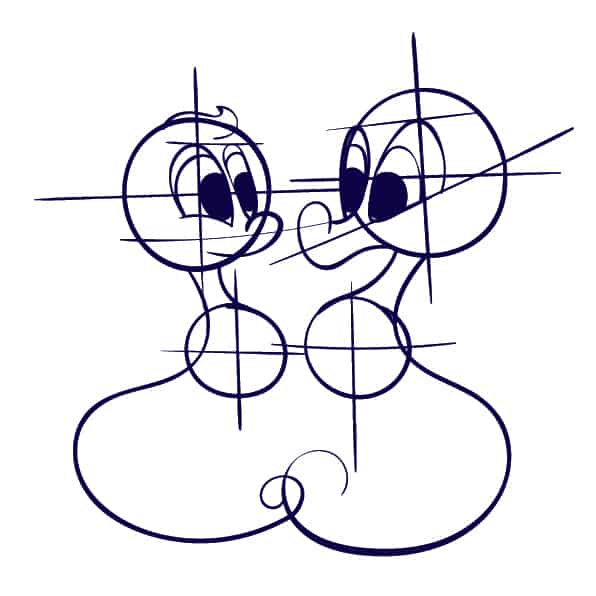
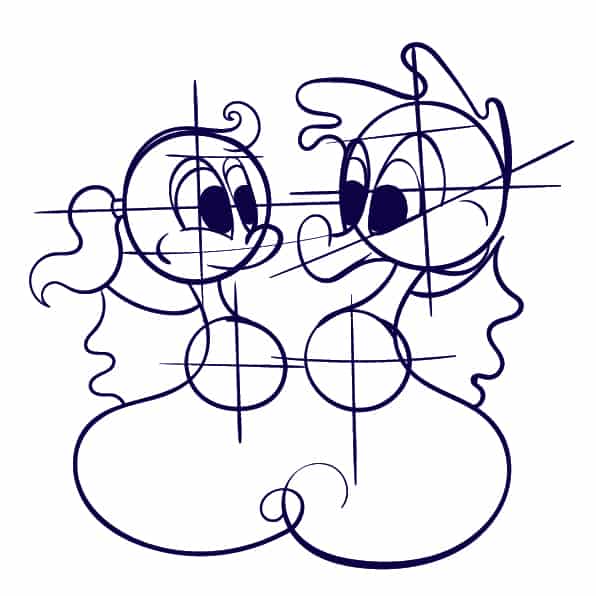
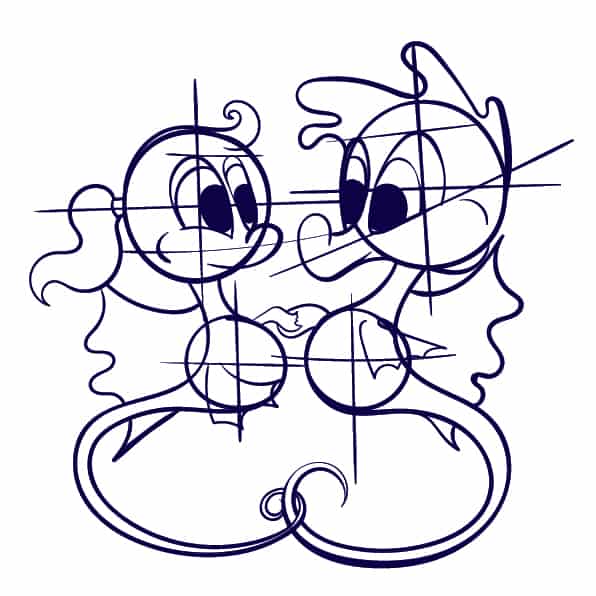
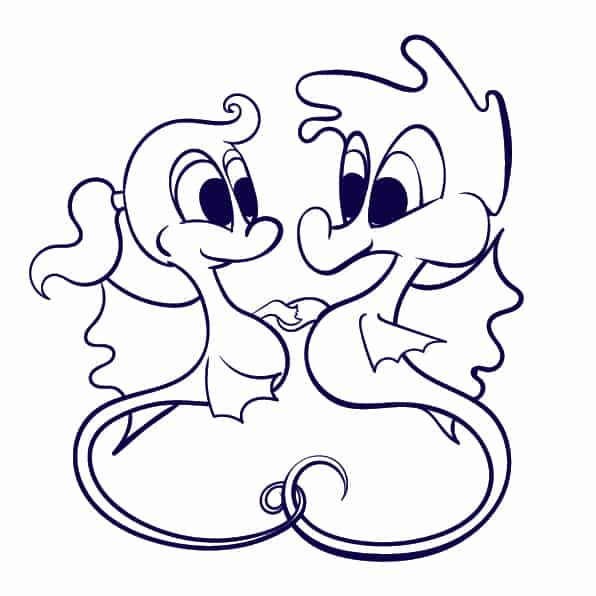

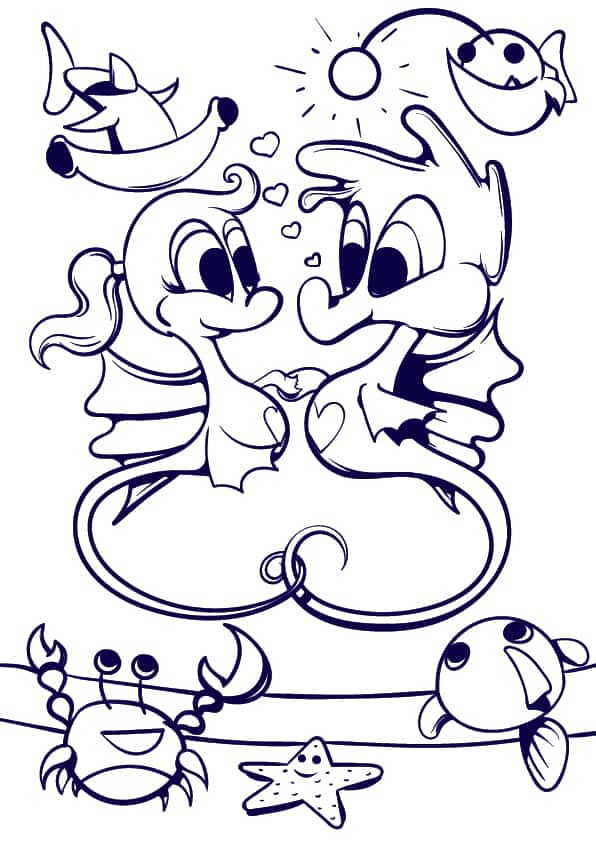
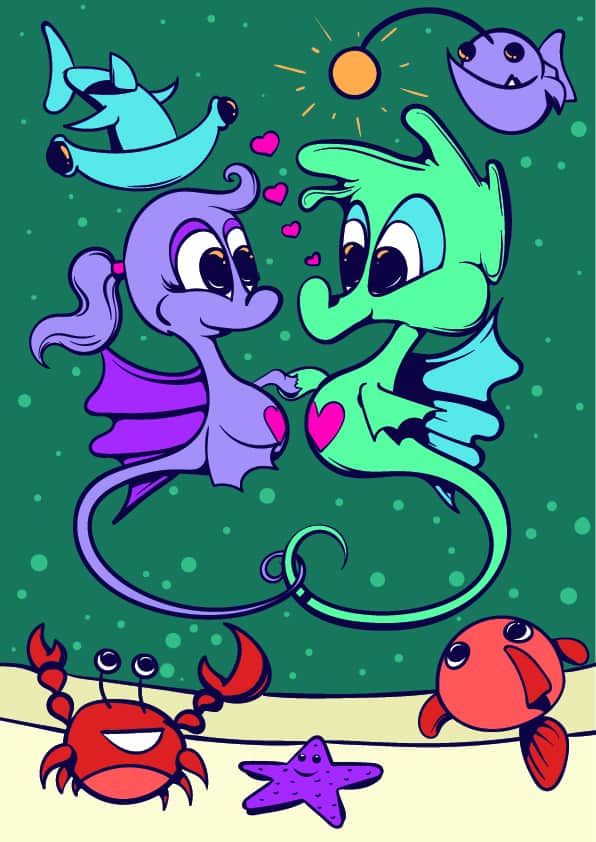


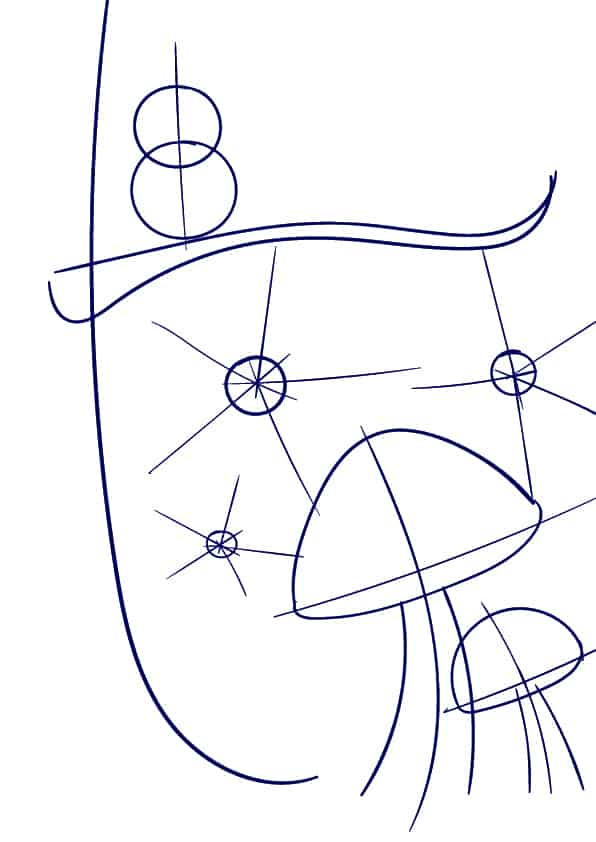
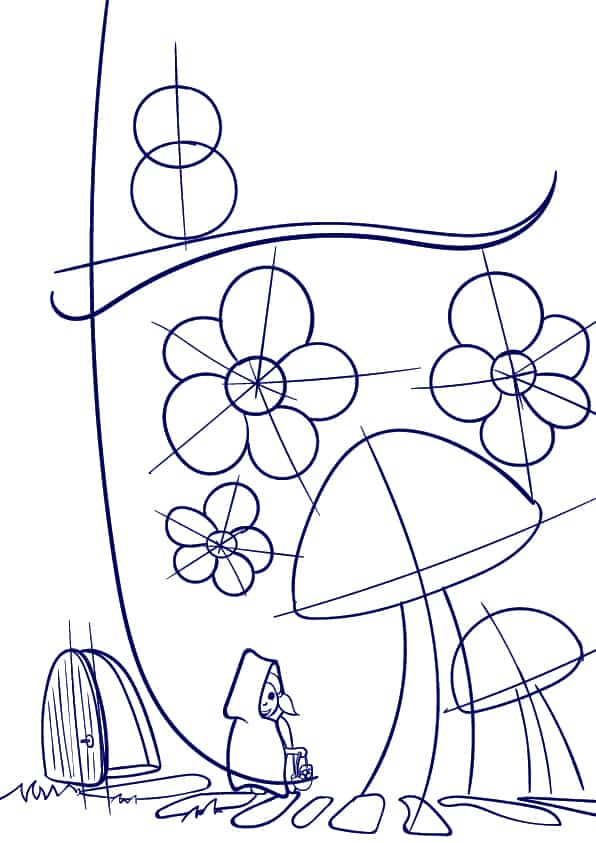
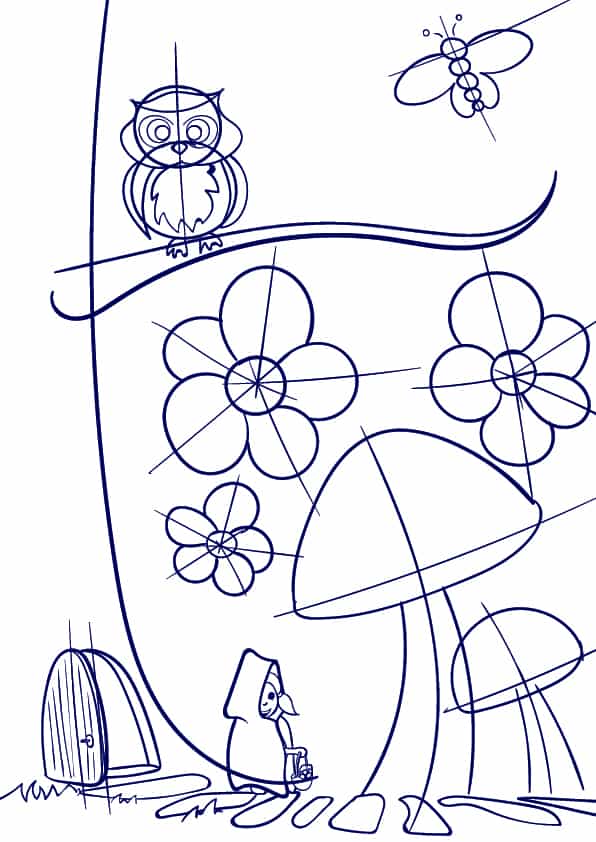
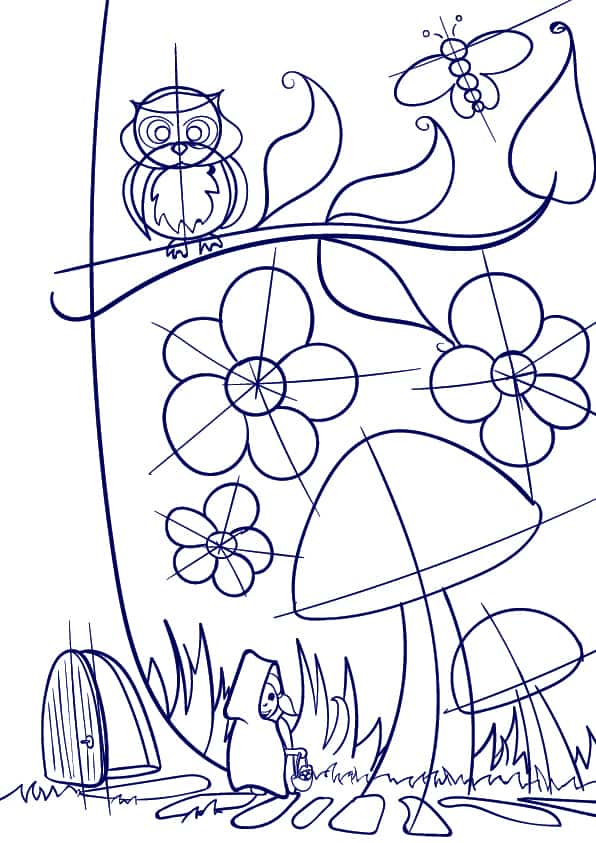
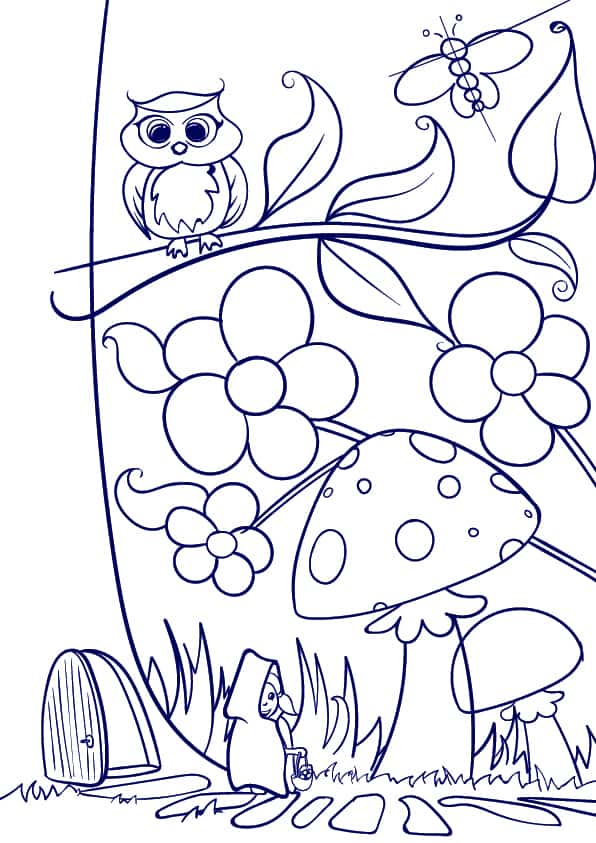


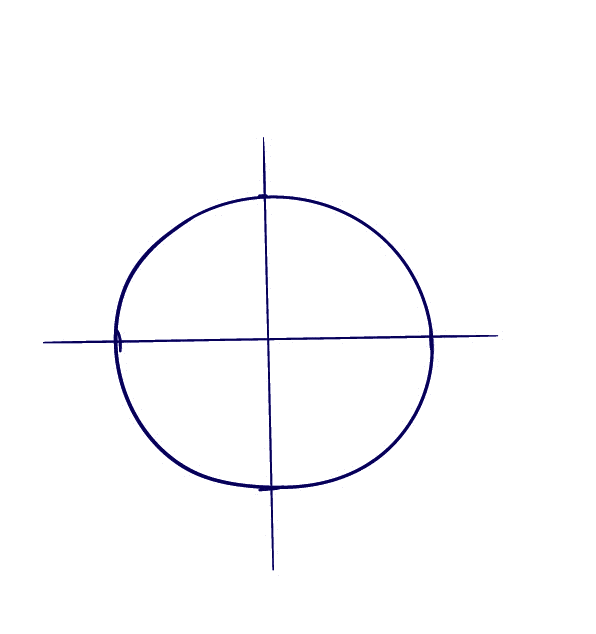
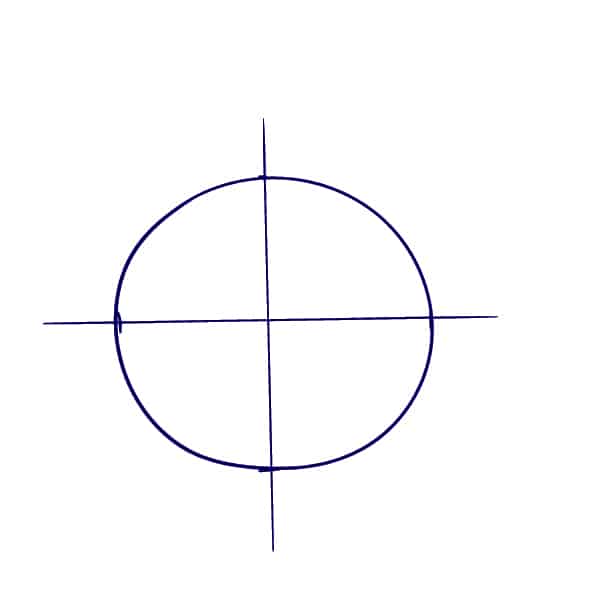
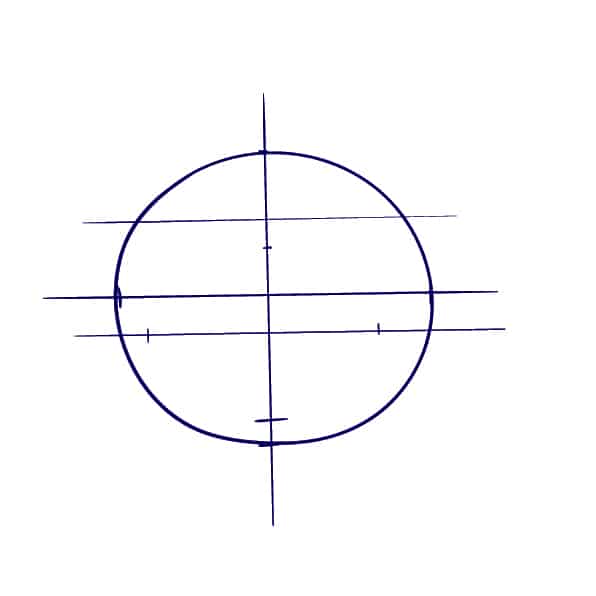
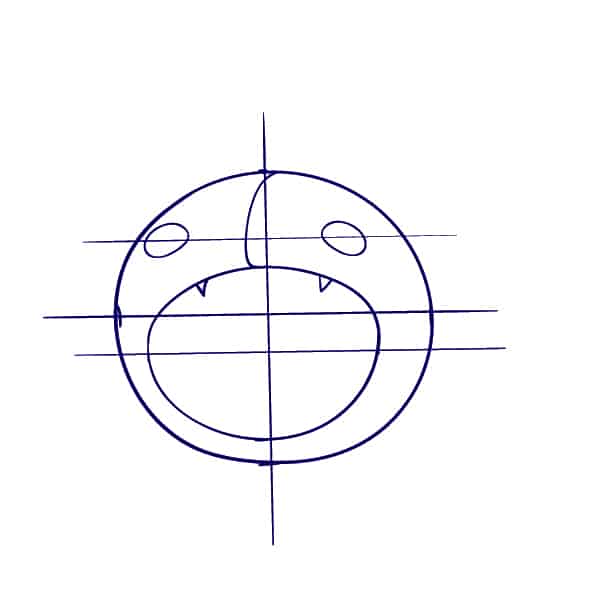
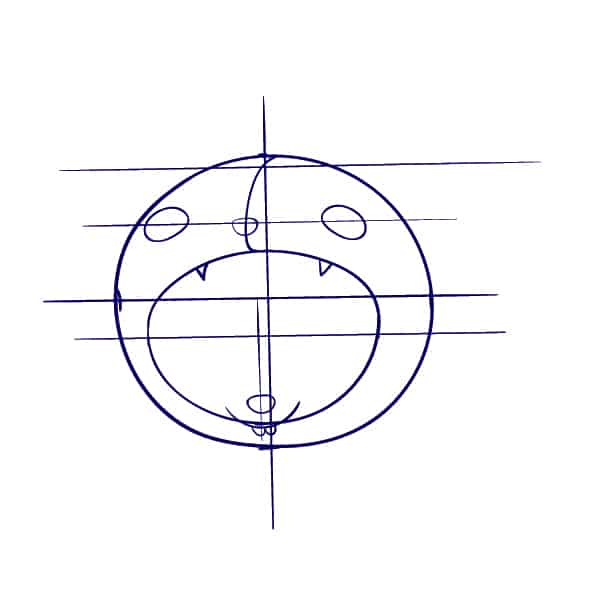
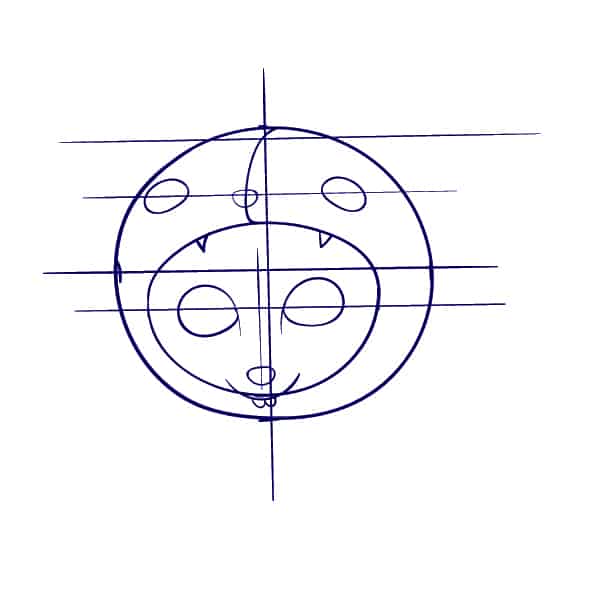
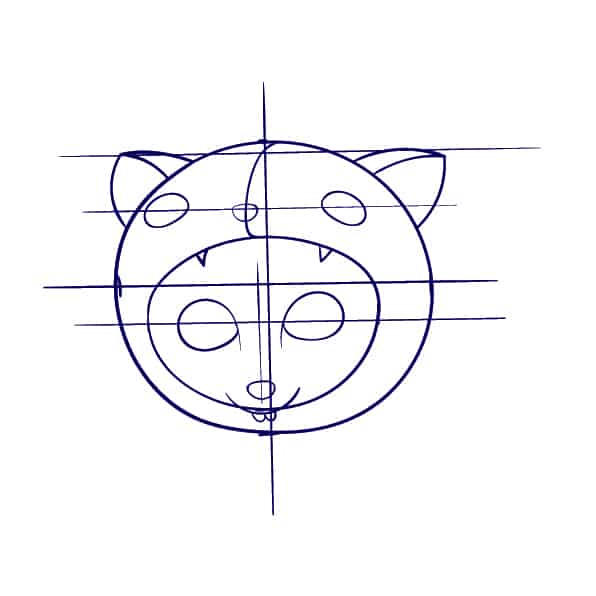
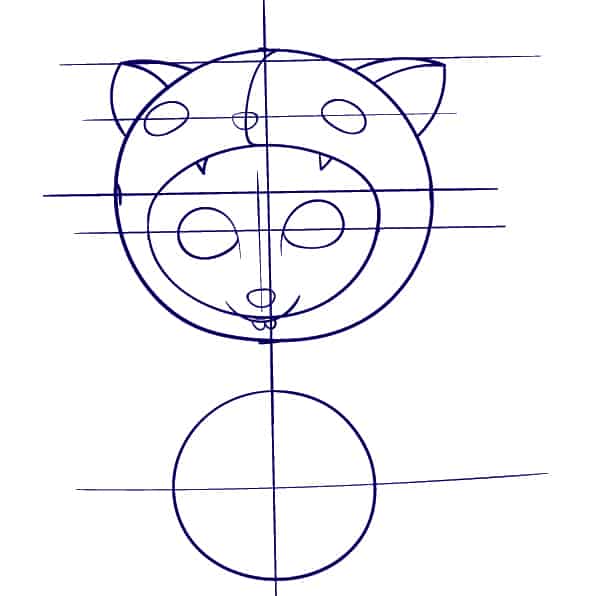
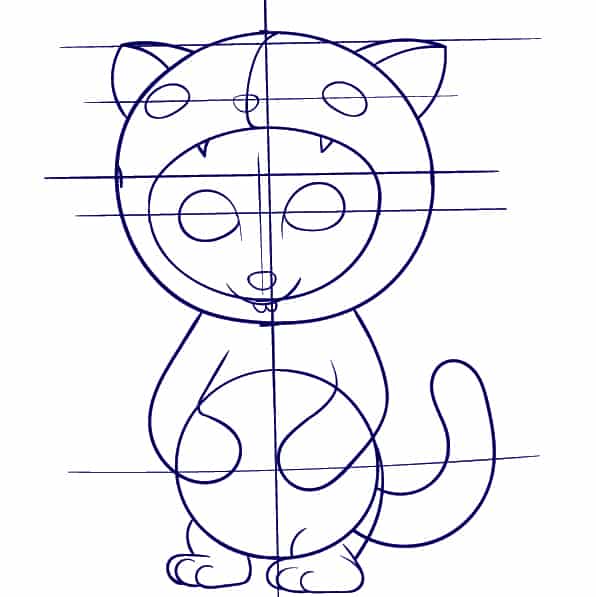
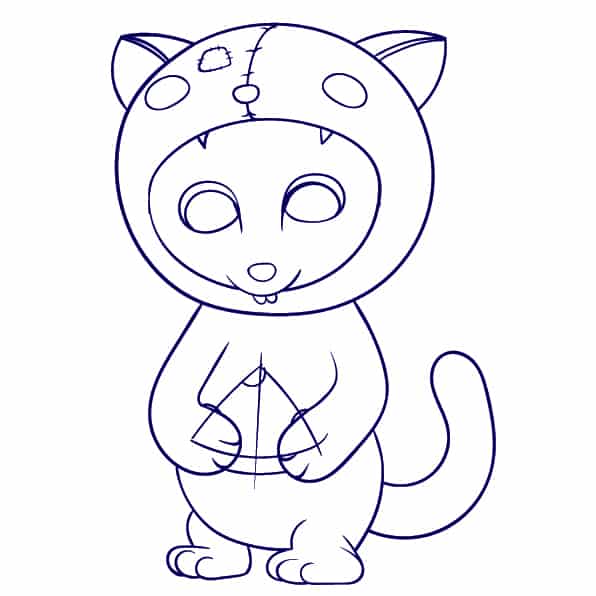


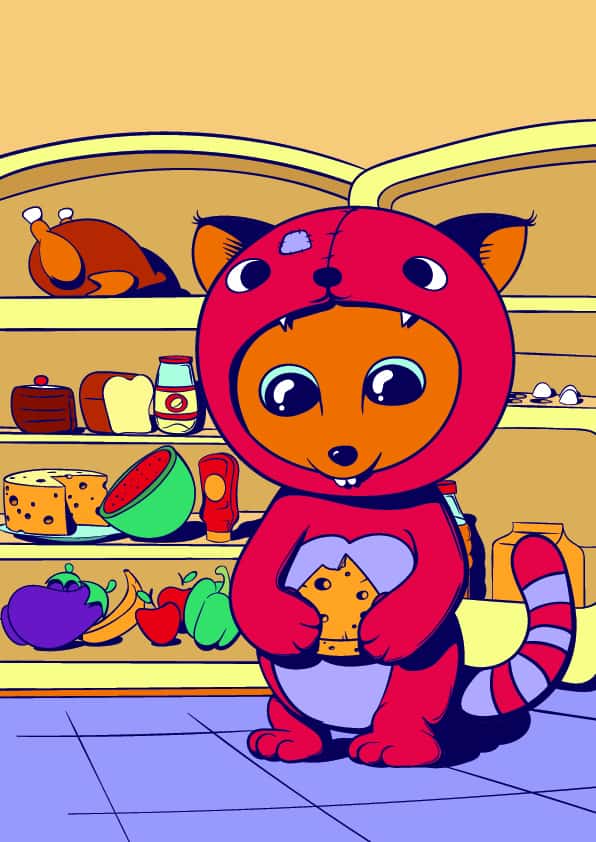

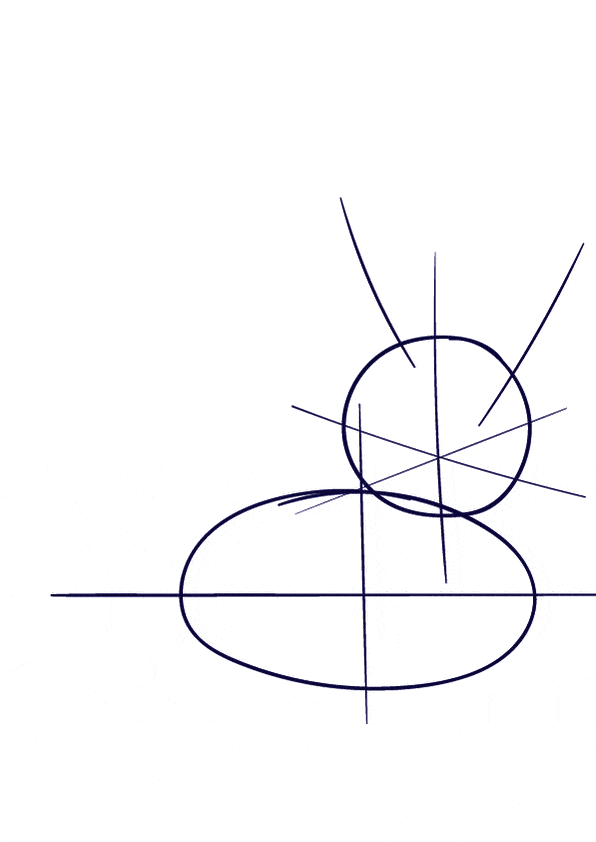
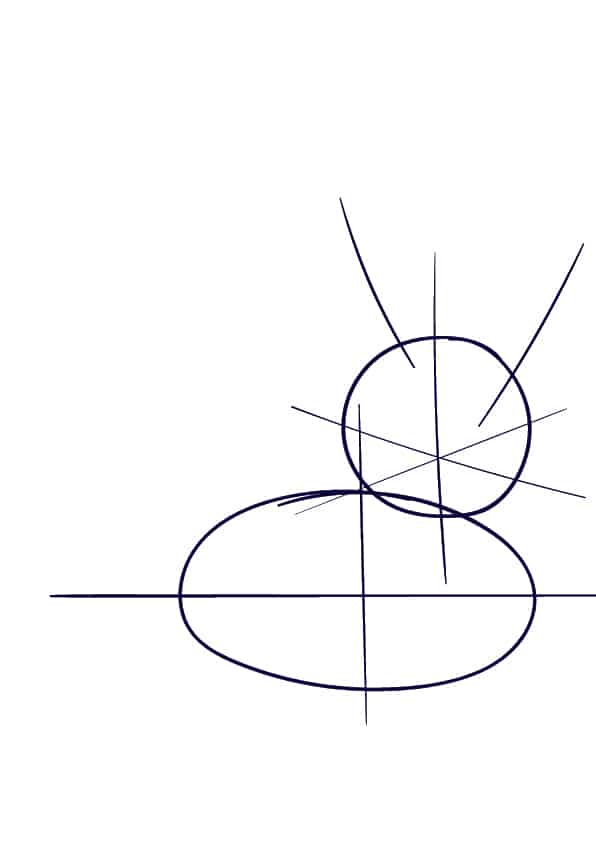
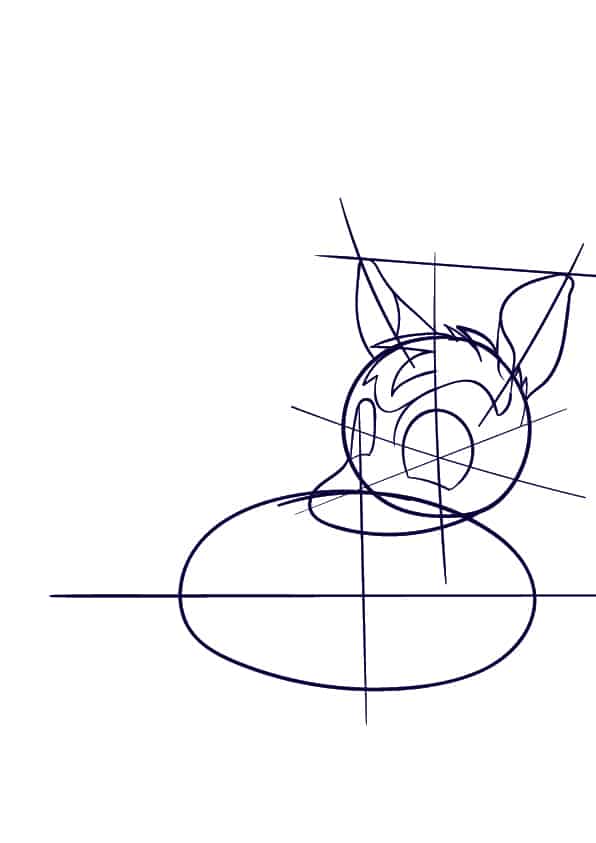
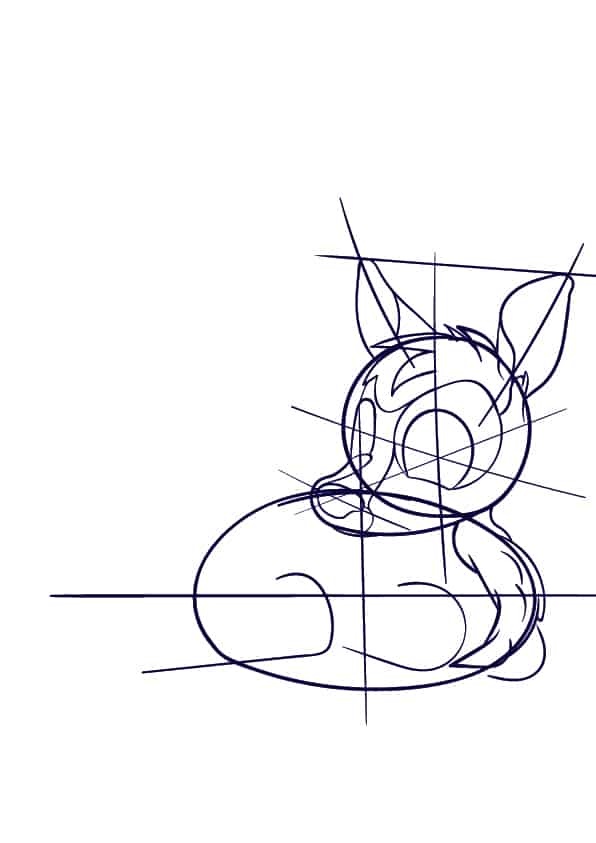
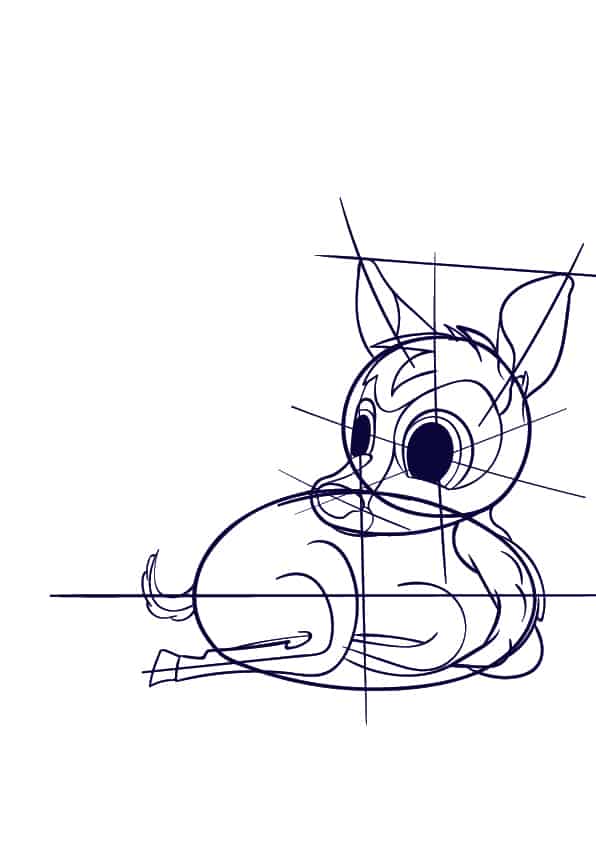
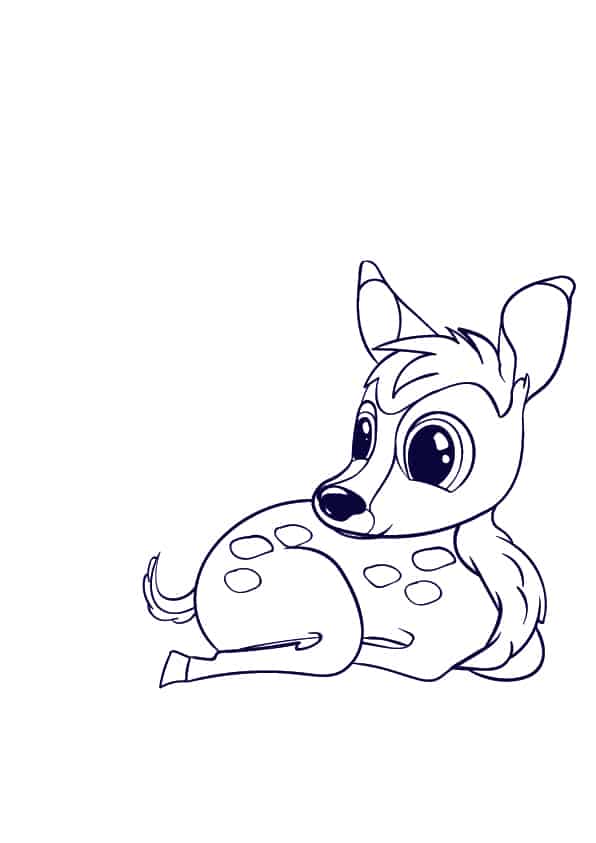
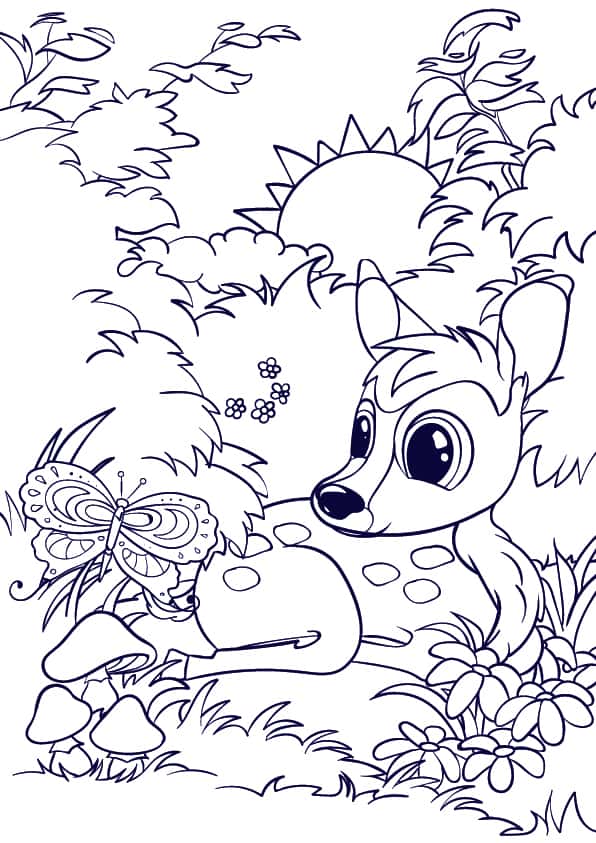
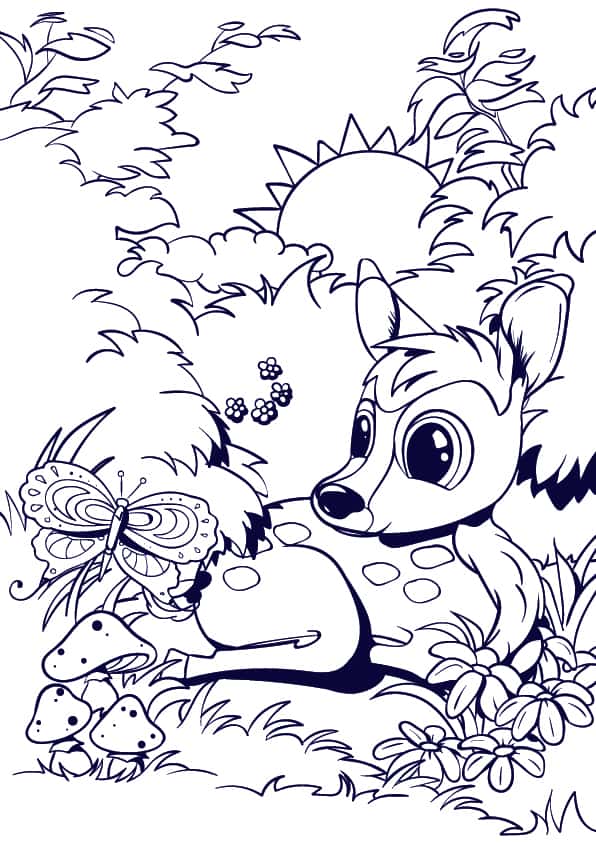


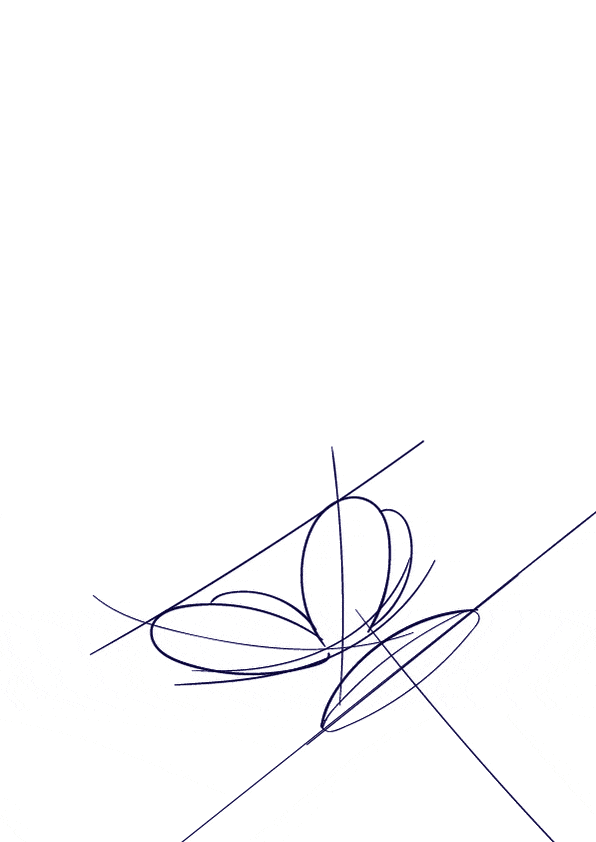
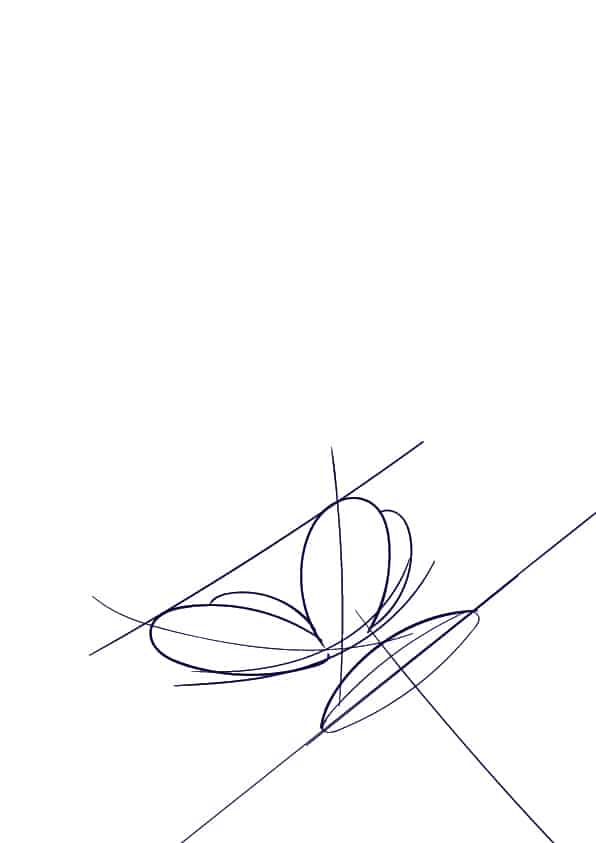
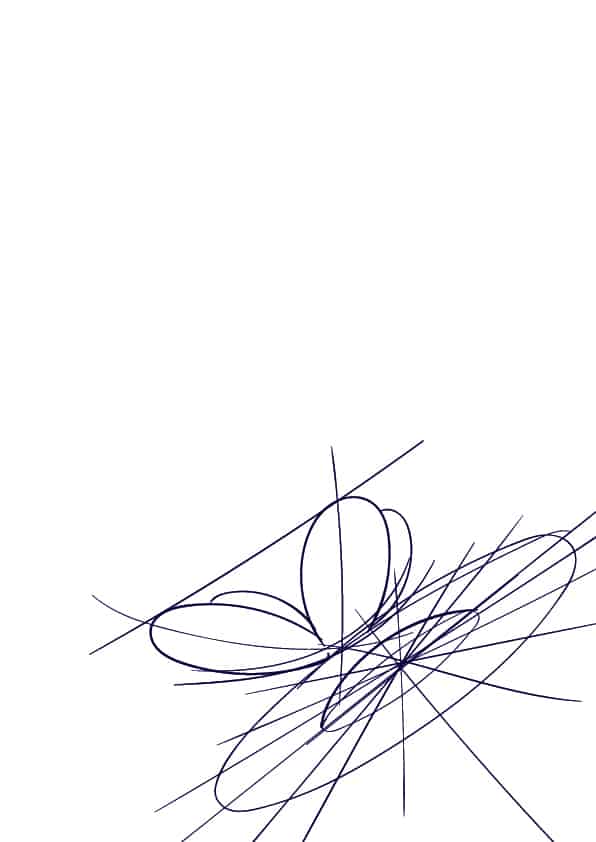
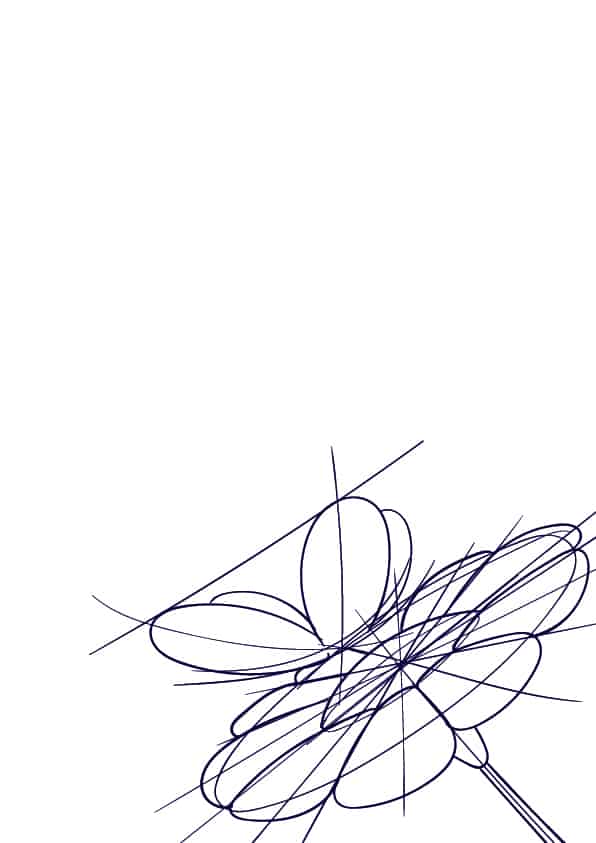
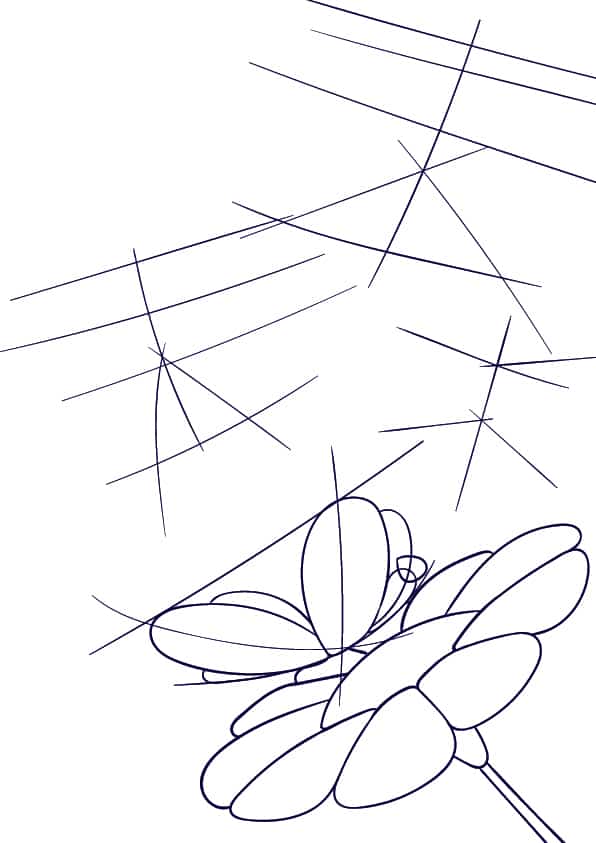
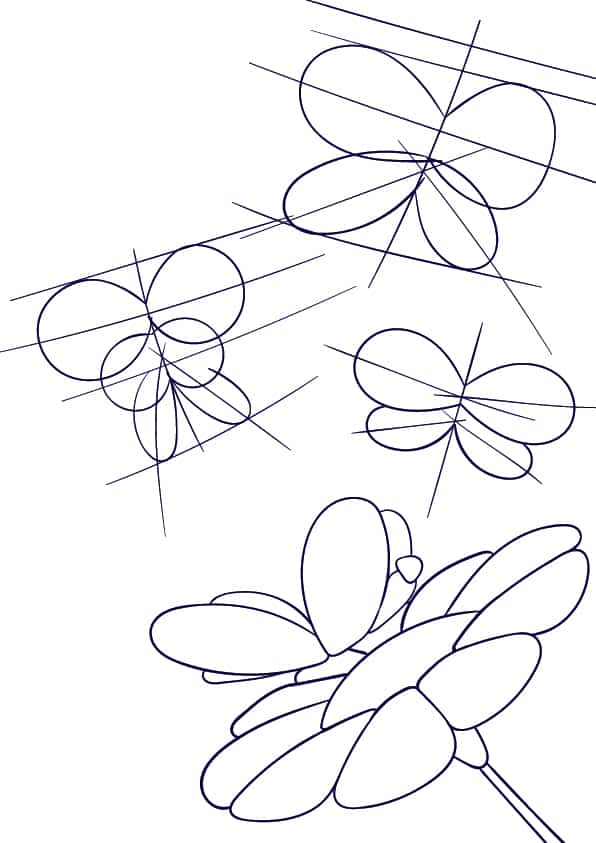
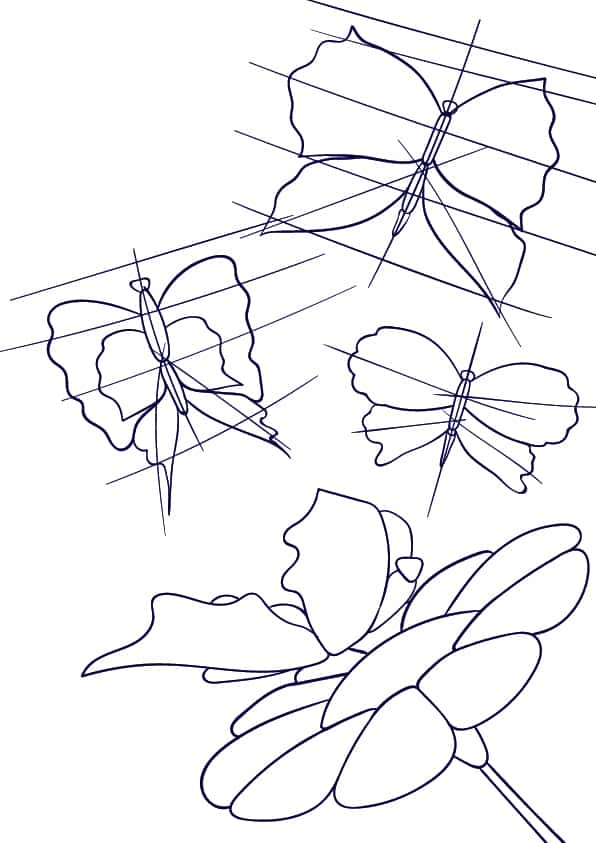


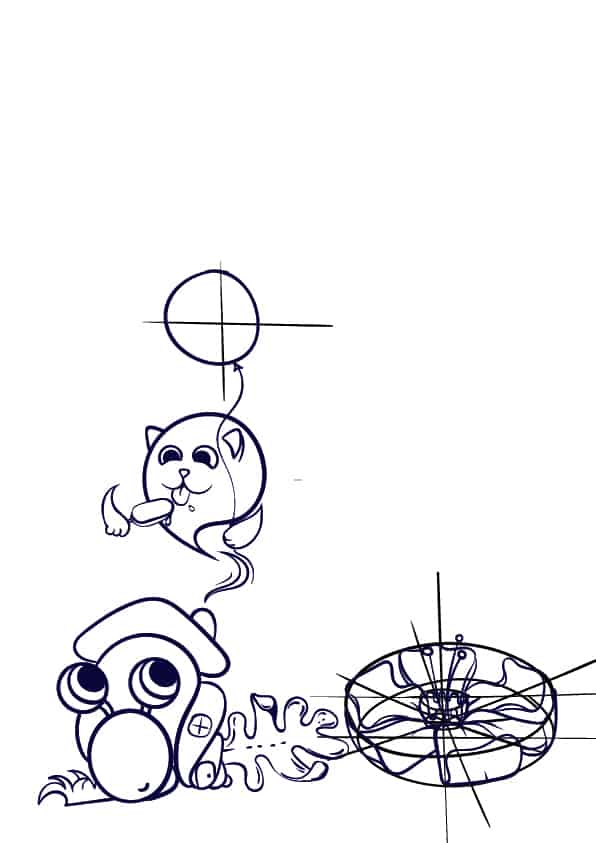

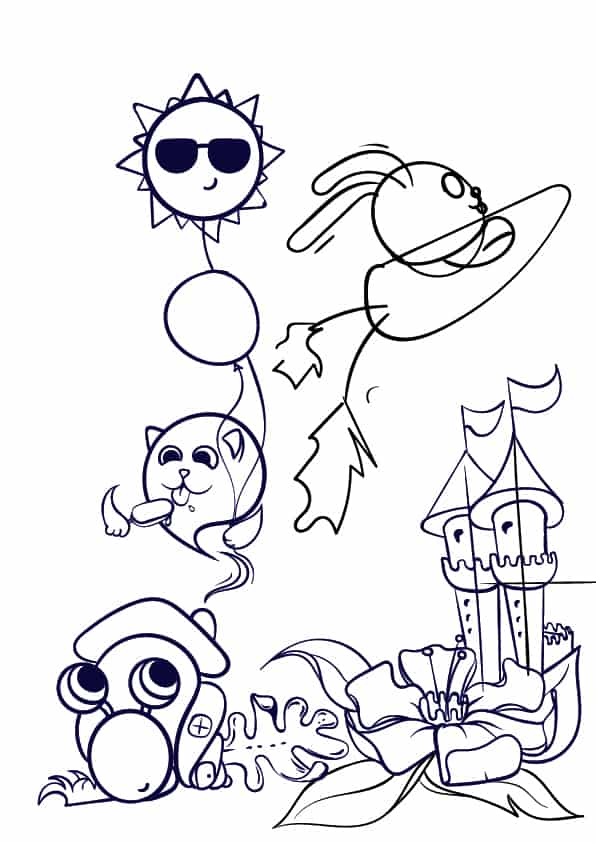
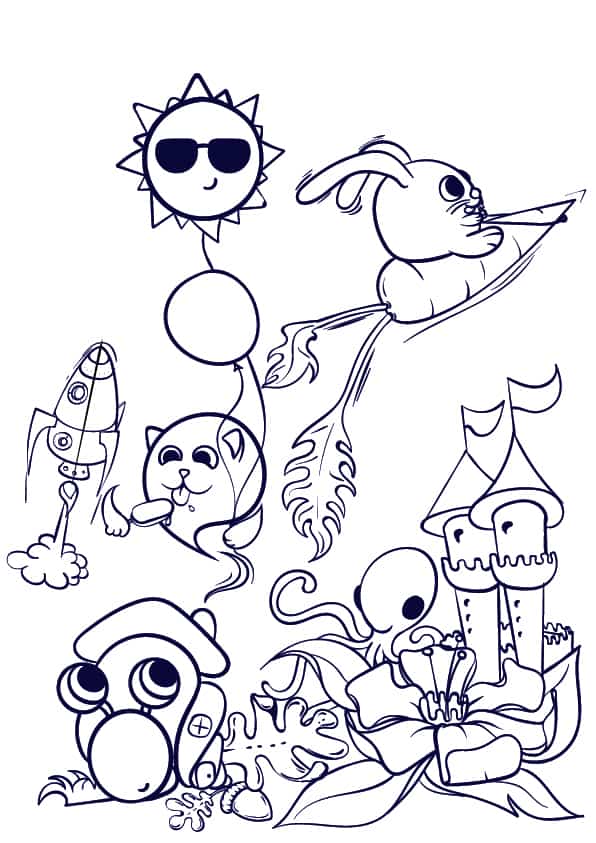

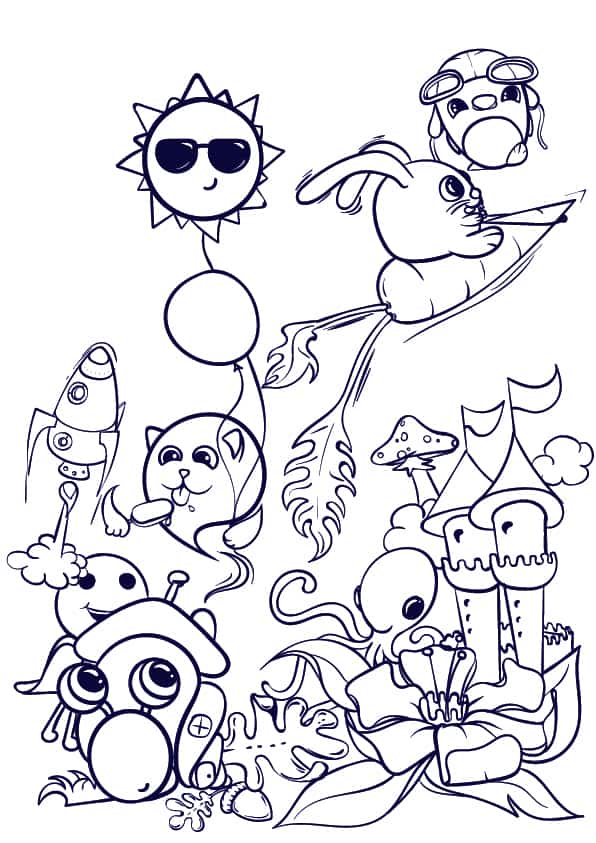


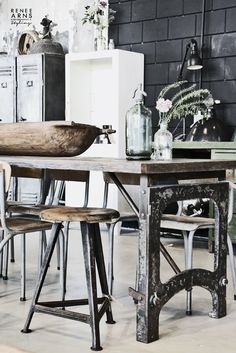
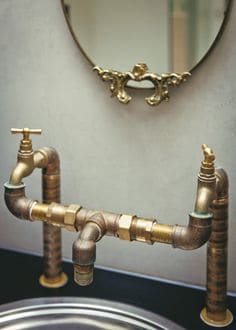
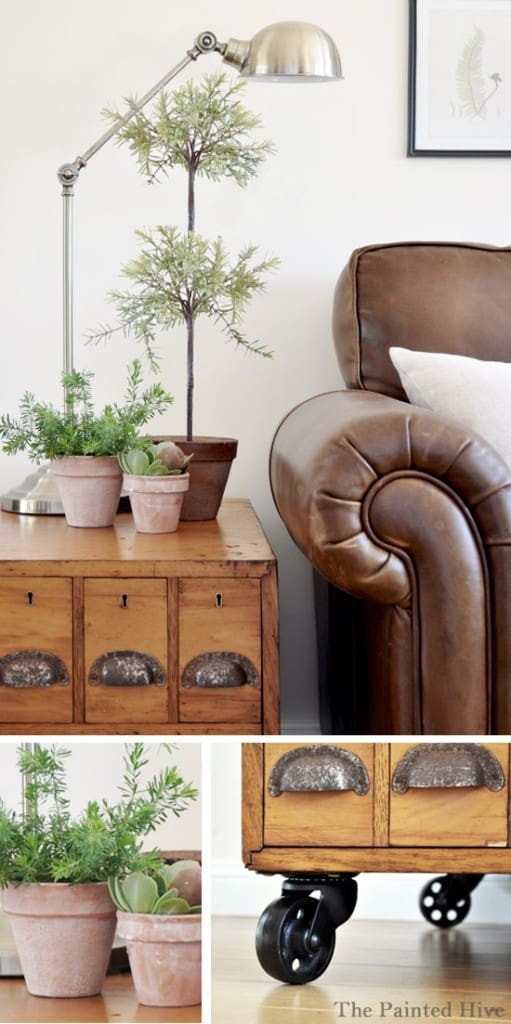
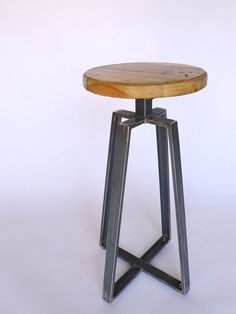
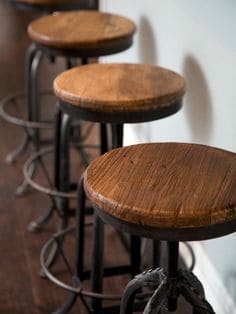
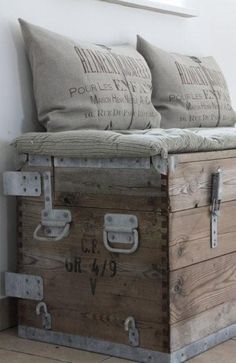
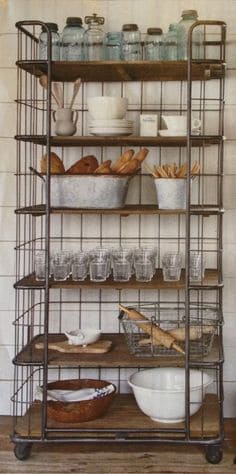
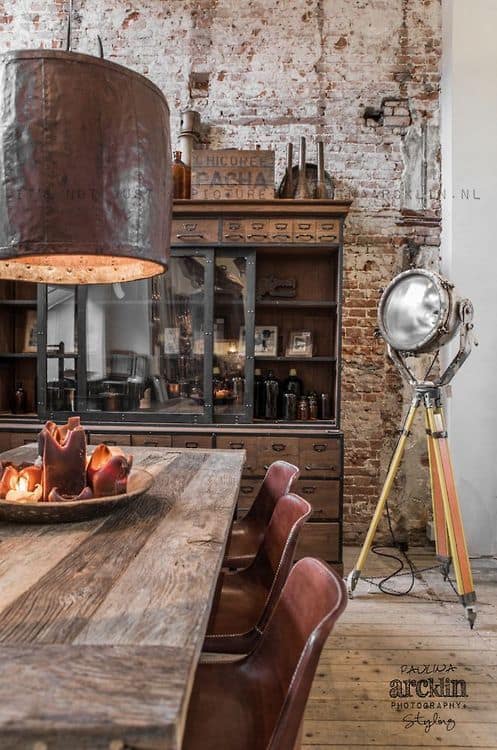
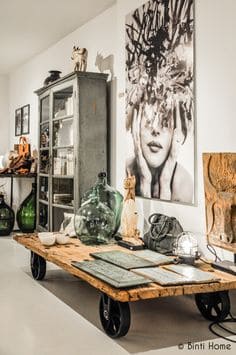
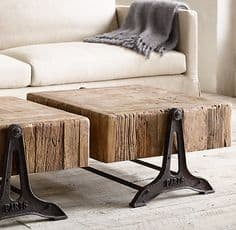


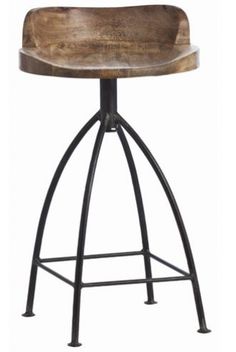
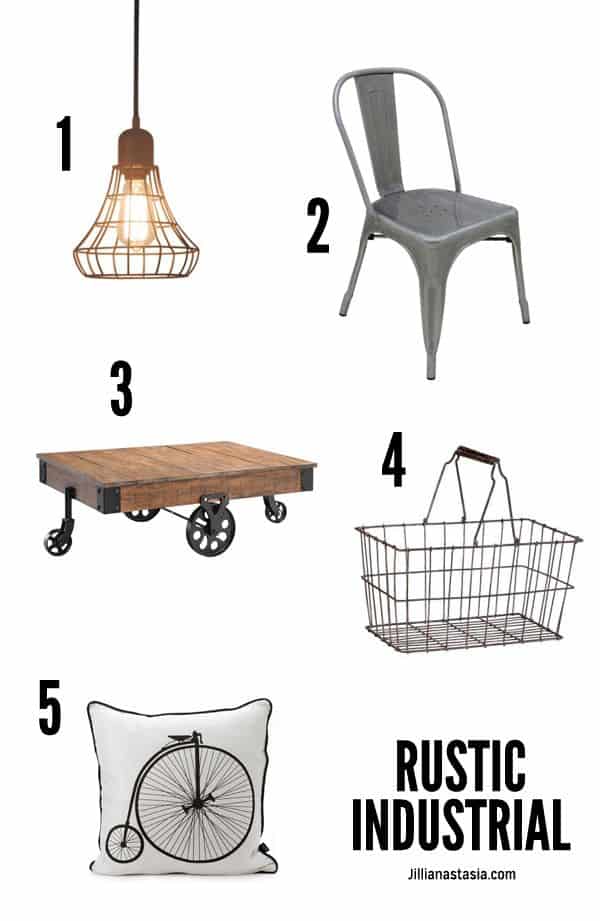
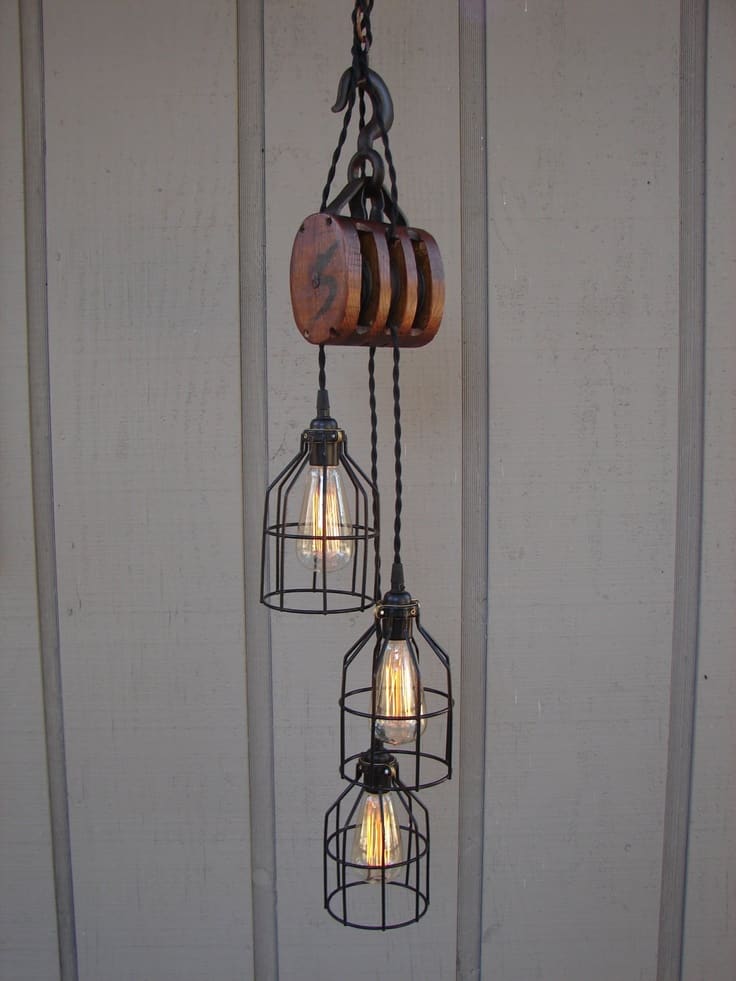
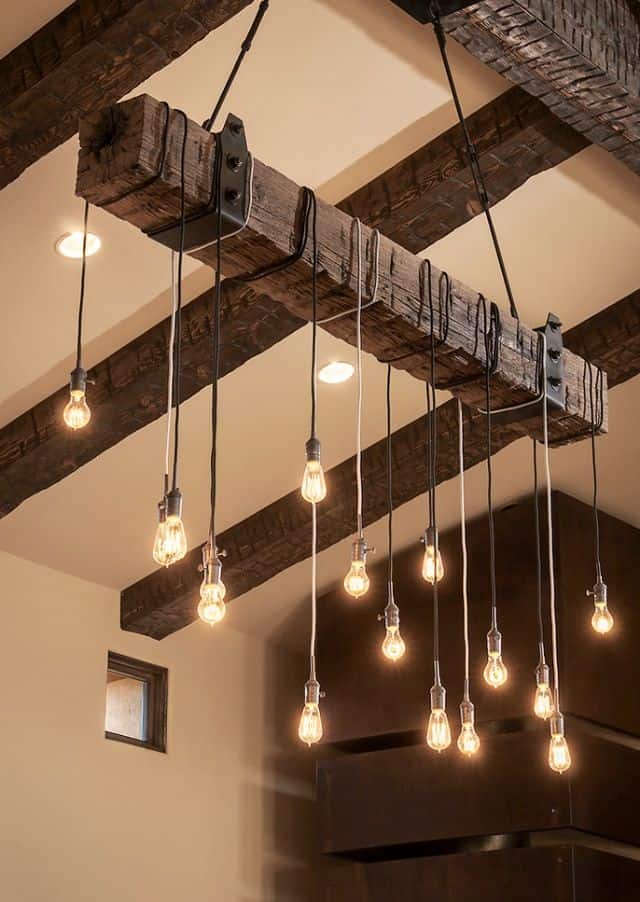
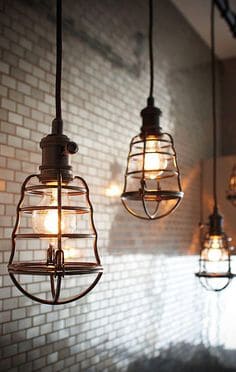
![Guide on How to Create a Colorful Rainbow DIY Crane Curtain [Video+Detailed Instructions]](https://homesthetics.net/wp-content/uploads/2014/10/Guide-on-How-to-Create-a-Colorful-Rainbow-DIY-Crane-Curtain-Video-Detailed-Instructions.jpg "Guide on How to Create a Colorful Rainbow DIY Crane Curtain [Video+Detailed Instructions]")
![Guide on How to Create a Colorful Rainbow DIY Crane Curtain [Detailed Instructions] homesthetics (2)](https://homesthetics.net/wp-content/uploads/2014/10/Guide-on-How-to-Create-a-Colorful-Rainbow-DIY-Crane-Curtain-Detailed-Instructions-homesthetics-2.gif)
![Guide on How to Create a Colorful Rainbow DIY Crane Curtain [Detailed Instructions] homesthetics (11)](https://homesthetics.net/wp-content/uploads/2014/10/Guide-on-How-to-Create-a-Colorful-Rainbow-DIY-Crane-Curtain-Detailed-Instructions-homesthetics-11.jpg)
![Guide on How to Create a Colorful Rainbow DIY Crane Curtain [Detailed Instructions] homesthetics (5)](https://homesthetics.net/wp-content/uploads/2014/10/Guide-on-How-to-Create-a-Colorful-Rainbow-DIY-Crane-Curtain-Detailed-Instructions-homesthetics-5.jpg)
![Guide on How to Create a Colorful Rainbow DIY Crane Curtain [Detailed Instructions] homesthetics (7)](https://homesthetics.net/wp-content/uploads/2014/10/Guide-on-How-to-Create-a-Colorful-Rainbow-DIY-Crane-Curtain-Detailed-Instructions-homesthetics-7.jpg)
![Guide on How to Create a Colorful Rainbow DIY Crane Curtain [Detailed Instructions] homesthetics (10)](https://homesthetics.net/wp-content/uploads/2014/10/Guide-on-How-to-Create-a-Colorful-Rainbow-DIY-Crane-Curtain-Detailed-Instructions-homesthetics-10.jpg)
![Guide on How to Create a Colorful Rainbow DIY Crane Curtain [Detailed Instructions] homesthetics (1)](https://homesthetics.net/wp-content/uploads/2014/10/Guide-on-How-to-Create-a-Colorful-Rainbow-DIY-Crane-Curtain-Detailed-Instructions-homesthetics-1.jpg)
![Guide on How to Create a Colorful Rainbow DIY Crane Curtain [Detailed Instructions] homesthetics (3)](https://homesthetics.net/wp-content/uploads/2014/10/Guide-on-How-to-Create-a-Colorful-Rainbow-DIY-Crane-Curtain-Detailed-Instructions-homesthetics-3.jpg)
![Guide on How to Create a Colorful Rainbow DIY Crane Curtain [Detailed Instructions] homesthetics (4)](https://homesthetics.net/wp-content/uploads/2014/10/Guide-on-How-to-Create-a-Colorful-Rainbow-DIY-Crane-Curtain-Detailed-Instructions-homesthetics-4.jpg)
![Guide on How to Create a Colorful Rainbow DIY Crane Curtain [Detailed Instructions] homesthetics (6)](https://homesthetics.net/wp-content/uploads/2014/10/Guide-on-How-to-Create-a-Colorful-Rainbow-DIY-Crane-Curtain-Detailed-Instructions-homesthetics-6.jpg)
![Guide on How to Create a Colorful Rainbow DIY Crane Curtain [Detailed Instructions] homesthetics (8)](https://homesthetics.net/wp-content/uploads/2014/10/Guide-on-How-to-Create-a-Colorful-Rainbow-DIY-Crane-Curtain-Detailed-Instructions-homesthetics-8.jpg)
![Guide on How to Create a Colorful Rainbow DIY Crane Curtain [Detailed Instructions] homesthetics (12)](https://homesthetics.net/wp-content/uploads/2014/10/Guide-on-How-to-Create-a-Colorful-Rainbow-DIY-Crane-Curtain-Detailed-Instructions-homesthetics-12.jpg)
![Guide on How to Create a Colorful Rainbow DIY Crane Curtain [Detailed Instructions] homesthetics (13)](https://homesthetics.net/wp-content/uploads/2014/10/Guide-on-How-to-Create-a-Colorful-Rainbow-DIY-Crane-Curtain-Detailed-Instructions-homesthetics-13.jpg)
![Guide on How to Create a Colorful Rainbow DIY Crane Curtain [Detailed Instructions] homesthetics (1)](https://homesthetics.net/wp-content/uploads/2014/10/Guide-on-How-to-Create-a-Colorful-Rainbow-DIY-Crane-Curtain-Detailed-Instructions-homesthetics-1.gif)
![Guide on How to Create a Colorful Rainbow DIY Crane Curtain [Detailed Instructions] homesthetics (9)](https://homesthetics.net/wp-content/uploads/2014/10/Guide-on-How-to-Create-a-Colorful-Rainbow-DIY-Crane-Curtain-Detailed-Instructions-homesthetics-9.jpg)
![Guide on How to Create a Colorful Rainbow DIY Crane Curtain [Detailed Instructions] homesthetics (2)](https://homesthetics.net/wp-content/uploads/2014/10/Guide-on-How-to-Create-a-Colorful-Rainbow-DIY-Crane-Curtain-Detailed-Instructions-homesthetics-2.jpg)

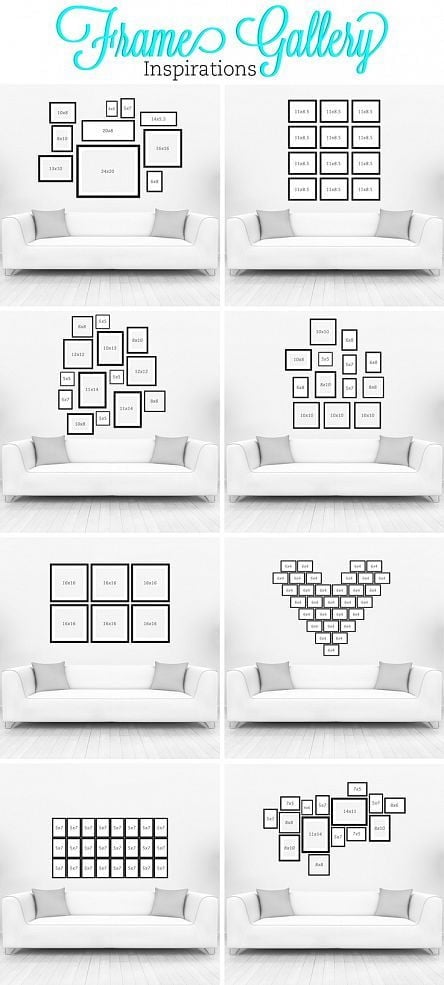

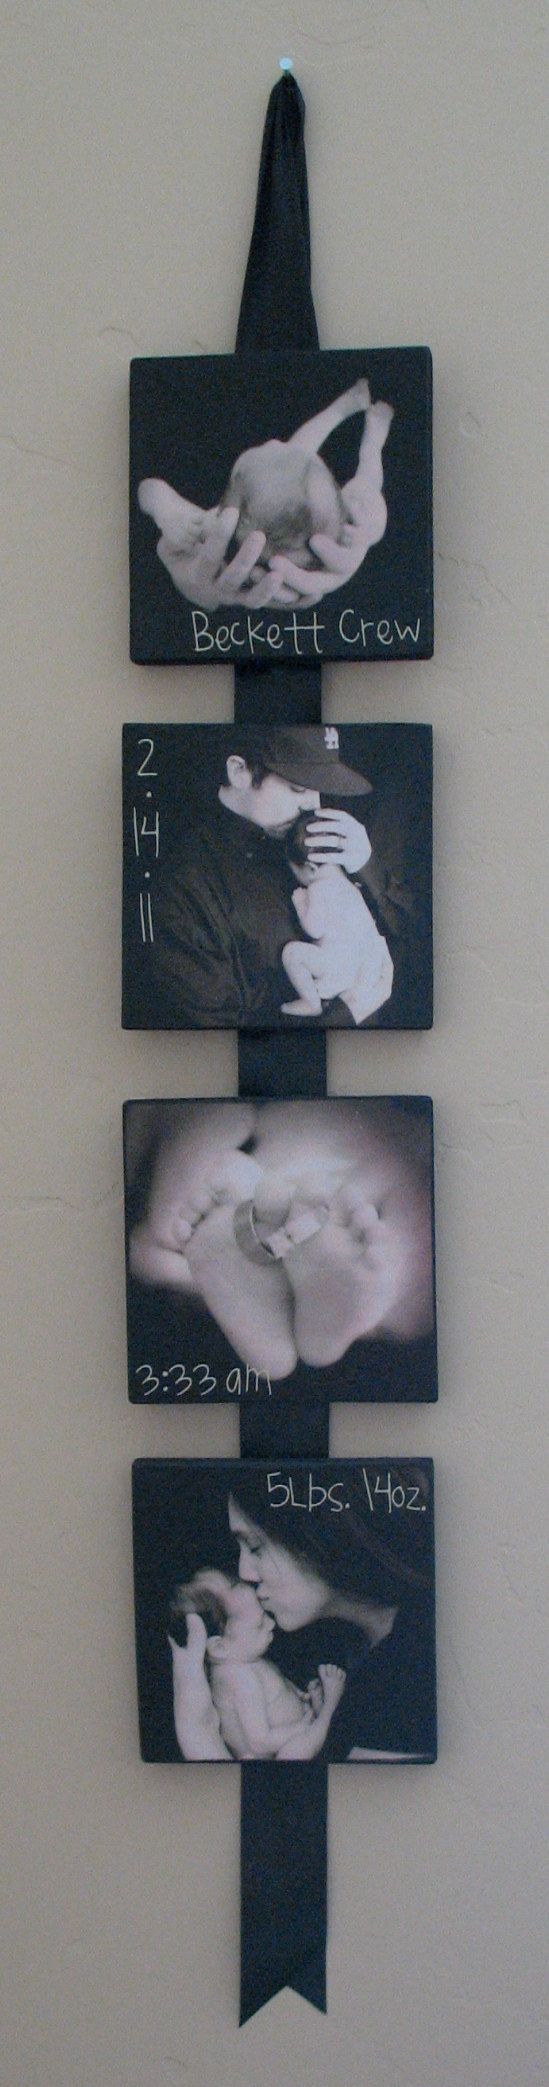
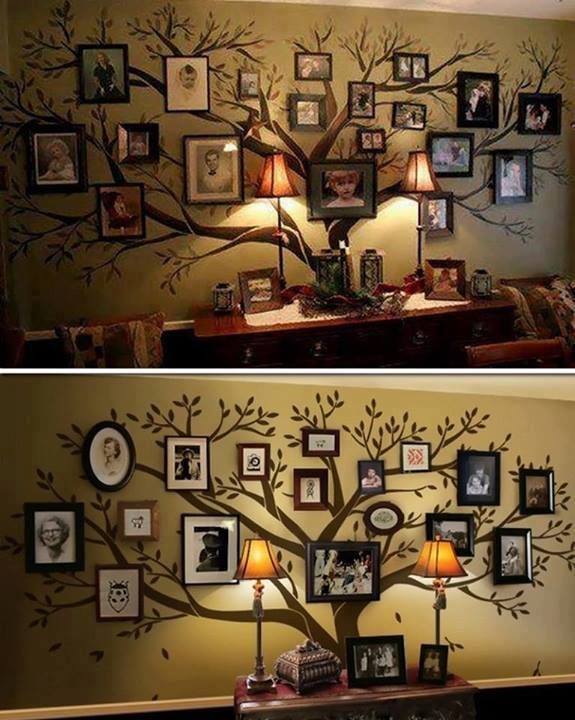
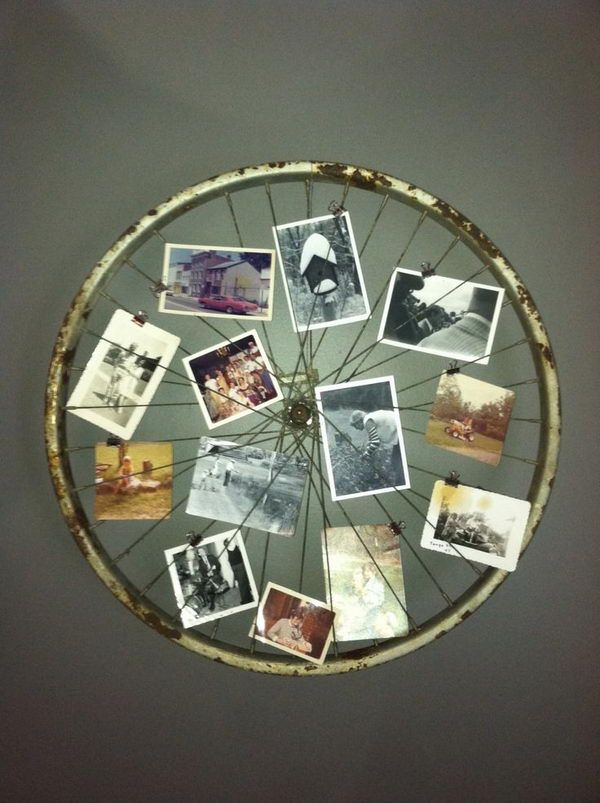
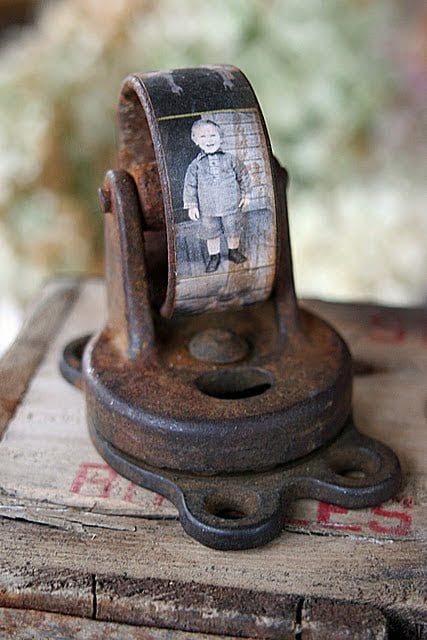


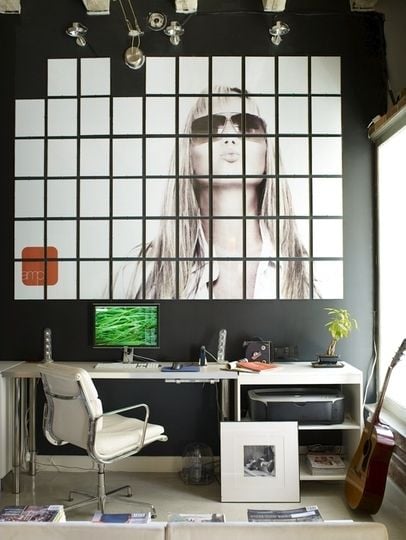
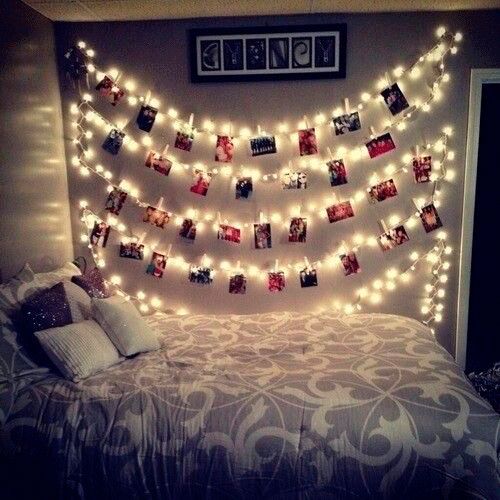
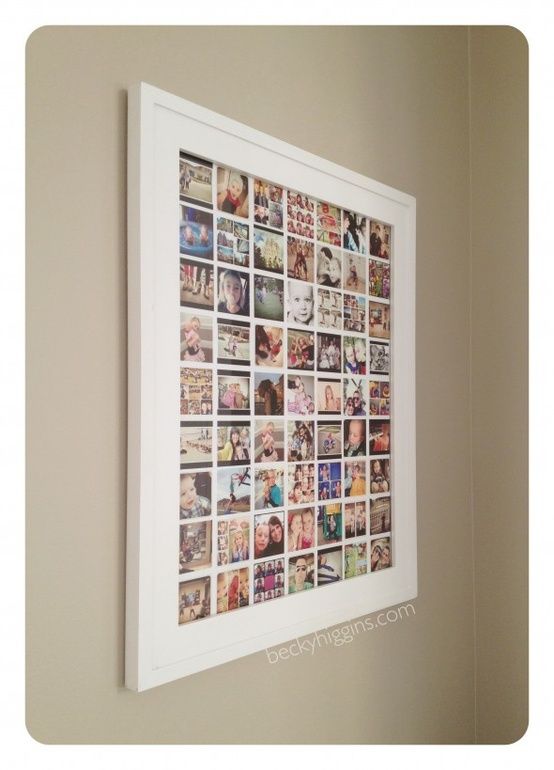

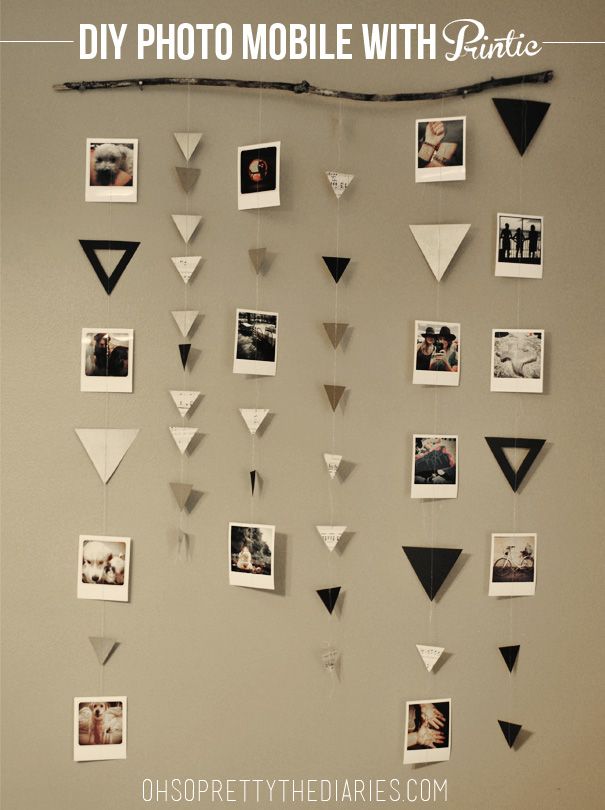


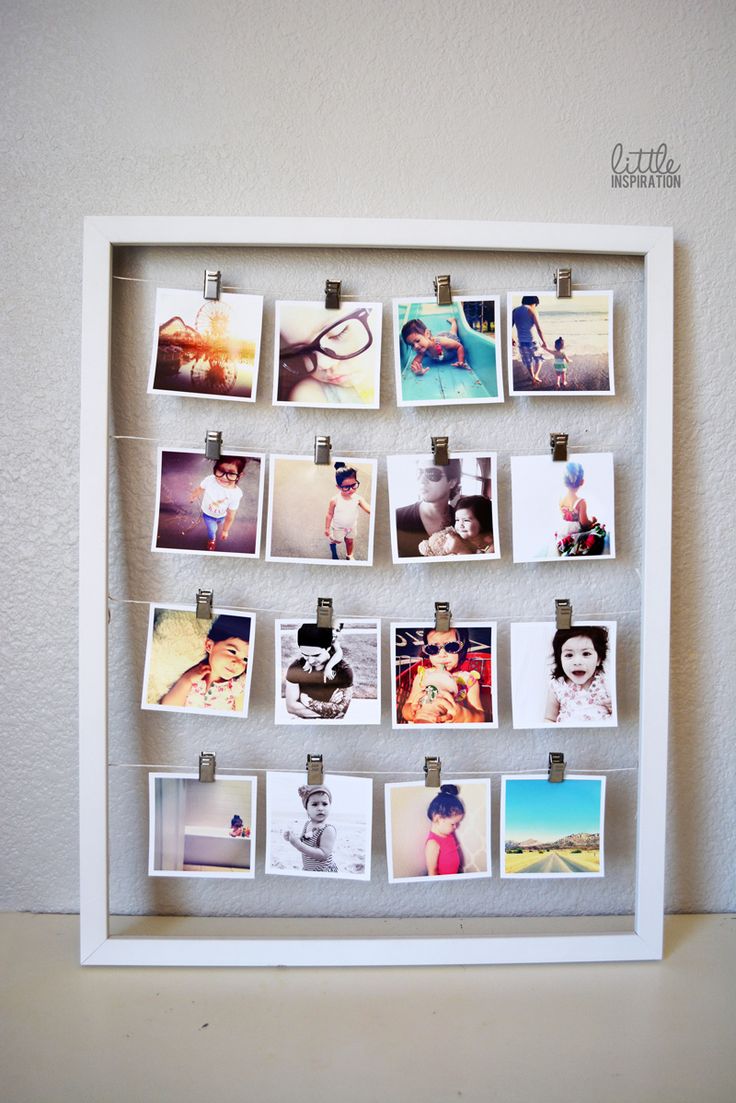

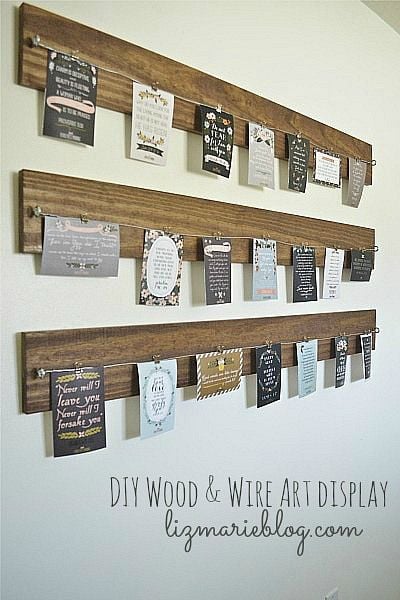

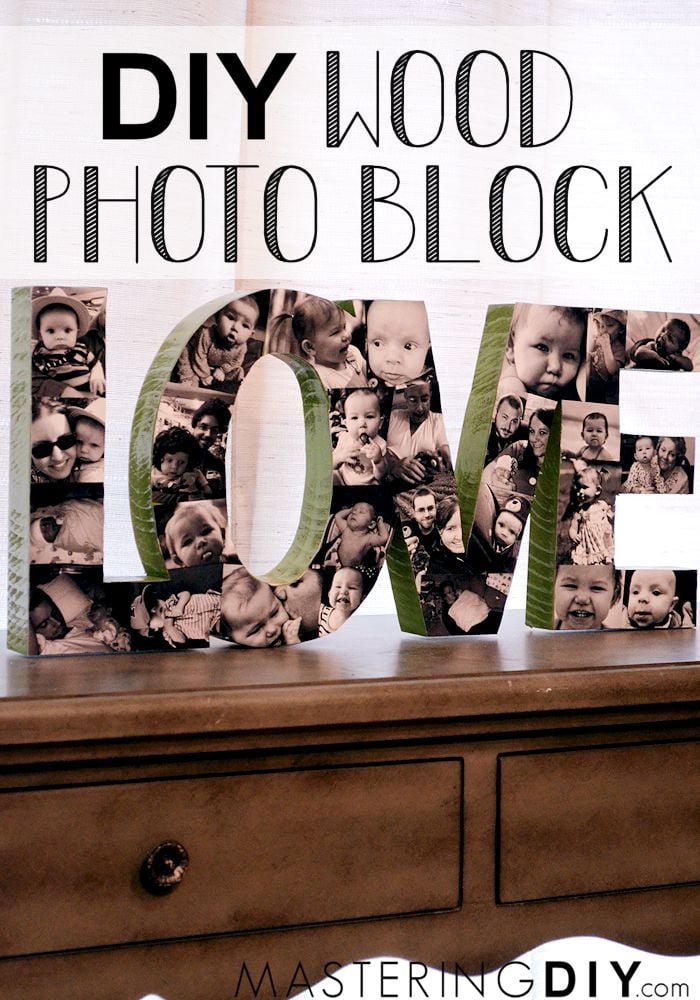
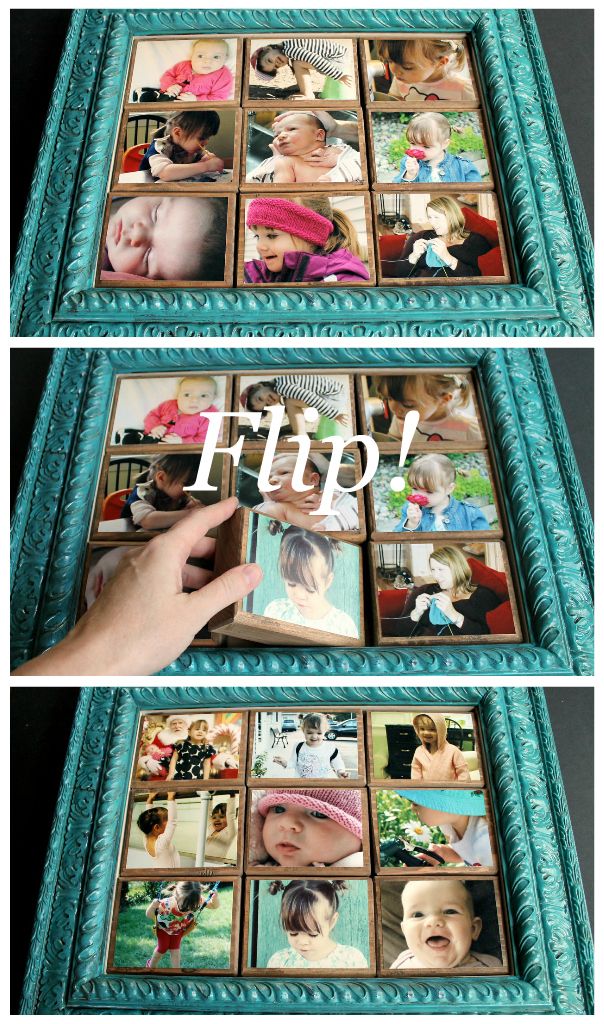
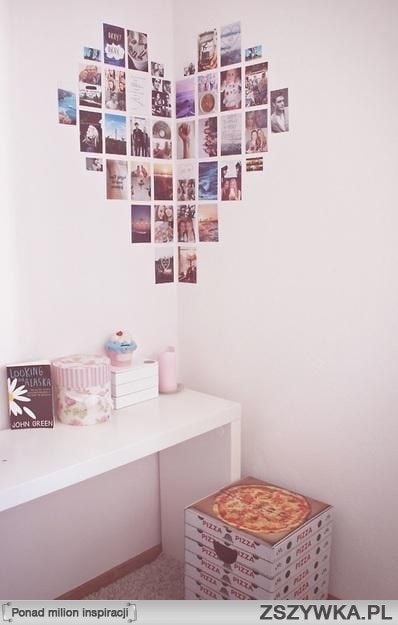
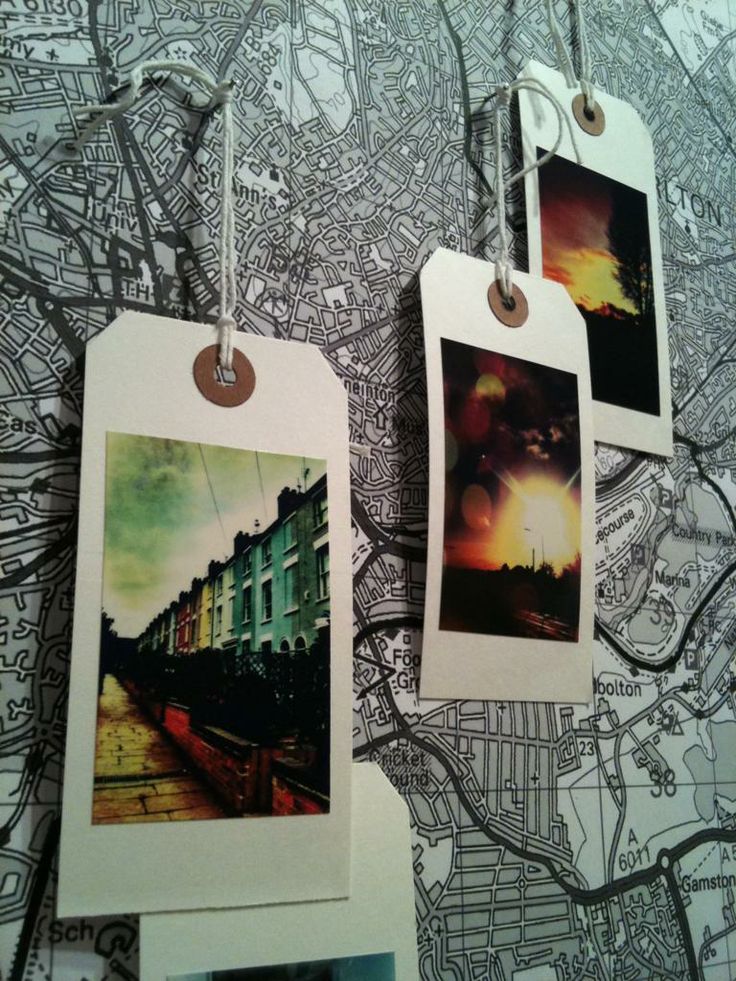

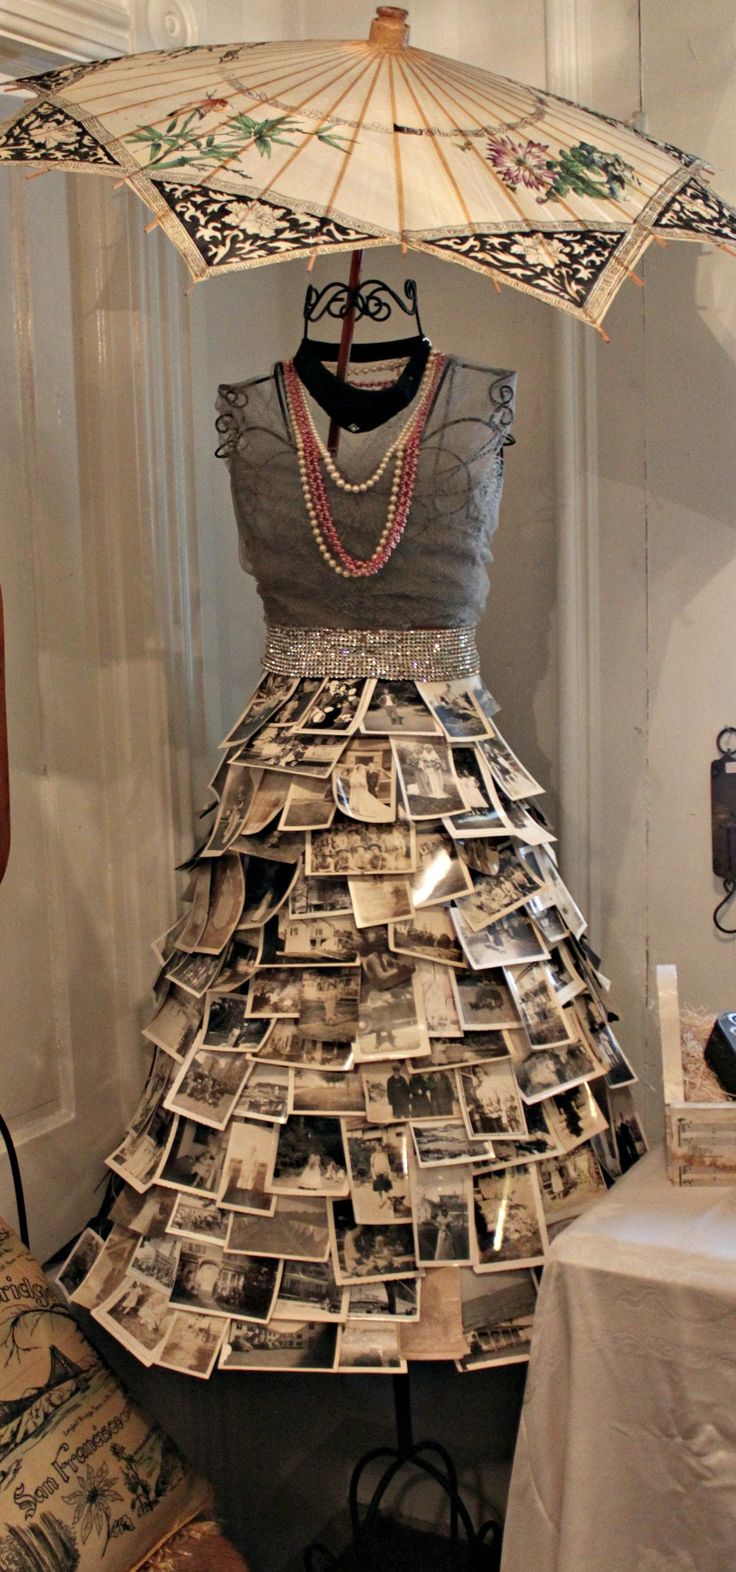

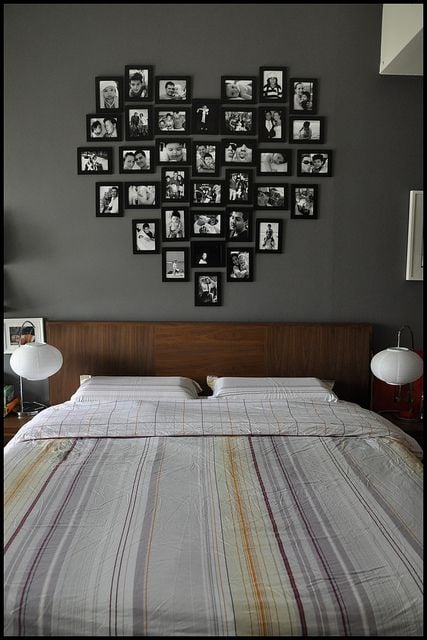
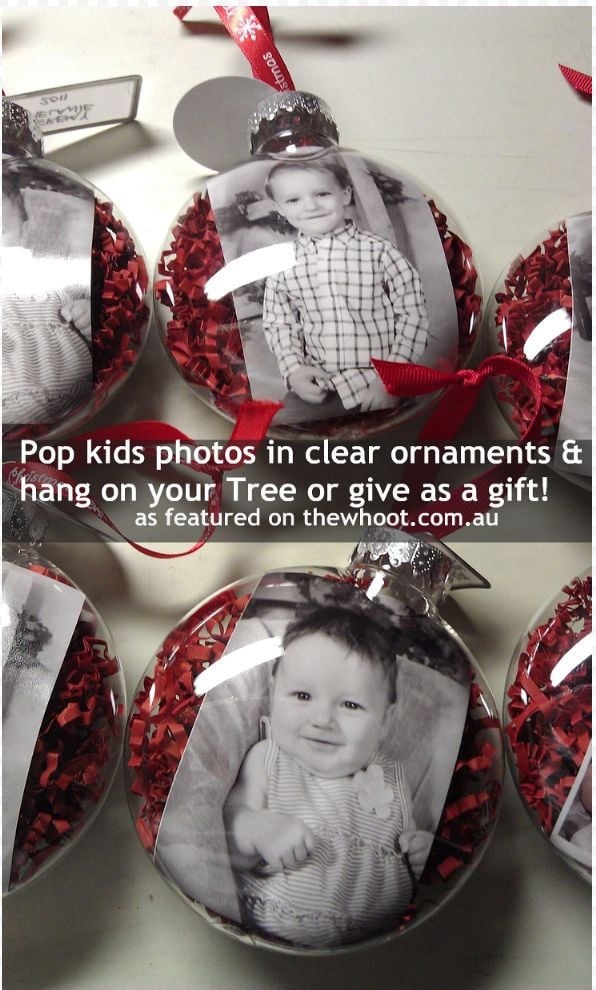

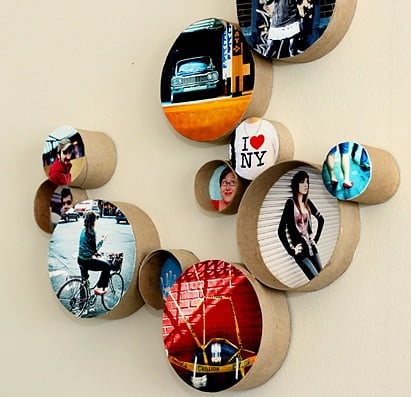
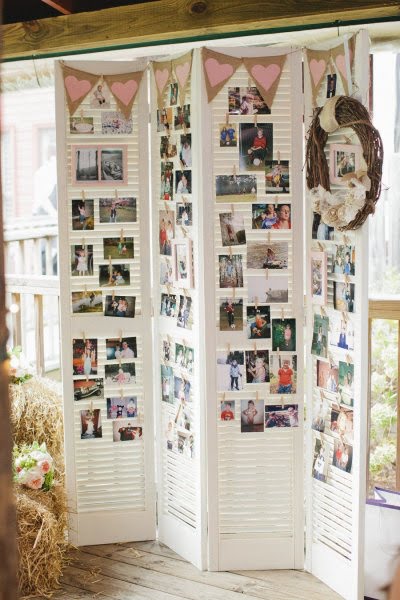

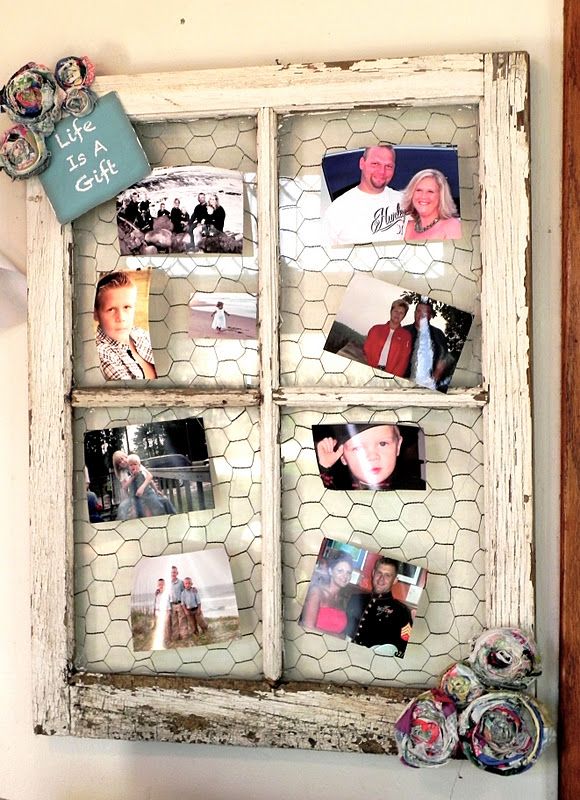
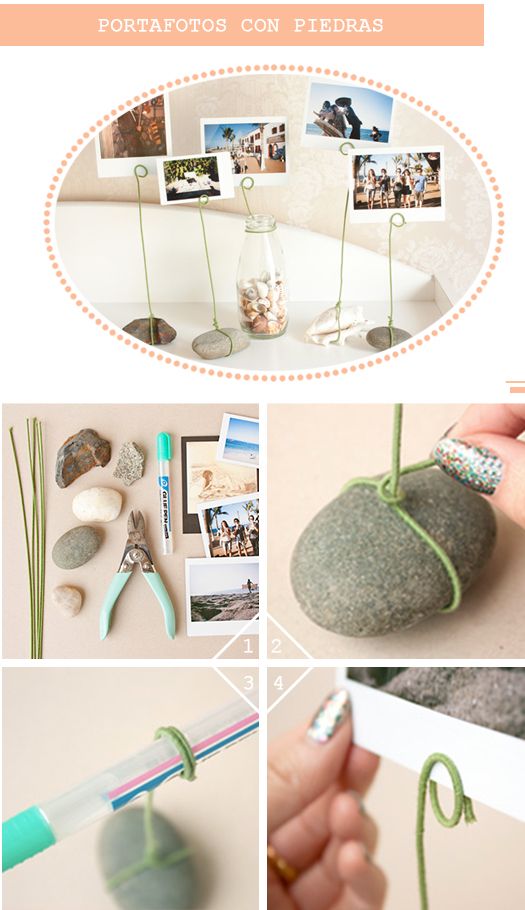
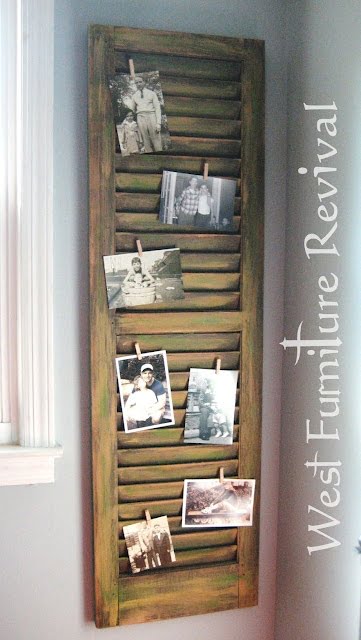
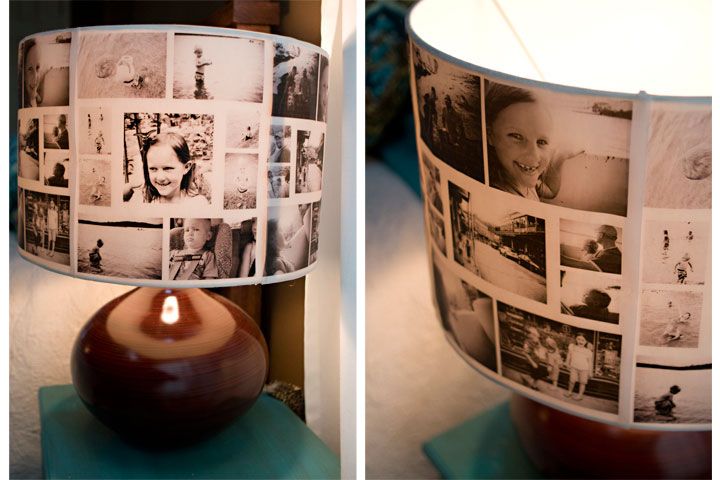
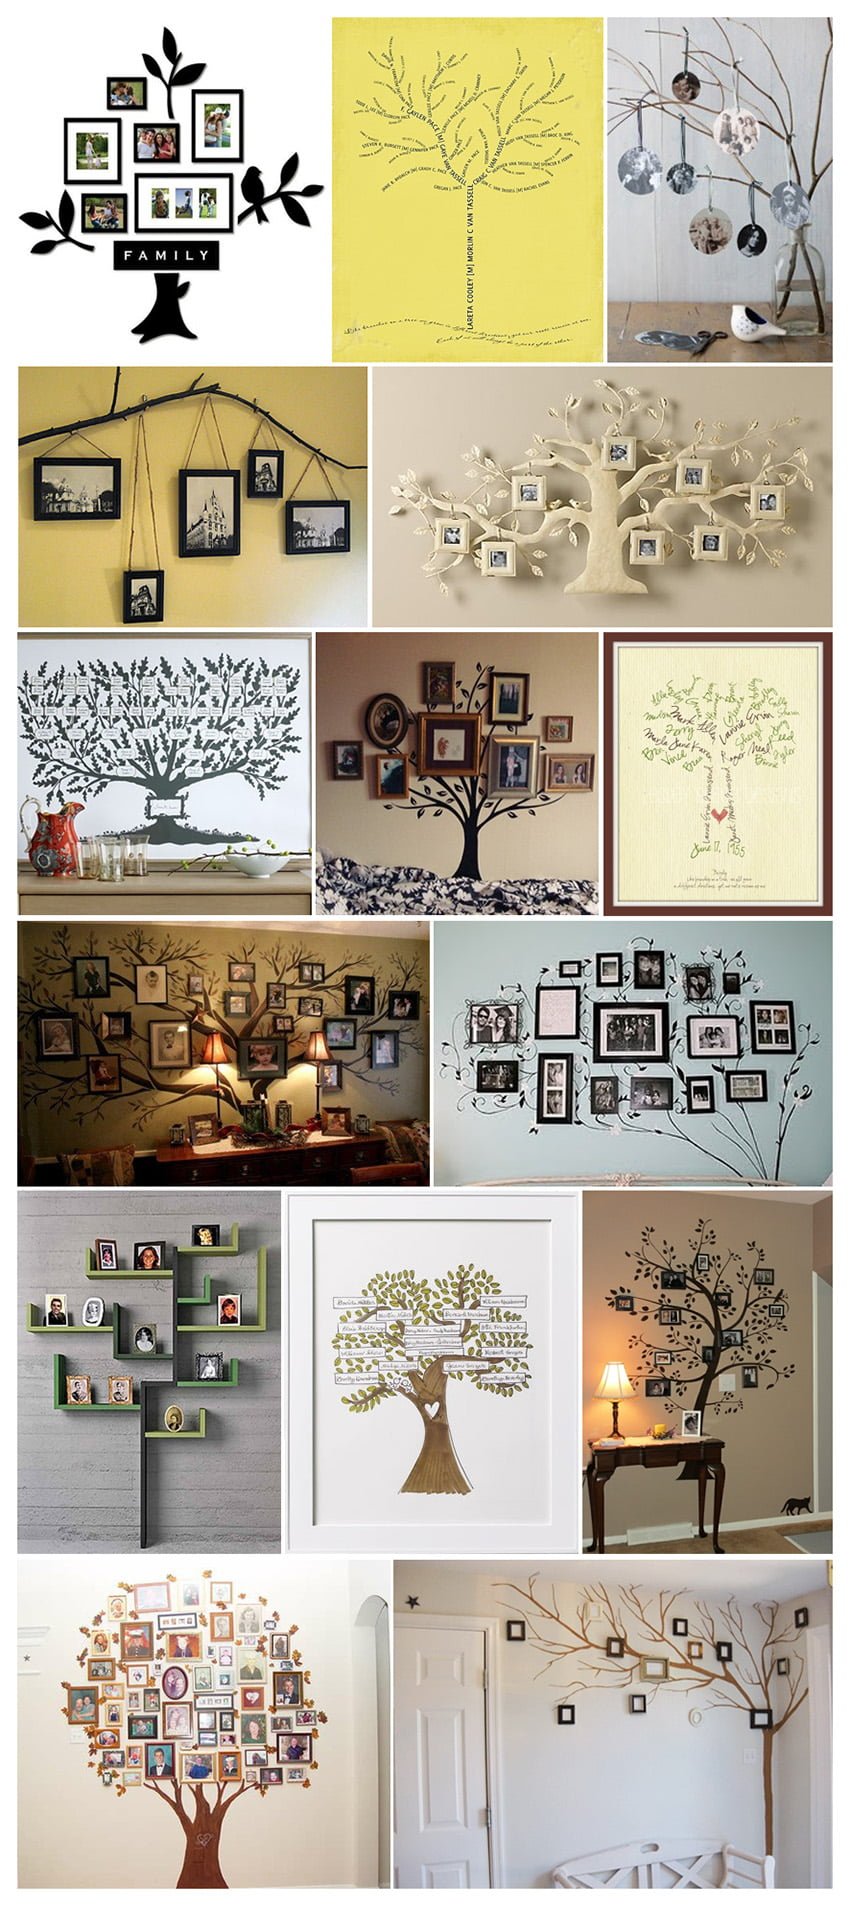
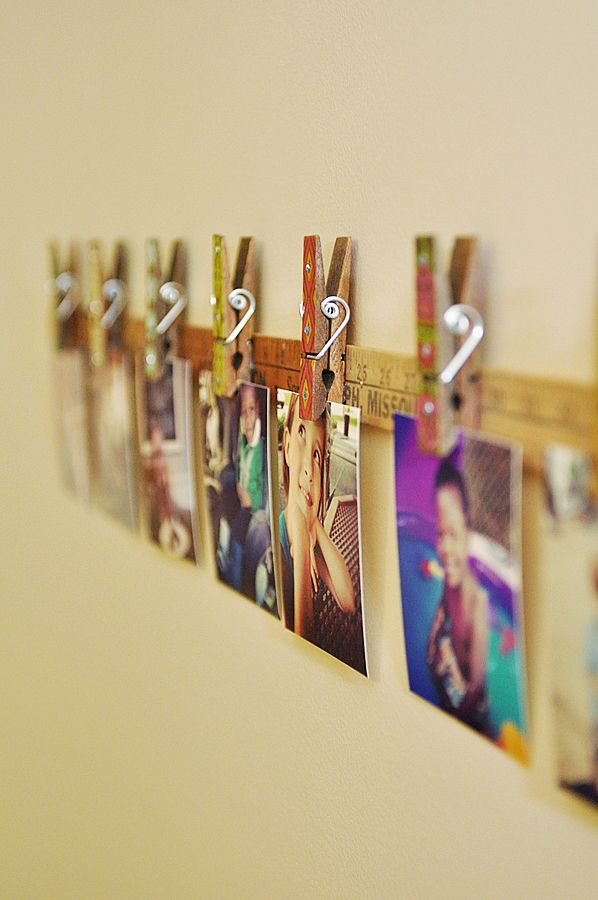
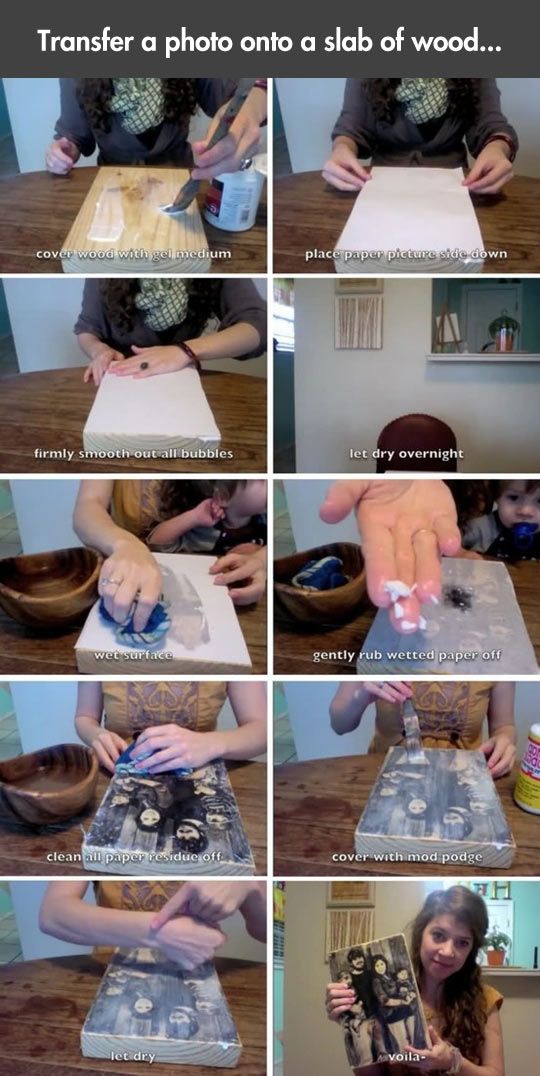
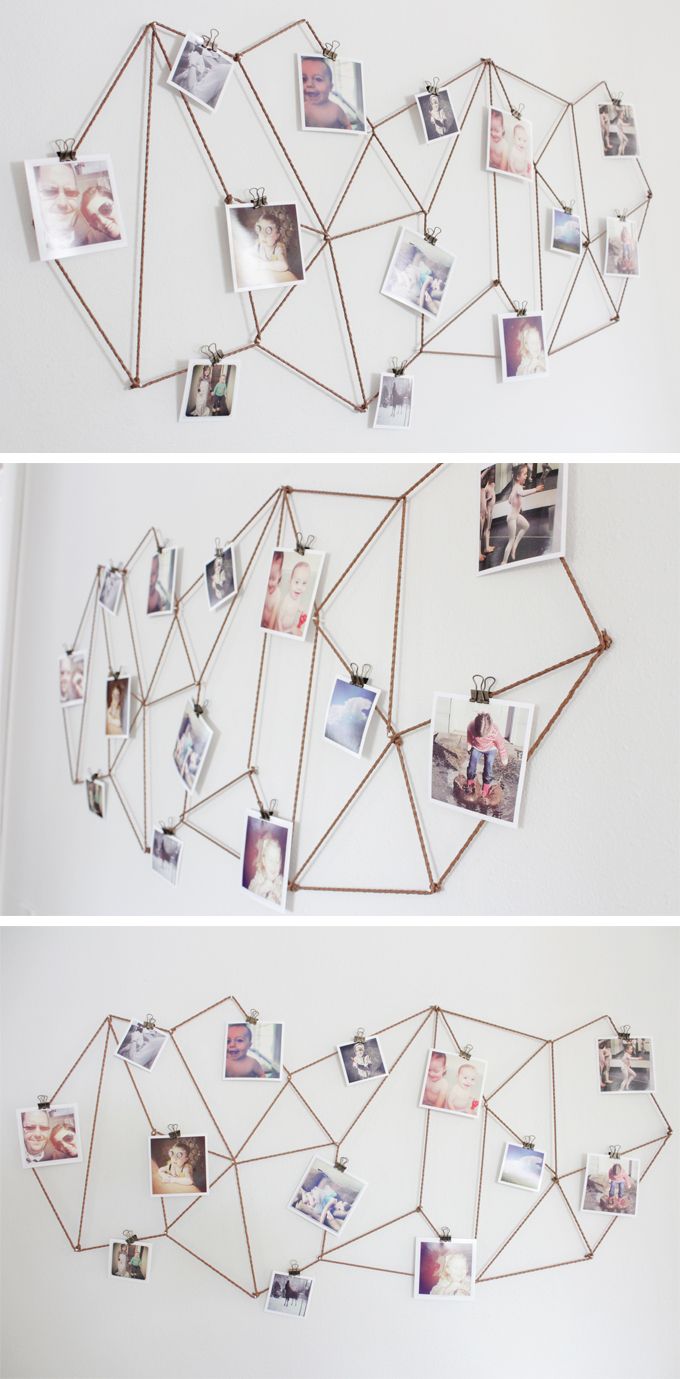

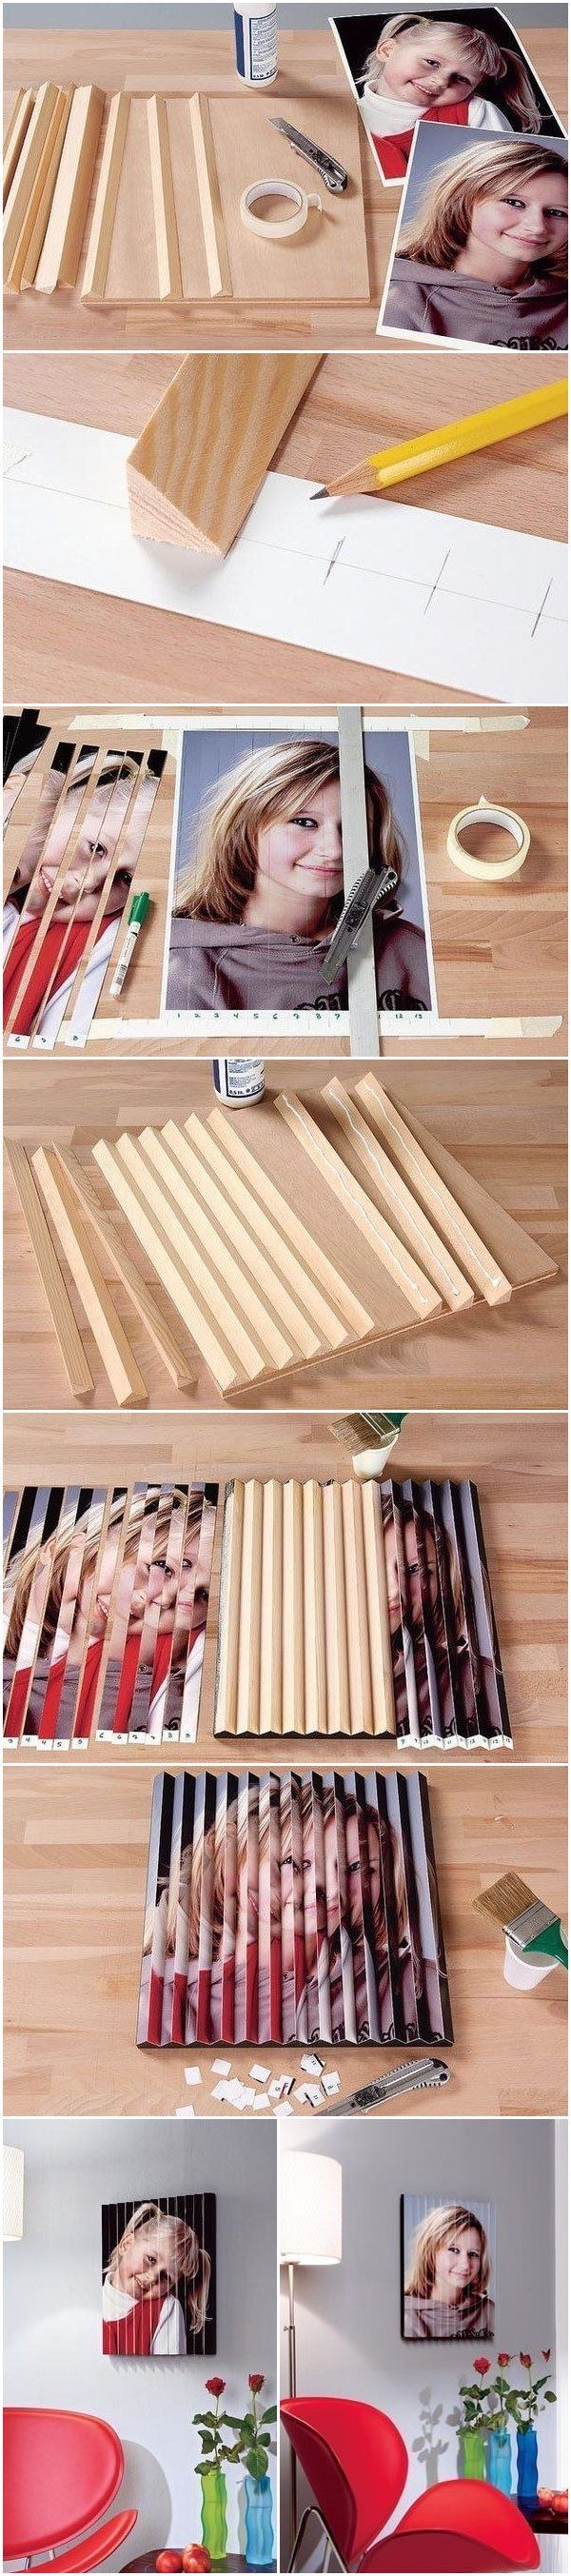

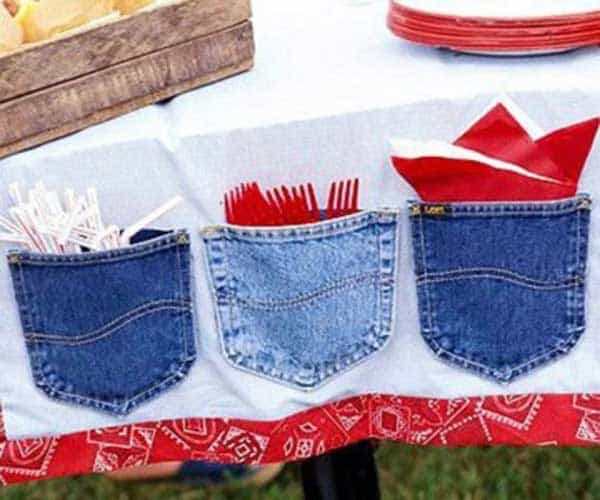
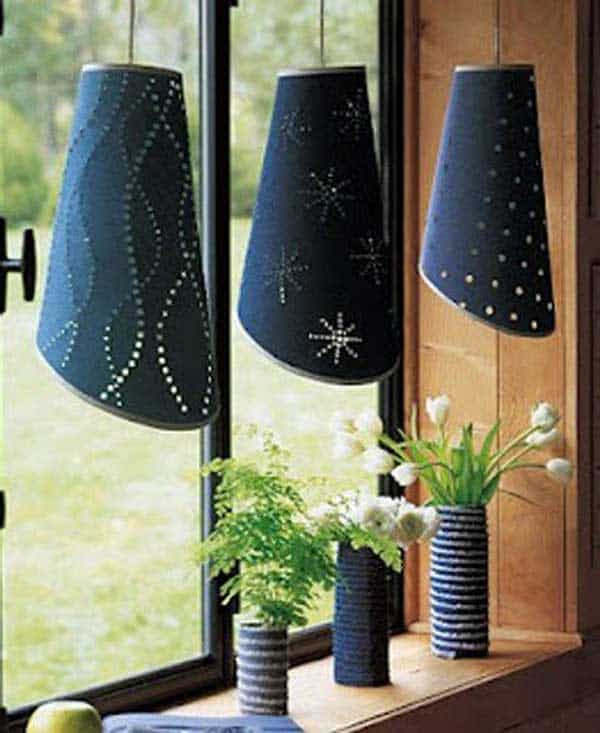
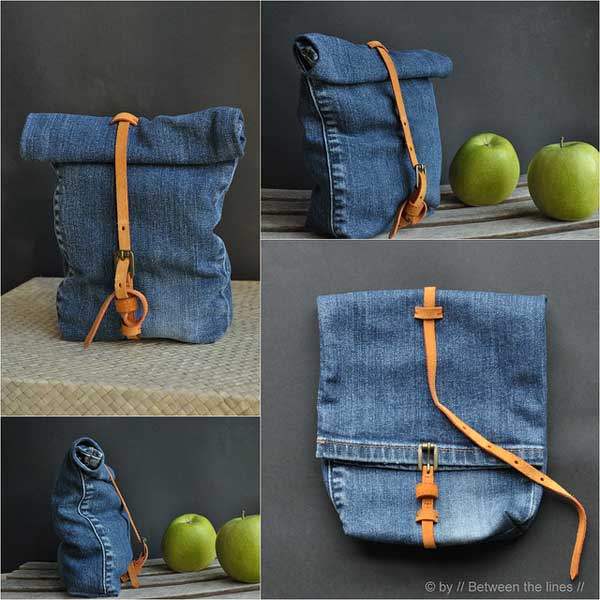
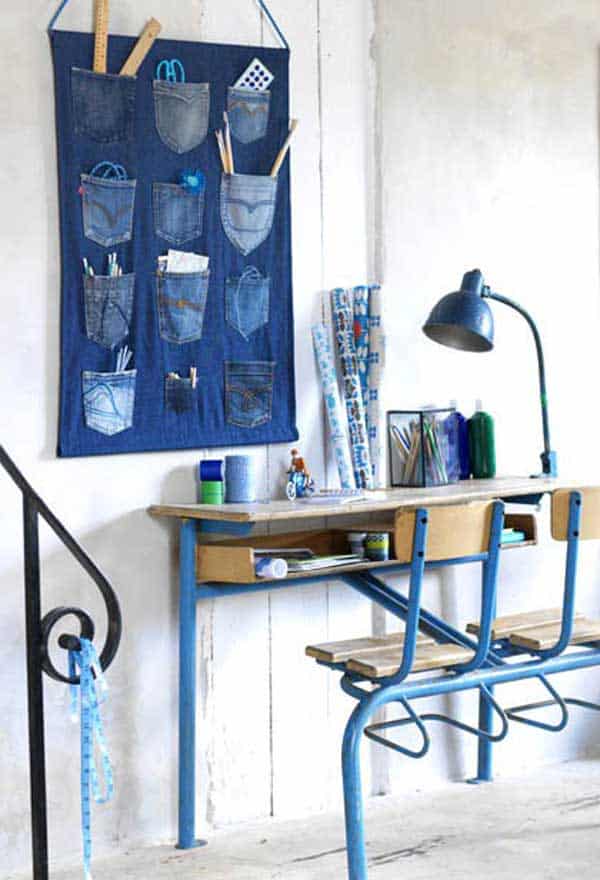
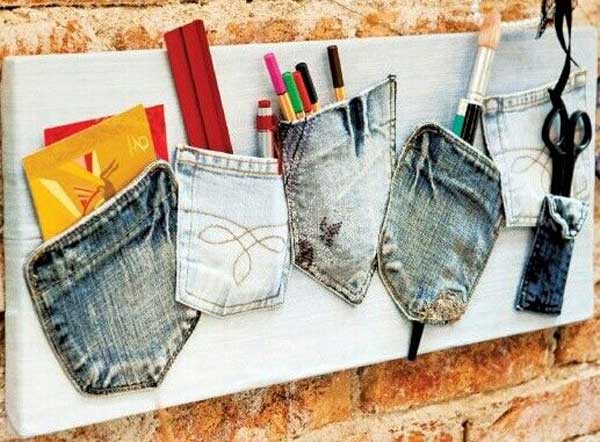
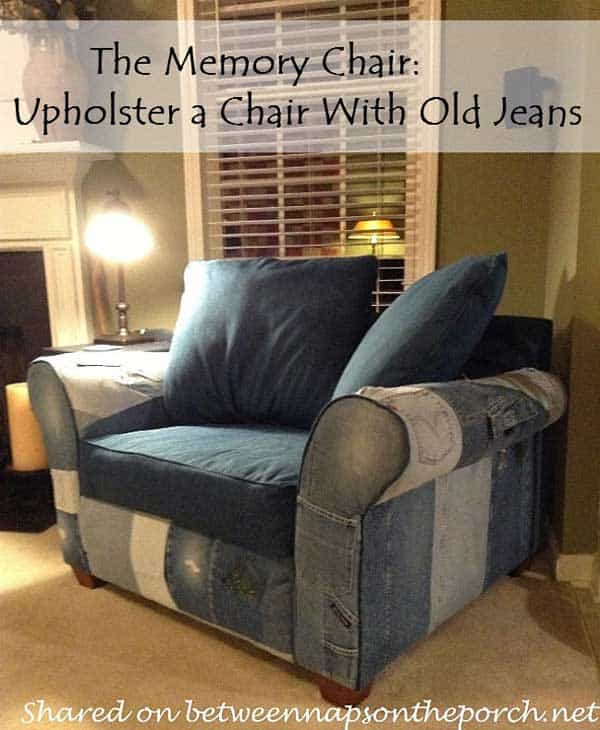

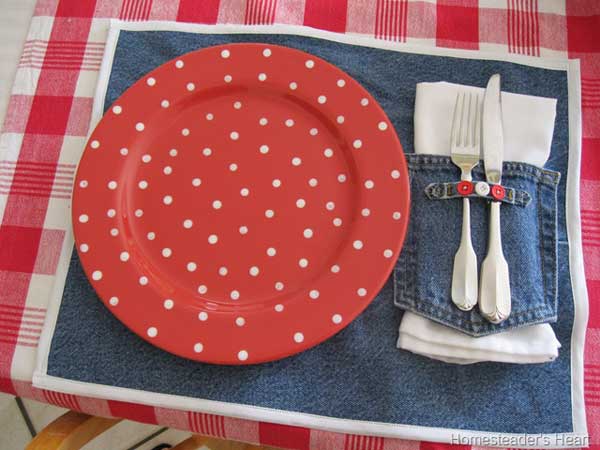
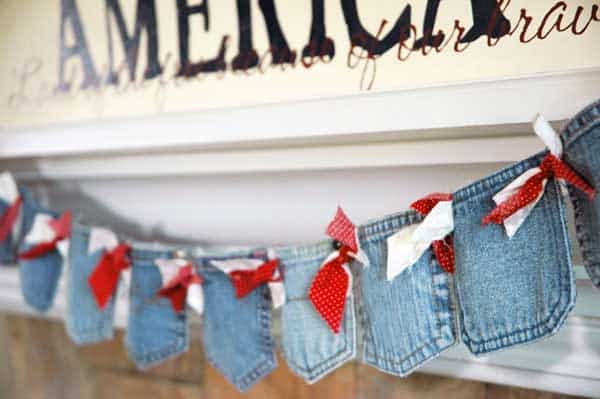
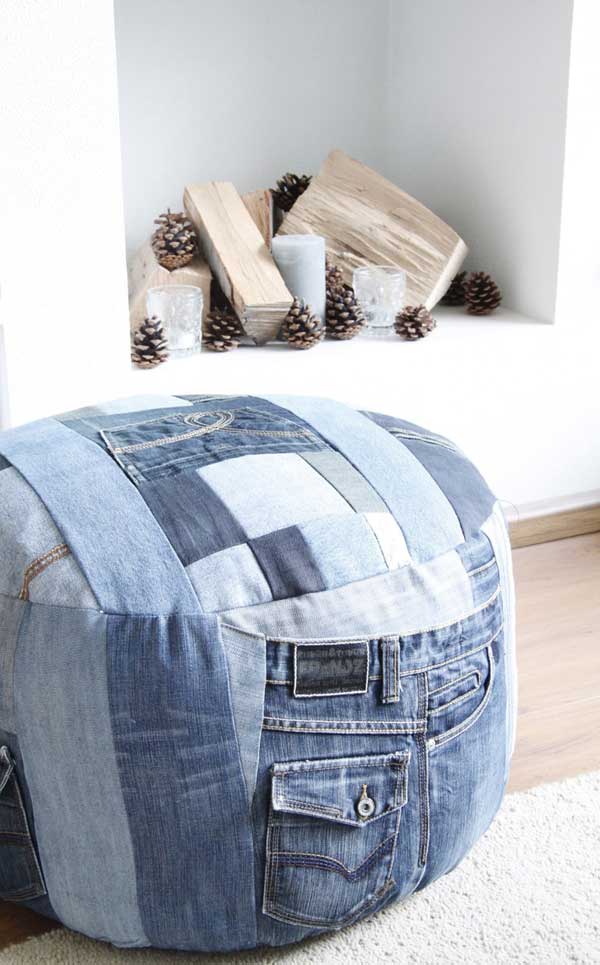
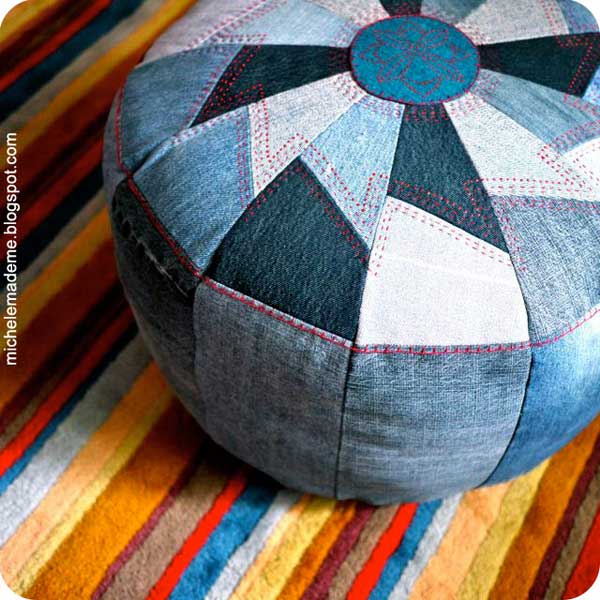
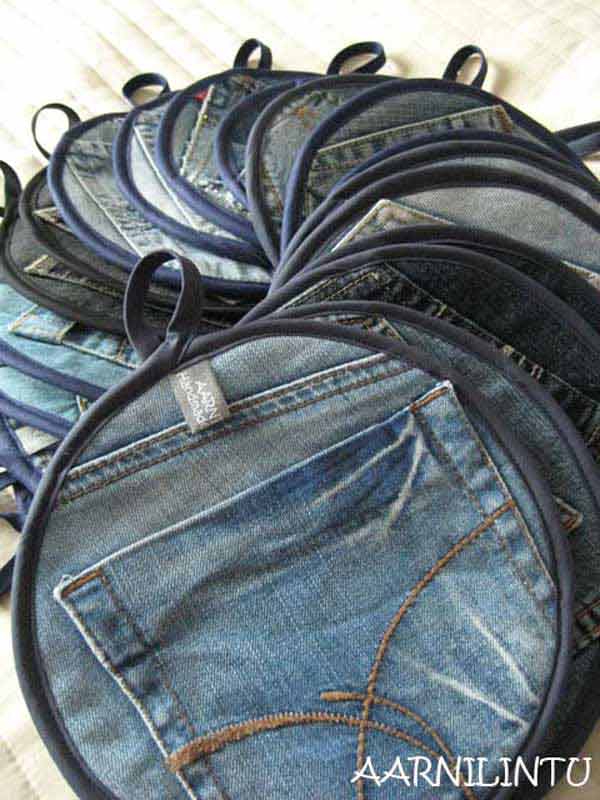

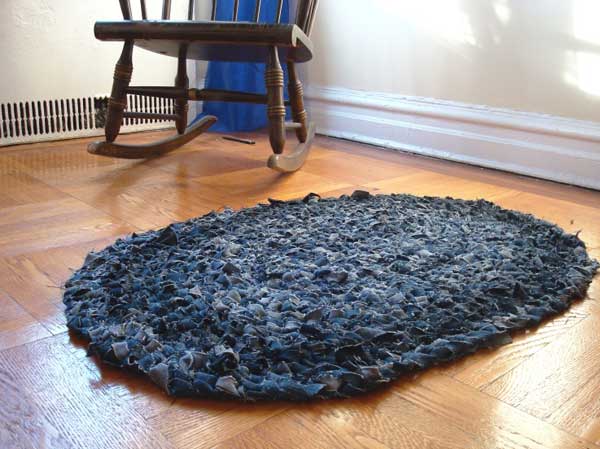
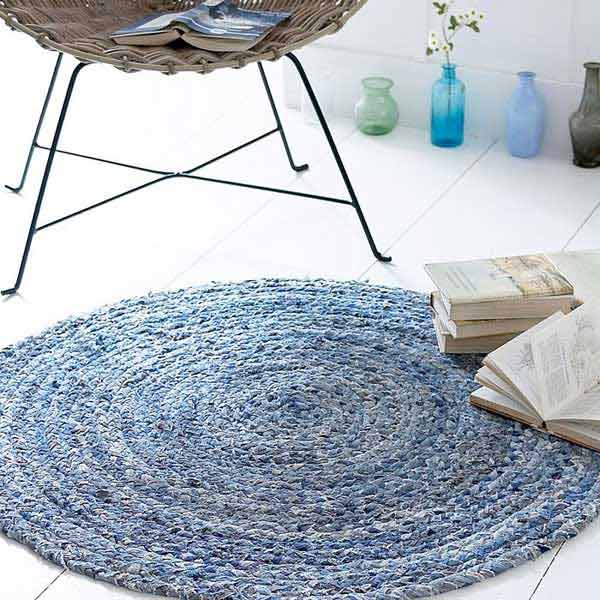

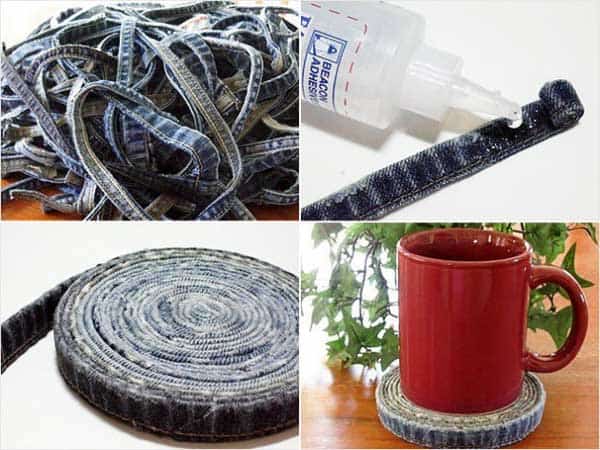
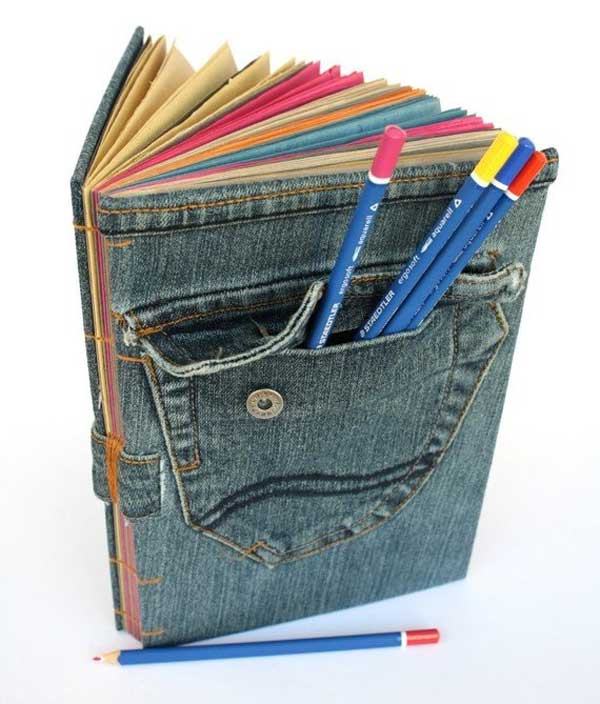
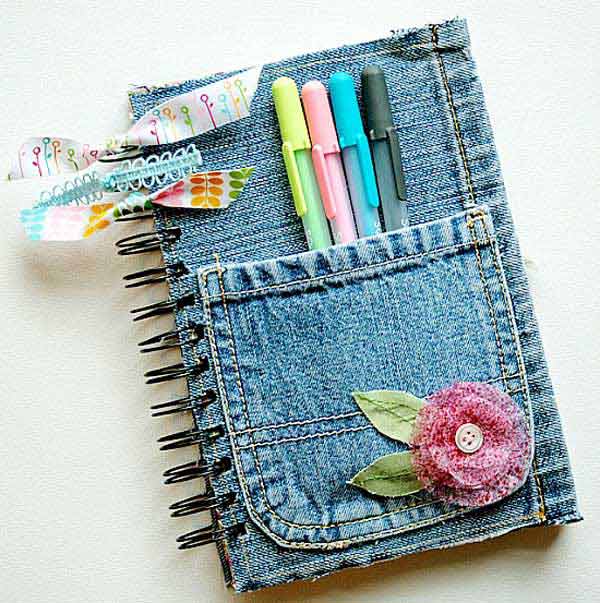

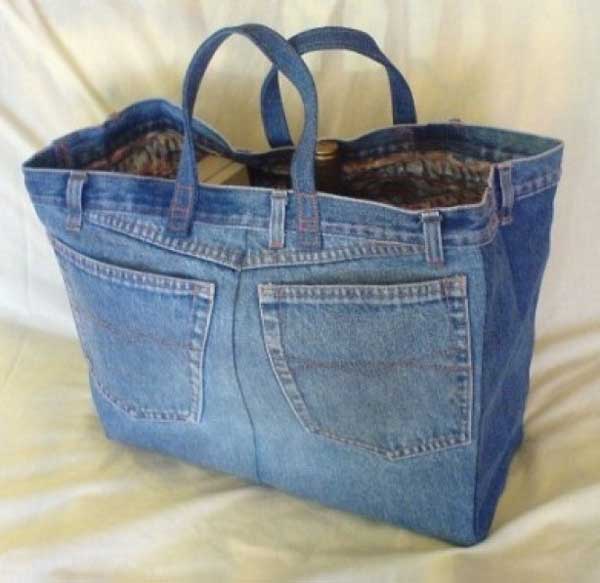
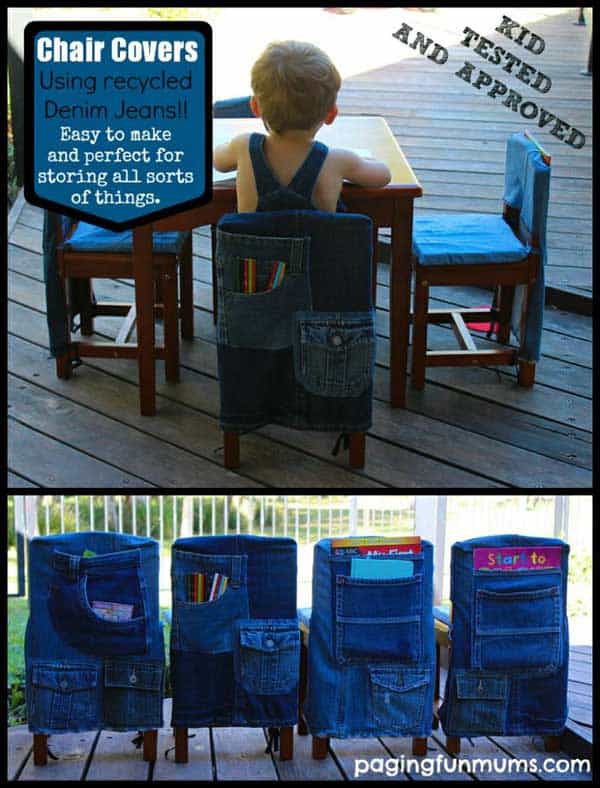
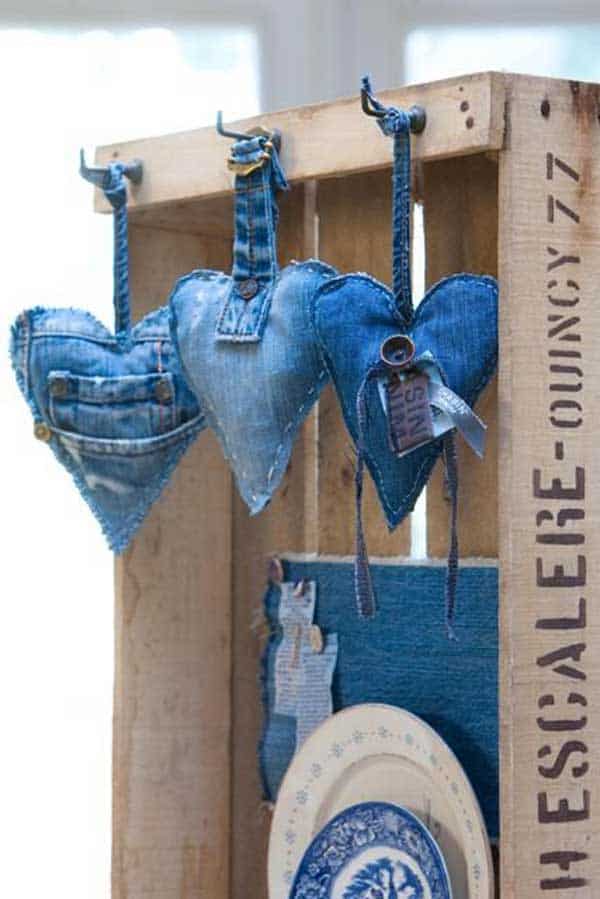
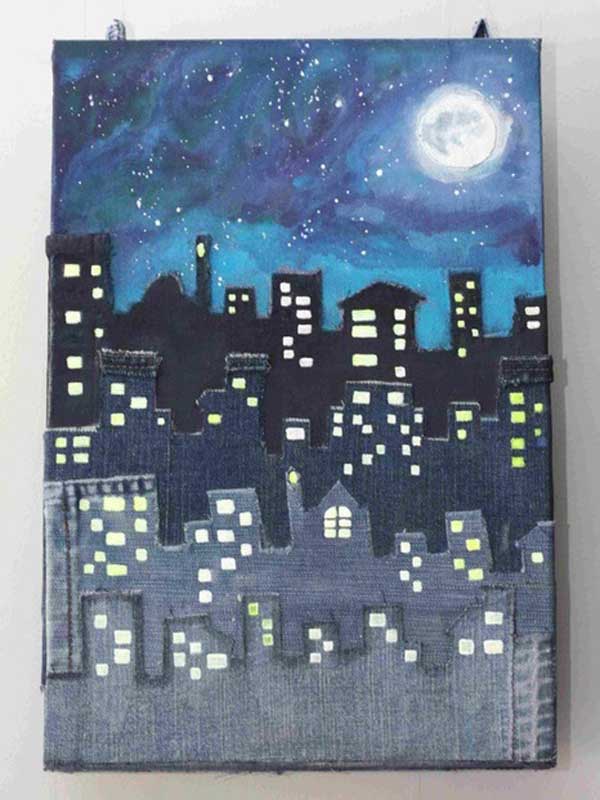

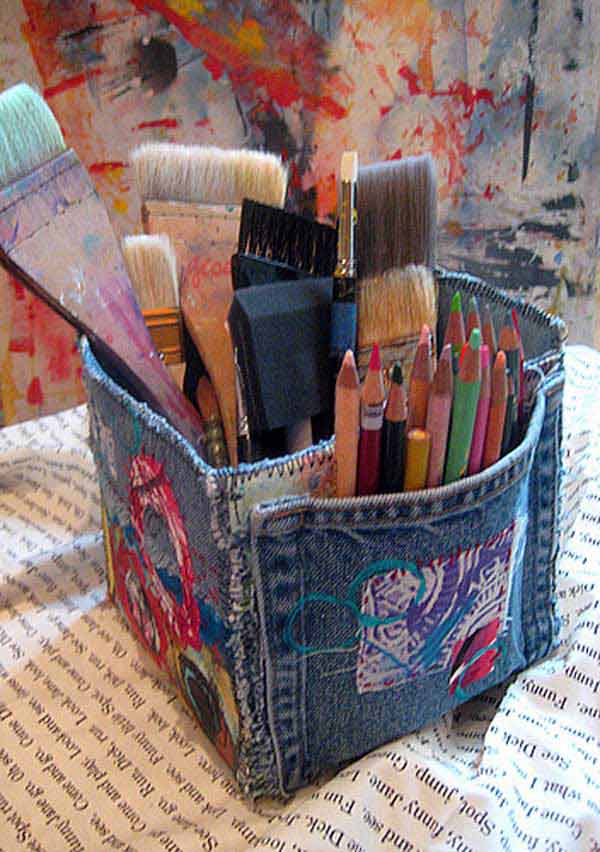
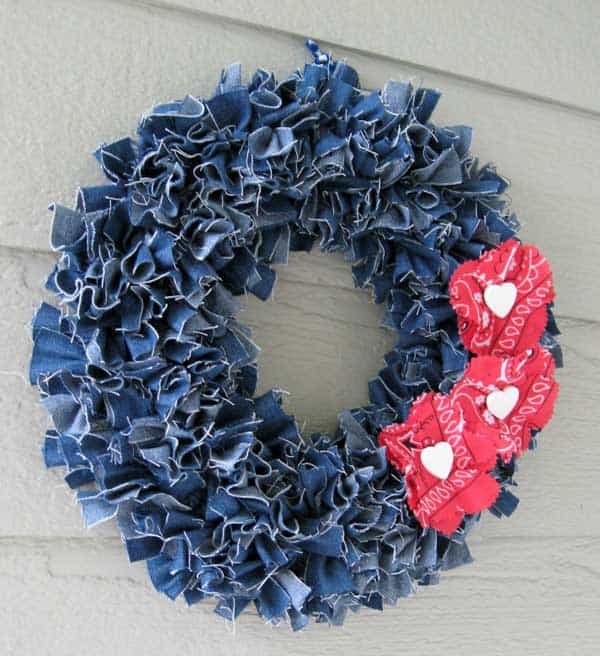

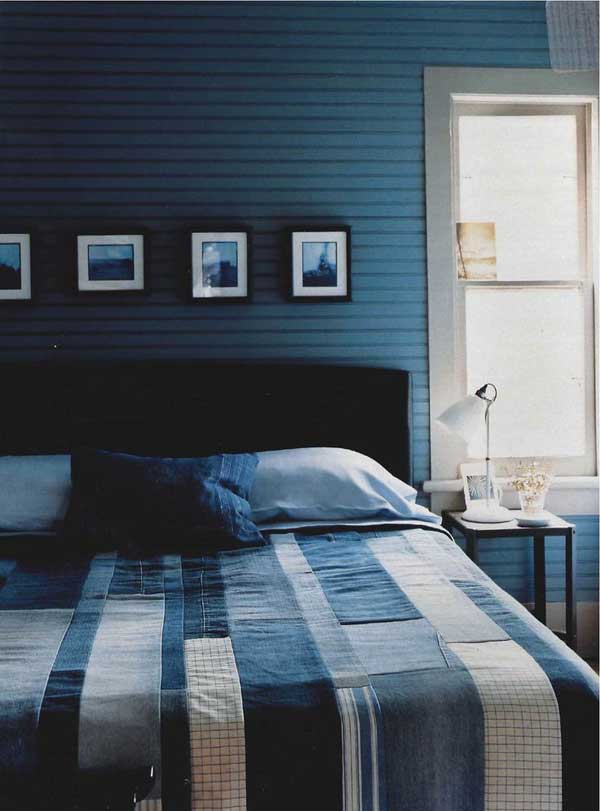
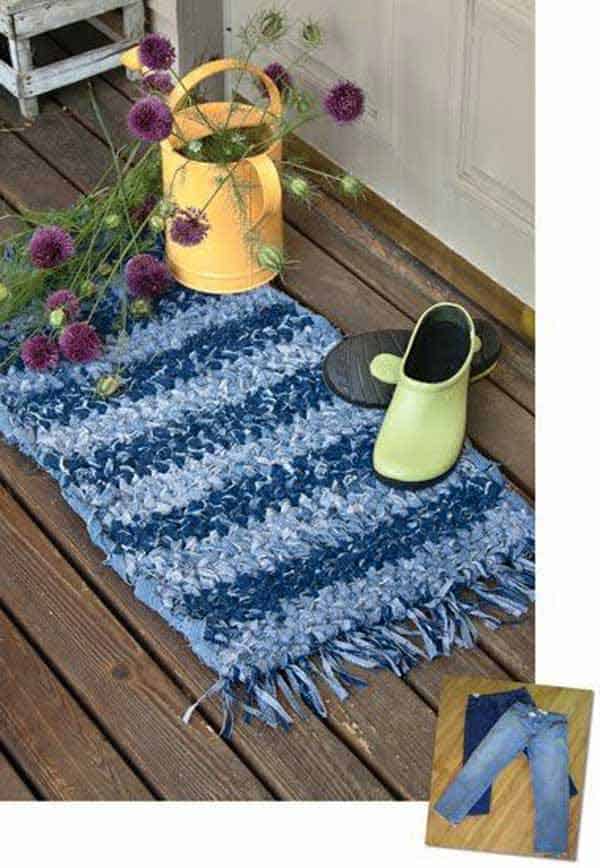

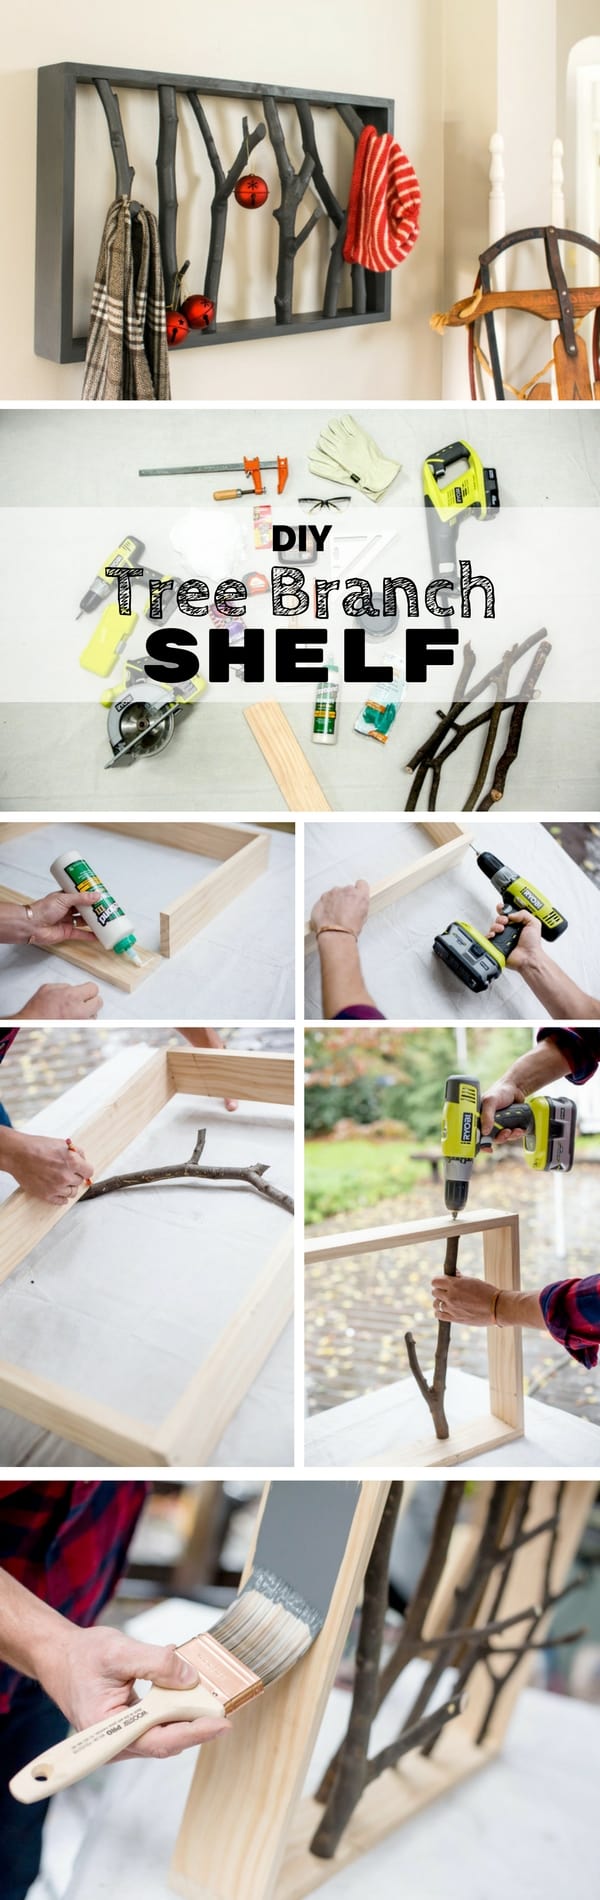
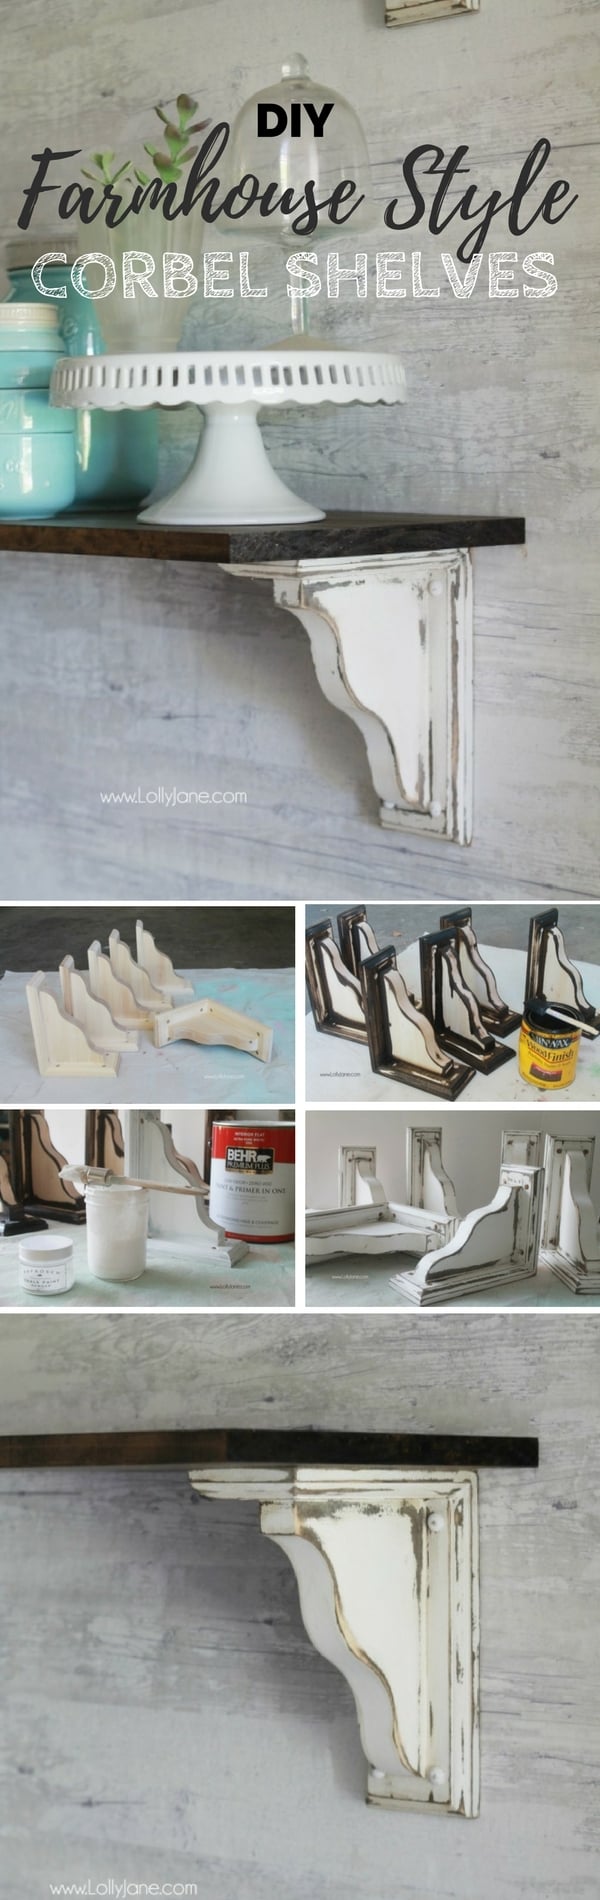

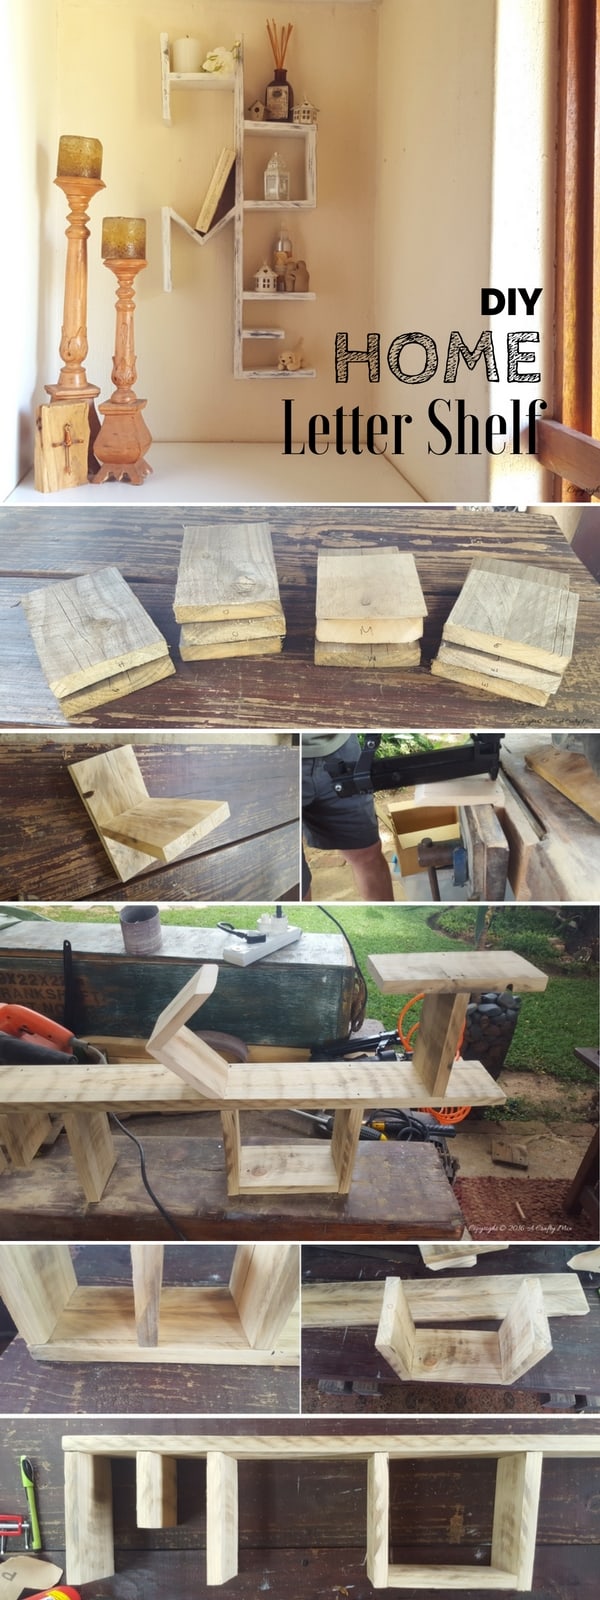
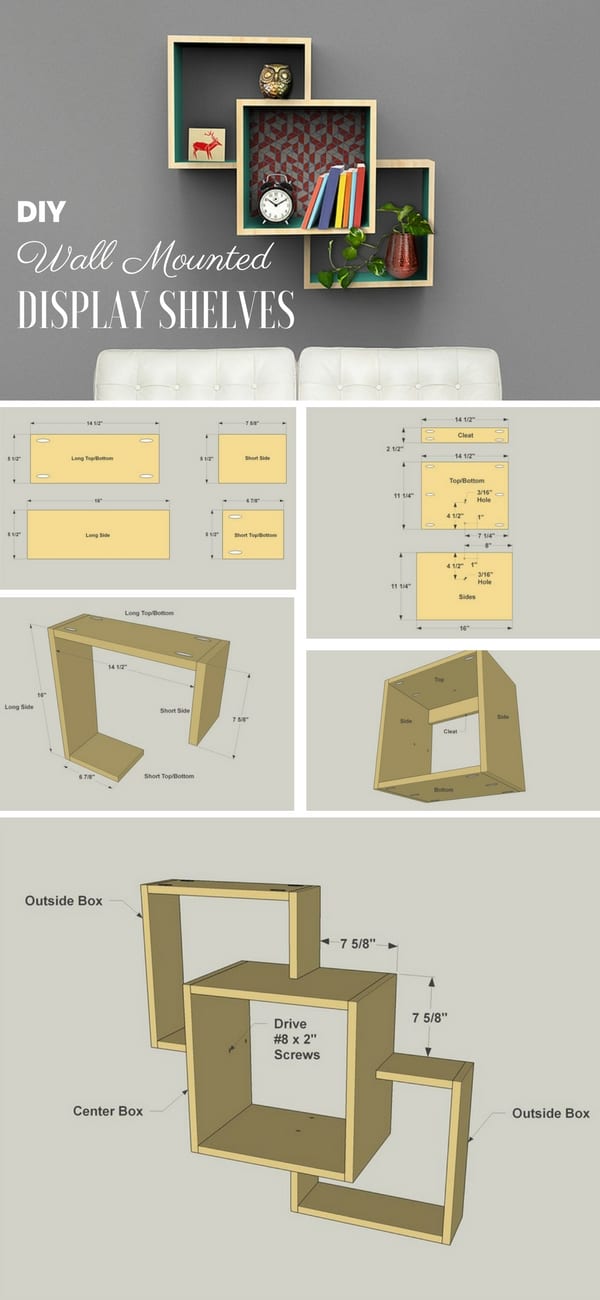
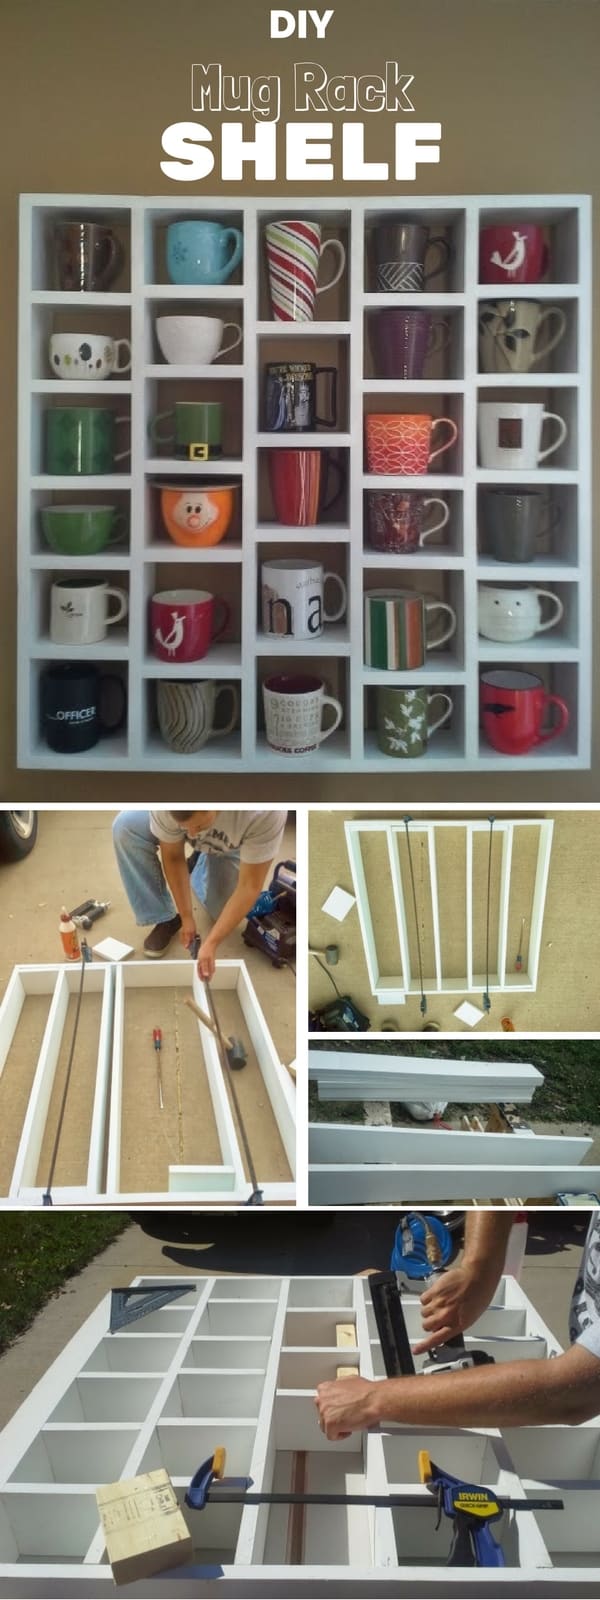

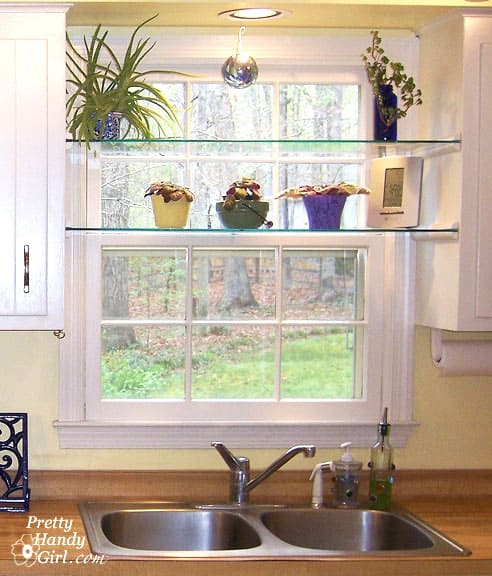
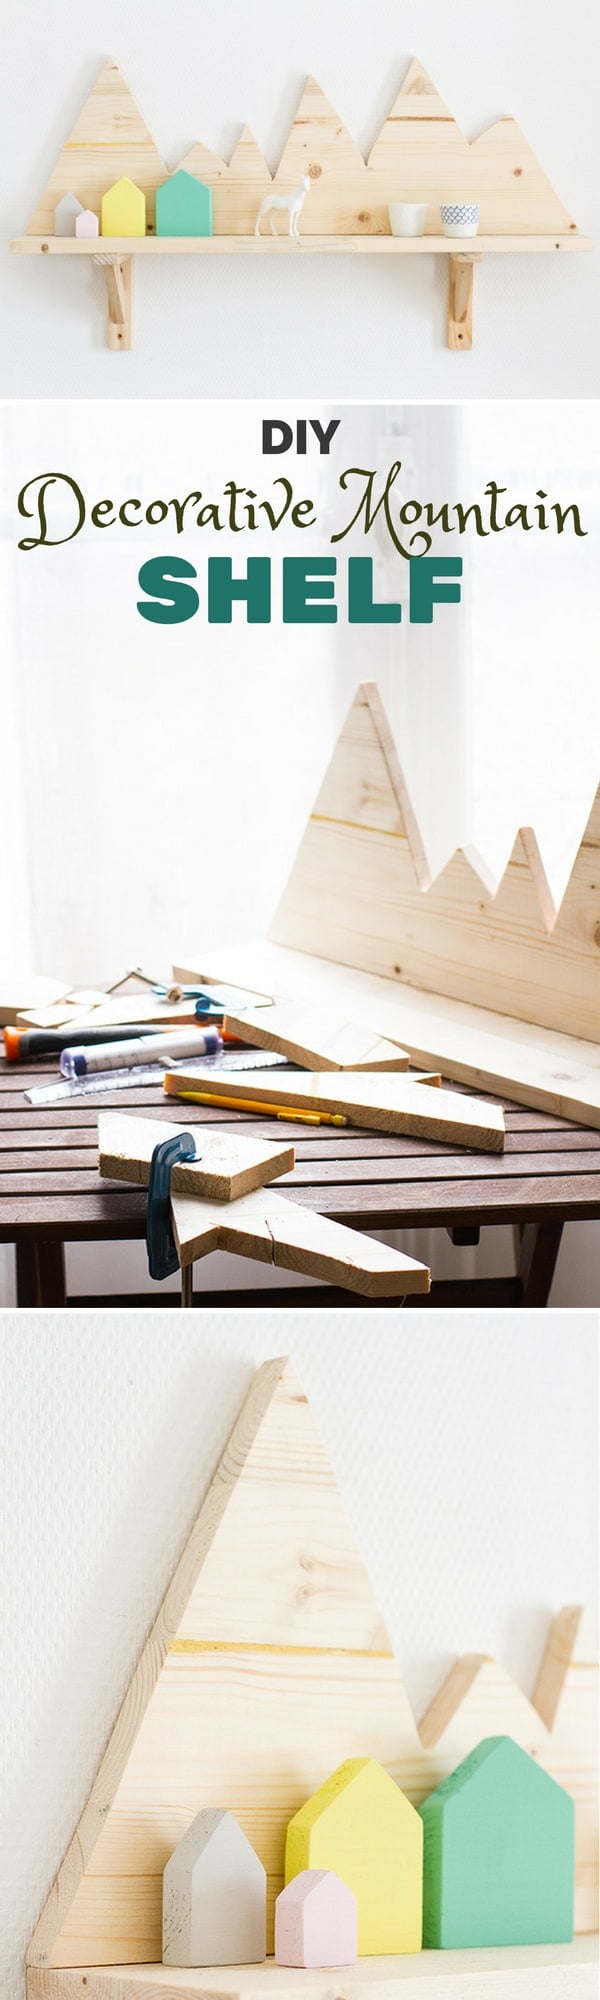

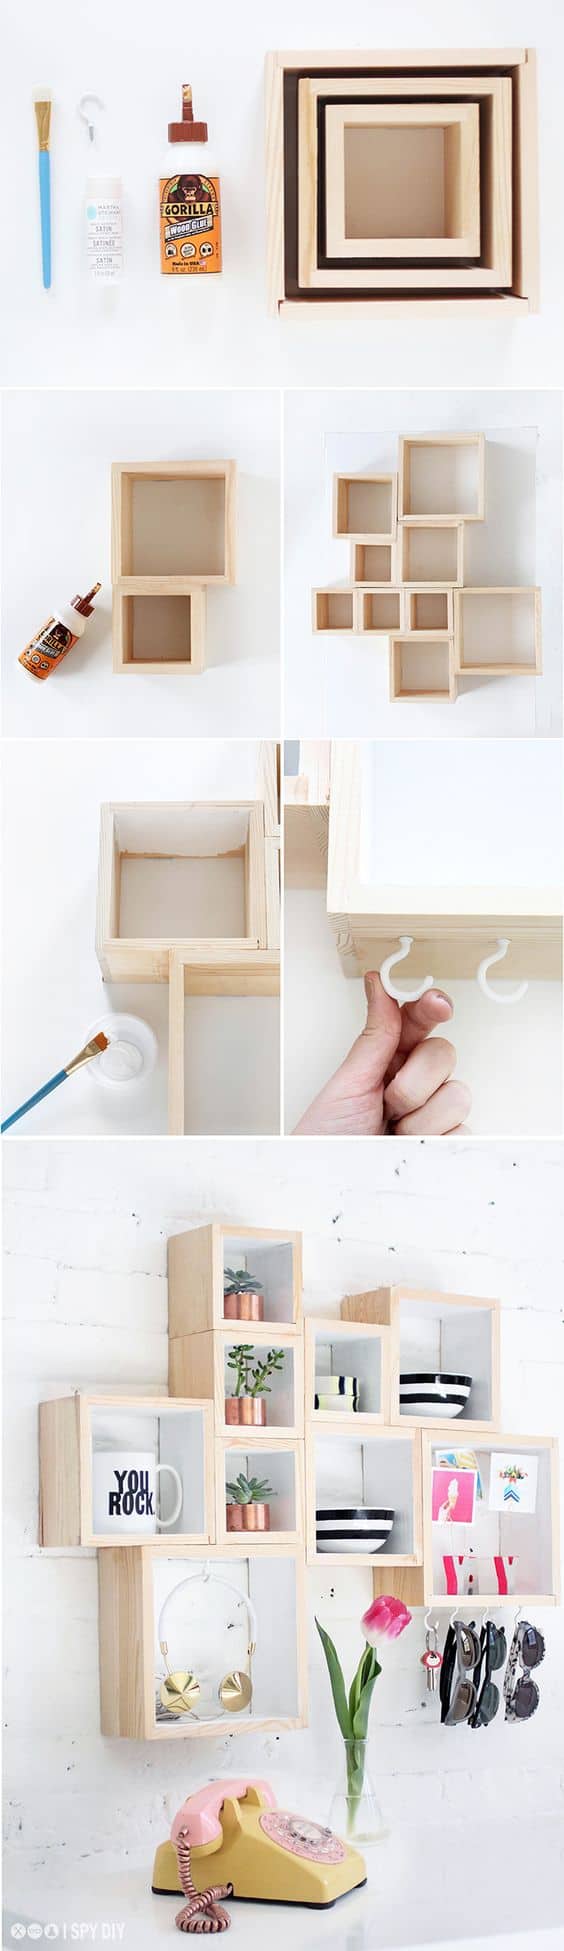
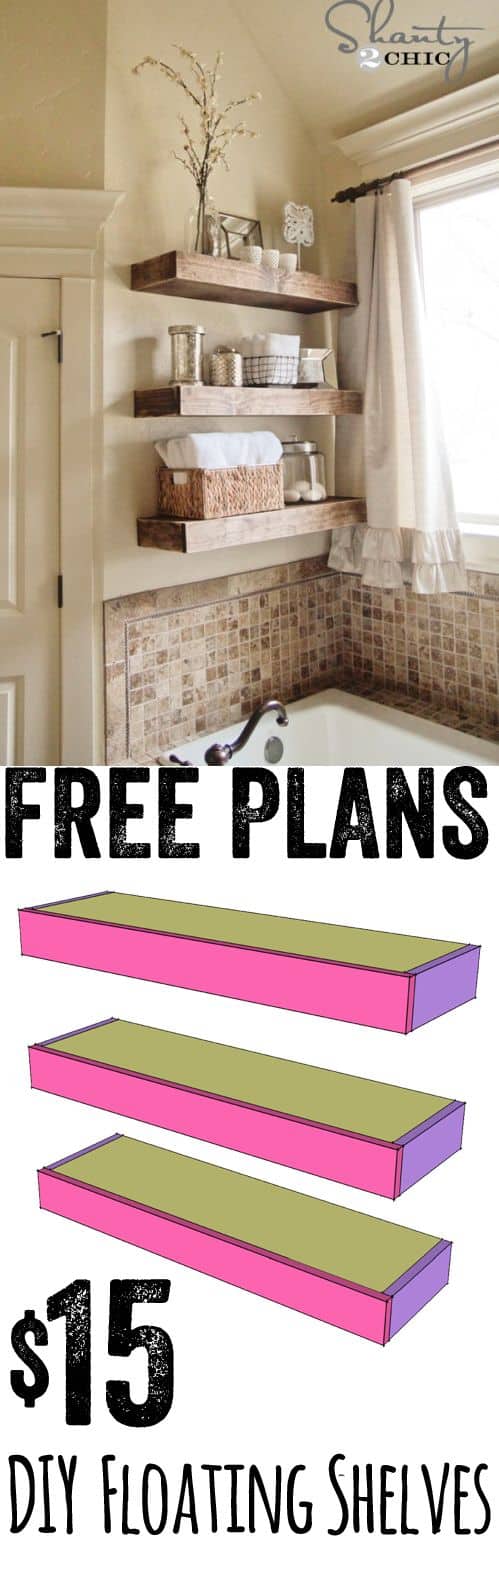
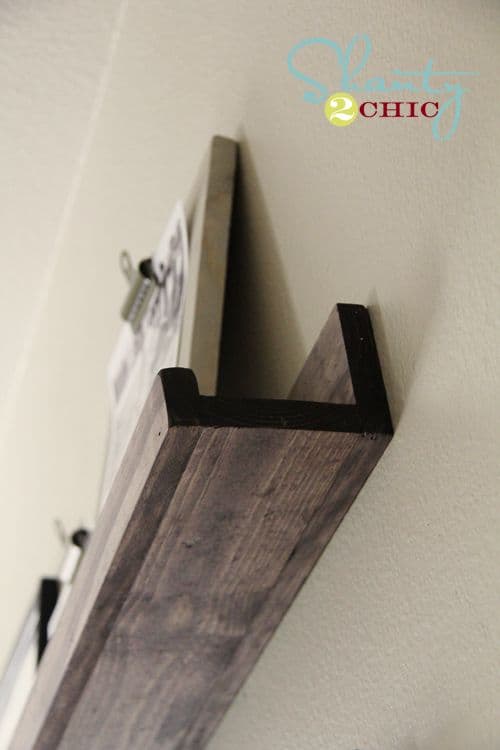

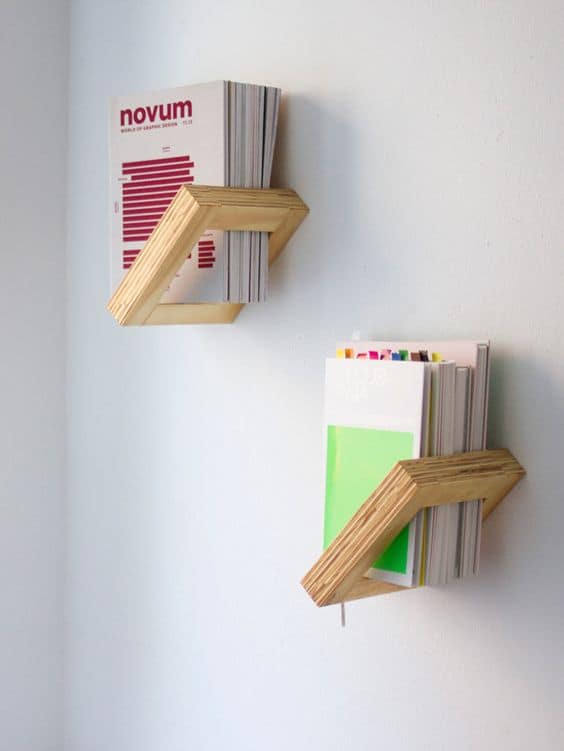
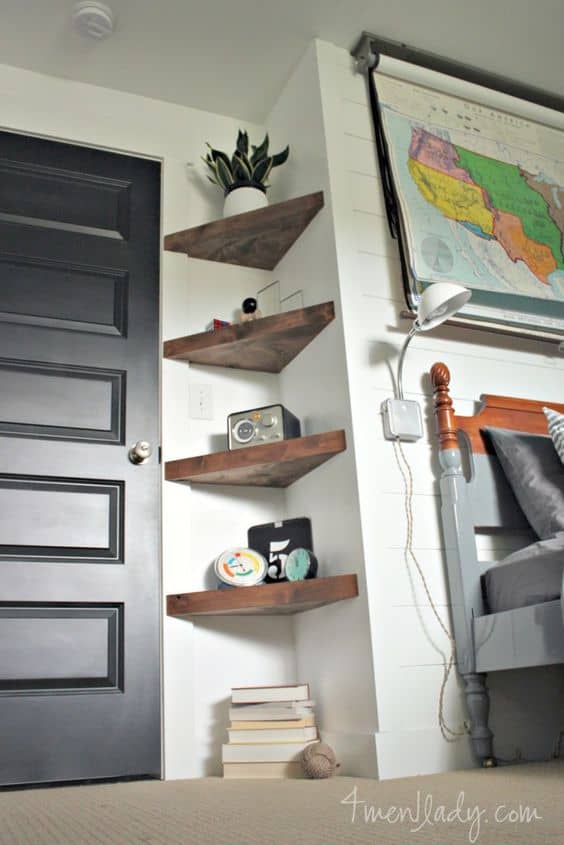
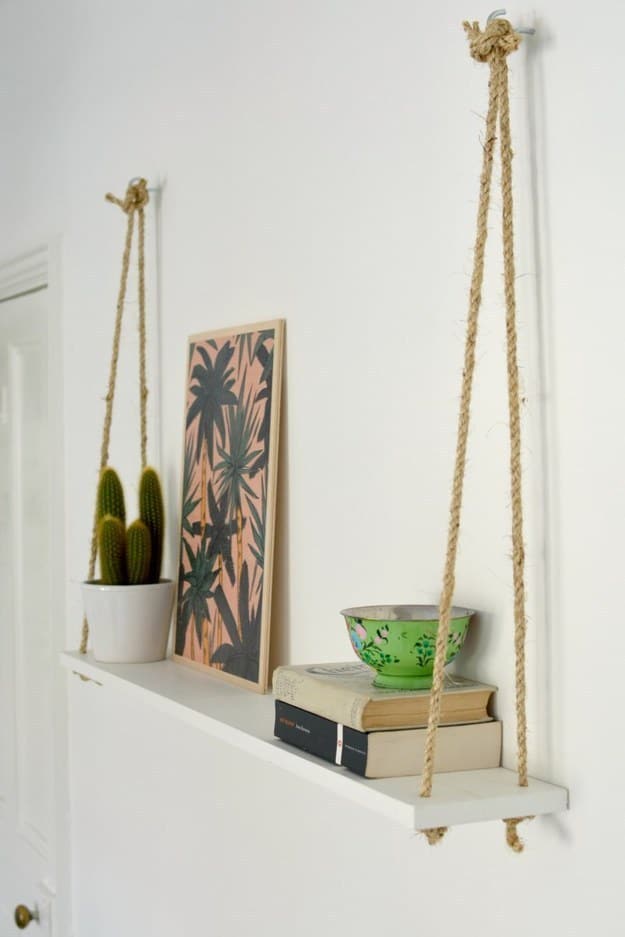


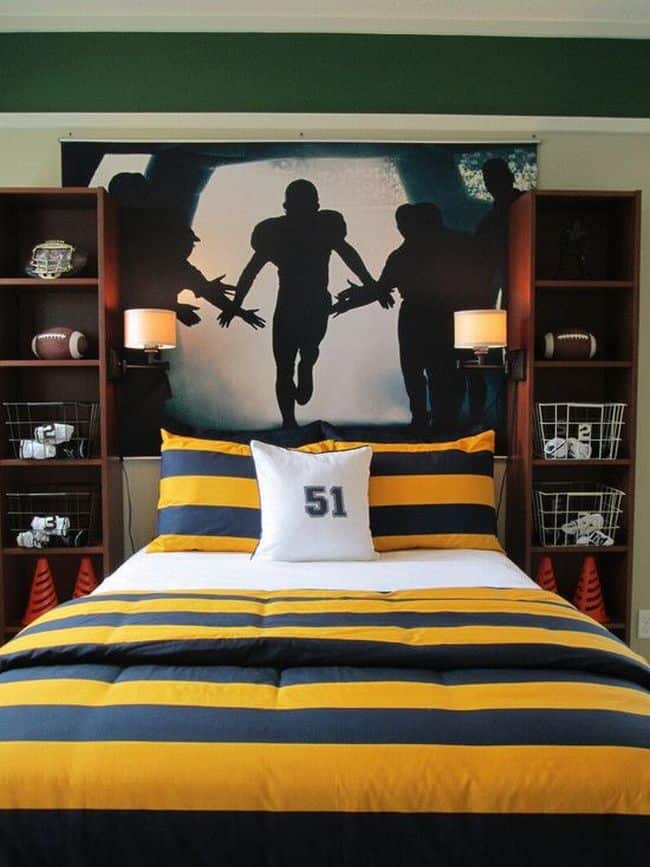
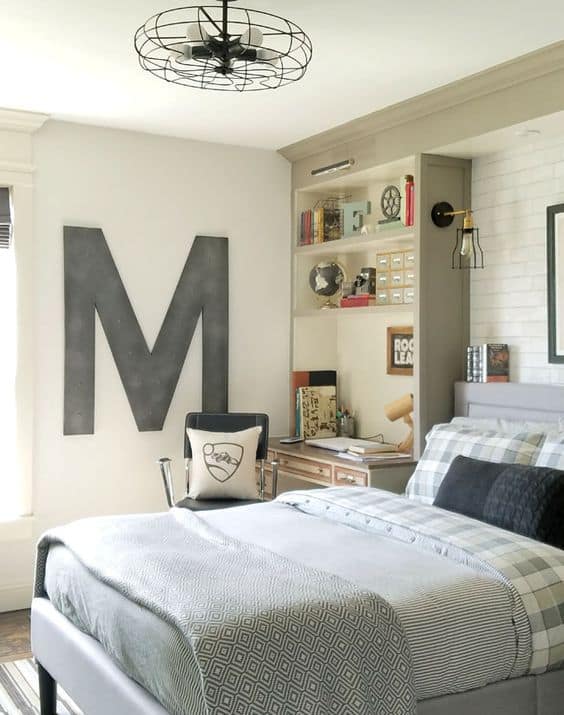
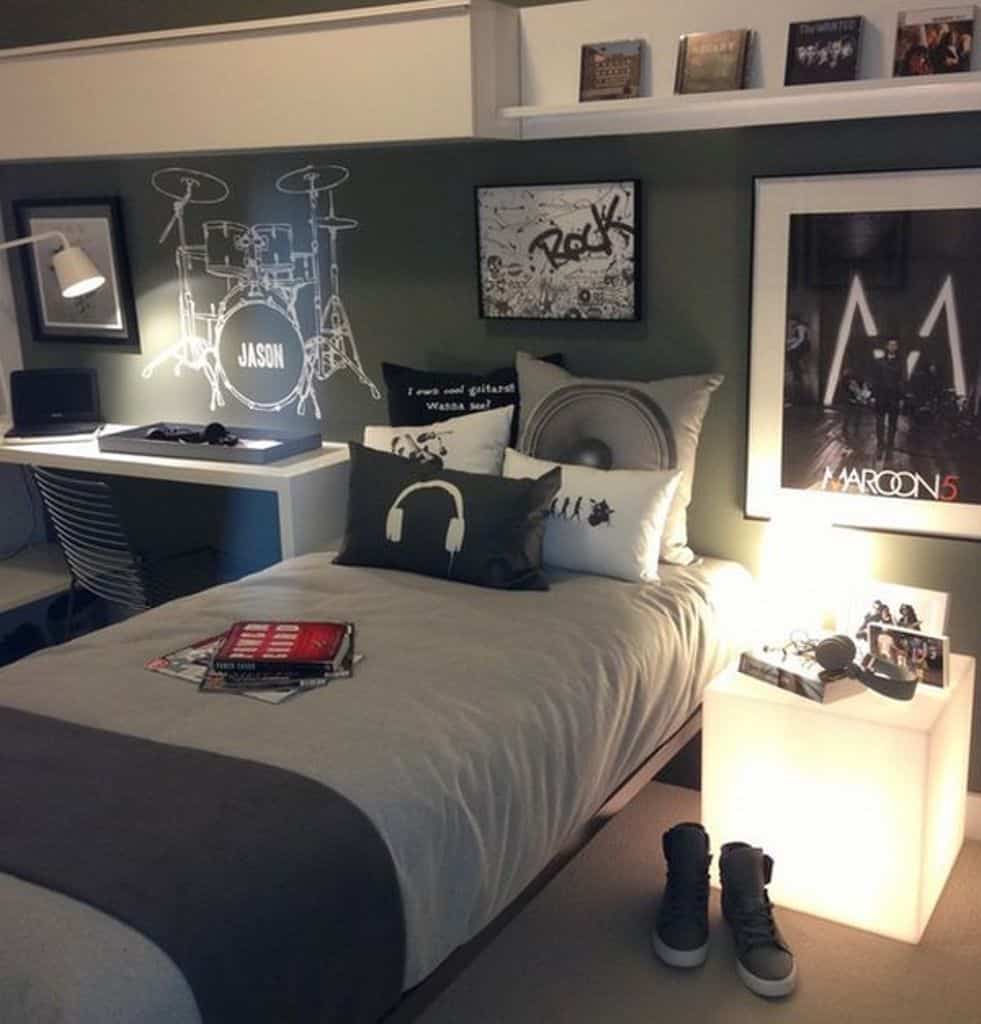
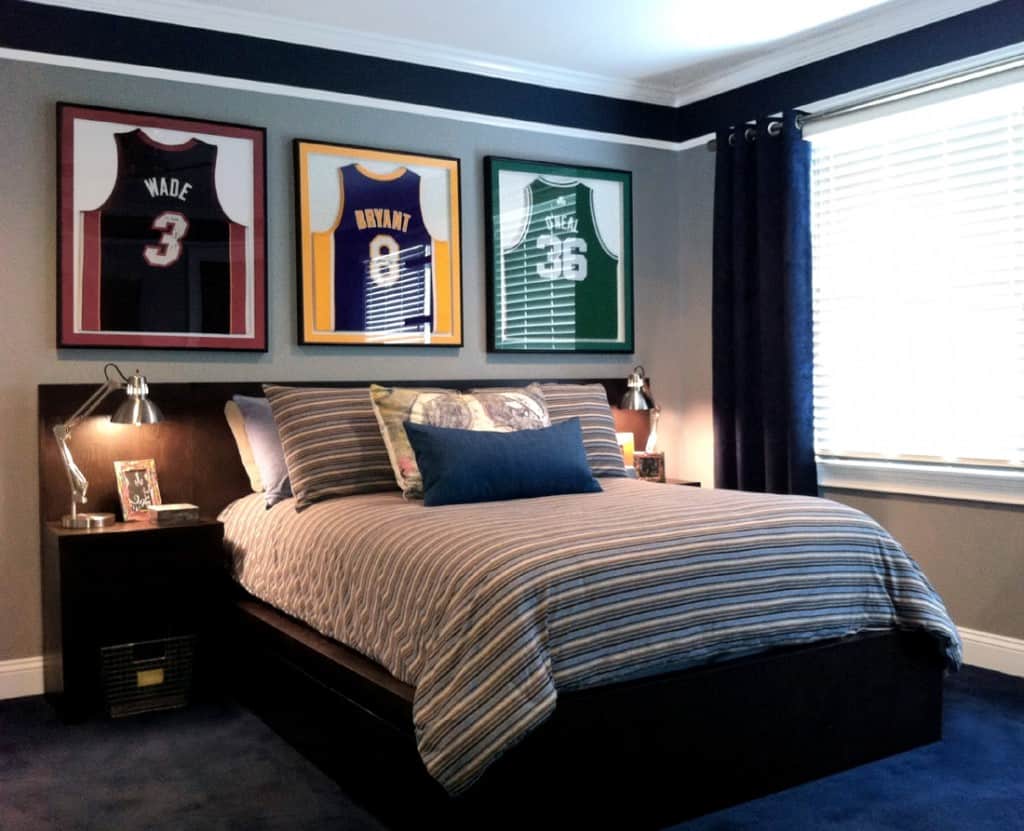

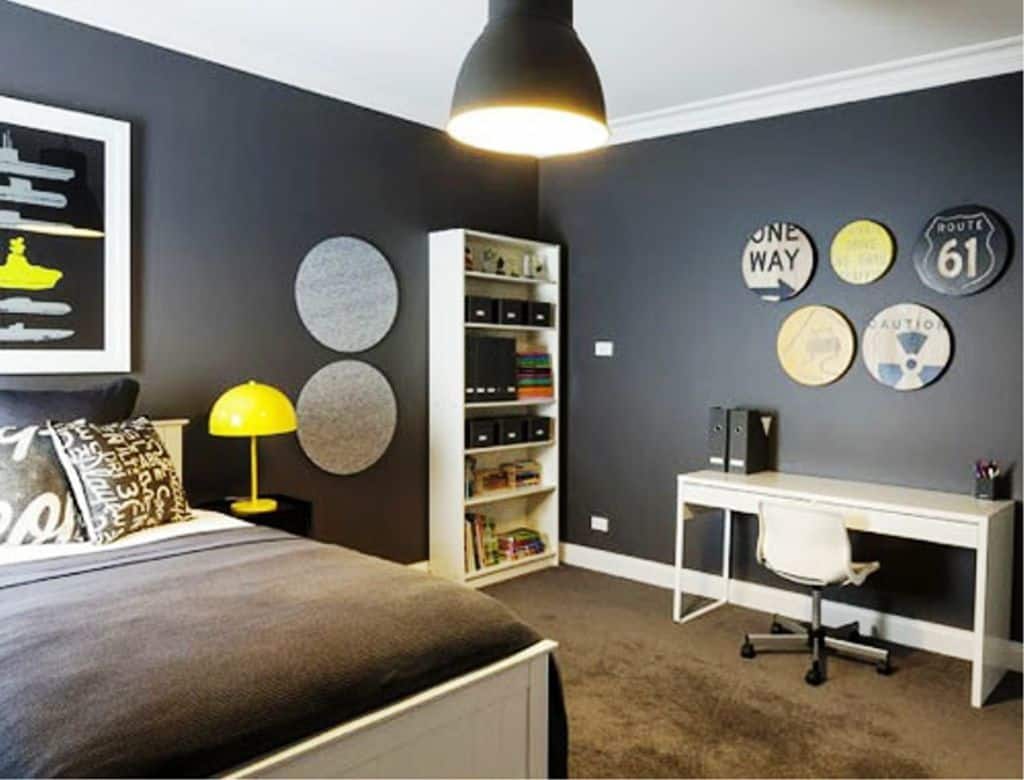


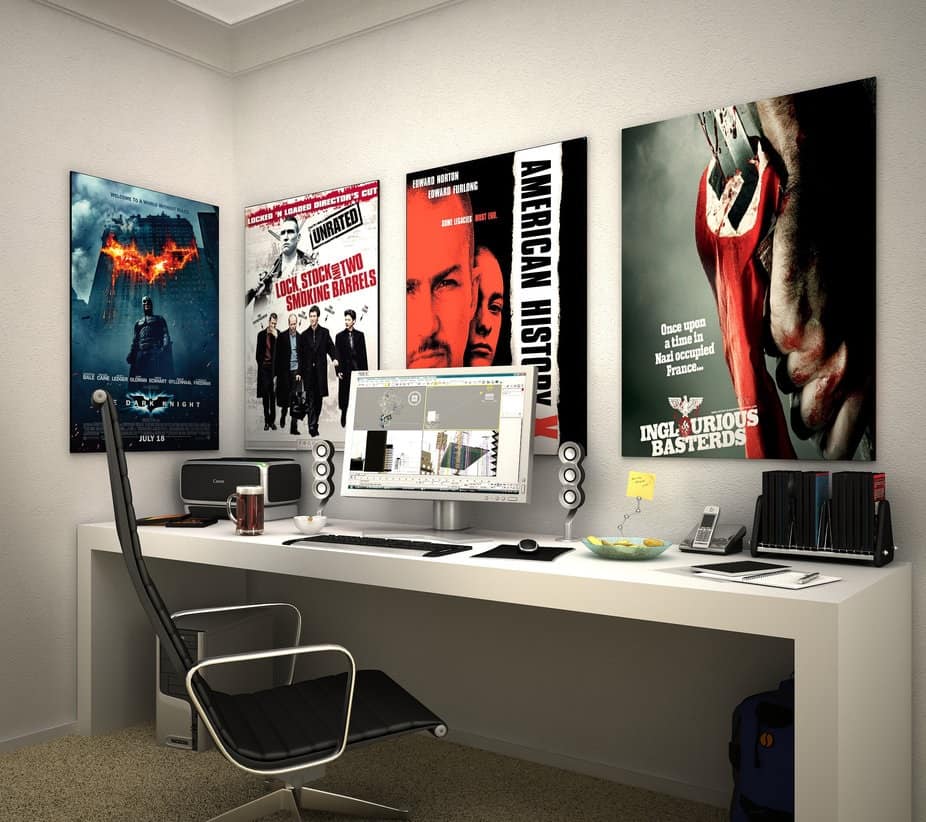

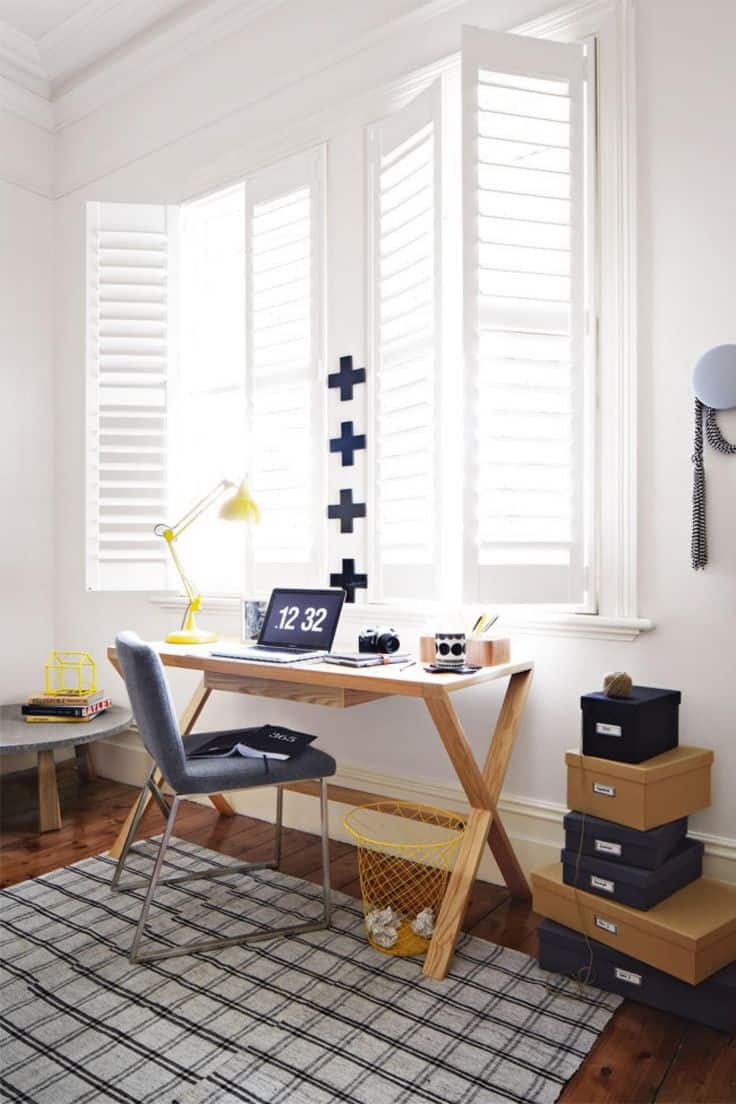

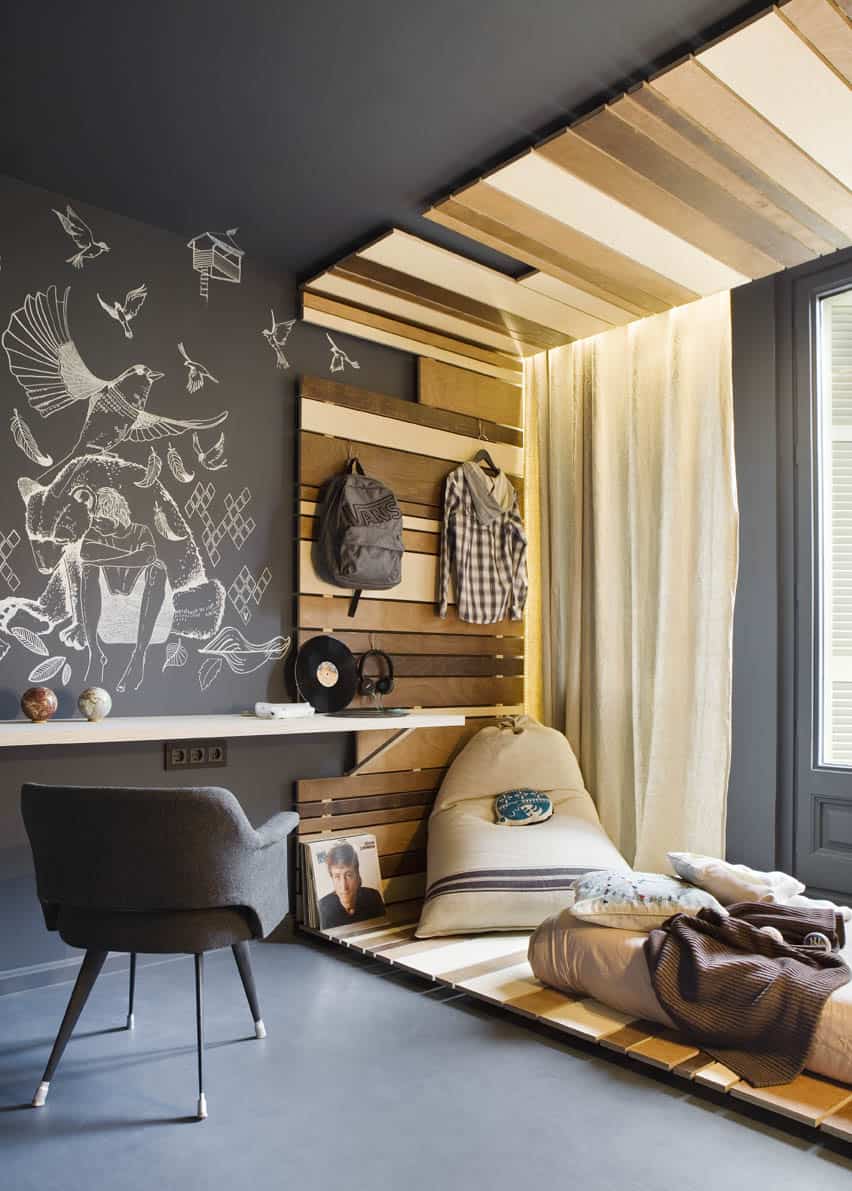
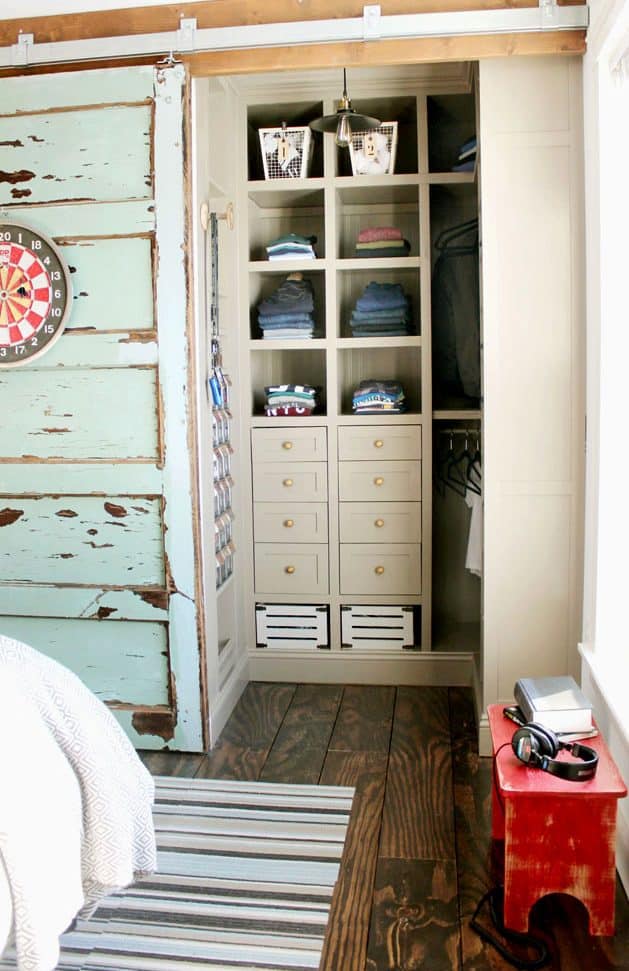


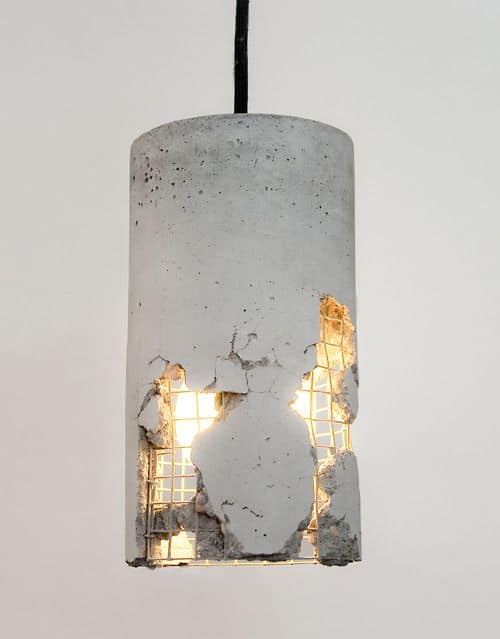

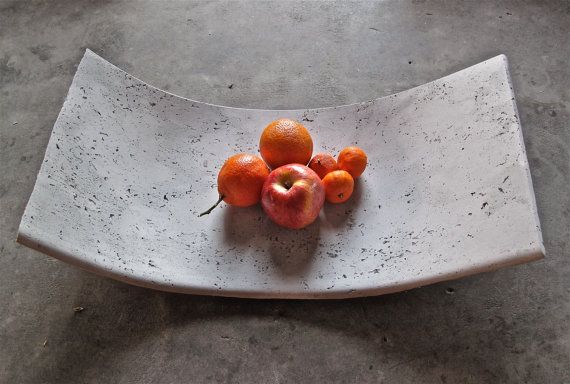
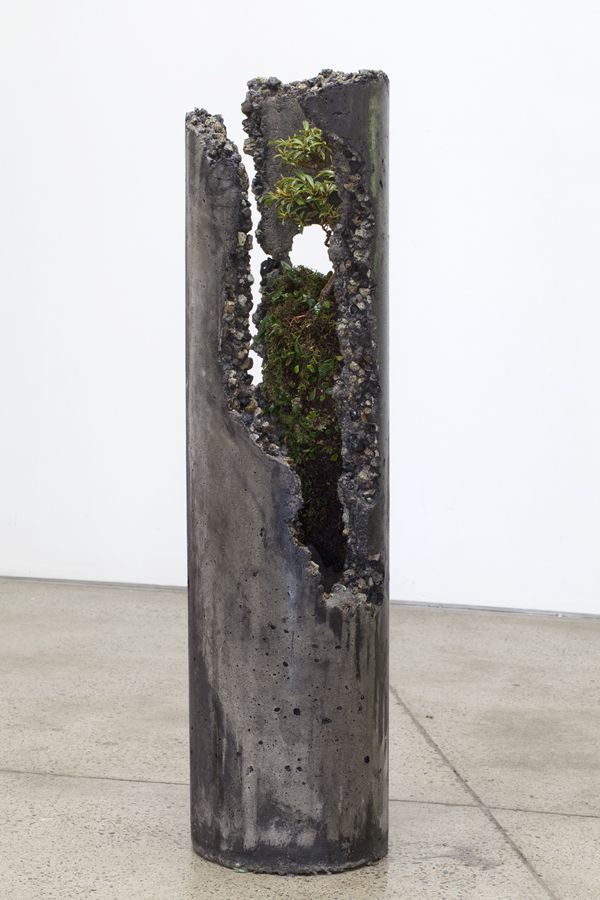
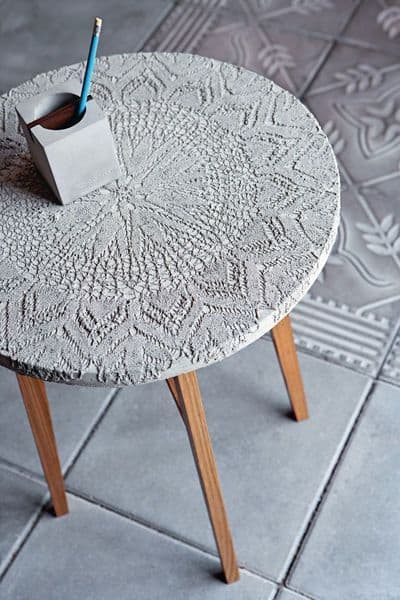

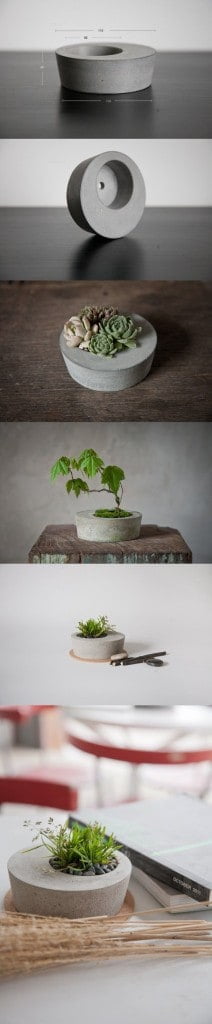

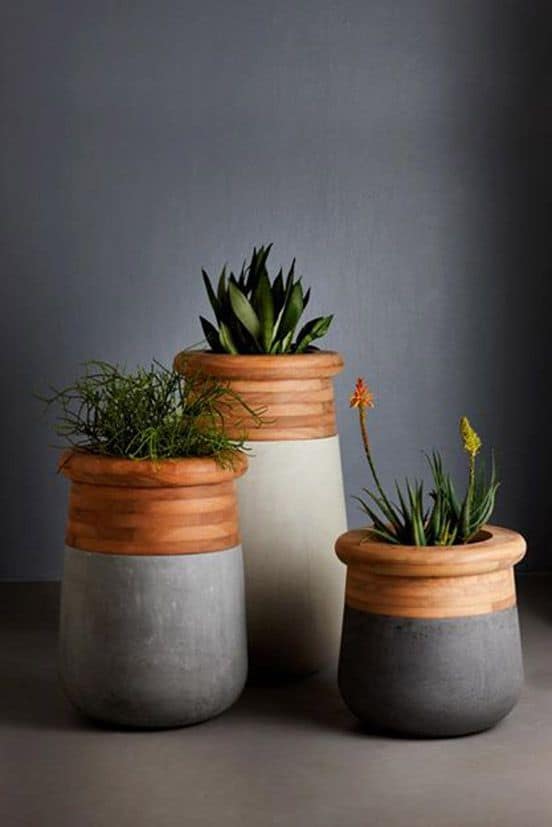
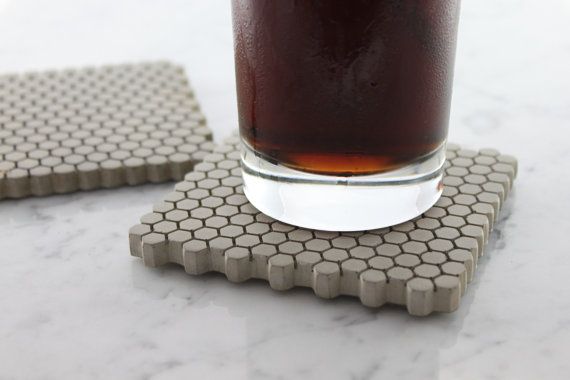
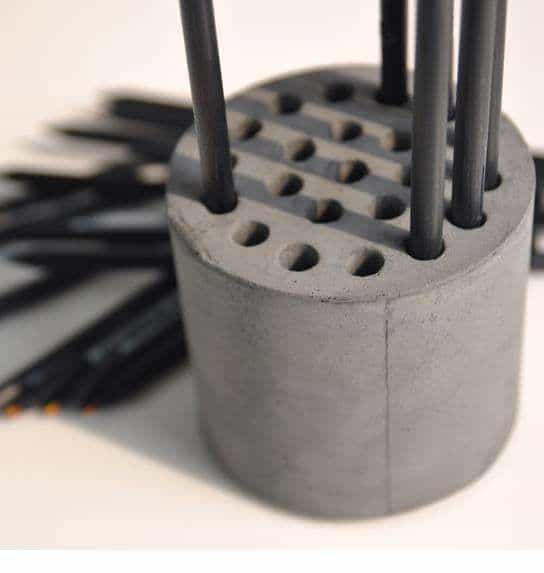
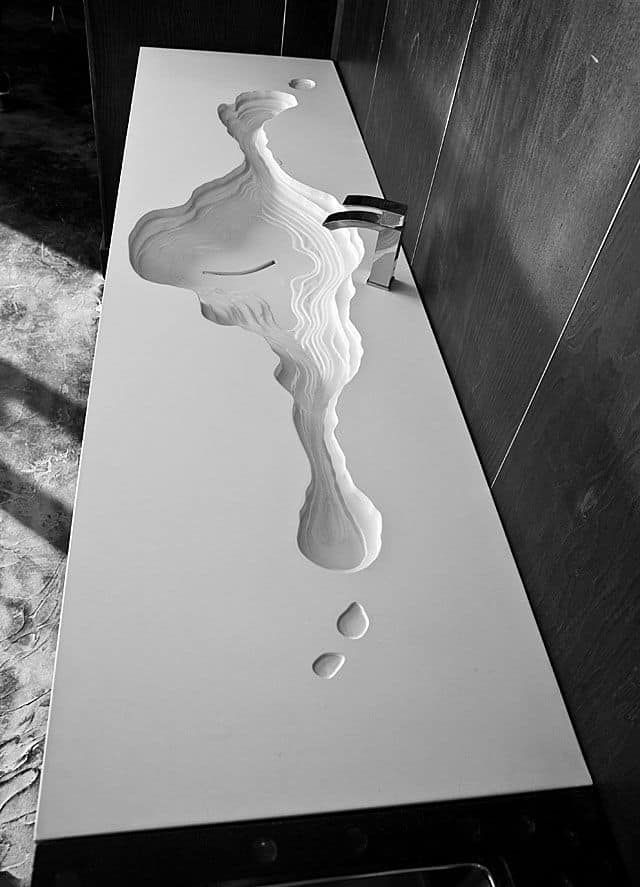
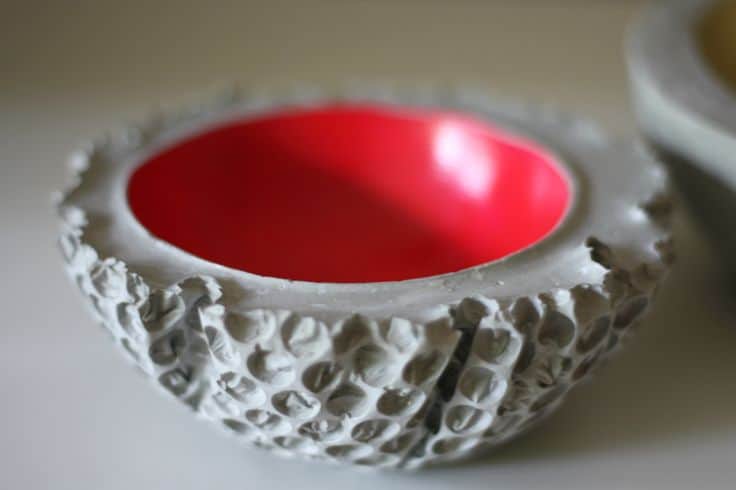
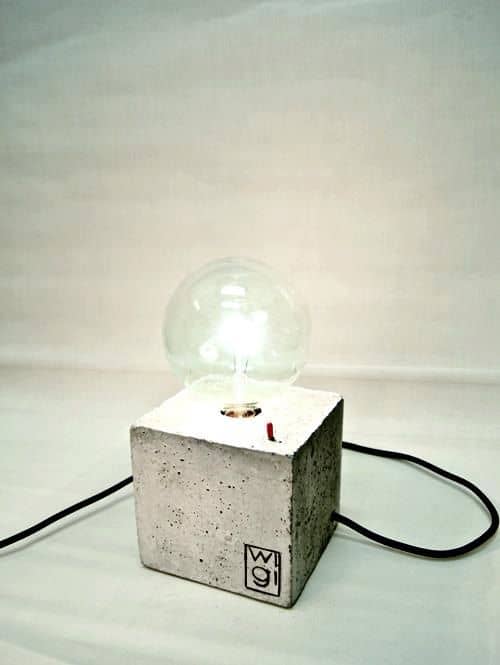


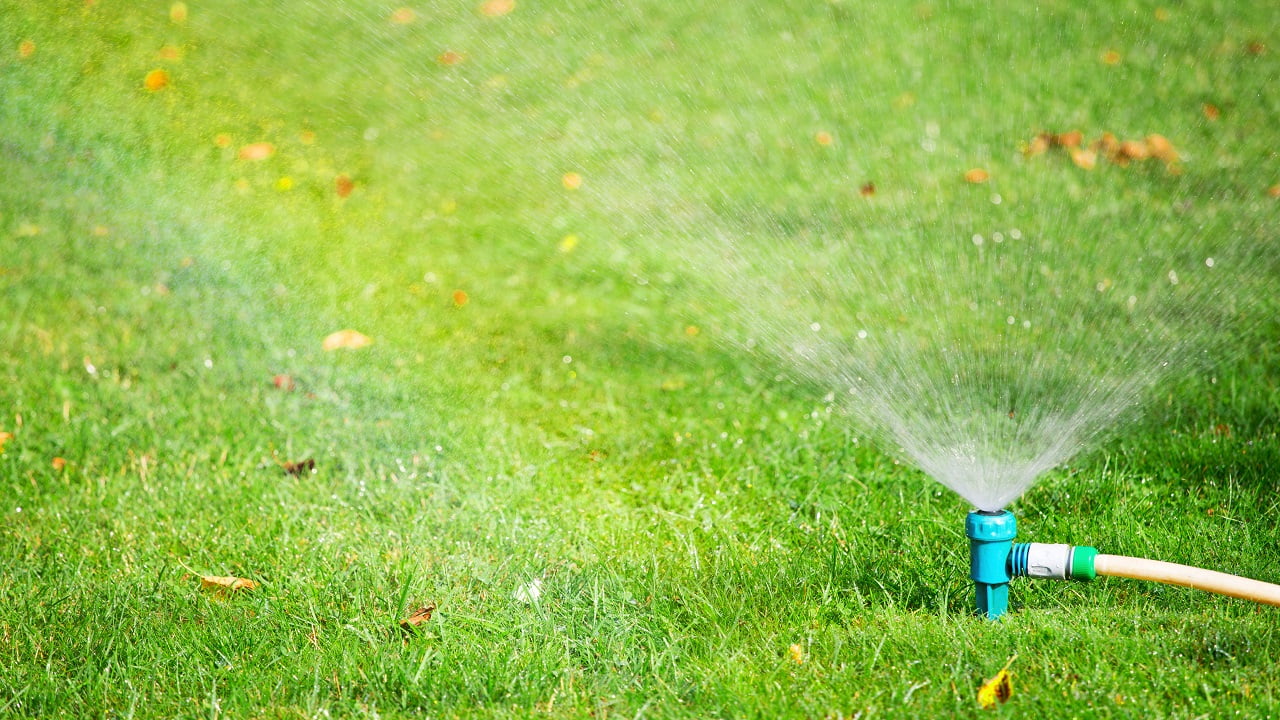


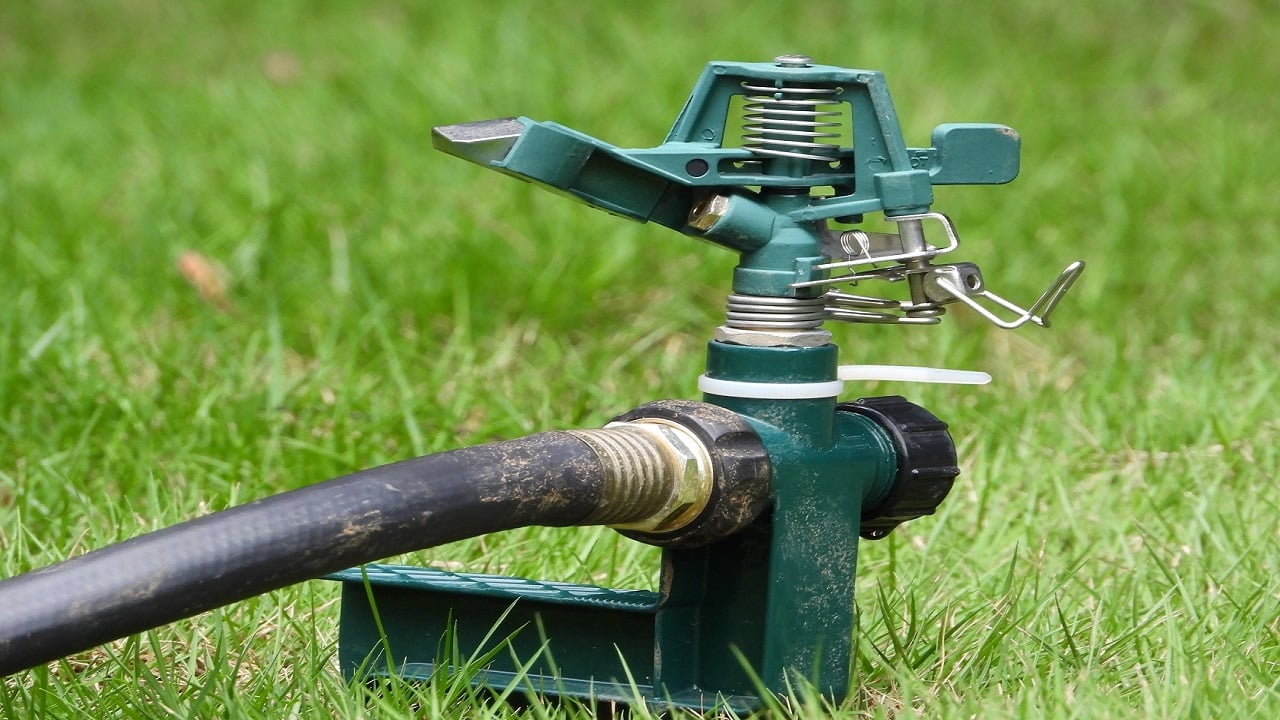
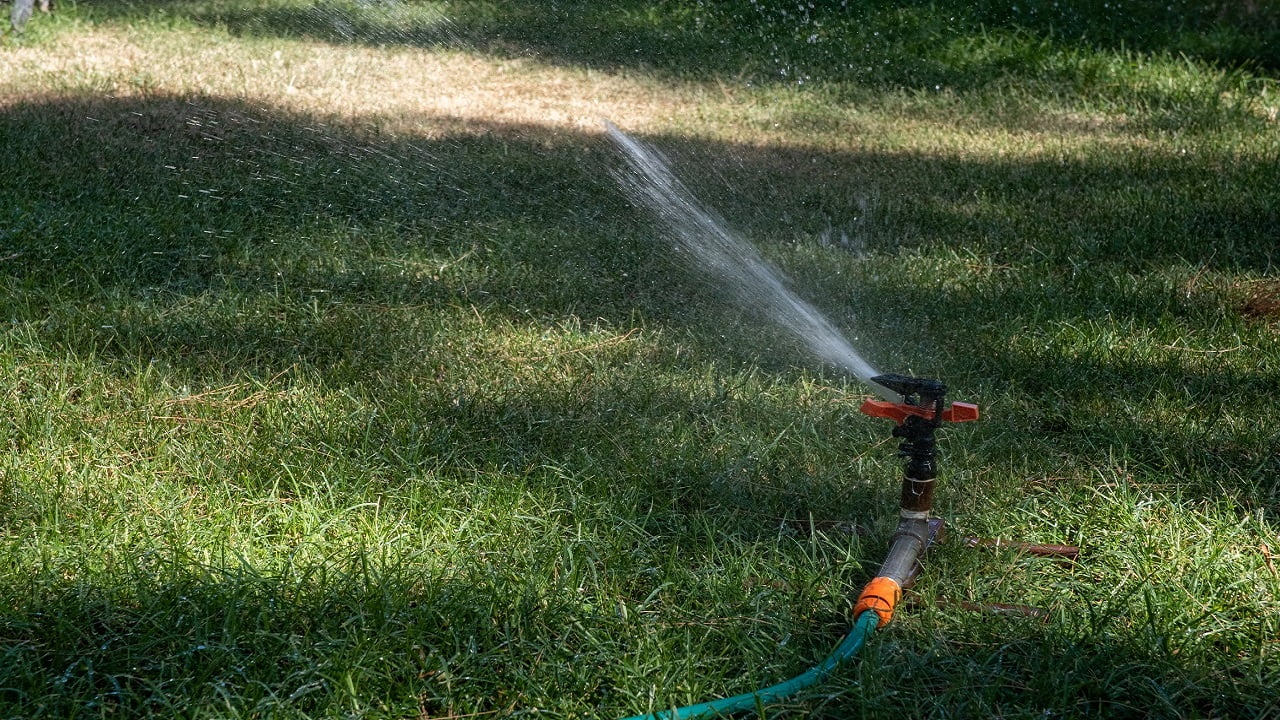


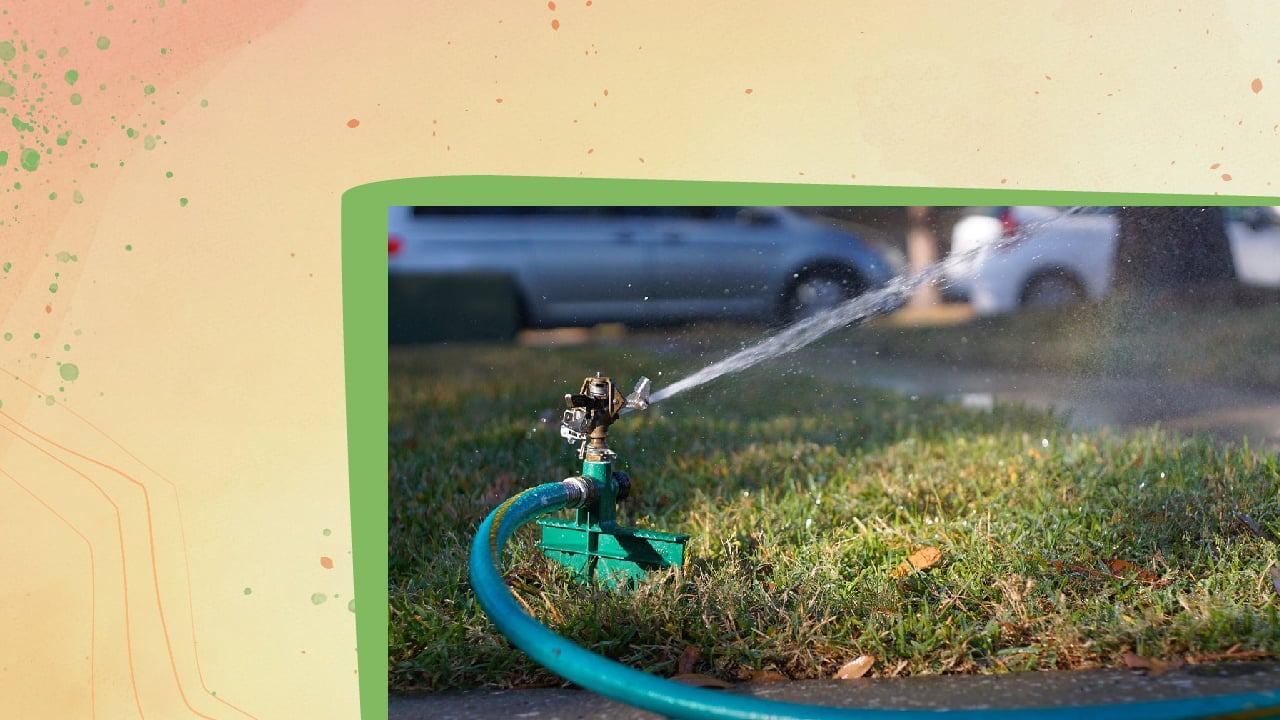


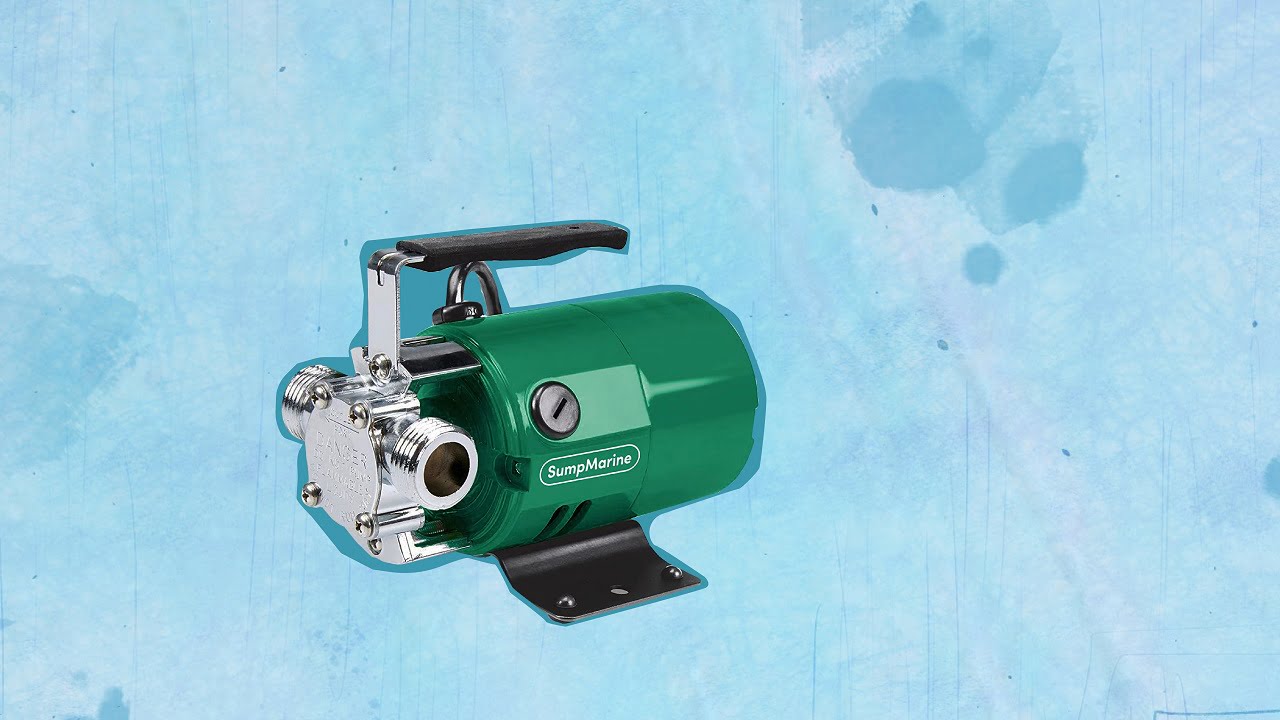

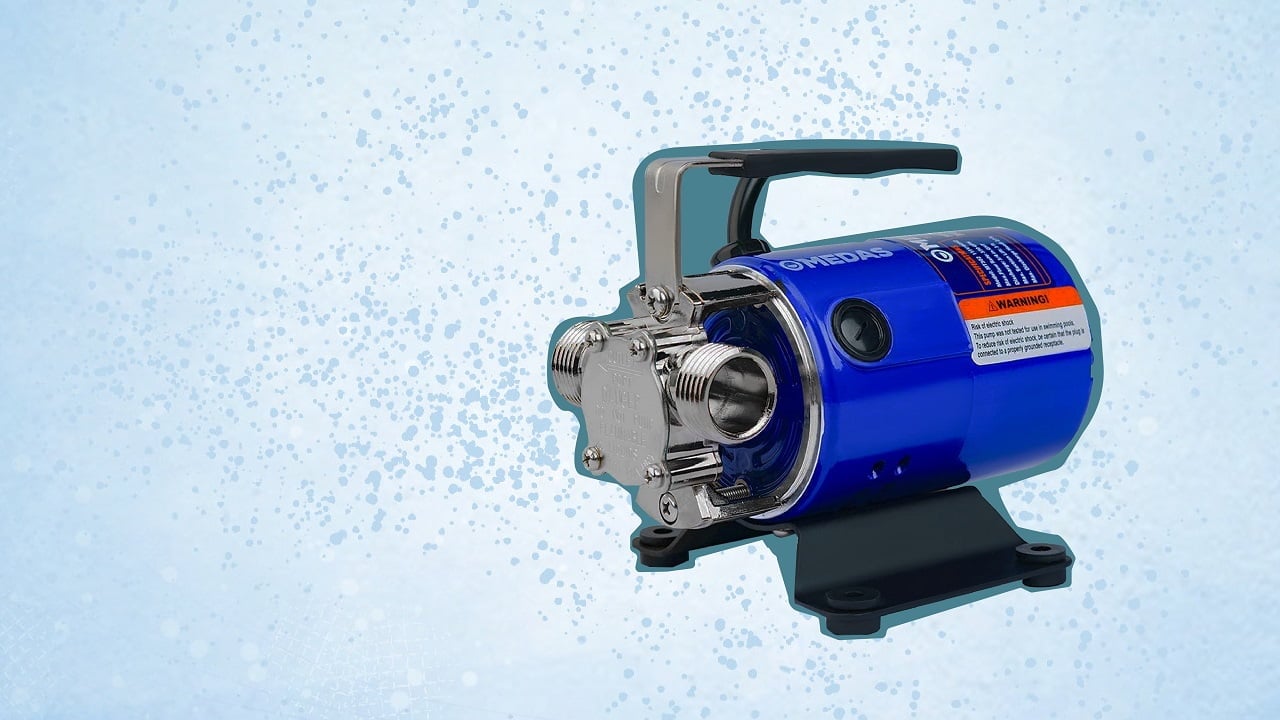


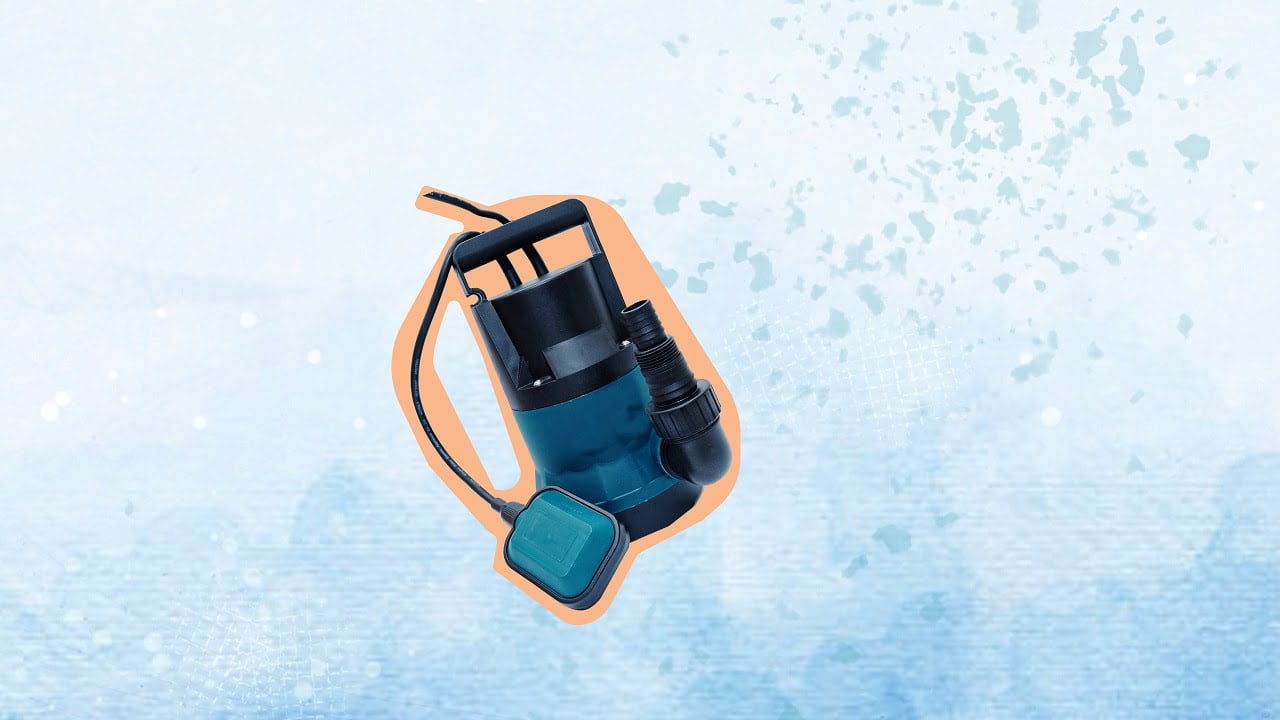

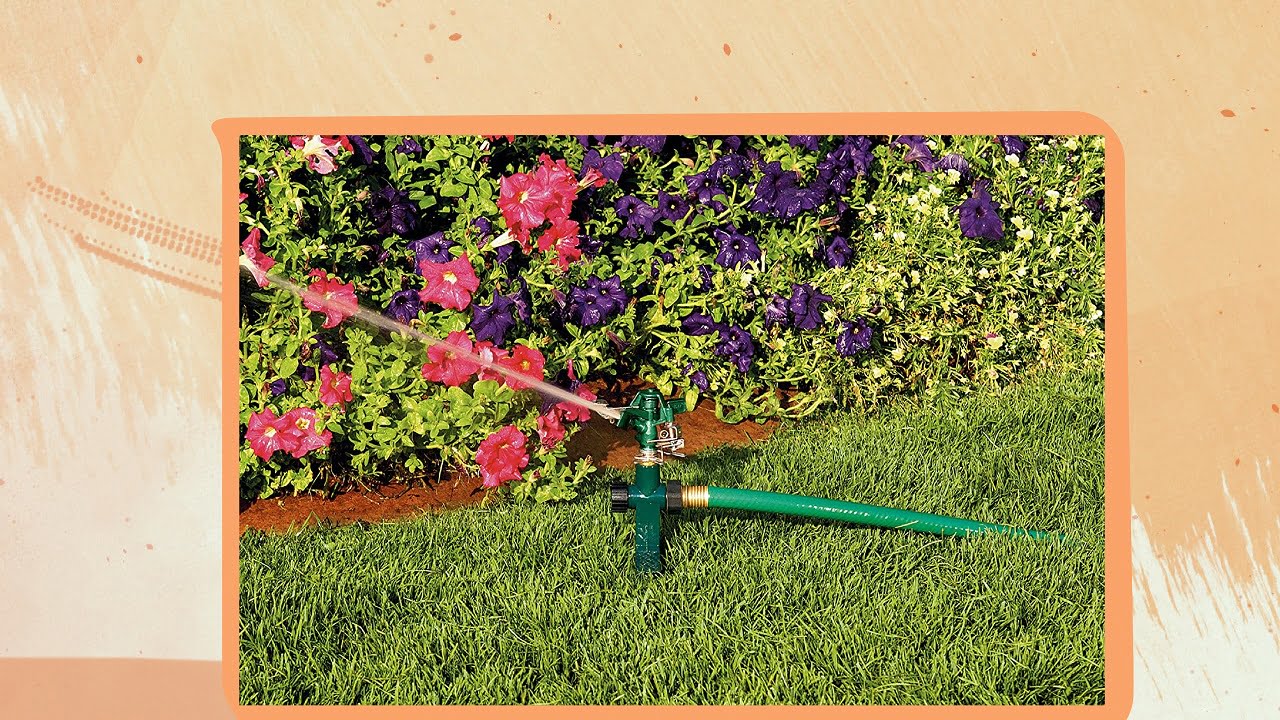


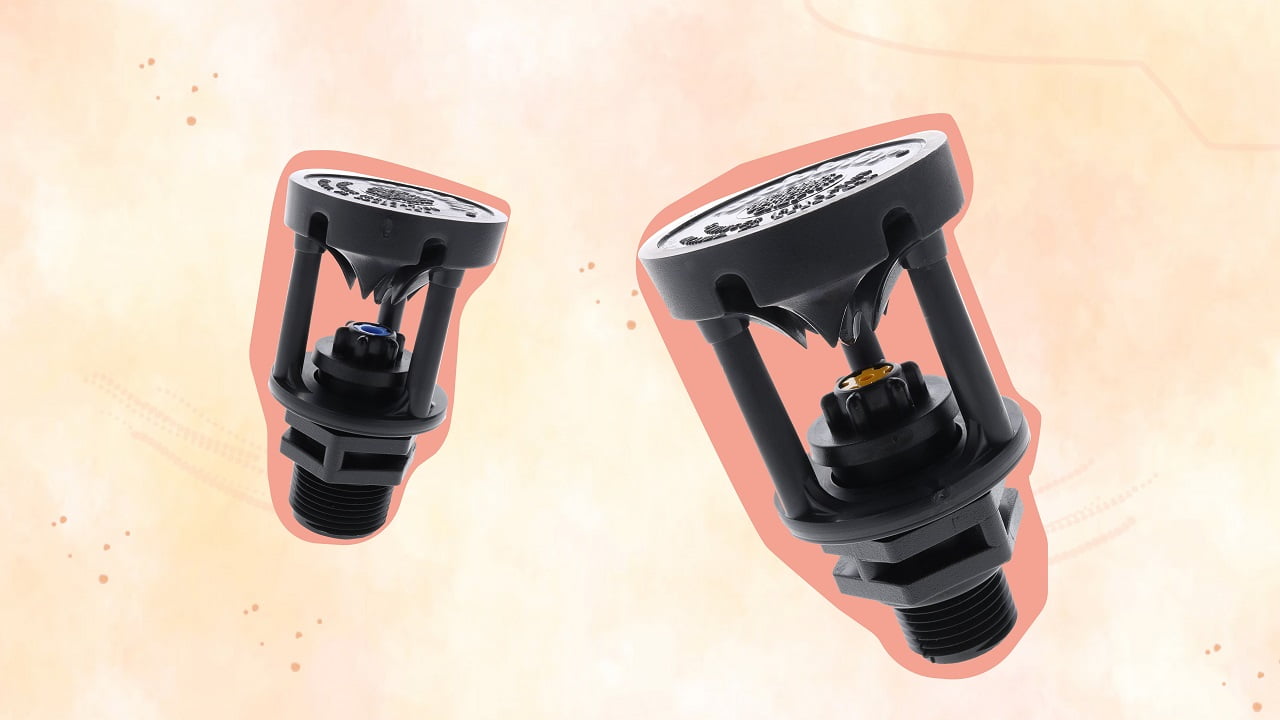


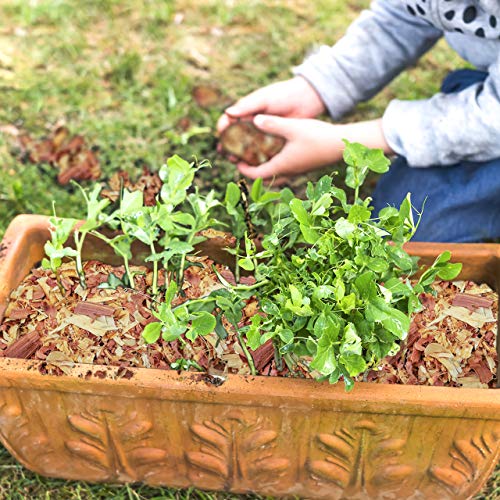


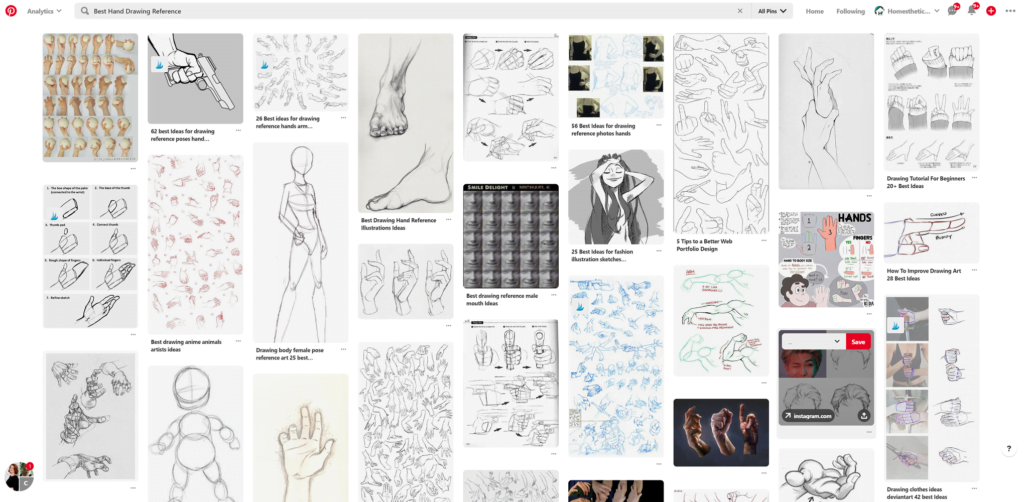


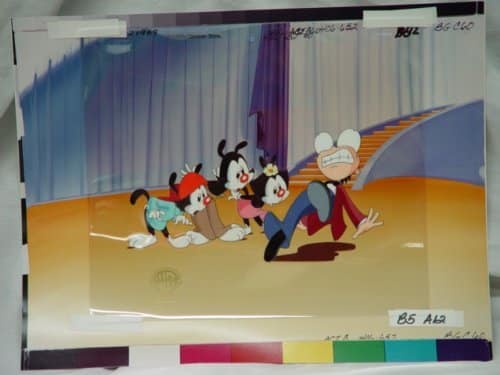
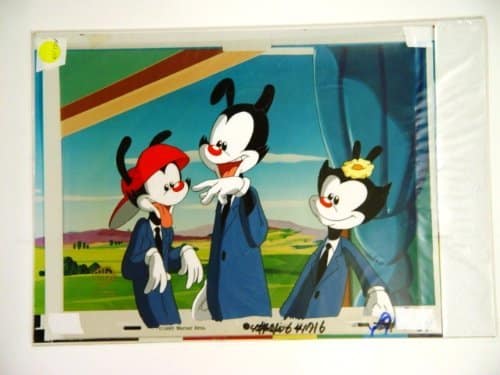
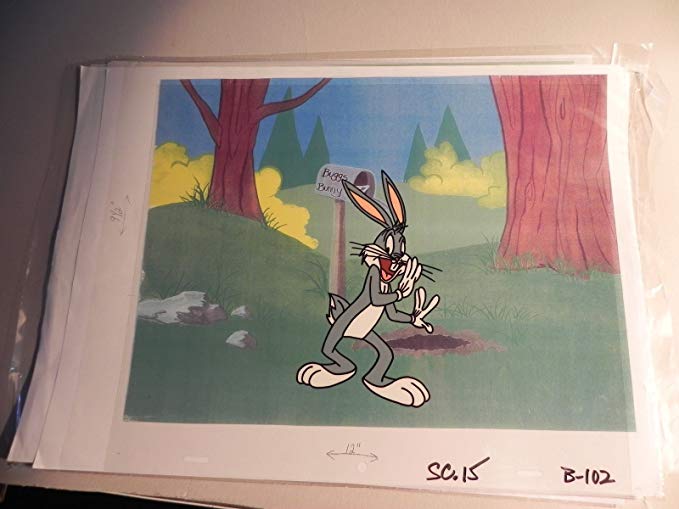


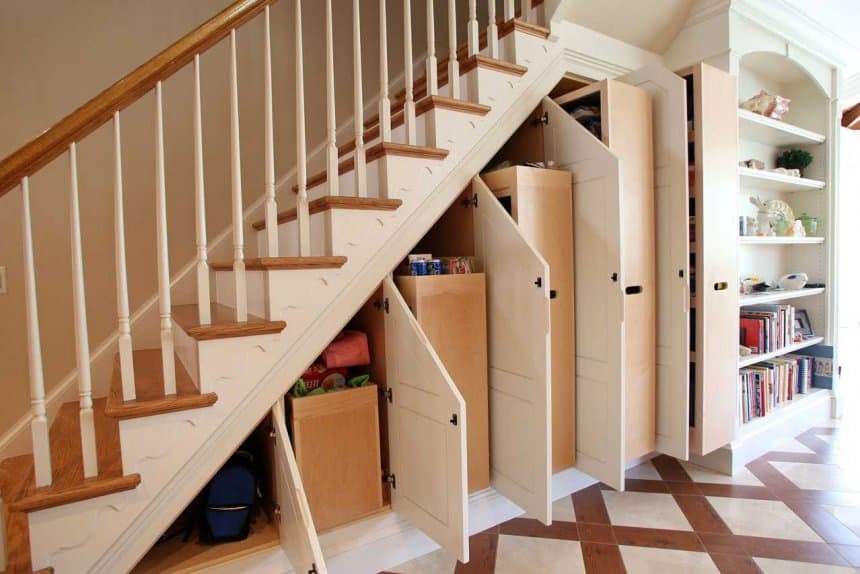


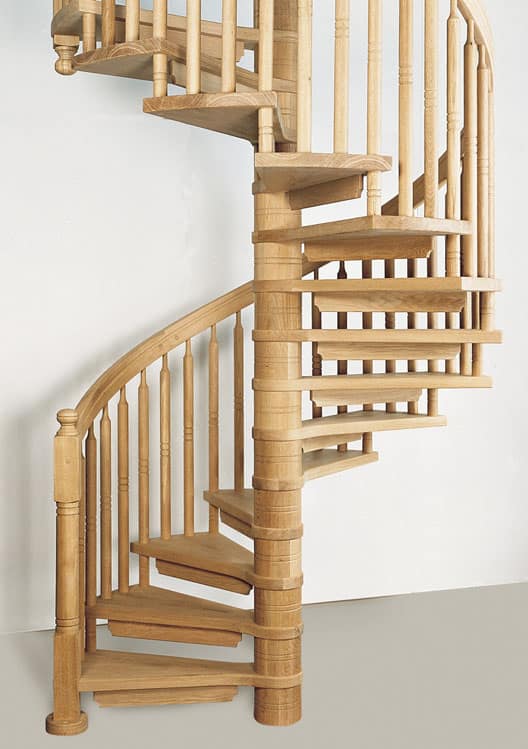


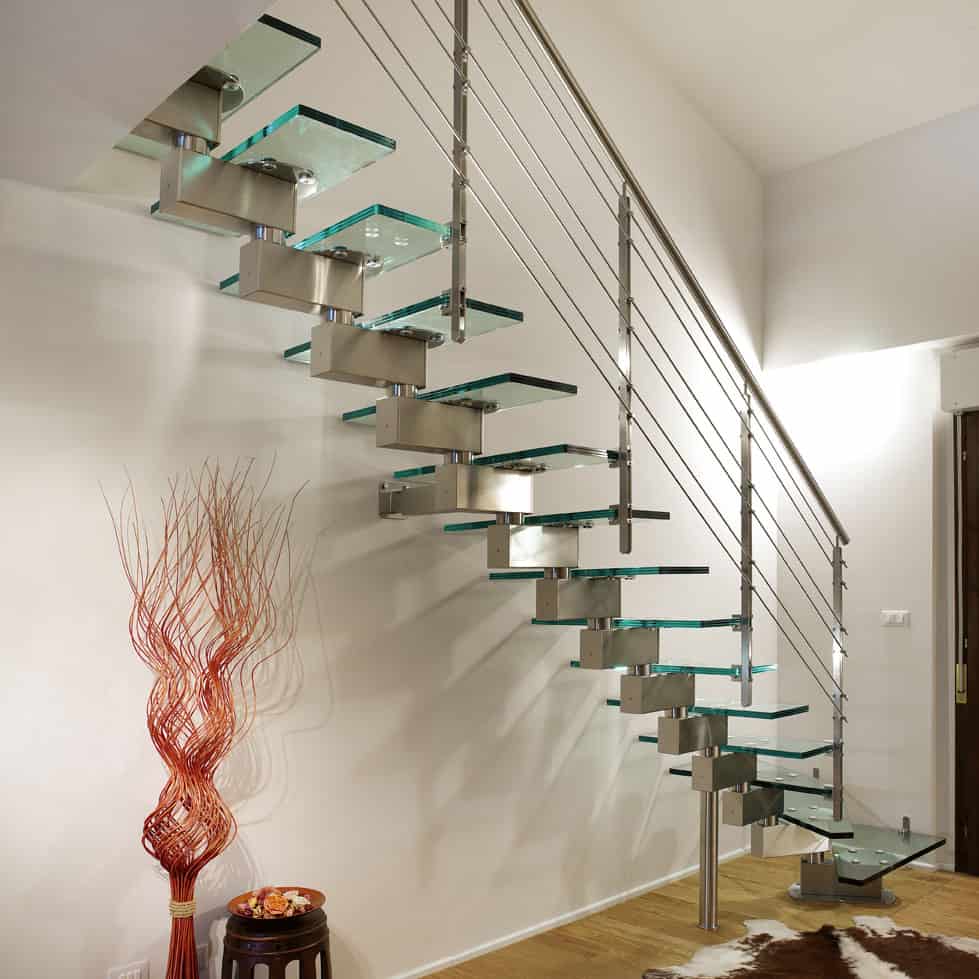


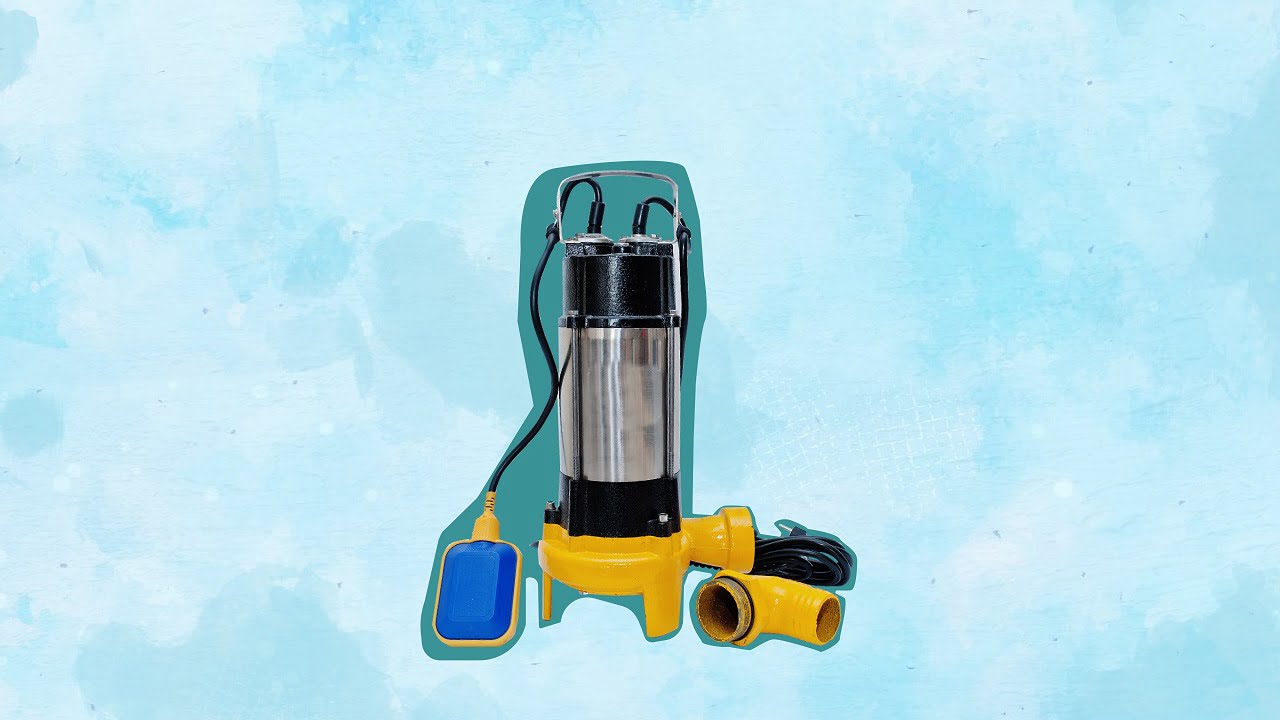


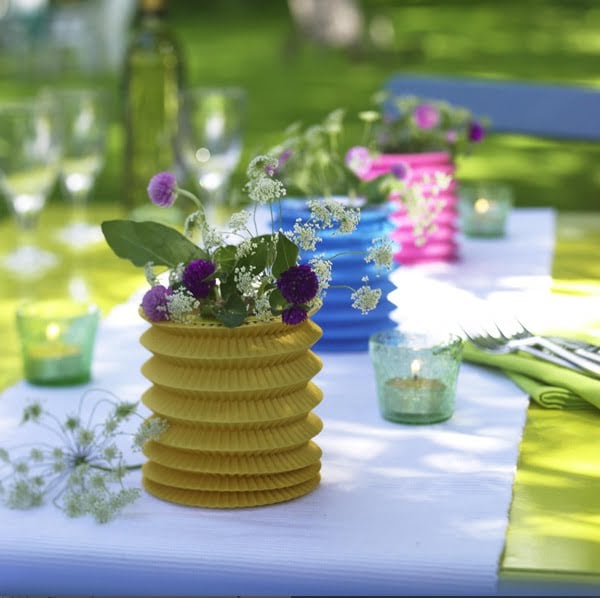


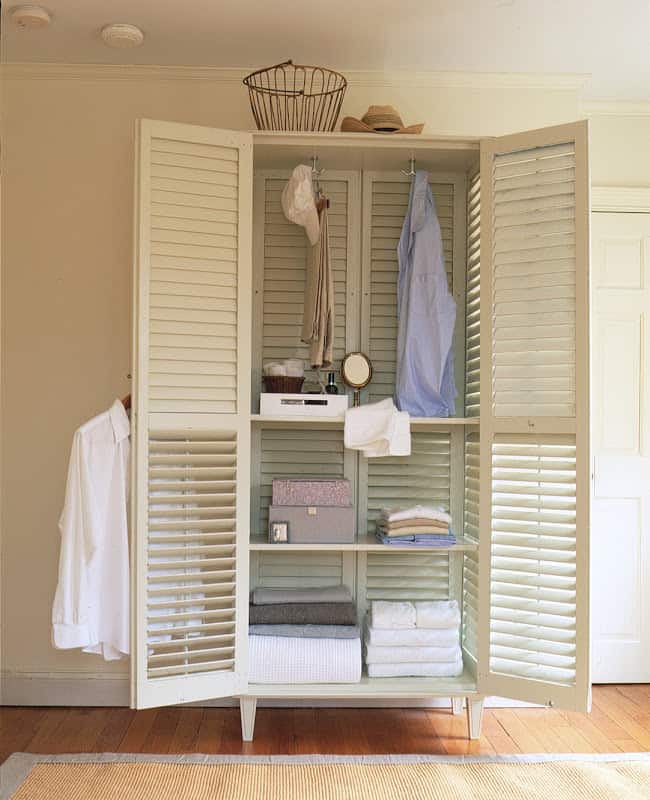
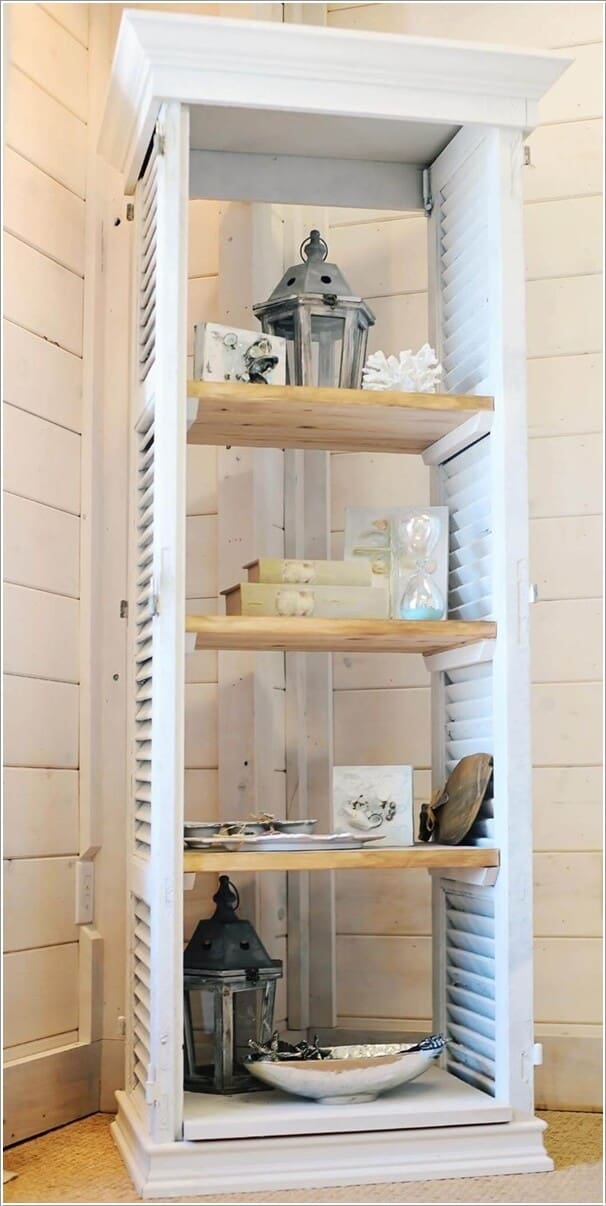

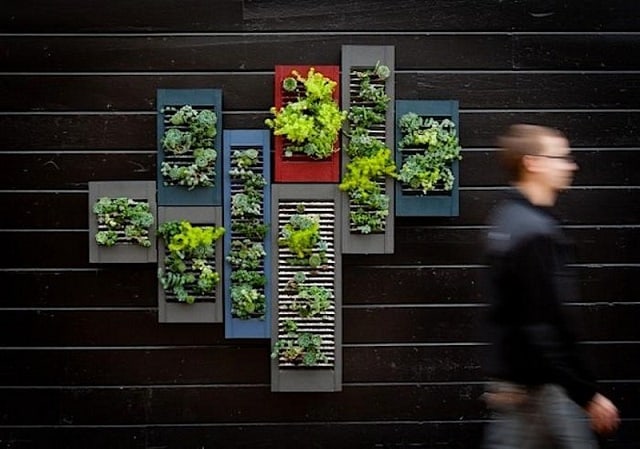
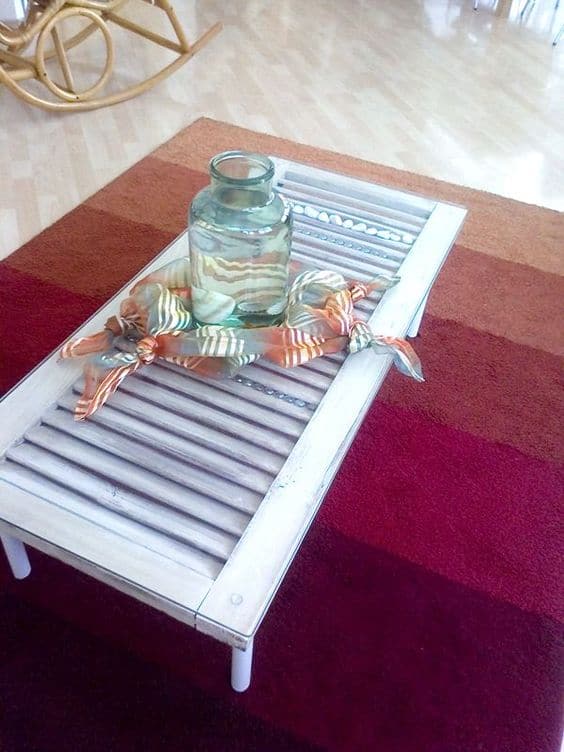


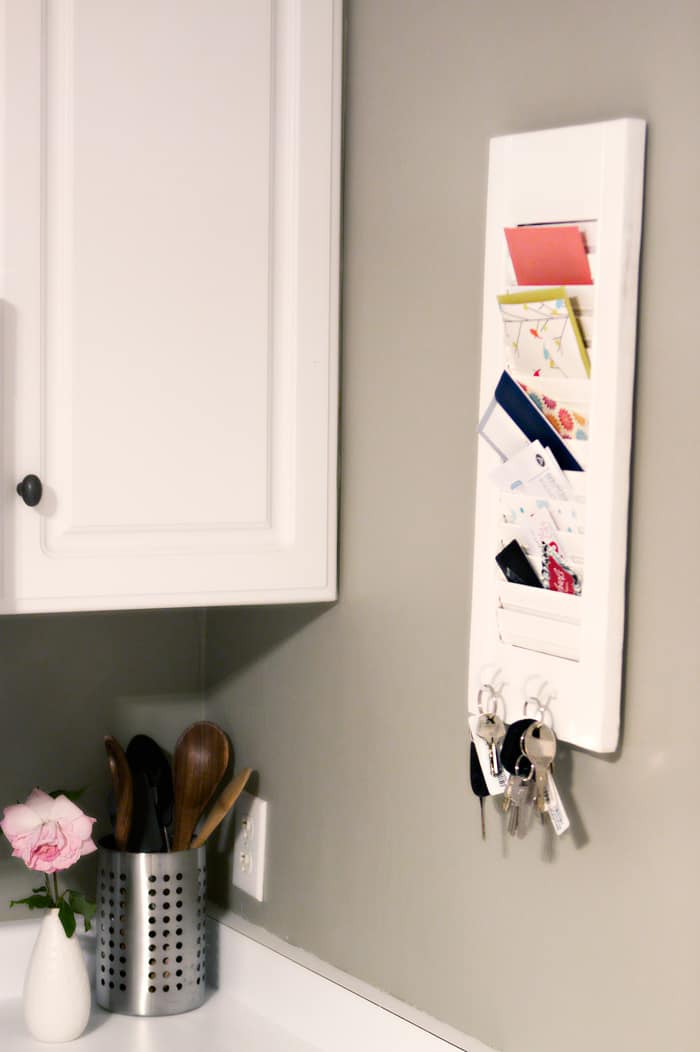
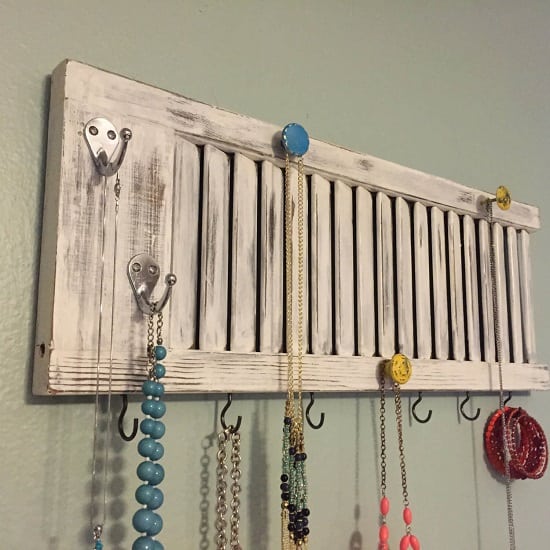
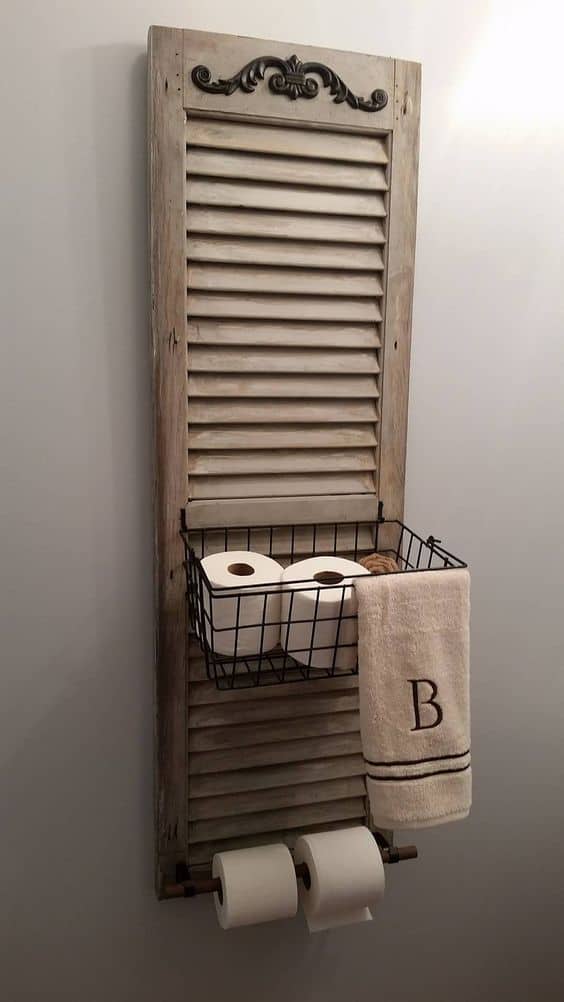

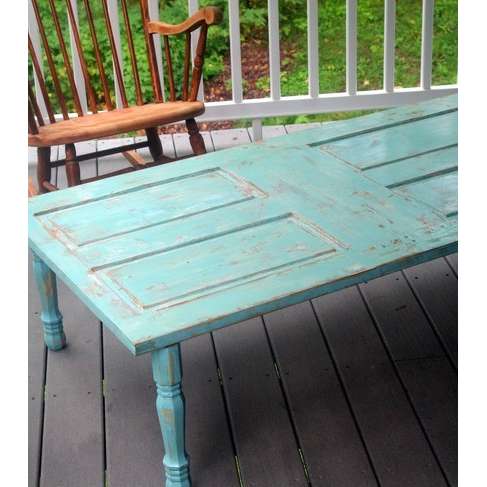
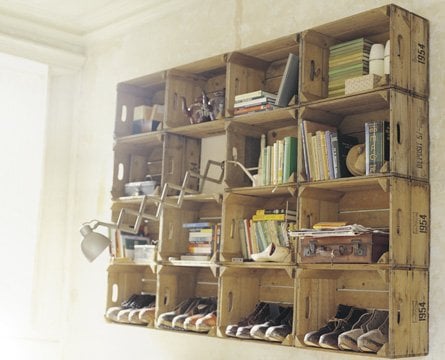

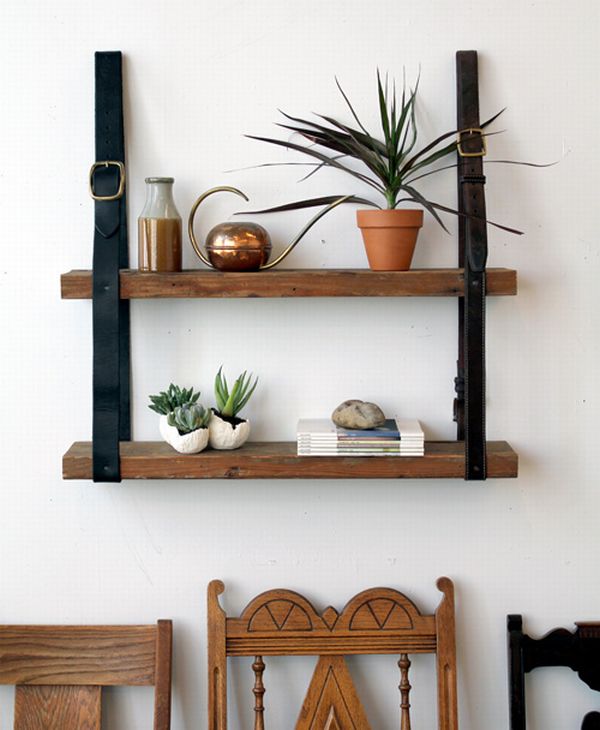
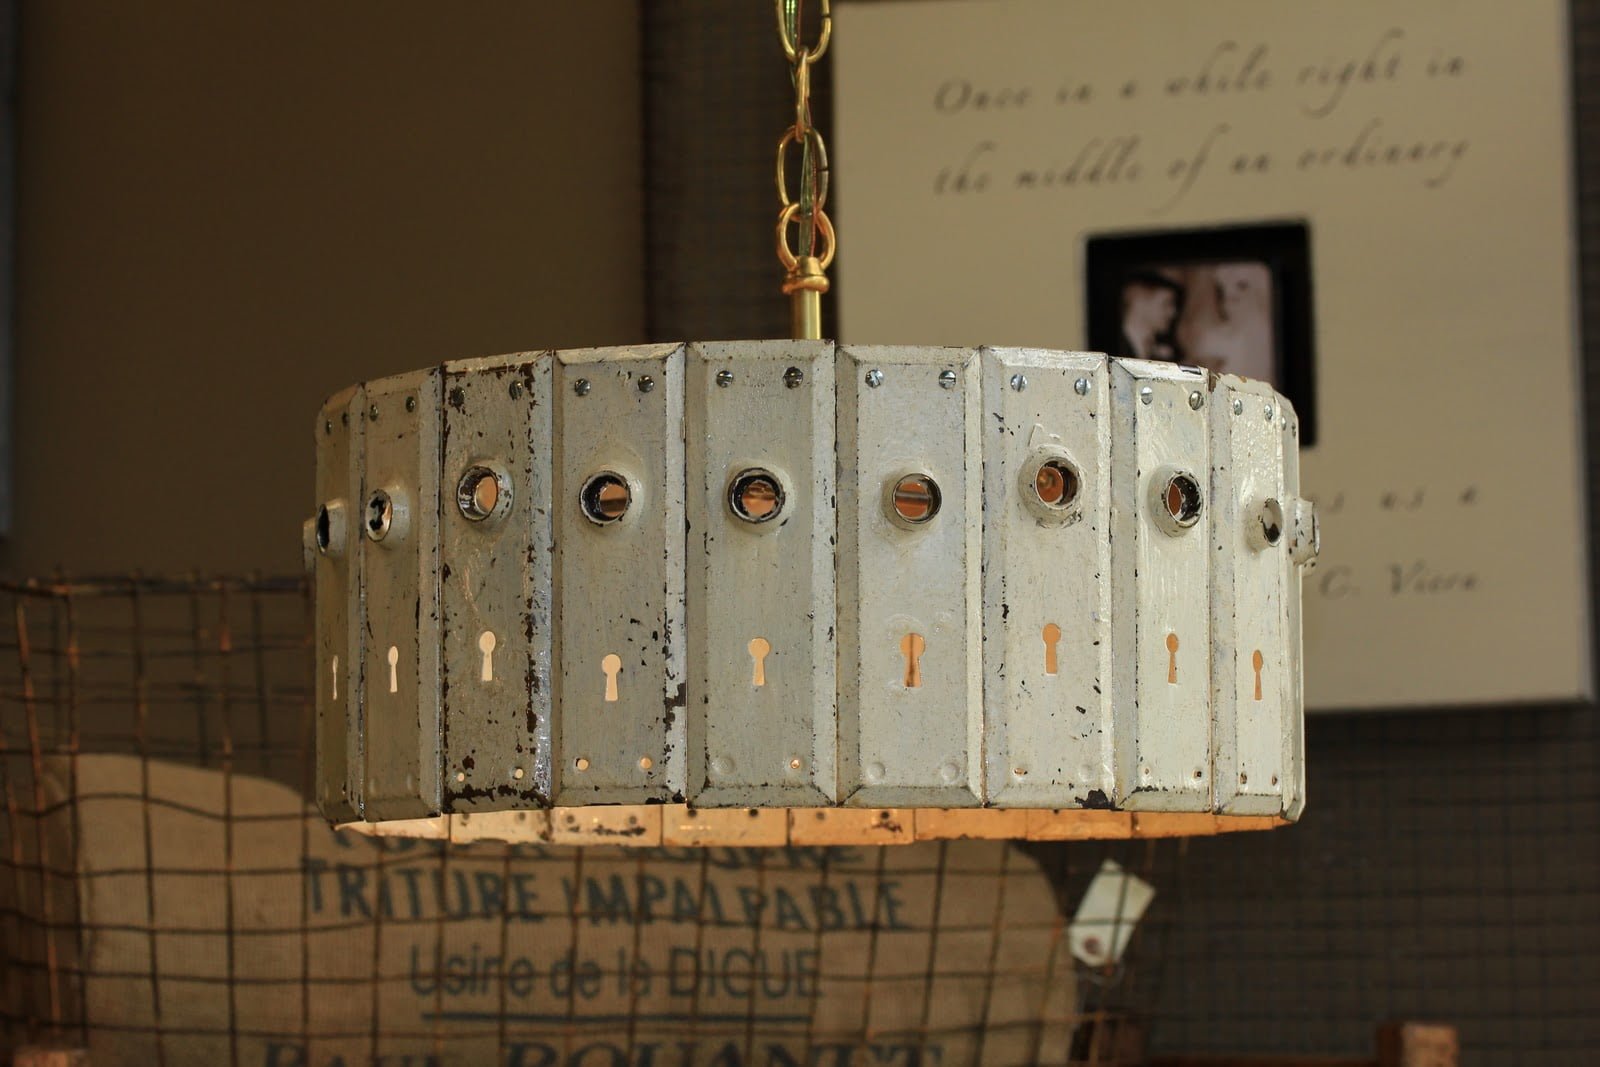


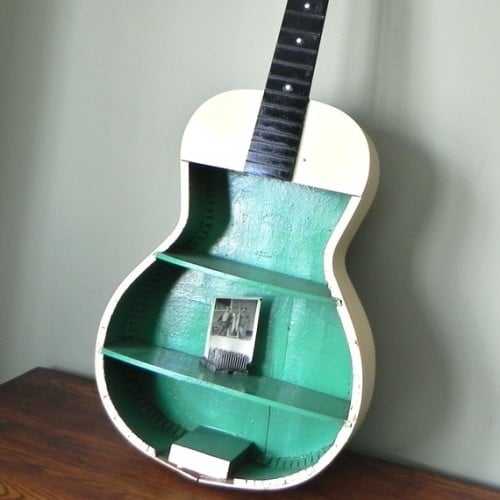
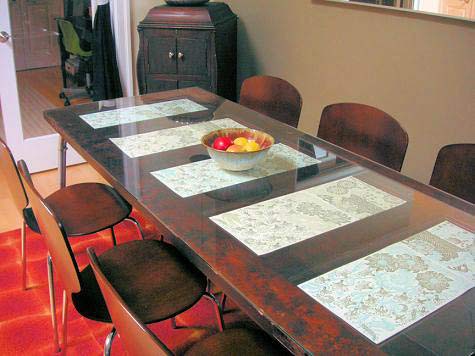


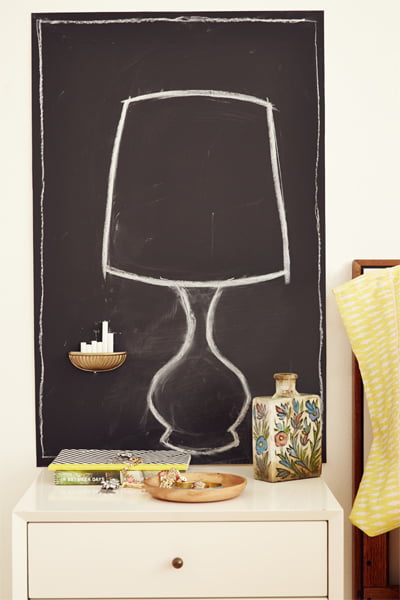


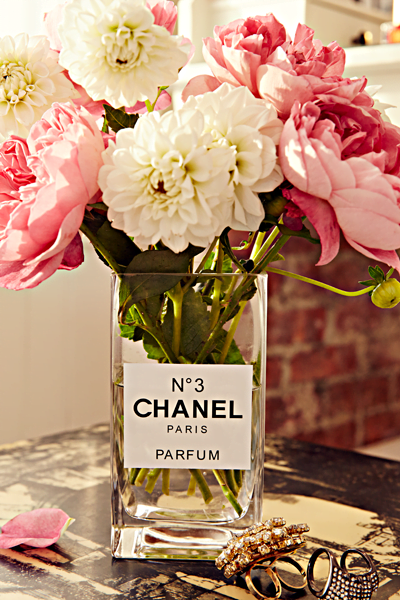
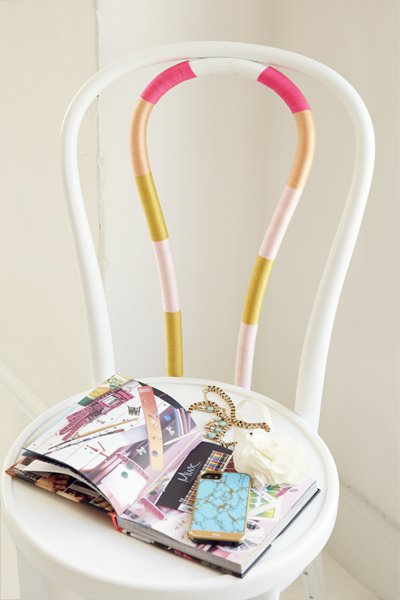

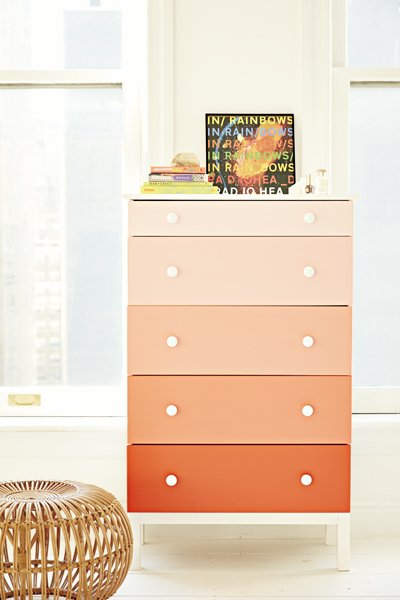
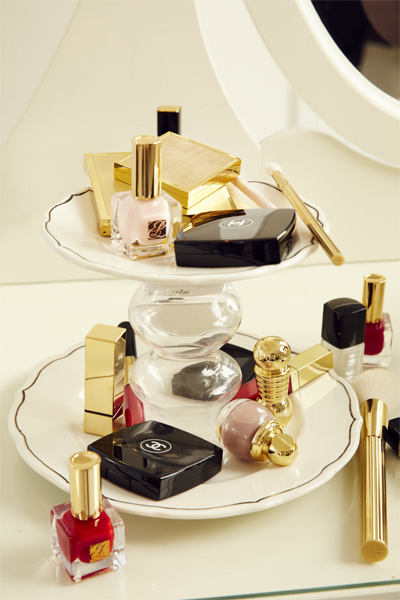


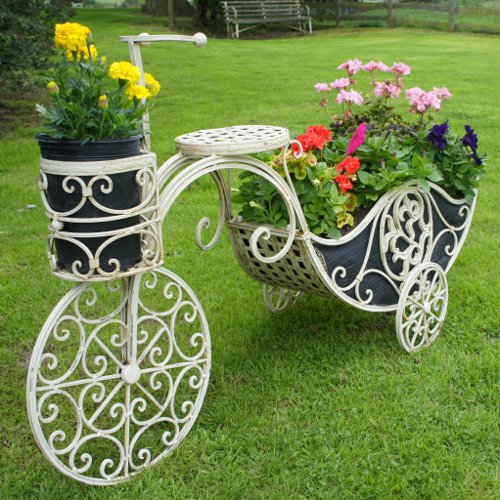
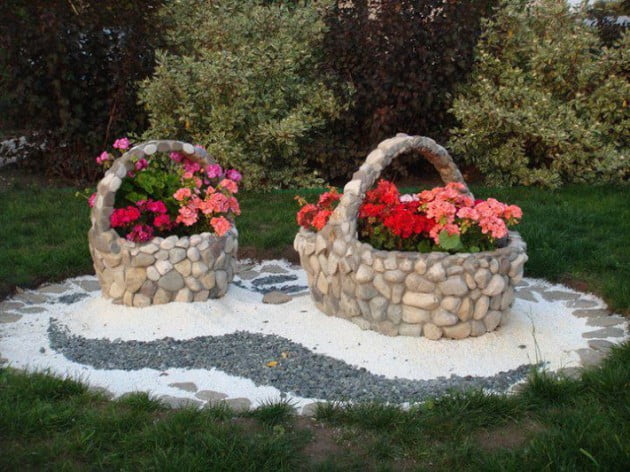

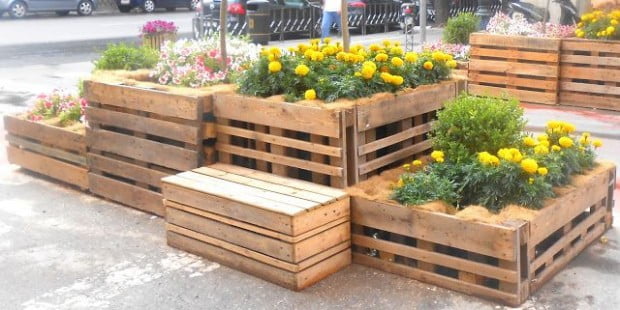
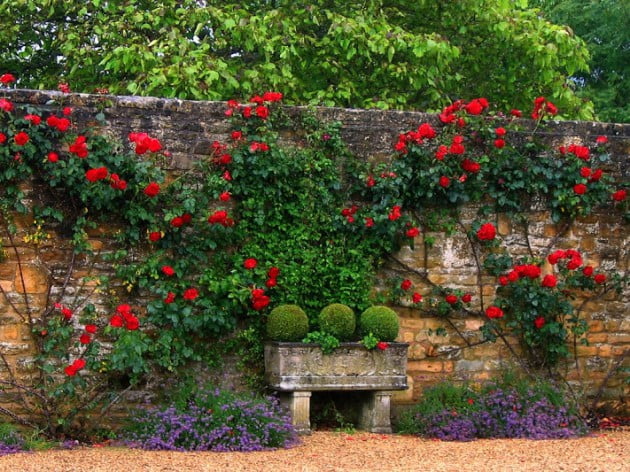
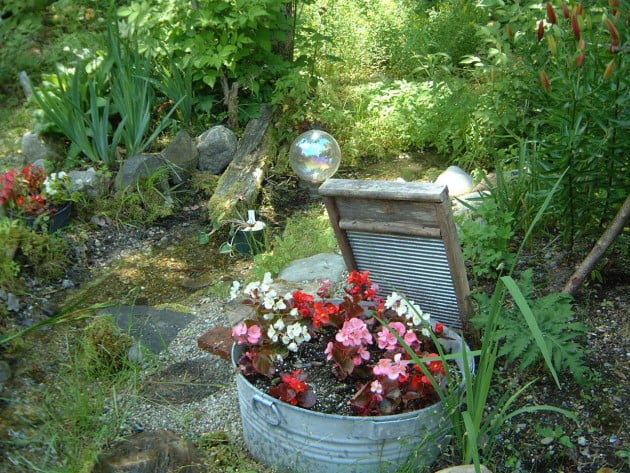
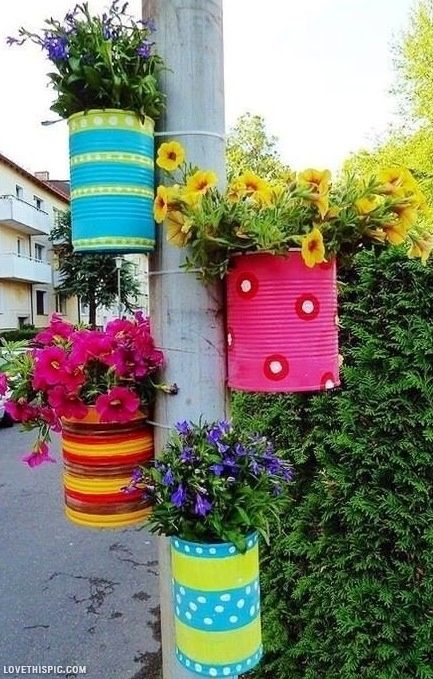
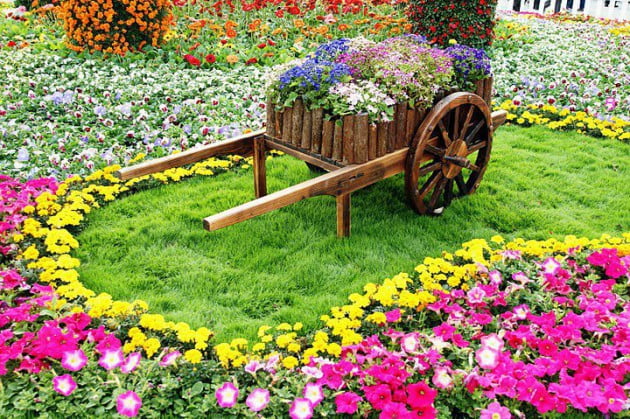
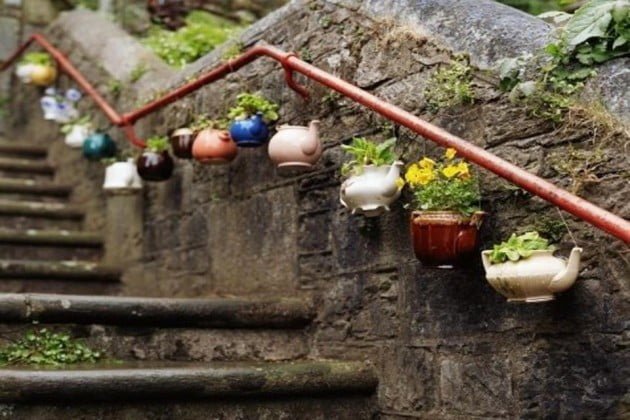

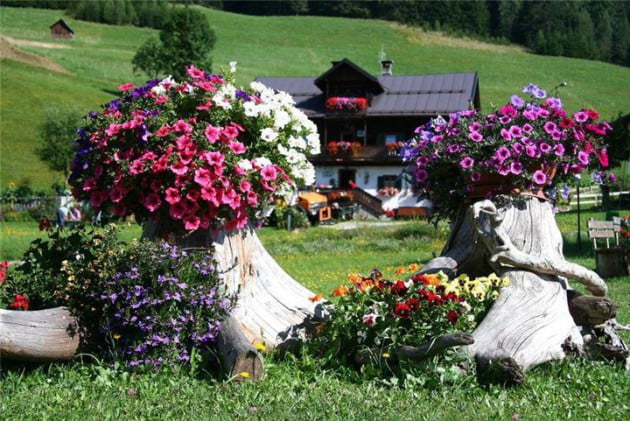
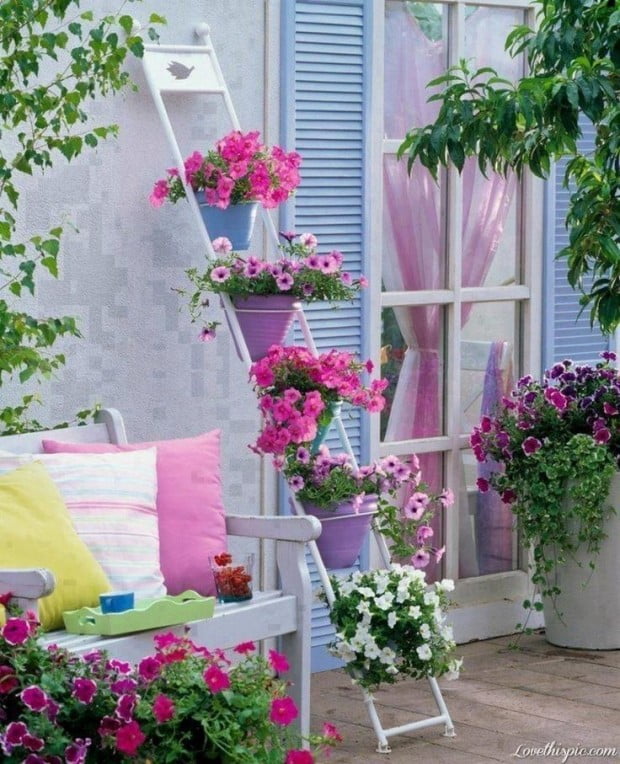


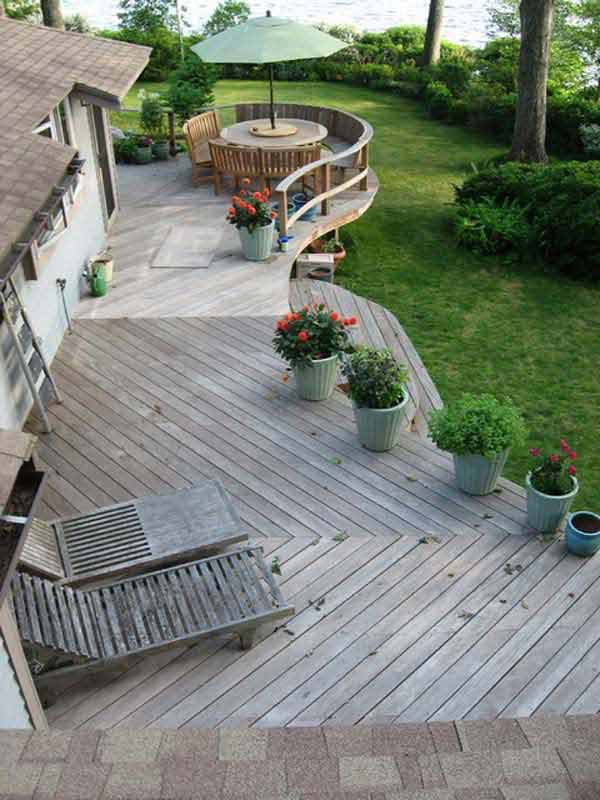
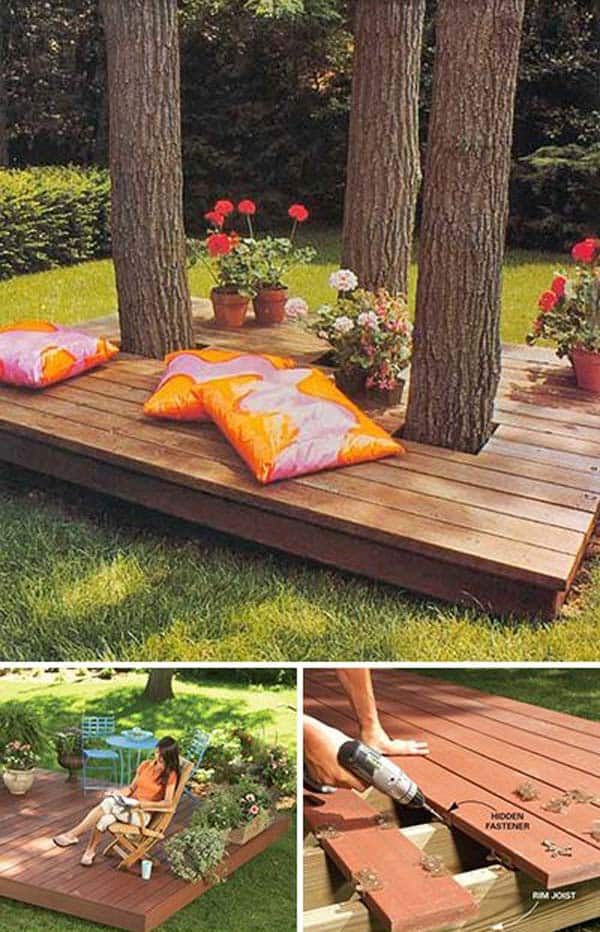
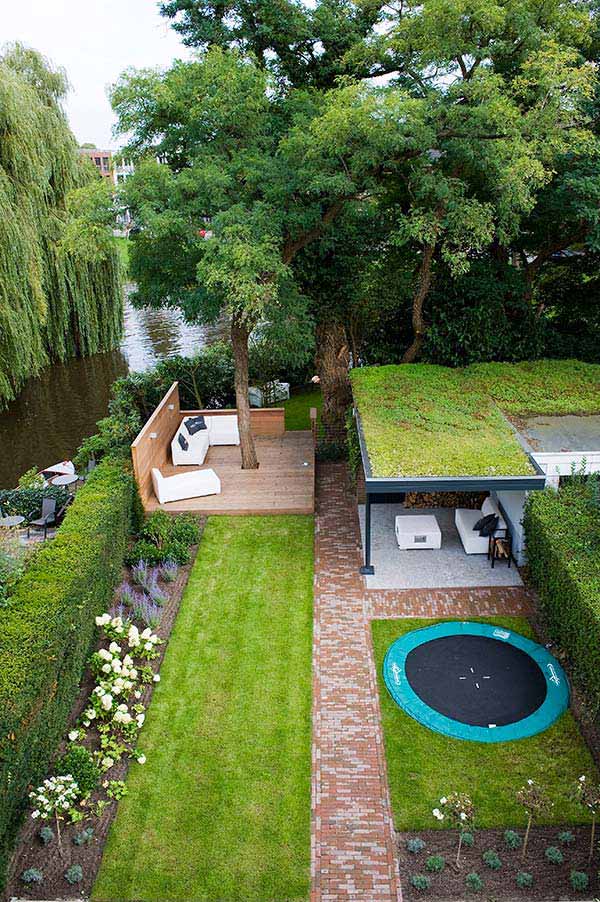

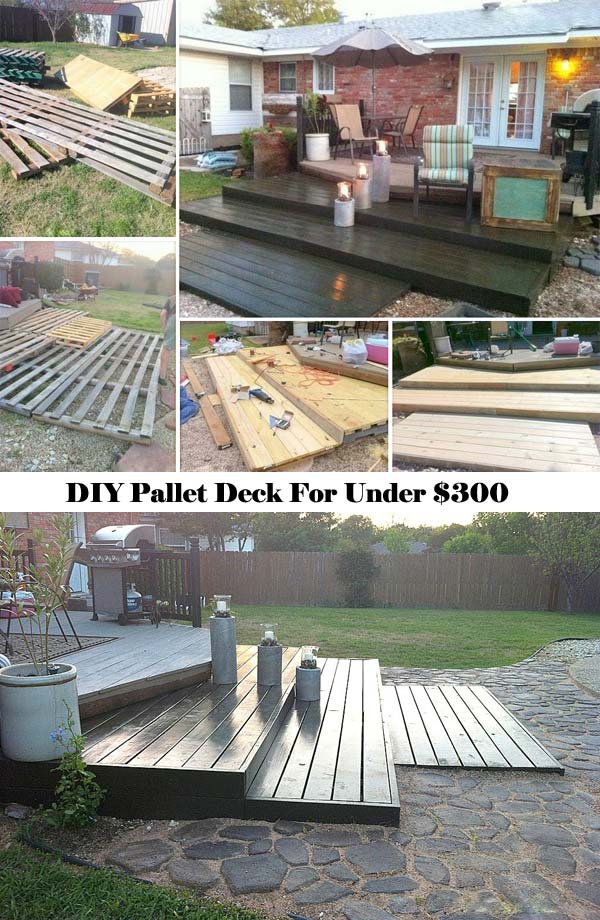

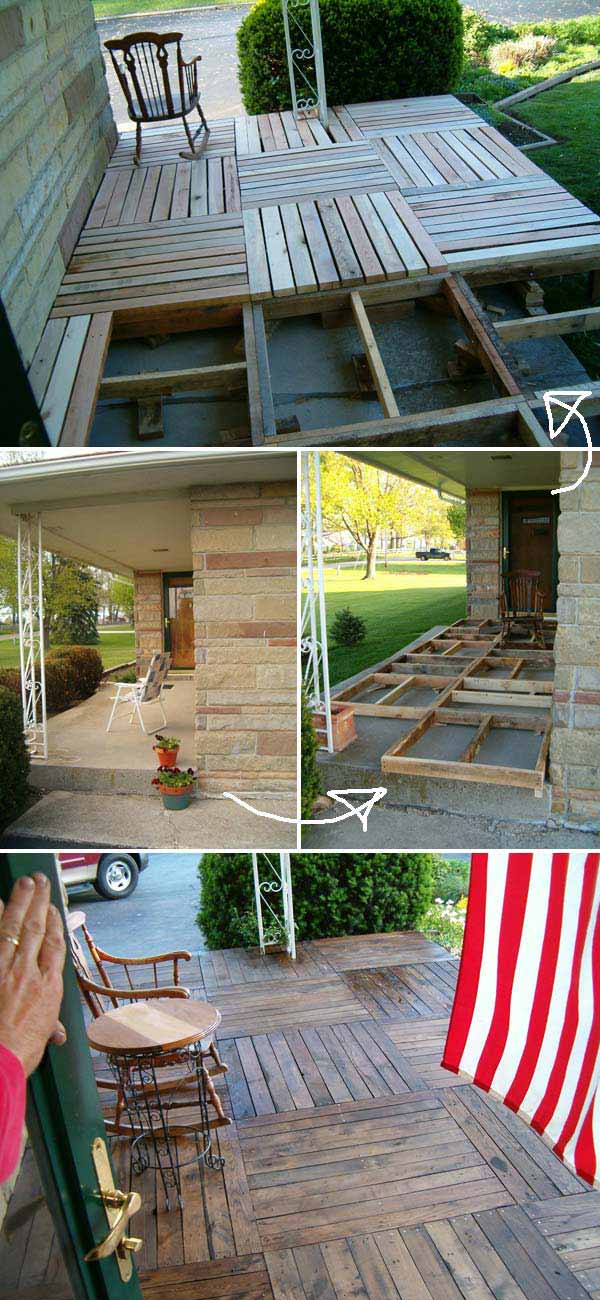
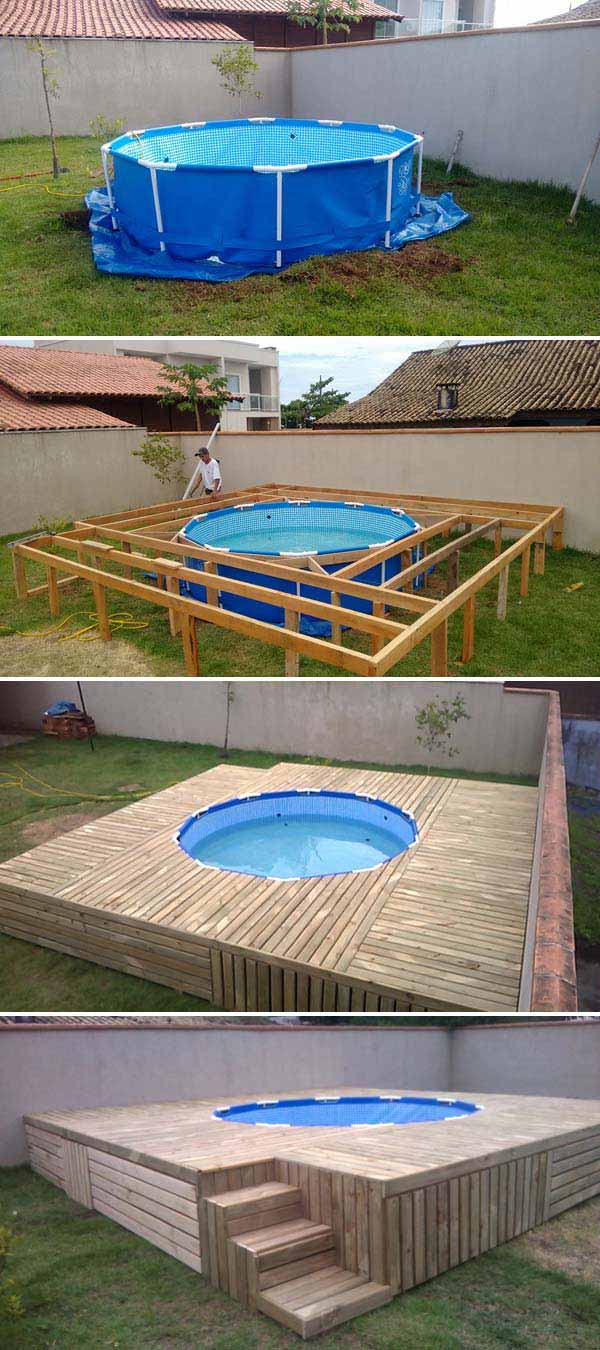
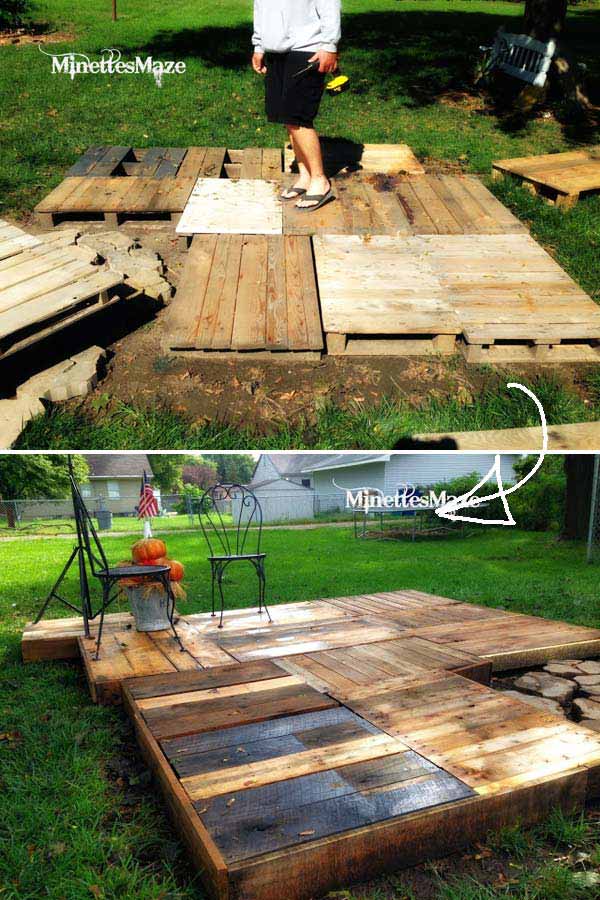
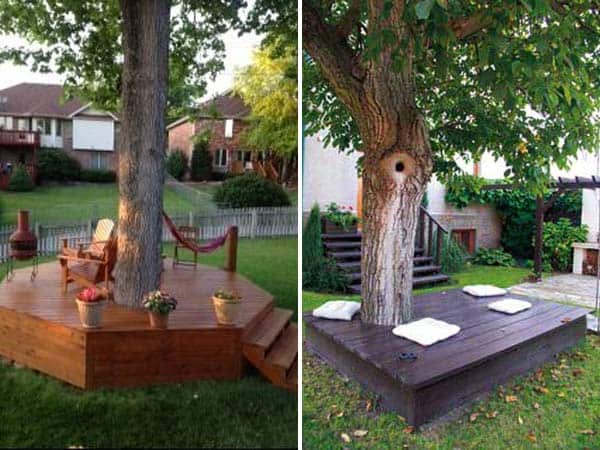
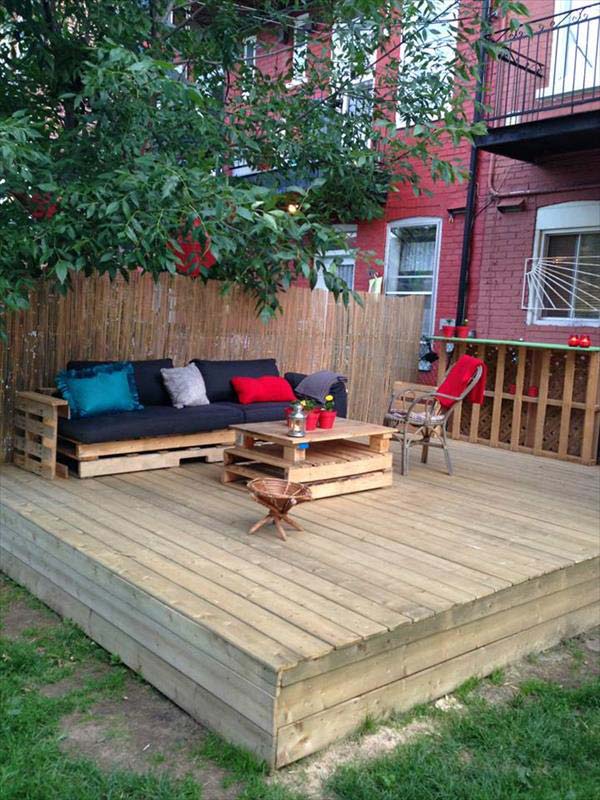
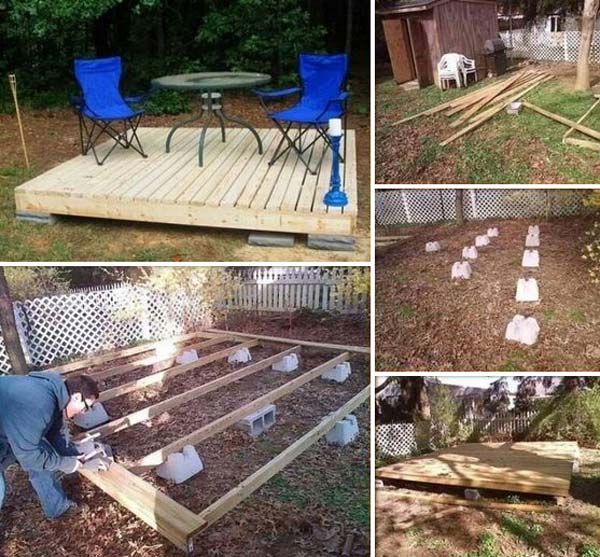
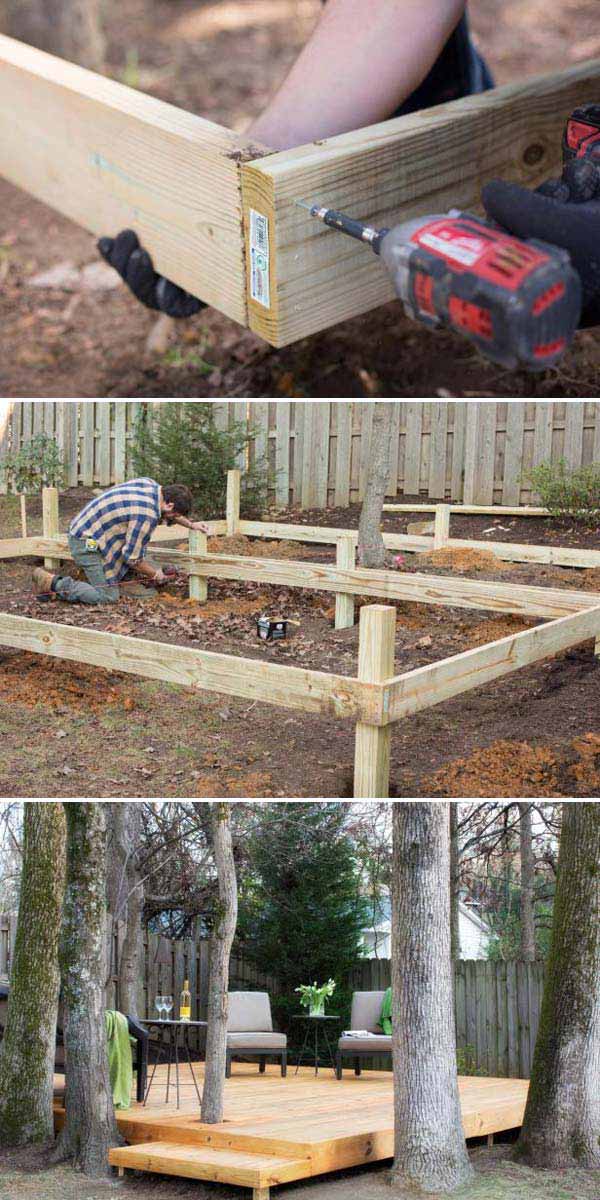
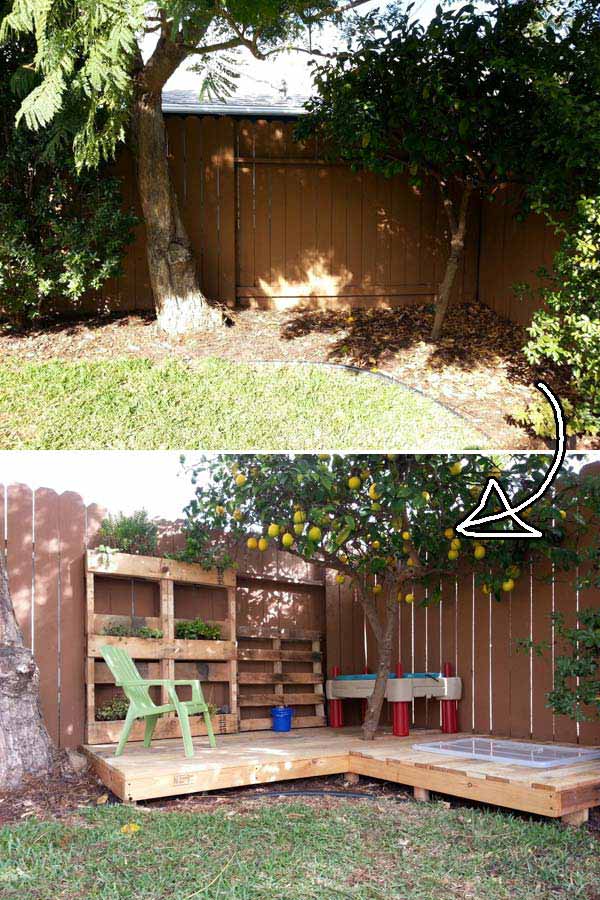
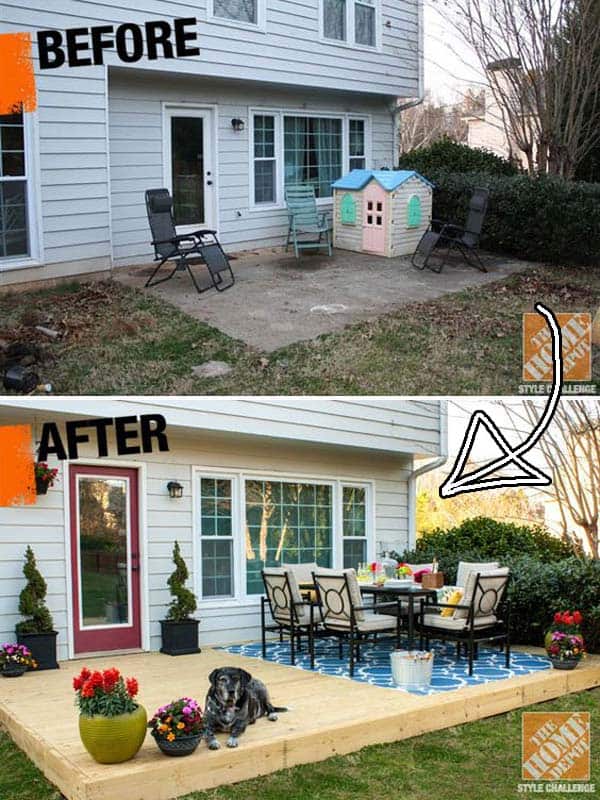


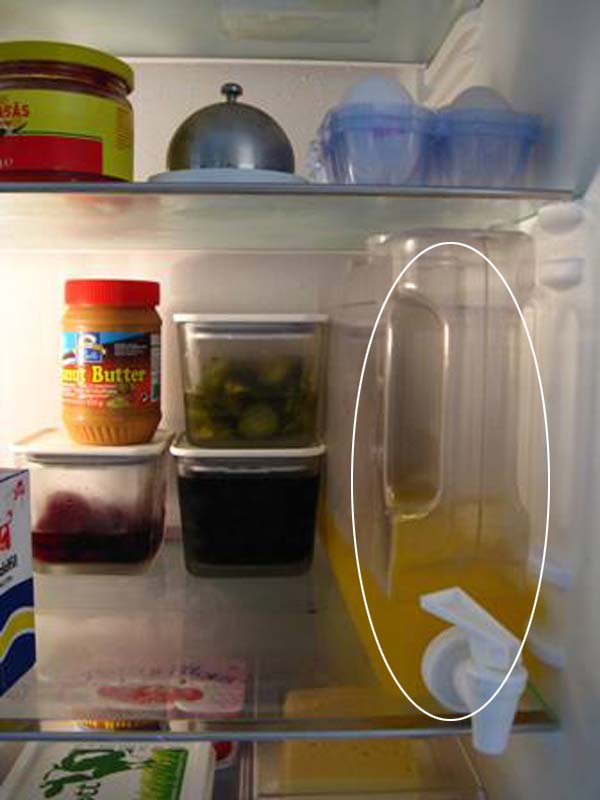
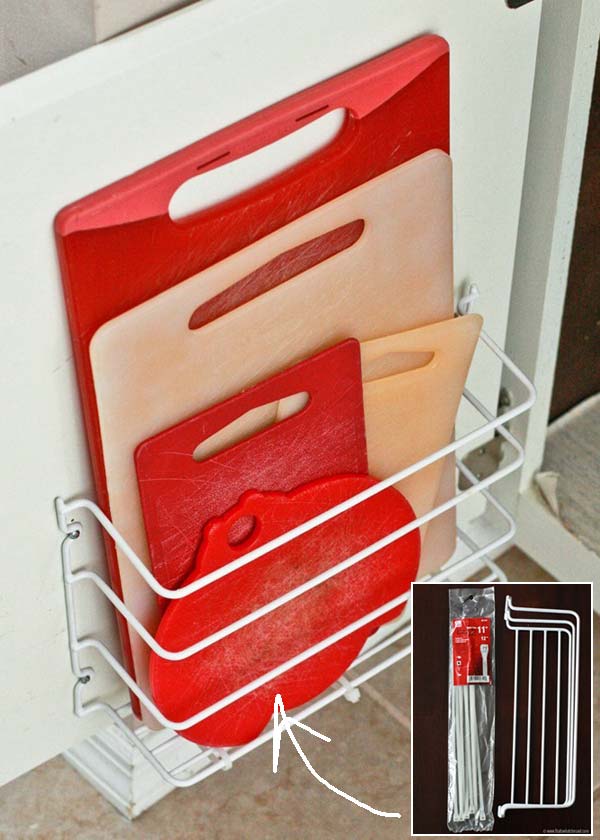

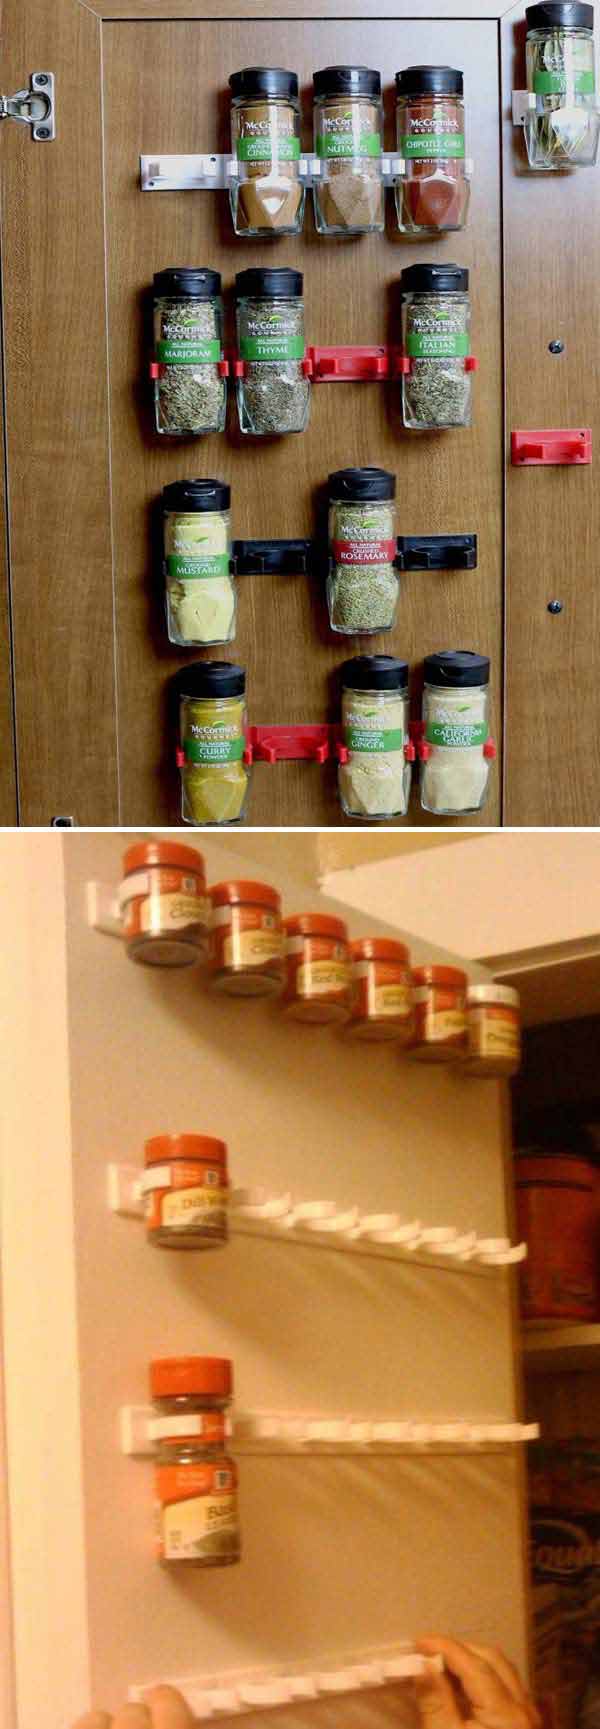
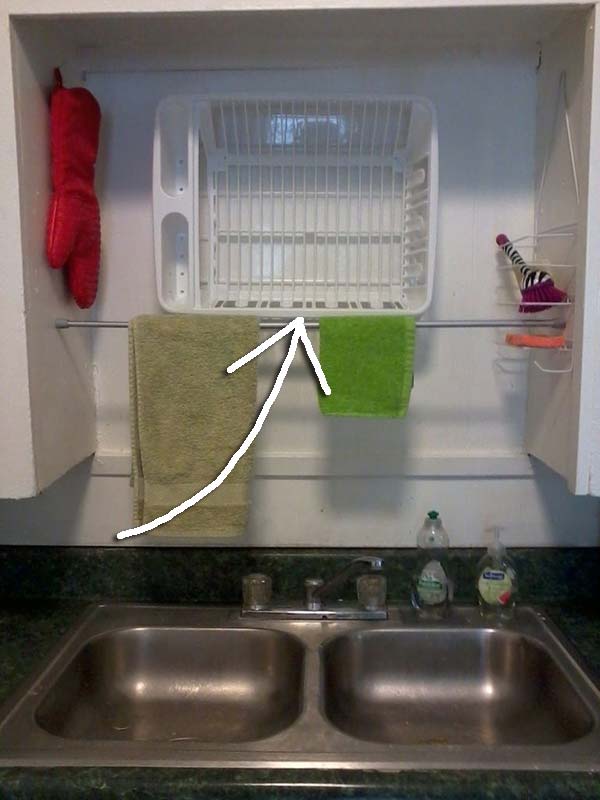
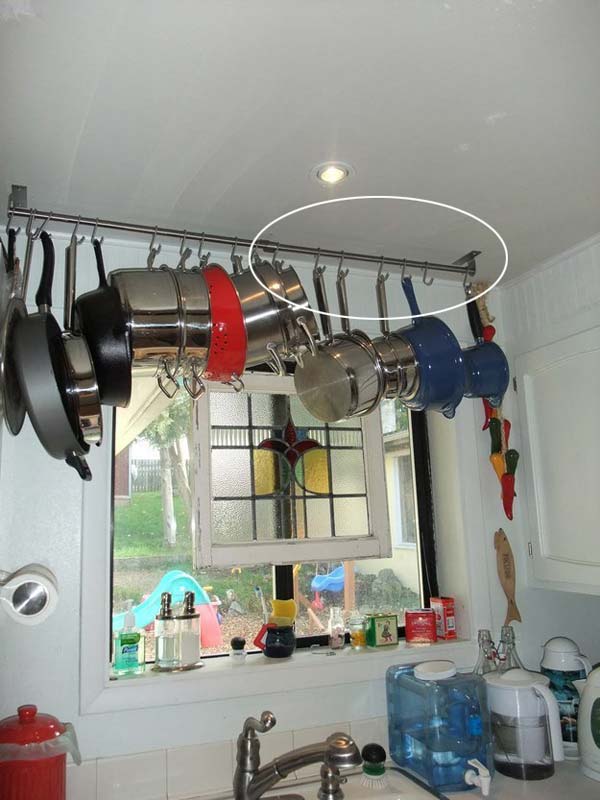

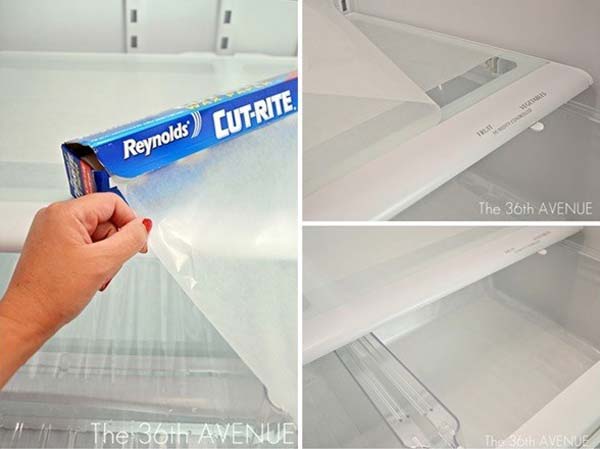
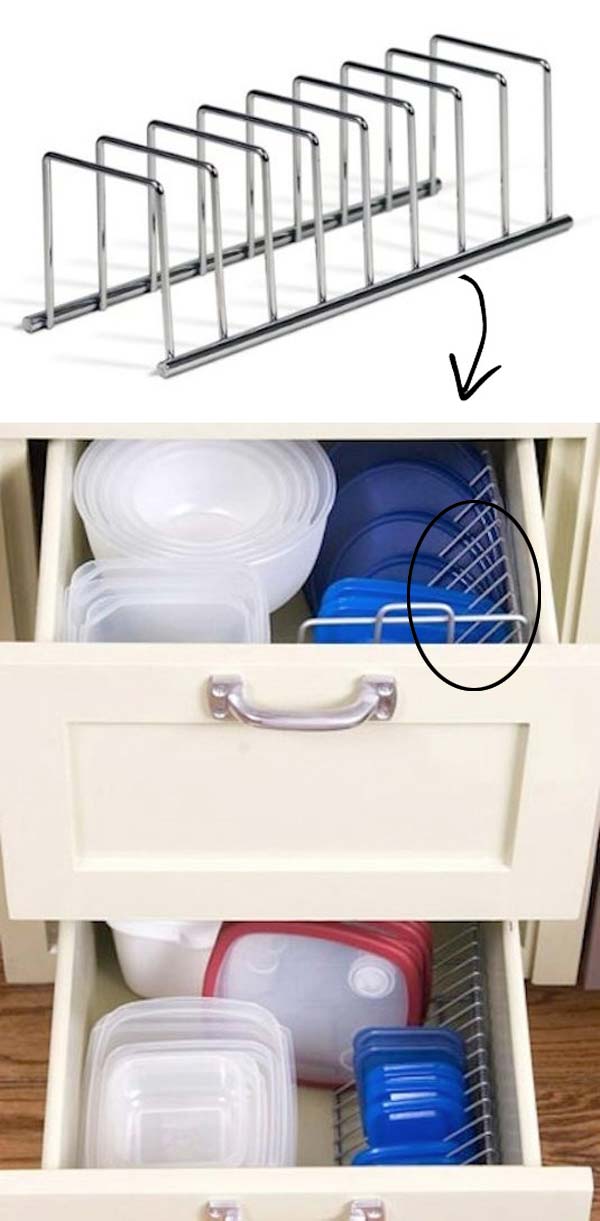
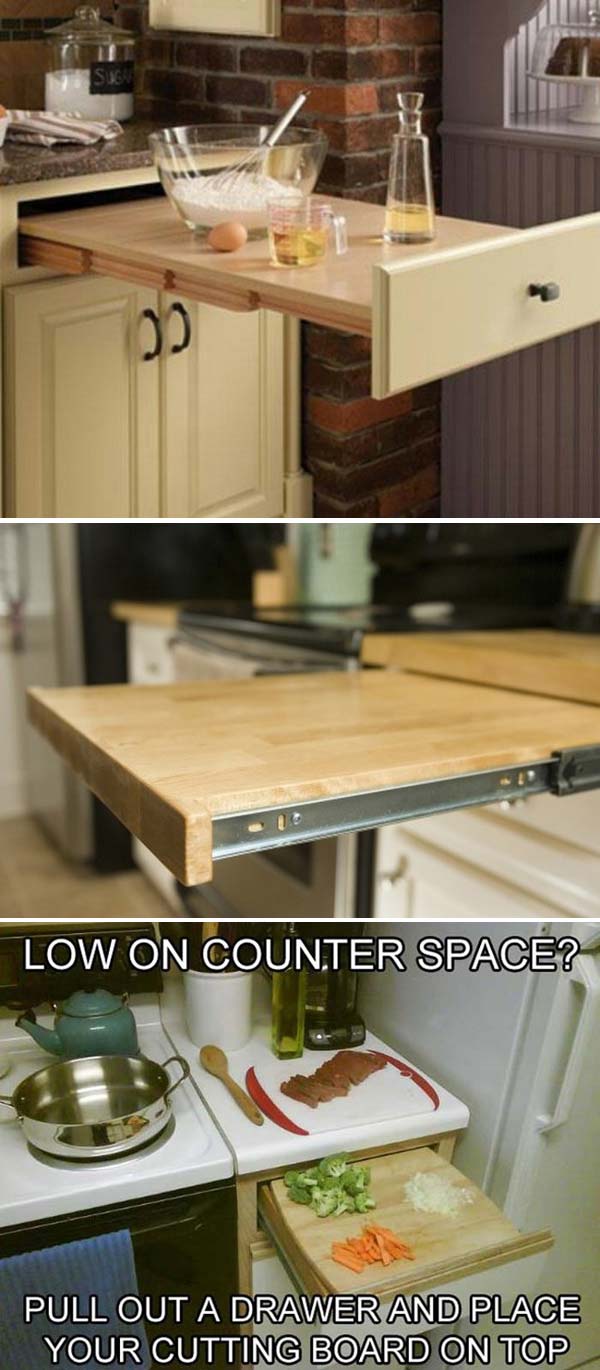
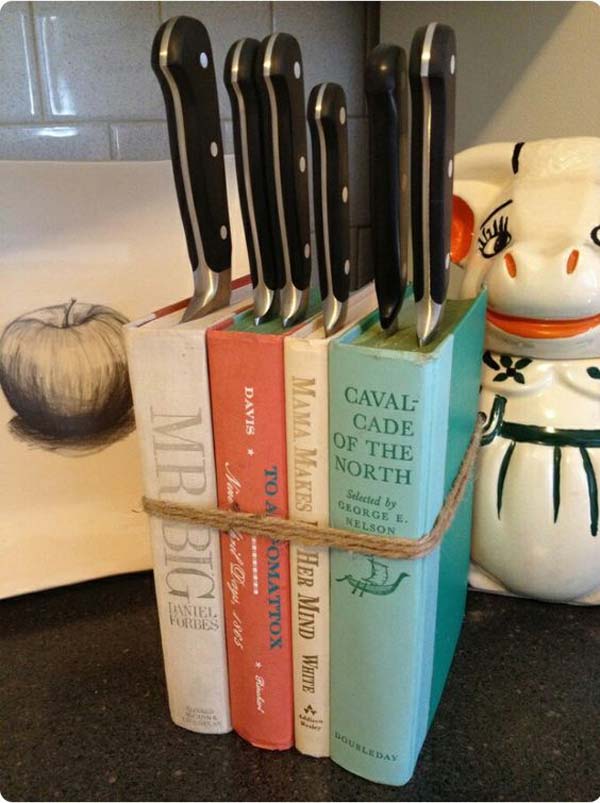
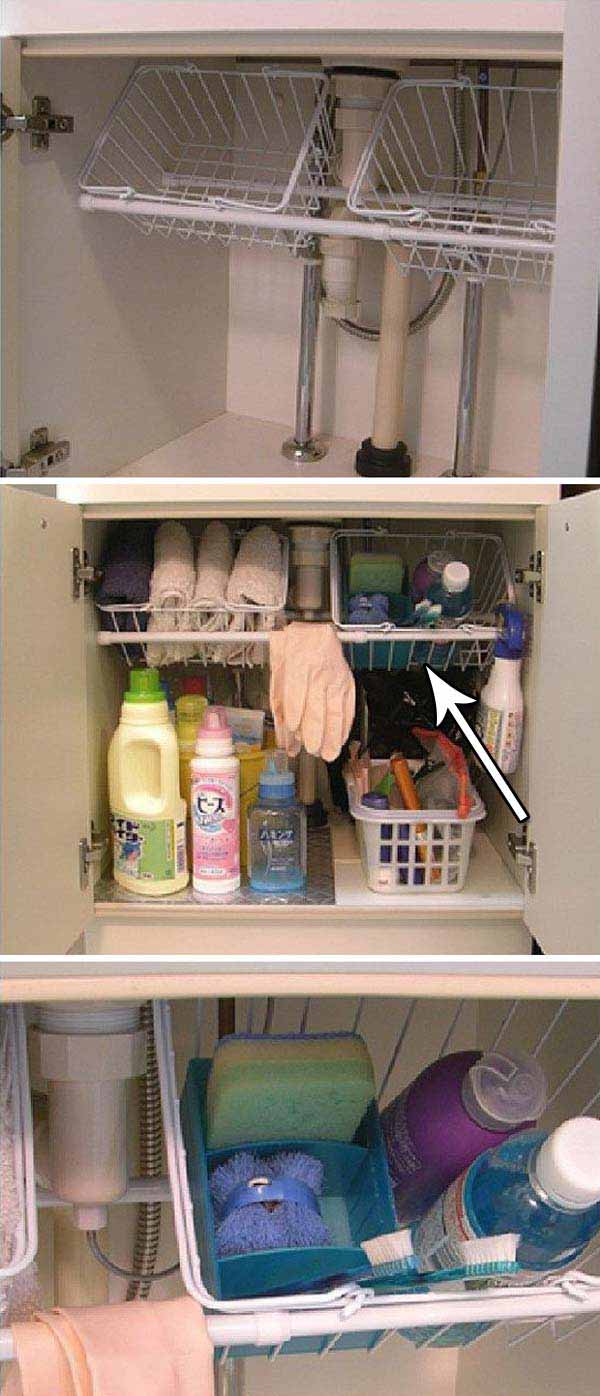
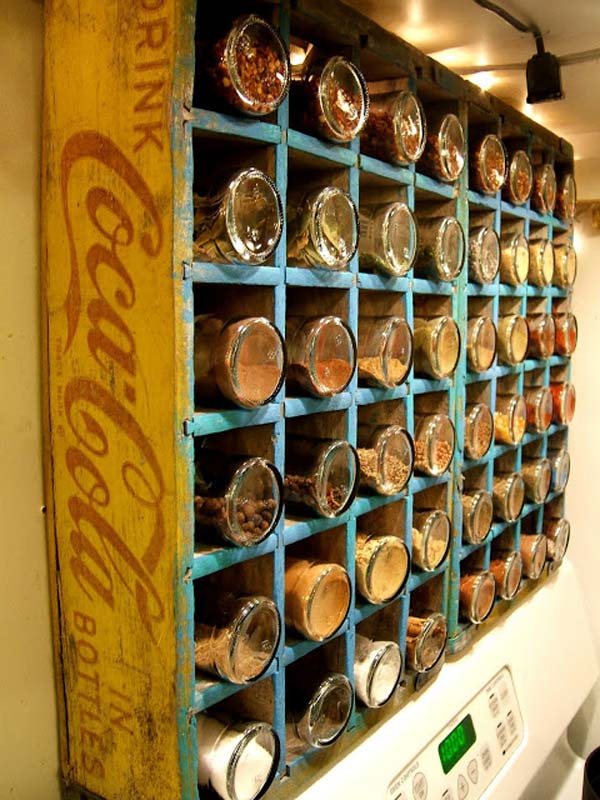
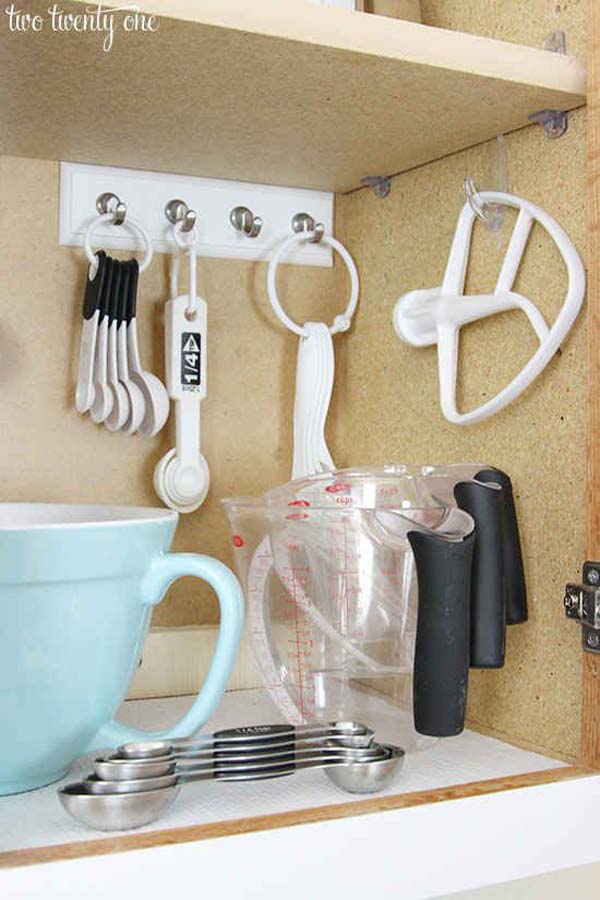

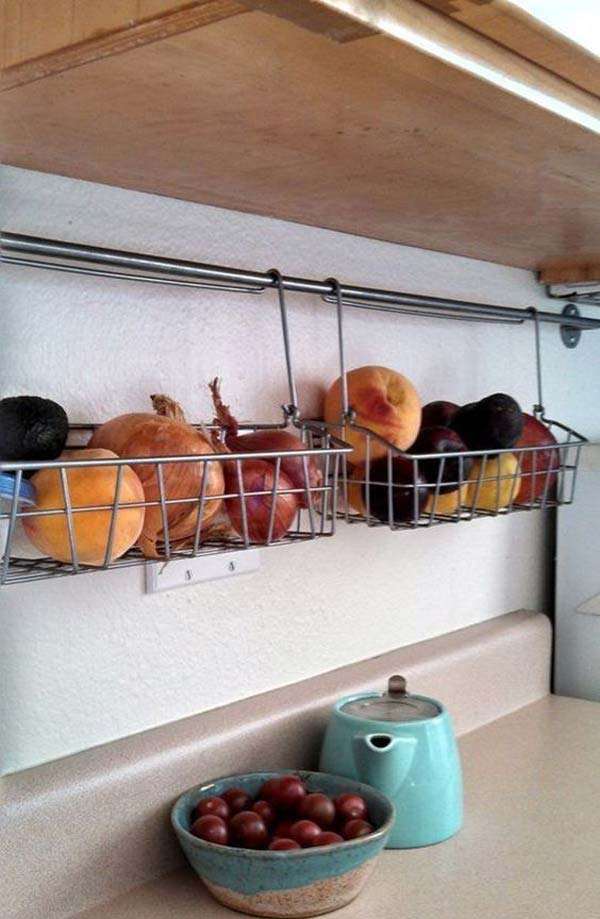
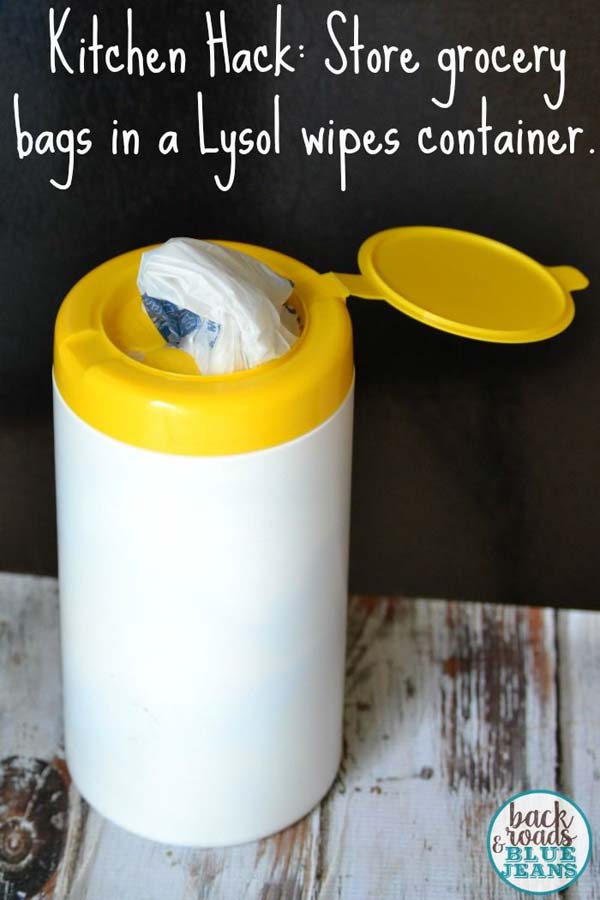
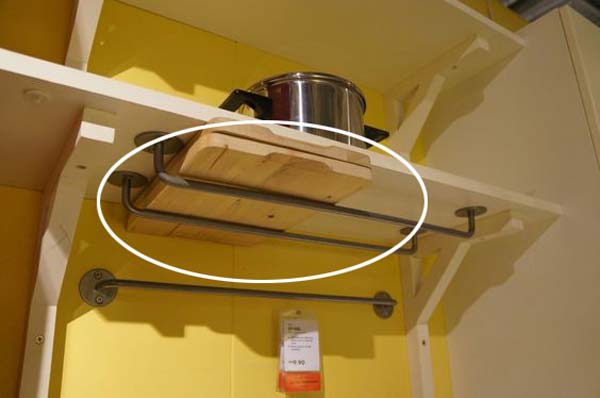
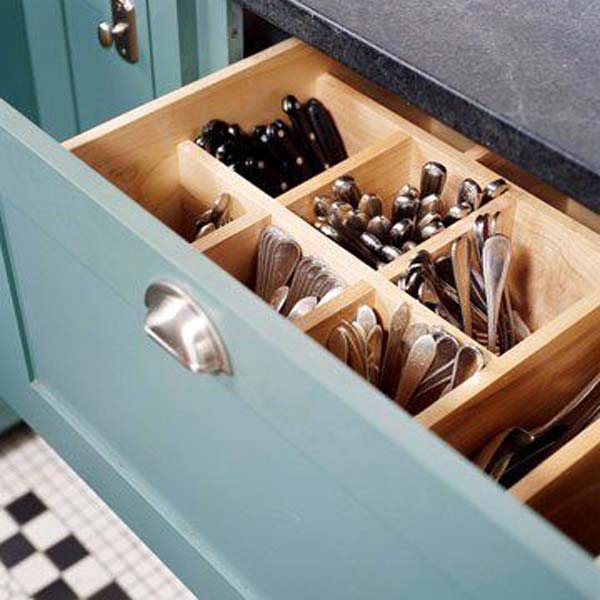
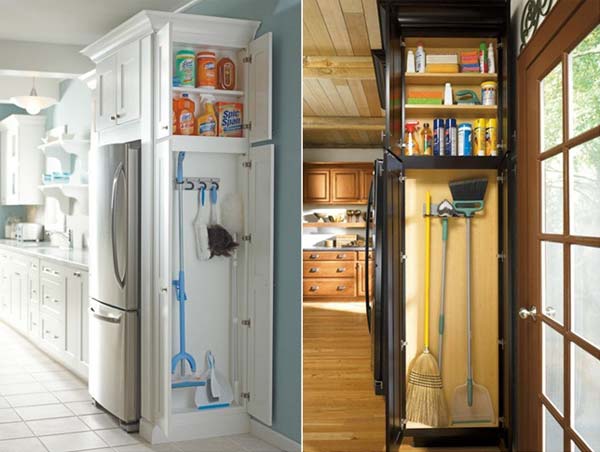
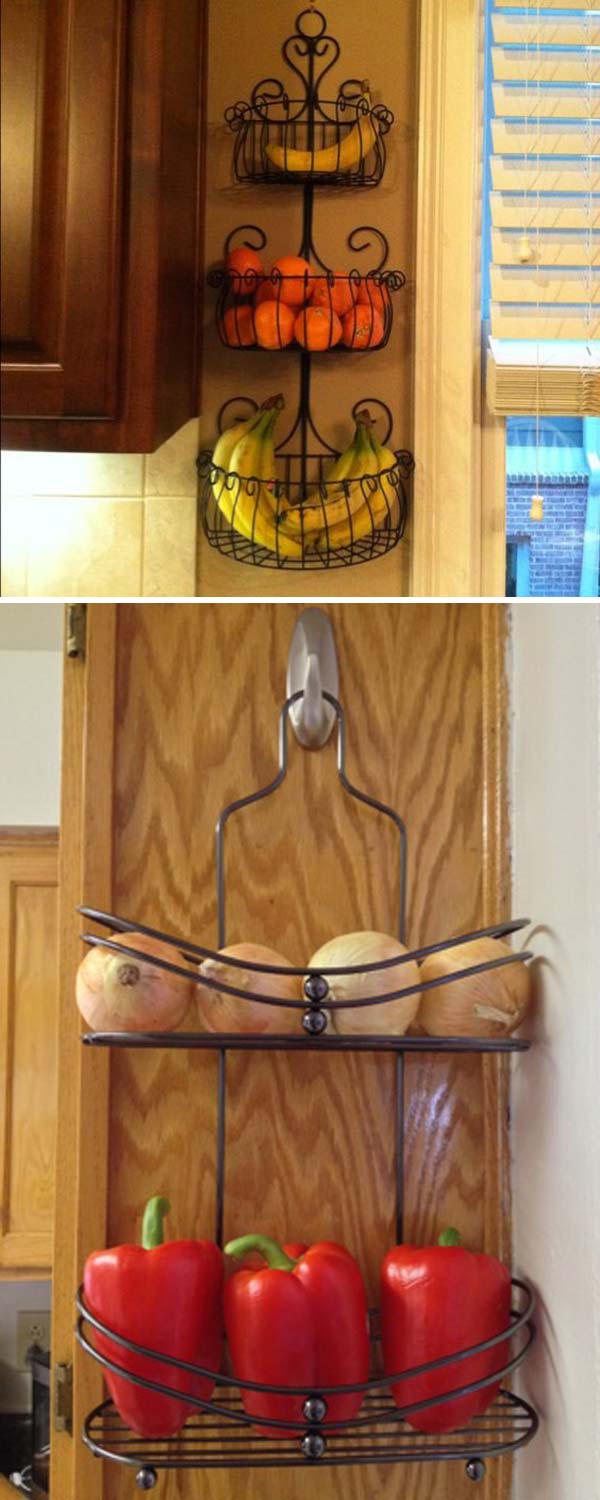
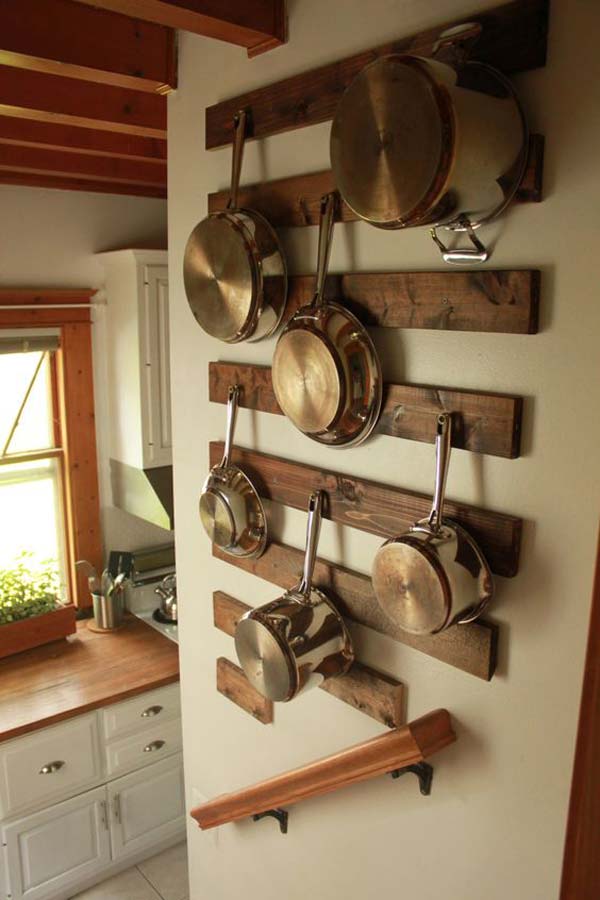
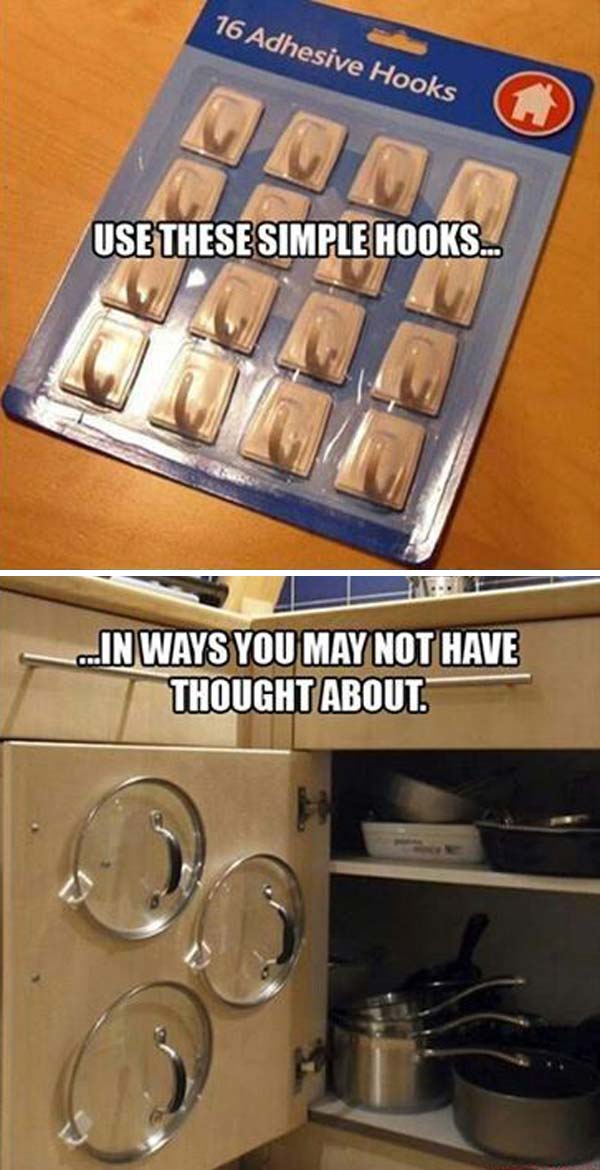

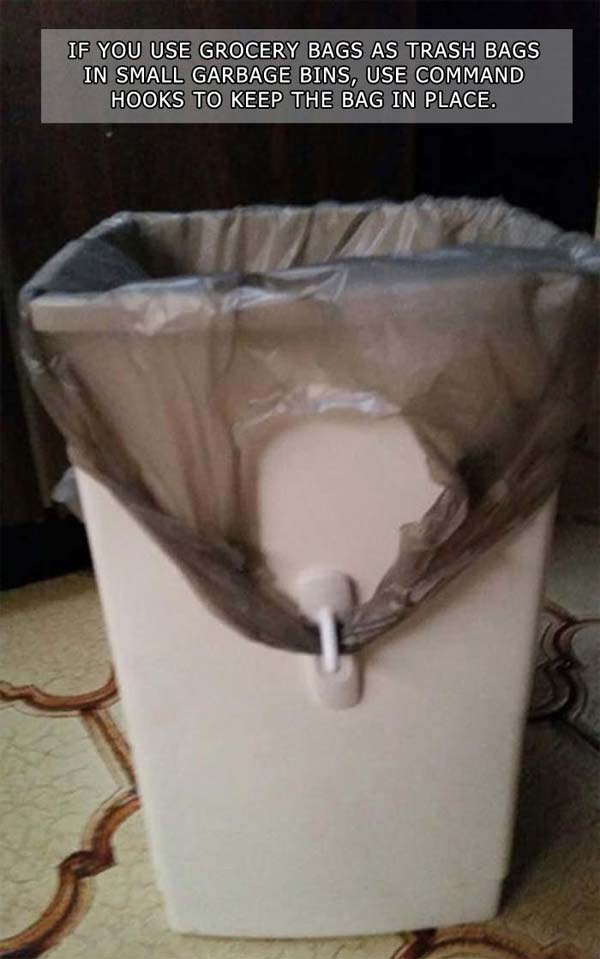
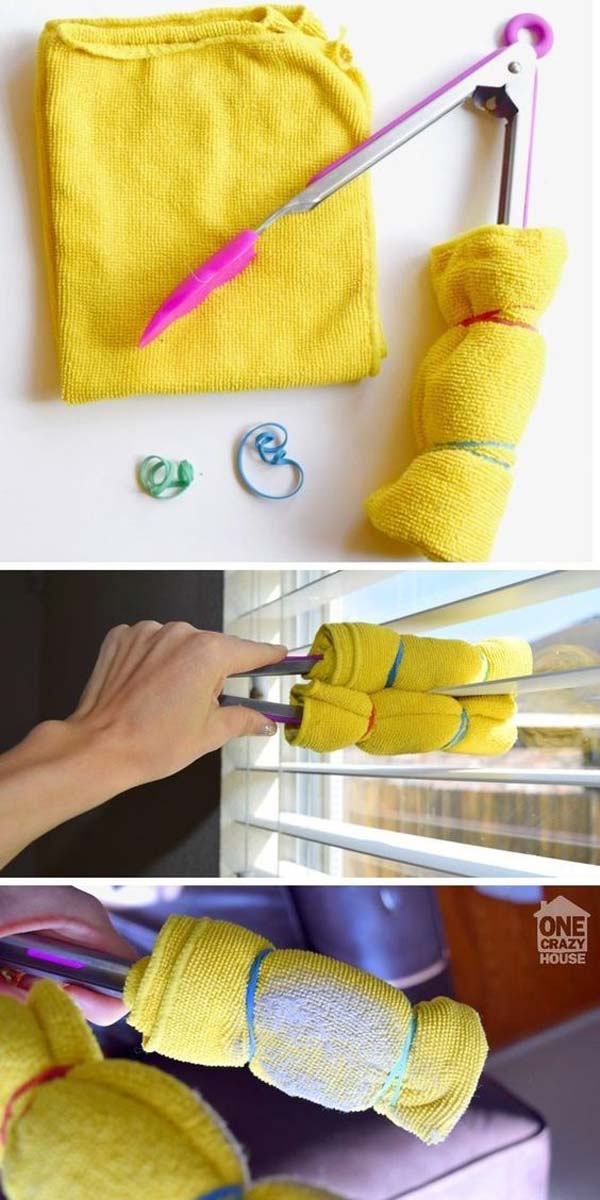
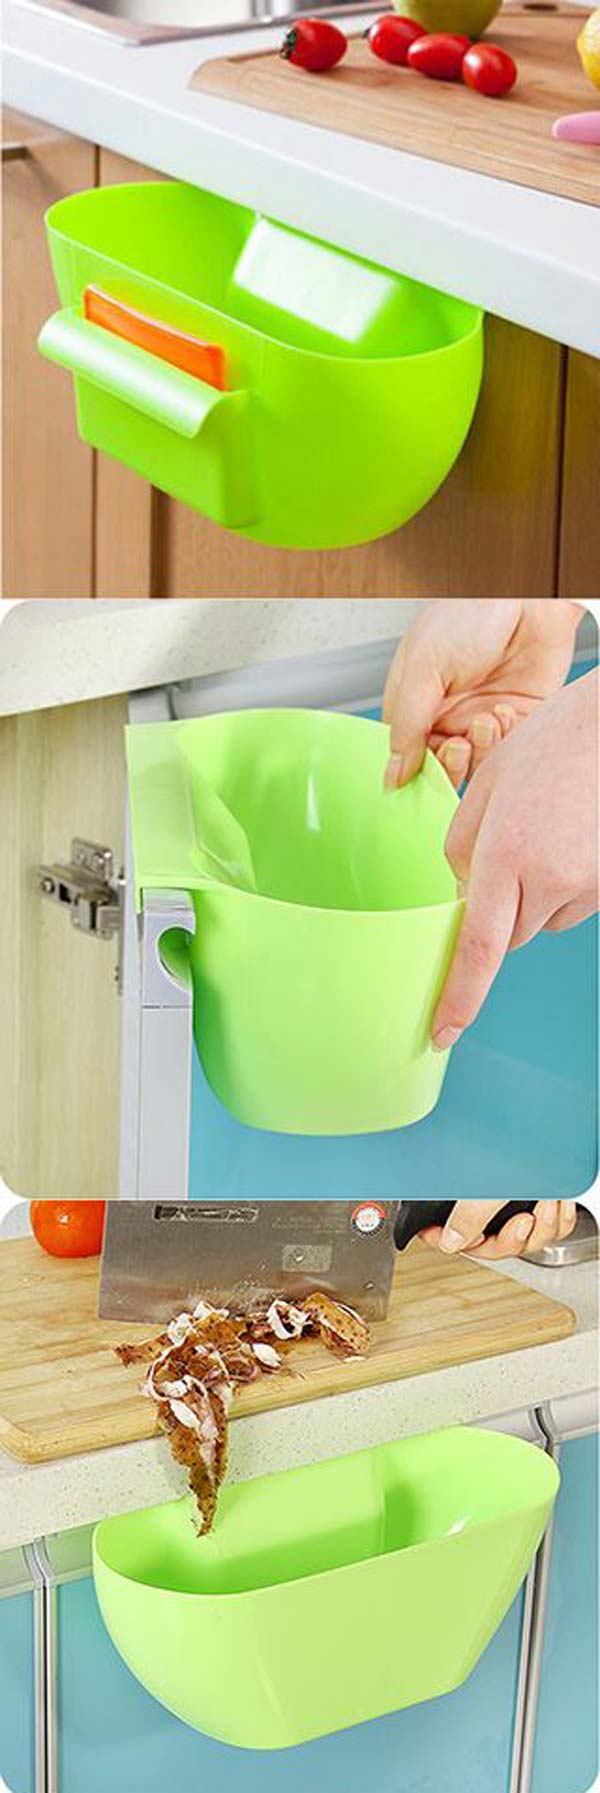


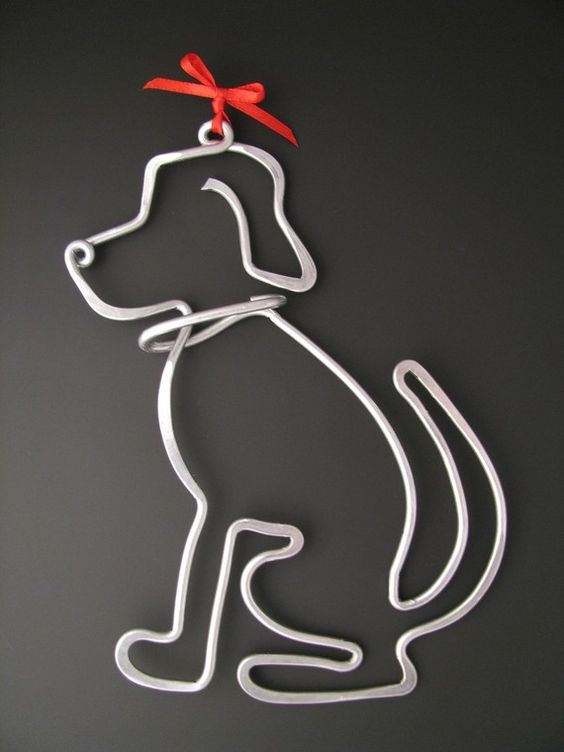
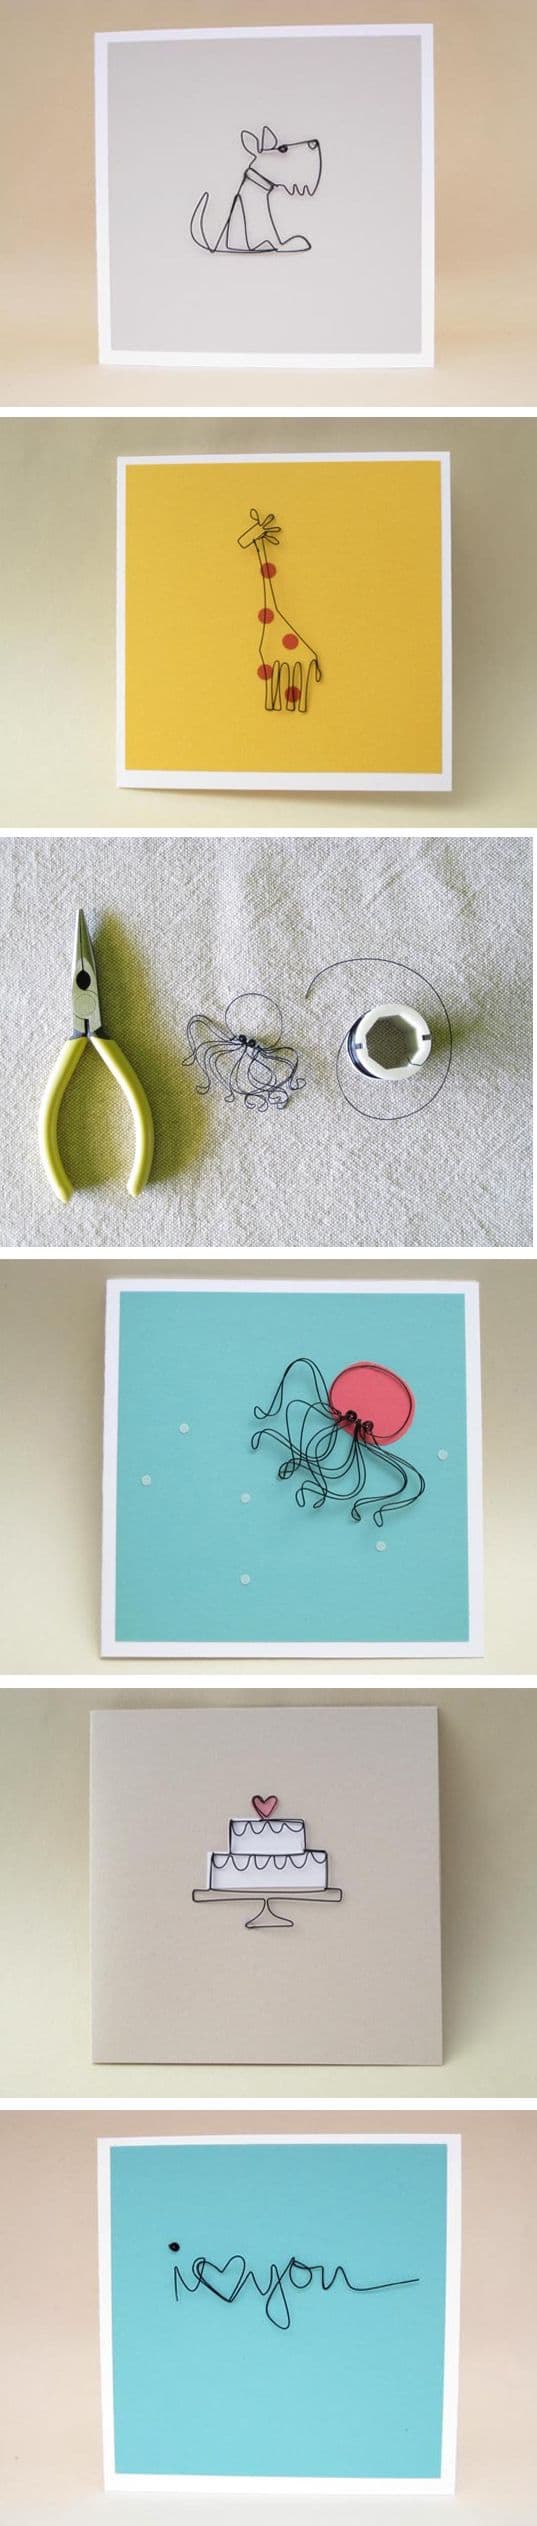
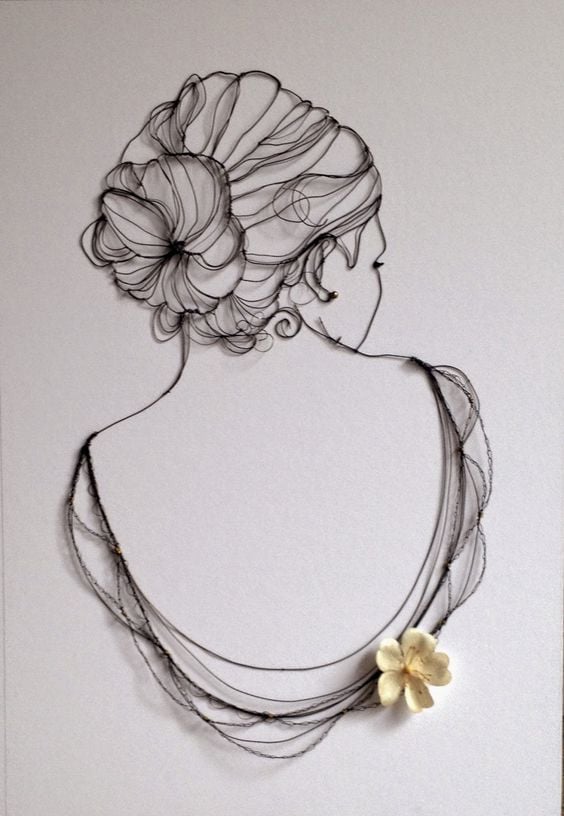
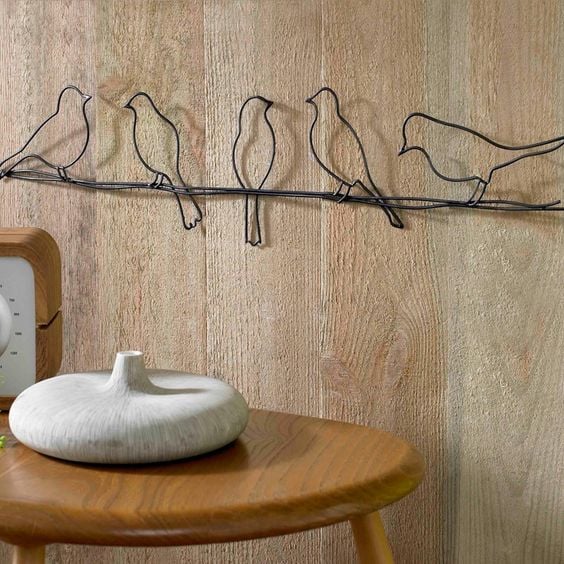
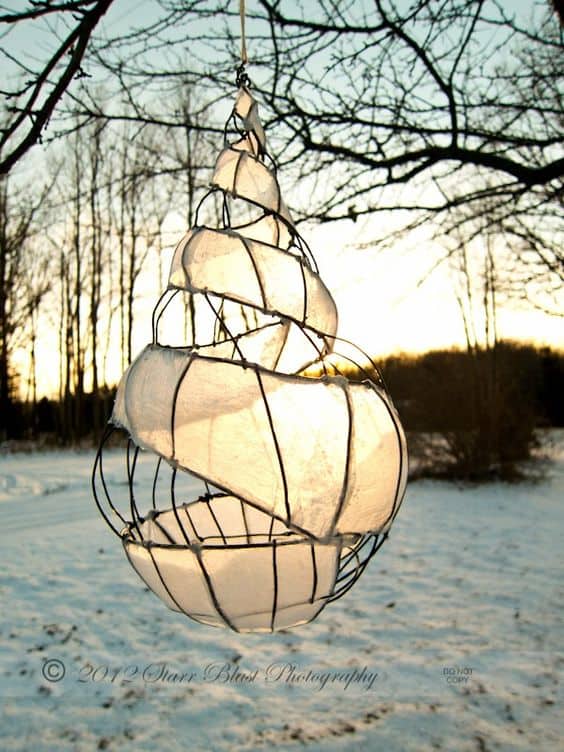
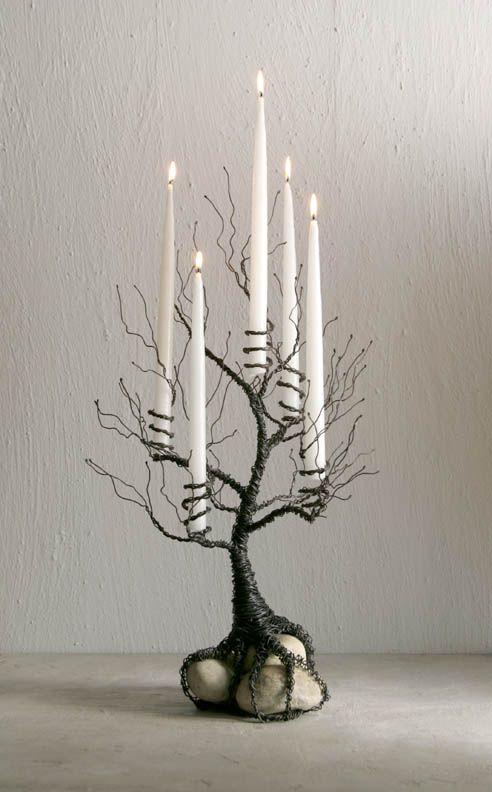

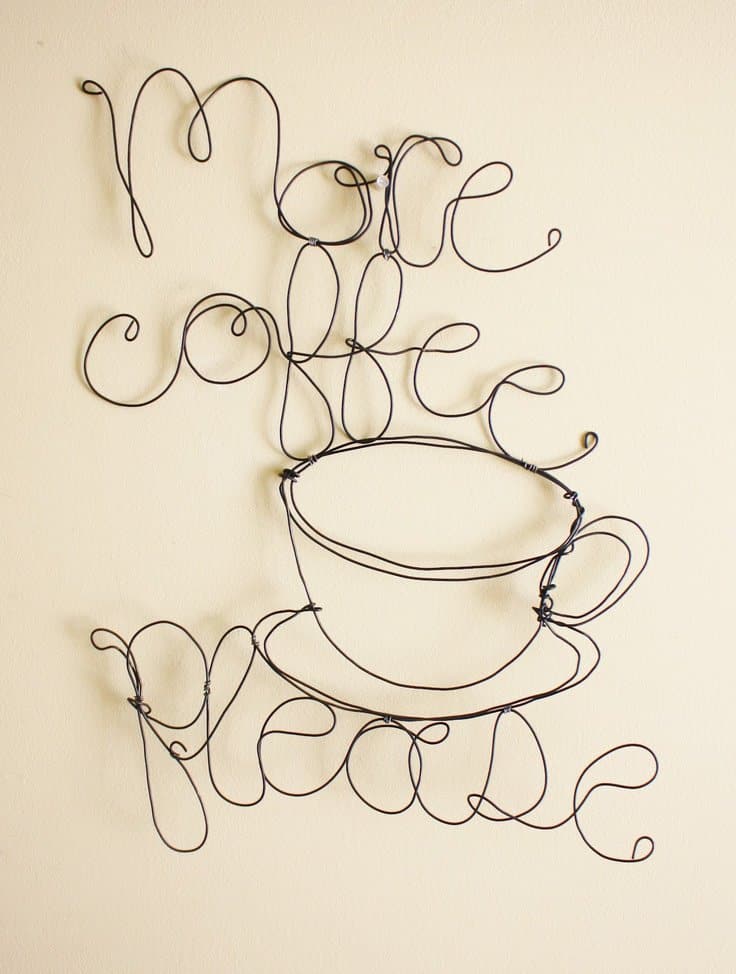


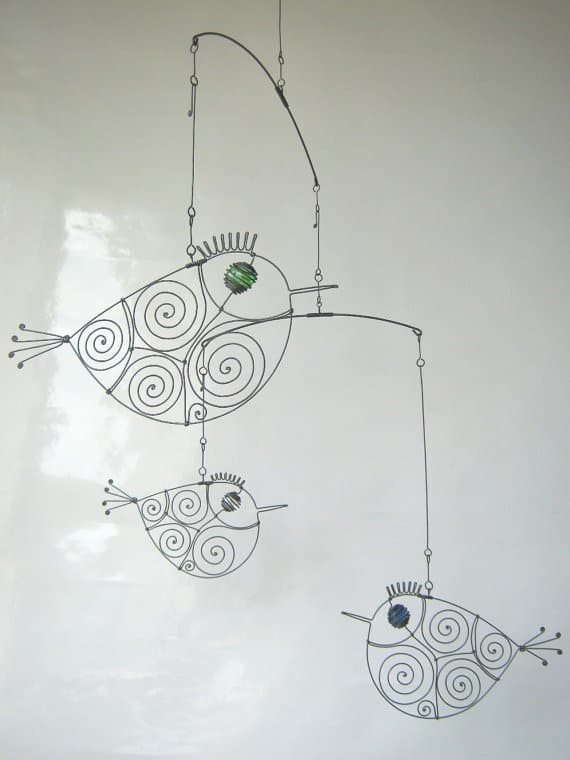
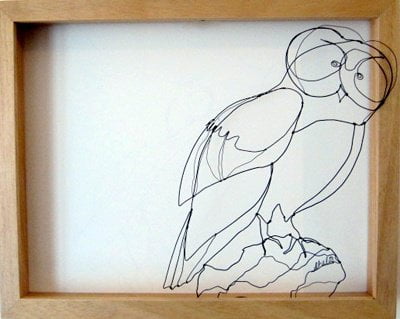
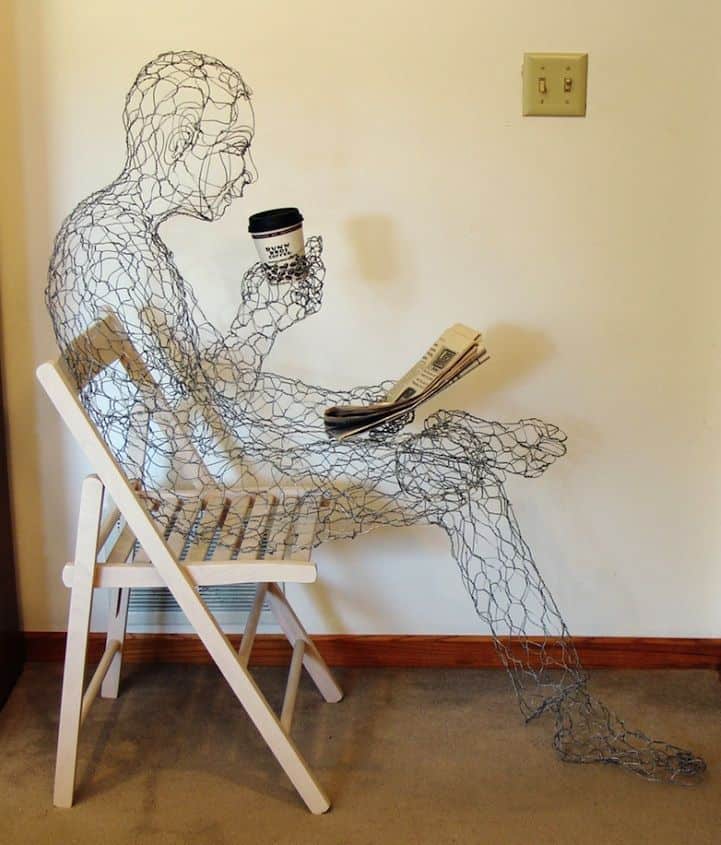

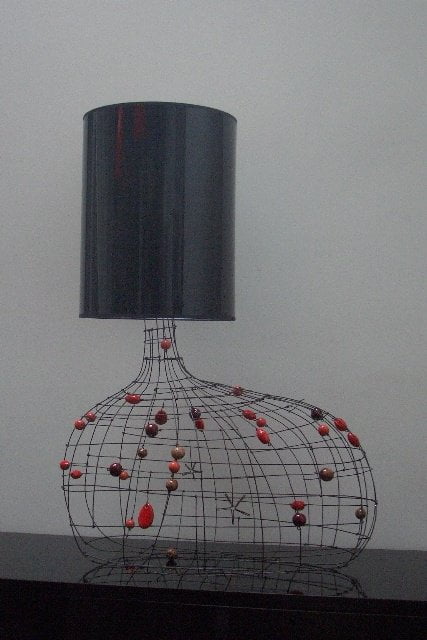


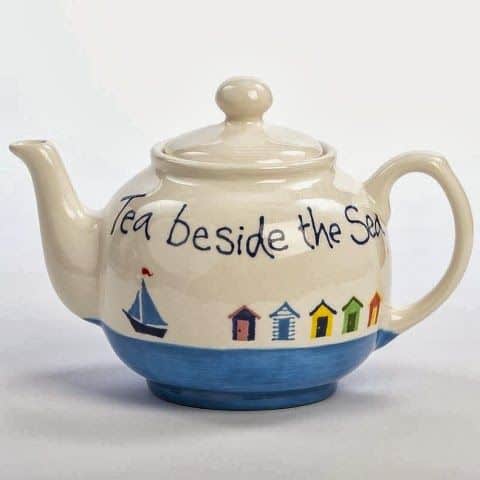


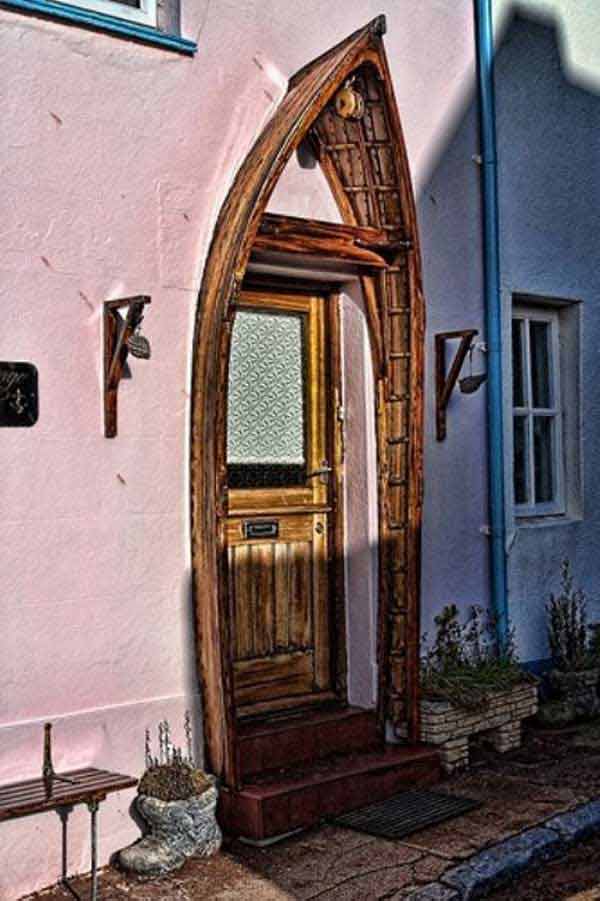
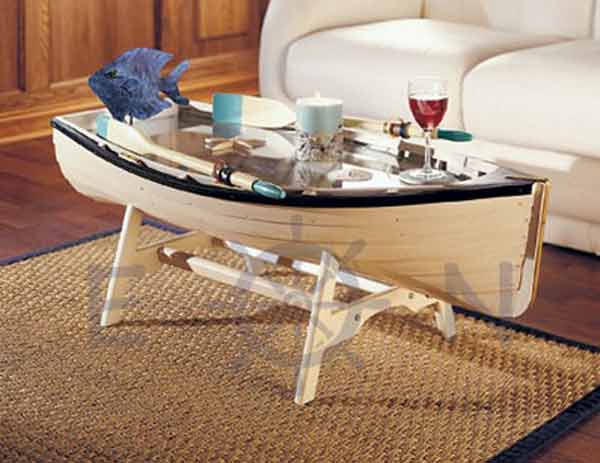
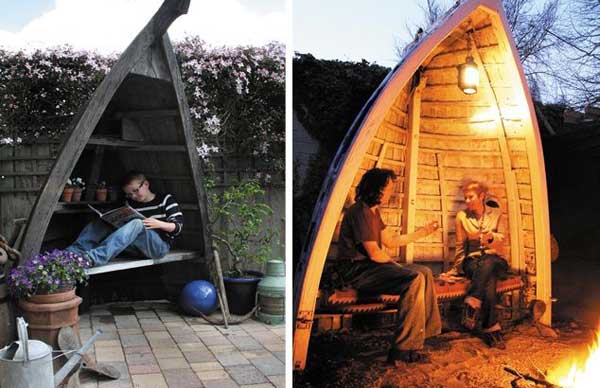

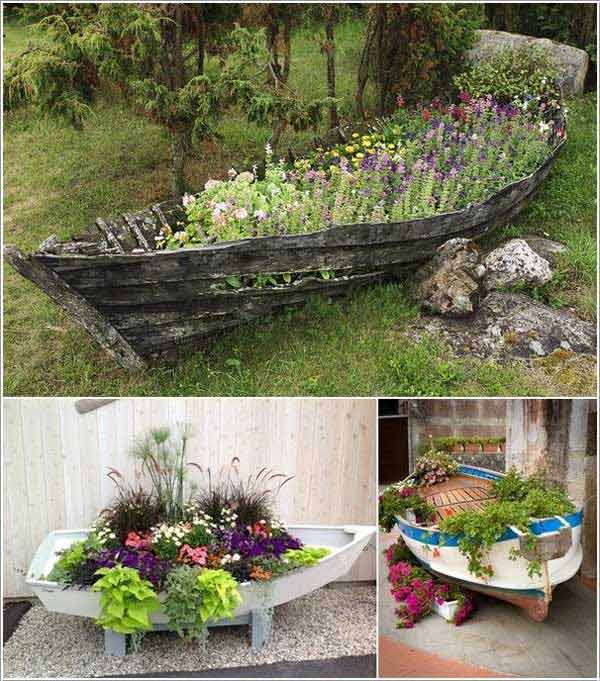
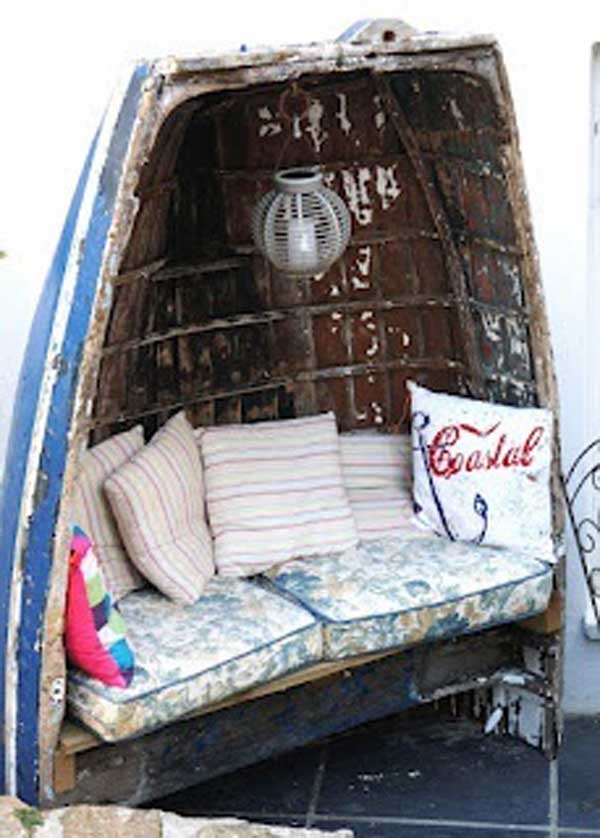

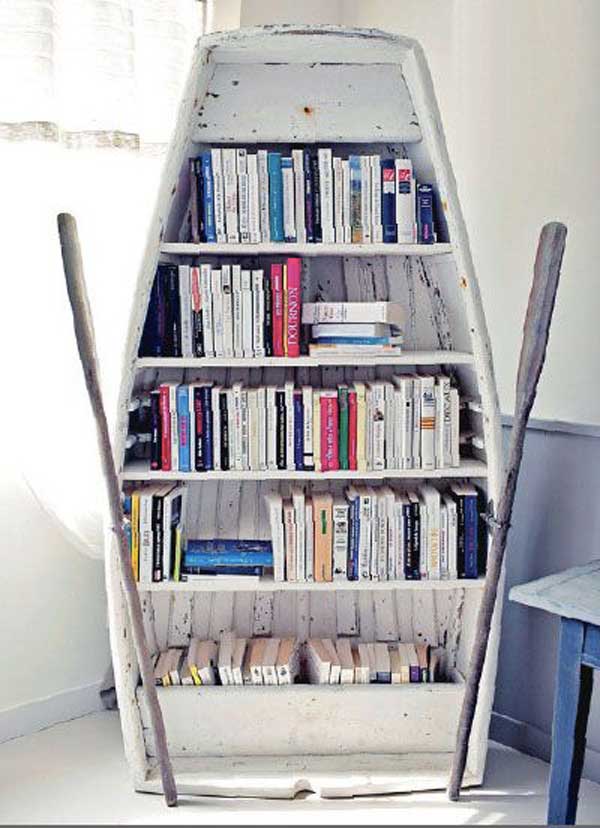


