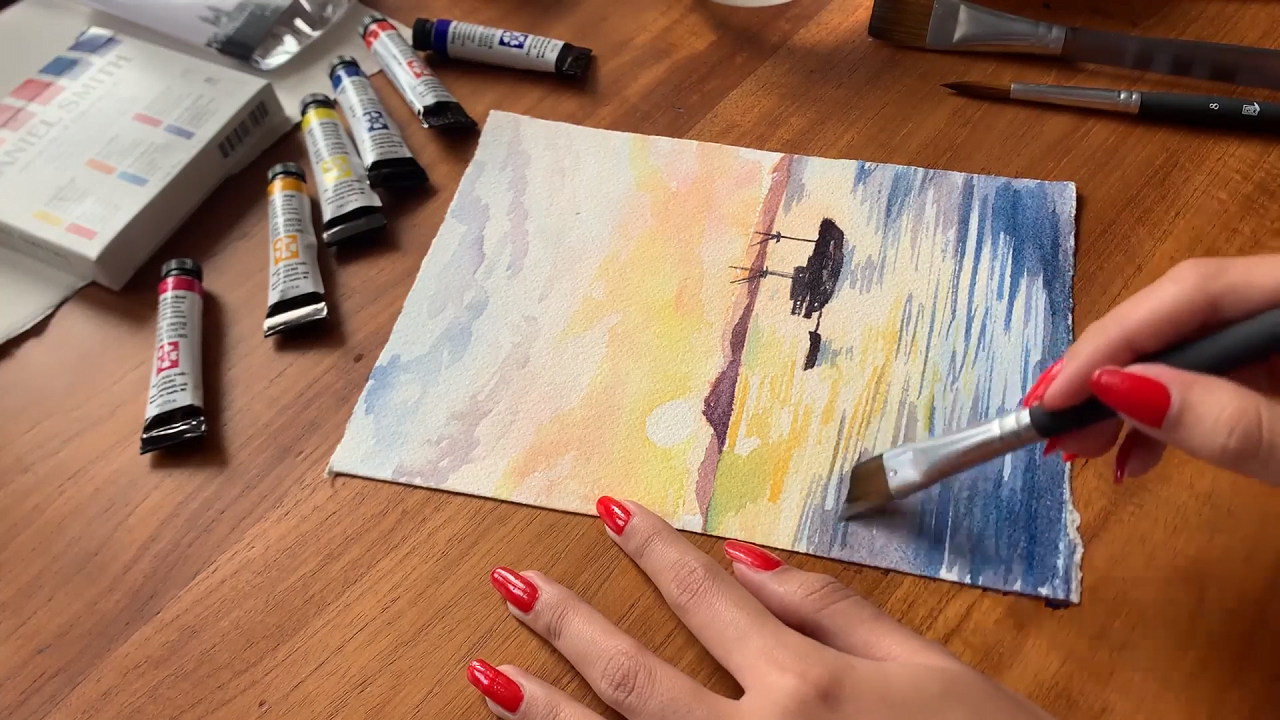
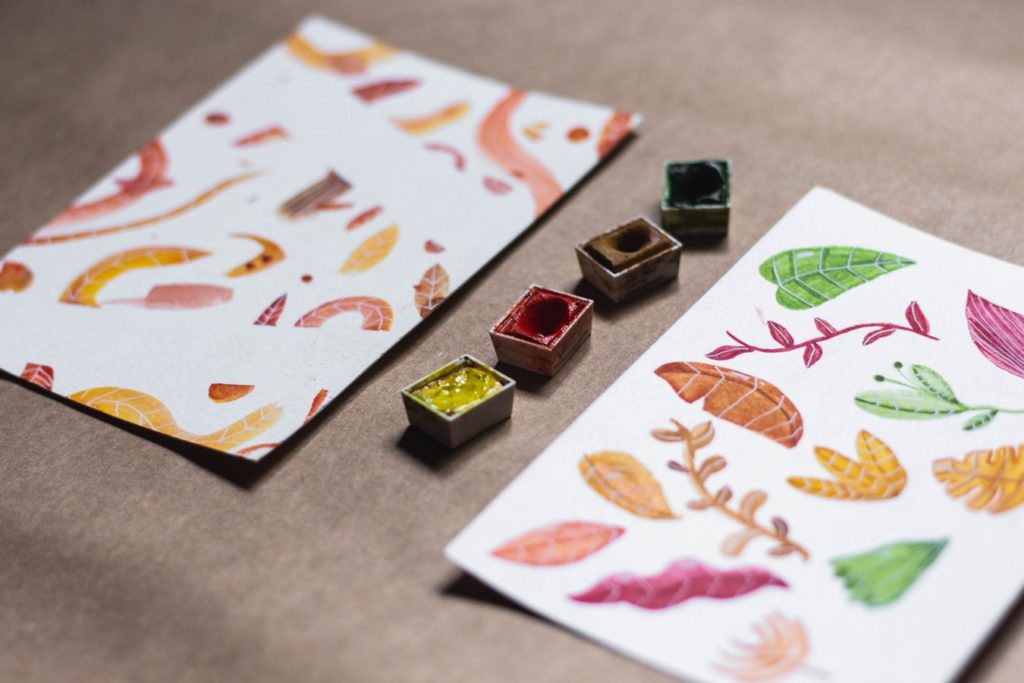
If you ask me, I’d say that coloring markers are relatively underrated as a coloring tool!
However, due to the presence of some high-quality options, such as the Copic markers, this coloring medium is eventually gaining popularity. Unfortunately, the above marker set is quite expensive and difficult to get.
There’s no need to worry, though, for there are different Copic marker alternatives available on the market. That is what we have reviewed in this guide today. So, if you wish to create gorgeous artwork using markers, then dive in!
15 Best Copic Marker Alternatives
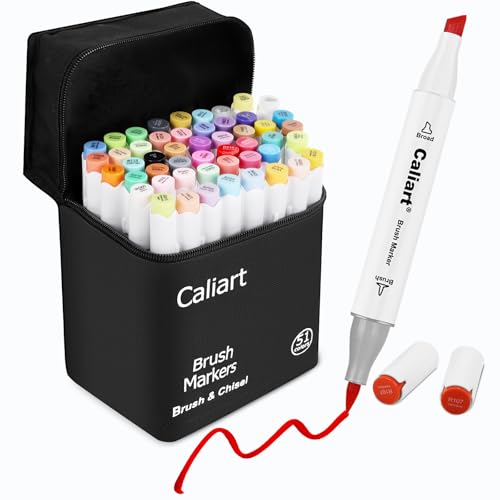
1. Caliart Dual Tip Art Markers - Best Alcohol-Based Marker Set
- 🎨 Alcohol Based & Permanent Markers: 41 Vibrant Colors,...
- 🎨 Dual Tips & Round Pen Holder - Broad chisel (approx....
What I like
- Highly versatile usage
- Works on most surfaces
- Includes a convenient carrying case
- Vibrant and long-lasting colors
What I don't like
- The colors may bleed on thin paper
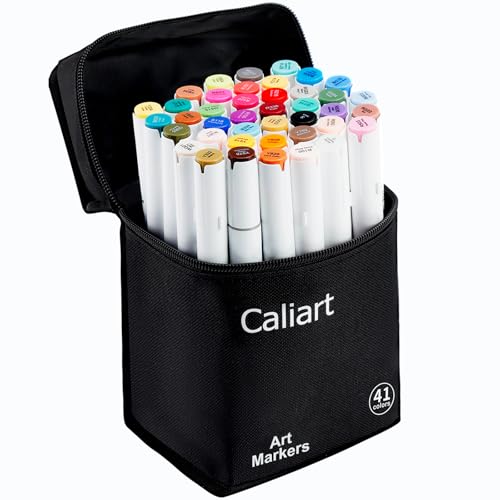
Caliart is a relatively well-known brand in the domain of art supplies that makes different types of markers, such as alcohol markers, brush markers, and so on. The Caliart Dual Tip Art Markers is a set of versatile alcohol-based coloring markers containing 41 vibrant shades, which makes it a great alternative to the basic Copic sketch markers.
Due to the nature of the ink, these markers have a smooth flow, and they work well on most surfaces, such as papers, ceramics, glass, or plastics. Moreover, I noticed that the ink is smudge-proof and waterproof, which is great for producing clean and crisp artwork. That said, you might notice a bit of color bleeding in some cases, especially if the drawing canvas is thin.
On that note, the dual tips of these markers are quite useful. You have a broad chisel nib on one end, which has a thickness between one and seven millimeters. The other end consists of a fine point nib that has a thickness of 0.7 millimeters. This broad tip provides greater coverage while drawing or shading, while the fine tip is best suited for detailing tasks.
Each pen has enough ink to produce up to 300 meters worth of drawings. Besides, given the durability of alcohol-based ink, you can rest assured that it won’t fade over time. Apart from that, the markers come with color-coded caps, which help with easy identification and improve overall user convenience. Speaking of convenience, I saw that it comes with an attractive and form-fitting black-colored carrying case.
Number of markers: 41 | Ink type: Alcohol-based | Tip thickness (range): 0.7-7 mm
2. Shuttle Art Dual Tip Art Markers - Best Long-Lasting Ink
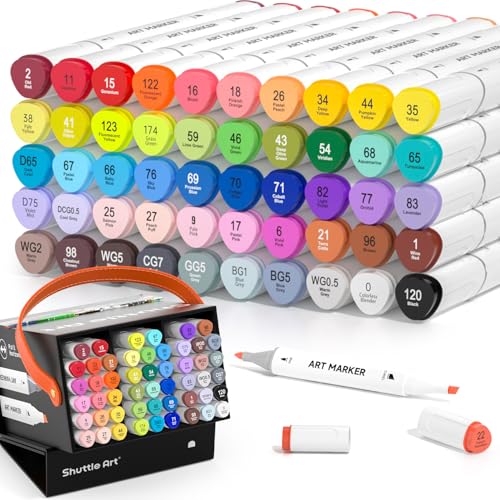
- 51 COLORS MARKERS: Shuttle Art 50 Vibrant Permanent Markers...
- DUAL TIP: Shuttle Art dual tip alcohol markers have both a...
What I like
- Offers a good color variety
- Safe to use
- Ergonomic design
- Includes a convenient storage bag
What I don't like
- Usable on a specific type of paper only
Shuttle Art is another renowned stationery brand and with good reason. It offers high-quality products for office-goers, students, and artists. The Dual Tip Art Markers set is one of its most popular products, and it includes 50 different colors along with a colorless blending marker.
Thanks to the color variety and the blending marker, you can create vibrant works of art with these alcohol-based markers. In that context, the ink conforms to the ASTM-D4236 safety standards, which means that they are non-toxic and acid-free.
I noticed that the ink in each of these pens lasts for a long time. As for the dual tip, it features a broad tip of seven millimeters on one end and a fine tip of one millimeter on the other.
While using these markers, I did not see any significant color bleeding, which makes them a good choice for writing, highlighting, or producing clean drawings. However, these pens can only be used on a specific type of marker paper, which reduces their versatility to some extent.
Every marker has a unique triangular-shaped barrel that makes it ergonomic to hold. Additionally, it prevents the markers from rolling on flat surfaces. Apart from that, you get a zippered storage case to keep all of them in one place conveniently, which is great for those who travel a lot.
Number of markers: 51 | Ink type: Alcohol-based | Tip thickness (range): 1-7 mm
3. Prismacolor Premier Art Markers - Best Color Saturation
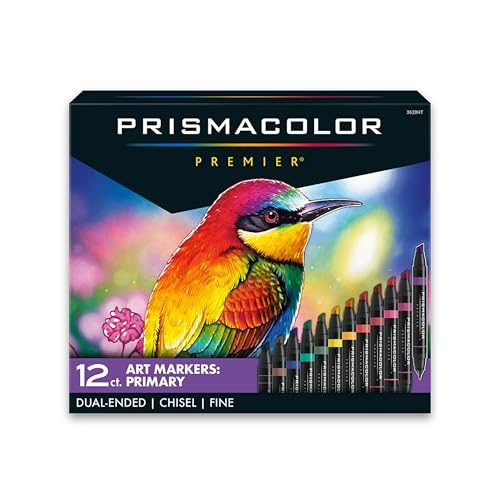
- Dual-ended markers featuring both fine and chisel tips
- Advanced dye-based ink formulation for richly saturated...
What I like
- Highly blendable
- Produces rich, professional quality colors
- Smooth ink flow without bleeding
- Non-toxic ink formulation
What I don't like
- Contains only 12 colors
When it comes to art supplies, Prismacolor is possibly one of the most well-known brands today, and this is all thanks to its focus on quality. The Prismacolor Premier Art Markers set is no different either, as it provides a great coloring experience to artists, thereby making it one of the best Copic alternatives.
Each marker pen in this set has a dual-ended design consisting of fine and chisel tips. What’s more, every pen features an advanced dye-based ink formulation, which provides superior color saturation. In order to ensure better color consistency, the pens use a single ink reservoir for both tips. However, the inclusion of only 12 shades is a drawback of this particular option.
The colors are highly blendable, which can help to address this limitation to a certain extent. In other words, you can seamlessly mix the different colors to expand the available color palette. On that note, there are different sets available for purchase, such as manga, pastel, or mid-tone, with each set having a specific color palette.
I noticed that the Prismacolor markers provide a rich color tone, which makes them suitable for producing professional-quality artwork. Likewise, the ink has been formulated to offer a smooth flow without any noticeable bleeding. Furthermore, the ink is non-toxic, which means that you don’t have to worry about any safety issues while using these pens.
Number of markers: 12 | Ink type: Alcohol-based | Tip thickness (range): 1 mm
4. Bianyo Classic Series Art Markers - Best Ink Capacity
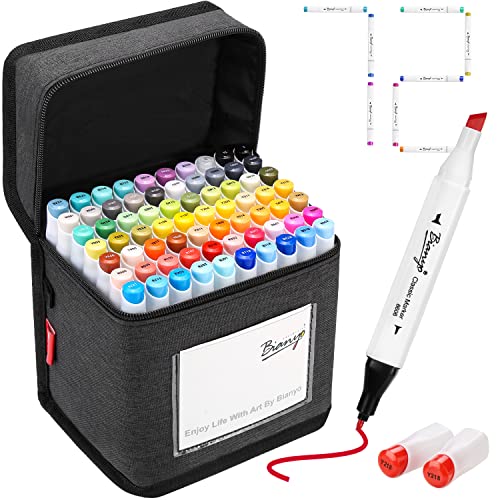
- Certified Safe & Alcohol-Based Ink: Bianyo markers feature...
- Vibrant Colors with 1 Colorless Blender & Extra Black...
What I like
- Good color variety
- Long-lasting ink
- Non-toxic and odor-free
- Includes self-adhesive paper labels
What I don't like
- Expensive to purchase
While Bianyo manufactures other types of art supplies, such as watercolor sets and drawing pads, it is primarily known for its art markers. That is why I have included the Bianyo Classic Series Art Markers set. With this set, you get 72 different colors, which should be enough for any kind of art project that you have.
Each pen in this set has dual tips for enhanced versatility. The bullet nib produces sharp lines that are 0.7 millimeters thick and are great for adding fine details. Conversely, the chisel nib produces lines that are one to seven millimeters thick, which makes it suitable for quick coverage and highlighting.
In that context, if you use the chisel tip, the ink supply will last for 328 feet. And if you use the fine point bullet nib, the ink will last for up to 1738 feet.
The set includes a colorless blender pen, which allows you to mix the colors easily. Apart from that, the alcohol-based ink produces smooth colors and is smudge-free. I noticed that the ink formulation is not only non-toxic but is also odor free. On top of that, the ink dries instantly and is resistant to fading.
For the convenience of users, this option comes with color-coded caps and self-adhesive paper labels that allow you to identify the colors easily. Aside from that, you get a sturdy cloth bag to store all the pens in one place. However, this set is slightly expensive to purchase, which is its only drawback.
Number of markers: 72 | Ink type: Alcohol-based | Tip thickness (range): 0.7-7 mm
5. Hhhouu Dual Tip Brush Pens - Best Water-Based Marker Set
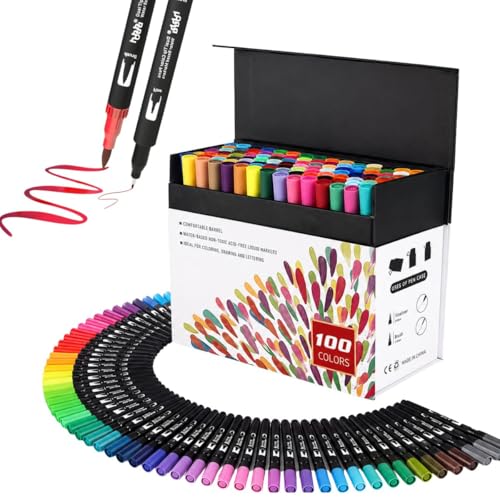
- VIBRANT COLORS - 100 Colors, No Duplicates ,Quick dry,...
- Dual Tip Coloring Pens : Include 1-2 mm brush tip and 0.4mm...
What I like
- High color variety
- Suitable for different types of art projects
- Safe, water-based ink
- Quick to dry and easily washable
What I don't like
- The storage box design is not very convenient
Do not be fooled by this brand’s quirky name, for the Hhhouu Dual Tip Brush Pens is one of the top alternatives to Copic markers available today. This brush marker set includes 100 vibrant colors, which makes it a lot more versatile than other markers. And its low price point means that you get good value for your money with this option.
On one end, you will find a brush tip with a thickness of one to two millimeters. The other end consists of a fine tip that has a thickness of 0.4 millimeters. Both these brush tips are made from durable and flexible nylon fiber material, similar to a paintbrush. Thanks to that, you can use these markers for calligraphy, illustration, doodling, scrapbooking, or any other type of art project.
The ink used in these pens is water-based, which makes them a lot safer than alcohol-based markers. Besides, these pens can effectively emulate the look of watercolor paint, which makes them one of the best watercolor markers available today.
Each marker in this set produces vibrant and opaque colors. Despite that, I did not notice any color bleeding when using these markers. Apart from that, the ink is quick-drying, and it is easily washable. Thus, if you make any mistakes, you can rectify them quickly. The only downside is its storage box, whose design is not that convenient to use.
Number of markers: 100 | Ink type: Water-based | Tip thickness (range): 0.4-2 mm
6. Caliart Alcohol Brush Markers - Best Ergonomically Designed Markers
- 🎨 Brush & Chisel Double Tip Alcohol Art Markers. Each...
- 🎨 50 Vibrant Colors + 1 Free Colorless Blender. Valued...
What I like
- Smooth and blendable colors
- Smudge-free and waterproof ink
- Ergonomically designed
- Highly convenient to use
What I don't like
- The colors bleed on thin paper
For this review, I have chosen another product by the Caliart brand. Its Alcohol Brush Markers is a set of 51 dual-tip markers that can be used as a suitable alternative to Copic pens. As the name suggests, these markers use alcohol-based ink to produce high-quality artwork.
In this regard, the set includes a colorless blender, which complements the premium-quality Japanese marker ink quite well. So, you get a smooth ink flow and highly blendable colors.
Likewise, the brush tips on the broad chisel nib and the fine point nib are designed to be durable. Therefore, you do not have to worry about the tips becoming frayed after a while. When combined with alcohol-based ink, these tips can produce highly pigmented, vivid colors that are not only smudge-free but also waterproof.
You can use these markers on most surfaces without issues. That said, I did notice some color bleeding when used on thin paper. Fortunately, such an issue can be resolved if you use thick drawing paper.
In terms of convenience, I noticed that the pens have a highly ergonomic design, which makes them easy to use for beginners and experts alike. On top of that, you get color-coded caps for easier identification, as well as a bonus carrying case to keep all the markers together.
Number of markers: 51 | Ink type: Alcohol-based | Tip thickness (range): 0.7-7 mm
7. Ohuhu Pastel Alcohol Brush Markers - Best Pastel-Coloured Markers

- 48 PASTEL COLORS + 1 FREE BLENDER : The rainbow is at Ohuhu...
- BRUSH & CHISEL, DOUBLE-TIP, DOUBLE THE FUN: Widen your...
What I like
- Vibrant and versatile shades
- Produces smooth and even strokes
- Quick-drying and smudge-proof ink
- Convenient color-coded caps
What I don't like
- Expensive to purchase
Due to this brand’s focus on quality and versatility, Ohuhu markers are pretty popular among artists. On that note, the Ohuhu Pastel Alcohol Markers make up a set that contains 48 pastel-colored shades. It is a great Copic marker alternative and is a part of the brand’s Honolulu series of markers.
These markers use alcohol-based ink that dries up quickly and is completely smudge-proof. There is a colorless blender included in this set, which allows for seamless color mixing. These pastel shades provide beautiful coloring effects and can imitate almost any shade possible, including human skin color.
The dual-tip design of these pens includes a fine brush tip that facilitates sharp, sweeping strokes suitable for calligraphy and detailing. On the other hand, the wide chisel tip allows for making broad strokes, which can be used to color a large area quickly. Thanks to the premium-quality ink, each stroke feels smooth and comfortable. Besides, you don’t have to worry about the ink bleeding through the paper either.
What’s more, these markers come in a convenient storage bag and include color-coded caps for easy identification. Because of these aspects, I found them easy to use. The caps are fairly effective at preventing the ink from drying out. This means that you can use these markers without issues for a long time. However, this set has a high price tag, which can deter users from buying it.
Number of markers: 48 | Ink type: Alcohol-based | Tip thickness (range): 1-6 mm
8. MemOffice Dual Tips Alcohol Markers - Best For Anime Illustrators

- UNLEASH YOUR CREATIVITY - The MemOffice alcohol based...
- PREMIUM QUALITY - Made from sustainable materials, these...
What I like
- Produces highly saturated, vivid colors
- Minimizes bleeding and color blotching
- Eco-friendly ink
- Versatile color range
What I don't like
- The ink has a strong odor
MemOffice is a relatively small brand that is primarily known for manufacturing gaming chairs and markers. Interestingly, the brand’s Dual Tips Alcohol Markers set is particularly popular among anime artists. This is mainly because of its rich color quality and versatility.
With this set, you get 80 different shades that produce highly vivid colors on paper. The alcohol-based ink used in these markers dries instantly and provides an even coloring throughout the drawing surface. So, you do not need to worry about issues like bleeding, blotching or uneven colors. The broad tip allows you to color large areas fast, while the fine tip enables you to do precise detailing and highlighting.
In addition to the above, I noticed that the ink used in these markers is eco-friendly, despite being alcohol-based. If you care about such aspects, you will find these markers to be highly suitable. That said, the ink is not exactly odorless, which is a drawback of this option. The smell is fairly strong, which can make it unsuitable for some users.
Thankfully, if you use the caps, the smell won’t bother you that much. These caps are color-coded, which makes the markers easy to identify. What’s more, they prevent the ink on the nibs from drying out, which ensures a smooth flow of color at all times.
Number of markers: 80 | Ink type: Alcohol-based | Tip thickness (range): 1-6 mm
9. Alchilalart Alcohol Markers - Best Versatility

- 【Vibrant Colors, Fade-Proof】Alchilalart marker set...
- 【Dual Tip Design, Endless Fun】Each marker features a...
What I like
- Highly versatile usage
- Affordably priced
- Safe to use
- Long-lasting ink
What I don't like
- The carry bag has poor quality
The Alcohol Markers set by Alchilalart is a versatile and affordable option that can be used on a wide variety of surfaces, such as wood, plastic, metal, and so on. This set contains 80 different colors for writing, marking, painting, or doing any other type of art project.
These markers have a dual-tip design, with the broad chisel tip having a thickness between one and seven millimeters. Conversely, the fine nib has a thickness of 0.7 millimeters for precise detailing.
The alcohol-based ink used in these markers dries up quickly on the drawing surface and does not cause any smudging. This ink does not fade easily either, which means you can create smooth, clean, and vibrant paintings that will last for a long time.
Furthermore, the ink conforms to different safety standards, such as ASTM-D4236, EN71, and TRA Evaluation. Therefore, if your child loves to use your markers for painting, you can let them use these pens without having to worry about toxicity issues.
Besides, the ink volume provided with each pen is pretty high. So, you can use these pens for a long time before requiring a refill. The caps for both tips have been designed to prevent the ink from drying out in the nib.
Also, the caps are color-coded, which makes the pens easy to organize and identify. However, I found the carrying bag provided with this set to be of poor quality, which can make it difficult to store these markers.
Number of markers: 80 | Ink type: Alcohol-based | Tip thickness (range): 0.7-7 mm
10. Anngrowy Alcohol Coloring Markers - Best For Convenience
No products found.
What I like
- Offers great value for your money
- Produces vivid and realistic drawings
- The ink lasts for a long time
- Convenient to use
What I don't like
- Significant color bleeding
Anngrowy is a brand that is primarily known for manufacturing fitness accessories like exercise mats. The brand has forayed into other types of products as well, such as automotive cleaning supplies, camping equipment, and marker pens. In this regard, the Anngrowy Alcohol Coloring Markers set is particularly popular due to its quality and versatility.
The set includes 80 different colors, along with a colorless blender. With these markers, you get vibrant, professional-quality colors that do not smudge or fade over time. The highly pigmented alcohol-based ink dries quickly and makes it easy to blend and layer the colors so that you can create lifelike paintings with ease.
On the downside, I did notice a significant bleeding issue with these markers, where the color penetrated the paper and stained my desk space. This aspect can cause a lot of problems for many people.
You can use these dual-tip markers to draw on any type of surface, such as paper, wood, ceramics, fabric, and even stone. Similarly, the ink volume you get with each marker is quite high and can last for up to 984 feet. When combined with the low price point and one-year warranty, these above aspects make it a great investment for your artistic needs.
The ink in these markers has been certified under the ASTM-D4236, EN71, and ROHS safety standards, meaning that they are safe for both adults and children. For the convenience of users, these markers come with color-coded caps, a carrying bag, and a color-testing card.
Number of markers: 81 | Ink type: Alcohol-based | Tip thickness (range): 1-7 mm
11. Primrosia Skin Tones Dual Tip Marker Pens - Best Looking Marker Case

- You can draw beautiful faces and bodies using the subtle...
- Double tipped: Enjoy the flexibility of both worlds, shade,...
What I like
- Produces attractive coloring effects
- Safe water-based ink
- Easy to identify and organize
- Attractive storage container
What I don't like
- Limited color choices
If you are a seasoned artist or illustrator, you must have heard of the Primrosia brand. Despite being a relatively smaller brand, it is well-known for its attractive packaging and premium-quality art supplies. The Primrosia Skin Tones Dual Tip Marker Pens are no different either, as this set includes a variety of skin tone colors that offer an enjoyable drawing experience.
This is a set of water-based markers, which makes it a lot safer than alcohol-based markers. Besides, the water-based ink will not bleed through the paper, which allows you to create clean drawings. On top of that, the ink can be easily blended and layered to produce stunning watercolor effects.
The marker pens have a double-tipped design for versatility. Their brush tips have a thickness between one and two millimeters and are meant for shading and coloring large areas. On the other hand, the fine tips are 0.4 millimeters thick and are great for adding intricate details.
This set consists of 24 light shades, along with some grays and darker greens. And while this color set is great for drawing skin tones, calligraphy, and journaling, many users may find the limited color choices to be disadvantageous.
Aside from that, the set is highly convenient to use. Each marker has an easily identifiable color-coded cap, and the colors are numbered for better categorization. Also, I found the cylindrical container to be pretty appealing and unique.
Number of markers: 24 | Ink type: Water-based | Tip thickness (range): 0.4-2 mm
12. Dabo & Shobo Dual Tip Art Markers - Best Environmentally-Friendly Set

- DIFFERENT DOUBLE HEAD DESIGNS:The marker pen has white...
- HIGH-QUALITY MATERIALS:The marking pen is made of...
What I like
- Made from environmentally friendly materials
- Square-shaped body to prevent rolling
- Easy to organize
- Good after-sales service
What I don't like
- Poor quality zipper on the carry bag
The Dual Tip Art Markers by Dabo & Shobo is a set of high-quality markers that contains 96 different shades. This set of alcohol-based markers is a great alternative to Copic markers, thanks to the unique design and premium quality materials.
I noticed that the body of each marker pen is made from environmentally-friendly materials. Similarly, it features a square-shaped design that prevents it from rolling on sloping surfaces. As for the ink, it produces vibrant colors without any smudging or blotching. Since it is alcohol-based, it dries up quickly and can be seamlessly blended.
Moreover, the dual-tip design enhances versatility and ensures uniform color distribution. The rough chisel tip is six millimeters thick, while the fine tip is one millimeter thick.
In terms of usability, I noticed that the set includes not only a convenient carry bag but also a square pen holder for each marker. Additionally, the lids are color-coded, and each lid has a unique color identification number.
Because of these aspects, these markers are easy to organize. However, the quality of the zipper used in the carry bag is not that great. So, you will need to be careful while using it.
Another notable feature of this option is the after-sales service provided by the brand. It comes with a 90-day warranty that enhances user convenience. And if you encounter any issues while using these markers, you can seek help from the brand’s friendly customer service representatives.
Number of markers: 96 | Ink type: Alcohol-based | Tip thickness (range): 1-6 mm
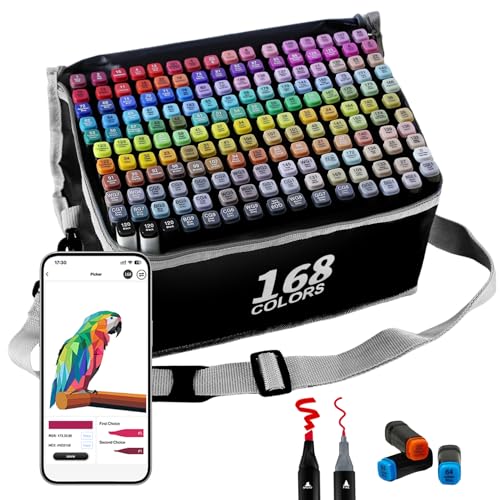
13. SiwaQio Alcohol Markers - Best Color Variety
- DUAL TIP ALCOHOL MARKERS: SiwaQio coloring markers feature a...
- POWERFUL APP, EASIER COLORING: Discover a smarter way to...
What I like
- Large color variety
- Includes a smart coloring app
- Safe to use
- High ink capacity
What I don't like
- Relatively expensive
If you are looking for a set of markers to meet all your coloring needs, then look no further than the Siwaqio Alcohol Markers set. With 168 different shades, you get a huge range of colors to pick from. What’s more, you get a random bonus color and a colorless blending marker, which makes a total of 170 marker pens.
Another notable feature of this particular option, besides the large color variety, is the free coloring app. With this app, you can create realistic artwork with ease. All you need to do is click an image, and the app will present a detailed color analysis so that you can reproduce the image on paper with these markers.
The alcohol-based ink used in these markers is MSDS certified, which means that it is safe for both adults and children. On top of that, the ink is fast-drying, smudge-proof, and resistant to fading. Thus, it allows you to create vibrant and long-lasting drawings.
Each pen contains enough ink to color at least 950 feet. The broad chisel tip has a thickness between one and seven millimeters, while the fine tip is 0.7 millimeters in thickness. Likewise, the body of these markers has a square shape to prevent rolling on sloping surfaces.
While the price may seem a little steep compared to other markers, I’d say it offers good value for your money. The packaging includes two experience cards for testing the colors, as well as a convenient carry bag for storage.
Number of markers: 170 | Ink type: Alcohol-based | Tip thickness (range): 0.7-7 mm
14. Tensine Artist Alcohol Markers - Best Safety

- ❤【NOTE】As these are alcohol-based markers, the ink may...
- ✿【TenSine Markers】 Using international standard color...
What I like
- Highly safe to use
- Suitable for beginners and experts alike
- Smooth color output
- Easy to blend
What I don't like
- The ink on the nibs dries up quickly
Tensine is a relatively small brand that manufactures art supplies. Do not be fooled by this aspect, though, for the Tensine Artist Alcohol Markers set is a good Copic marker alternative. You get 80 different shades with this option, along with a free pearl pen. Besides, the alcohol-based ink produces vibrant colors which are easy to blend and do not become blotched.
The ink used in these pens is odor-free and acid-free, and it comes with several safety certifications, such as MSDS, SDS, SGS, and ASTM-D4236. Because of this reason, these markers are possibly one of the safest options you can get.
As for the dual tips, you get a broad chisel nib for coloring and shading, which has a thickness of about six millimeters. On the other hand, the fine nib is suitable for precise detailing and has a thickness of about one millimeter. And while these professional quality markers are primarily meant for expert artists and illustrators, they can be used by beginners and children as well.
The ink in each pen lasts for at least 300 feet and offers a smooth, quick-drying color output. There are color-coded lids on each pen, along with a convenient carrying case. However, I noticed that the ink on the nibs tends to dry up even with the lids closed. This is a major limitation of this particular option.
Number of markers: 81 | Ink type: Alcohol-based | Tip thickness (range): 1-6 mm
15. Jack Brown Alcohol Markers - Best Value For Money Marker Set

- Dual Tip Versatility: Jack Brown 120 Color Markers feature...
- Vibrant & Long-Lasting Colors: Enjoy 120 mesmerizing vibrant...
What I like
- Sturdy nib design
- Versatile usage
- Long-lasting ink
- Easy to organize
What I don't like
- Marker bodies have a poor build quality
Jack Brown Alcohol Markers Set is another cheap Copic alternative that offers good value for your money. With it, you get 120 different colors at a highly competitive price point. Not only that but these markers can be used for a wide range of artistic endeavors, which makes them quite versatile.
Both the nibs in these double-sided markers are designed to be sturdy. In other words, the marker tips will not fray or become damaged easily. Likewise, the ink capacity on each pen is relatively high, which means that you can use it for numerous drawings.
As for the thickness, the chisel tips are 6.8 millimeters wide, while the fine tips are one millimeter wide. While drawing with these markers, I noticed that the ink dries up quickly and does not cause any noticeable bleeding. That said, the ink on the nib does not dry up so quickly, which is all thanks to the color-coded lids.
Speaking of the lids, I noticed that the colors are properly numbered on the lids, which makes them easy to organize. The storage bag comes with a convenient handle, which makes it easy to carry.
There is a marker storage tray included in the packaging, too, which enhances user convenience even further. However, I found the build quality of the marker tubes to be somewhat lacking. As a result, you might notice frequent ink leakages from the pens.
Number of markers: 120 | Ink type: Alcohol-based | Tip thickness (range): 1-6.8 mm
Quick Comparisons Of The Top Alternatives To Copic Markers
| Alternative Markers To Copic | Number of Markers | Ink type | Tip thickness (range) |
|---|---|---|---|
| Caliart Dual Tip Art Markers | 41 | Alcohol-based | 0.7-7 mm |
| Shuttle Art Dual Tip Art Markers | 51 | Alcohol-based | 1-7 mm |
| Prismacolor Premier Art Markers | 12 | Alcohol-based | 1 mm |
| Bianyo Classic Series Art Markers | 72 | Alcohol-based | 0.7-7 mm |
| Hhhouu Dual Tip Brush Pens | 100 | Water-based | 0.4-2 mm |
| Caliart Alcohol Brush Markers | 51 | Alcohol-based | 0.7-7 mm |
| Ohuhu Pastel Alcohol Brush Markers | 48 | Alcohol-based | 1-6 mm |
| MemOffice Dual Tips Alcohol Markers | 80 | Alcohol-based | 1-6 mm |
| Alchilalart Alcohol Markers | 80 | Alcohol-based | 0.7-7 mm |
| Anngrowy Alcohol Coloring Markers | 81 | Alcohol-based | 1-7 mm |
| Primrosia Skin Tones Dual Tip Marker Pens | 24 | Water-based | 0.4-2 mm |
| Dabo & Shobo Dual Tip Art Markers | 96 | Alcohol-based | 1-6 mm |
| SiwaQio Alcohol Markers | 170 | Alcohol-based | 0.7-7 mm |
| Tensine Artist Alcohol Markers | 81 | Alcohol-based | 1-6 mm |
| Jack Brown Alcohol Markers | 120 | Alcohol-based | 1-6.8 mm |
Buying Guide
That was my list of the top Copic markers alternatives. So, have you decided on which option you want yet?
Honestly speaking, it is not easy to choose a worthy alternative to the real Copic markers. Yeah, I admit there are a lot of Copic competitors in the United States today who claim to be better than the Japanese brand.
But the truth is that most of them are just cheap Copic alternatives that fail to capture the authenticity and color quality of the original Copic markers. Only a few brands can come close to providing a similar coloring experience as those markers, and the ones we have mentioned on our list are some of them.
However, if you are a beginner or are inexperienced in these things, you will have trouble deciding on the best one for your needs. That is why we have made this buyer’s guide that discusses some of the most important factors that you need to keep in mind before making the purchase.
1. Ink Quality
The original Copic markers are renowned for their exquisite ink quality. Therefore, it goes without saying that the quality of ink is the most crucial factor when looking to buy a decent Copic alternative.
When it comes to quality, you need to check the overall smoothness and texture of the ink. In other words, the color should not feel too thick or too thin. If it has the optimal texture, it will be easier to apply and will produce a uniform, blotch-free texture.
Likewise, the ink should dry up quickly when applied on the drawing surface, and it should be able to retain the richness for a long time. If it doesn’t, your artwork will become pale and will eventually start to fade out after a few years.
2. Type Of Ink
There are three different ink types used in coloring markers, which are alcohol-based, solvent-based, and water-based. Here, you should know that the type of ink directly impacts the quality of your drawings.
The alcohol-based inks primarily use ethanol or denatured alcohol as the base chemical. This type of ink offers high color saturation and vividness. Besides, such ink dries very quickly while drawing, and it produces permanent colors on papers and plastics that cannot be removed without special means. On the flip side, this ink creates a noticeable bleeding effect in most situations and may have a strong odor as well.
In the case of solvent-based ink, the color pigment is mixed with a binder resin and an organic solvent, such as mineral oil. This type of ink also produces vibrant and long-lasting colors, similar to alcohol-based ink. As a matter of fact, such a type of ink is highly resistant to heat and UV light. With that being said, it is rarely used in coloring markers and is relatively expensive.
Lastly, you have water-based ink, which is made by mixing the color pigment in water. This type of ink is the safest option and is used to produce unique watercolor painting effects. And it can be easily washed, thereby making it a good choice for beginners who tend to make mistakes while drawing. However, it does not blend as easily as alcohol or solvent inks, which is a drawback.
3. Color Variety
By color variety, I am referring to the number of colored markers available with each set. Naturally, the color variety, which is otherwise known as the color palette (painting), is an important factor for most artists. After all, you would not want to buy a marker set that comes with only a limited number of color choices, would you?
So, it goes without saying that the higher the marker count, the better it will be for you. It is my personal preference to use marker sets that have over 40 color choices. However, if you are a beginner or a casual artist, you might not need so many colors.
In that scenario, you can easily use marker sets with a slightly lower color variety. Once you hone your skill enough, you can purchase an option with a greater variety.
4. Blendability
The blendability of the colors is a crucial factor for those who cannot afford to buy an option with high color variation. If the colors are easily blendable, then you can mix different colors to get new shades. That will subsequently help to address the issue of low color variety in your marker set.
Apart from that, the blendability helps to ensure a uniform color texture as well. For instance, if you are painting a scene with a lot of different colors, then this aspect will allow you to create a realistic and detailed drawing seamlessly.
5. Nib Type
The nib (pen) is possibly the most important component in a coloring marker, given that it helps to apply the colors on the drawing surface. Having said that, you might have noticed that all the options I have included on the list have dual nibs or tips. One of these tips is broad, and the other one is fine.
This broad tip is used for coloring large areas quickly, which is why it has a flattened, chisel-like shape. Typically, the chisel tip has a thickness between one and eight millimeters and is cut at a specific angle to allow better control and uniformity. If you change the angle at which the pen is held, though, you can alter the thickness of the lines produced by the chisel tip.
Conversely, the fine tip has a sharp point with a thickness of one millimeter or less in most cases. Thus, it is best suited for precise detailing and highlighting tasks. In any case, such a dual nib system helps to improve the versatility of your marker set.
Apart from the nib thickness, you have to consider its build quality too. It is a good idea to pick markers with durable nibs as they won’t fray or break while painting.
6. Cost
The original Copic markers have a fairly high price, which is why people seek alternatives in the first place. That’s why the cost is one of the most important factors to consider here. I would strongly suggest that you stay within budget while choosing a marker set.
This does not mean that you should choose extremely cheap alcohol markers or watercolor markers either. Low prices are usually an indicator of poor quality, which is why you should avoid them.
Do you still have some lingering doubts and concerns? Well, then check out this FAQ section, where I have answered some of the most common questions asked by the average customer. As I have mentioned before, Copic is a brand that is based out of Japan, and it is globally renowned for producing high-quality art supplies, especially markers. These refillable markers are popular due to their high color quality, variety, and ease of use. With these markers, you can create vibrant details and layers and achieve perfect color combinations in your artwork. Yes, there are some downsides to using Copic markers, which is why you should seek an alternative if possible. For starters, they are incredibly expensive, which makes them unsuitable for those on a limited budget. Secondly, these markers use special dyes that are not so compatible with other types of coloring media. Besides, these dyes have been observed to fade when exposed to UV lights. If your marker contains water-soluble ink, it can be easily removed by washing it with water. In the case of alcohol or solvent-based ink, you will need specialized chemicals to dissolve the colors. Usually, rubbing alcohol and nail polish removers can get rid of these marker colors from certain surfaces like wood or plastic. For fabrics, you may have to wash the surface with detergent to remove the color properly. In order to use your Copic alternative markers for a long time, you will need to keep them away from direct sunlight and extremely high or low temperatures. If they come in a separate storage bag, I recommend using it for as long as you can. Also, make sure to replace the cap properly after you are done painting.Copic Marker Alternatives FAQs
Final Words
That brings me to the end of this detailed review-based guide. I hope that the information here has helped you to decide.
Before wrapping it up, I would like to mention my top three Copic marker alternatives from the above list. The Caliart Dual Tip Art Markers set is my favorite choice, as its premium-quality, alcohol-based ink helps to create clean and crisp artwork. Plus, it is relatively versatile as well, which means that you get a well-rounded product.
If you want a more durable option, though, you can go with the Shuttle Art Dual Tip Art Markers. With them, you can create paintings that will not fade easily. Therefore, your drawings will remain vibrant and colorful for years to come.
However, if you are seeking an option that has higher color saturation and brightness, you can pick the Prismacolor Premier Art Markers set. With these coloring markers, you can create incredibly realistic, professional-quality paintings.
")


![Bissell 3624 Vs 2694 [SpotClean Portable Cleaners Compared]](https://homesthetics.net/wp-content/uploads/2021/12/Bissell-3624-Vs.-2694-SpotClean-Portable-Cleaners-Compared.jpg "Bissell 3624 Vs 2694 [SpotClean Portable Cleaners Compared]")


![12 Best Weed Eater Strings [Reviewed & Buyer’s Guide]](https://homesthetics.net/wp-content/uploads/2023/09/Best-Weed-Eater-Strings.jpg "12 Best Weed Eater Strings [Reviewed & Buyer's Guide]")


![6 Best Two-Burner Gas Cooktop Of 2024 [Reviewed & Buyer’s Guide]](https://homesthetics.net/wp-content/uploads/2021/02/Best-Two-Burner-Gas-Cooktop-of-2021-Reviewed-01.jpg "6 Best Two-Burner Gas Cooktop Of 2024 [Reviewed & Buyer's Guide]")


![10 Drawing Tablets That Don’t Need A Computer [Buyer’s Guide]](https://homesthetics.net/wp-content/uploads/2022/01/Drawing-Tablets-That-Dont-Need-A-Computer-01.jpg "10 Drawing Tablets That Don't Need A Computer [Buyer's Guide]")


![6 Best Sprayers For Plasti Dip Of 2024 [Reviewed & Buyer’s Guide]](https://homesthetics.net/wp-content/uploads/2023/07/Best-Sprayers-For-Plasti-Dip.jpg "6 Best Sprayers For Plasti Dip Of 2024 [Reviewed & Buyer's Guide]")

![9 Best Solar Gutter Lights of 2024 [Buyer’s Guide]](https://homesthetics.net/wp-content/uploads/2023/06/Best-Solar-Gutter-Lights.jpg "9 Best Solar Gutter Lights of 2024 [Buyer's Guide]")
![9 Best Solar Electric Fence Chargers of 2024 [Buyer’s Guide]](https://homesthetics.net/wp-content/uploads/2021/02/Best-Solar-Electric-Fence-Chargers-01.jpg "9 Best Solar Electric Fence Chargers of 2024 [Buyer's Guide]")


![7 Best Shed Locks Right Now [Reviewed]](https://homesthetics.net/wp-content/uploads/2023/09/Best-Shed-Locks.jpeg "7 Best Shed Locks Right Now [Reviewed]")


![9 Best Rated Solar-Powered Dusk to Dawn Lights [Buyer’s Guide]](https://homesthetics.net/wp-content/uploads/2021/02/Best-Rated-Solar-Powered-Dusk-to-Dawn-Lights-01.jpg "9 Best Rated Solar-Powered Dusk to Dawn Lights [Buyer’s Guide]")