Best Concrete Vibrators
Here's the list of the 11 best concrete vibrators, helping you choose the perfect tool for your construction or home improvement needs.
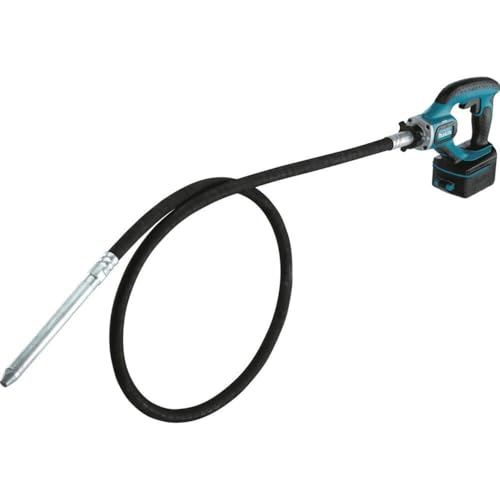
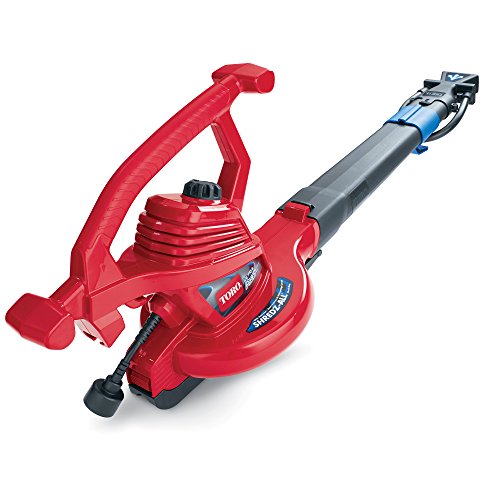
1. Makita XRV02Z - Best for Portability & Ergonomics
Occupying the top spot on the list is the Makita XRV02Z, which has turned out to be a trustworthy product for most people. It is well-balanced and innovative, making it a quality unit capable of handling light to medium jobs with aplomb. All this and more guarantee a satisfying performance.
- Makita-built motor delivers 12,500 VPM to help increase...
- Dual-directional switch to conveniently hold the tool in...
Why Did We Like It?
It weighs in at only 11.4 lbs, making it one of the lightest tools on the market. The size well supports the weight as it measures 39x24x6 inches. Therefore, it is compact and is ideal for taking from one site to another. Additionally, it is powered by an 18V lithium-ion battery that drives all the functions and makes it long-lasting.
Likewise, it features an ergonomic design that makes it comfortable to work with and comes in handy while controlling the 12,500 vibrations per minute. However, the star attraction is the dual-direction switch that ensures you get the much-needed stability.
On top of this, there is a computer control protection system that improves both performance and battery life by monitoring the output under various conditions. So, you do not have to worry about overheating, overloading, or over-discharging and can get the job done swiftly.
What Could’ve Been Better?
Batteries are not included with it, so you will have to pitch in extra to buy a compatible power source. Hence, it could be an inconvenience for many people. Besides, it is not ideal for massive projects, meaning that a section of buyers would look for other options.
- Cordless
- Lightweight
- Ergonomic design
- Powerful
- 25-minute runtime under load
- Batteries not included
- Not suited for heavy-duty work
2. Stark 2.0HP Gas Vibration Industrial Plate Compactor - Best for Versatility & Large Areas
The name Stark usually reminds us of Iron Man. While this may not be Tony Stark's brainchild, the Stark 2.0HP Gas Vibration Industrial Plate Compactor is impressive when it comes to delivering a stable output. Thus, you will not only be able to handle various types of work, but it will also stand out from the crowd.

- Ideal for Homeowner or Professional - A perfect combination...
- Powerful Engine - 79cc vibratory plate compactor model...
Why Did We Like It?
To ensure that your work is long-lasting, it delivers a 2000-pound impact force due to the 2.0HP engine. As a result, even a large area can be covered in a short time, which is made possible by its ability to compact an area of 2691ft per hour. So, it is the ideal model if you want your machine to be versatile.
Therefore, you can use it around the house or for professional purposes, and even for landscaping work. Moreover, it has fold-up wheels that make it best suited for transportation from one place to another. Plus, the recoil ignition enables you to start it up quickly.
This proves to be very convenient and adds to the 79cc vibratory plate; you get a dependable output in most scenarios. Finally, it measures 40x15-1/2x34-1/4-inch, which, coupled with the base area of 17x11.8-inch, allows you to get a vibration frequency of 5210.
What Could've Been Better?
It is smaller than some of the other units. So, if you want your tool to look muscular and powerful, this is not the model for you. Besides, users have reported that it leaks oil, which could not only bring your work to a stop but also mean that you will have to buy a new machine.
- Versatile
- Compact
- Portable
- Recoil ignition
- 79cc vibratory plate
- Slightly small
- May leak oil
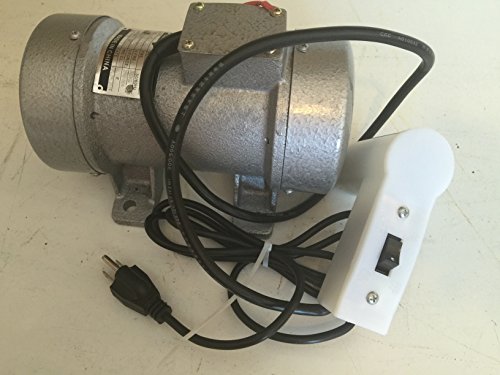
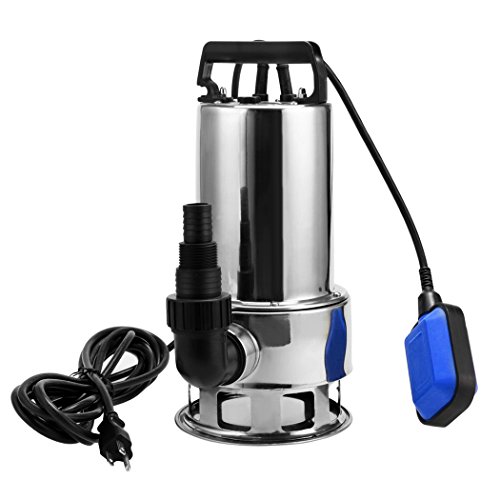
3. GlobMarble Concrete Vibrator - Best for Durability & Low Maintenance
And in the third spot, we have the GlobMarble Concrete Vibrator, which comes with some exciting upgrades. These additions make it a highly useful tool with some of the features not available in other products. Thus, you get a very reliable performance that has earned it positive reviews.
- Concrete Vibrator for Concrete Vibrating Table. Concrete...
- Vibration Motor, Electric Vibrators, Electric motors
Why Did We Like It?
Right off the bat, you will be charmed by the IP65 protection feature, which is hardly seen in any other tool. Thus, your machine is well protected against dust, water, or other harmful contaminants that can enter it while working. Moreover, the vibrating motors are heat-resistant and can withstand temperatures as high as 180 degrees Celsius.
Furthermore, it is low maintenance, unlike other devices, but that does not compromise reliability. Likewise, the motors generate a lot of power that produces both small and large-scale vibrations for different jobs. However, just in case you also have the option of adjusting the intensity of vibrations as you wish.
Additionally, it is very versatile, and you can use it as a vibrating source if you need to use vibrating screens, vibrating feeders, vibrating dryers, and concrete forms. Moreover, even under full force, you get an uninterrupted performance and a high level of consistency.
What Could’ve Been Better?
It is a heavy unit that could be a deterrent for a lot of people. Most people like their models to be lightweight so that they can maneuver quickly, which is lacking in this case. Plus, it becomes difficult to control the speed as well-meaning that you may not get the desired result at work.
- Powerful
- Versatile
- Reliable
- Waterproof
- Low maintenance
- Heavy
- Difficult to control the speed
4. Lightweight Chicago Pneumatic - Best for Light-Duty Tasks
Having gone through our top three products, we now take a look at the Lightweight Chicago Pneumatic, which just missed the cut. Yet, there is no reason to be disappointed as this is a feature-heavy tool that can carry out light-duty tasks with ease. Therefore, it is incredibly efficient.

- Lightweight and compact design for all day use
- 13,000 vibrations per minute
Why Did We Like It?
It measures 28x8x4 inches, which makes it ideal for maneuvering on most jobs. Plus, the weight of only 15 lbs means it is incredibly lightweight, making it portable as well. Now, thanks to the 1-3/8-inch diameter, it can generate up to 13000 vibrations per minute. Added to this, the vibration head is 15-1/8 inches long, allowing you to use it for deep concrete consolidation.
It also features a lock-on button that provides stability and ensures that extended working hours are not a worry. You can enable the function and continue working without having to ponder the controls.
Meanwhile, due to the cast aluminum body, this is a sturdy unit that can handle even the toughest of jobs regularly. And thanks to the swift-to-change shaft, you will be able to enjoy it without any hassle. Finally, despite all the functions on offer, the designers have kept the price within reasonable limits.
What Could’ve Been Better?
There is a problem with the switch, which could affect performance while you are at work. Thus, it is not ideal to find yourself in such a situation when you have to meet a deadline. Besides, it is not the most flexible tool, meaning you could be prompted to look elsewhere.
- Affordable
- Durable
- Powerful
- Lightweight
- Swift-to-change shaft
- Not very flexible
- Problems with the switch
5. USA Pro Concrete Vibrator - Best for Affordability & Ease of Use
The USA Pro Concrete Vibrator is a handy unit that can take care of your light-duty requirements at work. Plus, it is affordable, and with a range of features on offer, you will undoubtedly take a liking to it. As a result, it has earned a lot of praise from users, making it highly accessible.

- Heavy Duty Vibrator has a 60in X 35mm shaft needle
- Will Vibrate the Bubbles out of Concrete / Cement
Why Did We Like It?
If you need to vibrate air bubbles out of the cement or concrete, then the 60-inch by 35mm shaft needle will come in handy. Plus, thanks to the 6.5ft power, you will be able to reach most spots quite quickly. Moreover, thanks to the 110V supply, no job is too tight for this model.
Moving on, the 1-3/8-inch breadth of the head makes it ideal for generating 12000 vibrations per minute. Likewise, the trigger lock is well-suited to allow you to control all the power. It helps you to get better results and makes the overall experience user-friendly.
Besides, since it is handheld, you can use the 1.5HP to set the concrete quickly. Additionally, you get all these features for a meager price. The manufacturers have made sure that it is reasonably priced to cater to a broad audience.
What Could’ve Been Better?
It is not the most powerful option available in the market. If you are looking for a model that delivers a high power rating, then you have to consider some other option. And because the power is less, it is not ideal for large-scale projects.
- Affordable
- Long cord
- Maneuverable
- Suitable for light-duty tasks
- Eliminates air bubbles and water
- Not very powerful
- Not for heavy-duty projects
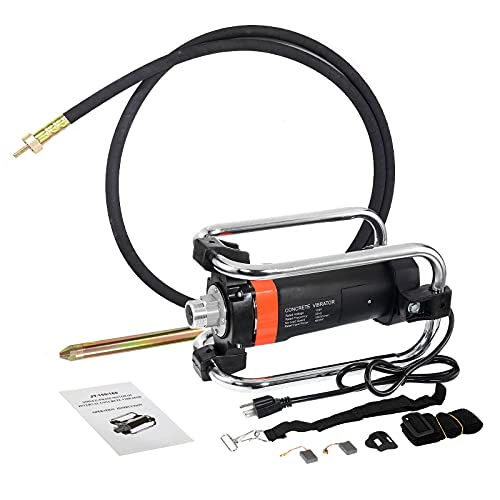
6. Seeutek Hand-Held Concrete Vibrator
We are nearing the end of our list, but the top-notch products just keep on coming. Up next is the Seeutek Hand-Held Concrete Vibrator, which is a useful option if you want to finish your projects fast. So, you are guaranteed a powerful performance thanks to its potent functions.

- ✅ Powerful Concrete Vibrator: 1500W Concrete Vibrator More...
- ✅ Efficiency Concrete Vibrator 1-3/8" diameter vibrator,...
Why Did We Like It?
If you need speed, you will love the 13000 vibrations per minute that it generates because of the 1HP engine. Additionally, it can produce a maximum of 750W power, which effectively allows you to remove air bubbles so that the concrete is durable and consolidated.
Furthermore, it has an extra-long shaft woven from steel and ensures you get the desired flexibility. Thus, you can rest assured that it will not stop working under normal conditions due to overheating problems. Meanwhile, it comes with an ergonomically designed handle that makes long working hours possible.
And this design is well complemented by the lock-on button, enabling you to leave your machine on until the work is complete. Therefore, you do not need to worry about anything else and can get the desired output. Plus, it has a metal screw thread that forms a secure connection.
What Could've Been Better?
This unit is not suited for heavy-duty work. Therefore, the buyers' base is reduced, and several people may miss out. Plus, there is a slight delay before it starts, which may not please you. You may even have to bang it on the head to get it up and running.
- Metal screw thread
- Flexible
- Suited for light-duty projects
- The shaft is 4.9ft long
- Secure connection
- Not for large-scale tasks
- Slight delay before it starts working
7. WEN 56035T Compaction Force Plate Compactor
If you are a professional worker or if you harbor hopes to be one, then the WEN 56035T Compaction Force Plate Compactor is the tool for you. It is a highly versatile unit that comes with some unique features, which have made it one of the top buys in the market.
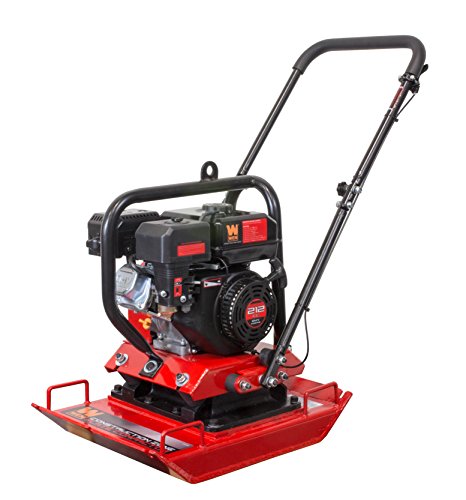
- Power Source Type: Gas Powered
Why Did We Like It?
It comes with a 212cc engine that gives it a lot of power and allows you to use it for different compounds other than just cement. So, you can form a solid groundwork on most projects and use it for walkways, driveways, repair work, or even the foundation for small buildings.
Plus, with the swing-over-handle, you get a high degree of maneuverability while also being capable of taking it to various worksites. Therefore, given the versatility on offer, you can even use it for projects around your home. Likewise, thanks to the 4496 lbs of force, it can generate 5400 blows per minute.
Furthermore, due to the isolators, the vibration from the motors is reduced considerably, helping to extend the lifespan of your tool. Besides, it has fast travel speed, likewise increasing output, and ensuring that a single direction plate can travel up to 82ft per minute.
What Could've Been Better?
There have been reports that while working, it tends to bog down on instances. Therefore, you will have to put in more effort to get the maximum out of it. Plus, you will have to keep a check on the bolts to see if they are coming loose or wearing out.
- Swing overthe handle
- Highly maneuverable
- Vibration isolators
- Portable
- Durable
- May bog a bit
- Bolts could be an issue
8. DEWALT DCE531M1 Cement Vibrator
At number two on our list is the DeWalt DCE531M1 Cement Vibrator, which is quite similar to the first product. But there are a couple of areas where it is different, which has placed it in the runners-up spot. Nevertheless, it has quality features that will please many buyers.

- 1 - 1/8-inch diameter concrete vibrator delivers maximum...
- The concrete vibrating tool has 4 foot long flexible shaft...
Why Did We Like It?
It is a very convenient model, weighing in at only 8lbs, and added to the overall measurements of 8x46.5x3.8 inches, it is compact. Now, the 1-1/8 head permits you to get 14,000 vibrations per minute, and coupled with the shaft and isolated motor, you will see that it delivers productive output.
Plus, it is very versatile and works well with both residential as well as industrial operations. Because it is cordless, you get added maneuverability under most circumstances. So, you can use it to get into tight areas for excellent execution.
Furthermore, due to the separate drive shaft and motor, it is sturdy and can last for a long time. Also, given that it is portable, you can consistently use it for several small-scale jobs. Besides, it will give most consumers great pleasure to learn that it is easy to clean, and you can rinse it off.
What Could’ve Been Better?
The problems with this device are similar to the earlier product. For one, batteries are not included, and many people would not like to spend extra to purchase batteries. If you need a machine for big projects, then it is better to consider some other option.
- Compact
- Durable
- Flexible
- Portable
- Ergonomic design
- Batteries not included
- Suited for light-duty tasks
9. DeWalt DCE531B 20V Max Pencil Concrete Vibrator
A pencil is usually associated with subtlety, but in this case, the designers of the DeWalt DCE531B 20V Max Pencil Concrete Vibrator have been quite smart. They have coupled finesse with power so that you get an uninterrupted performance on most jobs. Therefore, most people have taken a liking to its excellent features.
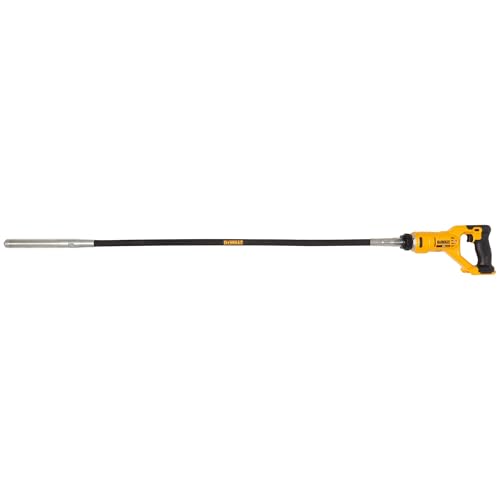
- 4 foot long flexible shaft for easy use and long reach
- 1- 1/8" diameter vibrator delivers maximum consolidation...
Why Did We Like It?
If you crave power, then you will love the sharp performance that it produces. Thanks to the shaft, you get 14000 vibrations per minute, allowing you to take on most tasks with assurance. As a result, you can fix anything from the sidewalk to the footing required for streetlights.
Such is the reliability that you can bet your bottom dollar that it is much faster than other units. Meanwhile, the shaft is 4ft long, enabling you to use it on some large-scale tasks. Moving on, it is lightweight, so you do not face any problems while controlling it.
Besides, when you use it on the concrete, you will see air bubbles coming to the surface. This is thanks to the 1/8-inch vibrator that offers a consistent burst of power. Finally, it can reach even the problematic spots to produce a complete performance.
What Could've Been Better?
If you opt to buy this unit, then you must know that you will have to purchase the batteries separately, which will drive up the total cost. Additionally, it is not the ideal unit if you have to cater to big-scale project,s and, therefore, potential buyers may look elsewhere.
- Flexible
- Reliable
- Fast
- Ideal for small-scale tasks
- Versatile
- Not for heavy-duty tasks
- Battery not included
10. BIZOERPO Hand-Held Electric Concrete Vibrator
We are down to the last three products on our list, and maintaining the quality, we have the BIZOERPO Hand-Held Electric Concrete Vibrator. This is a very versatile tool that provides you with incredible efficiency. Moreover, it is potent, which has endeared it to users.

- 【HIGH EFFICIENCY】: The length of vibrator shaft is up to...
- 【HIGH POWER】: Remove air bubbles and level concrete...
Why Did We Like It?
The vibrator shaft measures 4.5m in length, having a 1.5” head that both improves as well as gives you more coverage while working. Therefore, it comes equipped with an advanced leading design that lets it work at a maximum power of 1100W.
Thus, you can get rid of air bubbles with ease and get a smooth operation while leveling the concrete. All you need to do is dip the head into the wet cement, which will get rid of air or excess water and solidify it within the structure. Furthermore, it has a metal roll cage that provides excellent protection and makes working with it safe.
Finally, it is incredibly versatile, making it suitable for use on numerous jobs from concrete slab bridges to hydroelectric power plants. Also, you will be happy to know that you will not have any issues in starting it up, such as having to tap or knock on the vibrator shaft.
What Could’ve Been Better?
This is a heavy model, so there may be people who will opt for another option. Thus, if you are not well-built, you could have trouble controlling it. Besides, it could bog down and start smoking, hence bringing your work to a premature stop.
- Powerful
- Efficient
- Easy to use
- Versatile
- Accurate
- Bit heavy
- Could bog down and start smoking
11. BEAMNOVA Electric Concrete Vibrator
The penultimate product on our list is the BEAMNOVA Electric Concrete Vibrator, which flaunts a simple design. It comes with all the components to make this a complete unit, and you will enjoy working with it. Thus, it is a trendy device and is a good investment for most buyers.
- Efficient & Long Reach - The BEAMNOVA concrete vibrator is...
- Versatile Use - Submerge the vibrator head into wet concrete...
Why Did We Like It?
It is a lightweight model allowing you to get better handling so that you can control the 13000 vibrations per minute. Complementing the speed is the 1-3/8-inch vibrator shaft that gives you more range at work and makes the entire operation more potent.
Moving on, you can dip the head into the wet concrete to remove air bubbles or excess water. This will allow the concrete to set into the mold which will make it stable. Plus, you can even use it to level the concrete, which is a great function to have.
The significant inclusion is the dust-proof button switch that provides you with user-friendly operation and permits you to get over 10000 presses. Likewise, thanks to the metal-built case, you do not have to worry about cement entering the machine. Thus, it is a highly versatile tool that can perform a range of tasks such as patching or pouring operations.
What Could’ve Been Better?
Like some of the other modes, it does not start instantly. You may have to bang it on the body to get it rolling, which many people may not like. Another cause for concern is the lack of robustness, which will affect the longevity of the unit.
- 4.9ft shaft
- Versatile
- 13000 vibrations per minute
- 1-3/8-inch vibrating head
- Removes trapped air
- May not start instantly
- Durability is an issue
Best Concrete Vibrators Comparison Table
| Product | Power Source | Voltage | Horsepower | Vibration Frequency | Vibration Amplitude | Length of Shaft | Weight | Warranty |
|---|---|---|---|---|---|---|---|---|
| Makita XRV02Z | Battery | 18V | N/A | 12,500 VPM | 1/16" | 4 ft | 11.4 lbs | 3-year limited |
| Stark Vibration Industrial Plate Compactor | Gas | N/A | 2HP | N/A | N/A | N/A | 165 lbs | 1-year limited |
| GlobMarble Concrete Vibrator | Electric | 110V | N/A | 12,000 VPM | 1.5" | 10 ft | 10.5 lbs | 1-year limited |
| Lightweight Chicago Pneumatic | Electric | 110V | 3/4HP | 13,000 VPM | 1" | 0.83 ft | 5.5 lbs | 1-year limited |
| USA Pro Concrete Vibrator | Electric | 110V | 1.5HP | 13,000 VPM | 1.2" | 6.5 ft | 11 lbs | 1-year limited |
| Seeutek Concrete Vibrator | Electric | 110V | 2HP | 13,000 VPM | 1.2" | 6.6 ft | 10 lbs | 1-year limited |
| WEN 56035T | Gas | N/A | 7HP | N/A | N/A | N/A | 207 lbs | 2-year limited |
| DEWALT DCE531M1 | Battery | 20V | N/A | 14,000 VPM | 1/16" | 4 ft | 8.5 lbs | 3-year limited |
| DeWalt DCE531B | Battery | 20V | N/A | 14,000 VPM | 1/16" | 4 ft | 2.9 lbs | 3-year limited |
| BIZOERPO Concrete Vibrator | Electric | 110V | 2HP | 16,000 VPM | 1.2" | 13 ft | 10.7 lbs | N/A |
| BEAMNOVA Concrete Vibrator | Electric | 110V | 2HP | 11,000 VPM | 1.2" | 43 ft | 9.3 lbs | N/A |

Concrete Vibrator Guide
Before you buy, there are some points that you need to keep in mind. These are the aspects that distinguish the top products from the not-so-good ones. Although they may all look and feel the same, the best concrete vibrators' anatomy is a little different.
It is based on these points that we have formulated our list, but you still have to choose the best from the best. Therefore, by taking note of the details, you will be much better placed to make an informed choice.
Durability
Most significantly, your model must be able to withstand the demands of work daily. A concrete vibrator is likely to be subjected to the harshest of conditions, and in that regard, it cannot afford to break down. The designers need to be careful and use quality materials so that they get a long lifespan.
If the device is unable to deliver on longevity, then all the other functions go to waste. There is no point in loading it with features if you do not get to enjoy it for a long time. Also, it is not precisely feasible to keep purchasing new tools in a short period. Therefore, durability is essential for any user.
Ease of Use
It must be user-friendly because you are working with a heavy machine, which is already difficult. On top of that, you do not need the added burden of figuring out what every function or feature does. One does not have the time.
All the functions should come to you quite smoothly. The tool's primary purpose is to ease your workload and, in that regard, you cannot afford to compromise. Rather than having lots of features, manufacturers should focus on the most important ones to make the device uncluttered.
Speed
Finally, it has to be fast. Working in the field is hard, and being fast is essential because you are working with various components that need to dovetail to make your work complete. Thus, it has to offer the maximum number of possible vibrations per minute to ensure that the cement sets appropriately.
Additionally, you have a lot of work to do and cannot just focus on one task. The best concrete vibrators reduce the time of work considerably, allowing you to focus on other things. Plus, the faster you get your job done, the more chances you will have to work on various projects.
But being fast does not mean compromising on efficiency. There must be a precise balance between pace and output, and they should complement each other for the best results.
The most common types of concrete vibrators are internal (needle) vibrators, external (form) vibrators, and surface vibrators. Internal vibrators are most commonly used for concrete consolidation. The ideal frequency for a concrete vibrator is between 7,000 to 12,000 vibrations per minute (VPM) and the ideal amplitude should be around 0.04 to 0.06 inches. The choice of a concrete vibrator depends on the size and shape of the concrete pour, the thickness of the concrete, and the desired level of consolidation. Also, consider the type of vibrator needed and its power source. If a concrete vibrator is used improperly, it can damage concrete. Over-vibrating or using a vibrator with too high of a frequency or amplitude can cause segregation of the concrete mixture, which can weaken the final product. To maintain a concrete vibrator, keep it clean and dry, lubricate the internal bearings, and store it in a dry place. Check for damage or wear on the cord, switch, and housing before each use. Yes, it is safe to use a concrete vibrator as long as you follow the manufacturer’s instructions and take safety precautions, such as wearing protective gear and ensuring that the power source is properly grounded. The average lifespan of a concrete vibrator depends on its quality, frequency of use, and maintenance. Generally, a well-maintained vibrator can last for several years. No, a concrete vibrator should not be used for any other purpose other than consolidating concrete. Attempting to use it for other purposes can damage the tool and result in injury. Yes, concrete vibrators produce a significant amount of noise during operation. It is important to wear hearing protection while using them.Concrete Vibrators FAQ's

Conclusion
We hope that, having gone through our list, you have a better idea about concrete vibrators.
We have decided to assist you a bit more before you make the final choice. We have narrowed the top three products from our list to give you a much clearer idea of where every model stands.
In first place is the Makita XRV02Z, which is an exceptional model that can carry out a range of functions even under challenging situations. It is followed in the second spot by the DeWalt DC530B Cement Vibrator, which has ticked most of the right boxes and has turned out to be a dependable tool for most people.
Finally, in the third spot, we have the GlobMarble Concrete Vibrator, which presents a different option compared to the other two products, which many users will like. So, that is all from us.
We believe you are well-equipped with all the knowledge to make your purchase. Till next time!


 More details at