A massage table can cost from $300 up to $6,000, depending on the features, build quality, and lift mechanics it uses. The best massage tables should offer these qualities without cutting corners and at a reasonable price.
The therapeutic benefits of a massage are undeniable, and a good massage table can take these positives to the next level.
Several factors determine the cost of a massage table, and you can find products in all price ranges. The trouble is, it can be difficult to get the biggest bang you can get from your buck.
So, take a look at all the factors and considerations that add to the price of a massage table. These considerations factor in the qualities that make a spa table suitable for your spas or office needs.
Factors That Affect The Cost Of A Massage Table
The price tag that accompanies a massage table is nothing to scoff at. Typically, a table with the most basic of functionalities can cost you a couple of hundred dollars, while higher-end products can reach up to a few thousand dollars.
Of course, the price differential results from the features, the quality of the materials, and the convenience these tables offer. Here’s a brief overview of each of them.
1. The Table Type
When scouring the market for a massage table, you will find that there are two primary types-. portable and stationary tables. I’ve found that each of these brings a different massaging experience.
A portable table is the best value and ergonomic option, allowing you to fold and store it. It’s a light weight massage table with simple builds that cut down on the cost significantly, trading off lifespan for relatively short-term convenience. But some of the higher-end portable tables boast durability that is comparable to stationary tables.
On the other hand, a stationary massage table is hefty and more expensive, but it is generally more comfortable and offers a better massaging experience. These can be further categorized into static and dynamic stationary tables, where the latter can be adjusted into a reclining or upright position. The former are less expensive, while the latter are generally better for your back.
Long story short, the most expensive type of massage table would be a dynamic stationary massage table that allows some flexibility in its operation.
2. The Make
Build quality is paramount when purchasing new equipment, and massage tables are no different. The price of a massage table can shoot up if it is made from more expensive materials, such as maple wood. Factoring in upholstery, the price of such massage tables matches the premium quality offered by more expensive materials.
Table bases and legs can be precision crafted from beech wood, steel, and alloys, while the upholstery makes use of polyurethane foam. Polyurethane is the primary compositing material in memory foam, and you may be able to find earthlite massage tables using said foam.
Tip
You can also find portable or stationary massage tables constructed using sustainable materials only if you are conscious of the environment.
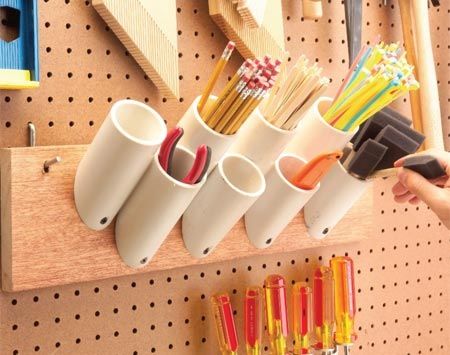
3. The Accessories
Table accessories can go a long way in making your massaging experience much smoother and more comfortable. These include bolsters, face cradles, extra storage, headrests, warming pads, and more. And including some or all of these will add to the overall price of your portable massage table.
These massage table costs can be managed by choosing the necessary accessories for your specific needs and by purchasing them through third-party means. Independent purchases of these table accessories lower the overall massage table cost by quite a bit.
4. The Lift Mechanics
Some treatment tables come equipped with a lift feature that allows you to adjust the height of your massage table. The more complex this lift mechanism is, the greater the cost of your massage table will be. Some of the more advanced lift mechanisms can have you invest upwards of a couple of thousand dollars.
For reference, a lift table that uses hydraulics will cost quite a bit more than a manually operated one, as will an electric lift table. If you have the money to spare and require the lift mechanism for super easy access, such tables may be worth the purchase.
5. The Customer Service
Massage tables are a hefty investment, and it’s good to purchase one from a brand that offers good customer service, particularly after you’ve purchased one.
Many massage tables are covered under a lifelong warranty from the manufacturers, which is the preferred option when scouring the market for such products. Such tables are often offered by reputed brands and accompany a satisfaction guarantee as well.
Should you run into any issues at any point in the lifespan of the portable table, I’d advise contacting the manufacturer to have the problem fixed soon.
6. The Weight
If you find yourself in a position where the stationary massage table has to be moved, its weight can be quite troubling. A hefty stationary massage table becomes a stationary object in a room dedicated to it- a prospect that can be daunting when you need to move it. And no one knows this plight better than a practicing mobile therapist!
How much weight a massage table can carry is always a concern for a practitioner working as a massage therapist. Since they have to move frequently, a table that weighs too much is impractical for their line of work.
It’s generally agreed among therapists that the best table weight is between 22 and 46 pounds. These are usually portable massage tables with a light aluminum frame, making them good for massage therapists.
Of course, if you are not a practitioner, you have some leeway in choosing a portable massage table with the right weight. You can opt for a slightly heavier portable massage table that isn’t too difficult to move around with some help. The heavier the build, the more difficult it becomes to maintain the tableand the area around it.
7. The Size
It may seem fairly obvious that a portable massage table needs to be large enough to accommodate your body frame, but it’s important to mention nonetheless. An inaccurately sized table can be quite painful for the body, after all.
When picking a massage table, you should try to ensure that the table isn’t too wide, narrow, short, or tall. As such, the ideal measurements for a portable massage table range between 28-35 inches in table width and 20-36 inches in height.
The Hidden Costs Of Purchasing A Massage Table
These variables involved in choosing a massage table don’t affect the price tag of your massage table directly. Rather, these are the costs incurred as you continue to use the table and what you get in return over the long haul.
The hidden costs of massage tables are all tucked away in the intangibles, where they won’t be obvious at first glance.
1. The Purpose
When looking at a particular portable massage table when purchasing, you may want to consider if it will serve purposes beyond just massages. If the table is intended to be used by physiotherapists or tattoo artists, being mindful of them before making the purchase becomes paramount.
A portable massage table should have features that support each of these purposes and functions, such as padding, height adjustment, and backrests. Though these premium features can make the massage table cost more, you will end up saving money in the long run. The table will eliminate the need to purchase products for other purposes by fulfilling them after all.
Using the wrong table can hamper your experience with a specific purpose and nullify any benefits you wish to receive. Putting undue strain on your body is not something you’d want, and a good massage table will help avoid that.
2. The Comfort
A massage table ought to be comfortable for both the massage practitioner and their client. The practitioner needs to be aware of the benefits a good massage table provides and make a choice accordingly. It is the backbone of their business, after all.
The table needs to support physical build ergonomically, taking body weight, height, strength, and modality of the massage professional in consideration. It should be able to prevent physical burnout for the client as well. Well-designed and sturdy portable massage tables can manage this and more with relative ease.
Massage therapists need an ergonomically designed massage table as well since poor-quality portable massage tables can create undue pressure on their bodies while they work. This can lead to frustration on both the client's and the practitioner’s side, ultimately hampering the practitioner’s business.
Naturally, the clients’ comfort throughout the massage experience should be prioritized as well, as a poorly performing table can distort their view of the therapy. Repeat customers are essential to the massage business, and taking their experience to the next level is essential for any practitioner.
These points of comfort apply for personal use as well. Never have I encountered someone who likes an uncomfortable massage table, professional or not.
3. The Safety
Low-price massage tables are likely to have less invested in their design process, testing and development and, as a result, may have fewer safety options. But safety is something you should never compromise on, no matter the price of the product.
Well-built and sturdy portable or stationary tables should comply with safety standards set by the government, and the manufacturer must commit to testing and weight-acceptance ratios. Reputable companies make it a point never to cut corners when it comes to safety.
As a customer, you should remain conscious of the safety of the massage table you purchase. After all, if the table ends up causing you harm, you should be able to question the manufacturer about the incident. Reputed companies recognize this and are generally prompt with their responses.
4. The Longevity
Good quality equipment lasts for a long time, and massage tables are no different. Tables built using top-notch materials and high-quality equipment will last for years without causing any major issues. Though a high-quality stationary table can be pricey, you will recoup the value in years to come, something that can’t truly be said about low-priced products.
How Much Is A Massage Table Conclusion
A massage table is no small investment, and it’s important to know each aspect of its pricing. The prices of portable and stationary massage tables fluctuate between hundreds and thousands of dollars, with the differences being the quality, features, and durability.
No matter the price range you decide upon, it’s advisable to buy your preferred portable or stationary table from a reputed shop that offers a warranty. The safety and comfort of a massage table are paramount, and well-known companies make it a point to maximize both of these qualities.
Getting your money’s worth is important with such purchases, and it never hurts to be careful when picking a table of a particular price range.
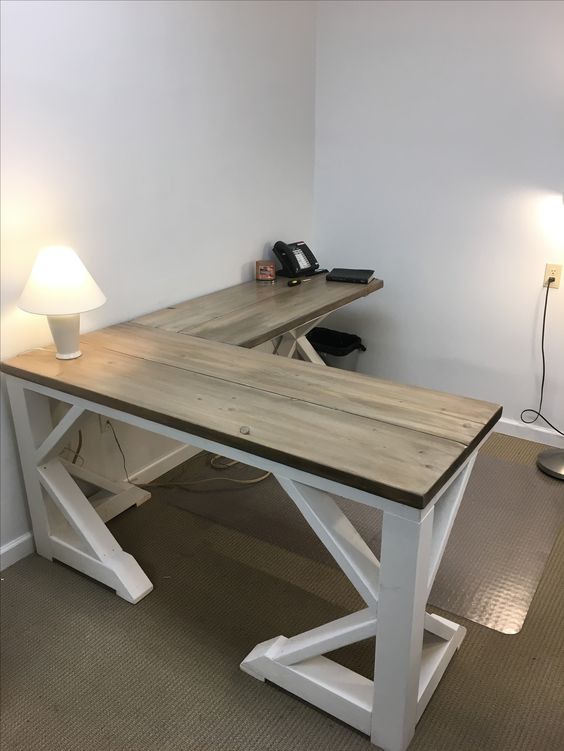
For building your own massage table, you will mainly need plywood, some textile, and your toolbox. First off, cut the face hole in the tabletop, and cover it with foam and fabric. Next, screw in the leg assemblies, and your table will be ready.
Are you a massage therapist trying to set up a new salon?
Or do you just want to kickstart your doorstep massage business? Whatever the case, owning your own massage table is a must. It is a one-time investment that would provide you with long-term business gains.
However, if you want to cut the cost, you can build your own massage table. Trust me, it’s not as difficult as you think. My step-by-step guide can help you out!
Things To Consider
Before I tell you how to build a massage table, there are a few things you need to consider while making a DIY massage table. So, let’s discuss them first:
A. Design Features
A stationary massage tablehas certain design features that distinguish it from other furniture. It isn’t just another table; instead, it is a comfortable surface meant to relax the person lying on it. These tables are generally flat and hard, apart from soft upholstery to support the user’s body.
Some are equipped with movable headrests, while others have movable designs to let you use the table in a half-sitting position. These types would be tricky to craft at home, but straightforward massage tables are easy to make.
B. Types Of Massage Tables
Depending on the structure, there are mainly three types of massage tables you can choose to build, and they are:
1. Folding Massage Table
As the name suggests, a folding massage table can be folded into a compact bundle and is very easy to carry around. You can simply pack it in a suitcase and carry it to your client’s home if you offer doorstep massages. A foldable portable massage table is lightweight, easy to clean, and offers easy transportation.
2. Movable Massage Table
Movable tables are portable too, but not as handy as folding ones. They weigh no more than 10 to 15 kg and can be simply rolled from one room to another. You can easily move them from one room to another, but they won’t be of much help if you are a doorstep massage therapist.
3. Stationary Massage Table
Made of heavy-duty wood and steel, stationary tables are quite bulky and cannot be moved around easily. They are the best in terms of quality, but not so much when it comes to portability.
This type of massage table is best suited for hospitals, medical institutions, massage rooms, and salons. It also has prime features such as a movable headrest and adjustable back support.
C. Dimensions
Another feature to keep in mind before picking up the tools is the dimensions of the massage table. Speaking from personal experience, these are the standard measurements:
1. Length
Now, it is crucial that your clients can comfortably fit on the table and that their heads or legs don’t dangle off the edge. There should also be sufficient head and foot space for all-around comfort. You can find 184 cm to 200 cm long massage tables on the market. But I personally believe 185-190 cm is the ideal range.
2. Breadth
Typically a massage table is 50 to 80 cm wide, but narrow ones are not really suitable for a relaxing massage. A big table, on the other hand, is quite comfortable and allows the user to unwind completely, but they can tire out massage therapists quickly.
So, it is essential to strike the right balance while deciding the breadth of your massage table. I’d suggest keeping it 70 to 75 cm wide, provided you will be using it for one client at a time. If you plan to use it for pair massages, then you can just double this measurement.
3. Height
The height of your massage table primarily depends on how tall you are. Tables usually lie in the range of 55 to 85 cm, but you can tweak it according to your height because, in the end, you want to do your job comfortably. If the massage table is too high or low for you, your hands, shoulders, and back will get strained easily.
How To Build A Massage Table?
A. What Will You Need?
You will need the following materials to build a DIY massage table:
Plywood for the tabletop
Four wood boards for building massage table legs
Pine boards for framing
Some upholstery, polyvinyl chloride, or leather for the table surface
Foam padding to cover the plywood
Wood glue or some adhesive
Nails, screws, and hinges
Apart from the material, you will also require these tools:
Miter saw
Circular saw, or table saw
Measuring tape
Drill
Pencil
Stapler
Upholstery gun
B. How To Build A Massage Table: Step-By-Step Guide
Now that you have your toolbox and materials ready let’s get to the action now. Here’s the step-by-step procedure I follow to build a massage table:
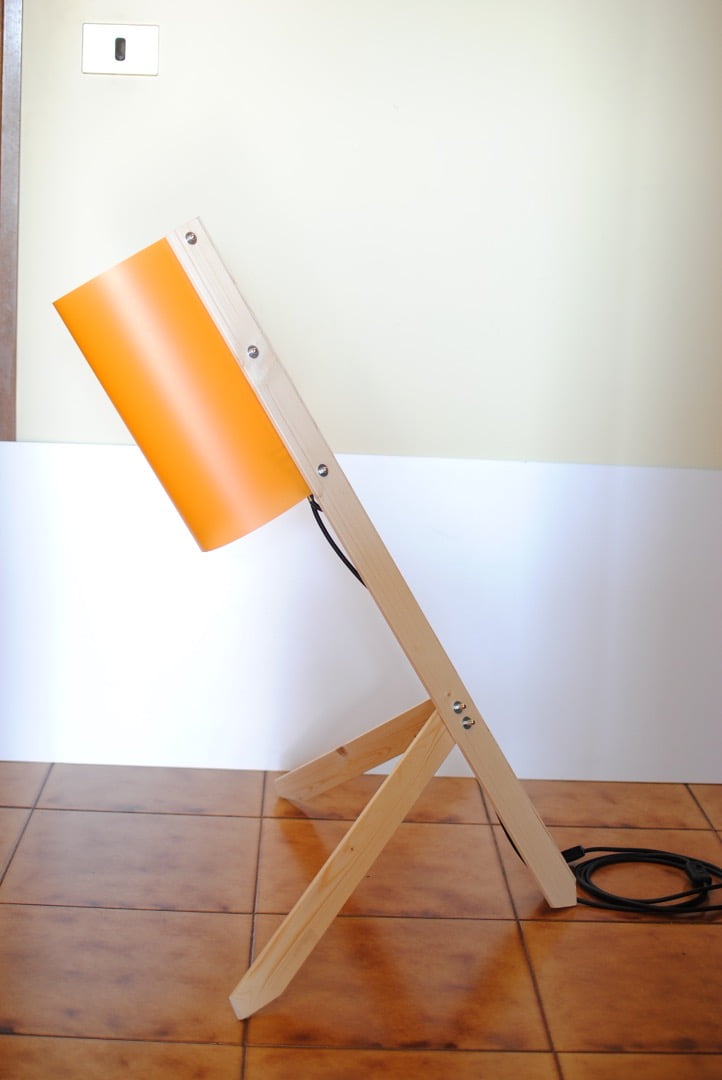
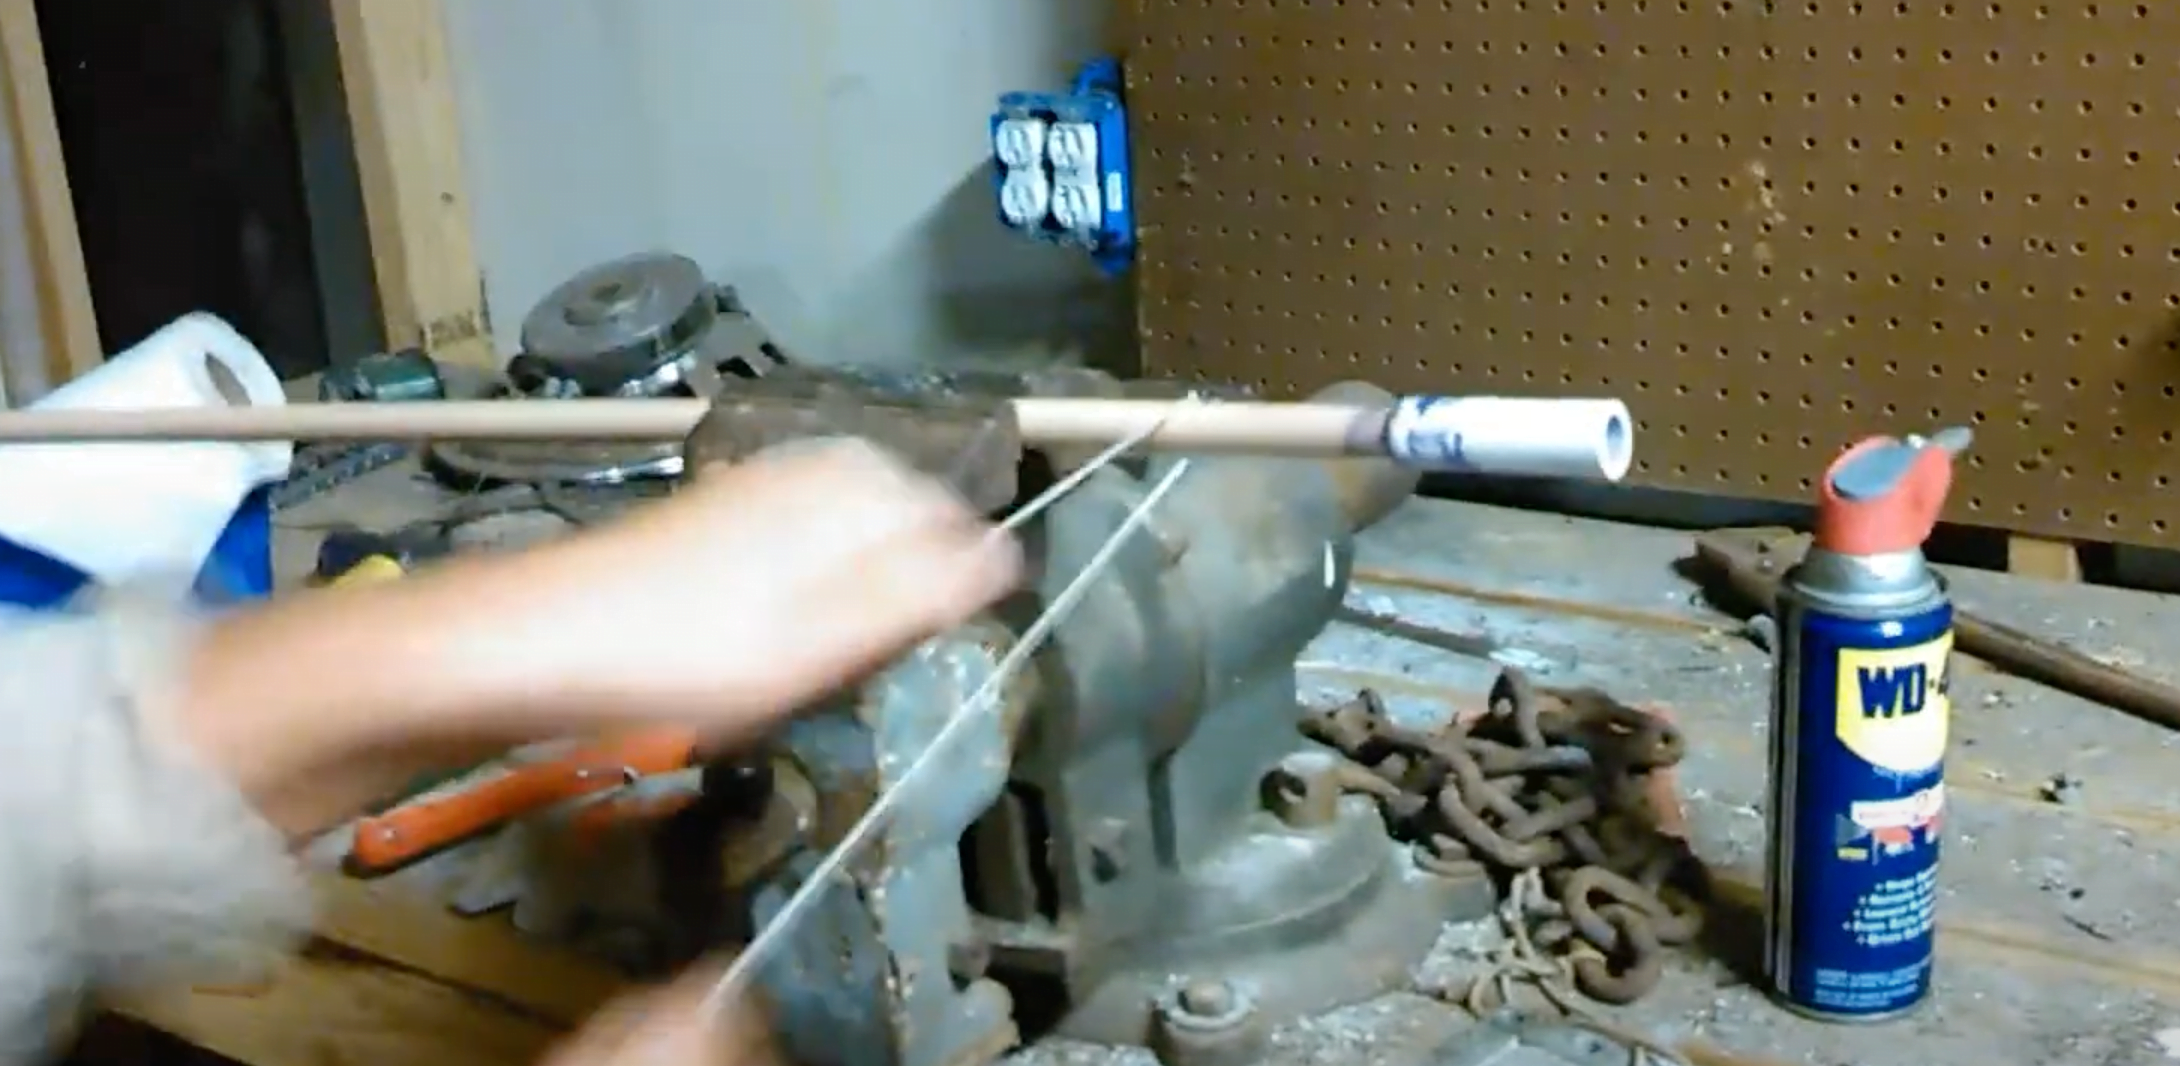
1. Cut The Face Hole
I prefer cutting the face hole in the plywood before everything else because it’s a tricky step, and getting it over with is a huge relief. The oval hole can be 15 cm long and 11 cm wide, and it should be centered near one end of the tabletop plywood. First, draw a rough oval using a pencil, and once you are satisfied with it, cut it out using a miter saw.
2. Make A Plywood Frame
Use 19 x 50 mm pine boards to frame each sheet of plywood you would use as a tabletop. Attach the pine boards to the plywood using nails and wood glue.
3. Upholster The Tabletop
Spread out the foam sheet and lay the plywood pieces on top of it. Start tracing the pieces around the edges and the face hole onto the foam and cut it. Once the foam piece is ready, lay out the leather cloth or PVC sheet.
First, place the foam on top of the material and then the plywood pieces. Trace out the pieces on the fabric using a pencil, leaving some margin on all sides as well as the face hole. Cut the cloth so that it fits the top, and use an upholstery gun or stapler to paste it with the foam and the tabletop plywood.
4. Build A Long Pair Of Legs
To make the table legs, take two 855 mm long wood boards and make half-lap joints at their base to place a third board as a 555 mm spacer. Attach the spacer board to the legs using nails or wood glue. Prepare two such table leg assemblies with an angle of 41° at the feet.
5. Build A Short Pair Of Legs
Now, follow the same process to make another pair of leg assemblies, but this time the pine boards will be only 695 mm long. The 555 mm spacer will go at the top, so make the half-lap joints at the top of the legs this time.
6. Attach The Legs
Next, you’ll have to put together both leg assemblies. Attach the feet of the shorter pair of legs with the base of the longer one using hinges. Ensure that both pairs fold flat on each other without any obstructions.
Once the base and the tabletop are ready, you’ll have to put them together. So, take measurements and drill holes to attach the legs to the inner frame of the tabletop. Then hinge the leg assemblies to the frame on opposite sides.
If you want to make a foldable table, then you can cut the top plywood in two halves and attach them using hinges. That will let you fold your table easily.
7. Fit In The Spreader
This last step is for those building a foldable massage table. You will have to fit a spreader between the legs of your massage table. For that, simply take a pine board, cut it into two halves, and join them using hinges, just like the tabletop. Join it to both the leg assemblies so that it collapses every time you fold the massage table.
Tip
Most people first put the table together and then cut the face hole in the tabletop. But I’d say you don’t make that mistake. Before you craft the entire table, cut the hole so that you can use another plywood board in case you are not happy with it.
If you do it after putting the whole massage table together, you won’t have the liberty to easily replace the tabletop and will be stuck with a poorly cut face hole.
How To Build A Massage Table Conclusion
Opening your own massage salon takes a lot of effort and money. And if your massage table isn’t comfortable and relaxing, it could be a huge turn-off for your clients. So, it’s important to get it right.
But if you cannot afford a new massage table, you can always build one at home with minimum investment. You would primarily need plywood, pine boards, fabric, foam, and a toolbox. The procedure is pretty straightforward, and you will be done in a jiffy if you get the basics right.
Simply follow the steps I mentioned, and you will be good to go! Just make sure that you use good-quality foam and fabric to ensure maximum comfort.
From sturdy timber workbenches to collapsible and portable designs, with this free workbench plans list you can create a functional and customized workbench inexpensively.
Imagine having your very own workbench, a dedicated space where you can bring your projects to life.
Well, guess what? Today, I am going to share the 19 best workbench plans that are available for free. With these easy-to-follow plans and some basic tools and materials, you'll be on your way to creating your own custom workbench in no time. So, let's get started.
1. The Timber Workbench by John Ostermann
The Timber Wood Workbench is a stunning example of craftsmanship and ruggedness. Constructed from hefty logs of pine, this sturdy workbench exudes a masculine appeal. The combination of wood and black pipes adds an industrial touch.
Careful attention was given to preserving the natural characteristics of the wood, such as the live edge on the front plank.
Feasibility-wise, it's a dream come true. The step-by-step instructions are clear and easy to follow, allowing anyone to build this with confidence. If you're building the Timber Wood Workbench, you'll want to make sure you have a good jointer to smooth out any rough edges.
As I explored the workbench plan further, it demonstrated careful consideration and attention to detail. From the initial selection of pine logs to the final assembly, each step was thoughtfully executed to create this sturdy and visually appealing plan.
2. Rolling Workbench by a Crafted Passion
For just under $35, you can have your very own workbench project set up, saving you tons of money compared to buying pre-built benches. The instructions provided are clear and straightforward, making it easy to follow along, even for beginners.
This easy workbench plan is designed to be portable, thanks to the use of swivel casters. It can easily be customized to include a built-in router table.
The detailed cut list and tool requirements are a huge bonus, ensuring you have everything you need before getting started.
Overall, it is a budget-friendly and practical solution for creating a well-organized workspace in your garage. And with a few minor tweaks, you can make it totally stand out as the ultimate workbench.
3. Dave Flanagan's Collapsible Workbench
This DIY workbench plan offers a major advantage: it's collapsible! When it is not in use, it conveniently folds to only a few inches, saving space in your workshop. This feature alone is a game-changer for those of us with limited storage space.
This folding workbench plan provides clear and detailed instructions with diagrams that make the construction process easier to follow. After giving it a go, I think it's definitely worth considering if you are in need of a collapsible workbench.
4. Workbench And Outfeed Table Plan by Jen Woodhouse
With just a few studs and sheets of MDF boards or plywood, you can construct this mobile workbench in lumber. Plus, the plan provides some handy tips along the way, like using magnetic strips to hold screws and drill bits and adding a second shallow and small shelf for easy access to power tools.
Another great aspect is the mobility of this DIY workbench. It's built by locking swivel castors, making it easily movable despite its large size.
After putting it to the test, I think this mobile workbench plan offers a solid foundation for a versatile and functional workbench. It's affordable, offers some clever features, and can be paired with a benchtop planer for added versatility.
5. DIY Workbench With Circular Saw by Fine Woodworking
This DIY workbench plan only requires a circular saw and a cordless drill. That means you don't need a whole arsenal of expensive power tools to get started. It also uses common lumberyard supplies and can be paired with an electric hand planer for added efficiency.
This workbench plan emphasizes simplicity and practicality and provides detailed instructions. The DIY workbench itself is described as rock-solid and includes a video specifically designed for woodworking.
I also loved the fact that they offer a free pdf download of the plan, so you can have it handy while you work. It's perfect for beginners, it's affordable, and it provides a solid and practical woodworking bench plan.
6. Rogue Engineer’s Easy Portable Workbench Plan
This do-it-yourself workbench plan comes with clear instructions, a cut list, and a printable PDF. You only require a few tools like a miter saw, brad nailer, and tape measure.
This workbench also includes storage space and is heavy-duty enough to handle a variety of tasks. Moreover, this heavy-duty workbench can be made in just 30 minutes.
It's an affordable and practical solution for those who need a portable and heavy-duty workbench. Definitely worth checking out.
7. DIY Workbench by Projects With Pete
This workbench plan provides a detailed list of supplies needed, including lumber, screws, stain, and more. DIY Pete does a fantastic job explaining each step, making it easy for beginners to follow along. The plan includes a video tutorial as well.
The design is practical and efficient. It has a spacious top, sturdy legs, and a bottom shelf for storage. The addition of a caster wheel allows for mobility, making it versatile for different work areas.
The plan emphasizes safety, which is a responsible approach. It's budget-friendly, well-explained, and offers a practical design.
8. Simple Workbench by Wayne of Woods
The design is practical and space-saving. Since it has no legs touching the floor, it's easy to clean and provides a solid work surface. It's especially great for confined spaces, like a garage. The top surface is made of particle board and is easy to customize for a larger bench.
The plan offers step-by-step instructions with accompanying images, making it easy to follow along. If you're looking to build a DIY garage workbench, this plan is worth checking out.
9. Garage Workbench by Lowes
This garage workbench plan is an excellent choice for those looking for an affordable and customizable DIY workbench project. It offers different dimensions and customization options to suit your specific needs. You can choose the depth, width, and height of your workbench based on the space you have available.
The instructions provided are clear and detailed, making it easier for DIYers of all skill levels to follow along. The plan covers everything from assembling the substrate and sending it to attaching the workbench rails and legs. It even provides formulas to help you calculate the size of the different components based on your desired dimensions.
It also includes casters for mobility, making it convenient to move around. It can be paired with a table saw for optimal results. This plan uses wood glue and a brad nailer to attach the shelves and provide extra strength and durability to the overall structure. The author also mentions outfitting the workbench with favorite power tools, showcasing its versatility.
Through my practical knowledge, I can say that this workbench plan offers a cost-effective solution for small workspaces. The instructions are clear, and the design is practical.
11. DIY Workbench by Handyman
The free workbench plan by Family Handyman is not only simple to build but also budget-friendly, costing between $51 and $100. It's designed for beginners, so even if you're new to woodworking, you can tackle this project with confidence.
The cutting diagrams and step-by-step instructions make it easy to follow. The workbench features a lower shelf or drawer for storage and offers the option to add accessories like a pegboard, a bench vise, and even a power strip.
The best part? It only takes about an hour or even less to build this workbench. So, if you are short of time but in need of a functional workspace, this plan could be perfect for you.
12. Sturdy Workbench by Ana White
The workbench plan from Ana White aims to provide a sturdy and functional workspace. It is designed to be beginner-friendly, so it's perfect for those new to woodworking. The plan calls for basic tools like a tape measure, circular saw, drill, and drill bits.
The construction process is straightforward and well-explained, with step-by-step instructions and clear diagrams. Ana White emphasizes the importance of safety and advises checking for squareness after each step, which is a great tip for ensuring accurate results.
Moreover, this workbench plan offers the know-how to customize the width of the bench by adjusting the length of the shelf supports.
The design of this workbench is relatively simple. It consists of upright members fixed to the wall, top and lower shelves, braces for support, and wire cable or chain to hold the top shelf in place when folded down.
You'll need some basic materials like wood, screw, and nails to bring it all together.
The wall-mounted feature is definitely a highlight, as it saves valuable floor space in a small workshop. Additionally, the folding mechanism allows you to conveniently tuck the workbench away when not in use. It's a clever solution for those who need a functional workspace but have limited room.
It's a great concept with space-saving features, but the absence of precise measurements and instructions is a letdown. If you're up for a challenge and enjoy improvising, this might be a fun project to tackle.
14. Simple DIY Workbench by Popular Mechanics
The plan starts off by emphasizing the simplicity of the design, using ordinary construction lumber, lag screws, dowels, and threaded rods. It's great for those on a budget or looking for a straightforward build.
One of the highlights of this plan is its flexibility. It encourages customization to suit your needs, allowing you to adjust the bench's height, size, and top material.
After giving it a go, I can say that this is a fantastic addition, as it lets you tailor the workbench to your specific requirements.
The instructions provided are clear and concise, making them accessible for DIYers of various skill levels. Additionally, the plan includes helpful tips and recommendations for tools and materials, making the project more manageable.
15. Simple Workbench by Octane Press
This plan promises a simple and sturdy workbench that can be built in 2-3 hours. The construction-grade pine lumber used in this plan keeps the cost down, making it an affordable option.
The instructions are straightforward, and as mentioned before, you won’t have to spend a ton. The plan includes a detailed cut list and provides tips on using the right tools, such as a circular saw and a cordless drill.
It offers a simple and sturdy design that can be customized to your needs. The detailed instructions and affordable materials make it accessible to DIYers of all levels.
16. Tablesaw Outfeed By WOOD Magazine
This workbench plan offers some impressive elements that make it stand out. It sits ¼" lower than a table saw, which makes it usable as a table saw outfeed table.
Another great aspect is the inclusion of drawers that slide out from both sides of the bench, providing easy access to all your stored tools and materials. It's always a bonus when a workbench offers ample space without sacrificing functionality.
The plan provides clear instructions, accompanied by helpful images, making it easy for both beginners and seasoned woodworkers to follow along.
From creating the end frames to drilling the mortises, the steps are well-explained, ensuring a smooth and enjoyable building experience. It combines practicality, functionality, and ease of construction into one fantastic package.
17. Knock Down Workbench by Woodcraft
The design of this workbench revolves around a bolt-together frame. The joints are secured with hex bolts, making them accessible to anyone with basic supplies. This design not only works well with hardwood but also with cheaper construction-grade lumber.
The plan provides flexibility in choosing the dimensions of the benchtop based on your intended use. It does provide guidance on calculating the frame size and the length of the stretchers.
You have the option to choose either soft maple or glued-up hardwood for the legs. Overall, this free workbench plan from Woodcraft offers a simple and sturdy solution for those in need of a reliable work surface. The design is well thought-out, and the instructions are clear and detailed.
18. DIY Kids Workbench by Fix This Build That
This kids' workbench is designed to be a functional and safe workspace for your little ones. The plan includes constructing a shelf beneath the work surface, perfect for storing tools and supplies. The materials required for this project are also easily available. Plus, there's a pegboard on the back for easy tool organization and cleanup.
What sets this plan apart is the use of hidden pocket hole joinery. This not only makes the construction quick but also adds to the overall attractiveness of the workbench.
After a thorough inspection of the plan, I am really impressed with this one, as the clear instructions and detailed diagrams make it easy for even a beginner to follow. The design is practical and safe for kids, and the use of pocket-hole joinery is a smart choice.
19. Classic Workbench by Allcrafts
This free workbench plan is suitable for someone looking for a traditional European-style workbench. It features both front and end vises with dog holes in the top. It can be constructed with dense hardwoods such as ash or oak.
The plan includes a recessed tool shelf, and you can adapt it to your needs. It also includes clear pictures and helpful instructions to assist you with the process. It is suitable for someone with basic woodworking skills. Overall, the plan is well-written and easy to follow.
Can a workbench be used with power tools?
Yes, a workbench can be used with power tools. It provides a stable and secure surface for operating power tools such as drills, saws, and sanders. Just ensure that you have enough space and a sturdy work surface to safely use the power tools.
How long does it take to build a sturdy workbench using free plans?
How long it takes to build a sturdy workbench using a free plan can vary depending on the complexity of the design chosen and your skill level. For a basic workbench, it can take anywhere from a few hours to a full day to complete the construction.
Are traditional workbenches suitable for beginners?
Yes, traditional workbenches can be suitable for beginners. These workbenches often use basic woodworking techniques like butt joints and are designed to be simple and functional. They are a great starting point for those new to woodworking projects.
How much storage space does a mobile workbench provide?
The storage space a mobile workbench provides can vary depending on its size and features. Workbenches with built-in shelves, drawers, or storage compartments offer more storage options, allowing you to keep your tools, supplies, and materials within reach and organized.
Are pocket holes used in basic workbench construction?
While pocket holes are not commonly used in basic workbench construction, they can be incorporated into the design if desired. Pocket holes provide a strong and concealed joint, which can be useful for attaching certain components or joining pieces of wood together. However, traditional workbenches often rely on simpler joinery techniques like adhesive, screws, nails, and butt joints.
Can a folding workbench be modified to include locking wheels?
Yes, a folding workbench can be modified to include locking wheels or casters. By adding locking wheels, you can enhance the mobility of the workbench, allowing you to easily move it around your workspace when needed and secure it in place when working on projects.
What are the benefits of a flip-top workbench?
The benefits of a flip-top workbench stem from its unique design that features dual work surfaces on one bench. With an integrated rotating mechanism, it facilitates seamless transitions between different surfaces or tool stations, making it extremely versatile. This design not only enhances workspace efficiency but also makes it highly functional and capable of managing various tasks or tools without requiring additional space.
These free workbench plans offer us an opportunity to embark on a woodworking adventure. They not only provide a blueprint for building a practical and functional workbench but also ignite a spark of inspiration and creativity.
The process of selecting the perfect design, envisioning the possibilities, and carefully crafting each detail is a true labor of love. As you follow the instructions and witness the pieces coming together, a feeling of accomplishment will fill in the air. The fact that you are not just building a workbench, but creating a space for yourself where your creativity can flourish, is truly inspiring.
As the workbench takes shape, it will become more than just a piece of furniture – it will become a symbol of your capabilities.
Hi there! Congratulations on starting this wonderful journey as a parent!
We know. Parenthood is that one journey of life where you realize that your life is finally evolving from the chaos and into an order-driven family life. But, it is also the moment you realize that you’re just about to enter into a brand new spectrum of chaos where making sense of the rapid changes becomes harder and putting everything into order is a conscious choice more than ever.
An extension of this is organizing your baby’s essentials in your home, both for the sake of reaching to them quickly and also for safeguarding them from being misplaced or dirtied. From closets to drawers, compartments for different baby stuff come in all shapes and sizes. The following tips are there to help you through just that little problem of choosing the one that fits your needs.
Baby Clothes Organizer Designs
Label The Drawers
One of the simplest ways to organize your baby’s clothes, and a lot more, is to label the drawers with paint. You can use the standard chalkboard paint or can try something else. With stencils or without them, label the drawers with adorably accented fonts that will not only help you put things where you intend to but also add an extra bit of cute appeal to the room.
Moreover, as your baby grows, he or she will learn to be more appreciative of it. And for that reason, you can even make line drawings on the drawers.
Even if your visit is nothing more than window shopping for cool ideas, strolling through the aisles and floors of IKEA is always a rewarding experience. People of any age are delighted by looking at the picture perfect life-size models of what IKEA would want you to call home.
And perhaps, IKEA would shape the vision of your baby’s ideal home. There are several options for you to choose from when it comes to picking a closet, shelf or cabinet for your little one’s essentials. Ranging from different colors, patterns, and designs, IKEA’s easy to assemble units are the building blocks you might need to organize your new one’s life.
Sometimes you are resigned to accept the fact that you cannot create additional space for a new closet. The house, though large enough for your baby’s wondering eyes, is too small. What to do and where to store? Well, right behind your existing closet’s door.
By adding small compartments, similar to the ones in your refrigerator, vertically on the inside of your closet door(s), you’re making use of space that has gone unnoticed. It gives you enough leeway to add a row full of compartments to store various things that your baby requires on a daily basis.
Just fling the door open and pick and choose everything at an arm’s length.
Whenever there’s a new precious life brought into the world, parents are often saved from being overburdened on the shopping side. After all, almost everybody around you has been a parent, whether recently or a long time ago, and they have a lot of things from their nursing time that they need to give away. And that’s where you come in! Or more like they come knocking.
So, what do you do when you have an assortment of clothes for your baby, ranging in sizes and types? Do you dump them in a suitcase? No! You file them in the closet using labeled dividers so that you knew when to make use of what. Makes for adorable baby closet pictures too.
With a baby comes a plethora of expenses and even if you want to make your baby’s room look the best in the world, the reality is sometimes you are forced to compromise on wishes and focus on buying stuff based on priority.
A fancy clothes storage unit is certainly not one. In this case, you can get a cloth made hanging closet until to install at the back of the door. It is originally used as a clever space-saving option to keep shoes, but it can definitely work for your baby’s essentials too. Lined with several vertical cloth pockets big enough to fit baby shoes, clothes, diapers, et cetera, this one’s an affordable fix to get you out of the jinx.
An alternative to the shoe closet is fishnet nailed behind the door. You can cut and stitch fishnet into small pockets to fit behind the door, against a long cloth piece.
The wire is a flexible material that comes in handy for just about everything. Need to shield your windows? Grill it up with wire. Draw a fence around your garden? Wire again. Need to create compartments in your kitchen? Wire to the rescue. And in the same vein, wire helps your baby too!
Mounting cabinets made out of wire onto walls saves both space and money and with some creative thinking also works as a decorative installation. You can paint the wire mesh in single or multiple toned colors, add cute little animals, soft toys, flowers and the ilk to make them look more appealing. You can also shape the wire cabinets in different shapes, and not just the boring rectangle. Stars, oysters, eggs, boats, planes, whichever shape seems best to you. Additionally, you can create spirals and ramps to roll down the baby stuff from the cabinets for that extra bit of peppiness.
Are you having trouble keeping all those adorable baby shoes in one place? Worry no more! This simple do-it-yourself technique is your solution. A simple suspension rod and some curtain rings fitted in your closet or a rack make for cute little shoe hangers, arranged in pairs and more categories.
Apart from shoes, you can also hang your baby’s small soft toys if you worry they’ll get dirty or your pet’s going to use them as a plushie for biting.
Your baby’s going to do a bit of traveling in your house while growing up, either in a house on wheels cradle, a pram or a baby walker. Why not give your baby a portable home for the essentials too?
Not only does it serve as a more flexible replacement for a big, burly compartment, it also helps you get the emergency stuff with ease. Moreover, if you’re too busy working or watching something on the telly, you don’t need to pause and get up or miss out on a scene.
A trolley comes with a few handful compartments, some of those can be retrofitted for disposable purposes too.
Need something simpler than a wire basket or a shoe rack, and also something that can be installed in different areas of the house for whenever there is a need? Hooking up knitted baskets to wall hooks helps you organize everything from diapers to shoes to clothes to toys in the right corners of your home.
With a little more work, you can even create a portable hanging closet for the nursery. Attaching ropes just below the ceiling and hanging knitted baskets with string and hook, you can slide them to wherever your baby needs the stuff crawling around the room. Dolling the baskets will only add to the charm. Perhaps, a little-stuffed monkey hanging by one basket while a parrot perches on another?
Perhaps you are slowly turning into those parents who do not have anymore requirement for baby clothes that your baby has outgrown, or you need to dump away stuff that needs serious washing, but you just don’t have time for laundry. Getting long, cylindrical and colorful plastic baskets for the castaways, kept at the bottom of the closet or a comfortable corner of the room, labeled and dressed up, is the option to go for.
At the end of the month, you can donate the clothes and every weekend wash those that you need to use again.
Drilling and attaching planks full of pegs to carefully decided locations of the room helps in hanging baskets and bags, of clothes, diapers and more, strategically.
You can also add pegs to the closet door, either vertically or horizontally, to once again use the unused door space for your baby.
Wicker baskets feel good on touch, look organic at first sight, and blend in well with just about any decor they are surrounded by. They also are sufficiently spacious to accommodate different essentials. Wicker baskets can be hung by hooks below shelves, filled with soft toys, socks, towels and diapers, and yes books.
Larger sized wicker baskets can be customized too. You’ll have to pick a few items at the hardware store, like skateboard wheels and a couple of small pallet planks to create a wicker basket trolley.
What if you took a few baskets, doesn’t matter if they’re made of wicker, wire or plastic, and fit them horizontally on the wall? You can use baskets of different sizes for different needs, arrange them as a compound of shelves on the wall in any design. They’re easier to keep clothes and other items in, without you having to dip your arms down the baskets or perching to peek into them to find what you need.
They’re also a stand out in the room and like everything else, can be decorated with toys or even small pots and vases on the top side.
Babies are cute and cuddly little bundles of joy, but they require a lot of things to catch up with the ever-expanding world. Books, in this regard, are the most trusted of friends they can find. Books on the English alphabet, books on simple science, drawing and coloring books, picture books, animal identification books, fairy tales, and much more. You really do need space to store.
Cubbies are space savers, decoration pieces, comes in a number of colors, can be used as tables and benches, and are very customizable to make as many compartments as possible. They also are open to experimentation in regards to the alignment of the cubes, leaving you with interesting options to implement.
Available as do-it-yourself compartments at IKEA and also easy enough to make from scratch with your own two hands, cubbies are ever green companions for your babies.
Just like your daily planner helps you note down everything you need to do on a daily and weekly and monthly basis, organizing everything based on the time of the day, day of the week, and type of clothing makes it easier to pick and choose regularly.
You can label drawers with the seven days of the week, and with separate sections for both indoor and outdoor wear, wherein you can further customize the daytime wear and nighttime wear, and the type of clothing. Having one closet with several such levels of cubbies and drawers and hangers make it much easier for you.
Additionally, instead of folding the clothes in neat rectangles and adding to the space, you can roll them up like spring rolls to fit more in less. Moreover, categorizing clothes by length, instead of the given size, is a logical way for organizing.
Which idea seems best to you? Do you have some additional input on the options given? Perhaps you can make use of more than one, or four, depending on your needs and affordability. Remember, planning your baby’s organizer is a one-time hassle, and once you’re past the trial period, everything becomes a lot easier to manage.
You can always make your own drawers, baskets, and closets or mix and match a bunch of them to add more value for money and material.
May you have all the good luck with this endeavor and happy parenting!
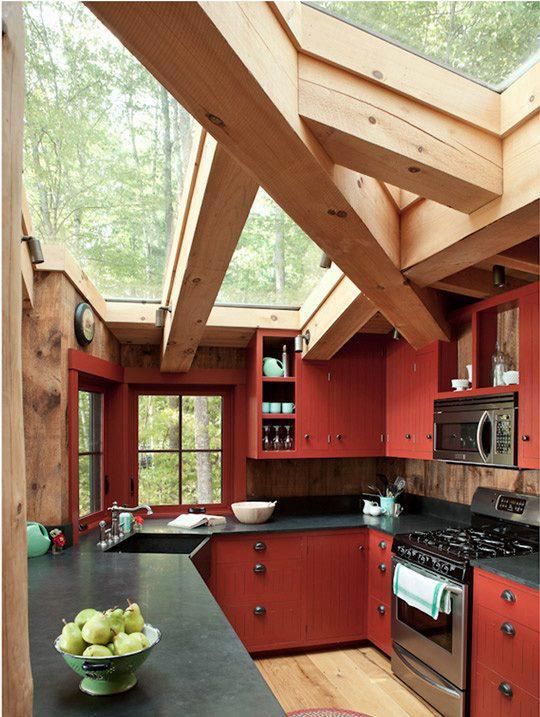
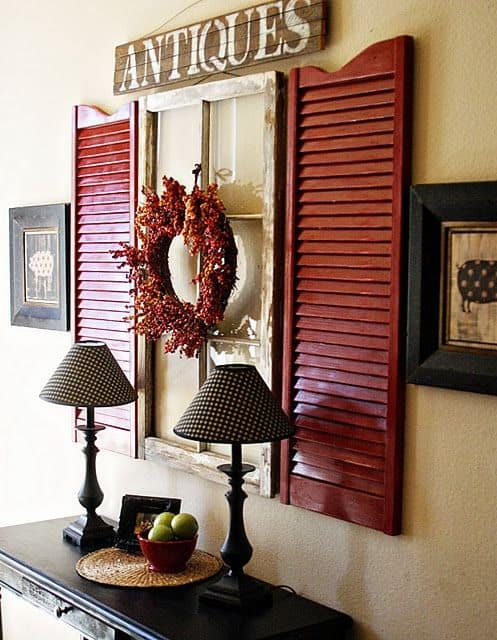
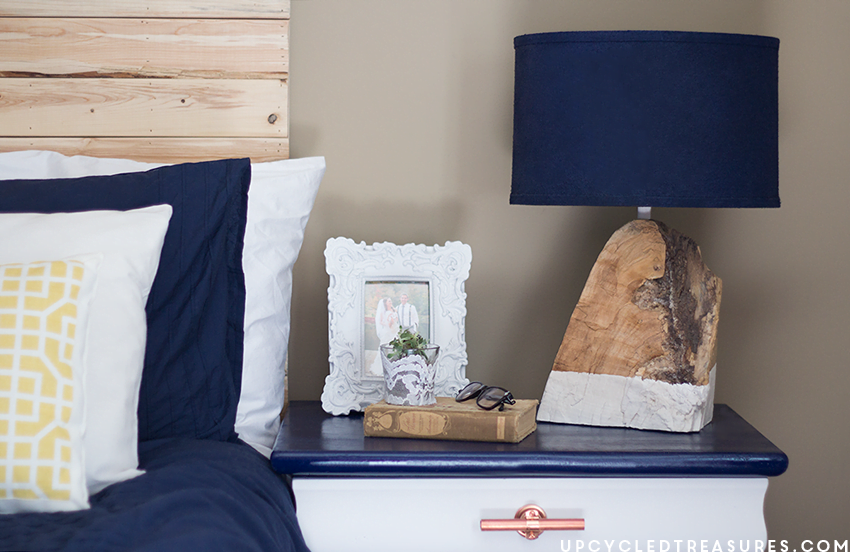
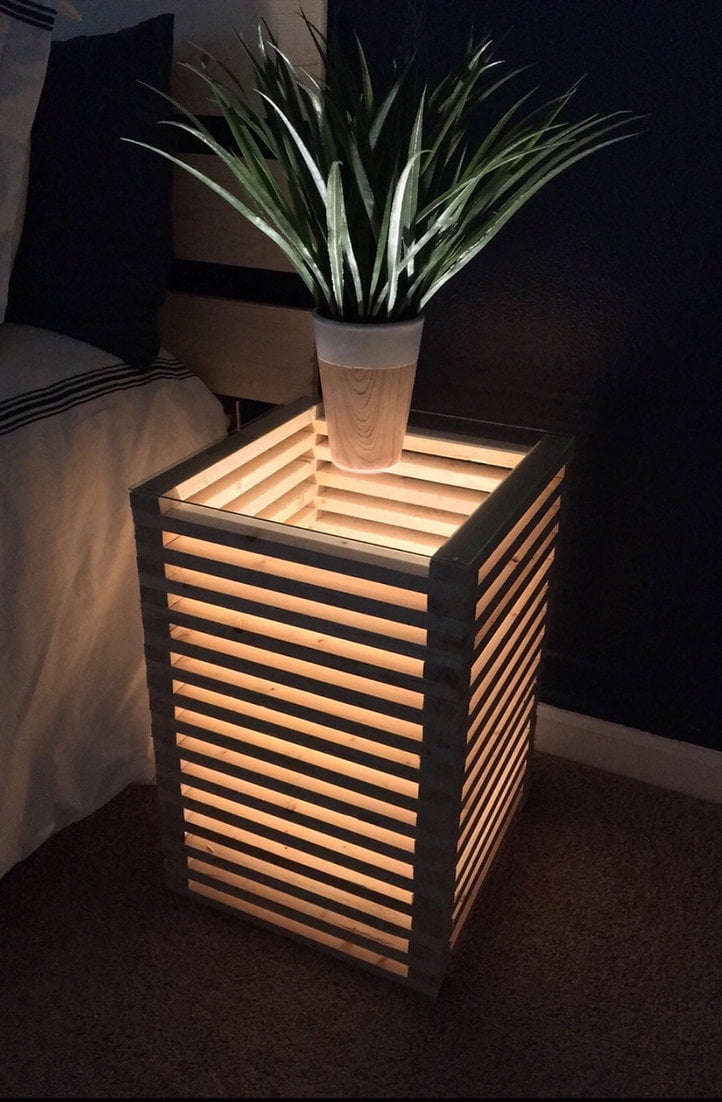
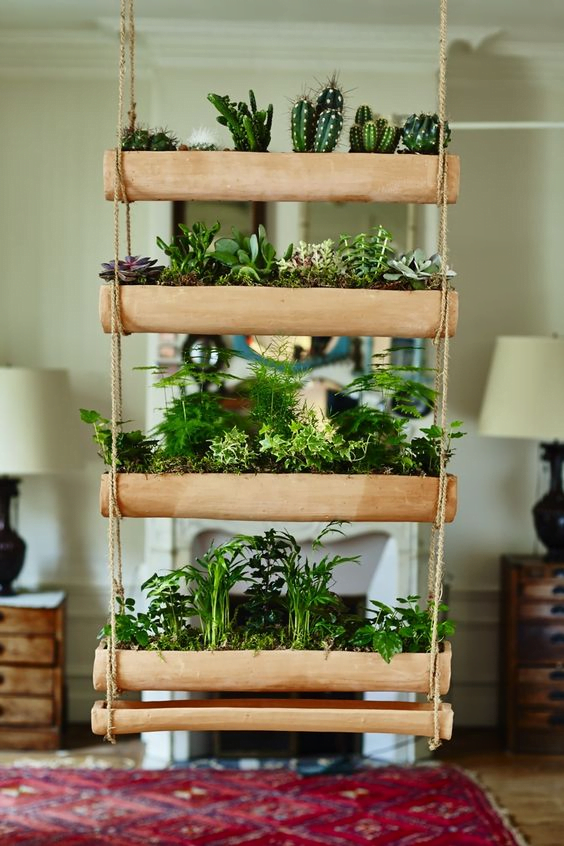
Pallet wall ideas offer a budget-friendly, creative way to add character, warmth, and texture to any space using upcycled wood. From rustic feature walls in bedrooms to statement backdrops in living rooms or DIY garden dividers, wood pallets are among the most accessible materials for transforming interiors and exteriors alike. Their versatility allows for everything from clean modern accents to farmhouse charm, and the natural variation in tones and grain adds unique depth to any wall treatment. Whether you’re repurposing reclaimed wood or using pre-finished planks, pallet walls can be tailored to suit a wide range of aesthetics. And if you're also interested in improving room acoustics alongside visual impact, consider pairing your project with proven strategies like those in our guide to soundproofing existing walls. In this roundup, we’ve curated 50 inspiring pallet wall ideas to help you refresh your home with low-cost, high-impact style.
Create a rustic-inspired bedroom by installing pallets of plank on the wall. This is a great way to spruce your plain-looking walls!
You can choose between installing the wood planks on only one side or all four. We recommended starting with only one side to see if you love what it looks like.
If you've got extra wooden pallets lying around, turn them into a geometric pallet wall. You only need a few leftover pieces and a geometric pattern to build.
All you need is a solid vertical base to attach your pallets. This will instantly add a rustic charm to your room.
Transform your living room into a page straight out of a magazine with this cabin-inspired look. Create a pallet wood wall for your fireplace and watch it come to life.
You can use different colors of wood planks. But darker shades generally look great for that rustic and cozy feel. Add in your favorite lights to complete the look!
If you aren't using your garage at home, consider transforming it into your man cave. Start using wooden pallets on the walls, and add your favorite art pieces!
Your pallet wood wall will look outstanding! We're sure you'll wow your friends with this DIY wall.
Believe it or not, pallet walls also look great in a children's room. It won't look out of place, and we're sure your child will love having wood walls.
Wood pallets are perfect for creating a pirate-inspired bedroom many kids dream of having. Get your kids to build it with you, and enjoy the moment!
This is a good break from the usual fairy-tale bedroom décor you've been looking at.
Whitewash your wood pallets to create a modern-looking wood pallet wall in your house. You don't have to stick to the usual shades of brown!
This is one of the clever ideas to brighten your home, even while you're using wood. You don't need to worry about your pallet walls looking brown and boring.
Surround your window with beautiful wood planks. The brown wood shades greatly contrast the light that comes through your bedroom.
You don't have to worry about choosing the same wood shade for your pallet walls. The charm of it is with the different shades, each having its personality.
Another wood pallet creation is this multi-colored pallet wall. If you're bored of the usual shades, painting over them helps.
You can choose your favorite color and make them pop on your wall! In the alternative, you can choose different colors of wood if you want to avoid doing some painting..
If you're looking for a portable privacy screen, this wooden pallet craft is a great place to start.
You can customize the height and width depending on how much you want to block out! You can easily wheel this screen behind you whenever you need some privacy.
Bring nature into your room by crafting this wall garden out of wood planks. You can choose your favorite indoor plants to grow!
Consider this your mini planter at home. Ensure the slots are large enough to hold your soil or moss in. You don't want soil spilling all over your floor.
Start the fall season by crafting this awesome pallet wall decoration. This is one of the great ideas you can do with your kids to excite them for the holidays!
You can choose different shades of orange for a beautiful and vibrant-looking pumpkin. Nail it on your wall, and viola!
If you still need a headboard for your bed, consider making one out of wood pallets.
This headboard is so easy to put together. All you need are a few ideas to get you started. You can also cover the planks with a shade that fits your room's aesthetic.
We love installing hanging shelves in our house because it gives us an extra place to put our mementos. We can display all our special pieces for everyone to see!
This is one of the best pallet wall ideas where you can get creative minus the cost! Build the shelves in your bedroom or even in your hallway!
Consider this wooden planks-inspired wallpaper if you aren't ready to go all in. It gives the same illusion as the real thing, perfect for those who can't decide yet.
You don’t need to use nails and studs anymore. However, keep in mind that sticking the wallpaper may take some time.
Create this wood pallet wall vase with a few easy steps and materials! All you need is a small wood pallet you can hang on the wall.
Add a small vase to place your favorite flower, and your room will look much better. You can incorporate this in your hallway or anywhere in your house!
Trade your old wall clock for this DIY pallet wall idea. It's a great DIY project you can do with your kids.
The only problem you might experience with this project is building the clocking mechanism. But don't worry because there are ready-made ones you can install.
One of the reasons why we love using pallet wood is we can stain it according to the shade we want. Doing this helps us find the perfect pallet shade for our DIY projects.
You can play around with the different colors for your next decorating project.
Complete your outdoor project by making a shed entirely out of wood pallets. This is one of our go-to wall ideas because we can utilize our pallet wood properly.
Just make sure to use sanded pallet wood planks to give the entire wall a nice and smooth finish. You can even paint it over with a plain-looking varnish and a water-resistant top coat.
Another awesome wood craft you might be interested in is this wood pallet frame. It only requires a few pallet pieces, which you can get for free.
The beauty of this project is you can craft the frame in nearly any shape and design you want. Just make sure to attach its pieces and add your favorite picture!
Wooden pallets can be cut into small pieces and repurposed as picture holders. This project is perfect for people who don't want to cover their walls with pallets.
You can paint over the pallet wood, depending on the color of your room, to match it. Hang it to your walls, and you're done!
A full wood wall office looks great because it has a cozy and professional-looking finish. This is the most loved interior improvement project for crafty people.
Finish off your interior with your favorite pin lights, and you've got an amazing-looking space.
Use wooden pallets to create a rustic-inspired TV wall. This simple DIY project will take you only a few days to complete!
Just make sure to screw the boards in properly to prevent them from falling over your living room.
Conclusion
With dozens of creative pallet wall ideas to choose from, we hope you’ve found the perfect inspiration to add warmth, texture, and personality to your space. Whether you're leaning into rustic charm or aiming for modern minimalism, wood pallet walls are one of the most affordable and impactful ways to upgrade your interior or exterior. But why stop here? There’s a whole world of pallet DIY waiting for you! From building your own cozy pallet swing or pallet fence to assembling a stylish pallet bar for your backyard or even trying your hand at seasonal decor like pallet Christmas trees, the possibilities are nearly endless. You can even go big with pallet garden ideas or create comfort with recycled pallet bed frames. And if you’re open to other natural materials, don't miss our guide to DIY bamboo projects for even more sustainable inspiration. Be sure to check out our full library of pallet projects and let us know in the comments which ideas you’ll be trying next. Happy crafting!
A simple Google search can find you thousands of sources of used pallets and a trip to your local home improvement store will most likely be a successful one. Today, the wooden pallets are properly the most common item used in outdoors recycling projects that vary from sofas and armchairs to vertical gardens and small tool sheds. Indoors smart recycled pallets have gained ground with each day as well, the great quality of natural wood at a small or nonexistent price being a triumphant factor in the recycling process making the pallet viable for different organizational ensembles, small desks or inexpensive graphic beds and many many other high quality diy projects.
We are thrilled to say that Homesthetics is being host to innovative recycling ideas everyday, massively improving our library with curated data all around the web everyday. Today`s article features 21 smart pallet diy projects that we have found simply inspiring; craft away!
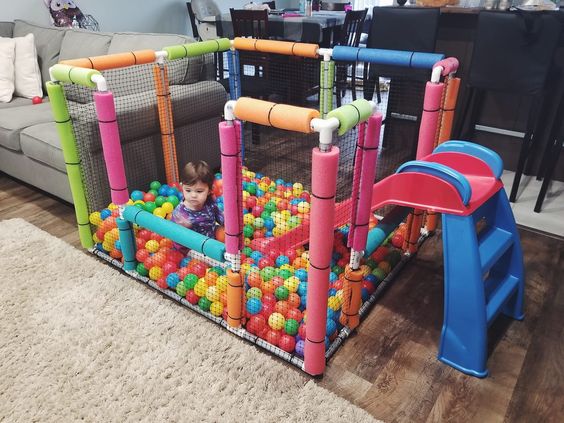
Recycled Pallet Crafts
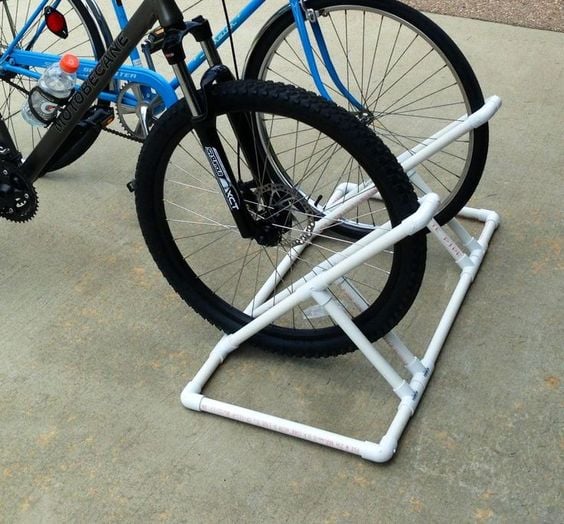
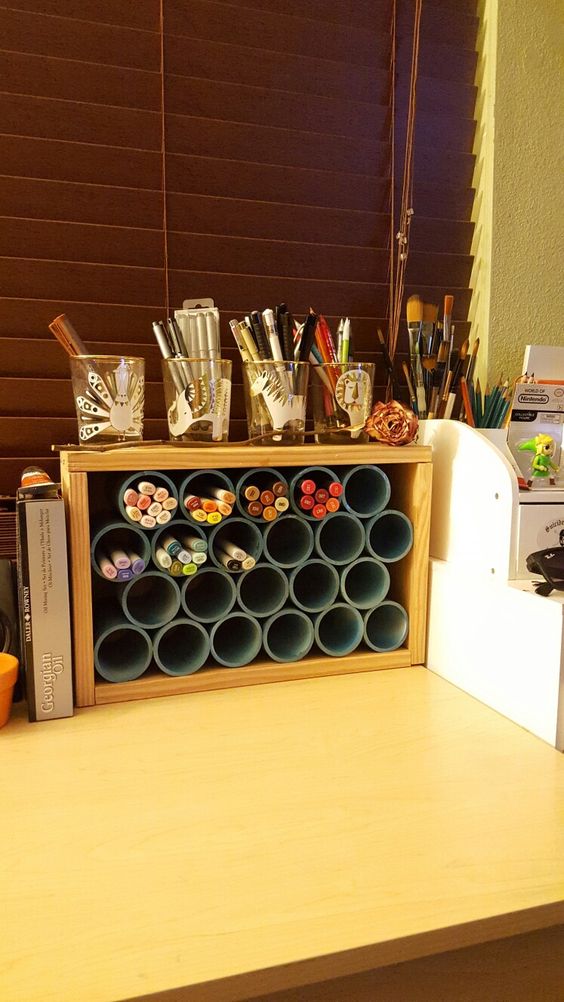
#1 Vertical Garden Planter
#2 Wooden Pallets Storage Box
#3 DIY Wall Art Deer Head Silhouette
#4 DIY Wall Art Showcasing Your Favorite Trip
#5 Small Key Storage
#6 Great Small Wooden Stair Fence
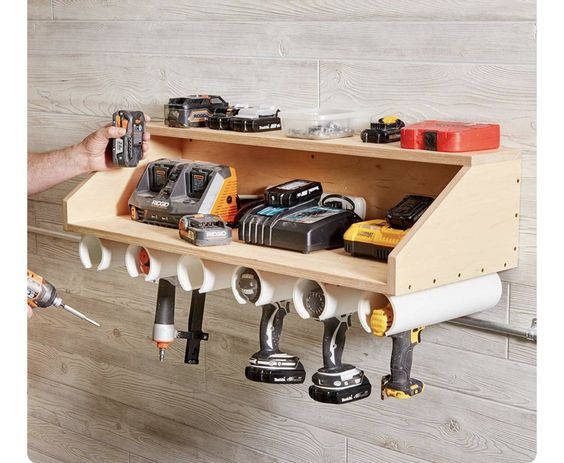
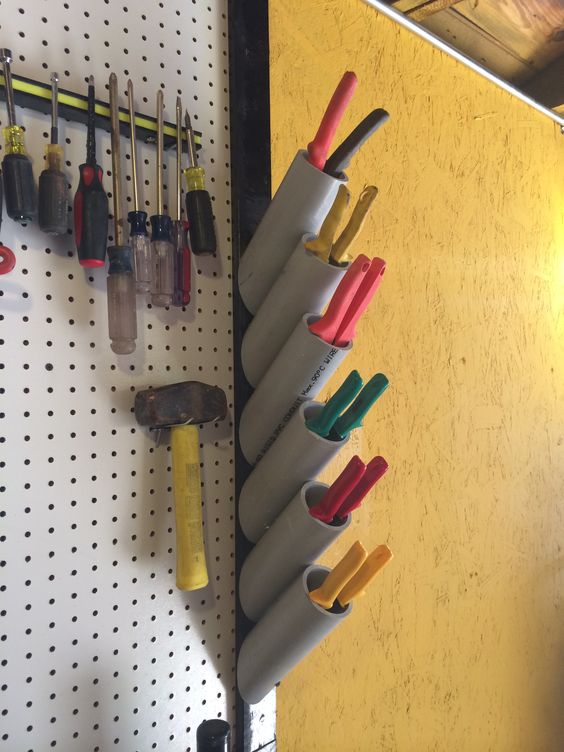
#7 Insanely Useful Storage Options Realized Out of Recycled Pallets
#8 Wooden Pallet Bathroom Storage Ensemble
#9 Small Hallway Entry Side Table
#10 Vertical Planters and Patio Flower Pots
#11 Recycled Wooden Pallets Swing
#12 Pallet Wall Art Craft That Uses Shape Tape
#13 Sustainable Christmas Tree Option
#14 Garage or Shed Organizer
#15 Graphic Vintage DIY Headboard
#16 Kitchen Vertical Storage
#17 Creative Vintage Looking Light Fixtures
#18 Garage or Workshop Organizer
#19 Small Patio Swing
#20 Scandinavian Like Patio Welcome Sign
#21 Dart Wooden Pallet Organizer Protecting Your Walls
We would love to hear your valuable feedback in the comment section below. More articles containing recycled pallets inspiration can be found below :
Most of us are all too familiar with glue, especially the ones we used for school projects. But not many people know about the different types of glue out there.
Glue is one of the oldest-known substances available to man. In fact, there are several instances of natural glue-like substances in the world - from tree sap to manmade glue created by mixing the bone extracts of animals with other substances.
In our modern world, we use a highly processed version of glue that is mostly made in factories. It is still required for everyday jobs like carpentry, plumbing, shoe-making, and many others.
In this guide, we will dive into the different types of glue you can find today. We will also talk about the uses and popularity of these glue variants.
So, without further ado, let's begin!
Different Types Of Glue
We don't usually think about glue on a daily basis - that is, until we need to use it. This seemingly mundane substance is extremely useful; it (literally) keeps things from falling apart. While most of us are familiar with white glue (used for arts and crafts) and hot glue (used for more powerful adhesion jobs), there are over a dozen more varieties in the world.
White Craft Glue
When you think of the word “glue,” this is probably one of the first images you see in your mind. The white, lightweight, water-based glue is most commonly found in every artist and crafter's kit. It helps join porous materials together like paper, cardboard, sheets, and even some types of cloth.
This kind of glue has almost zero toxicity, making it ideal for children to use. It is the most common type of glue found in schools and arts and crafts stores. Moreover, it is easy to clean up after an accidental spill. It does not stick to your clothes or even your skin in a way that is impossible to remove, thereby making it a safe option for kids.
An important characteristic of this glue is that since it is water-based, it requires at least 24 hours to set completely. During this time, the objects being glued must be kept tightly together. Once a period of time has passed, the strength of this glue can be appreciated.
That being said, most projects involving white craft glue take just a couple of minutes (or an hour at max) to dry. It goes without saying that white craft glue is not useful in applications that require water resistance.
Wood Glue
Wood glue, as the name suggests, is designed to act as an adhesive between wooden pieces or wooden surfaces. It is typically yellow and is made of the same vinyl acetate polymers as white craft glue. However, wood glue is also available in white or transparent shades if a specific kind of work requires it.
Wood glue is far more rigid than white craft glue - its inherent rigidity makes it easier to sand. It is more waterproof than craft glue, yet, it cannot be used in applications that require complete water resistance.
Polyurethane glue, epoxy, and hide glue are different types of wood glue. The various types can be used for different purposes, so it is essential to read the labels before purchasing wood glue for specific jobs. The different types of wood glues work best with specific types of wood, so be sure to research this thoroughly before purchasing.
Some of the primary characteristics of wood glue are its rigidity, superior strength, moisture resistance, and inherent gap-filling abilities. Wood glue is used to make beds, furniture, decorative wooden items, tables, chairs, etc.
Wood glue requires a couple of hours to set completely but is exceptionally reliable once set. It is a must-have for any type of carpentry work.
Fabric Glue
Although white craft glue is sometimes used to hold fabrics together, this job is better suited for fabric glue. Polyvinyl acetate (PVA) is a popular type of white fabric glue often used for mending upholstery or making clothes.
Fabric glue stays flexible even after it dries completely, making it ideal for clothes and other fabrics. Moreover, it is waterproof, enabling you to wash and launder the fabric without worrying about the glue (or pieces of fabric) coming off.
Depending on what kind of fabric you want to stick (and some other factors), there are various types of fabric glues to choose from. While most fabric glues resemble white craft glue, others come in a webbing form. These have to be melted before use. They are excellent for DIY projects and are very popular amongst people who enjoy making their own clothes or giving them a new spin.
Super Glue
Super glue is also known as Cyanoacrylate adhesive. This is yet another common type of glue that most of us have used for various adhesive projects. The glue is known to dry within seconds, or sometimes minutes, depending on the objects being glued together. However, once it is dry, it becomes transparent and is extremely rigid and waterproof.
This glue is called 'super glue' because it works within seconds and is almost impossible to 'unstick' once it is dry. Joining materials like wood, leather, ceramics, plastic, glass, and even metal is made possible with the help of super glue.
The chemical compound Cyanoacrylate is known for its quick-drying and' super bonding' abilities. When applied on two dry surfaces and held together tightly, the objects can be stuck together within seconds - and will not come off, even with extreme force or pressure.
Super glue is very versatile and is often used by individuals to glue together all kinds of objects - toys, broken handles, furniture, plastic, etc. However, it dries very quickly and can end up sticking your fingers together, so be very cautious when using it!
Hot Glue
Hot glue is most commonly found in 'guns' or 'hot glue guns' and has become a huge rage, especially on social media. Hot glue guns contain heating elements that efficiently melt a solid form of glue before ejecting it from a 'gun.' They are typically used for DIY projects and 'hacks,' hence, their rising popularity.
The 'glue' comes in the form of long, solid sticks that look like glow sticks. These sticks are inserted into the gun. On pressing the 'trigger,' the glue stick is melted and squeezed out - this can be used for various projects like arts and crafts, handiwork, wood and carpentry work, etc.
Once the glue dries up, it returns to its solid state. This is what effectively holds the materials together. Hot glue is very tough and rigid and has a variety of uses. Its ease of use, quick-drying abilities, and high strength are what make it such a popular tool. In fact, hot glue can be used to stick almost everything except metal.
One of the most unique and fascinating applications of hot glue is the ability to form patterns and textures with it. Using the 'gun' as a tool, squeeze the hot glue in patterns of your choice, adding glitter, colors, beads, and stickers to create a fun DIY item. That being said, it is not safe for children and is best used under adult supervision.
Pressure Sensitive Adhesive (PSA)
Pressure Sensitive Adhesives are found in two primary forms - glue dots and sheets. They can be used for a multitude of projects such as simple sticking or adhesive jobs (sticking notes to fridges instead of using magnets, sticking photographs on walls).
PSA is used for various lightweight objects like paper, glass, plastic, and even metal.
Epoxy
More often than not, epoxy glues are two-part systems sold as a single unit. The first part of the glue contains resin, while the second part contains a hardener. There are different types of epoxy glues available for various purposes - multi-purpose epoxy or epoxy for marble, wood, plastic, etc.
The composition of epoxy varies depending on its uses. A certain kind of epoxy works best for typical household adhesion jobs, while a different type would be better suited for more extreme or harsh outdoor environments.
This kind of glue has superior cohesive strength, and durability and has excellent gap-filling abilities. It has the ability to penetrate microscopic holes and join surfaces together with superior strength and hold. The mixture generally needs to be prepared according to the kind of surface you wish to bond. Depending on the application, the proportion of the mixture varies.
Epoxy has the inherent ability to cure fast and also exhibits a range of flexibility, making it ideal for all kinds of bonding.
Spray Glue
Spray glue is a contact, multi-purpose adhesive that is intended to be applied on large surface areas. As the name suggests, this type of glue comes in a spray bottle, making it convenient to spread on large surfaces without hassle. One of the most important things to keep in mind when applying this glue is to use it in a well-ventilated room.
Depending on the material it is sprayed on, the glue can exhibit varying degrees of bond and durability. It can be used for various household fixes, craft projects, and even office applications. The glue works efficiently with paper, fabrics, foam boards, plastic, felt, and more.
Spray glue is often used to adhere photos to foam boards; however, it can be used for various other adhesions.
Polyurethane
Polyurethane is a multi-purpose adhesive that comes in both one-part and two-part systems. The substance is used in various types of glues and adhesives but is also sold under its generic name.
This glue is marine grade, so it is completely waterproof and withstands exceptionally high tensile strength. It can be used to bond a multitude of materials from wood to rubber, ceramics, glass, plastic, concrete, and steel.
That being said, polyurethane takes a few hours to cure and build strength. Typically, it takes about six to eight hours to completely bond two surfaces. However, once it is cured, the strength and durability of the object are near impossible to break. Dried polyurethane glue can be sanded with ease.
Although this glue is extremely strong, it can be removed using various solvents like acetone and mineral spirits.
Glue Pen
Glue pens are commonly used in households as well as for children's art and craft projects. They are available in small tubes and come in a 'pen' form that is convenient to use and mess-free. Upon drying, they form a clear, transparent adhesive.
Glue pens generally come with a variety of tip sizes that allow users to fill in small or large cracks and gaps. The glue is quick-drying and leaves a clean finish once it is done. These glue pens can be super convenient for everyday adhesion jobs, but care must be taken to choose the right tip for the right job.
Glue Dots
As the name tells you, glue dots are solidified adhesives that come in different forms. You can buy them in rolls, sheets, or even dispenser forms. They are incredibly convenient to apply and are removable, making them ideal for use around the house.
These glue dots are often used for minor sticking projects - sticking photos, sheets of paper, lightweight plastics, etc. As they do not contain excessive rigidity or strength, they are not appropriate for more heavy-duty sticking jobs like sticking metal, heavy plastics, ceramics, steel, wood, etc.
That being said, you may apply glue dots on any of the surfaces mentioned above to stick lightweight objects on them (such as paper). Keep in mind that these dots are easy to remove and can only create long-lasting bonds for lightweight objects.
Many people often use these glue dots to create patterns or texture, adding dimension to an otherwise plain, mundane surface.
Glue Sticks
Glue sticks are among the most common types of glue found in most homes, schools, and art centers. They are used for minor sticking projects such as joining sheets of paper, foam, and sometimes even fabric. However, in many cases, the quality of the glue is not very high. Thus, you may find earlier glued objects coming loose after some time.
Glue sticks come in a standard, cylindrical roll and are found in most arts and crafts kits. They can be used by children safely and will not stick to the skin. It is also easy to loosen the glue by warming it or washing the surface with warm water and soap.
Rubber Cement
Rubber cement is made of elastic polymers such as latex and is typically mixed in solvents (acetone, toluene, hexane, or heptane). There are different types of rubber cement available in the market, depending on your specific requirements.
Like many other types of glue, certain rubber cement may be multi-purpose, while others may be designed for specific materials only. This glue is a type of drying adhesive, which inherently gives it the quick-drying property, fast-evaporating and solidifying on drying. Once it dries, it can form a rigid and tough bond that is flexible.
Glitter Glue
Glitter glue is immensely popular amongst children, thanks to its colorful and glittery appeal. It is most commonly used in arts and crafts projects by kids but can also be used by adults to tap into their creative sides. This glue typically comes in liquid form in tubes, which can be squeezed and applied on any surface.
Glitter glue is quite similar to glue pens in the way that they are used. On drying, it leaves a semi-translucent, glittery, and slightly colored appearance. However, these glues may come in a metallic finish as well, making them very versatile and ideal for DIY projects.
The slender, cylindrical packaging makes this glue very easy to handle, especially for children. It dries quickly and is generally nontoxic. The best part about this glue is how easily it can be removed using any common solvent. In some cases, the glue can even be peeled off.
Although glitter glue is very cheap, it is easy to make at home using ordinary craft glue. Mixing colors and glitter in a container will create glitter glue effortlessly. It can be a fun project to make the glue at home with kids, and using the glue is even more fun because of its vivid colors.
The Right Way To Apply Glue On Any Surface
Although there are more than a dozen types of glue, their applications are relatively similar. Depending on your project requirements as well as your budget, you can purchase different brands and types of glue. Here are a few things you need to know about correctly applying glue.
Clean The Surface
No matter what the surface is - paper, wood, plastic, etc., it is imperative to clean it before you begin. Any dirt, dust, or moisture on the surface can inhibit the glue from bonding properly and sticking to the two surfaces. Moreover, if there is dirt or stains on the surface, and you use transparent glue, the dirt will show up underneath, ruining the aesthetics of your project.
Keep A Cloth Or Cardboard At Hand
No matter how careful you try to be, accidents can happen. Glue can be very messy, especially the kind that is quick-drying. Ensure that you keep a disposable cloth or a piece of cardboard at hand when you are working with any kind of glue. This will help you clean up any mess you make.
You can also keep a solvent close to you to use in case of accidental spills on your skin or clothes. Fortunately, most glues will come off relatively quickly with the help of a suitable solvent.
Work In A Well-Ventilated Room
While many types of glue (such as craft glue) are safe to use in a closed room and are nontoxic, others may not be so. It is best to work in a well-ventilated space when working with glue so that you don't breathe toxic fumes.
In case a child is playing with glue for DIY projects, it is crucial always to keep them under adult supervision. Children are prone to putting glue in their mouths or getting it on their hair and skin. Although it is not hazardous, it can be challenging to remove the glue from their skin and hair. Ingested glue can be dangerous, so be sure to stay safe.
Read The Directions
Not many people think of reading instructions when using glue. However, this can result in mistakes if the glue is misapplied. Different types of glue (and different manufacturers) have different instructions on how to use their glue.
It is best to read the manufacturer's instructions when using any new type of glue, especially those that need to be mixed (like epoxy).
Close The Bottle After Use
Although children are more prone to making this error, many adults do it too. Often people leave their containers or tubes of glue open while using them. However, this can effectively weaken the adhesive and cause it to spoil. Ensure that you always close the lid or cap while using glue and store it in a cool, dry place when you are not using it.
Conclusion
With so many different types of glue available in the market, how do you know which one you should buy?
Well, the choice is simple. Depending on your requirements, you will have to choose between the different types of glue, while keeping their applications in mind. Ensure that you research and determine which glue is best used for specific projects to make better and long-term decisions.
We hope our guide helped you learn something new and interesting about the different types of glues. Always stay safe when using any type of adhesive and use the right kind for specific jobs.
As you are reading this article, we are going to presume you know a thing or two about drilling holes.
Forstner bits and Spade bits are extensively used for this purpose. But which one does a better job? If that is the question on your mind, then welcome to our blog.
In this article, we are going to find out which tool does a better job. Apart from taking you through the basics, we will go into the details and comparison of these two tools, the purposes they serve the best, and how they differ from each other.
We are confident that you will have a clear knowledge of both these wood-cutting tools after reading this article.
So, what are we waiting for? Let us dive right into it.
Forstner bit is one of the most popular wood drilling machines. It was named after Benjamin Forstner in 1886, the person behind the invention of this tool. Forstner bits allowed woodworkers to make big holes without the lead screw and ensured that the workpiece was not damaged. In simple words, Forstner bit offers woodworkers cleanly drilled flat-bottom holes.
Moreover, Forstner bits are designed quite differently in this day and age than they used to be. You will find a sharp tip in modern Forstner bits instead of the lead screw and a split ring design. However, the purpose remains the same.
That’s not all; Forstner bits are used in places where the drilled holes demand absolute precision and neatness. For this, they are used with drill presses. Forstner bits can also be used with hand drills to gain further precision.
Spade bits are drill bits that are famous for boring holes in wood and have also been known as paddle bits in the past. They are mainly used for rough purposes where the speed is more important than the accuracy and neatness of the hole created.
Furthermore, Spade bits tend to splinter the wood while drilling through it. As a result, it is always recommended to drill the wood from both sides to achieve a cleaner finish. Spade bits are also used for making larger holes than those made by conventional twist drill bits. They usually come in sizes ranging from 1/4 inch to 1-1/2 inch.
Differences Between Forstner Bit And Spade Bit
There are a whole lot of differences between Forstner Bit and Spade Bit. We strongly recommend you go through this part to have a detailed understanding of both these tools.
Availability Of Sizes
Knowing how to choose a wood drilling machine is not enough; you need to be aware of the sizes they come in. That said, the size ranges of the tools mentioned above vary greatly. Forstner Bits come between 1/4 inch and 2-1/4 inch, whereas spade bits come mainly between 1/4 and 1-1/2 inches.
In general, however, Forstner bits give you a wider variety of options than Spade bits do.
Uses Of Forstner Bit and Spade Bit
The uses of both these products are quite different from each other. Forstner bits are used for drilling holes in hard material wood because Forstner bits are firm and solid. Forstner bits also come in handy in professional uses where the wood needs to be cut in a precise and decorative manner.
When it comes to Spade bits, they are mainly used for utility installation purposes that require drilling holes such as plumbing or drilling holes for electrical wires. Furthermore, spade bits prove to be more useful when one needs to drill a lot of holes in a limited amount of time.
Cost
All these products come from different brands, and that is why the prices vary greatly. This makes it almost impossible for us to tell which one of them is the most expensive and which one is the cheapest.
In general, however, spade bits are considered cheaper as there are no outer rims in spade bits, requiring fewer materials to be produced. Forstner bits are more expensive than Spade bits because it drills way better than Spade bits do, ensuring the accuracy and neatness it needs.
Neatness And Accuracy
If neatness and accuracy are not your priority while drilling a hole, we suggest going with a Spade bit as it facilitates drilling through the thickest of wood pieces. Also, it drills way faster than a Forstner bit. However, keep in mind that you need to take care of the workpiece as drilling it through spade bits is likely to make it prone to splinter.
And finally, if you are looking to drill only halfway through wood, we recommend going with a Forstner bit. Using it correctly with the help of a drill press will get you the neatest of cuts of the two options. A Forstner bit comes in very handy, especially when you are looking to make a flat-bottom hole.
Speed Of Forstner Bit and Spade Bit
When it comes to speed, Spade bits win the race by a mile. No doubt, Forster bits cut better with precision, but they are slow as it has a larger surface area.
On the other hand, spade bits have a lesser surface area, giving rise to less heat during drilling, leading them to be a lot faster than Forstner bits.
Winner
So, those were all the important details and comparison of the two products. But, don't you want to know which tool is the winner? Before we get to that, let us rewind a little bit and look at their differences if you are still not sure which one to choose.
Let us start with Forstner bits - they are useful in making flat bottom holes and also tend to deliver the neatest holes of the two.
Coming to Spade bits, they are the cheapest of all the two and are helpful in drilling rough holes through thick pieces of wood. Keep in mind; however, they do not deliver precision or neatness.
Keeping all the above points in mind, we suggest you go with Forstner bits because they are more efficient in cutting wood accurately. Even though they take a little bit of time and money, they are totally worth it.
Frequently Asked Questions [FAQs]
Here are some frequently asked questions about Forstner Bit and Spade Bit that need answering.
Which tool provides better results with a drill press?
Forstner Bit does a better job than spade bit when used with a drill press. Forstner Bit cuts precisely with its fine blade; it is much like a table saw. On the other hand, spade bits cut more like a chainsaw. When it comes to overlapping holes, you can drill them better with a Forstner bit.
With a drill press, the spade bits perform a lot faster, but they cannot match the versatility, neatness, and precision of Forstner bits. All these factors make Forstner the clear winner when it comes to drilling with a drill press.
Which wood-cutting tool is the most efficient?
Both Forstner bit and spade bit are efficient. However, spade bits are meant explicitly for high-speed use, and they also can be used to cut materials like aluminum and copper. Since they do not overheat quickly, they can also be used on plastic. The best part about spade bits is that they can be sharpened and even tuned up to create a cleaner cut.
On the other hand, Forstner bits are not meant for high-speed uses. They do not handle pressure very well, so you should be extra careful and use them at the slowest speeds. Forstner bits work well with drill presses because a drill press can control the downward force better.
So, while working on a rough construction, you must use spade bits, and for fine wood-cutting, go with Forstner bits.
Which wood-cutting tool cuts faster?
Hand downs, Spade bits do a better job in cutting wood faster. Since Forstner bit cuts wood precisely and accurately, they demand longer times. In contrast, Spade bits do not take as much time as Forstner bits because they have a lesser cutting surface area. They chop the wood with minor abrasion, so they have a faster cutting rate.
Which tool can drill slantwise?
Forstner can drill slantwise; the outer rim allows for that to happen. The rim blade gets stuck into the wood, which prevents any kind of movement or shifting.
On the other hand, you get only a pointy tip in the middle when it comes to the spade bit. This is why you have to apply extra pressure to ensure it does not move away from its position.
Which woodcutting tool does a better job in modifiable drilling?
While Forstner bits come in handy in drilling slantwise and precision drilling, Spade bits do a better job in modifiable drilling. A Spade bit lets you modify the form of the hole by simply tilting the sides. This adds to the customization as it enables you to sculpt a spot and even drill a very small hole.
Final Thoughts
So, that was pretty much all the details about Forstner Bit and Spade Bit. We are pretty sure that now you are confident enough to choose the best tool for wood cutting purposes. As a woodcutter, these tools are a must-have in the arsenal.
We hope this article has provided some valuable insights regarding these two popular wood-cutting tools. Each of these products performs better in their respective applications, so that is one thing you need to keep in mind before buying.
For further feedback or questions, drop a comment down below.
With that, we wish to take your leave. Until next time!
For those in the woodworking line, be it professionally or as a hobbyist, there can be moments of failure when it comes to getting a clean, smooth finish across the wood.
Either as a mistake or a natural kink in the wood itself, these holes can be a nuisance and bring down the quality of your project. To work around this slight bump in the road, so to speak, many woodworkers use either wood filler or wood putty; sometimes even both.
Both have the same purpose of restoring wood, so you won’t need to restart from scratch. They also come with their own strengths that make one an ideal choice over the other in specific restoration projects.
The two materials are hands down one of the best, if not the only, materials needed if you make a mistake or need to hide natural blemishes in your wood. Knowing what the strengths of wood putty and filler are can help you choose which one you need to add a clean finish to the project.
Wood Filler Vs Wood Putty
An Introduction To Wood Filler
Wood is by no means a flat, smooth surface when taken as is. It has a number of holes, cracks, and scratches, be it from natural wear and tears, or just a result of the conditions the tree was grown in.
These imperfections can be smoothed over with a wood filler. To better understand what a wood filler is, looking at the composition can provide insight into what situation it should be used for.
It is made of a combination of epoxy, lacquer, clay, and polyurethane. Having a combination of these materials as well as different bases gives the filler unique properties, allowing it to replicate the look and feel of natural wood.
Sawdust can be added into the mix to lend an almost seamless integration with the rest of the board, almost like the filler is a part of the wood itself.
Thus, it’s ideal for more significant blemishes and holes in the wood. As it spreads well, it gives an even finish and is almost indistinguishable from the actual wood once set.
Additionally, the filler comes in a neutral color, so it can be dyed and tinted to match the look of the wood. As it can be dyed to match the raw wood, it should be applied before any staining is done on the project to have a cleaner match with the finished product.
On the flip side, it is an excellent choice if you are short on time or want a fast fix for your project. Some variants of wood filler begin drying around ten minutes after application and dry completely within a few hours.
To sum up, wood filler is the go-to choice for any indoor pieces that need to be touched up or restored. Combine this with the fast-drying property, and it is the perfect restoration material for indoor wood projects.
Precautions When Using Wood Filler
If a wood filler is to be used on wood that has already been stained, it can be challenging to match the shade and finish precisely. However, when there is no other option, a small amount of filler should be used with the stain until it matches the wood’s finished color. This gives you the proportion of filler to stain - to match the rest of the wood filler to the finished wood.
For projects which are exposed to the elements or regular changes in temperature, the wood filler may not be a good option to use to seal cracks. As it can not expand, it will crack when the wood shifts and pulls or pushes against it due to temperature changes. Furthermore, heat will cause the filler to contract and deform the piece further.
Another point to be noted is the lack of a bonding agent in the composition of the wood filler. The compound will not be able to stick to the wood, so it needs a seal to hold it in place.
Wood filler is ideal for surfaces that are porous to allow the filler to seep in. Wood types, such as ash, walnut, and oak would be great to use with it. These wood types, when unfinished, can give an uneven appearance to the filler. In such cases, sanding the filler away once it has dried to make it flush with the surface of the wood is a quick fix.
The surfaces the filler is to be applied on can affect how well it smooths over the blemish or crack. Consequently, sanding down this surface before using the wood filler can help if the particular wood type is not cooperating with the filler.
Types Of Wood Filler
Wood fillers can have different bases to give the filler unique qualities that make it ideal for specific use cases. These qualities give the wood filler diverse application potential.
Many filter types are water-based to keep it from damaging the wood and keeping the option to dye open. It is also easier to apply, but if it is still too thick for your project, you can always add more water to thin it out more.
Other filter types have solvents as their bases. These solvent-based fillers are comparatively thicker in consistency than the water-based variants. With a thicker consistency, it is able to fulfill more heavy-duty jobs or larger cracks.
Latex Wood Filler
This water-based filler is one of the more versatile of wood filler types. As such, it is the most commonly used filler due to the easy clean-up. It is ideal for sealing raw wood to prevent any damage or water from entering the lumber and causing warps.
Epoxy Wood Filler
An epoxy wood filler is a filler that requires pre-sanding in order to have a quality application. These filters are ideal for use on unfinished wood. They will seal and bond to the wood tightly.; however, it is susceptible to becoming brittle. To combat this, you can use a sealant to protect the filler from breaking down.
Polyurethane Wood Filler
Using polyurethane along with wood filler is ideal for use on furniture. The added polyurethane in the compound mixture allows it to act as a sealant or protective layer. It keeps the wood from being exposed to humidity and moisture.
Pros of Wood Filler
Versatility
Having several wood filler types to choose from can make for a more versatile experience. Working with different materials and build characteristics does not have to be an issue. It is simply a matter of choosing a suitable wood filler type for your project.
Functionality
Another beneficial application of wood fillers is the functionality it brings. Not only is it perfect for indoor furniture, but it can also be used on any piece which is not regularly exposed to the sun or rain.
Dye Selection
Finding a perfect match to the wood’s finishing color can be challenging to find. However, the ability to dye your own filler to match any finish you have is a welcome convenience. The option to have control in customization and control of how the filler matches with the rest of the wood helps in blending the filler to the wood.
Cons Of Wood Filler
Rigid Shape
When wood filler is dried, it will harden to fill the negative space. As such, it cannot contract on itself to accommodate the wood shrinking due to changes in temperature. Additionally, if the filler is pulled by expanding wood, it will result in a crack in the putty.
No Adhesive Properties
Looking at the composition of the wood filler, no adhesive ingredients or properties are present. This means the filler needs an extra coating of a seal over it after application. The seal will hold the shape and protect the filler.
An Introduction To Wood Putty
Also known as “wood plastic,” wood putty is another common wood-filling compound used by many woodworkers.
The composition of this compound is more intricate than a wood filler to keep the compound’s ingredients from damaging the raw wood. It is advised to apply wood putty only after the project or piece has been stained and varnished.
By staining and varnishing the entire piece, it acts as a protective layer that the wood putty binds to in order to fill in the gaps and give a seamless surface.
While the actual proportion and chemicals in wood putty can change depending on the manufacturer, the base remains the same - which is oil. The most essential ingredient in every wood putty is boiled linseed oil, some colorant, and a bit of calcium carbonate.
When mixed, the putty compound becomes sticky until water is added to give it a more malleable shape. Application of the wood putty is done with a special putty knife which helps spread it evenly.
This makes it ideal for large areas as it spreads smoothly, giving a clean surface when dry. Additionally, for small areas, a simple dab will be sufficient to hide those more minor blemishes.
Wood putty does not require any extra work to be applied beyond the occasional acetone to bring the putty back to a clay-like consistency. This acetone is added in a small quantity to the putty when it has dried out.
By being able to restore your putty in the container, the shelf life exponentially increases. What’s more, you won’t have to buy more putty if it can never go bad, which in turn gives you so much more value for your money.
Adding even more value for money, the wood putty’s durability is strong. After applying it to a project, there will be no requirement ever to touch up the repair. This, along with the ability to restore putty after it has dried out, can make even a tiny tub of wood putty go a long way.
The ideal piece that wood putty can be used for is outdoor furniture. These pieces are arguably the most susceptible to getting chipped and weathered away. Additionally, as the days pass, these pieces of furniture will stretch and shrink with the ebb and flow of heat.
Wood putty is not affected by the shrinkage of the wood it is attached to. In fact, it resists this shrinkage which can boost the life of your furniture or wooden pieces. What’s more, the wood putty can negate the effects of the sun and rain in preserving the quality of the wood it is coating.
Precautions When Using Wood Putty
After the putty is spread across the cracks and blemishes, it takes a long time to dry as compared to the wood filler. There are methods for some putty to dry faster by adding in a drying agent to expedite the hardening process.
However, this drying agent is limited to a specific few putties and may not work on all types. An area where putty does not need any added materials is the adhesion to the wood surface. As it has adhesive chemicals within it already, there is no need for a sealing agent to keep it on the wood.
One of the drawbacks of using wood putty is this long dry time. While waiting for the wood putty to dry, it remains open to contaminants settling onto the putty.
Contaminants such as dust and dirt stuck to the putty after it has been dried will be evident after it has dried. These contaminants can also affect the color of the putty after it has dried, giving it a darker shade than what was intended.
On the topic of colors, wood putty is not as versatile in its color availability as a wood filler. As this putty is a pre-mixed combination, the different shades available are limited. However, there is a large inventory of colors available to choose from to find a shade that matches the wood finish you are working with.
Pros Of Wood Putty
No Sealant Required
Oil-based putty has adhesive properties within the putty itself. After applying the putty to the surface of the wood, it does not require a coat of sealant to keep its shape. The putty will hold on its own after it dries.
Durable
Wood putty has the best value for money when it comes to restoring or covering up blemishes in the wood. It can be restored to its clay-like state by adding some acetone. Additionally, the putty will not require any further touch-ups; it is durable and holds against the test of time.
Resistant To Shrinking
As evident from its alternative name, “plastic wood”, wood putty is malleable, making it an ideal choice for outdoor pieces. What’s more, the putty itself is resistant to shrinking and negates the effect that rain or sun can have on your furniture or outdoor projects.
Cons Of Wood Putty
Long Drying Time
One of the biggest drawbacks to using wood putty is the time it takes to dry after application. Due to the large window of time needed to dry completely, the putty can be darkened due to the accumulation of outside contaminants on the putty. This discoloration can offset the seamless integration between the putty and the finished wood.
Limited Color Options
Coloring putty is not possible as the ratio of chemical components is already set. Furthermore, the clay-like consistency would make coloring it yourself a difficult task.
To match different wood finishes there are a large number of shades available. However, this can backfire if the putty becomes discolored; you would need to remove the putty and apply a fresh layer.
How Do They Differ?
Now that the basic features of each wood restoration option are known, the differences between them will highlight where each shines or falls short.
Composition
Perhaps the most significant difference between wood filler and wood putty is in their composition. While the wood filler has different bases for specific materials, wood putty is largely oil-based. This difference in what they are made up of dictates the qualities that each possesses.
On the one hand, the wood filler can be mixed with sawdust to create a more natural look when applying it to a piece. Moreover, it requires a sealing agent applied after application in order to adhere to the wood surface.
The way it works is it seeps into the wood and hardens to maintain the shape of the wood. Thus, a sealing agent is needed to be applied on top to preserve the filler.
On the other hand, wood putty does not need any sealing agent as it has adhesive qualities in its composition. Similarly, it does not harden the way wood filler does; it is thus ideal to apply putty after the wood has been finished.
Dyeing
When it comes to the coloring of each, the wood filler has more versatility as it can be dyed to your convenience by mixing it into the compound. Wood putty, on the other hand, comes pre-mixed to match different wood finishes to blend in.
Drying Time
After the application of the wood filler or putty, it must be given time to set and dry. The time difference of this drying time also differs and can be the deciding factor for many when choosing which option to go for.
Wood filler will be dried within 15-20 minutes. Once fully dried it is ready to be sanded down to be flush with the regular wood surface. Wood putty takes a considerably longer time to dry and set. Often lasting several hours to even a full day depending on the size of the blemish being covered.
Functionality
As wood fillers have hardening agents, they are less flexible and can break or damage the wood if it contracts or expands due to heat. Because of this quality, it is advised to use it on pieces that are not exposed to the elements or regular changes in temperature.
Wood putty is highly elastic and can hold fast to the wood even if it changes shape due to heat and humidity. This allows them to be used for both indoor and outdoor pieces alike with no damage done to the wood or the putty itself. Additionally, it is great at resisting water and heat, making it the go-to option for retouches on outdoor wooden pieces.
Frequently Asked Questions
How long does wood putty last?
Wood putty is clay-like in nature and can be rejuvenated if it dries out while stored away. As a result, it can last for years with no problem. Furthermore, once it has been applied to a project it will adjust to the natural contraction and expansion of the wood.
What can you use if the wood filler is unavailable?
Other types of sealants are available if you don’t have access to any wood filler. Wood glue and epoxy glue are common alternatives to look for. It should be noted, however, that these may dry faster than wood filler and should be used carefully.
Conclusion
Now that both products have been briefed regarding where they work and where they may fall short or cause further damage, what is the ideal choice between them?
For those who work with indoor projects or are under a time constraint, using a wood filler is the way to go. With a fast-drying and natural look, it has no problem filling in the gaps in your wood before it has been stained.
However, if larger projects outside are what you work on, wood putty is the ideal choice. It may take more time to set, but once it is in then it is assured to stay there with no problem of cracks forming.
Whatever the project you may be working on, it is always a good idea to have one, if not both, options at your disposal. The safety net that each provides will help your end product come out looking professional and clean!
Woodworkers do not believe in wasting any part of the wood, especially if the piece is beautiful. However, sometimes, the wood can become too soft to use.
Wood stabilizing will help in using up all the parts of wooden planks, ensuring almost zero wastage. Since wood is a precious resource today, this is something that artisans and woodworkers prefer to do.
Now there is a lot of information about this process on the internet, and you might initially find it too confusing. So, we decided to create a guide for you about how to stabilize wood.
All the information regarding the types of wood and the different stabilizing methods used have been listed down for your benefit. We will begin by explaining the process in general so that you have a clear understanding of what you are dealing with.
So, grab a cup of your favorite beverage and read on!
How To Stabilize Wood
What Do You Mean By Wood Stabilizing?
Wood is not always very hard, and softwood can easily be damaged. Hence, wood stabilizing becomes necessary to ensure that they last long and remain protected from moisture. To create a stable and hardened piece of wood, you will need to inject softwood with resin.
Once you have injected it, the resin will fill up all the air pockets and gaps in between the grains in the wooden block, hardening the wood from within. You can then add a layer of resin to the top to provide a glossy layer that will prevent moisture from entering.
The Process Of Stabilisation
Before you begin the process of stabilization, remember to consider the desired hardness that you aim to achieve. For example, if you want to make a wooden toy from hardwood, then the toy could turn out to be very heavy, making it difficult to play with.
How To Prepare For The Stabilisation Process?
Some steps need to be taken before you start with the stabilization process. First of all, keep all the required materials in one place. If needed, make a note of the items needed beforehand and check the list again before beginning work. This is important as otherwise, you will have to stop work in between to find the missing material, and that could hamper the workflow.
Next, you will have to do a thorough checkup of the equipment that you plan to use. This means checking and cleaning every part so that all the dirt is removed. Dirt can cause problems in the curing process, and hence, clean up becomes an important step. Also make sure the equipment is working fine and will be able to cure the resin well.
Other than that, you will need all your safety gear in one place, which involves gloves, glasses, and an apron. Resin can spill, and it will be very difficult to get the marks out of surfaces. Hence, we will recommend that you cover the surrounding area well before starting off.
Clean your hands well and rinse off any container that you have used with the resin as soon as the job is over. It is best not to let the resin or any other stabilizing medium stick anywhere as that could then be very difficult to remove.
In case you are going to use a vacuum chamber, check the machine well for any kind of damage before beginning the curing process. The machine has to be in perfect condition in order to stabilize the wood well.
Moreover, we’d suggest keeping the tools in a place where you can access them easily. This would ensure that you have a smooth and error-free process.
How To Stabilize Wood?
With Epoxy Resin
If you are working with softwood, then using epoxy resin is a great idea to stabilize the wood. When mixed with hardener, epoxy resin will form a hard layer to cover the surface of the wood and keep it safe.
For best results, process the wood at 20 degrees Celsius. However, you should know that this type of resin will not seep into the wood, and hence, the entire piece will not be hardened.
Now before you begin working, the wood needs to be prepared, and you will have to clean it well. Ensure that there are no small pieces of wood sticking out from the sides. Then sand the top if possible to have a clean surface.
If dirt gets stuck inside the resin layer, it will look unattractive, and naturally, you would not want that. Hence, the wood has to be thoroughly cleaned before stabilizing it.
Furthermore, we will recommend wearing gloves during the entire process so that you do not get any of the fluids on your hands. Once you are wearing proper gloves, get some thinner and mix it with the epoxy resin.
Now you already know that the resin does not penetrate wood well by itself as it is thick. The thinner is needed so that it can penetrate the surface to some level and ensure that the wood hardens a little more.
With Thermal Hardening Resin
The thermosetting resin is another great alternative that can be used to harden softwood. It will penetrate the topmost surface of the wood, and the heat will soak in, hardening the entire block at once. But you will have to be careful about not letting any moisture interrupt this process.
Moreover, the wooden piece has to be completely dry before this process can begin. Since this method requires some heat to be added, you might have to put it in the oven. In this regard, we will recommend heating the oven up to 104 degrees Celsius and then drying the piece for the next 24 hours inside the oven.
This will remove all the moisture and will ensure a smooth hardening process. Remember that one of the reasons behind adding resin is to keep moisture away. Hence, you should ensure that the piece contains none of it before resin is added.
Cactus juice is another type of thermal hardening resin, which can be used after mixing with other necessary chemicals. Remember that it needs to be stored in a dry place, as otherwise, the chemical properties of the fluid might change.
Also, we will add a small tip here: when the stabilization process is done, clean all the tools and equipment with soapy water immediately. If you let the remains dry up, then they might be difficult to remove later.
With Vacuum Chamber
Another way of stabilizing wood is by using a vacuum chamber for the purpose. Now, if you do not have a vacuum chamber, then purchasing a new one is a good idea. Please select one, which will remove moisture from the wood as well as cleans the epoxy fluid. It should be able to eliminate all the organic material and essential oils from the fluid so that it is perfect for use.
Next, you will need to decide upon the capacity of the vacuum chamber before purchasing one. This is again a personal preference and will depend upon the kind of projects that you need it for.
Moving on, this method is generally used for rotten or old wood, which has been damaged by moisture to some extent.
With Wood Hardener
In case the softwood is damaged, then many people stick to using wood hardeners for the purpose. This is a transparent fluid that is largely used by wood artisans for their products.
And the major reason behind its popularity is that it does not change the color of wood at all. Instead, it will just add a transparent layer on top, which will make the wood hard and will protect it from moisture.
However, there is one problem here, and that is the wood hardener does not penetrate into wooden surfaces. That would mean that it would not harden the entire block of wood but would only protect the sides. So, it will stabilize the wood to some extent, but you may need to use some other agent for the complete protection of wood.
With Thermosetting Resin
When the resin is cured at 95 degrees inside an oven, it is known as a thermosetting resin. The wood needs to be dried completely before the process can begin. Hence, you can use the oven to dry the wood at 104 degrees Celsius for 24 hours. Then use the resin to cover the wood and the pores will absorb it slowly.
You will need dry wood, a vacuum pump, a vacuum chamber, aluminum foil, an oven, hardened resin, and a coloring agent, along with proper safety gear. Collect all the items needed and then start curing the wood.
How To Use A Vacuum Chamber?
The most common method of stabilizing wood is by using a vacuum chamber. We have divided the process into steps so that it is easier for you to understand.
Step 1| Laying The Wooden Pieces
The first step in this process involves laying out all the wooden pieces in the chamber. Now there is a chance that after laying them in place, they might float or move away. To prevent that from happening, you can use an anti-float mat. This would keep the wooden planks in place, and you can move on to the next step.
Step 2| Filling Up The Resin
Next, you will have to pour the resin onto the wooden planks in the vacuum chamber. We will recommend pouring in 15 mm and seeing if all the pieces are well soaked. You can fill it up to 30 mm so that the woods are deep inside the resin. This would ensure that the planks would soak up a lot of resin, and that would make the wood harder.
Step 3| Air Extraction
After the resin has been poured, you can close the vacuum chamber. Then the air extraction will begin, and all the air trapped within the wooden pieces will be released and extracted. Once the air is sucked out well, the resin can enter the blocks.
You will soon see the resin boiling once the vacuum chamber is closed. This process should begin right after extracting all the air. Also, make sure that the resin does not foam too much while boiling.
Step 4| Letting The Wood Sit
Once the process has been completed, allow the wood to stay in the container for a while before taking them out. Also, open the lid of the chamber carefully as it would be extremely hot.
Step 5| Drying The wood
Then you will need to take the woodblocks out from the chamber and allow them to dry. Keep them on a paper towel and let them stay in the open. While they dry, we will ask you to immediately pour the resin from the chamber into an airtight container.
You can store it in a dry place, and the resin will last for a long time. It can be used again for stabilizing wood the next time you plan the process. Also, wash all the equipment used immediately with detergent and water. They should be cleaned immediately as it would be easier to remove all the resin while it is still hot.
Step 6| Using An Aluminum Foil
Once the wooden pieces have dried, you will need to wrap them in aluminum foil. The shiny side needs to be on the inside, and the matte one should be facing you on the outside. Wrap the wood well so that the foil clings onto the wood.
Step 7| Heating The Oven
The oven has to be preheated before the wood can be placed inside. To do this, set it at a temperature of 71 degrees celsius and wait for it to get heated. Once the oven is hot, you will need to put the aluminum-covered wood blocks inside. Here, you might lose some amount of resin from the surface, but that should not cause an issue.
But if you are losing too much resin, then you would know that the surfaces had not dried well. Hence, please wait for enough time before placing the wooden pieces in the oven.
Moving on, after they are placed inside, leave them there for an hour and a half to bake.
Step 8| Removing The Foil
You can remove the foiled wooden pieces from the oven when they have been baked completely. Then you can wear your gloves and remove the foil from the wood. Now, this process can be difficult as the foil might not come off easily.
In that case, you can use a knife or any sharp tool to poke the foil. Then the foil can be pulled off from the top of the wooden pieces.
You will be able to see how the pieces have become hard, and there should be a huge difference from when they had been put in the oven.
What Types Of Wood Can Be Stabilized?
All types of wood cannot be stabilized as they do not have equal absorbing capacity. However, there are certain types of wood that come with larger pores, and these work the best. As the pores are bigger, the density is lower, making the wood perfect for stabilizing.
The stabilizing medium can be poured over the wood to make it harder and better protected. Plus, the big pores will provide more space for the medium to settle, and that would make it harder. So, the major types of wood that can be stabilized are,
Beech
Polar
Birch
These types have larger pores, and the resin can easily settle in them. That provides the final product with a good structure, and you can then use the stabilized wood for multiple purposes.
Moreover, you can use coloring dyes with the stabilizing medium, and the finished product will look beautiful. MMA can be used along with resin to get the desired color and shine. If you are confused, ask the local store, and they will tell you about the popular colors that are being bought.
However, there are some wood types that do not work with a stabilizing medium at all, and they are softwood, olive, ebony, and rosemary. These have tiny pores and an oily nature that prevents them from absorbing the stabilizing medium. Also, if the wood has a lot of tanning medium, then it will not stabilize as there are very limited empty pores remaining in the wood.
What Is Stabilized Wood Used For?
Craftsmen and artisans who work with wood often stabilize wood before using them to make items. If you are wondering what stabilized wood can be used for, think of all the things that you would use good quality wood for.
The list would range from knives, dishes, pans, bowls, frames, and other daily use objects. These need very tough wood as otherwise they can easily get damaged or break over time.
Tips To Remember
Please remember that taking out all the air from the wooden plank is essential before moving forward. The more the air leaves from the deepest of pores, the more resin can get into the spaces. That would make the wood harder and better protected against moisture or damage.
Next, keep an airtight container ready to store the excess resin from the vacuum chamber. If you are prepared beforehand, then you will end up saving a lot of resin, which can easily be used again.
Additionally, the stabilization process should be done under controlled conditions to prevent the wood from hardening up too much. While hardwood is what you require, if it is too hard, then it cannot be used for many purposes. You might not be able to cut or carve it well.
Also, hardened wood can become very heavy and difficult to manage. Imagine writing with a very heavy pen and then facing hand fatigue every now and then. So, keep these factors in mind before you actually purchase a product.
How To Stabilize Wood Frequently Asked Questions
In this section, we will be listing down some of the frequently asked questions about stabilizing wood. This should help in clearing up your queries too and hence, read through carefully.
Can Water Enter the Wood After Stabilizing?
Yes, while stabilizing fills up the pores, wood can still absorb water and puff up. This happens through capillary action, and the water stays stored inside, destroying the wood. Hence, please make sure that you keep the wood in a safe and dry place.
You could also add a protective resin layer on the sides of the wood after the furniture has been made. This would protect the wood from moisture and water to a great extent, and you do not have to worry about accidental spills.
How Much Time Will The Entire Process Take?
The time period will largely vary depending on the type of wood, the density, and the weather conditions. You can expect it to take 6 to 24 hours and hence, do not plan anything in the next 24 hours. The resin needs to cure well, and you will need to keep a watch on the entire process while it happens.
Moreover, if you are working with high-quality wood, then it can easily take 24 hours to cure well. This is because all the air needs to be pulled out and eliminated so that the pores become free. Then the stabilizing medium can fill them up easily.
However, if you are working with lower quality wood, then you will need around 6 to 8 hours for curing.
Can You Use Glue Instead Of Resin?
Yes, you can use PVA glue instead of resin for stabilizing wood but be careful with the amount. It can be too thick, and hence, you would need to add some water to make the consistency thin. The softwood can then be soaked in this mix for the night before you take the wood out and dry them.
Final Words
Stabilizing wood might have seemed like a job that is best left to professionals, but after reading this guide, you should be able to do it on your own. Just keep all the ingredients handy and follow the instructions.
If necessary, you can check up videos on YouTube to see how the process looks. We will also recommend taking the help of another person so that the work is done flawlessly.
One person can keep a note of the instructions while the other can focus on the job at hand. Having said that, it is time to wrap up as we are sure that you have a clear idea about the wood stabilizing process.
Let us know if you have any doubts in the comment section below. We will try to address them in our next guide.
Are you fascinated by resin coasters, pendants, trays, and cake stands?
Honestly, when we saw one on the internet, we were fascinated too. With different resin pigments to choose from, the creative opportunities are limitless. Moreover, you can even sell such stunning pieces online and make a few bucks.
However, working with epoxy resin isn’t child’s play. Those who use it daily to create eye-catching art pieces know how challenging it is. Along with all the necessary supplies, you must also get your hands on epoxy mold release agents.
In case you don’t know what epoxy mold release agents are, then this guide is just for you! When used properly, epoxy mold release agents will easily let you unmold cured resin pieces without any difficulty. Rest assured, both your castings and molds will be safe.
In this guide, we’ll share with you everything about epoxy mold release agents. So, let’s not procrastinate anymore and dive straight into the deets.
Mold Release Guide + Epoxy Release Agents
Why Are Release Agents Necessary While Working With Epoxy Resin?
Well, you know that mold release agents are necessary if you’re working with epoxy resin. For the novices who aren’t aware of release agents, then let us introduce it to you. Basically, release agents are chemicals that prevent materials and objects from adhering to other resin pieces.
Simply having the correct resin, hardener, and a few silicone molds isn’t enough, particularly when you’re curating art pieces to sell online. So, you’ll have to get your hands on epoxy release agents. Whether you have to unmold resin coasters or pendants, having mold release agents will let you unmold anything smoothly and easily.
However, as a rule of thumb, always remember to grease silicone molds before pouring the resin into the molds. That’s because greasing prevents the hardened resin from sticking to the molds. Note that this isn’t just applicable for smaller castings. You’ll have to use this on every surface where you’ll be using epoxy resin.
Moreover, if you make casting molds, you will have to use epoxy release agents on them too. That’s because it is important to coat the negative mold before you begin. Also, remember to go for epoxy compatible release agents.
Generally speaking, if you do not use release agents, know that all your efforts will go in vain. So, whether you’re making molds out of glass fiber mats or epoxy resin, make sure you use release agents.
With molds being completely covered by release agents, you can rest assured that the resin will not come in contact with the molds. Moreover, epoxy resin release agents are compatible with polyurethane and polyester resins too.
Which Surfaces Don’t Go Along Well With Epoxy Release Agents?
However, you must keep in mind that epoxy mold release agents don’t get along well with wood because they are porous. So, when you’re handling wooden surfaces, make sure you seal them up properly. Or, the release agent will get completely absorbed into the wood.
Along with wood, plaster and foam also don’t respond well to epoxy release agents. Therefore avoid using them on such surfaces.
Epoxy Release Agents That You Can Consider Today
Now that you know the basics, it’s time to dive into the intricacies. The market is saturated with tons of options. However, you need not worry because we’ll be discussing each of the agents in detail. So, move on and take a look.
Mold Release Wax
While searching for epoxy release agents, we came across mold release wax. As the name suggests, it comes in the form of wax. It is a chemical agent that prevents the bonding of casting material with the mold.
Generally, it is like liquid wax and comes in a container. This makes application an easy task. Simply open the container, pour the wax onto the cloth and use it to grease silicone molds. Truly speaking, we love the fact that this wax is highly versatile. And so, you can use it on any surface you want to.
Note that the cured resin might appear to be dull after applying mold release wax onto your molds and surfaces. In such situations, use a lint-free cloth to revive the shine of your cured objects and surfaces.
Uses Of Mold Release Wax
Mold release wax is compatible with a variety of surfaces. Once you’ve got your hands on it, the possibilities are endless. However, they are best suited for flat and large surfaces. That’s because such surfaces are easy to grease.
Although you can grease small surfaces and molds, we recommend sticking to large surfaces. That’s because it will be challenging and time-consuming to apply grease on small surfaces. Moreover, there are chances of missing corners or small angles.
Also, when you’re greasing a mold that has been used thousands of times, remember to clean the mold completely. To do this, use some steel wool and warm water. It will clean up all the wax residue from the mold, preparing it for the next application.
How To Use Mold Release Wax
Using mold release wax onto the molds isn’t challenging at all. Rather, it is quite an easy task. So first off, shake the container well before you use it. Since it has been sitting on the shelf for quite a long time, it is necessary to shake it properly. This will recombine the wax with solvents, thereby allowing easy applications.
Next, take out a small amount of wax with a spatula and apply it to the surface with a lint-free cloth. After you’ve applied it thoroughly, wait for a few minutes before polishing the release wax with a clean rag.
Note that if you’re greasing a new mold, you will have to apply a second coat to it. Also, there should be a gap of 12 hours between the two coats. Thus, apply the first layer and leave it overnight. However, one coat is sufficient for old molds.
Also, for those who want to give a polished look to their wax, here’s a pro tip - use a PVA release lacquer on the wax.
This mold release wax is perfect for those looking for a top-notch quality product without burning a hole in their pockets. Formulated with hydrocarbon and microcrystalline waxes, this is a multipurpose product option for all of your epoxy resin projects.
Standout Features:
1.5 lb metal can
Blend of hydrocarbon and microcrystalline waxes
Why Did We Like It?
There are many things we love about this mold release wax. However, what we really like about it is its affordable price tag, making it a convenient option for those on a budget.
Speaking of functionality, this mold release wax works great on large surfaces. Also, you may use it to seal uneven wood molds. So, it is a highly versatile product.
Additionally, we love the design of this mold release wax. Coming in a 1.5 lb metal tin, you can tuck it safely anywhere in your cabinet. And you need not worry about the container getting damaged.
Moving on, this wax comes in a 680 ml container which is decent enough, in our opinion. So, feel free to use this on silicone molds, river tables, fiberglass, countertops, and other surfaces.
Lastly, it is easy to use. Simply clean and prep the mold or surface and apply a thin coat of this wax with a clean, dry cloth. Also, make sure you rub the fabric in every direction.
What Could’ve Been Better?
Undoubtedly, this is one of the best mold release wax that we’ve come across. However, our only gripe is that it doesn’t come with a wax applicator pad. That said, we recommend you either buy one or simply use a good quality rag for greasing your molds. Other than that, this product works incredibly well.
Pros
Affordable
Versatile applications
Easy to use
Nice packaging
Cons
No applicator pad
Mold Release Spray
Those looking for a more convenient option than wax must definitely try their hands at release spray. Unlike mold release wax, it is perfectly suited for small and detailed applications. That’s because the spray reaches such teenie-weenie spaces easily. So, if you’re a jewelry designer or coaster maker who sells his creations online, then this spray is best for your molds.
With a superb combination of aerosol and wax, release spray does a decent job of adding a protective layer to your mold. However, aerosol evaporates after some time, while the wax remains.
Uses Of Mold Release Spray
Mold release sprays are best suited for molds with small and challenging edges. For instance, it would be perfect for flower pot molds, jewelry molds, and crystal shards molds. The spray tip ensures an even distribution of the release agents into the molds. So, rest assured even the challenging nooks and crannies will be covered with mold release spray.
If you’re looking for ways to take your cured epoxy objects to the next level, simply polish them to achieve a uniform and even surface. However, this depends upon the preference of the users.
How To Use Mold Release Spray
First off, you will have to remove all dirt, grease, oil residue, and other impurities from the mold. Generally, cleaning the mold is important no matter which release agent you will be using. That’s because impurities will hinder release agents, thereby preventing them from adhering to surfaces.
Also, once cured, these impurities will damage both the mold and the casting. So, after cleaning the molds, shake the can of the release spray properly. Next, with a distance of 20 cm to 30 cm, spray over the surface of the mold. Spray only a thin layer, and remember to do this carefully.
Moreover, you must take care to cover every part of the mold. When you’ve completely sprayed the release agent all over the mold, wait for a few minutes. If you wish to polish the surface of the mold, then do so. Use a lint-free cloth, and you’re done. However, polishing is optional.
Note that if you’re using a new mold, it’s important you treat the mold with release spray at least three times. Also, you must leave the molds overnight after each spraying session.
Looking for a good epoxy release spray to prolong the life of your expensive molds? Check out this silicone mold release spray. Suitable for a wide variety of applications, this mold release spray is a fast-drying one. So, get one for your DIY epoxy resin projects and make coasters, crystals, flowers, and anything you want.
Standout Features:
Meets FDA-regulation
Excellent lubrication
Why Did We Like It?
The most striking thing about this spray has to be its versatility. From blow molding to injection molding, this spray is highly functional. Plus, it is compatible with both hot and cold molds.
With its 3.5 silicone content, this mold release spray adheres perfectly to your molds. Also, it is a fast-drying one. So, you won’t have to wait long to apply a second coat. Plus, it is non-staining and non-corrosive. Thus, when it comes to this epoxy release spray, your molds are in safe hands.
Additionally, it prevents sticking, thereby improving the lifespan of your expensive silicone molds. Also, it enhances the finish of the surface. You will also appreciate the fact that this product is low in odor. Therefore, you can use it indoors.
This release spray also meets FDA Regulations. This means it is safe for contact with foods. Last but not least, this spray is easy to use. Hold it at a distance of 10 to 12 cm, and spray a thin coat over the surface of the mold.
What Could’ve Been Better?
This epoxy release spray works amazingly on silicone molds, and that’s why it is a popular pick among DIYers and enthusiasts. That said, this spray comes with an expensive price tag. So, if you’re on a budget, this might not be an ideal pick for your projects. Apart from that, it performs incredibly well.
Pros
Highly functional
Compatible with both hot and cold molds
Non-staining and non-corrosive
Easy applications
Cons
Expensive
PVA Release Lacquer
Featuring polyvinyl alcohol, PVA release lacquer and serves as a great mold release coating. Moreover, it is highly functional since it can be used both as a release agent and can also be used for better demolding of cured resins pieces.
By spraying this release lacquer onto the surface, you can create a thin and even film on the surface of the mold. Those looking for agents that will help them unmold their resin castings effortlessly must definitely get PVA-release lacquer.
Uses Of PVA Release Lacquer
Mostly, when people use this PVA release lacquer for epoxy resin, they use it in conjunction with release wax. After greasing the silicone molds with a release wax, release lacquer is applied. Later it is topped with epoxy resin.
The PVA release lacquer also helps you to unmold your artistic creations easily and effortlessly. Moreover, release lacquer does not require polishing, thanks to its glossy surface.
Along with silicone molds, PVA-release lacquer can also be used on treated and porous surfaces. So, if you’ve got wood, plaster, or even melamine resin press plates, then feel free to use it on them too.
How To Use PVA Release Lacquer
When it comes to applying PVA release lacquer, you are free to do it any way you want. Spray gun, foam, brush, or sponge - use anything you want. As a rule of thumb, first, apply lengthwise and then crosswise. Repeat this pattern.
However, do not add any other paint in between. Also, make sure to apply the coats as thin as possible. And needless to say, coating the surface evenly is necessary. After you’re done coating the molds, keep the mold aside for at least ten minutes.
Additionally, you can remove the residue of release lacquer from the mold using a sponge and lukewarm water.
If you are a weekend warrior who loves crafting DIY jewelry or revamp kitchen countertops, then this product is perfect for you. Moreover, this PVA release agent is highly versatile and can be used in all your DIY projects. Plus, this water-based formula will not shrink. So, grab one and become a pro in DIY projects.
Standout Features:
Water-based formula
16-ounce bottle
Why Did We Like It?
Available in a 16-ounce bottle, this PVA mold release agent makes demolding an easy task. With its easy removal and release, you can rest assured that your creations and molds won’t get damaged. Also, this saves a lot of energy and time, which you can, in turn, invest in creating other art pieces.
Additionally, its hassle-free applications ensure you don’t face any issues while working. You can use a sponge, brush, roll, and even spray to use it on molds and other surfaces. Plus, it doesn’t leave any stain, thanks to its non-staining properties.
Moving on, if you love DIYs, then this is a must-have as it is highly functional and can come in handy in all of your DIY projects. Thus, the creative opportunities are endless. Moreover, with just a single coat, you can get smooth-looking, bump-free, and flawless objects.
With this water-based formula, cleanup is an easy task. Simply use water and scrub using dish soap. Overall, this PVA release agent is perfect for all your DIY projects.
What Could’ve Been Better?
This PVA release agent is one of the best that we came across on the market. However, our only gripe is that it leaves a green residue on your objects. That being said, we strongly recommend you avoid using it for transparent or crystal clear creations.
Pros
Unmolds creations excellently
Hassle-free applications
Non-staining
Versatile applications
Cons
Leaves a green residue
Alternatives Of Commercial Mold Release Agents
Epoxy mold release agents work like a charm for unmolding curated resin pieces. However, if you are on a budget, then don’t worry! We have a few alternatives that you can consider for your epoxy resin projects. So, let’s dig right in!
Our first and foremost alternative is sitting right at your dressing table. Yes, petroleum jelly! It works perfectly with molds that do not have challenging corners. Moreover, the best way to apply petroleum jelly is through hands. So, take some amount of petroleum jelly on your fingers and grease the mold properly.
However, make sure you apply a thin layer and coat the mold evenly. Also, avoid using this for intricate or small molds. That’s because its thick viscosity will tamper with your final product.
Cooking sprays were invented to prevent vegetables, rice, and other foodstuffs from sticking to the pan. But, you can use it to prevent curated resin from adhering to the mold. All you need to do is get non-stick cooking spray from the local store and use it as an epoxy mold release agent.
Moreover, they are non-toxic, and so they are safe to use. Also, after demolding resin pieces, make sure you wipe the cooking spray from the mold and resin piece.
Did you know you can use regular cooking oil as an alternative to commercial release agents? If not, then it’s time you try using it. Simply use a paper towel and grease the mold properly. And your surface is ready.
Also, mineral oils are a great alternative to commercial release agents. However, make sure you apply both oils in moderation. Alternatively, use a paper towel to wipe off excess oil from the mold.
Another inexpensive alternative to mold release agents is talcum powder. So, if you’re working on silicone molds with even surfaces, then talcum powder will work perfectly. However, it isn’t an ideal option for molds with finer details. That’s because it will not coat the molds properly. So, it’s best to avoid using it on those molds where details will be lost.
Tips And Tricks For Easy Demolding Of Resin Casting
Size And Design
First and foremost, the size and the design of your mold are important. That’s because it will determine how to unmold your cured piece. For those who use finely detailed molds, we recommend you use a release spray for effortless unmolding.
Alternatively, for those who create resin pieces using two-dimensional molds, epoxy release wax would be the best bet.
Use Demolding Wedges
If demolding resin casting seems too much of a task, use demolding wedges. They are similar to plastic wedges, and you can buy them from any local store or even shop them online. While working with a two-part mold, they’ll come in handy. So, if you frequently work with epoxy resin, we suggest you get them.
Loosen The Edges Of The Casting
Demolding resin casting would become easy if you loosen the edges of the casting first. Besides, unmolding simple resin pieces such as coasters and trays is pretty easy. Simply flip over the mold, and your resin pieces will pop out.
Blow Compressed Air
Even after making several attempts to unmold resin casting, then we’ve got another solution for you. Try blowing compressed air between the mold and resin casting. Alternatively, you can also try using a rubber mallet. Gently tap it on the mold to loosen the casting.
Mold Release Guide Frequently Asked Questions
Q1. Which Mold Release Agent Would Be Perfect For Silicone Coaster Molds?
We suggest you go for mold release spray while working with silicone coaster molds. It is pretty easy to use. Simply spray the mold thoroughly at a distance of 12 cm. However, you can also use release wax if you want to.
Q2. Can I Use Mold Release Spray Directly On Porous Surfaces?
No, you cannot use mold release agents directly onto the porous surfaces. You will have to treat the surface first and then use release spray. Or all your efforts will prove to be futile. However, you can go for a PVA release agent because it works well on both treated and porous surfaces.
Q3. Are Mold Release Agents A Necessity?
If you ask us, we’ll strongly recommend you use mold release agents while working with epoxy resin. They are great for demolding resin casting and also prolong the life of your silicone molds. Therefore, mold release agents are important for all your epoxy resin projects.
Summing It Up
Regardless of whether you are a weekend warrior or a full-time professional, epoxy release agents are a must-have in your DIY craft kit. That said, we suggest you consider your needs and get one soon.
Now, we have come to the end of our informative guide. We hope you enjoyed reading this guide as much as we enjoyed making it for you. Hopefully, you’ll be able to pick the right epoxy mold release agent for your DIY tasks.
It’s time for us to sign off! Let us know your favorite mold release agent in the comments below, and we’ll be back with more informative guides soon.
It goes without saying that DeWalt is one of the best tool manufacturers in the world. But how do you choose between two of their most outstanding table saws?
DeWalt has been a favorite of professional woodworkers and enthusiasts alike. Plus, when you are looking for an option that is fast and portable, you are most likely to end up with either DW745 or the DWE7480.
Honestly, both these products are incredibly well-built and robust. And if you acquire the correct expertise, you can easily get the sharpest and the most refined cuts with these two devices. But if given a choice, which one do you pick?
Today, in this guide, we take you through the features, what’s good and what’s bad, and also help you compare the two products. Our goal is to help you make an informed choice, one without any biases.
So, without any more delay, let’s check them out!
EDITOR NOTE | Both of these products are now discontinued and the latest model is the Dewalt DWE7485 which greatly outperforms the previous models.
DW745 vs. DWE7480
Before diving right into comparing the two products, it is essential that we give you a brief overview of the features of these two items. Some of you may be using table saws for the first time. So, to make this choice simpler for you, we will discuss their basic features before moving on to the comparison.
Let’s take a quick look at the products!
A Glance At DeWalt DW745
The DeWalt DW745 has been a favorite of many users for the last few years and has been a go-to option for many who prefer robust and sturdy table saws. It has been in the market before DWE7480 and has won the trust of many woodworkers with its sharp performance.
Now, let’s move on to why we called it powerful. This machine runs on a 15-amp motor and can easily generate speed as high as 3,850 RPM. Now that’s not the highest that you get on the market; however, it is more than sufficient for the typical cutting and chopping required of a table saw.
Moreover, it comes with a high-tech railing system that enhances the portability of your everyday woodworking tasks. So, it allows easy attachment of any application of your choice to increase the accuracy and efficiency of work. The lightweight design further adds to its convenience.
Also, many DIYers are pretty impressed with how it enables you to perform a 0 to 45-degrees bevel cut with much ease. The adjustable rear feet make it super simple to keep the machine well-balanced on any surface.
A Glance At DeWalt DWE7480
DeWalt has tried and improved the shortcomings of DeWalt DW745 in their upgraded model, DWE7480. This item comes with a brilliant metal construction that makes it one of the best heavy-duty table saws currently available on the market.
The 15-amp motor is highly efficient and delivers a speed of up to 4,800 RPM. This is what allows you to experiment with unique cuts that are often not possible with standard machines.
With our research, we found out that the professional woodworkers are pretty impressed by the large rip capacity of this item. All these features combined make it possible for the cuts to be on point. It also makes the process much smoother and faster. All thanks to the telescopic fence rail system, you can efficiently perform 0 to 45-degree bevel cuts.
The overall design of the device allows high portability and ease of movement according to your tasks and requirement.
DW745 vs. DWE7480 Compared
Now that you have a slight idea about the design and basic features of these products, we guess you are prepared to delve right into the comparison.
Both these DeWalt products are excellent choices, but you need to know what really sets them apart if you have to select one. And in this section, we will discuss the crucial factors you should watch out for when picking between the two.
Power
At first glance, the power difference between the two does not seem to be too big.
For instance, both the devices use the same kind of motor that produces a power of 15 A. But after testing both, we can say that due to its sturdier inner construction, DWE7480 gets an edge over DW745. It can easily spin the 10-inch carbide blade better and at a speed of 4,800 RPM.
Now, this is relatively faster as compared to the 3850 RPM speed that DW745 manages to produce. So, if your requirement is for a high-powered table saw that offers excellent speed, DWE7480 is any day a better option. We cannot overlook the difference of almost 1,000 RPM speed.
You might be wondering what a higher speed implies. Let us break it down for you! It means that DWE7489 is better equipped to produce much cleaner cuts when working on the hardwood. It also makes it easier for you to cut through thicker pieces of wood with much ease and comfort.
Other than earning high scores for its ease of use, it is significantly faster too! Unfortunately, this implies that this power-packed device is quite noisy. But we excused this issue since you are most likely to be using this in a workshop or a garage, where noise is not too much of a problem.
Machine’s Weight And Size
When it comes to the size, we have to say that both the devices are again pretty much similar. However, DWE7480 is a little larger than DW745 and is also comparatively slightly heavier. So, if portability is your major concern, it is pretty evident that DW745 is a better bet any day.
Some professionals need to shift from one workshop to another quite often, and unless their table saws are portable, it becomes a huge fuss. DW745 comes with a compact design and weighs about 45 lbs, making it quite convenient to move and store.
DWE7480 is around 48 lbs., which is not too heavy either. But its construction is a little cumbersome, which is a major deterrent when it comes to storage. Unless you have a big workshop where you can easily keep your appliances, it might become difficult to store this item.
Accuracy And Simplicity Of Use
In this category, DWE7480 outshines its competitors because of its much larger rip capacity of 24.5 inches. For those who are not familiar with rip capacity, it is basically the space available on the table saw’s surface that can be used to cut different types of wood.
So, a larger capacity simply means that you can fit bigger wood pieces on the surface to work on them. This allows you to become experimental and offers enormous versatility when you engage in woodworking and sawing tasks.
However, both the devices come with a telescopic and high-quality rail system that makes them very easy to move around. So, when it comes to the issue of portability, both the products get a good score.
Moreover, both have a significantly large measurement indicator placed on their surfaces that allows you to make the cuts more accurately. It helps you adjust the fence guard properly, quickly and efficiently as and when required.
But what gives DWE7480 an edge is that it comes with a specially coated surface. When you’re using this device, you can rest assured that it will not get scratches on the surface. This also ensures that the wooden pieces do not get stuck to the surface and glide smoothly.
This factor, combined with the high RPM offered by its motor, makes it a stellar choice when it comes to accuracy and the ease of operating DWE7480.
Arbor Size
After testing both the items, we realized that we should shed some light on how similar these two are on certain grounds. Both of these come with the same arbor size of 5/8-inches.
It is true that not a lot of woodworkers actually put much emphasis on the arbor size. But if you are a professional in the field, knowing about this factor can be crucial. In case you are likely to make an adjustment to your table saw, it is essential to know the capacity. Since the arbor size is the same, you can understand that the blade used in both devices are of the same size.
So, if you plan on upgrading from a DW745 to DWE7480, instead of buying a new blade, you can transfer the old blade. However, we suggest that you do this only when the old blade is in good shape.
Size Of The Blade
If you have worked with table saws before, you would know how vital the blade size is in determining your work quality. What kind of wood a saw can cut is highly dependent on the size of the blade that the device comes with.
Small 8-inch blades are not very suitable to cut large wood pieces. However, if you would like to opt for a larger than a 12-inch blade, you must keep in mind that the device should also have a powerful enough motor to support it.
DeWalt, as you know, is an old player in the market and they take good note of this aspect. Both these options are equipped with a 10-inch blade which is suitable for professionals and DIYers alike. The size is especially perfect because it can handle thicker wood logs without having the need for an extremely strong motor.
And it is not just the size but also the build, which makes the blades incredible. They are both constructed of carbide, and that is one strong material! The durability is significantly high and keeps the blade sharp for a long time. Additionally, the blades are equipped with 24 teeth, which further adds to their versatility of their performance.
Maximum Depth Cut
With the same motor strength and the same blade size, it is pretty evident that the max cut depth will also be the same. Or, at least, something close.
When kept in a vertical position, the blades on these two devices offer a cut depth of 3 ⅛ inches. However, when it is placed at a 45-degree angle, the maximum cut depth that you can expect is 2 ¼ inches.
While it is true that these are not the deepest cuts that you can make with table saws, for compact devices like these, the capacity is pretty decent. Plus, after our research and understanding of the woodwork DIYers indulge in, it is highly unlikely that you will require deeper cuts than this.
Bevel Angle
If you manage to get your hands on either of these two devices, there will be no need to ever buy a separate machine for making bevel cuts. Both the devices are equipped with bevel capacity.
For those who are not familiar with what bevel capacity is, we’ll explain it to you. This feature enables you to adjust the blade between 0 to 45 degrees, depending on the cut that you want. And as we have mentioned before, both come with high-quality blades, which makes the bevel cuts much more manageable and smoother.
Maximum Rip Capacity
This is one area where the devices end up differing from each other. DW745 offers you a maximum rip capacity of 20 inches on the right side of the blade and that of 12 inches on the left. On the other hand, DWE7480 comes with a rip capacity of 12 inches on the right side of the blade. It has an edge over DW745 on the blade’s left side, where the rip capacity is 24 inches.
Honestly, their performance is incredible as compared to other products in their class. We recommend that if rip capacity is of major concern to you, it’s better to go for DWE7480, even if it costs you a few extra bucks.
Accessories
Coming to accessories, both DE745 and DWE7480 pretty much come with the same sets of tools and accessories. In the package, you will find a miter gauge, a blade guard, and a push stick.
If you are new to using table saws, let us explain how using these tools will make your woodworking task a lot easier. You can use the miter gauge to fix the blade at a certain angle and lock it down. This will enable you to cut the wood in any manner you like and give it a precise edge.
The push stick lets you maneuver the wood parts that you are working with. You can consider this more of a safety device as it keeps your hands away from the blade. Additionally, the blade guard is what protects you from accidentally hurting yourself when the blade is not in use. It also makes sure that the blade stays sharp even when you do not use it for a long time.
Dust Port
If you have engaged in woodworking before, you know the amount of cleaning that is needed after the work is completed. And this seems to be a headache for many. So, in order to save time, DeWalt has included a dust port in both DW745 and DWE7480. This helps you save a lot of effort and time that you otherwise have to spend on cleaning the wood curls.
As we mentioned, both the items come with a 2.5 inches dust port that stores all the dust generated as you work on the table saw. The size is quite sufficient to capture all the dust. On top of that, the size is ideal for getting adjusted on all types of shop vacs. So, most likely, you would not be required to use an adapter or any other kind of modification.
After testing, we have to say that both the products are pretty efficient when it comes to managing dust.
Warranty and Price
When buying a decent table saw, price should be the last consideration unless you are on a very modest budget. Instead, things like product performance and durability should determine your decision.
Coming to price and warranty, DW745 clearly wins on both grounds. Irrespective of where you look, DW745 is slightly cheaper as compared to DW7480. However, it is a little smaller, and the motor is not as powerful.
So, it is pretty justified that the price is relatively affordable. However, we have to say that for a compact product, DW745 provides excellent versatility and power capacity at an affordable price.
But the real and significant difference gets visible when we consider the warranty. In this case, the difference becomes quite evident. DW745 offers a 3-year extended limited warranty covering issues of replacements and repairs and basic manufacturer's defects.
Moreover, it provides you with an additional year of service and a 90-day money-back guarantee. From the customer's viewpoint, that's an incredible amount of protection for an affordable product like this one.
On the other hand, DWE7480 only offers a 3-year limited warranty to the customers. We are not complaining here, but we have to agree that it is simply not as good as the protection provided by DW745. To conclude, we can say that in order to get the best of the manufacturer's support, DW745 is an impressive and inexpensive choice.
Why Did We Like DW745?
When it comes to DW745, the first thing to catch our attention was the durable construction. It offers a powerful internal structure that allows you to easily engage in heavy-duty woodwork. Every component of this item reeks of sturdiness that helps it last for a long time, and makes it suitable for a variety of projects.
Moreover, its compact build and lightweight design makes the device not only portable but also very easy to store. So, you can travel with it without worrying about its bulk and space.
Additionally, the motor capacity is also quite remarkable. To compliment that, the in-built miter gauge and bevel adjustment help you carry out a range of unique cuts on wood. Because of the accessories and tools included in the package, you can achieve a high level of accuracy and precision.
To be honest, with fencing and guards as excellent as what is offered by this item, we can safely say that it is excellent for professionals and enthusiasts alike. You can safely practice your skills without any major worries.
What Could Have Been Better With DW745?
After using this item on a variety of wood, it is safe to say that the rip capacity calls for improvement. The 20-inch capacity is not much to fit in large chunks of hardwood and can restrict your options of experimenting with a variety of wood.
Moreover, the blade comes with 24 teeth, which is not the most suitable number to make precise and refined cuts. However, you can always add a new blade to your system in order to combat this drawback.
Why Did We Like DWE7480?
We agree that the construction of DWE7480 is slightly bigger and heavier than DW745. However, as compared to other standard options available on the market, this item is relatively lightweight and portable. Also, considering the incredible motor function that it offers, secondary factors like size and weight shouldn’t define the worth of this product.
What needs a special mention is the enhanced RPM. The 4800 RPM is extremely powerful and increases the smoothness of your woodcutting activity. It also helps you achieve more delicate and refined cuts.
What Could Have Been Better With DWE7480?
We have noticed that the more traditional woodworkers complain how the portable version like this one is often restrictive when it comes to project-specific work. Another minor drawback is the fact that this device is costlier than many of its contemporaries.
DW745 vs. DWE7480 Frequently Asked Questions
We understand that you might still have some doubts and queries regarding the two products that we are discussing today. Here, in this section, we are talking about a few of the most commonly asked questions. Let's take a look!
How To Replace The Blades?
As we have mentioned before, the package comes with all the essential tools that you might need while changing a blade on either of these table saws. All you need to do is to adjust the wrench fitted on the side of the saws and loosen or tighten them as required.
It might sound easy, but we always recommend that you use proper gear while adjusting the blades. Also, make sure that you switch off the machine before you start replacing the blades. For more details on how to replace the blade, go through the user manual carefully.
Are The Machines High-Maintenance?
Working with wood is one messy affair, but with the built-in dust collecting mechanism, you won’t have to spend too much time on maintenance. Post-work cleaning is minimal, and all you need to do is clear out the dust collection tray.
Similarly, both the items require little to no maintenance. Thanks to their durable construction, wear and tear will be at an all time low.
Are Stands Included in the package?
DW745 doesn't come with a stand included in the package. However, if you are going for the DWE7480, you can add a stand while purchasing the unit. It helps to achieve better stability and also makes it quite convenient to store the item.
How Can The Fence Be Adjusted?
The unit comes with a built-in gauge in the front portion of the machine and knobs that make it convenient to adjust the fence. You can modify the knob settings to make sure that the fence is exactly how you want it. Again, we would suggest that for more detailed instruction, you should refer to the user manual included in the package.
Final Words
When it comes to table saws, the most important thing is quality and performance, and DeWalt is a pro on both grounds. We hope that after reading this comprehensive informational guide, you will be able to decide which option to pick.
While it is true that DW745 is more compact and portable than DWE7480, not everyone actually looks for lightweight designs. For some, a powerful motor like the one offered by the latter might be more crucial.
Honestly, we have to say it is a tie! DeWalt has put immense effort into making both the items incredible in their own ways. However, it goes without saying that both come with their own set of demerits too. The quest is to figure out your needs first and select an item that would best suit your requirements.
That's all for today, folks! Keep a watch on this space for more such interesting reads. And we’ll see you next time.
Until then, take care!
EDITOR NOTE | Both of these products are now discontinued and the latest model is the Dewalt DWE7485 which greatly outperforms the previous models.
Most woodworking professionals would agree that a table saw is an important machinery in their workshops. As such, choosing the right one becomes crucial.
A table saw should be versatile, portable, and packed with exceptional safety features. Now, as far as the Bosch 4100-09 is concerned, most woodworkers say that it is one of the best performing table saws.
But, is it so? Well, today we’re going to find out. Bosch is one of the leading manufacturers of top-grade power tools and accessories.
Naturally, the Bosch Worksite Table Saw is the ideal choice for DIYers and woodworking professionals alike, thanks to its robust combination of power and portability. What’s more, it delivers top-notch precision, which allows you to cut through a wide range of wooden materials effortlessly.
If we have piqued your interest, let us take a look at the capabilities of this table saw in detail. This will help you decide whether to buy it.
Bosch Worksite Table Saw With Stand Review
Key Specifications
Before buying any woodworking machinery, you should have knowledge about the specifications of the model. Here, we have highlighted some of the key aspects of the Bosch 4100-09 unit so that you can quickly decide if it fits your requirements.
Measurement:39”×29.75”×21”
Power:Electricity (corded)
Motor: 4 HP, 15 amp
Warranty:1-year limited warranty
Table dimensions:21-1/2’’x 28’’
Weight:92 pounds
Blade diameter:10”
Blade speed:3,650 RPM
Size of dust collection port:2.5” in diameter
What Do You Get In The Box
These are the things you get in the box
The table saw
SquareLock rip fence
A push stick
An adjustment wrench
Multi-functional blade wrench
Stand
Throat plate insert
Miter gauge
A guard system consisting of a barrier-guard device and anti-back pawls
Bosch Features
This unit is packed with a ton of features that make woodworking very easy. Let’s take a detailed look at some of its top features.
Portability
Portability is one of the many aspects, where the 4100-09 table saw from Bosch stands out from most of its competitors. Weighing around 92 pounds, it is a relatively lightweight table saw, which makes it very portable.
For professional woodworkers, it is a very important feature as it allows them to easily carry it from one workstation to another. Meaning, all the spare parts, safety tools, and essential accessories can be conveniently stored inside the main body of the table saw without compromising on movement.
Cutting Capacity
The product sports a 40-tooth carbide blade that easily fits into the 5/8” shaft of the motor. But, you can also use an 80-tooth blade for cutting veneered panels.
Its unique shaft is compatible with different types of blades, including dado blades. What’s more, you can change them in the blink of an eye; all you have to do is pull the locking lever and use a wrench to remove the old one.
Further enhancing its cutting capacity is its unique tabletop that measures around 21-1/2’’x 28”. But you can extend it to 40” by using the locking level and extending the tabletop to your right.
Doing this will help you to achieve an 8” cutting capacity on the left and a 25” cutting capacity on the right.
Safety Features
The Bosch 4100-09 comes with optimal safety features, thanks to its Smart Guard system which consists of adjustable blade guards, anti-kickback pawls, and a riving knife. The best part about it is that you can easily attach or detach the components without any additional tools, making this product extremely flexible.
Now, if you have used a table saw before, you would know that kickbacks are a major problem, which must be dealt with ingenuity. And this unit handles it extremely well due to the inclusion of a high-quality riving knife, also known as a splitter.
Finally, as far as the blade guard is concerned, it ensures that there is enough clearance between your hands and the blades, taking safety to the next level.
Design
The unit boasts an aluminum tabletop, giving you ample space to work.
But especially pleasing is its sturdy design which makes it worth the investment. Users worried about longevity will love its durable metal construction, which can handle regular wear and tear with ease.
Additionally, thanks to its pneumatic wheels, the Gravity-Rise stand enables you to move the table saw without any difficulty. Also, you can adjust the height of the stand as per your requirements, which is an added advantage.
Motor
It is powered by a robust 4 HP motor that can cut through thick hardwoods easily. And even though it is not the most powerful product that you will come across, it does a decent job for most parts.
You will find that the motor delivers a blade speed of 3,600 RPM, but you can tweak it depending on the task. However, that doesn’t mean it compromises on user experience because it comes with a soft start feature that reduces recoil and noise.
Furthermore, it is integrated with the Constant Response Circuitry from Bosch. Meaning, the unit can keep a check of the power consumption when it is under load and adjust the torque accordingly.
Overall Functionality
You need to have a certain amount of woodworking knowledge and experience to operate the Bosch 4100-09. However, it suffers from various shortcomings that affect its functionality, thereby restricting the variety of tasks users can perform.
For starters, controlling the blade is not that simple as the height of the wheel is controlled by the handwheel, which you cannot lock in one place. Though it doesn’t wobble much during operation, we feel that a locking feature would have added more stability.
Moreover, despite having positive stops at 90 degrees and 45 degrees, adjusting the bevel angle is not easy. Not to mention, the bevel scale tends to be inaccurate at times, which makes it suitable only for rough cuts.
Pros
These are some of the advantages of using the Bosch 4100-09 table saw.
Outstanding Features
It comes with a Smart Guard system, which prevents accidents by ensuring that the machine does not jam or kickback during use.
Plus, the riving knife lets you use blades that are wider than those available with the unit. This means that you may have to purchase additional components for the best results but we must tell you that assembly isn’t easy. So, first-time users may find it difficult to get it ready.
Highly Functional Fence System
The fence system is one of the best on the market and you can glide through the rail, thanks to its Sqaurelock Rip Fence. Moreover, you can lock it easily and carry out small precision cuts without any problem.
Integrated With Constant Response Circuitry
The product’s powerful motor is integrated with the Constant Response Circuitry, which helps keep track of the blade’s rotational speed. Additionally, it helps you manage the output without impacting the performance of the blade and prevents sudden speed oscillations while using the unit.
Top-notch Portability
Weighing around 92 pounds, the Bosch 4100-09 is relatively lightweight, so you can move it easily in case you need to switch worksites. Plus, its Gravity-Rise table deserves a special mention as it is equipped with wheels that deliver portability.
Compatible
This model is compatible with dado blades that let you carry out different types of cuts. Meaning, it is highly versatile so that you can work on various projects.
Cons
Just like any other machinery, the Bosch 4100-09 also has its disadvantages. Here are some of its most common problems.
Poor Dust Collection System
The 4100-09 mostly does a decent job when it comes to dust collection. It features a 2.5-inch dust port, which you can connect to a vacuum to remove most of the debris. However, don’t expect it to collect all the dirt particles as it does not come with a dust collection bag.
Understandably, we were not impressed with the performance. It might still help you clean a room but you will have to undertake further measures to ensure that all corners are spick and span.
Reduced Rip Capacity
In our opinion, the 25” rip capacity is not enough for cutting large pieces of wood. For example, if you intend on cutting wide sheet stock on a daily basis, the product’s output may not match up to your expectations.
We suggest that you use it for light-scale or moderate projects for the best results.
Difficult Bevel Adjustment
Adjusting the bevel angle is quite difficult, to say the least and you might need assistance to alter the settings.
Alternative Table Saws To Bosch
After reading thus far, if you feel that the 4100-09 model from Bosch is not the right product for you, consider going with these options mentioned below. Needless to say, they are all highly efficient table saws.
The Bosch 4100-10 is an upgraded version of the Bosch 4100-09 unit and both these models have a lot of similar features. For starters, they come with a 4 HP motor, allowing both units to complete different tasks with aplomb.
Now, the former can be bought with a Gravity-Rise stand; however, the model number is different. Also, it looks a lot different from the one you get with the latter, meaning there could be variations in output.
What’s more, the 4100-10 features a 24-tooth blade which is better suited for rip-cutting wood, whereas the 4100-09 model has a 40-tooth blade.
Founded in 1924, Dewalt is one of the leading power tool brands in the US. On that note, allow us to introduce you to the DWE7485-QS table saw which is powered by a 15 amp motor.
Understandably, it has a substantial capacity and can carry out high-quality and accurate cuts at 5,800 RPM. Speaking of cuts, what caught our attention right from the start was its 24-tooth blade which can make short work of different materials.
Upon purchase, you will find that it comes with a wide range of accessories, including anti-kickback pawls, a riving knife, a push stick, and wrenches so that you can change the blade. Plus, it features an onboard storage, which comes in handy for keeping all the tools organized.
However, despite all the good things, it has a rip capacity of 24.5,” and an 8.5-inch blade, which we don’t think is sufficient for cutting through large wood pieces.
Next up, we bring you another quality alternative to the Bosch 4100-09 from Evolution Power Tools, a prominent name in the table saw industry. Whether you are a DIYer or a professional woodworker, this machine can help you get the desired results.
Even though it is a bit bulkier than the 4100-09 model, it is more versatile in its functionality. For instance, by using its 28-teeth, 10-inch R255-TCT multi-material blade, it can easily cut through a wide variety of surfaces, including wood, aluminum, plastic, and mild steel.
Moreover, the blade is made of Japanese tungsten steel, which makes it highly durable and long-lasting. But another advantage is that you can use it to make precise crosscuts without any hassle.
It also comes with a hi-torque gearbox that helps in minimizing motor stress, thereby improving its performance and longevity. That said, we have noticed a few performance issues.
You will find that its collapsible frame does not come with detailed assembly instructions, which is pretty disappointing. As a result, assembly takes time and could be frustrating.
Pros
Highly durable
Backed by a 3-year warranty
Can cut through a wide variety of materials
Cons
It doesn’t come with detailed assembly instructions
For over 50 years, JET has dedicated itself to manufacturing a wide range of top-quality woodworking and metalworking machines. And the Jet Table Saw is another prestigious addition to their woodworking repertoire.
It features a robust 15 amp motor that can cut through thick materials easily. But, for us, the main highlight of this product is its wheeled stand, which collapses quickly for storage, portability, and quick setup.
We also found that it weighs under 100 pounds and is slightly on the heavier side to provide stability during operation. Further adding to its stable output are the anti-kickback pawls and a European-style riving knife for working on heavy-duty tasks.
Furthermore, it is backed by a 3-year of limited warranty, which is something we truly appreciate. However, the downside is that the fence is a bit difficult to adjust, and it is more expensive than other models.
Pros
Professional woodworkers consider it as their go-to product
Our next item is a quality product from the Japanese powerhouse, Hitachi, the new Metabo, a brand that has been in the business for over a century. So, it should not come as a surprise that their 10″ Table Sawis in our top recommendations for alternatives to the Bosch.
Just like the latter model, it also comes with a soft start feature that minimizes noise and recoil during startup. Now, excessive recoil can lead to safety issues, so Metabo has ensured optimal protection with the integration of an electric brake. It stops the movement of the blades instantaneously in case of any accident.
Moving on, as far as the cutting capacity is concerned, it sports a 10” 40-tooth blade, which can cut through thick materials easily. Meaning you need not worry about performance issues.
But in case it encounters a problem you’ll be pleased to know that it is backed by a 3-year warranty. Hence, you can expect it to perform efficiently for a very long time.
SKIL is a very popular brand among woodworking professionals, and hence it requires no introduction. The 3410-02 Table Sawis a highly budget-driven alternative to the Bosch 4100-09 and could be a suitable choice for those looking for a reliable cutting machine.
Thanks to its heavy-duty steel stand, woodworkers can set it up in a jiffy. This is further helped by the fact that it weighs around 67 pounds, which makes it a lightweight option. But keep in mind that it does not have wheels underneath, so you may need help with installation.
Lastly, people who are on a tight budget will love its affordable price tag, which makes this unit all the more valuable.
As you already know, Dewalt is one of the oldest and most reliable power tool brands in the US. So, it made sense to add another robust product to the list.
The DEWALT DWE7491RS Table Saw is a premium, powerful and accurate product. Weighing about 100 pounds, it is not the lightest option that you will come across. However, the base can be folded, which certainly helps in portability.
It features a 2 HP motor, which can handle medium to light cutting jobs. However, it may fail to compete with the other options mentioned on this list because of its relatively reduced motor power.
Now, as far as the blades are concerned, they deliver precise cuts. Not to mention, they are retractable and ensure safety for users. Naturally, it is a good alternative to the Bosch 4100-09.
Pros
Portable
Delivers precise results
Good value for money
It has a decent motor
Cons
The miter gauge is not great
What Are The Various Categories Of Table Saws
There are 3 main categories of table saws on the market:
Cabinet
These table saws are large in size and are mostly used for heavy-duty professional work; hence they need fairly big workspaces. Moreover, cabinet saws deliver accurate results but are more expensive than other table saws.
Benchtop
Benchtop models are perfect for DIYers and individuals who are starting out new.They are much lighter than cabinet table saws, making them highly portable and easy to store.
Also, if your workshop has limited space, you should go with a model in this category.
Contractor
The contractor is another popular category of table saw and features robust motors that can perform all types of cutting tasks with ease.
Although a bit heavier than benchtop models, they are lighter than cabinet table saws. But despite their robust design, they have spacious tabletops, which helps in cutting large materials.
Factors to Consider When Buying A Table Saw
Let’s be honest; choosing the right table saw that meets all your requirements is easier said than done. In this section, we have mentioned a few important factors that you should keep in mind before making a purchase.
Blade Compatibility
While choosing a unit, it would be best to ensure that it is compatible with dado blades.
The stacked variant utilizes two blades with a few chippers positioned between them. On the other hand, the wobble design offers excellent adjustments but cuts unevenly with more possibility of a tearout.
That being said, both types of dado blades will need a table saw with an extended arbor for better grip and extra space. For this reason, we strongly recommend going with a model with a lengthy arbor.
Build Quality
The build quality is another factor worth considering, as it plays a crucial role in determining the overall value of a table saw. Since buying any model requires a significant amount of investment, you should always go with a unit that offers durability.
You must check the materials with which the table saw is made, as it affects both the performance and longevity of the machine. As far as performance is considered, the material should be able to minimize vibration; otherwise the cuts tend to be inaccurate.
Now, the primary materials used in table saws are cast iron, aluminum, stainless steel, and plastic. Among them, cast iron significantly reduces vibrations but is heavy and expensive.
Plastic, on the other hand, is inexpensive but flimsy and, therefore, vibrates the most. So, we suggest choosing a product that is made of either aluminum or stainless steel as both efficiently control vibrations while being lightweight and portable.
Portability And Size
Portability is something that all professional woodworkers should look for in a table saw, as they have to carry it from one job site to another. It doesn’t necessarily have to be lightweight, but it should come with a sturdy cart stand.
Motor Power
Believe it or not, the motor power is as important as the build quality of a table saw as it has a direct impact on the torque. In general, strong motor power comes in handy when you cut thicker woods.
So, in that case, you should always opt for a model that has a higher HP, amps, and rotations per minute. However, if you cut medium and soft hardwood, a medium-powered option will do the job.
Fence Quality
The quality of the fence may not be the first thing that comes to your mind when purchasing a table saw, but it is a noteworthy factor nonetheless. An ideal rip fence should be adjustable, and it should lock well to the table.
Dust Collection System
People with allergies and breathing issues appreciate machines with efficient dust collection systems. That said, the main problem with machines with poor dust collection systems is that it allows dust to build up inside them, which takes a toll on the tool’s productivity.
As a result, it lowers the cutting effectiveness of the blade and may cause it to wear out quickly. For this, all woodworkers should aim to purchase a table saw that comes with a big dust vacuum port.
That being said, the best option would be to go with a model that features a dual dust collection system and a vacuum port on the blade guard.
Safety Features
Table saws are usually very dangerous machines to use, which is why safety is a major concern. However, most models in this day and age ensure that they are packed with a ton of safety features.
For starters, they come with the blade guard, which makes it easy to remove or adjust the blade as per the user’s requirements.
Apart from this, anti-kickback pawls are also necessary as they reduce wobbling and provide stability. Speaking of stability, you will also find that some models come with blade brakes that shut down the machine in the blink of an eye when it touches the skin.
Understandably, these are some of the most practical safety features your table saw should have.
How To Safely Use A Table Saw
These are some safety tips that you need to follow while using a table saw to avoid the risk of getting injured.
Wear Ear And Eye Protection
You should always wear proper ear protection while using a table saw. Since it is a large and heavy-duty piece of equipment, the saw blades can be exceedingly loud and may damage your eardrums. Hence, we recommend buying disposable earplugs or earmuffs that don’t cost much in order to protect your hearing.
Additionally, you could wear safety goggles while cutting wooden materials as it will prevent the debris and sawdust from entering your eyes.
Consider Using Clearance Inserts
If you use the table saw for cutting extremely thin pieces of wood, it would be best to use an insert to avoid injuring your fingers.
Those who don’t know, an insert is a thin piece of wood that sits between the blade saw and the side fence to create a buffer zone while cutting thin wooden boards. Doing this prevents your fingers from getting too close to the blade.
Use A Splitter, Push Stick, Or A Push Shoe While Cutting Thin Materials
While you are cutting short and narrow pieces of wood, your hands might not have sufficient clearance between the side fence and the blade. This is why you should always consider using a notched sled or a push stick that guides the wood along the cutting line.
Now, certain push devices come with adjustable features to easily fit different wooden materials. You can also buy these accessories from your local lumberyard or purchase them online from e-commerce stores.
Never Use Warped Boards
Never even think of using bent, warped, or water-damaged wooden boards because disfigured wood will lead to uneven cuts. This will in turn produce kickbacks, which obviously, is something you would not want.
Don’t Forget To Install The Blade Guard Properly
Blade guards play a very crucial role in ensuring safety. It keeps your fingers safe and deflects debris away from you.
Nowadays, it is easy to hook guards to the blades. All you need to do is fit it on top of the blade and secure the plastic clamps or screws for a tight fit.
Also, if the blade guard does not come installed, there is no need to worry. You can buy it from the manufacturer by visiting the brand website.
Know The Location Of The Emergency Button
In case of any accident or a severe kickback, you should immediately turn off your table saw. Most models feature a massive paddle or button; simply press it to turn off the unit in an emergency.
At times, it is possible to push the button with the leg if your hands are preoccupied.
Never Wear Loose Clothing Or Hanging Jewelry
While operating your table saw, you should never wear clothes, such as ties or loose sleeves that can get caught in the blade.
We have found that loose and baggy clothing could get trapped in the machine and pull you into it. And believe us; it is nothing like Charlie Chaplin’s movies so you could get seriously hurt.
Plus, people with long hair should tie it up before operating the machine.
Always Read The Instruction Manual Carefully
Ensure that you read the instruction manual carefully before installing and using your table saw. Even though the functionality of most models are similar, it might vary depending on the brand and the year of manufacture.
The reason you should read the instructions carefully is that they will provide a clear knowledge of every part of the table saw. You will be able to learn about its different components and how they operate.
This will come in handy when fixing any accessory or to disarm the unit during an emergency.
Tips To Maintain Your Table Saw
Table saws require regular maintenance to function efficiently without experiencing hiccups. Here are sometable saw maintenance tips.
Check The Alignment
In most cases, table saws don’t require an alignment provided that it’s not a lower-ned model. Either way, it is best to develop a habit of checking the alignment every time you start working. Doing this will ensure overall safety and deliver precise cuts.
On the other hand, bad alignment can cause many problems, including kickbacks, uneven cuts, and burnt wood edges. Hence, you need to ensure that you are using a straight blade.
To check this, you can place the blade on a flat surface to ascertain whether the saw is vertical. One way to be sure is to look at the splitter or the riving knife which should perfectly align with the blade. Also, don’t forget to check the stabilizing accessories like miter gauge stops, rip fences, and miter slots; the latter should be parallel to the blade.
Overall, it would be best to check all the components that could affect the cutting angle because some parts will require realignment more than the others.
The Cleaning Process
Most woodworking professionals and DIYers often tend to overlook this maintenance step. You must clean and lubricate the parts from time to time in order to prevent tool failures.
Firstly, ensure that you have unplugged the table saw from the power source before gaining access to the internal parts you want to lubricate. We suggest going through the user manual before doing that, ensuring that you know how best to clean them.
After having cleaned the internal components, it would help if you lubricate them with a dry silicone-free lubricant, especially the trunnions and gears. However, do not use wet lubricants as they collect more dust and debris, thereby forming a gum-like material that may harm your table saw.
Polishing And Caring
Always ensure that the tabletop of your model is smooth and well-polished. A dirty surface drastically affects the quality of your work and could reduce the lifespan of the machine.
On the other hand, having a clean and polished tabletop means the materials will slide smoothly allowing you to make varied cuts.
So, as a rule it would be best never to put any kind of food or beverages on them. Also, if you notice rust, sand it gently with a block of wood and sandpaper.
Another valuable tip is that you should always wax and polish the parts in direct contact with the wood, such as the outfeed and rip fence.
Consider Replacement
By following the steps mentioned above, you can extend the lifespan of the vital parts of your table saw. But, if the condition of the components does not look good, you might have to consider replacing them.
So, if your table saw gives out weird vibrations while you are working, turn it off immediately. Then without further delay, get it diagnosed by a professional mechanic.
You should also note that the saw blade is the most common part that needs replacement as it becomes dull quickly if you use the tool frequently. But, if you don’t want to get new blades, at least ensure that you use a blade sharpener for much-need longevity.
Bosch Worksite Table Saw with Wheel Stand FAQs
These are some of the frequently asked questions regarding the Bosch 4100-09 that we have answered. We strongly recommend reading it carefully to clear all your doubts.
What is the Bosch 4100-09’s country of origin?
Bosch is a US-based brand, but its power tools are made in China, including the Bosch 4100-09.
What is the cost of the Bosch 4100-09?
The Bosch 4100-09 table saw would cost you between $500 and $600, making it one of the high-end models. Rest assured, it will be well worth- the investment.
Can I use the Bosch Table Saw professionally?
Despite having a moderately powerful motor and excellent blade rotational speed, the Bosch 4100-09 is not meant for large-scale or heavy-duty projects. As such, it is an ideal choice for DIYers and hobbyists rather than professional woodworkers.
What are the materials that I cut with the Bosch 4100-09?
You can use this product to cut wood but not other materials such as steel, metal, or plastic.
Is using the Bosch 4100-09’s Smart Guard system mandatory?
No, it is not mandatory to use the Smart Guard system of the Bosch 4100-09. If you want, you can operate it without installing this safety feature. However, we do not recommend you doing so as it is highly risky.
What are the dust collection options of the Bosch 4100-09?
As mentioned before, this product comes with its own dust-collecting feature. But, if you consider adding additional equipment for enhancing the functionality of the dust-collecting system, you can do so by using these two vacuum hoses:
Do I have to remove the riving knife for dado cuts?
No, you don’t have to remove the riving knife for dado cuts because it is unremovable. So, to carry out dado cutting, you need to slide it down until it reaches the tabletop.
What are some of the best brands of table saws?
Some of the popular table saw brands that have been consistently manufacturing quality units are Bosch, Dewalt, Skil, and Jet Power Tools. The table saws from these brands have always met the demands of the customers.
Verdict | Is The Bosch 4100-09 A Clear Winner?
Now, coming to the main question - Is the Bosch 4100-09 a clear winner? Well, without a doubt, it is highly beneficial for people looking to purchase a top-quality table saw.
Its powerful amp motor can easily slice through thick woods, which is something professional woodworkers look for in a table saw. And to manage the power for a stable operation, it features a Gravity-Rise stand, allowing buyers to use it on uneven surfaces.
Apart from this, it comes with exceptional safety features, which is a bonus, especially for first-time users.
However, it is not accurate and hence is best for making rough cuts where precision and half-angle play a minor role. But, this does not overshadow the fact that it is affordable, portable, and durable.
Overall, the machine is safe, easy to use, and built with premium-quality materials. So, if you are looking for a portable and heavy-duty table saw, the Bosch Table Saw could be your best bet.
Finding the correct power planer for all your woodwork tasks is quite a challenging task.
It doesn’t matter whether you’re working on small projects or large ones, a power planer does all your tasks in a breeze. When you have to level rough-sawn timbers, benchtop planers are a useful tool.
WEN is a well-known brand in the world of benchtop power planers, and its 6550 and 6552 models are the 2 bestselling benchtop power planers. But, how do you choose between two of its excellent power planers?
Honestly, both these power planes work best for leveling out bumpy planks and timbers. Honestly, benchtop planers do not come in one-size-fits-all sizes.
Today, we’ll take you through these two bench planers and their features to help you analyze the two. Our goal is to help you make the correct choice.
So, without further ado, let’s jump into the details.
EDITOR NOTE| WEN 6550 and WEN 6552 are now discontinued by the manufacturer, if you are looking for the latest WEN Planner please check the WEN PL1303.
WEN 6550 vs. 6552 Benchtop Planer
All your tasks begin with a wood board. And, no matter how many tools you have in the workshop or home, a benchtop planer is a must-have tool for all your tasks. So, owning a planer will save you a lot of time, money and notch up all your tasks.
While browsing through the variety of planers available on the market, a benchtop planer is an excellent option. With it by your side, working on your next wood project won’t be a challenge anymore.
In this regard, let’s take a look at the two best benchtop planers, the 6550 and 6552 by WEN, to figure out which one will be ideal to meet your needs. These two power planers are quite similar to each other in terms of power and performance. Plus, they feature a robust motor and are incredibly durable.
Despite sharing certain similarities with each other, they differ from each other in quite a few aspects like efficiency and preciseness. Needless to say, these tools are one-time investments, and so you must invest in one which will last you for years.
So, without further delay, let’s dive right into the deets, shall we?
A Glance At WEN 6550 Benchtop Planer
The WEN 6550 is an excellent option for amateurs, hobbyists, and professional workers. Featuring a cutter-head dual knife, the WEN 6550 ensures a smooth finish to your wood boards. Also, its two-edged blades featuring a reversible knife ensure accuracy and perfection while making it a more durable planer for all your woodworks.
At a speed of 26 feet per minute, its 15 amp motor offers 18,000 cuts per minute. If you have to level off planks of wood as thick as 6 inches or wood boards with a maximum width of 12 and a half inches, this benchtop planer will do the job in no time.
Moreover, its plastic handle allows you to add depth up to 1 - 16 inches.
What’s more interesting is that the granite bed of this 6550 planer is highly durable as it is flat and cumbersome enough to maintain the balance of the worktop while using the benchtop planer. The granite also doesn’t damage the wood plank you are working on.
Although it weighs more than 77 pounds, it is relatively portable. With handles on the sides and foldable infeed and outfeed tables, you can carry this planer from your workshop to the construction site without any hassle. Also, changing the angle of the table is not much of a task in this 6550 planer.
Plus, the fan in the dust port is highly impressive, for it clears away the dust peelings. To put it in a nutshell, this 6550 benchtop planer by WEN is an excellent option for all enthusiasts, amateurs, and woodworking professionals.
What Is The WEN 6550 Benchtop Planer Good For?
The WEN 6550 benchtop planer is stuffed with a host of features that allow you to perform your woodworking tasks with ease. So, let us explore the features which give this benchtop planer an edge over the others on the market.
Sturdy Motor
Given the fact that this is an entry-level benchtop planer, we are pretty impressed by its 15 Amp motors delivering 18,000 cuts per minute. While moving through uneven timbers, the motor of this planer works excellently to produce the smoothest surface for your projects.
With a speed of 26 feet per minute, you’re sure to carry out all your tasks like the wind. If you are a DIY enthusiast or an interior designer, this tabletop planer with its sturdy motor will deliver an excellent finish to all your woodworking projects.
Powerful Dual-Blades
If you think that the dual blades on this planer aren’t powerful enough, then you’re laboring under a delusion. Unlike other planers of the same range, the blades of the WEN 6550 are pretty impressive. As such, its powerful dual-blades are sufficient to carve out wood boards with the smoothest finish.
The dual blades can peel off up to 3/32 inches, thanks to its fast-rotating spin. Also, dealing with boards as thick as 6 inches and as wide as 12.5 inches isn’t a hassle for this benchtop planer.
These blades are reversible, which adds to their durability. So, whether it is woodworking tasks of the DIY enthusiasts or minor household wood tasks, this WEN 6550 is the ideal wood planer.
Foldable Granite Table
One of the striking features of the WEN 6550 is its foldable granite table. Because of this granite table, you can place timber planks at roughly any angle you want. This granite table is what makes this planer a cut above other comparable planers.
The foldable ends of the granite table allow wood to move over it freely and also perform impeccably with large chunks of wood. Also, the granite doesn’t wear out, and so, the plate will outlast the machine itself. For all your 12.5-inch wide woodwork, this planer is an excellent option.
Dust Hose Connection Port
This benchtop planer features a dust hose connection port to collect all the wood shavings. You just need to connect a vacuum cleaner or a dust extraction machine while working to collect all the flakes and wood shavings in one place. This relieves you of sweeping the room after your hectic tasks by collecting all the shavings in the dust port and making cleaning an easy task.
Adjustable Rubber-Grip Handle
Do you sweat buckets while adjusting the depth of your planer? Not anymore - this planer is equipped with a rubber handle that can be rotated easily while working on any woodwork projects. You can alter the height easily by 1/16 inches after each complete rotation. This adjustable rubber handle allows you to work with perfection on wood boards.
Tri-Roller Feeding System
The tri-roller feeding mechanism of the 6550 benchtop planer is pretty pleasing as it securely grips the timber and thrusts it in to guarantee minimal swiping. With the twin blades sandwiched between the infeed and outfeed rollers, you can be assured of clean and precise cuts.
Designed For Optimal Stability
The WEN 6550 packs a punch into a benchtop package. It is designed in the most impregnable way and is perfectly weighted. Weighing nearly 70 lbs, it does not wobble or quiver while you are working on it.
Also, the granite table lays a solid base for timber to prevent it from getting tarnished while smoothening.
The machine’s cast iron lays a solid base to prevent any mishaps from occurring while working on it. Also highly striking are the pre-drilled holes that allow you to fasten the planer on your tabletop and work with convenience.
A Glance At WEN 6552 Benchtop Planer
If your next woodworking project involves dealing with wood boards as wide as 13 inches, then consider the 6552 benchtop planer to ease your task. Featuring a 15 Amp motor with three blades, you can be assured of a smooth finish to your woodwork projects.
At a speed of 26 feet per minute, this planer delivers 25,000 cuts per minute. As such, its speed churns out wood pieces with precision and perfection. Also, you’d be pleased to know that it has a metal worktop that is significantly lighter in weight.
With its pre-drilled supporting holes, you can easily fasten it to your worktable and make it less quacky. Plus, this planer allows you to reduce the snipes by adjusting the infeed and outfeed tables.
Simply put, this benchtop planer is an excellent choice if you are looking for precision and perfection in your woodworking projects. Rest assured, you will not be disappointed.
What Is The WEN 6552 Benchtop Planer Good For?
The WEN 6552 is the upgraded version of its predecessor, the 6552. This updated version is packed with a whole raft of features which is why it is the sought-after planer among most DIY enthusiasts and woodworkers.
If you’ve been dealing with wood for quite some time and are tired of your basic hand planer, it’s time to upgrade to a more advanced tool to complete your tasks quickly. So, let us explore the features of this benchtop planer to see what makes it worthy of an upgrade.
Robust Motor
Featuring a 15 Amp motor, this 6552 benchtop planer spins at a rate of 8500 RPM. This strong motor will handle all your daily tasks with ease. With 25,000 cuts per minute, you are sure to achieve a wood plank of the smoothest finish for your next DIY project. And, because of this high cutting rate, you can also work with thin chunks of timber without any hassle.
The fast-spinning blades combined with a powerful motor are the two ingredients for an accurate and perfect finish on your wood surfaces. Similar to the 6500, the wood chunks move underneath the blade at a speed of 26 feet per minute to provide you with the perfect piece for your next DIY or interior project.
Toughened Triple Blade Cutter Head
If you’ve used the double head cutter-knife, you must know how efficiently it completes all the woodworking tasks, isn’t it? With this, let me introduce you to the WEN 6552 featuring a triple-knife cutter head. This ensures precise and perfect cuts on your timber. For all the hobbyists and DIY enthusiasts, this three-blade system benchtop planer will be an excellent choice to carry out all your wood-related tasks.
If you’re looking for preciseness and smooth finishes, then a triple-knife cutter head will provide you with the best results, for they outperform all their dual-blade counterparts. Also, to ensure finer cuts, you can place them upside down. This also adds to the longevity of the blades.
Metal Table
As against the previous 6550 benchtop planer, the 6552 planer is equipped with a metal table. The ultra greasy coating of this benchtop planer provides a smooth and even surface so that the wood glides beneath the blade in the blink of an eye. With this metal table, cleaning isn’t a challenging task rather a more easy-breezy one and can also be stored conveniently.
If the enthusiast in you wants to work on large pieces, then you may adjust the table accordingly and work without any hassle. This metal table of the WEN 6552 improves the performance and adds to the efficiency of the planer.
Reversible Blades
The WEN 6552 benchtop planers triple-blade system is quite pleasing. But, what’s interesting is, they are featured with reversible blades. Once the blades begin to go blunt, you can reverse them and continue with your work.
As such, reversing ensures quicker and more efficient performance. Also, these blades are disposable. This ensures the longevity of the blades while also allowing you to save those extra bucks too.
Double Roller
To ensure optimal performance, the WEN 6552 is featured with two rollers above the tool’s housing. You can easily control the rollers without much hassle. As such, you don’t have to worry about the snipes while working on your masterpiece as the rollers reduce the snipe. Also, they ensure your board remains in perfect shape.
Handy Dust Port
Who wouldn’t agree to the fact that planing wood is a chaotic affair? But, it isn’t messy anymore, for the dust port behind this planer allows you to connect either a vacuum cleaner or a dust hose and collect all the shavings. This will keep your workshop as clean as a pin.
Also, the dust channel is pretty easy to connect. You just need to fasten the screws, and within a minute or two, the planer is ready to create your masterpiece. The 2 inches port perfectly collects all your shavings in one place. With this WEN 6552, planing will no longer be a messy affair.
Designed for Optimal Stability
The WEN 6552 is a user-friendly planer. Featuring a crank handle, you can easily fiddle with the thickness and depth you want. Also, you can adjust the gauge to shave off from 0 to 3/32 inches.
Moreover, the infeed and outfeed tables are designed to hold up the wooden board while also restraining sniping efficiently. Plus, its fast-rotating triple-blade cutter head rotating at a speed of 10000 per minute will shave off your woods at breakneck speed.
The WEN 6550 vs. 6552 - A Comparative Study Of The Key Features
Although both the 6550 and 6552 planer are pretty similar in terms of specifications and features, they do differ from each other on specific aspects. The features of both the benchtop planer are of utmost importance while deciding to purchase one.
Here we have discussed some key features you must consider while going for either the 6550 or the 6552 benchtop planer from the WEN brand.
Both the 6550 and the 6552 are suited for meeting different planing requirements, depending mainly on the nature and the size of your work and the kind of woods you will be dealing with.
So, without wasting any more time, let us explore the features of both the 6550 and the 6552 planer.
Motor And Speed Considerations
While talking about the motor and speed of the two machines, they both are pretty similar to each other. The WEN 6550 is built-in with 15 Amp motors which makes it ideal for all amateurs, enthusiasts, DIY workers, and household uses.
Designed particularly for enthusiasts and DIYers, the cut rate of this planer is highly impressive. Offering 18000 cuts per minute, you can complete all your tasks in a breeze. With a speed of 26 feet per minute, you can expect nothing but a smooth finish to your wood pieces.
On the contrary side, the WEN 6552 is similar to the 6550 model when it comes to the motor but differs in terms of speed. Like the 6550, its 15 Amp motor ensures smooth and efficient performance.
But with 25000 cuts per minute, you are assured of a more smoothened and uniform finish on your wood boards as against the speed rate of 6550. And with a speed of 26 feet per minute, the 6552 is sure to provide your wood piece with the best possible finish.
If you are an amateur or just someone who’s venturing into the field of woodworking, then the WEN 6550 would be an ideal pick for you, mainly because of its speed rate and cuts. But, if you are a professional woodworker or a contractor, you must pick the 6552 to complete all woodworking tasks quickly as a wink.
Number Of Blades
With a dual-blade cutter head, the entry-level WEN 6550 performs efficiently to even out the wooden planks for your next remodeling project. The extra blade makes this planer perform better than others on the market. Although the blades are relatively smaller than the other, they perform streets ahead of the other entry-level planers.
On the other side, the WEN 6552 is equipped with a three-blade cutter head to provide sharper cuts to your wooden boards. You can get a smooth and even surface with this three-blade cutter head in almost no time. However, in rare cases, the three blades do not always ensure superior cuts, but more is always better than less.
If you are an amateur or a DIY enthusiast, then the WEN 6550 with its dual-blade will be a perfect go-to planer for all your woodworking tasks. But, for all the professional workers and workshop owners, the WEN 6552 will be an excellent choice to carry out all your tasks like the wind.
Stock Handling Ability
Being an entry-level benchtop planer, the stock handling ability of this planer is quite impressive. The WEN 6550 deals efficiently with wood pieces as thick as 6 inches and as wide as 12 and a half inches. So, if you have to deal with wood as thick as 6 inches for your next remodeling project, then this planer would be perfect for all tasks.
On the other hand, the WEN 6552 works efficiently with wood boards as wide as 13 inches. Being equipped with a triple-blade system, you can trust this for all those heavy planks of wood.
If you are having a tough time deciding between the two, you must consider the stock handling ability of the two benchtop planers. This is quite an important aspect of the planer which will help you choose the correct one. Keeping in mind the nature of the task and the size of the wood you’re dealing with will help you make an informed decision.
As such, the WEN 6550 perfectly handles wood of up to 12.5 widths, whereas the 6552 performs well with wood pieces as wide as 13 inches. The 6550 will be an excellent choice for any household or DIY project, while the 6552 will be an ideal choice for professional workers or workshop owners.
Cutting Quality Of The Planer
When you’re looking for a benchtop power planer to replace your hand planer, the cutting quality of the planer is crucial. Both the WEN 6550 and the 6552 can take up to 6 inches of wooden board underneath their plate, which is quite impressive.
Both the planers allow you to adjust the blade up to 3/32 inches without causing any damage to the planer. Being an entry-level planer, we were quite pleased with the smooth finish offered by the 6550 on our board of wood without any appalling snipes or stripes.
Even though both the planers use the tri-roller system, the 6552 benchtop planer produces a better finish to the wood boards with fewer scalloping streaks and snipes, thanks to its metal table.
So, if more refined and accurate cuts are what you’re looking for, then 6552 will work perfectly for those woods used for heavy-duty tasks. However, the 6550 model suits perfectly for household or small-scale tasks.
Blade Mechanism
When it comes to wood planing tasks, the number of blades is of utmost importance. Both the planers 6550 and 6552 are equipped with different numbers of blades. With dual-blades, the 6550 provides smooth and even surfaces to the wood pieces that you are planing.
On the contrary, the WEN 6552 is equipped with a triple-blade mechanism offering more finer cuts than the 6550. Whatever heavy-duty task you have at hand, you can always trust this for producing efficient cuts.
Be it remodeling, renovating, or even any DIY task, a triple-blade planer is sure to yield satisfying results. But, at times, the dual-blade planer has shown to produce better results than the triple-blade ones.
If you’re hopping in search of a good planer on the market for your DIY works or remodeling projects, 6550 will be an ideal pick, while the 6552 will yield excellent results on all the wood pieces of heavy-duty tasks.
Design And Length Of The Blade
The length and the design of the benchtop planers are crucial to determine the tasks that they can carry out. While unpacking the two planers, we noticed no such difference in the design of the blades. However, because they are made to handle different cut widths, we noticed slight differences in the length of the blade.
Because of the accuracy and precision this entry-level planer offers, its 12.5 inches blade wears away due to constant use. But, worry not, for they are replaceable. Replacement blades are available in pairs, so it is easy for you to replace them.
On the other hand, the blade design of the WEN 6552 is similar to the 6550 but varies in width. Although just like the 6550, the blades of these are available in a set of three for easy replaceability.
However, the blades of this model perform impeccably well, for the pressure is evenly distributed among the three blades. So, the blades of this are highly durable and don’t call for replacement as frequently as the former one.
Also, blades that are manufactured in Germany or the USA are far more durable than those of other countries. So, you must count on them.
But, despite being equipped with two blades, the 6550 offers superior cuts and precision than the 6552. If the result of the wood surface matters to you more than the number of blades, then 6550 is your go-to planer. However, if you believe that more is always better than less, then 6552 will be perfect for satisfying the perfectionist in you.
Work Table
Although both the planers are offered by the same brand WEN, they are designed with different work tables. The 6550 model is equipped with a granite table. Granite is one such material well-known for its strength and longevity. And so, the table of this 6550 unit is strong, sturdy, and resistant to wear. Also, it provides a smooth finish to the wood pieces that you plane.
Because of its durability, the table will last more than the unit itself. But, it cannot handle more than 12.5 inches of wood. Also, the granite tables are significantly better than those of cast iron materials and also reduce abrasion when lumber passes through the planer.
What makes the WEN 6552 stand out is its metal table. The slick covering of its metallic table allows timber to slide through with little friction. The broad thickness planner is quite impressive for it supports wooden boards of up to 13 inches in width.
But, with good comes the bad, and so this metallic table is subject to wear and can easily bend.
Both the 6550 and 6552 provide finer cuts along with a smooth surface for the wood pieces to slide through. However, if you are looking for a durable planer, the 6550 unit with its granite table will be best to work with as against the 6552’s metal table.
Weight
Whatever tool you are looking for, make sure to consider how much it weighs. We are pretty sure you wouldn’t want to break your back while lifting it. Weighing 77 lbs., the 6550 unit is significantly heavy, mainly because of its granite table.
However, the extra weight is beneficial because it reduces vibrations and results in a smooth and efficient finish. But, this extra weight affects the portability of this planer.
The 6552 benchtop planer is equipped with a metal table and weighs significantly less than the former model. Weighing around 70 lbs, you can easily move this planer from the workshop to your home or factory without much hassle. Besides, it won’t cause any strain on your back, thanks to its lightweight.
If you are looking for a benchtop planer only for the workshop or factory, then the weight isn’t an issue, and you can go for the 6550 unit. But, if your job entails moving to different locations, then 6552 will be perfect because of its lightweight.
However, we found that the 6550 model is better because it comes with pre-drilled holes, which you can fasten on the table to work conveniently.
Price Of The Planer
The price of the planer is an important factor which you must take into account while choosing one for your tasks. The WEN 6550 is much cheaper than the 6552 unit. But, considering the fact that the blades of the 6552 are more durable than the 6550, the latter is worth extra bucks.
However, the price variations are not of much importance. What matters more is the features and the finish offered by the two planers. Your budget and the nature of the work will determine which one will be an excellent choice for you.
So, if you are on the lookout for a planer for household use or for dealing with small-scale wood projects, the 6550 will be an ideal planer to carry out all your tasks. However, if you are a professional woodworker or a construction contractor, the 6552 will be perfect for it will allow you to carry out heavy-duty tasks in a breeze.
Why Prefer The WEN 6550 Benchtop Planer?
We love the WEN 6550 benchtop planer for a variety of reasons; however, we were hooked by its granite table, which is strong, sturdy, and resistant to wear. Its dual-blades even out the rough surfaces in almost no time. If you are a DIYer or a professional woodworker, then this planer is an ideal addition to your toolbox. As such, it will help you in carrying out all your wood-related tasks in a breeze.
Even if you are a hobbyist or an interior designer and thinking about getting this unit, you will not be disappointed. As such, you can use this planer to carve that perfect piece of cabinet or dining table. Also, this planer is flexible enough to deal with hard chunks of wood.
So, if you are in quest of a planer that can offer exceptional smooth finishes to your surfaces, then this planer will be an excellent value for money. However, beginners must use this with caution and under an expert to avoid any mishaps.
Pros
Ergonomic handle
Equipped with a granite table
Affordable
Reduces snipes
Features a dust port with a fan
Cons
Is equipped with only 2 blades
Quite heavy
Why Prefer The WEN 6552 Benchtop Planer?
What we love about the WEN 6552 benchtop planer is that its motor of 15 Amp is powerful enough to offer 25000 cuts per minute. This results in a much smoother and more precise finish than the 6550 unit. Also, its three-blade structure is impressive, for it provides a more uniform finish to your wood pieces.
While working with this planer, you are free to adjust the depth as you want. Weighing 70 lbs., this planer is portable. And because it can take up wood as wide as 13 inches, it is ideal for all heavy-duty tasks. Furthermore, its metal tables make it easy for the timber to glide beneath the blades.
So, if you are a professional woodworker, a construction contractor, or a workshop owner, this 6552 is an excellent choice to perform all your woodwork tasks like the wind. This model will be excellent for planing your 13 inches of wood for the masterpiece you want to create.
Pros
Features a dust port to collect the dust
Ergonomic handles
Robust motor
Offers 25000 cuts per minute
Reversible blades
Smoother finish
3 blades
Easily portable
Cons
Slightly expensive
Metal table isn’t durable
Similarities Between The WEN 6550 vs. 6552
Since both the planers, the 6500 and the 6550, are offered by the same brand, they are similar to each other in quite a lot of aspects. So, let us explore the similarities between the two planers.
Both the 6550 and the 6552 are equipped with a dust port to collect all the shavings in one place without making planing a messy affair.
The 6550 and the 6552 models by WEN are portable planers, thanks to their side handles. Also, the two benchtop planers are featured with a roller bar.
There are infeed and outfeed tables in the two planers, which provide ample support to your wood boards and can be adjusted to the angle you wish to. This results in smoother and precise cuts.
The two planers are equipped with an adjustable rubber handle. You just have to rotate the handle to adjust the height. This allows you to work with any wood piece.
The two benchtop planers by WEN are powered by 15 Amp motors to ensure efficient performance.
Difference Between The WEN 6550 And The 6552
The WEN 6550 and the 6552 are both woodworking tools. With these woodworking tools by your side, you can carry out all the woodworking tasks like the wind. Although they both are from the same brand WEN, they differ from each other in certain aspects. Let us find out the areas in which these tools differ from each other.
The WEN 6550 is featured with a dual-blade cutter head to ensure utmost precision in all your wood planing tasks. However, on the other hand, the 6552 model is equipped with a triple-blade cutter head. So, the former model is ideal if you are planing for your crafts, DIY projects, or remodeling projects. At the same time, the latter will prove an excellent choice for all your heavy-duty wood tasks.
Secondly, the two models are featured with a powerful 15 Amp motor, but they offer cuts at different speeds. The 6550 model provides 18000 cuts per minute, while the 6552 model provides cuts at the rate of 25000 per minute.
Thirdly, the 6550 benchtop planer can deal with wood pieces as wide as 12.5 inches, while the 6552 unit can deal with wood up to 13 inches width effectively. So, the 6552 benchtop planer is superior to the 6550 in this respect.
Fourthly, the two benchtop planers are equipped with different tables. The table of the 6550 model is made up of granite which is strong, sturdy, and resistant to wear.
However, on the contrary, the 6552 consists of a metallic table. Both these tables allow the timber to pass through the blades with minimal friction.
WEN Planer FAQ
Which Of The Two Planer Will Be Suitable For Hardwoods?
If you are a professional woodworker or work at the workshops, we assume you have to deal with a variety of wood. So, the 6552 planer will be the ideal tool that you should consider for all your woodworking tasks.
Powered by a 15 Amp motor, this planer is designed to handle a wide variety of woods, including the infamous exotics. Its triple-blade cutter head combined with a metal table makes it absolutely perfect for handling the hardwoods.
What Are The Features To Be Considered While Choosing A Power Planer?
The nature of your task is of utmost importance while choosing a power planer for your task. And so, while hunting one on the market, you must look at whether or not the motor is powerful.
Also, the planers come in a variety of blades, and so you must check the number of blades the planer is equipped with. In general, a dual-blade planer will be sufficient for all your tasks. However, if you are dealing with hardwoods, you may go for the one equipped with triple blades.
Apart from this, you must also consider the fact whether the planer is portable or not. Also, check how many years of warranty is offered by the company for it speaks a lot about their durability. WEN provides a 2-year warranty on all its planers.
Are The Blades Of Both The WEN 6550 and 6552 durable?
The blades of the WEN 6552 are far more durable than the 6550 unit. The dual-blades of the 6550 wear out with constant use, but you can replace them easily. While the triple blades of the 6552 are more durable because of the even distribution of pressure.
Where Can I Buy The Replacement Blades?
The replacement blades for both the WEN 6550 and 6552 power planers can be ordered directly through the website of the WEN brand.
EDITOR NOTE| WEN 6550 and WEN 6552 are now discontinued by the manufacturer, if you are looking for the latest WEN Planner please check the WEN PL1303.
Summing It Up
When it comes to benchtop planers, WEN does not disappoint us. Both the 6550 and the 6552 planers are excellent tools for planing wood. And so, it is extremely difficult to pick a winner between the two tools.
Although both the planers enjoy certain advantages over the other, the 6552 clearly outshines 6550 in terms of features and uses. The WEN 6552 is perfect for all professional woodworkers and contractors dealing with a wide variety of hardwoods, while the 6550 works perfectly for small chunks of wood.
Eventually, it all depends on the nature of your task and your personal preference. Not to forget, your experience plays a crucial role in it.
And so, we come to the end of our comprehensive guide and hope that you will be able to choose the correct one for your tasks. And, keep your eyes glued on this space for more such intriguing reads.
Whether it is framing the garage door or building cabinets, adding a table saw to your collection will speed up your task significantly.
And while searching for one, you might have stumbled upon the DeWalt DW745 and the DWE7480 table saws. DeWalt makes the best table saws, and this is why it is most popular among professional woodworkers and DIYers alike.
Both the table saws are compact, portable, and high-performing saws. So, how do you know which one would be an ideal fit for your workshop? Honestly, even professionals need a little help in selecting the correct saw for their workshops.
And so, to make things easier for you, we’ve designed this comprehensive guide. We’ll walk you through the features, the plus and minus points. This will help you compare the two table saws and choose the best one for your needs.
So, without any further delay, let’s jump right into the deets.
EDITOR NOTE| DeWalt DW745 and Dewalt DWE7480 are now discontinued by the manufacturer, if you are looking for the latest WEN Planner please check the Dewalt DWE7485.
DeWalt Overview
DeWalt tools are loved by almost everyone working in the manufacturing and construction industry. If you’ve been in the woodworking field for some time, you must have seen DeWalt tools on the job site or the woodworking workshops.
Since its introduction in the modern market, DeWalt has altered our perception of power tools with its compact and portable equipment.
DeWalt is one of the leading manufacturers in hand tools and power tools. It designs tools to ease all your construction, woodworking, and manufacturing tasks. Although it is an American company, it supplies tools worldwide. Also, what we love is that their tools are user-friendly.
Speaking of performance, DeWalt’s tools are robust and incredibly powerful and are packed with a host of features to ensure efficient cutting. Whether you are an amateur crafter, DIYer, or construction contractor, DeWalt’s wide variety of top-notch quality tools are perfect for pulling off your tasks in a breeze.
DW745 vs. DWE7480
A Glance At DW745
Not only the professional woodworker but even the DIYers know how handy a table saw can be. Rather than fussing and looking for ways to shear large chunks of wood, you can do it in the wink of an eye. This DeWalt DW745 is the perfect option for those who are looking for an affordable table saw to carry out all their tasks.
The DW745 comes with everything that you will ever need for any of your DIY projects. Since its introduction to the market, the DeWalt DW745 slowly gained popularity and became the go-to option for almost every woodworker, including the DIYers and hobbyists. It is highly praised by users for its durability, accuracy, and above all, portability.
Speaking of power, this tool is highly powerful for it features a 15 Amp motor that can generate speeds up to 3,850 RPM. Also, you’d be delighted with how easily it allows you to cut at an angle between 0 to 45 degrees. As such, regardless of how you use the saw, your cuts would be clean and quick.
Furthermore, it has a great rip capacity with 12 inches on the left side and 20 inches on the right side of the blade. Thus, in comparison to other table saws, we’d easily call this one capacious.
Highly striking is its portability. Weighing about 45 lbs, you can load or unload the saw all by yourself comfortably. Also, you can move the saw easily to the job site.
Because of its compact design and lightweight, it is storage-friendly. As such, you can properly stash it away in your basement or garage. Plus, it comes with adjustable rear feet that allow you to level it on any surface easily.
Whether you have to shear wooden planks or sheet metals, its 10-inch carbon miter blade perfectly cuts through with perfection. Also, its 24-teeth indents ensure accuracy and precision. Moreover, you can also add any blade of your choice to enhance precision and performance. It ensures you cut through sheets and wood efficiently with no snags or stalls.
Features Of DW745
Most people tend to underestimate this table saw, mainly due to its compact size. But you mustn’t belittle this small rig for its powerful motor coupled with the speed of up to 3500 RPM packs a powerful punch that can effortlessly handle whatever task you throw at it.
So, let’s jump into the features of this compact yet powerful saw.
Size And Structure
Let’s begin by talking about the size and structure of this table saw. Of course, you must be looking for a saw which will perfectly fit cramped garages or medium-sized workshops so that you can comfortably shear workpieces.
This table saw is constructed with heavy-duty materials, which makes it strong and highly durable. Although this is a compact tabletop tool, it allows you to shear even larger pieces without any hassle.
Weighing 45 lbs., you can conveniently carry this tool from your workshop to the job site. Also impressive is its steel roll, which makes this saw highly popular among professionals. The steel cage roll will keep your saw safe against accidental drops.
Moreover, its onboard storage system lets you store any extra accessories conveniently. So, whether there are nails or small handy tools, you can keep them in the onboard storage system.
Power
The sturdy construction of the DW745 is coupled with a tough motor of 15 Amp, which is capable enough to cut through whatever workpieces you throw at it. It is because of this strong motor that you can shear even large pieces with much ease.
The 15 Amp motor spins the blade at a high speed of about 3850 RPM, and so whether it is pressure-treated timber or hardwood, this saw will perfectly cut through all the pieces. Rest assured, you will get precise and accurate cuts in all your projects.
Cutting Power
The DW745 features a 10-inch blade consisting of 24 teeth allowing you to cut through tough materials without much difficulty. But, if you are looking for precision and accuracy, you will have to switch to a more efficient blade.
This 10-inch blade will perform efficiently with all the small and medium-sized workpieces that you throw at it. And because of its high torque, you can confidently carry out all your workshop tasks. Furthermore, it is capable enough to make bevel cuts of up to 45 degrees and make cuts of 2.25 inches.
Moreover, its rip capacity of 20 inches allows you to make variations while cutting. Plus, its overload protection system is our favorite which ensures robust performance in any workpiece.
Dust Collecting Port
Sawing wood is a messy affair, and so just like other saws on the market, this too features a dust management system. Its dust collecting port does a pretty decent job in keeping the place clean by collecting all the sawdust.
User-Friendly
Most people ignore the user-friendly aspect while choosing a saw. However, you mustn’t ignore it for it is the most important aspect. Thankfully, this DW745, because of its tabletop design, is a user-friendly saw.
While using this saw, you can easily make adjustments to fit in your workpiece. This ensures accurate and perfect cuts on your workpieces. Also, this table saw is simple to set up. You just need to use a wrench and no other tool. Honestly, this easy setup saw is quite time-saving. Plus, its portability is a bonus.
A Glance At DWE7480
As a powerhouse tool manufacturer, DeWalt solidified its position in the market with the introduction of DWE7480. The DWE7480 is quite similar to the DW745 table saw by DeWalt. It is an upgrade to the previous models manufactured by the company.
This table saw is well-constructed with heavy-duty components, and so it is one of the robust and durable saws currently available on the market. It is equipped with a robust motor of 15 Amp, which delivers enough power and torque to cut through any material with accuracy and precision.
It delivers a high speed of up to 4800 RPM, which is pretty impressive. With such high speed, you can carry out all your cutting and shearing tasks like the wind. Its larger rip capacity has made it highly popular among the woodworkers as it shears large pieces smoothly and efficiently.
Also, because of its telescoping fence rail system, you can use this for heavy-duty tasks without any snags or stalls. Plus, it allows you to perform bevel-cuts between 0 to 45 degrees. Its adjustable rear feet make it great for those job sites with uneven surfaces.
As against other DeWalt saws, this is significantly lighter in weight. Weighing about 45 lbs, you can carry the saw easily from your workshop to the job site. Also, this makes the saw highly storage-friendly. So, you can tuck it away in any corner of your garage or workshop.
Features Of DWE7480
DWE7480 by DeWalt is portable, and an affordable table saw. Also, it is relatively easy to handle and offers adequate power to carry out all your cutting tasks quickly as a wink. With a high speed of up to 4800 RPM, you can carry all your shearing tasks with utmost precision and perfection.
So, let’s take a look at the features of this upgraded DeWalt table saw.
Design
With DWE7480, we’ll kick it off with its design. This well-constructed table saw is sturdy and saves a lot of storage space, thanks to its compact design. It features a Site-Pro Modular Pro Guarding System, which allows you to adjust the knife and blades of the saw. As such, this ensures you work conveniently and safely.
As it is made from heavy-duty components, this table saw is highly durable. Also, it features a metallic base which ensures the saw will last for years. Moreover, it has an onboard storage system so that you don’t have to worry about storing accessories.
It weighs about 45 lbs. and is significantly lighter in weight which makes it easy to carry around without any trouble.
Motor
DWE7480 is equipped with a powerful motor of 15 Amp, which efficiently cuts through any workpiece you throw at it. Although most table saws are equipped with the same motor, DeWalt cuts above the rest because of its affordable price tag.
Also, its robust motor spins the blade at a high speed of about 4800 RPM to allow you to carry out all your cutting and shearing tasks in a breeze. Whether you have to cut through thin sheets or hard and thick pieces, DWE7480 allows you to complete all the tasks smoothly and efficiently.
24 Inches Cutting Board
The 10 inches blade of DWE7480 is pretty sharp to cut or shear any piece. With its 24 inches cutting board, you can ensure precise and accurate cuts on your pieces. Because it operates at a high speed of up to 4800 RPM, you can carry out even your large-scale tasks without much hassle.
Its high speed makes it an ideal fit for all your workshop tasks. Its 24 inches rip capacity is highly impressive, for it is capable of shearing through whatever piece you throw at it. Whether it is wood, steel, plastic, or hardboard, you name it, DWE7480 shears it.
Moreover, its blades can handle wide boards as well. DWE7480 is best if you are looking for smooth, perfect, and accurate cutting.
Dust Collecting Port
No matter how much fun sawing is, you wouldn’t deny that the mess it leaves behind is frustrating. But, DeWalt has equipped its DWE7480 with a dust collecting port to ensure sawing isn’t a messy affair anymore.
Its aluminum dust collecting port can be connected to a 2 1/2 shop vac which collects dust effortlessly. As such, this ensures your workshop remains clean.
Hassle-Free Operation
DeWalt DWE7480 is pretty easy to set up without any professional help. Installing the guards and the fence is slightly challenging. However, once you figure it out, it is easy to set up this saw in your workshop.
Moreover, this saw is pretty easy to use and time-saving than others on the market. Also impressive is its ergonomic handle, which allows you to carry out your cutting tasks much more smoothly and efficiently.
Forward Facing Hand Crank
The DeWalt DWE7480 features a Forward Facing hand crank that allows you to adjust height like a piece of old tackie. You can easily adjust the height depending on the size of the material you’re working with.
Be it large or small metal, plastic or hardwood, you can adjust according to the thickness and size of the piece. You might well have to take a few turns before reaching the maximum and the minimum points.
DW745 vs. DWE7480 Compared
DeWalt manufactures the best table saws and buying one from DeWalt guarantees that you’re investing in the best. When you have to pick one between the DW745 and DWE7480 table saws, you need to know what sets them apart.
And so, here we are discussing some important factors you must consider while choosing between the two. So, let’s get started.
Motor/Power
Table saws aren’t meant for any of the trivial tasks. They are meant for cutting and shearing wood pieces, and so one of the first things that you must look for is the power or motor of the saw. If the motor isn’t powerful enough, what good is the tool for?
Nevertheless, when we talk about power, the two models are on similar terms. Both the table saws feature a 15 Amp motor which is powerful enough to carry out all your cutting and shearing tasks like the wind. So, there isn’t any clear winner here.
Speaking of their portability and affordability, the powerful 15 Amp motor is the best that you can have at your workshop. So, regardless of what you choose, you will be assured of efficient performance without being heavy on the pockets.
Rotation Speed
Both the tools are equipped with a 15 Amp motor to carry out your task efficiently. However, we noticed there’s a slight difference in the rotation speed of the two saws. The DW745 saws torque motor rotates the blade at 3800 RPM.
On the other hand, the DWE7480 cuts at a capacity of 4800 RPM. And the higher the cutting speed, the tougher materials the table saw can handle. And so, DWE7480 wins over DW745.
For professionals, workshop owners, and job site workers, DWE7480 is an excellent option that will let you cut through any piece you throw at it smoothly and efficiently. And also, this adds to the versatility of DWE7480, and so whether you’ve got hardwood or softwood, you can work quickly, without any hassle.
Dust Port
Sawing wood is without a doubt a messy task, and cleaning after a tiring day is frustrating. So, a dust port is another important feature to look for while choosing a table saw. And luckily, both the DW745 and DW7480 feature a dust port of 2 1/2 inches.
This saves quite a lot of your time and effort by collecting all the wood shavings in one place, thereby keeping your workshop clean. Also, the size is perfect for collecting all your wood shavings and also big enough to fit shop vacs. So, you don’t really have to worry about using any adapter or modifications.
And so, the dust port of both the saws performs excellently in keeping your workshop or garage clean. You may choose either one for your task.
Size Of The Blade
If you’ve been working in the workshop for quite some time, you must be aware of how crucial the size of the blade of a table saw is, for it determines what your table saw can best shear. The small 8 inches blades are perfect if you are a DIYer, a hobbyist, or an enthusiast for it perfectly shears small and medium-sized pieces.
However, if you are a professional or a workshop owner, and your job involves dealing with large and thick workpieces, you’d be needing a 12-inch blade saw coupled with a powerful motor.
DeWalt has been in the market for decades and is pretty much aware of this point. And so, it has equipped both the DW745 and DWE7480 with a 10-inch blade to cut through all your workpieces without snugs and stalls. And, its 15 Amp works perfectly to provide you accurate cuts.
Apart from the size, the construction of the blade is impressive. DeWalt has used carbide, which is one of the toughest materials; kudos to DeWalt for getting this right! Also, this makes it highly durable for the blades to remain sharp for quite a long time.
Plus, the blades consist of 24 teeth ensuring they cut through efficiently no matter what piece it is. So, it also adds to their versatility.
Arbor Size
The arbor size is quite an important factor for professional woodworkers and those owning a workshop. However, DIYers or small-scale woodworkers do not pay much attention to the arbor size of the table saw. But, you mustn’t ignore this aspect while choosing a saw for your tasks.
Both the models have the same arbor size of about 5/8 inches, which means the blades of the two saws are also of the same size.
As such, the same arbor size means the blades of DW745 will work perfectly on the DWE7480, which means you can interchange and use them. This is particularly beneficial for those who keep on modifying or altering their blades.
Maximum Cutting Depth
Equipped with the same 15 Amp motor and 10-inch carbide blade, it should come as no surprise that the DW745 and DWE7480 cut to the same depth. Or if not exact, at least pretty close to it.
Both the DW745 and DWE7480 deliver a maximum cut depth of 2 1/4 inches at 45 degrees and 3 1/8 at 90 degrees. Regardless of the nature of your task, this cutting depth makes it perfect for all kinds of workpieces.
Despite being compact, the cutting depth of these two tools is pretty impressive. No matter what pieces you throw at it, it will cut through smoothly and perfectly.
As such, both these tools are efficient enough to make bevel cuts. Plus, because they are equipped with a carbide blade, you don’t have to worry about making bevel cuts. You can adjust the blade up to 45 degrees and make cuts as per your needs.
Rip Capacity
We’ve seen how the DW745 and DWE7480 are similar to each other in certain aspects. But, in terms of rip capacity, they stand apart from each other. With the DW745, you enjoy a maximum rip capacity of 20 inches to the right side and 12 inches to the left side blade.
On the contrary, the maximum rip capacity of the DWE7480 is 12 inches to the left but it gains a cutting edge over DW745 due to its 24 inches blade capacity on the right side. With such rip capacity, both the table saws perform excellently. However, if you often deal with thick and large pieces, you must spend a few bucks more and go for DWE7480.
As for DIYers and enthusiasts, we don’t think rip capacity would be a major concern for you. So, going for DW745 will be a perfect option.
Size
In terms of size, the DeWalt DW745 table saw edges over the DWE7480. Although both the tools are compact and portable, the DWE7480 makes a perfect fit for your garages and workshops because of its dimensions.
Meanwhile, the DWE7480 with 25.75 x 26.50 x 13.88 inches might not be a great choice for your cramped garage or not-so-large workshop. Also, the dimensions of 22.72 x 29.21 x 16.73 inches of DW745 make it easy to carry from your workshop to your job sites. Also, it does not take up much space in the car cabinet.
Although they both weigh the same, the compact size of DW745 over DWE7480 makes it ideal if portability is what you’re looking for in a table saw.
Price And Warranty
DeWalt’s table saws are great, mainly because of their affordability and portability. And the DW745 and DWE7480 are no exception. But in terms of price, DW745 edges over DWE7480 for it is relatively easy on your pocket.
The compact size coupled with a less powerful motor makes it cheap and cheerful. But it must also be noted that although DeWalt has made this saw affordable, it doesn’t compromise with performance. It offers excellent power and versatility to carry out all your tasks.
However, the two tools stand apart from each other in terms of the warranty. The DW745 comes with a 3-year warranty which includes repairs, replacements while also covering manufacturing defects. Apart from that, they offer a money-back guarantee of 90 days and an additional year of service, in case of any issue.
Meanwhile, the DWE7480 comes with only a limited warranty of 3 years. Although 3 years warranty isn’t bad, it certainly isn’t as good as what is offered by the DW745. This speaks volumes of the durability of DW745 in comparison to DWE7480.
So, DIYers, hobbyists, and enthusiasts must definitely go for the DW745 table saw if a budget-friendly saw is what they are looking for.
Why Prefer The DW745?
What we love about DW745 is that although it is compact, it features a powerful motor of 15 Amp. With its speed of 3800 RPM, you can carry out all your cutting and sharing tasks comfortably.
Also, it is portable, so you can carry this to your job site without difficulty. Its compact size allows you to store it conveniently in your garage or small workshop. You can also adjust the bevel cuts up to 45 degrees and ensure accurate and precise cuts on your workpieces.
Plus, it features a guarding system to ensure your safety. No matter if you're a DIYer, a hobbyist, or a professional woodworker, this DW745 will be an excellent choice for all your small to medium-sized projects.
Pros
Lightweight
Sturdy construction
Adjustable blades
Affordable
Extended warranty with additional services
Cons
Noisy motor
Low rip capacity
Why Prefer The DWE7480?
The DWE7480 also features a 15 Amp motor, just like the DW745 saw. However, its high RPM speed makes it a perfect option if you are dealing with large and thick workpieces. Furthermore, its 45 lbs. weight will allow you to carry it from one place to another without any difficulty.
Also, its ergonomic handle allows you to shear materials with ease. For professional woodworkers, this DWE7480 is excellent because of its excellent performance, sturdy construction, and its excellent rip capacity.
Pros
Ensures accurate and more precise cuts
Ideal for heavy-duty pieces
Lightweight
Portable
Large rip capacity
Cons
Expensive
Doesn’t includes a stand
Safety Tips For Using Table Saws
The cutting or shearing tools are not something you can trifle with. Even a small amount of carelessness could lead to serious accidents. And so, while using a table saw, it is important for you to follow certain safety tips to ensure your safety as well as those around you.
Also, before beginning to work with one, make sure you go through the manual carefully.
Use a dust mask to prevent inhalation of dust
Make sure to wear goggles and gloves to keep away dust and debris
Wear proper clothing to avoid accidental snugs
Handle the table saw carefully
Always switch off the saw when you’re not using it
Do not leave your saw unattended
EDITOR NOTE| DeWalt DW745 and Dewalt DWE7480 are now discontinued by the manufacturer, if you are looking for the latest WEN Planner please check the Dewalt DWE7485.
Dewalt Table Saw FAQ
We understand that choosing the correct table saw is quite a challenge, particularly when both the tools perform impeccably. Whether you are planning to go for the DW745 or DWE7480 table saw, you might have some doubts or queries in your mind regarding the two table saws.
To make you choose the best, we are discussing a few commonly asked questions in this section regarding the two table saws by DeWalt. So, let’s not waste time and dive right into the questions.
Which Of The Two Come With A Stand?
Unfortunately, none of the two table saws come with a stand. However, DeWalt has customized a stand for its DWE7480 model, and so you can buy them separately from DeWalt. It will provide much better stability while cutting workpieces.
Can A Dado Blade Be Used With The DW745 Model?
Although you can change or replace the blades of this unit as per your needs, dado blades aren’t compatible with this unit. Its 5/8 inches arbor is too short to accommodate the dado blade’s width. Moreover, when you purchase the unit, go through the manual to know more about which types of blades can be used with the DW745 model.
Are Dust Bags Provided With The Table Saws?
No, the unit does not include a dust bag. You will have to connect a shop vacuum to the dust port, which will collect all the dust and debris, thereby keeping your surroundings clean.
EDITOR NOTE| DeWalt DW745 and Dewalt DWE7480 are now discontinued by the manufacturer, if you are looking for the latest WEN Planner please check the Dewalt DWE7485.
Summing It Up
All in all, both the DW745 and the DWE7480 by DeWalt are outstanding table saws. And so, it is extremely difficult to pick a winner.
While the two table saws of DeWalt are similar in terms of performance and features, the DWE7480 certainly outshines the DW745. But, even the DW745 does a commendable job in shearing wood pieces with accuracy and perfection.
Ultimately, it all boils down to the needs and preferences of the users. So, the final choice is yours.
However, if you are looking for a budget-friendly option, the DW745 will be perfect for your small to medium woodworking tasks. Meanwhile, the DWE7480 will perfectly suit the workshop owners and the professionals. And on this note, we come to the end of our comprehensive guide and hope that it was useful enough to help you make an informed decision.
It isn’t surprising that lathes are known as the “mother of machining tools” because they can be used for diverse purposes.
And, if you’ve been working in the metal manufacturing industry for quite some time, you must have surely heard praises about the Grizzly lathe. For over 30 years, Grizzly Industrial has been manufacturing all kinds of machine tools, power tools, and hand tools. So, if you are considering a lathe from Grizzly Industrial, then you are most likely to end up with either the G8688 or the G0602.
To be honest, both these lathes are sturdy and highly durable. But, how do you know which will be the ideal one for you? To help you decide just that, today we’ll talk about the two lathes and discuss their features.
So, without further delay, let’s dive straight into the deets. Shall we?
Grizzly Lathe Review
The Grizzly Brand
Since 1983, Grizzly Industrial has been manufacturing top-notch tools and equipment for the metal and wood manufacturing industries. You can browse through the wide variety of tools offered by them to choose the best one for your task. All Grizzly tools are quite user friendly and allow you to complete your tasks in a breeze.
Speaking of durability, Grizzly Industrial tools are robust and well-built to tackle all your metal manufacturing tasks. Also, their machines have been awarded for excellent quality.
If you are worried about the prices, then let us tell you their tools are reasonably priced. Plus, their customer services are always there to assist you in case of any issues, which is a bonus.
Whether you are manufacturing with metals or working on a new construction project, a good lathe is the need of the hour to carry out your tasks in a smooth and efficient manner.
Both the G8688 and the G0602 by Grizzly Industrial are among the top-notch models for all your metal needs. Be it cutting, drilling, shaping, turning, sanding, knurling, or deformation, you can carry out any task you need.
These tools will help you in shaping those metal pieces without any hassle. You can trim off those extra parts with these machining tools and carve an excellent piece for your use. Further, due to their compact size, these mini metal lathes are extremely portable.
If you are a hobbyist looking for a good lathe for all your metal tasks, then the G8688 is an excellent option to consider. This mini metal lathe is one of the most durable options available on the market, thanks to the top-quality components used in manufacturing it.
Featuring a single-phase motor, it allows you to complete whatever metal task you have at hand smoothly and efficiently. Also, its 3/4 HP motor offers 110 volts for your metal shaping tasks.
What’s more interesting, is that it has been designed with a space of 12 inches between centers. So, whether you have to deal with bite-sized materials or medium-sized tasks, you’re good to go with this lathe.
To put it in a nutshell, the Grizzly G8688 mini metal lathe packs a lot of punch into a tiny tabletop package. Also, the handy features of this lathe are coupled with quite an affordable price tag. So, if you are a beginner, DIYer, hobbyist, construction contractor, or workshop owner, then this unit is perfect for carrying out all your tasks.
Key Specifications Of The Grizzly G8688 Mini Metal Lathe
Even if you are just a beginner with not much experience in metalworking, you can still use this mini metal lathe to carry out your latest project. Because of its compact size, you may store this anywhere you want.
What you’ll love about this lathe is that it has a thread dial indicator. This will particularly delight those who have just ventured into metalworking and find it difficult to detect the exact size of threads without a guide.
We must also mention this lathe’s variable speed, which starts at 100 RPM and shoots up to 2500 RPM. With this speed, be prepared to achieve more accuracy and perfection in all tasks. It even allows forward as well as backward motion.
Here are the key specifications of the Grizzly G8688 mini metal lathe:
Features a 250 watt, single-phase, 2.8 A/110 V motor
12 inches of distance between centers
7 inches swing over bed
Spindle speed varies from 0 - 2500 RPM
0.78 inches spindle bore (20mm)
Thread dial indicator
5/16 inches maximum tool bit size
Multiple thread pitches
2-34 inches cross slide travel
2-½ inch tailstock travel
Weighs 74 lbs with dimensions of 13 x 30.2 x 13 inches
Key Features Of The Grizzly G8688 Mini Metal Lathe
It would be unfair of you to expect this lathe to perform heavy-duty tasks. But you must not underestimate the device, for it performs impeccably with both medium and small size tasks as compared to others in the same range.
Its single horsepower motor is more than enough for hobbyists and the amateurs to carry out their tasks. Let’s have a look at the features of this lathe to know why it will be an ideal option for you.
Engine
We were caught on the hop when we saw this petite lathe carrying out so many tasks like the wind. No matter what task you have at hand, this lathe carries it out effortlessly. Although it might not be an ideal choice for heavy-duty tasks, it is an excellent option for small-scale jobs.
For novices, hobbyists, and amateurs, this single-phase motor of 250 watts will help you work quickly as a wink. Though we agree that its motor isn’t very powerful, it is definitely a cut above other comparable products.
Capacity
This mini metal lathe is a perfect example of the saying that big things in life often come in little packages. We were pretty pleased with its potential to maneuver turning techniques like beveling, facing, shaping, and bifurcating.
What we found more interesting is the versatility of this Grizzly lathe. If the amateur in you wishes to make screws, small rivets, or any other pneumatic tool, then you must trust this lathe for outstanding results.
Featuring a long spindle of 12 inches in diameter with 7 inches of swing diameter, you can make these objects for your home, and even for commercial purposes.
Variable Speed Control
If you are a professional using lathes for years, you must know the importance of variable speed in the lathe. Thankfully, the Grizzly G8688 mini metal lathe is featured with variable speed controls.
Also, its ability to scythe in both forward and reverse directions makes it an excellent lathe for all the beginners out there. As such, you can use it at no matter which speed you want. It is an ideal addition to your workshop if you are the one who has little experience with lathing.
Design And Longevity
The compact size of this mini metal lathe is quite appealing. Since not every workshop is large, the G8688 lathe is designed to fit your small workshop perfectly. Although small in size, it is highly durable and built to last.
While using this lathe, we did not notice any major vibration as is the case for other lathes. Although it just weighs about 74 lbs, it does an excellent job of absorbing vibration. If you have to carry out small projects, then this would be an ideal pick for all tasks.
Cutting threads and creating tiny brush pulleys is what we loved doing with this lathe, and we were quite pleased with the result it produced. Despite its compact size, it can tackle threads ranging between 8 to 72 TPI-33 inches.
Threading Gears
Though the threading gear of this lathe is made of plastic, you will find it significantly better than others on the market. You’ll find these gears come with a host of benefits such as corrosion resistance. Also, plastic gears are a treat for your ears, for they significantly reduce the noise.
The plastic threading gears perfectly complement the compact design of this lathe machine. Since it is explicitly designed for light metal turning tasks and for smaller workshops, you’d find these plastic threading gears a perfect fit.
What’s more, you will find that the gears are more forgiving than the metal ones as they are easy to replace. Also, we were quite pleased with the four-position turret post because it is ergonomically designed.
Performance And Power
Its compact size mustn’t be taken lightly, for this mini metal lathe delivers a powerful punch when it comes to metal turning tasks. You can throw any metal task at it from medium to large and see how it works. For the novices and the small workshop owners, this brings a lot of versatility to the table.
If you’ve been eyeing the G0602 Benchtop Metal lathe by Grizzly Industrial for a while, then you’ve stopped by at the correct place. This gilt-edged benchtop lathe is super easy to use and is superbly built.
Grizzly has designed this lathe with a robust motor so that you can get the ball rolling for all the tasks that you’ve got to accomplish. Plus, you’ll be delighted to use this lathe for all your turning tasks because of its 0% vibration feature.
Highly striking is its ability to carry out all the metal turning tasks you need; kudos to Grizzly Industrial for polishing up its tools. Moreover, this is an incredible tool with a backsplash guard, a 1 HP motor, thread dial, a dedicated switch for reversing the spindle, and a chip tray. It’s built with all the features you’d be needing for accomplishing any small metal turning tasks.
To put it in a nutshell, this model features all the power of a full-sized lathe with the convenience of tabletop storage. Its 14 amps of power will churn out your metal and wood projects like magic. Further, its user-friendly operation makes it an ideal pick for all the amateurs, novices, and experienced workers.
Key Specifications Of The Grizzly G0602 Benchtop Lathe
If you are just venturing into the field of metal turning and looking for a good lathe to carry out all the metal tasks, then you are good to go with the G0602 benchtop metal lathe. This 10 by 22-inch tabletop lathe works well with tough materials.
It allows you to work with a variety of materials, even plastic, without any hitch. This is only possible because of the tool’s bit which is versatile enough to bisect or shape a variety of materials. Also, you can adjust the rotation speed as you want.
On top of that, its V-way bed provides you with just the kind of support you need while dealing with metals. It also ensures that your lathe lasts almost a lifetime.
What is more interesting, only premium quality materials are used for designing this lathe, so we can vouch for its longevity and durability. As such, you can count on it for years to carry out all your metals tasks. Overall, it is highly versatile, and even allows you to mold engines.
Here are the key specifications of the Grizzly G0602 benchtop lathe:
Features a single-phase 1 HP motor
22 inches of distance between centers
9-½ inches swing over bed
Spindle speed ranges between 150 - 2400 RPM
25 mm of spindle bore
Inch thread ranging between 8 - 72 TPI
Maximum bit size of 1/2 inches
Metric thread ranges between 0.25 to 3.50 mm
6-1/2 inches cross slide travel
2-½ inches tailstock quill travel
Weighs 432 lbs with dimensions of 46 x 22 x 21 inches
Key Features Of The Grizzly G0602 Benchtop Lathe
Unlike the previous product, this lathe works well with tough materials. This makes it perfect if you have been working with lathes for years. Rest assured, you won’t be disappointed. Let’s explore the features of this lathe to know why it would be an ideal choice for experienced metalworkers.
Design And Longevity
Whether you have a construction project at hand or some DIY work, you can complete all related tasks that you want with this ergonomically designed lath. Adjusting the speeds, and changing the bits isn’t much of a hassle while using this lathe; you can do all of this easily. Also, its strong and sturdy V-way bed provides excellent support while working.
Although this benchtop lathe is slightly heavier than the Grizzly G8688, you can store it wherever you wish to after completing your work. Be it on the top of your old cupboard or somewhere in the garage, this lathe can be stored easily. Featuring a chip tray to gather debris and a backsplash guard for the oil, this benchtop metal lathe is a perfect addition to your workshop.
It is without a doubt an excellent lathe for metal turning tasks on the market. Also, because it is made from cast iron, the vibration generated is subdued straight away. This means you can work with your metal pieces steadily without any significant disturbance.
Variable Speed Controls
For those who look for perfection in every arena, this Grizzly G0602 lathe will please the perfectionist within you with its accuracy and precision. As against other lathes, the speed range of this lathe is quite impressive.
If you think switching speeds is a pain in the neck, then this device will let you switch from 150 RPM to 2400 RPM in no time and work smoothly without any hassle. While using this for metal turning, you can easily adjust the speeds as per your convenience. This ensures precision and accuracy in your tasks. Just turn the knob, and you are good to go.
The Gearing System
We found the gearing system of this benchtop metal lathe quite impressive. The Grizzly G0602 lathe is featured with a precise gearing system consisting of a spindle bore of 1-inch. This gearing system ensures that the lathe works impeccably without posing any hindrance while turning metals.
As already stated, the six variable speeds contribute to smooth functioning. You don’t need to fret about the speed since the gearing system takes care of that. Just select the appropriate speed setting, and you’re good to go.
Sturdy Motor
If you are a professional metalworker or a woodworker, then this would be best for all your tasks at hand. Since it features a powerful motor, you can use this benchtop lathe for turning tough metals. And on account of its 1 HP motor of 110 volts, you can carry out all the tasks with ease.
Unlike other metal lathes, this one has made turning out metals a relatively easy task mainly because of its robust and solid motor. So, we highly recommend this Grizzly G0602 if you are on the lookout for a lathe to work with tough metals without any hassle.
Grizzly G8688 vs. Grizzly G0602 - Which One To Choose?
Grizzly Industrial has been offering top-notch quality lathes for years, and the raving customer reviews stand testimony to this fact. Both the Grizzly G8688 and the G0602 lathe are outstanding lathes and perform impeccably well.
Both are robust and durable metal lathes. But, how do you choose between the two? So to make things easier, let’s explore the pros and cons of each in detail. After going through the following, you’ll have no doubts regarding which would be better for your particular needs.
Why Prefer The Grizzly G8688 Mini Metal Lathe?
The Grizzly 08688 lathe works exceptionally well if you have small or medium-sized metals to deal with. Moreover, its compact size makes it ideal for those who work in small workshops. It will allow you to perform all your small to medium-scale tasks in a breeze.
The variable speed ranges offer perfection in all your work. So, we’d recommend all the novices and amateurs to go with this lathe to carry out all their tasks easily.
Pros
Variable speed
Packed with a plethora of features
User-friendly
Compact in size
Cons
Unsuitable for tough materials
Why Prefer The Grizzly G0602 Benchtop Lathe
The Grizzly G0602 comes packed with a host of features that makes it an ideal choice for all the experienced workers out there. Its powerful motor makes it a durable product and it’s highly versatile due to its six variable speed options which allow you to work with almost any material.
Also, it delivers perfect cuts, making it an ideal choice for all the perfectionists out there. And, if durability is a significant factor in your purchase decision, then don’t worry; this product ticks all the right boxes in that department.
Pros
Highly versatile
Strong motor
Durable
User-friendly
Features six variable speeds
Cons
Slightly on the expensive side
Can be used only on top surfaces
Summing It Up
When it comes to lathes, Grizzly never disappoints us. Both the G8688 and the G0602 metal lathes are excellent tools for turning metals. As a result, it is extremely difficult to pick a winner between the two. While both the lathes enjoy certain advantages over the other, the Grizzly G0602 Benchtop Metal Lathe certainly outshines G8688 in terms of features and uses.
The Grizzly G8688 is perfect if you are a novice or an amateur dealing with small materials without much experience, while the G0602 goes well with tough materials. Ultimately, it all boils down to your needs and the nature of your task. Not to mention the fact that your experience level also plays a part in it all.
With that, we come to the end of our comprehensive guide; hopefully, you will be able to make an informed choice. And, keep your eyes glued to this space for more such informative content.
Out of the many options of Kreg jigs, which one is right for you?
The pocket hole jig by Kreg Tools is massively popular for its reliability. After all, if you are building a wooden project, you will need a tool that keeps both the material and the machine in place.
If you are not familiar with jigs, they are essentially a device with an open frame or plate which holds wood or other materials in place. But, that's not the only function; jigs also provide direction for operating and cutting objects.
Kreg jigs are one of the most trusted brands when it comes to pocket hole jigs. Today, we will look at the differences between two of the most popular jigs Kreg K4 and K5. Let's attempt to find if one is better than the other.
So without further ado, let's get to know about each brand:
Kreg K4 vs K5 Compared
Kreg Brand
Kreg is a well-known brand in the woodworking industry and has built a well-grounded reputation for itself for the past 30 years. They are the front runners in America for providing quality tools and equipment and solutions for joining, cutting, clamping, routing, and hardware installation.
When it comes to pocket hole jigs and other tools like clamps and cutting tools, they have top-notch accessories that are used all over the world. There is a story about the conception of this company - it all started with one kitchen cabinet which was built in 1989. This was when Craig Sommerfeld, the founder of Kreg, was busy working on a personal project.
The First Kreg Jig
Craig had developed a U-shaped jig (single-hole) to hide kitchen cabinet holes, which he built for Kathie Sommerfeld. Soon after that, they saw the potential of this invention and began selling this new jig in stores.
The immensely positive response of customers to this product led to the foundation of the company "Kreg Tool." Craig and his son Todd would work to create patented products that became a massive success over the years.
Expansion Into A Company
In the early 90s, Craig first patented the Kreg Jig and shifted work from the basement, expanding the company in Huxley, Iowa. Over the years, Kreg Tools made new and improved models like the K2000 jig, which was a game-changer in the industry.
This model was different because it was made from injection-molded plastic instead of metal, making it a low-cost and durable option for woodworkers. Since then, Kreg products have been used by woodworkers of all skill levels globally. The tools are widely available in stores across the USA, UK, Canada, and Australia.
Now that we know how this brand started let's find out more about the jigs they make and about jigs in general.
What Are Jigs?
A jig is essentially a device that is used to hold and support a workpiece. It is also used to navigate other tools to perform specific functions. Mainly, jigs come in handy to provide accuracy in cuts along with the ability to repeat an action many times over. This is especially useful when there is a need to create consistent and even-sized wood panels.
Often used in tapping, drilling, and reaming work, they are quite light, making them easy to use. Usually, jigs will not be attached to a machine table unless you have a larger project to finish. Also, gauge blocks are not required for these jigs.
Essentially, woodworkers use these accessories to ensure the material is stable and positioned correctly before cutting any pieces. Without appropriate tools like jigs, a material might move from the position, making wrong cuts due to insufficient support.
Also, there isn't one design that is the best when it comes to jigs. You can find various designs and features for all types of users.
Moreover, jigs are usually more complex in design than fixtures that merely keep wood in place without guiding any direction of movement. However, jigs cost more than fixtures due to their longer manufacturing process.
Types Of Jigs
There are numerous jigs available on the market, depending on your purpose. Some of the common ones are -
Plate jig
Template jig
Ring jig
Diameter jig
Angle plate jig
Pocket hole jig
Kreg Jigs
Kreg makes a variety of jigs for all purposes. They come up with various models to help DIYers and professionals with the right tools they need. The earliest jig they patented was the K3 model, which had many new features making them easy to use.
The Kreg pocket hole jig 520 pro model is the latest design in a long list of accessories and jigs. This newer model is much more versatile and is designed to build any kind of configuration with ease.
Kreg K4 And K5
Kreg products are known for their high quality and user-friendly build. And, if we talk about overall features, both provide intuitive and sturdy abilities which come integrated into both K4 and K5 models.
The primary thing which differs is how you apply it with its individual machining functions for specific uses. But one thing is clear, some types of fabricators and woodworkers would benefit more from one model than the other.
In this section, we will take a comprehensive look into both Kreg K4 and K5 jigs, so you have a better idea of individual features. We recommend taking a look at the overview so that you can figure out if either one matches your requirements.
Kreg K4 is built with the primary purpose of drilling pocket holes with unmatched precision and reliability. You may think that such a high-quality product would not be the best for students or novices. Actually, we'd be glad to tell you - this is absolutely not true.
In fact, it is quite commendable that woodworkers of all experience levels can use a product as sophisticated as this. That is why it should come as no surprise that this model contains many design elements that make operating the jig effortless.
K4 Uses
Kreg K4 can handle smaller materials or pieces of wood and guide them for precise and even cuts every single time. This prominent feature makes it one of the most capable and dependable jig options in its price range. Since the model is originally designed specifically for cutting and shaping smaller materials, you'll find many uses for this jig for regular wood jobs.
Whether you are making kitchen or tool cabinets, rolling storage crates, garden or balcony benches, work desk, small sliding wardrobe, the K4 won't disappoint. The jig can be adjusted according to the material thickness, enabling you to experiment with the settings and finding a comfortable fit for your projects.
K4 Benefits
Apart from that, this K4 jig also has a fast clamping system that makes sure the device is secure while cutting or shaping materials. Furthermore, this model is 100% compatible with other Kreg accessories and attachments, making work more straightforward, so you don't have to worry before buying.
In other words, you can easily expand the abilities of this jig by adding more valuable accessories from the same brand.
Not only that, the Kreg K4 model has an integrated drill guide that helps with making the same types of cuts repeatedly. If you have no use for this feature, you can easily remove the accessory for additional mobility and experiment with lengths and styles of cuts.
But if you choose to use the 3-hole drill guide, you'll find it is one of the best of its kind for precise incisions.
Overall, the K4 is a superb option for people who are getting started and interested in DIY projects in and around the house. This device makes it easy to make home improvements without hiring expensive professionals and also to hone your skills as a woodworker.
Even though the K4 is not the most recent model by Kreg Tools, this jig variant is still relevant today for various building purposes.
Now, coming to Kreg K5 - we can call it an upgraded version of the previous models, including the K4 jig. They have substantially increased the range and power of this jig which helps improve its functionality. Professional woodworkers will find many uses for this model because it has many new beneficial integrations which will come in handy for various projects.
K5 Uses
One of the most distinctive features of the Kreg K5 is its front-mounted handle, making it easier to draw different angles. This makes it more versatile and gives the most accurate cuts making it a favorite option among seasoned woodworkers. Apart from that, the K5 also has a unique in-built clamping system which is absent in the previous model.
This clamping mechanism is much sturdier than a separate clamp which might move upon manual pressure. But, that is not the case with this clamp; it has a better design that holds the material in place with zero movements. The advantage of this clamp is that it is more ergonomically designed and isn't too expensive either.
Another good thing about this mechanism is that it contains a ratcheting function so you can independently move around the jig as per your requirement.
K5 Benefits
The Kreg K4 did not provide an additional wing for measurement and support, but the K5 comes with an onboard storage wing. This improvement/addition makes it easier for users to access tools and keep away all of the required accessories without needing extra attachments. Another thing to note is the size; the Kreg K5 is visibly larger than K4 and other models, which must be considered.
If you are used to carrying equipment around, then there is a chance that you might not prefer the K5 because of its limited portability. On the other hand, consider if you are going to build larger pieces of wooden furniture like outdoor garden dining tables or wall-length bookshelves. If yes, there isn't a better option than Kreg K5.
We say this because K5 is designed to support larger pieces of wood, and working with K5 will help you tremendously with cutting larger panels. Another new feature of the K5 is the new swiveling dust extraction system which allows for more movement of the dust vacuum pipes.
This extra maneuverability may not seem like much, but it can prevent your pipes from tearing in case they are bent in the wrong direction. You can't find the same benefit in the Kreg K4, which has a locked dust extraction that does not allow any movement.
Lastly, K5 also comes with a small block that can be used to adjust thickness for cutting and incisions. It is portable, so you can move it around to conduct repairs and building work.
Who Can Use Kreg K4 and Kreg K5?
K4 and K5 indeed have similar features and provide almost the same functions for woodworking. But there are a few things that users might want to know about before purchasing.
Both of these models can be used by professional woodworkers as well as people who are developing carpentry as a hobby or part-time work. However, each model gives different benefits for contrasting uses, and people might find one more suitable for specific tasks.
Who Can Use K4?
When it comes to the K4 model, this model was heavily designed for beginners and DIYers to make their tasks seem less daunting. The evidence for this can be found in its easy-to-use interface, which doesn't require prior experience or reading of extensive manuals. Even a novice can complete tasks like pocket joinery without the help of a professional.
If you are looking to work with a straightforward machine that assists you well in all basic woodworking tasks, K4 might be the perfect design. It has intuitive features like a sturdy toggle clamp along with regular add ons like drill bits.
Who Can Use K5?
What's different about the Kreg K5 is that it was built with a specific purpose in mind. The makers wanted to create a product that would excel at enhanced pocket joinery machining, which professional carpenters can make the best use of. It is easy to see that K5 is the more sophisticated and upgraded jig option when you compare them next to each other.
The thing is, K5 provides many features which are not found in K4 and older models, so it becomes a good choice for specific reasons. One of the things you might like to note is the swiveling dust collector, which is exclusively available in the K5 model.
So, if you are someone who cannot do without vacuuming large piles of dust while working, you definitely need to opt for K5. Also, the swivel is not available in K4; instead, the dust collector stays fixed in one place.
In short, if we have to summarize who can make the best use of K5 - they make a perfect choice for a professional fabrication worker. We say this because even though many design elements overlap with K4, the K5 model is superior and better suited for bigger builds.
Kreg K4 and Kreg K5 Compared
Now that we have seen Kreg K4 and K5 individually with their features, let's find out how they compare to each other. In this section, we will highlight the features of both models and see them one at a time to understand which one stands out.
The primary purpose of this comparison is to explore all the details within both jigs and assist you in making an informed decision before purchasing.
Similarities
Both Kreg K4 and K5 have a 3-hole drill guide included. This features various settings for the width of materials which can be found on the main base of both jigs. In both devices, the main base has a clamping recess which allows you to clamp the tools to your workstation. Both of them also have dust collectors, but the design is vastly different.
Feature Comparison Between Kreg K4 And K5
Clamping System
Let's start with the K4 clamping system. The K4 features a large clamping mechanism, and the main purpose for this aspect is to secure any materials or tools you are working with. This feature makes sure that the wood you need to cut is firmly in place so that the cuts are even and error-free.
Also, it's easy to secure to the workbench, so that is one less thing to worry about.
But let's compare K4 to the clamping system of K5. Unlike K4, which has a separate clamp that needs to be adjusted, the K5 has an in-built clamping system which is far more superior.
Attaching the tool and material to the table or workstation is pretty easy and cost-effective in the long run. We say it is cost-effective because of two reasons. The first being its sturdy nature which does not rust or spoil, thus lasting for years to come. Secondly, there is no need to purchase any extra accessories or attachments to fix the jib to your workstation.
Which one is superior? - Kreg K5
Collection Of Dust
Any woodwork requires a lot of drilling, and creating pocket holes using jigs involves even more drilling leaving large quantities of sand dust. Ideally, you will need a jig system that can efficiently remove most of the dust as you work.
K4 and K5 both have a dust port which allows for seamless collection of dust, saving your surroundings from sawing and cutting messes. However, one of the drawbacks of K4 is that it does not come with a method of integrated dust collection features.
There is a port that you can attach to the shop vac and remove the dust, but it does not have much movability. This can result in dust falling to the ground if not used correctly and then sweeping it off, making it time-consuming. If you think this will be too much of a hassle, maybe you should steer clear of the K4 and check out the Kreg K5 instead.
K5 has a swiveling dust collector that can be attached to the vacuum to remove dust simultaneously while cutting materials. Since it moves from side to side, the added movement gives the hose/pipe more leeway to move around. This feature makes it easier to attach the shop vac and protects the hose from tearing overuse.
So, even though both the jigs come with a dust collection feature, the K5 is definitely one step ahead.
Which one is superior? - Kreg K5
Portability
The K5 is physically larger in size and slightly heavier than the K4 model. The weight might not seem much at first, but it might get tedious when you need to carry it from one workplace to the other. Most users prefer to own a tool that fits in the truck and can be driven around to different locations.
This is all the more important for professionals who need to carry their gear to a client's house. We think that both are well designed to carry and can easily be placed at the back of your truck. But, if we compare the two, the K4 model is lighter and gives better portability.
Which one is superior? - Kreg K4
Storage
When it comes to K5, this pocket hole jig is clearly superior because it fulfills all the needs of a jig while providing a storage area. The design has support extension wings on two sides which are absent in the K4 model.
The second benefit of these wings is that they double up to make storage containers. This makes the woodworker's packing and storing job much easier, and there isn't any need to find a separate container to keep the jig in.
Which one is superior? - Kreg K5
Other Features
In the K5 master system, there is a recess that makes a place for the clamping tool to fit. The tool can be secured to your work table, and this is the same for both K4 and K5. However, the difference in the K5 jig is that it has a front mounting clamping system that includes an ergonomically designed handle.
To use this, you have to apply a little pressure and move the handle downwards, away from the jib and the table. This is an update to the older model and allows for a firm grip of the material, which does not move while cutting.
Functional Differences Between Kreg K4 And Kreg K5
Usage
Kreg K4 is designed keeping in mind newer woodworkers, so they are pretty easy to use and don't need elaborate instructions. Since it is made for beginners and DIYers, the parts aren't too complex either. On the other hand, if we compare this to the Kreg K5, it is pretty clear that this model is more advanced than the K4.
There is nothing surprising about this because most companies like to release new and improved models from time to time. In the same way, you can consider the K5 as a better and improved version of K4 and other previous models.
However, there is one specific function for which K5 is designed. Kreg K5 is pretty much the best jig when it comes to enhanced pocket joinery machining. So, if this purpose is essential for your builds, it doesn't get much better than K5.
Clamp And Dust Collector
Kreg K5 has a new feature that was not previously available with the K4 model. It has a swiveling dust collector port to allow the user to attach pipes for efficiently removing dust while working. Since this dust port can swivel, it gives a wider range of movement. They don't provide any other kit for dust collecting, so you'll have to purchase that separately.
K4 does not have this feature, but it does come with a toggle clamp. This toggle clamp is pretty durable and can be used to secure wood components in position securely. The clamp provided with the K4 model can hold thicker materials firmly and are overall reliable.
Project Size
Those of you who are going to build elaborate wooden pieces, the Kreg K5 would be preferable. The overall features of K5 are more than enough to support large-scale projects and fulfill all the needs for evenly cutting larger wood panels.
However, for smaller projects like wooden tables, kitchen cabinets, garden benches, crates, small dining tables, the Kreg K4 model would be good enough.
Price
If we compare the price, the K5 is priced a bit higher compared to the K4. However, if you think about it, K5 significantly improves almost all the aspects of the previous models. It even comes with extra features providing much more versatility than the K4. This is why it also costs more than other models, including the K4.
The Major Differences - Summary
Forward Facing Clamp Lever in K5 allows for smoother operation
Storage Wings in K5 help with storage
In-built clamp In K5 makes for easier and faster woodworking
Our Verdict - Is There A Winner?
Without a doubt, the better jig is the Kreg K5. It has more features than the previous models and was a pleasant improvement to the K4.
Not that K4 is a subpar product. In fact, K4 has plenty of valuable features, which make it a great product to start woodwork for newbies. Besides, not everyone needs an overly powerful and advanced system, especially not those invested in house repairs and DIY.
Which One Should You Buy?
Making a selection of the best model will depend on your needs and purpose. Although one model is far better than the other in some ways, it might not be the right choice for you.
If you are a woodworker or love to DIY for home improvement, the K4 would be enough to take care of all your needs. The older but functional model would be a reliable choice for repairs and building smaller objects in your garage or backyard.
Since the K4 is priced on the lower end, you can keep that in mind if you are working within a budget. The best part is when selecting this option; you are not compromising on quality; thus, you get a low-cost yet good-quality product.
Alternatively, if you are a professional material fabricator or woodworker, you might need a robust system that can last many hours of heavy work. If that is the case, then the K5 would be better suited to your work since you might need to use it for long hours.
Final Words
So, here was our comprehensive comparison between two of Kreg jigs - the K4 and the K5.
We hope the information in this guide helps you to make the best decision based on your woodworking needs. As we already mentioned, we did find that Kreg K5 was the better choice out of the two.
However, your work experience, the scale of work, and the frequency of work will decide which model you finally purchase.
All you need to know about K4 and K5 jigs are listed in this article. So, feel free to come back if you want to check on some info again. If you already have either of these jigs, do you agree with our comparison? Tell us about your experiences in the comments below.
It’s 2022, and we have a variety of wood glues in the market, and some of them are stronger than the wood itself!
Specialized glues for various repair tasks have recently cropped up, so if you’re looking to do some joinery work, you could look into using wood glue instead of clunky tools. It may sound like a far-fetched dream, but you’ll be surprised at just how effective an adhesive can be!
But, there are many brands available in the market, so how do you figure out which one to get? After a lot of research, we narrowed it down to the Gorilla wood glue and the adhesive from Titebond, which are the leading products in this field, in our opinion.
So, without further ado, let’s jump into this guide on Gorilla wood glue vs. Titebond, and let’s see which one is the better pick of the two!
1.Gorilla Glue
First, let’s look at this wood glue from Gorilla, which is multipurpose and can be used on different kinds of wood. It is ideal for soft or hardwood surfaces and natural wood composites. Plus, Gorilla is a reputed American company known for making quality products, and this glue is no different!
This wood glue is also suitable for DIY projects and is one of the most popular products available in the field of wood glues. Interestingly, it looks white when you look at it in the bottle, though it has a slightly deeper shade when it dries.
Moreover, Gorilla wood glue is a PVA, water-based glue. As such, it is easy to use and fast-acting, taking only half an hour to clamp and one day to cure. It is a user-friendly adhesive, and you also have the option of sanding off extra glue that might have spilled over onto the surface of where you were working.
Another fun fact about this wood glue is that it matches type ii ANSI and HVPA guidelines. This means that it's a breeze to use the glue outdoors since it's water-resistant and unaffected by mold. In addition to that, it doesn’t contain any added dyes, making it relatively safe.
What’s more, it’s suitable to use around food items and in the kitchen since it has been approved by the FDA.
Steps to Use
Step 1
Ensure that the surfaces you need to glue together are clean and dry. Also, make sure that they’re evenly cut and free from dust specks.
Step 2
Give the gluing process a trial run before applying the glue. Hold the pieces together and mark out how you want them to stick.
Step 3
Next, you have to add just the perfect amount of glue to the wood surface. This is probably the most crucial step since using too little glue will not provide a strong bond. However, applying too much glue might make things messy and tedious.
Step 4
In order to achieve an even distribution of glue, squirt a bit onto one spot and use a glue brush to spread it.
Why Did We Like It?
First off, Gorilla Wood Glue is easy to clean up if there’s an accidental spill. All you need is water and a washcloth, and you’re good to go. We also like how the glue is ultra-non-toxic and, thus, safe for people of all ages to use. So, if your children need to use it, there’s nothing to worry about!
Another remarkable fact about this product is that it doesn’t corrode or lose its adhesion even if exposed to sunlight or rain. So, we can say that the gorilla wood glue is waterproof! In addition to that, it can withstand both hot and dry weather and thus, is heat resistant.
We also liked how it expanded once used, making it strong and long-lasting.
What Could’ve Been Better
Despite all the advantages of the gorilla wood glue, we did, however, feel that it isn't as durable. Sometimes it dries up in the bottle itself if it hasn’t been used for an extended period of time. A probable reason for this could be the fast curing time of the glue, which kickstarts the drying procedure the moment it's exposed to any air.
Another thing the manufacturers could work on is the fact that this product does not work as efficiently with projects that require gaps to be filled.
Important Points To Be Kept In Mind
The glue can’t be used for heavy-duty projects with a structural focus (like load-bearing) but can be used to reinforce mechanical fasteners.
The glue is to be strictly used with wood and can’t be employed to stick plastic together.
Since Gorilla Wood Glue is PVA-based, it doesn’t foam.
It comes packaged in an attractive bottle with a nozzle that prevents excess glue from squirting out.
2. Titebond Glue
The other wood glue on our list is this one from Titebond, which is well known for its outstanding results when it comes to heavy-duty woodworking projects.
One of its most distinctive features is that it takes very little time to set. It needs one hour to clamp, which is exceptional, considering that it can pull off heavy-duty activities seamlessly. Titebond also adheres to type i ANSI and HPVA specifications which means it has superior resistance to water.
Titebond, too, has been approved by the FDA when it comes to indirect contact with food, and it’s relatively non-toxic as well. This is a helpful feature to have in case children come in contact with the glue.
Additionally, if you’re a messy worker and tend to glue yourself while working, fear not! Titebond can be easily washed off clothes when it still hasn’t dried up. This is important because Titebond isn’t a transparent glue- it looks yellow while in the bottle but turns to a brownish color post-use. This factor is also quite thoughtful- due to its brown finish, it blends right in with the wood.
Another fun fact about this product is that it is PVA glue, and thus, it doesn’t expand or foam. As a result, Titebond provides better adhesion than other kinds of polyurethane glues available in the market.
Steps To Use
Step 1
Make sure that the wood surface is clean before you begin working with the glue. A portable band saw may be used to make the edges clean and sharp. We recommend against using a handsaw since that leads to uneven edges, which create issues when you try using the glue.
Step 2
Next, it is imperative to ensure that the wood contains a moisture content of less than 6-8%. Additionally, the humidity of the workspace also needs to be below 50% for optimum results.
Step 3
Once the preceding steps are followed, the glue is ready to be applied. Take care to apply just the amount necessary- not too much and not too less. Applying excessive glue will result in the adhesive spilling over and creating a mess, whereas scarce application will result in a weak bond.
Step 4
Once the glue has been squeezed out onto the surface, it must be spread as evenly as possible with a glue brush.
Step 5
Lastly, hold the newly glued surfaces together using a clamp, and make sure to apply just the right amount of pressure. The glue might ooze out from the joining point if you press too hard. Conversely, a lack of pressure will lead to a bond that might break.
Why Did We Like It?
For starters, we liked how the setting time of this glue is minimal, which also means it takes significantly less time to clamp. Titebond wood glue is also solvent-resistant and thus, can be used pretty easily outside.
A highlight of using Titebond glue to bind your wooden items together is that the bond produced by the adhesive is stronger than the wood itself! Moreover, it’s a piece of cake to clean up any extra spillage on the wood- it just needs to be sanded out. You can, additionally, use water to clean up any remaining mess.
What Could’ve Been Better
To our dismay, though the glue makes pretty strong bonds, it cannot be used in cases where a lot of loads is to be born or structural joining is needed to be done. Moreover, one must take care of the conditions under which they are storing the glue. If kept at a very low temperature, the glue begins to thicken.
We also ran into another problem while using this adhesive. Right around the glue joint surface, we noticed a stain. This marred the look of our project significantly and was rather disappointing.
Important Points To Be Kept In Mind
In case the glue gets on your clothes, dampen the area immediately and wipe it off while it’s wet.
Ensure that the moisture level doesn’t go above 10%.
How are the Wood Glues Similar to Each Other?
1. PVA-Based
The major similarity between the two wood glues is that both are used for wood-to-wood adhesion and are PVA-based. This means that they don’t foam or make the bond weaker on application.
2. Waiting Time
In addition to that, the waiting time for both glues is similar. You have to wait 24 hours before you can safely test the strength of the bond.
3. Reaction To Low Temperatures
Another likelihood between both the products is that none of them react well to low temperatures and might become ineffective if exposed to a cold environment.
How are the Wood Glues Different from Each Other?
1. Time Taken To Create Bonds
One of the key differences between the products is that the Gorilla wood glue takes longer to create bonds. Whereas, Titebond sticks almost instantly upon application and takes far less time.
2. Scope Of Use
Apart from that, the scope of use of both types of glue also differs from each other. Titebond works most effectively with grain surfaces, and Gorilla Glue performs well on surfaces that are cross-grained.
3. Color
Moreover, as we mentioned above, Titebond tends to leave a brown color once applied, whereas Gorilla Glue is whiter.
4. Shelf Life
Titebond also has better longevity since it has a greater shelf life. Unfortunately, Gorilla Glue tends to dry up faster because it reacts more strongly with the atmosphere.
5. Strength Of Bond
Perhaps the most crucial difference is that Titebond is superior when it comes to spreading the glue. It has more viscosity, which is why it percolates into the pores of the wood and creates a sturdy bond. Comparatively, Gorilla Glue is thinner and doesn’t spread as well.
So, this means that Titebond has a stronger bond than Gorilla Glue since the latter can get shaky at the joints after some time has passed.
Conclusion
So, how do both products stack up against each other? After an in-depth analysis of the features of both the adhesives, we can see that Titebond comes out on top. Though Gorilla Glue has its advantages, it ultimately loses to Titebond in terms of overall functionality.
Titebond bonds almost instantly have a lot of glue strength and provide a strong bond. When it comes to adhesives, time taken and the strength of the bond are the most important factors to be considered, and Titebond makes a clean sweep in both categories.
However, if you’re looking to get something that doesn’t have a distinct color, you could consider the Gorilla wood glue. Since it dries clear, it will ensure that the appearance of your project remains unsullied.
With this, our guide concludes, and we bid you adieu. We hope you found it valuable and unbiased, and we shall see you again soon with more of these.
Take care and stay safe!
Super glue can be a pretty useful material for a DIY enthusiast. You can use it to put most broken things back together in a jiffy!
This fast-acting glue is not only strong but is also durable. In other words, it binds two surfaces together firmly for a long time.
On that note, many things we own today are made from leather, be it footwear, furniture, or apparel. And if they break or come apart, you may be tempted to use super glue instead of good old leather glue to put them back together.
But can super glue be used on leather surfaces? The answer is yes, you can, but only if the repairs needed are minor. For major repairs, however, it won’t be a very viable option. Also, removing any glue from leather, whether it is super or other adhesives, is a very tricky job if you don’t know how to properly remove that.
If you are wondering why super glue is not a viable option, keep reading because that’s what we have addressed in this brief guide.
FUN FACT | Do you know what looks like leather and almost feels like leather but not is leather? It's called faux leather!
And, of course faux leather is also prone to cuts and tears just like real leather. These damages can be fixed with specialized glue for faux leather.
So, without further ado! Let’s get to it!
What Is Super Glue, And How Does It Work?
As we have said before, super glue can be used to strongly bind two surfaces together. In this regard, the basic function of this product is the same as any other glue.
But the main point of difference between regular glue and super glue is the mode of function. Unlike standard glue, the latter acts relatively faster and can bind surfaces together in a short while. In addition, it is stronger than regular glue, due to which it is widely used for industrial applications.
Now, the primary ingredient in super glue is cyanoacrylate, which is what defines “super.” It is an acrylic resin that forms strong bonds almost instantly in the presence of hydroxyl ions.
These hydroxyl ions are found in water, and even trace amounts of them can trigger the compound to form bonds. The solvent of this glue contains water, and you can find water in the form of moisture in the air.
So, once you apply the glue on two surfaces, these water molecules trigger the cyanoacrylate molecules to start forming strong bonds almost instantly. This ultimately binds the surfaces together with a relatively strong bond.
However, once it has cured, further exposure to water may weaken the bond instead of strengthening it. That is why super glue is typically used to bind surfaces, such as wood, metals, or plastic together. Since they are non-porous, they do not allow any further contact with water molecules, due to which the bond lasts for a long time.
Can Super Glue Be Used On Leather?
Now that you know what super glue actually is and how it works, it’s time to get back to the original question. In that context, you can use super glue on leather, but only in small quantities, and for binding small portions of the leather surfaces.
Keep in mind that super glue is not designed to be used on leather surfaces. So, if you use it to bind large leather surfaces together, it will look fine at first but will most likely not last very long.
There are a few reasons why super glue is not suitable for binding leather surfaces together, which have been discussed below.
Leather Is Not Very Rigid
Metal, wood, and plastic surfaces are relatively rigid, due to which the super glue can remain bonded for a long time. In contrast, leather is a flexible substance that can be easily folded, stretched, or twisted. So, if the glue is subjected to such shearing forces, the bond might break.
If you apply it over a small area though, the shearing forces will be less compared to when you apply it over the whole surface. That is why it can be effectively used to bond small portions of the leather.
Leather Has A Porous Surface
The leather surface is highly porous compared to metal, wood, or plastic, which have no pores. And this porous surface makes it easy for water molecules to pass through.
We have already mentioned that after setting, the bonds of super glue become weak when they come into contact with water. Thus, the water passing through the porous surface weakens the bonds between the leather surfaces.
Super Glue Reacts With The Leather
The bonding process in super glue is an exothermic reaction, which means that it generates heat when it binds two surfaces together. So, if the glue is applied on a leather surface, the heat generated from the reaction may damage it.
As a result, the leather may become discolored or deformed. And that makes super glue unsuitable for binding leather.
What Glue Can Be Used On Leather?
While leather cannot be suitably bonded with super glue, there are other adhesives that can be used for it. Specialized glues, such as rubber cement or contact cement glue can be used instead. These adhesives are especially suited for binding leather surfaces together.
Can Super Glue Be Used On Leather Final Words
Super glue is indeed useful if you want to undertake some quick repairs. Its speed of action, strength, and durability makes it great for metal, wood, and plastic. But in the case of leather, you can only use it for minor repairs because of the reasons we have discussed.
However, you can use other glues for the purpose, which we have specified in this article. So, the next time you find yourself in a sticky situation with leather, you can use these adhesives instead.
And that brings us to the end of this short guide. We hope that it has been able to satisfy your curiosity.
So, until next time, goodbye!
If you are new to woodworking, you must be wondering can you use super glue on wood.
Guess what? We have the answer right here! Woodworking requires a fast drying time, and that is possible with a number of glues. You will want to use something to glue wood that can bind surfaces together and prevent them from separating in the long run.
It would be best to create a protective layer on top of wood surfaces which will provide an excellent finish and increase the impact resistance of the surface. Additionally, super glues provide greater control to ensure that wood and metal surfaces are securely glued together.
We will now be telling you in this informative read about how super glue can be used for wood. Read on to learn about the details.
FUN FACT |Did you know heat resistant glue for metal is very important for long term bonds?! If your metal-to-metal or metal-to- wood glue is not heat-resistant, then any one of them can peel off!
Now, without further ado, let’s begin.
Can You Use Super Glue On Wood
A lot of carpenters or DIYers use super glues for glue work on wood because of the beneficial features that they have. Super glue can create bonds that are firmer than even wood itself and you will not be able to separate the two surfaces once the glue has worked its magic.
That is not all; a lot of DIY projects involve using super glues with models, carvings, and craft items for furniture, décor pieces, and garden accessories.
Wood Glue V/s Super Glue: A Comparison
Super glues and wood glues are two glue types that are currently very popular on the market. From the name, it feels like wood glue is supposed to be the best for gluing wood, but that is not always true. It generally depends on the type of project that you are working on.
If you are working on large and complicated projects, then wood glues or PVA glue are a better option. That is because wood glue is cost-effective and can be used on a large wood surface or for complex projects where clamping is possible.
However, super glues work very well for small and simple woodworking projects. Suppose you are building a toy or working with wooden threads for an artifact that cannot be clamped together, super glue will be helpful in such a scenario.
But know that using super glues for larger projects can be very expensive and not sustainable because when compared with wood glue, super glue is stronger. To sum it up, woodworkers generally keep both types of glue handy for all kinds of projects.
They might be working on one surface, which is large, along with a few smaller projects simultaneously for which both adhesives are needed.
Uses Of Super Glue
In this section, we have a list of the most common uses of super glue. They are:
1. Repairing Objects
Super glue works perfectly well for repairing and woodworking. It is a quick-drying formula that can be used to repair wood pieces when working on small projects. For example, if your kid has broken a small wooden toy, then you can immediately fix it with this glue. And there is no need to drill or screw a nail to fix broken items.
2. Fill Gaps
Super glue works very well in filling gaps as well as to mend wooden objects. It can be used to fill grooves and holes in wooden pieces to ensure a clean finish. Now it is not dense or thick enough to work on its own; rather, you will have to mix super glue with wood dust to attain the right texture.
You can safely apply it to most gaps and one of the top benefits of using this type of wood filler is that it dries quickly. People can easily fix small wooden toys as well as furniture with it.
In case you do not have wood dust, you can use baking soda, which is mixed with super glue. This will also work for gap filling, but we will recommend wood dust if it is available. Wood dust can create a thick layer and can then be sanded as well as drilled when needed.
Once the job is done, you can apply paint or wood finish over the sanded surface to have a professionally coated wooden object.
3. Putting Parts Together
Super glue can be used as a strong adhesive to put together different parts, as it features amazing capillary action, which is stronger than general glue. You can use it to join materials together in order to create something new and a lot of people use it for DIY projects or crafts in school.
Moving on, you may be wondering if it can be used for toys that are not completely made of wood. The answer is yes; you will be able to attach the small parts and make them look better.
Another huge benefit is that super glue offers permanent and strong joints. If you wish to create a very strong bond, then just rub the wooden surfaces together with glue and press them together. Let the surfaces dry, and you will have perfectly connected pieces.
4. Investing Time In Waterproof Wood Projects
Some variants of super glue are waterproof and do not get affected by precipitation, humidity, and exposure to outdoor conditions. These types form a water-resistant bond that keeps the furniture or the object safe.
You can use premium-quality super glues if you are working on an outdoor project. The glue works to prevent the parts from falling apart even on a stormy day because of its permanent hold. Even if the entire object gets wet, the wood joints will not be affected at all by this.
While looking for super or cyanoacrylate glue, you will need to opt for a water-resistant option specifically for outdoor objects. The label should mention that it is waterproof to help you get the best results.
5. Providing A Coating
If you are into making small wooden jewelry or wooden toys, then cyanoacrylate glue can be used for the job. It can provide a beautiful coating that looks attractive and protects the product as well. Such a coating protects the wood pieces and carvings from water and scratches. It adds a very resistant top coat and will keep the item safe for a longer time.
But coating large wooden surfaces with it can be time-consuming as well as expensive, which does not make sense.
Is Super Glue Suitable For Wooden Cookware?
We already know how well super glue works for most kinds of items except fabric. However, it is not food safe and should not be used on wooden cookware of any kind. You should not even use it for cutting boards or other wood accessories kept in the kitchen. That is because it contains a toxic chemical called cyanoacrylate, which should not be consumed at all.
Do not use super glue for any product that goes into the microwave, as super glue is highly inflammable and can catch fire very easily. If you need to repair any cookware, it is best to use glue that is food safe and this will be mentioned on the pack itself.
Does Super Glue Take Time To Dry When Applied On Wood?
If you have worked with super glue before, then you must have seen that it dries to touch very quickly. But please know that even if it feels dry, it might not have finished curing. Some glue brands say that their super glue will dry within seconds, while others say that their product can take a few hours to dry well.
We will recommend letting the glue cure on wood for at least 24 hours before touching and moving the object if you have applied a thin coating. And if there is excess glue, it will take longer for it to dry.
Some low-quality glues do not dry well and will form a rubbery layer on top. These are to be avoided, and if you are confused, we will recommend purchasing Gorilla super glue from the market. The Gorilla glue has an average price and dries almost instantly which is why it is used by a lot of professional woodworkers to do their job.
You can also use Loctite super glue, which is very strong and is a popular choice among users.
While we have discussed super glues, let us talk about wood glue as well so that you can compare both. Wood glue is thin and will seep into gaps and holes on the surface. This will reinforce wooden threads to create a strong bond.
It will take 24 hours to cure completely, and the time period will increase if you are using more glue. So, avoid using too much of it as you might end up with a rubbery finish, just like excess super glue.
Steps For Using Super Glue On Wood
We will be discussing the process of applying super glue on wood. Remember that the procedure is pretty similar for filling cracks in wood and joining materials.
Step 1: Preparation
The first step for woodworking projects is to get all the parts in place. Remember that super glue can dry quickly and everything needs to be in place beforehand. Otherwise, you might have trouble moving the pieces around if they do not fit properly.
Make sure that the wood pieces are attached properly to each other with no gaps on the side. They should be aligned precisely and clamped if needed.
Step 2: Sanding
Clean the surfaces well so that the glue can stick to the wooden surface. For this, you will need to sand the surface and scuff it up with fine-grit sandpaper.
Step 3: Glue Application
You will generally find super glue in gel or liquid form. Add one drop to the surface and then immediately put the pieces together by pressing and holding for around 30 seconds. You can even use a clamp for this purpose, but use it for the first half an hour before letting the item dry naturally.
Leave the wooden object to rest for 24 hours so that it can cure fully.
Step 4: Cleaning
After you are done with the work, you can use a razor blade to remove any excess glue that is sticking out. Ensure that the entire surface is clean, and you can sand the surface if needed.
Is Super Glue Tougher Than Gorilla Wood Glue?
Gorilla wood glue is also known as polyurethane glue which is stronger than cyanoacrylate glue. It generally is very durable and lasts for a long time. So, yes, if you find Gorilla glue, then go ahead and use it for your wood projects, as not all super glues work well for all kinds of projects.
Other PVA glue options may not work well either, and you can opt for Gorilla super glue or Loctite super glue to get the desired results.
Does The Color Of Wood Change After Application?
Wood glue can be white or yellow, depending on the brand. White glues form a clear layer and will not change the color of the wood but if you are using yellow glue, the color might dry with a yellowish tinge. Let the color match your project and have it blend well with the surface.
Can You Use Super Glue On Wood Final Words
Before purchasing, we will recommend checking the shelf life of the glue tubes. If you are not going to work on large surfaces, purchase polyurethane glues or super glues which will last for a long time. There are good options to choose from, including CA glue, Loctite super glue, Krazy glue, and Gorilla glue.
Check for an anti-clog cap which will prevent the glue from drying out and clogging. Moreover the best glue will ensure that the bond created will be tough and impact resistant. The joints should be in perfect contact and the bond stronger than the wood itself.
With this, we will now be wrapping up the guide, and we hope you have a clear idea about how to use super glue. Until next time!
Usually, products made of particle boards can hold up to 45 lbs. However, the integrity of particle boards largely depends on the manufacturer, the materials used in construction, how and where they are used, etc.
Particle boards are used as lightweight household solutions, but it is often difficult to find the best screws for a particle boardand determine how much weight it can hold.
Surprisingly, despite being less durable than medium density fiberboard, when used in combination with other solid wood products, particle boards can hold a lot of weight. So, here’s a breakdown of how much weight this affordable yet functional engineered wood product can hold…
What Is A Particle Board?
Particle board is a low-density fiberboard or chipboard, mostly used in making doors, false ceilings, parquet floorings, and flat pack furniture like kitchen cabinets, bookshelves, etc. It is made of waste wood chips, sawmill shavings, and sawdust. These wooden parts are bound together with Urea Formaldehyde or any other synthetic resin or binder.
Types Of Particle Boards
1. Cement-bonded Particle Board
This type of particle board contains 60% of portland or magnesium-based cement. Then the waste wood chips and wood fibers make up 20% of the composition, with the rest being water.
As a result, this type of particleboard is highly moisture-resistant, making it suitable for constructing walls, floorings, and ceilings. This material also repels fire, rot, and termites, so it is a versatile material for making furniture products.
2. Laminated Particle Board
This particle board features a layer of thin laminate sheet, making it more durable and visually appealing.
3. Melamine Particle Board
The surface of this particle board boasts a mixture of melamine and decor paper. And the construction of this wooden product includes wax emulsion and melamine-urea formaldehyde resin. Thanks to these materials, melamine particle boards resist water damage and scratches.
Plus, it is available in various attractive colors and textures, making it the top pick for furniture, wardrobes, wall paneling, etc.
4. Veneered Particle Board
As the name suggests, this variant of particleboard has a thin layer of wood veneer attached to the surface. One of its biggest advantages is its durability against warping, compared to other types of particle boards.
5. Single-Layer Particle Board
When same-sized wood particles are pressed together such that they form a flat surface, they form a single-layer particle board. While they are water-resistant, they are not completely waterproof. However, the flat surface can be plastic laminated or veneered to enhance its durability.
6. Graded-Density Particle Board
This type of particle board is made of thin layers of fine wood particles and coarse wood fibers. It can be used to make wooden furniture and cabinets.
7. Three-Layer Particle Board
Particle boards containing layers of highly dense wood particles and large wood particles form this three-layer variant. They contain generous amounts of resin and feature a smooth surface, ideal for painting.
How Much Weight Can Particle Boards Hold?
To understand this more deeply, know that a particle board has a Modulus of Rupture (MOR) value ranging from 16-22 MPa. MOR determines the bending strength of materials, with the value of the particle board being equivalent to 224 kg/cm². Hence, a regular particle board desk can hold approximately 32 lbs.
However, when mixed with other wood products like medium density fiberboard (MDF) and plywood, particle boards may support up to 45 lbs.
As such, MDF can hold approximately 80-300 lbs per square foot depending on the quality of screws used. Similarly, ½-inch plywood can hold up to 35 lbs while the same material of 1-inch thickness can support up to 164 lbs.
Basically, the strength of the final structure depends on its thickness and the manufacturer as well. So, even though particle boards are more affordable than other materials, they are not always inferior.
Does Particle Board Break Easily?
Unfortunately, yes. Since particle boards are made of wood composite held together with resin, they cannot support heavy loads. The lack of a wood grain structure also lowers its strength.
Another major flaw of particle boards is their inability to resist scratches. Even the edges and corners of any product made of particle wood can get scratched and end up getting rough.
Not to forget, finding suitable screws for particle boards is a Herculean task due to the low integrity of the board. As such, specialized fasteners like chipboard screws are one of the few types of screws that can be used on a particleboard product.
Last but not the least, water damage is the most common culprit behind easily breakable particle boards. So, if you live in an extremely humid environment, you may notice particle board products losing their integrity and functionality sooner than, say, MDF boards.
How Long Can Particle Board Last?
Flat pack furniture made of particle board may not last more than a year. However, if manufactured well, they may last for upto five years. Not to forget, the durability of the product will also depend on how you use it.
Warning
Always check for warranties when buying particle board products. Most of those sold online do not have any form of warranty at all, so you must stay cautious.
How To Make Particle Boards More Durable?
Since moisture and humidity are major deterrents to the integrity of particle boards, you must avoid these two factors to ensure they last long. I recommend using suitable sealants (consult the manufacturer for this) around the edges and the surface of the particleboard product.
Framing or bracing the product with aluminum can also help increase its durability. Other products that can be helpful in this regard are plain lacquers and sanding sealers. Alternatively, you can laminate the particle board for more protection.
Tip
Try stacking two or more particle boards together, or use them in conjunction with plywood and MDF boards for additional support.
How To Repair Peeling Veneer On Particle Board Cabinets
Start by holding back the peeling laminate with a pair of pliers and then apply contact cement. I suggest using a paintbrush to do so.
Warning
Ensure that you apply the cement on the particle board and not on the peeling laminate. Wait for the cement to dry completely before pressing the peeling laminate back to its position, or else your efforts will go in vain.
I further recommend using a J roller to ensure all the peeling portions are back in place.
Method 2
If the peeling occurs in difficult parts, wherein you’re unable to clamp them together, try using a spray adhesive. Just pull the peels apart, spray the adhesive, and press them all together. Again, use a J roller to ensure a smooth surface.
Method 3
If the peeling laminate is too damaged and cannot stick to the particle board, no matter how hard you try, it’s best to get rid of it. You can loosen the glue with a heat gun and carefully remove the damaged pieces. Thereafter, you can follow the first method to add a new lamination.
Method 4
Dry the wet particle board with a hair dryer. Once completely dry, use medium grit sandpaper to sand the particle board. You may use finer grit sandpaper towards the end of the sanding process.
Thereafter, wipe off the dust and let the particle board dry again. You can use an electric dryer or let it dry naturally.
Finally, apply a waterproofing agent and let it dry.
What Is Particle Board Good For?
1. Cheaper Than Medium Density Fiberboard, Plywood, And More
Considering the low integrity of particle boards, you may be wondering if they are even worth it in the first place. Well, they are ideal for constructing versatile work surfaces, especially for homeowners on a budget. In fact, they are often used as cheaper alternatives to plywood and MDF to reduce construction costs.
2. Lightweight And Convenient
Products made of particle board are lightweight, making them easy to move around. So, if you do not have the means to move around heavy household items, it is best to opt for particle board.
3. Smooth Surface With A Stylish Look
Particle boards can lend a minimal and tidy look to your space. And with the large variety of colors and textures available out there, you won’t have to spend a lot for a stylish household environment.
4. Eco-friendly
Interestingly, particle boards are much better for the environment since they are made of composite material and waste wood. So, when you purchase a particle board, you are less likely to cause any felling.
How Much Weight Can Particle Board Hold Conclusion
Although particle boards cannot hold heavy items, they are widely used in flooring, wall paneling, and even in the commercial industry. Hence, with proper care, well-manufactured particle boards may last longer. Just ensure you do not keep them exposed to moisture and humidity, and you’re good to go!
If you found this article informative, I recommend checking my guide on “can you paint particle board?” And with that, I’ll be signing off for the day.
Until next time!
Tired of the dingy, old-fashioned furniture in your dwelling? It’s time you go to furniture stores and revamp your home with modern and elegant pieces.
Shopping for furniture online or visiting a physical store? We prefer the latter, because what could be more gratifying than snuggling down on a bunch of assorted recliners or trying out beds, furnishings, and sofas to your heart’s content.
But with zillions of furniture stores out there, how do you know which one’s the best to explore? That is where the internet walks in. You can explore all the different couches, recliners, and every furnishing trending currently, with just a click.
With that in mind, we are letting out the best furniture stores in Houston that you can walk in and get your old furniture replaced with modern ones.
So, without further ado, let’s check them out!
Best Furniture Stores in Houston
The Amish Craftsman
Location - 5555 Washington Ave Suite M, Houston TX 77007
Want to revamp your dining space, living room, bedroom or office space? The Amish Craftsman has it all. This boutique store creates some of the best furniture that’s not only unique and stylish but is also designed to last a lifetime.
Handcrafted in the USA by the Amish Craftsmen since 1926, you can also customize sofas, beds, loveseats, and other types of furniture you have in mind. So, you don’t have to settle for anything less than what you want.
The Amish Craftsman store also features pieces for home decors. This boutique store is something you should surely explore, for it will cater to all your needs and requirements.
Exclusive Furniture
Location - 12200 Gulf Freeway Houston, TX 77075
With 7 exclusive stores in Houston, Exclusive Furniture has been offering affordable furniture. Be it your living room, bedroom, dining room, or even office - Exclusive Furniture is the one-stop solution for all your furniture needs.
Since 1988, they have been the leading manufacturer and producer of top-quality furniture in Houston. If you are looking forward to visiting one of its showrooms, we recommend you visit the one at Gulf Freeway road.
Apart from furniture, they also offer mattresses and home decor pieces. With their friendly customer service, you are sure to find the right furniture within your budget.
Noel Furniture
Location - 2727 SW Freeway Houston, 77098
Looking to adorn your home with something unique? Noel Furniture is a furniture store you must not miss. Designed by designers, Noel Furniture offers everything for your home.
From premium furniture for living rooms or bedrooms to hand-woven carpets, you are sure to discover an assortment of exclusive items to furnish your place. Whether classic or modern, Noel Furniture caters to every taste.
Houston’s leading furniture showroom also offers design services. Just walk into the store and get assisted by their designers. Schedule an appointment today and transform your place into the house of your dreams.
Fond of handcrafted furniture? Living Designs Furniture has it all. Get everything at factory prices without compromising on quality. Whether it is that exquisite couch or that upholstered bed that you’ve seen online and wish to have in your bedroom, Living Designs Furniture can make all your dreams true.
You can choose from thousands of fabrics, and rest assured you won’t be disappointed. Handcrafted in Texas, they offer premium quality, exclusive furniture at affordable rates.
Rush to their showroom factory to collaborate with their design team and create the perfect furnishing for your home to transform your space.
Nadeau - Furniture With A Soul
Location - 1502 Durham Dr Houston, TX 77007
Nadeau offers exclusively handmade furniture from all over the world at incredibly affordable rates. Because they are handcrafted, each piece of Nadeau’s furniture has a soul. Every piece of furnishing is specifically designed to add grace and warmth to your living space.
From carved tables for your living rooms to bookcases for the reading room, Nadeau has everything that you will want. Their pieces are going to adorn your space and completely remodel them.
The carved mirror frames of Nadeau are really beautiful and would be an ideal piece if you want to add something eye-catching to your living room. If you are fond of boho décor, then you must pay a visit to their store.
La Sierra Home Furniture
Location - 11245 Southwest Fwy, Houston, TX 77031
La Sierra Home Furniture is one of the finest furniture stores in Houston which aims at providing a lavish living to you while being easy on the pocket. If you want to breathe life into your living room and bedrooms, pay a visit to the La Sierra furniture showroom.
You will find everything from love seats, sofas, beds to decor and mattresses. Their unique furnishings will breathe life and add beauty to your space. Want sofas, beds, or any other furniture to be customized your way? Head on to the La Sierra showroom - they will design precisely what you have in mind.
Modani
Location - 5370 Westheimer Road, TX 77056
One of the best furniture stores not only in Houston but also in the United States, Modani caters to almost all your furniture needs from the living room to bedroom, outdoor, and offices. Also, you will find sculptures in its showrooms which can add to the aesthetic appeal of your living space.
Love decorating your walls? Modani has a wide variety of wall arts to choose from. Although they specialize in contemporary design, you will find a few vintage pieces as well. Because of their exclusive collection, Modani has become a favorite store amongst celebrities and interior designers.
Star Furniture
Location - 18107 North Fwy, Houston, TX 77090
Star Furniture store is one of the oldest furniture stores in Houston. If you are looking for quality and durability along with comfort, head on to the Star Furniture showroom. Plus, their unique pieces add beauty to your space.
Their showroom consists of a wide variety of furnishings - from armoires to dressers, cocktails, standard ottomans, rugs, and lamps. They don’t compromise with quality, and so, they are slightly more expensive than other stores. You can also order online through their e-store.
Featured on Houstonia, Tidbits, Mid In Mod furniture store is ideal for those who have a fondness for mid-century modern design. They excel in mid-century modern furniture, and this is why they are ahead of the game.
They offer leather sofas, lounge chairs, dining tables, and a lot more. Want to order that favorite couch or anything that you want? You can now shop online from the comfort of your home. Moreover, they ship orders within 3 - 5 business days.
Home Source Furniture Post Oak Showroom
Location - 1705 Post Oak Blvd, Houston, TX 77056
If you love decorating your house from pieces around the world, then Home Source Furniture is the perfect place. Their showroom consists of a variety of handcrafted pieces imported from China, Indonesia, Central America, and India.
With stunning elegant pieces from Home Source Furniture, you can give your house a complete makeover. Their furnishings are pretty affordable. So, you can beautify your house within your means. Their handcrafted pieces are unique and have a soul of their own. Visit their showroom today and browse through their exclusive pieces to get your favorite one.
Bi-Rite Furniture
Location - 7114 North Fwy, Houston, TX 77076
Are you looking to give your bedroom a complete makeover? Bi-Rite Furniture has it all. Whether you are in the quest for furniture for your bedroom, living room, or dining room, take a look at of Bi-Rite Furniture showroom.
Moving on, they have a warehouse behind their showroom, and so you can take home your favorite piece. Also, if you are too lazy to visit the store, you may choose to shop online. Just place an order on their website and wait for your furniture to be delivered.
You can browse through a wide variety of furniture of various styles and materials by stepping into the Furniture Town showroom. Whether it is your living room, bedroom, office, or outdoor requirement, their pieces can add beauty to your living space.
Stepping into their showroom, you will be taken into a different world of furniture where you will come across all kinds of bed styles - from canopy beds to platform beds and upholstered beds. Whether you are looking for a new dresser, mirrors, or a complete set, Furniture Town has it all.
Gallery Furniture
Location - 6006 North Freeway, Houston, TX 77076
Gallery Furniture offers furniture of the highest quality, manufactured in the United States at the most reasonable prices. You’ll love the warm, friendly atmosphere of the employees at the Gallery Furniture showroom.
The showroom is furnished with plenty of styles, finishes, and varieties to choose from. With such versatility, you can select the best piece for your home. Also, they offer same-day delivery so that you can take your favorite pieces home without delay. You can win exciting prizes by participating in the giveaway hosted by Gallery Furniture.
Ikea
Location - 7810 Katy Freeway, Houston, TX 77024
If you are on the lookout for stylish furniture with modern designs, then Ikea is your go-to store. With their comfortable mattresses, classic drawers, fashionable lighting, and trendy pieces, you can transform your bedroom from a monotonous space to a lively one.
Just step into their showroom, and you will find furnishings of various styles, designs, materials for every space of your home. From living rooms to kitchen cabinets, Ikea has it all. You can adorn every corner of your home without worrying about the budget, for they are easy on the pocketbook.
With Ikea’s furniture, you can create a warm living space within your means.
Sarah Furniture
Location - 8009 Harwin Drive, Houston, TX 77036
For over 16 years, Sarah Furniture has been offering top-notch quality furniture to its Houston-area buyers. Their showroom floor is filled with a wide range of furnishings and accents from renowned manufacturers.
You can explore its showroom and discover items for your bedrooms, living rooms, dining area, kids room, and a lot more. Plus, you can beautify your space with their exquisite accent pieces. From rugs to pillows, lightings, and accessory sets, Sarah Furniture has it all.
Do you want to add a splash of color to your plain wall? Browse through their varied assortment of mirrors and wall arts.
Bellagio Furniture
Location - 5869 W 34th Street, Houston, TX 77092
If you are looking for a furniture store delivering high-quality furniture that is long-lasting, Bellagio Furniture is your go-to place. Their wide range of furniture is aesthetically appealing and is a perfect embellishment for your space. They have dining tables that will add elegance to your dining area.
Also, Bellagio Furniture has stylish home décor items which you can buy without spending a fortune. With such affordable décor pieces, you can not only give your home a complete makeover but also add a stylistic flair to the living spaces.
Castle Fine Furniture
Location - 3911 Fondren Rd, Houston, TX 77063
For over 23 years, Castle Fine Furniture has been offering unique furniture to the residents of Houston. It caters to the taste of not only the minimalist who is fond of classic furniture but also of those who prefer modern, stylish fittings for their space.
With their wide-ranging variety of furniture, you can add colors to the décor of the space and make your home a welcoming one. You are sure to love the elegant sets offered by Castle Fine Furniture.
Conclusion
Don’t let your old-fashioned furniture kill the beauty of your living space.
Instead, give your room a complete makeover by replacing your furniture with modern and luxurious furnishings. After all, your home is a place where you relax from the hustle and bustle of life.
So, it must be designed in a way that would provide you with much needed comfort and relaxation. At the same time, it must be attractive. The furniture stores mentioned in this guide are among the best ones in Houston where you can get marvelous pieces to adorn your space.
You can even get your favorite pieces customized. Add colors to your space with the unique accents offered by these stores. Do let us know your favorite furniture stores in Houston.
Particle board is a versatile material used to make various home furnishings and kitchen cabinets. It can be cut using several tools, such as a jigsaw, circular saw, table saw, utility knife, etc.
I had a couple of particle boards andscrews for particle board lying around in my garage, mainly because I didn't know how to use them, let alone cutting the boards correctly.
I realized that many people had the same dilemma as I did. So, with a little bit of research and some help from my DIY enthusiast friends, I have compiled this comprehensive guide on how to cut a particle board. Without further ado, let's dive in!
What Is A Particle Board?
A particle board is a utility material that can often be seen sandwiched between wood or even plastic veneers. It is used for building cabinets, countertops, shelving, and other home furnishings on a budget.
When compared with other engineered wood boards (like plywood, oriented strand board, and medium-density fibreboard) used for interior construction and cabinetry, it is the least expensive option. However, it is also comparatively the most fragile and least dense.
When it comes to cutting particleboard, it can be done just like one would cut any other type of wooden boards, be it natural or engineered. But the procedure and the right blade that is to be used heavily depends on the quality of the cut that the user desires to achieve.
Although the particleboard chipping out can be a slight problem, it will not matter if the work is being done quickly and on a fully functional project, like building concrete forms.
The desired outcome should influence the tools and techniques that are used to build the cabinets or shelves. Here is more information on the most effective ways I managed to cut particle boards.
How To Cut A Particle Board
1. Cutting Particle Board On A Tablesaw
A particle board comes in sheets that are 4 feet wide with varying thicknesses. The thickness can be 8 or 10 feet long, so if you want to rip a particle board sheet on a table saw, you need to provide it with ample support on its outfeed side. In the event that you don't have somebody to catch the particleboard, you can substitute it with a sawhorse that is placed 2 or 3 feet behind the table saw.
I noticed that I had to add a few extra boards to the top to allow it to flush with the table saw. Particleboard is much more flexible than other wooden boards like plywood, oriented strand board, or medium-density fibreboard. So, I had to be careful to keep the end of the board from falling lower than the table saw.
Otherwise, it would end up allowing the middle to flex upwards beyond the reach of the blade, making the cutting process a lot harder.
For a precise clean cut, it is necessary to remember two things: using a table saw blade with at least 80 teeth can help cut particle boards effortlessly, and to always cut the sheet with the good side facing upwards. When I experienced vibrations that caused chipping while cutting the sheet, I installed a zero-clearance throat plate insert on my table saw that allowed me to reduce the vibrations significantly.
These throat plates can be purchased at any home improvement store. However, I preferred to make my own. I did this by cutting a piece of plywood that would fit inside the table saw throat and screwing it in place with the table saw blade kept lowered. Then I turned on the saw, raised the blade, and allowed the blade to cut through the recently installed insert.
When using a Kreg screw for particle board, be very careful while driving it in. If the clutch is set too high, the screw will continue to drive and come out on the other side of the board.
2. Circular Saw Cutting Techniques
When cutting particle boards that are used for forming concrete, choosing a circular saw will be more suitable. It is much smoother to cut with and does not pose much of a dust problem, as particleboards do not create as much dust as medium-density fiberboards.
Start by drawing a line along the area you need to cut and use a circular saw along with a utility blade to cut the particle boards more precisely.
However, when using circular saws, there are chances that the edges of the particleboard sheet may chip. To avoid this problem, use different blades that enable smooth cutting and refine your cutting techniques.
With this cutting method, the entire particle board sheet needs to be supported, preferably on a 2x4-sized surface, where it is laid out on its edge. Typically, I use a blade with 60 teeth or more, though the more teeth, the better. Turn the particle board sheet over so the cut is made from the back of the board.
The problem of the sheet chipping out usually arises from the side that is being cut, so turning the board over can help protect the board's good side. If the cutting line is not satisfactory, use a utility knife to score the cut line on the better side before turning the sheet over and cutting it with the circular saw.
3. Cutting Curves In A Particle Board With A Jigsaw
Since particleboards are not as dense as other wooden boards, it is relatively easy to cut in curves using a jigsaw. However, the quality of the blade being used to cut the board significantly determines the quality of the result.
When I'm in a hurry and the quality of the cut does not matter as much, I use a 6 TPI (teeth per inch) jigsaw blade, which gets the job done easily. But at times when quality is of concern, blades with a higher TPI will ensure a clean, precise cut.
Note
Do not choose a jigsaw blade that has very high TPI, as it may cut too slowly and end up burning the wood in the process.
The maximum I would opt for is a 20 TPI blade and keep the saw foot in contact with the surface at all times to reduce any vibrations. Cutting curves from the back of the particle board sheet neither reduces chipping nor is a practical strategy.
As such, the best way to achieve a clean cut line on the sheet is to apply some masking tape on the sheet, mark the cut line on the tape, and then cut through the masking tape. If a large hole needs to be drilled with a spade bit or a hole saw, laying tape is a foolproof way to ensure a clean outcome.
4. Using A Miter Saw
A miter saw is much more precise than a circular saw or jigsaw. It is used to cut through smaller pieces of particle board sheets and when there is a need for angled cuts. This saw requires a blade with at least 80 teeth count and is carbide tipped.
Miter saws are much smaller in size when compared to their table saw counterparts. And this size factor will allow you to make more different cuts from different angles as you move the saw around easily. Table saws and circular saws, on the other hand, mainly help in making straight cuts.
The most important aspect of a miter saw is using the right blade to cut the particle board. Blades with a good number of teeth and carbide tips usually give the best cuts. And the better the blade quality, the better the end result.
5. Cutting With The Dremel Tool
Dremel tools are ideal for people who need creative freedom when cutting particle boards. They are typically used for smaller jobs such as polishing, sanding or grinding. But certain Dremel tools can be used for carving and engraving on wood. Some examples are the saber saw and moto-saw tools.
However, a Dremel tool is not ideal for cutting a particle board into larger pieces. The most important factors you need to keep in mind when using a Dremel tool to cut a particle board are the tool's speed and the blade type being used for cutting.
For example, the moto-saw tool has a reciprocal action that garners enough speed to cut through thinner sections of a particle board effectively. I use this tool mainly to engrave on the sheet or when I wish to be creative with the particle boards edges.
Additionally, dremel tools give the user the ability to smoothen out any chips or splinters on the edge of the particle board. This chipping or splinters are usually the result of using a circular saw or table saw to cut larger sections, especially when cutting particle boards for furniture.
However, like any power saw or utility knife, a dremel tool cannot cut through a particle board on the first pass, more so when the board is thicker. The first pass should be done with the right amount of pressure to lightly score the topmost layer of the board. A second pass is what will ensure a cleaner cut and smooth finish.
6. Cutting Particle Board With A Hand Saw
A garage that does not have a hand saw is a rare sight. But the main question is, can a hand saw cut through a particle board? Typically, a hand saw is not the first choice when it comes to tools for cutting a particle board. This is because the cuts will generally be quite jagged or splinter excessively, and straight cuts will be out of the question.
Long story short, a hand saw does not possess the required power and speed to cut through the particle board seamlessly. But if the result or the appearance of the particle board is not of concern, a hand saw can be used to cut it effectively. Keep in mind to sharpen the teeth of the handsaw so as to prevent the intensity of the tear-out.
Protective Measures And Equipment
A particle board comprises sawmill shavings, wood chips, and sawdust. These components make the particle board sheet more prone to chipping and splitting when it is being cut. Hence, taking precautions and wearing safety gear before cutting a particle board sheet is important.
The matter that is released from the particle board when it is being cut can be a safety concern. These tiny wood particles can be very harmful and irritating to the eyes and the lungs if inhaled. So, protect yourself by wearing shatter-resistant eye protection when cutting a particle board. Moreover, there are safety glasses that come with side shields which provide a lot more protection when compared to regular safety goggles.
To protect your lungs, consider wearing a tight-fitting ND95 dust mask that helps prevent any wood chips or particles from being inhaled. Make sure the mask fits snugly around the nose and mouth in order to ensure that wood particles do not seep through.
Last but not least, make sure to protect your hands. Since a particle board can chip and splint when cutting, wearing thick, cut-resistant gloves or thick leather gloves can protect the hands from any possible injury.
Depending on the type of method you use to cut the particle board, use the necessary ear protection. Since table saw, circular saw and other types of power saw produce a lot of noise, they can lead to the damage of unprotected ear drums. Wearing earmuffs or snug-fitting earplugs can block some of the noise and give the ears the protection they need.
How To Cut Particle Board Conclusion
A particle board is an extremely versatile material and can be cut in various ways, to make furniture, cabinets etc. However, some particle boards will have the problem of peeling veneers. In such cases, knowing how to repair peeling veneer on particle board cabinets will be helpful.
A simple method to do so is using contact cement on the veneer and particle board, attach the two, and smooth out any air bubble with a hand or J-roller. You can also trim any excess veneer off the edges.
Wood can be planed with a hand plane or mechanical surface planer. In the case of the former, you need to pick the correct hand plane, sharpen the blade, adjust its angle, and then run the planer over the wood. But when using a mechanical planer, you’ll need to set its thickness and depth stop before feeding the wood into the planer housing.
Planing is one of the most important tasks in woodworking, making wood planers very important tools for a woodworker.
However, not everyone may be experienced in using a planer tool. This is especially true in the cases of large and complex benchtop planers, molding planers, and other similar mechanical power tools. As such, these individuals may find it difficult to perform simple planning tasks.
That’s why we have discussed how you can plane wood easily with such tools in this guide. So, if you want to create flawless furniture items, then read on!
Planing with a hand plane
Using a hand plane is fairly simple, but it may take a lot of time and effort to complete the task with this tool. That’s because, unlike a mechanical plane, a hand plane needs to be manually operated.
In any case, here is the procedure for planing wood with a hand planer.
Step 1: Choose the appropriate hand plane for your job
The first and most important task in the process is to choose the correct hand plane, for if you pick an unsuitable tool, your task will become unnecessarily difficult. Besides, picking the wrong hand plane will give you unexpected results, which will lead to the wastage of wood and other resources.
There are different types of hand planing tools available today, with each having a specific usage scenario. That said, the primary aspect that differentiates these different types of hand planes is the size.
A plane with a long size can smoothen large areas of the wood at once, which improves the overall efficiency of the process. On the other hand, a short planer offers better control and is well-suited to perform precise planing tasks.
We have discussed the different hand planer types available today. It is important that you pick the one that best suits your work requirements.
I. Jointer plane
Jointer planes are typically the longest hand planer tools, having a body length of at least 22 inches (56 centimeters). These hand tools are highly effective for trimming or straightening doors, boards, and other long wooden surfaces.
II. Jack plane
A jack plane has a body that is between 12 and 17 inches (30 centimeters and 43 centimeters) long. Thus, it is slightly shorter in size than a jointer plane. However, it is much more versatile by comparison, which is why it can be used to shave both longboards and smaller lumber pieces.
III. Smoothing plane
As the name suggests, a smoothing plane is highly useful for creating a smooth surface from a rough lumber piece. It can also be used to trim medium-sized wood surfaces and even longboards to some extent.
Therefore, the smoothing plane is the most versatile hand-planning tool available today. This is thanks to its 10-inch (25- centimeter) body, which can cover a decent area in a short time and is easier to control than a jock or jointer plane.
IV. Block plane
With a body length of less than 10 inches, the block plane is the smallest hand planer tool that you can get. It has superior maneuverability, which makes it the perfect choice for planing tight corners or hard-to-reach spots on wood.
Furthermore, it is great for wooden boards with low thickness since it creates a very thin shaving. On the flip side, it is not very effective for trimming longboards or large pieces of rough lumber.
Step 2: Sharpen the blade of the plane
Once you have chosen the most suitable hand plane for this task, you will need to sharpen the plane blade. The blade (or the iron, as it is often called by carpenters) needs to be sharpened to a razor’s edge before starting the task. If you don’t do this, then the trim will not be perfectly flat.
Sharpening the blade is mandatory if you have used the hand planer before. As a matter of fact, even new plane blades need to be adequately sharpened before use. You can accomplish this task with the help of a sandpaper of suitable grit.
Ideally, we would recommend using 220-grit sandpaper here since it offers the best results. Hold the blade at an angle of 30 degrees over the sandpaper, making sure that the blade bevel lies flat on its surface. Then, rub the blade over the sandpaper in a circular motion by applying some downward pressure.
Stop rubbing once you see burr (fine metal shavings) accumulating on the back of the blade. After you remove the burr by wiping the blade’s back on the paper, you can use it for planing.
Warning: Do not change the angle when sharpening the blade, as that can lead to a non-uniform sharpening. Also, avoid applying too much pressure on the blade since that can wear it out quickly.
Step 3: Adjust the angle of the blade
Adjusting the angle of the blade is an important step that should not be ignored. That’s because this angle determines how thick the shaving will be.
If you increase the angle depth by too much, then the planer might tear into the wood or crack it. Besides, a high-angle blade can jam the planer, especially if the wood material is tough.
Thus, you need to carefully adjust the angle of the hand planer blade so that it reaches the optimal trimming angle. As a rule of thumb, you should start from a shallow angle and steadily increase it by turning the depth adjustment knob.
Step 4: Plane the surface of the wood
Now, it is finally time to plane the wood surface. To start, place the wooden board on a workbenchand set the hand planer at the edge of the wooden board. Then, gently push the planer forward in a straight-line motion by pushing on the rear handle. At the same time, use your non-dominant hand to apply a steady downward pressure by pushing on the front knob of the planer.
Make sure to maneuver the planer in a smooth and continuous fashion, avoiding any erratic or jerky movements. Try to maintain this technique as you work your way across the wooden surface. You need to pay extra attention to any uneven areas or irregular protrusions on the wood.
Step 5: Avoid tear-out by cutting along the grain of the wood
In order to get a flat surface of uniform thickness and smoothness, you need to cut along the grain of the wood. And since the grain direction does not always remain constant, you may need to change the direction of the planer accordingly.
However, you should avoid planing against the wood grain at all costs. If you do that, the blade will give rise to angled imperfections on the surface. These imperfections can lead to tear-outs, where small chunks of wood break off from the surface, thereby disrupting the finish.
Step 6: Check the accuracy of your planing
After you are finished planing the wood surface, you should check its accuracy to ensure the wood has a uniform finish. For this purpose, you will need to use a straight edge and a try square.
To check the uniformity and flatness of the main wood face, place the straight edge along its surface. If it has been shaved smoothly, then the straight edge will lie flush on the surface. But if there are any minor imperfections or protrusions still present, then it will leave a gap.
Similarly, you can use the try square to check the angle between two adjacent wood faces. Ideally, the adjacent faces should be perpendicular to each other, which means that the angle should be 90 degrees. If that’s not the case, then you will need to trim one of the faces further.
Planing with a mechanical surface planer
Now that you know how to plane wood using a hand planer, it is time to learn how you can use a mechanical surface planer to do the job. Mechanical planers are power tools that use a set of adjustable spinning blades and rollers to plane wood automatically. As per our expertise, the planing task can be completed very quickly with a power planer machine.
Due to this reason, it is preferred by veteran woodworkers. You can choose between different types of mechanical planers, such as handheld planers, stationary planers, and bench planers. However, most mechanical surface planers are fairly complicated tools, regardless of the type. That’s why beginners with no prior experience may have trouble using such a tool.
Besides, such a power tool generally performs relative planing that requires both the upper and lower surface of the wood to be flat. So, if the lower surface contains imperfections, those will be maintained on the upper surface as well. This can give rise to problems later on, which is why it requires proper expertise to use.
But there is no need to worry, for the procedure discussed below will allow you to use this tool easily and without any issues.
Step 1: Set the planer to your desired thickness
Before you start planing the wood, you need to adjust the thickness of the mechanical planer. This can be done by rotating the circular crank present on the planer manually. By adjusting the crank, you will be essentially lifting or lowering the planer’s housing.
If you move the housing higher, then the cut will be shallower, and vice versa. It is advisable to start with a shallow cut and gradually increase the depth. However, try not to keep it too shallow, as that will not yield the desired results.
In that case, you will need to make several passes, which can increase the time taken to complete the task. On the other hand, you should avoid increasing the cutting depth excessively, as that can tear the wood.
Based on our first-hand experience, we would say that it is unwise to cut deeper than 1/8 inches (0.32 centimeters) in one go. Doing that can strain both the wood and the planer machine.
Here, you should keep in mind that the displayed depth is not actually the depth of the cut but rather the thickness of the wood that you will get. So, you need to adjust the depth according to this aspect.
For instance, let’s say that you have a piece of wood that is three inches thick, and you want to shave off 1/16 inches of wood. In this scenario, you will need to adjust the crank so that the planer housing has a depth of 2-15/16 inches.
Step 2: Set the depth stop (optional)
Most mechanical planers these days come with a depth stop mechanism that allows you to lock the depth of the planer. In other words, you can prevent the planer from going beyond a certain cutting depth by using his mechanism.
For instance, if you set the depth stop to two inches, then the planer will not trim the wood once it reaches the specified thickness. Thus, it is a handy feature that can be used by woodworkers to prevent over-planing the surface.
However, it can cause problems if the wooden piece is thinner than the specified depth stop to begin with. For example, if you want to plane a two-inch thick wood in a planer that has a depth stop of two inches, then the machine won’t be able to perform the task.
In that situation, you may have to lower the depth stop setting to complete the task. Alternatively, you can skip using the depth stop altogether, in which case, this step becomes entirely optional.
Step 3: Turn the planer on and pass your wood through
Next, turn on the power to the planer machine and pass the wooden board carefully through the planer’s housing. It is important that you feed the wood along the grain and in a controlled motion to avoid any accidents or tear-outs. Once it reaches the rollers, though, the wood will begin feeding through the machine automatically.
Step 4: Pull up on the wood as it passes the rollers to avoid snipe
Using a mechanical surface planer to trim wood often gives rise to a condition known as “snipe.” Here, the wood exhibits a slight inconsistency in trimming thickness, where the leading or trailing edge of the board has a slightly deeper cut than the one at the center.
This occurs due to the blades of the feed table being set too high. It causes the leading and trailing edges of the wood to be pulled upwards, thereby causing a deeper cut. In order to resolve this discrepancy, you will need to slightly pull up on the opposite ends of the wood as it is fed into the roller.
Tips for planing wood effectively
By now, you will have gained a clear idea about how to plane wood using manual hand planes and mechanical surface planes. However, if you want the best results, you should keep some of the following tips in mind while undertaking this task.
1. Use protective gear for your eyes, ears, and mouth as needed
When planing wood, a lot of dust and debris is generated in the form of wood shavings. So, make sure to wear goggles and masks to protect your eyes and mouth, respectively. And if you are using a mechanical planer, you should wear a pair of earmuffs as well since the machine can be quite noisy.
2. Re-plane or sand the wood surface
If there are tear-outs on the wood due to errors in adjusting the depth or angle of the blade, you can re-plane the wood to get rid of the issue. Alternatively, you can try to sand the surface to smoothen the tear-out.
3. Store the blades properly
After you are done planing the wood, you should make sure to store the blades properly on their sides to preserve their edge.
Why is wood planing necessary?
Wood planing is a necessary and important woodworking task that helps to maintain the consistency of the material. Raw lumber pieces often have coarse and uneven surfaces. There may be loose splinters on the surface that can be harmful to the user. Besides, you’ll find numerous holes, crevices, and uneven protrusions on the surface.
Such uneven features can be found on newly crafted wooden furniture as well. Likewise, the surface of a wooden furniture item loses its consistency over time. So, by planing the wood, you can get rid of all the above problems.
How smoothly can a planer trim the wood?
How smoothly a planer can trim the wood depends on its configuration. If you use a properly configured planer, you can achieve a very high degree of smoothness on the wood surface. The blade of the planer needs to be sharpened well, and the depth and angle should be correctly adjusted before starting the task.
Is the smoothness achieved by a planer comparable to the smoothness achieved by sandpaper?
The smoothness achieved by a planer is superior to what can be achieved using sandpaper. The latter uses a rough surface or grit to smoothen the wood instead of a blade. The grit basically scratches into the wooden surface, which means that sandpaper does not give you the same level of smoothness as a planer.
Naturally, a higher grit creates rougher scratches and vice versa. On that note, the scratches are usually not visible to the naked eye, which is why the wood may appear relatively smooth at a glance.
What are some alternative tools that I can use to plane wood?
Some alternative tools that you can use to plane wood in case you do not have a planer are a table saw, drum sander, or wood router kit. They can achieve acceptable results but you will need to be extra careful while using them tools since planing wood is not their primary purpose.
As you can see from the above discussion, planing wood can be a fairly straightforward task. And as long as you follow the instructions we have provided, you can get it done in no time.
It goes without saying that prior woodworking experience can come in handy here. But even if you are a beginner, you can get the job done without any issues by following the tips we have mentioned. At first, you may make mistakes, but there is no need to become disheartened by them.
The more you practice, the more you will become familiar with the planing tools discussed here. And before long, you will be able to create flawlessly smooth wooden surfaces.
A dovetail is a strong and reliable joinery technique that can be cut by hand or with a router jig. Manually cutting it involves marking the wood, cutting the lines, and then trimming the cuts on both the pin and tail boards before assembly. With a router jig, you’ll need to set up the jig and the router first and then cut the wood.
Joinery techniques like dovetails are crucial in any woodworking task, for they help to create complex furniture items.
On that note, you can create dovetail joints by hand or with the help of a routing tool, like a trim router or handheld router. Unfortunately, creating such a joint may feel a bit complicated for beginners, which is why we have made this guide that discusses the process of creating dovetails.
Read on to learn more!
What is a dovetail joint?
Before we get into the meat of the topic, let’s briefly discuss what dovetail joints are. For those of you who are new to woodworking, the dovetail is a joinery technique that has been used in woodworking for a long time. This traditional joining technique helps in connecting two or more wooden surfaces together using interlocking elements cut into the wooden surface.
To be more precise, the woodworker creates a series of extended pins on the edge of one wooden board. On the other hand, a series of ridges or “tails” are created on the edge of another wooden board. These pins and tails are then interlocked to create the dovetail joint.
The pin and tail of a dovetail joint are shaped like trapezoids, and once they are put together, they do not come apart easily. Also, after it is glued together with adhesive, the joint requires no extra mechanical fasteners like nails or screws. The high tensile strength of the joint helps to secure it firmly in place and prevents it from breaking.
Creating dovetails
As we have mentioned before, the dovetail joint requires the woodworker to create trapezoidal pins and tails on the edge of a wooden board. Traditionally, these features are created on the face of a wooden board by hand using tools like saws and chisels.
Many woodworkers these days find using such manual tools to be dangerous and time-consuming. So, they prefer to use a router jig tool, which is more convenient by comparison. Drawing from experience, we can say that using router jigs is a much faster way to create dovetails than manual methods.
However, it comes with its own complexities since you need to use specialized tools in this case. If you are not well-versed with these tools, the dovetail joint will not be a satisfactory one. That is why we have discussed how you can create a dovetail joint using a router jig in a subsequent section.
For good measure, we have also discussed how to cut dovetail joints by hand here. You can create different types of dovetails using these two methods, such as single-lap and double-lap dovetails, through dovetail joints, and secret miter dovetail joints, among others. We have discussed these types in a later section, too.
How to hand-cut dovetail joints?
First, let’s discuss how you can hand-cut a dovetail joint. For those who like simplicity, the manual approach is obviously better, provided that the process is performed correctly. You can follow the procedure we have mentioned below to hand-cut dovetails easily.
Step 1: Gather the necessary tools
Collecting the necessary tools is the first step to hand-cutting a dovetail. In order to complete the task smoothly, you need to keep the following tools at hand:
Chisels
Saws
Clamps
Marking gauge
Adhesives like wood glue
Sharpening guide
Sharpening stones
Woodworking square
Cutting knife
Sliding T-bevels
Woodworking vise
Once you have gathered all of the above items, you can get started with the woodworking task.
Step 2: Mark the depth and lay out lines
Using the marking gauge, mark the depth of the dovetail on the wooden piece. Then, using the sliding T-bevel and a marking knife, lay out the lines and angles of the dovetail. Also, make sure to mark half pins on the two side edges of the pinboard. After that, extend the lines across the edge and to the other face of the board using a square.
Step 3: Cut to the lines
Now, you need to cut the board according to the marked lines using a dovetail saw. Make sure to cut the lines up to the depth line, and then chisel out the pin boards carefully. After that, you will need to chop off the wooden pieces from both sides.
Step 4: Trim the cuts
In this step, you need to pare the cuts made on the board using a chisel. Clamp the wooden board and carefully trim the inner edges of the cuts to ensure a smooth attachment surface.
Step 5: Mark the lines on the other board
Now that you have cut one board, you can use it to mark the lines on the other one. For this purpose, place the cut board on the edge of the second one and mark the lines and angles on its surface using a knife. This is to ensure that the tails and pins on both boards complement each other.
Step 6: Cut the lines and trim the cuts
Next, you need to follow a similar procedure as mentioned in step three for cutting along the lines and then chopping the wooden pieces from the board. Then, you need to trim the cut using a chisel, as we have done in step four.
Step 7: Test joint fit
Here, you need to test joints to see if they are a good fit. If you are not experienced, you will likely get a tight fit or a loose fit on the first try, which is completely normal.
You can do some fine-tuning by trimming the cut edges further. When you achieve the perfect fit, you only need to lightly tap the boards with a mallet to interlock the pins and tails.
Step 8: Assemble the joint and apply the finishing touches
In this step, you have to apply glue to the joint and assemble the wooden boards. Once that is done, you can apply the finishing touches by sanding the joint.
Warning: Avoid using too much glue on the surface as that can block the joints, making it difficult to attach the boards.
How to cut dovetail joints with a router?
Now, let’s talk about how you can create dovetail joints using a wood router and a jig. You can use a regular router or a trim router for this task. Also, make sure that the router jig is suitable for making dovetail joints. If you don’t use the right jig, then the cuts will not be consistent.
Furthermore, it is important to get a good router table for this task since that ensures a stable and supportive working surface. Apart from that, you need a few other tools like cutting guides and clamps to get started.
Once you get the above items, you can follow the procedure we have mentioned below.
Step 1: Set up the dovetail jig
The first step is to set up the dovetail jig for the router, which can often be a complex and time-consuming task. You need to ensure that the jig is properly aligned and adjusted so that it can cut the joint accurately.
We strongly recommend you go through the setup instructions for the dovetail cutter jig before using it. Also, use tools like calipers to fine-tune the orientation and positioning of the jig.
Step 2: Set up the router
Next, you will need to configure the router for the cutting task. You will need to select the proper router bit for the process, as that will ensure the consistency of the cuts. Then, you have to adjust the cutting depth of the router according to your preferences.
Step 3: Mark the wood
Here, you will need to mark the thickness of the tail boards and the pin boards using a square and a woodworking knife. For the best results, ensure consistency between the thickness of both boards.
Step 4: Start cutting the wood
Now that you have marked the wooden surface and set up the jig and the router, you can finally start cutting dovetails. Place the guide at the bottom of the router and simply move the tool in and out according to the metal guide. If your jig comes with guide bushings, then make sure to use those, as they can make the process easier.
On that note, a beginner is likely to make mistakes on the first try. That is why we would suggest performing some test cuts as practice before beginning the task. Based on our personal trials, we can say that this can considerably reduce the chance of mistakes and errors. So, once you are satisfied with the test cut, you can start making actual cuts on the wooden workpiece.
Step 5: Cut the pin board after the tail board
When you start cutting the wooden workpiece, make sure to cut the tailboard first. Once you have cut out the tails, you will need to mark the positions of the tail sockets on the pinboard. Make sure that the positions are consistent with the thickness that you marked earlier.
Following that, switch to the router’s pin-cutting bit and flip the metal guide to cut the pins. Then, move the router jig along the fingers of the metal guide to create the pin grooves.
Step 6: Test the fit
After you cut the tail and pin boards, you will need to test whether they fit well. If it is a perfect fit, it will slide in easily, requiring only a few light hits from a mallet. But if that’s not the case, then further trimming and adjustment will be necessary.
Step 7: Assemble the joint
Once you are satisfied with the fit, you can assemble the joint by applying wood glue. Allow the adhesive to settle for a while, and then finish off by sanding the joint.
Types of dovetail joints
When creating a dovetail joint, it is important to determine its type since that decides the wood router and jig you need to use. On that note, there are different types of dovetail joints, such as:
1. Through dovetail joints
The through dovetail joint is one of the most common types that is used by woodworkers today. Commonly known as the plain dovetail, it is the simplest dovetail joint that you can create. Here, the end grains for both wooden boards are visible. And while it is not necessary, many woodworkers prefer to cover up the wooden interlocking to protect it from wear.
2. Single lap dovetail joint
Single-lap dovetail joints are commonly used for furniture items like drawers. In this case, the end grain of the joint is not visible from the front since the tails are placed inside sockets at the end of the board. Because of such a design, these joints are otherwise referred to as half-blind dovetails.
3. Secret miter dovetail joint
The secret miter dovetail joint is commonly referred to as the mitered dovetail joint or full-blind dovetail joint. That’s because the end grains of both boards are concealed from view. It is a bit difficult to create but is incredibly sturdy. As such, the secret miter dovetail joint is commonly used in heavy-duty cabinets and boxes.
4. Double lap dovetail joints
Alternatively known as the full-lap dovetails, these joints are very similar in design to the secret miter dovetail joints. But instead of concealing the entire joint, the double-lapped dovetail has a thin section of end grain on one of the edges. It is slightly easier to make than a secret-mitered dovetail.
5. Sliding dovetail joints
The sliding dovetail joint is another popular type used by woodworkers. Such a dovetail joint is not placed at the edge of the board. Rather, it is placed within the field of one board, where the second piece is slotted in to assemble the joint. As a result, sliding dovetails usually do not require any chemical adhesive, making them easier to create.
How to use a router jig?
How to use a router jig is something that many DIY woodworkers don't know based on our findings, even though they know how to use a tool like a trim router. That is why we have discussed how you can use a router jig properly in this section.
A router jig is a useful woodworking tool that is used to rout or hollow out a wooden surface for creating joinery, making custom moldings, and performing other woodworking tasks. With that in mind, the first thing you need to keep in mind is the compatibility of the jig.
Typically, a router jig will only be compatible with a particular type or brand of router. For instance, if you are using a handheld router, you cannot use a trim router jig with it. Instead, you will need to use a jig that is compatible with handheld models.
In that context, there are some brands that make versatile routers that are compatible with most common router types. Ideally, we suggest getting dovetail jigs from brands like Leigh Industries or Porter Cable since they come with detailed instructions for cutting pin boards and tail boards.
Speaking of instructions, you will need to go through the usage guide provided with the jig carefully. That way, you will get a clear idea about things like thicknesses and material types that can be used with the jig. In this regard, most router jigs should be used with a guide bush, which helps you to get better control over the cutting process.
The type of joint should also be considered when choosing a suitable jig since there are different types of jigs that can be used to create different joints. So, to create a dovetail joint, you will need a dovetail jig.
A dovetail joint is undoubtedly one of the strongest types of woodworking joints. Thanks to this aspect, you can create sturdy furniture items like a drawer, cabinets, storage boxes, and others.
With the guide we have presented here, you will be able to craft a hand-made or a router dovetail joint easily. And with enough practice, you will be able to craft some of the more complex joints, such as the secret miter and the double lap dovetails.
In this regard, we advise you not to rush through the process since that can create unnecessary complications. Make sure to invest enough time in cutting the joint, which will ultimately reduce the chances of error.
Interior furniture defines our spatiality in which we spend our day to day activity, through simple change we can redefine and change spaces easily, this impacting your work and state of well being. Most of the time we buy new fresh furniture to reinvent a space, but this can also be done by ingeniously reusing and converting items and materials to create new and unique furnishings with simple DIY interior furniture ideas.
Further on we will present you 10 ideas meant to help you define your new space. Some are brilliant, some are just inspiration, you are the one to decide what suits you and what you need to start your own project, maybe, off the books.
Creative DIY Interior Furniture Ideas
1. Empty Bottles and Wood Boards Shaping Simple Sturdy Bookshelves
Simple solution for shelves can be realized by teaming up empty bottles and wood boards
image via thankgodfordesign.com
2. A Bookshelf With a Rope Bridge Look
Resembling a Rope Bridge This Bookshelf Look Extraordinary and Adds Authenticity to Your Interior Design
Using a road sign for a table can be a statement, but also an interesting piece of furniture that will brighten up your room. You can use a customized sign for effect .
Wood pallets can be used to make any piece of furniture : tables , beds, chairs , so keep that in mind when your plan your DIY interior furniture project.
image via exnwhy.com
What do you think about these 10 DIY interior furniture ideas? Will you try and materialize your own? We would love to see it and add it to our guide or simply hear your opinion in the comment section below.
Scroll down to feed your imagination with 27 of the most useful diy furniture projects in the world.
It is that simple.
Curated with care, the diy projects showcased below have strong abilities to magically transform your decor by being extremely useful, functional whilst being extremely graphic. From vertical storage options to up-cycled coffee tables the furniture projects are varied to match multiple functions and bend into multiple designs with ease.
Keep in mind that these are here to feed your imagination, the upholstery projects are definitely not restricted to chairs and armchairs and rustic benches designs are not limited by shutters. Gather the proper resources and put your creativity to good use; combined with perseverance and passion great things will follow.
Creative DIY Furniture Projects
1. Build a simple hardwood storage unit with rustic appeal
2. Give a vintage look to old furniture
3. Reclaimed roots can be used as coat hangers
4. Create your own movable kitchen island
5. Storage should never be neglected
6. Old shutters look incredible used as benches in the living room
7. Add up some crates and transform them into beautiful storage
8.You can get this simple creative desk from a wooden pallet and 3 pieces of plain wood
9. Recondition your office chairs in colorful tones
10. Hair pin legs are such a wonderful addition to a few wooden beams
11. Create storage for your bathroom using an old door
12. Or add a mirror to it and embellish your small garden
13. Get matters into your own hands and spray paint those old looking dinning chairs
14. Simplicity is the ultimate sophistication
15. Create useful storage for your hallway
16. Give your furniture a fun twist
17. A small coffee table can add color and contrast to any interior design
18. Simple wooden headboard give elegance to your bedroom
19. Repaint upholstery in paste tones for a fresh makeover
20. Choose strong unique pieces of wood for your backyard furniture
21. Add a few beams to COLORFUL cement block and you've got yourself a beautiful bench
22. Old door used as vintage storage unit
23.Turn an old tire into an ottoman
24.Unite old chairs into a unique corner bench
25. An old cable roll can be used as a coffee table
26. Glass and wood merge perfectly into a contemporary design
27. Learn how to paint old furniture and transform your home
We would be delighted to hear you valuable feedback in the comment section bellow. Craft away!
If you need a specialized nailer that you can use around the house to work on cabinets, trims, and moldings, a brad nailer is an excellent product.
We wanted to work on some DIY projects inside, which required detailed wood applications. With a brad nailer that fired brads efficiently, we were able to bind our wood trims correctly.
It is mainly a smaller type of finish nailer, but unlike the bigger version, this one takes care of more minor work needs. If you use a big device to work on tiny parts or thin surfaces, there is a chance that you will crack it.
With a brad nailer, we felt completely safe while using it for our home projects. Read on to find out about the different purposes it is used for and the benefits it comes with.
What Do You Use a Brad Nailer For?
This device has a remarkable way of providing a strong bond between thin wooden trims without splitting or cracking them. It uses thin 18-gauge brads that measure 2 inches long or smaller. Since they are relatively tinier than most nails, they do not make a big hole. This prevents any unnecessary cracking of a thin surface.
If you are looking for a product for home renovations, this is an excellent device to have in your toolbox. Why, you may ask? Because it makes very detailed trims on wooden surfaces of furniture, cabinets, and even smaller objects like photo frames.
Also, it can be used for coves, baseball shoe remodeling, and railings. If you are into making home furniture, a top-notch brad nailer will provide the peace of mind you deserve!
Safety
A brad nailer is considered to be comparatively safer than finish nailers. This is because of the relatively tinier size of the nails. But again, these could cause injury if proper precautions are not taken. So, it is essential that you wear safety glasses to protect your eyes.
Make sure there is no loose end of clothing hanging from your outfit. Also, use hearing protection in case you are working inside a closed space with a noisy device. Since the machine uses an air compressor, the sound level may go up. But again, it does not use up a lot of compressed air, and the noise can be controlled.
Types of Brad Nails
There are mainly two types of brad nailers, the 18-gauge and the 21-gauge one. The one which is most frequently used is the 18-gauge version. This one is fit for woodwork and will be a better choice to go for in case you need it to bind thin wood films.
Going forward, since you will mostly choose an 18-gauge version for your household work, the next most crucial thing to know is the height of required fasteners. The average nail length that this model uses is between ⅝ inch to 2 inches long.
Before you choose the nail size, remember that the length of these nails must be three times the width or thickness of a wooden block that you are nailing it with. If you are wondering why this is essential, the nails need to be long enough to pierce through the wood surface and then set inside another surface. Only then will it be able to perfectly attach both the planes.
Electric Brad Nailer
A brad nailer can be a superb gadget when you are looking to modify your interiors or work on a DIY project. It helps you go about your work smoothly and come up with brilliant designs.
But if a pneumatic model is not what is desired as you do not want to link it to a compressor whenever you use it, we have a solution! The electric brad nailer is one of the best alternatives available today as it does not use an air compressor or hose to perform.
Instead, it is available in corded and in cordless forms, which are operated with the help of cells. The only requirement is nail strips, and when you have a few, you can begin working and hammering in seconds. They are way easier to get started and work efficiently.
These devices can fire 18-gauge brads with perfection. They operate simply with the electric motor loading an air compressor chamber. As the chamber releases air, the nails start firing. Here we should say that the pneumatic model is more powerful though the electric model can drive 2-inch long nails into a thin wooden trim with ease.
The best part about this product is that since it is not connected to an air compressor, you can take it around easily. So, you can perform a wide range of tasks one after the other, beginning from installing trim on windows and doors to various furniture you have in the room.
Conclusion
It is essential to distinguish between a brad nailer and a finish nailer because both are not the same. A finish nailer can crack or split a thin board if it is used on one while a brad nailer is suitable for thinner surfaces.
One safety tip which we would like to give you here is to not try using a brad nailer too close to the end of the boards. This may result in splitting, so one should use this machine to attach the surfaces leaving a good margin near all the edges.
Also, try making sure that there are no knots in the wooden piece as the nails can easily bend if they come upon a knot. This can lead to the chipping of a side of the wood.
Now that you know everything about a brad nailer, it is time to try using it for yourself. For any additional help, follow one of the numerous tutorial videos available. Let us know about your experience in the comments section below.
You might have seen the term “RSVP” written on many invitations like a cocktail party, birthday party, wedding invitation, or other invitations for an event. Did you actually ever think what the term means? The term “RSVP” is actually an abbreviation of the French phrase “Répondez s'il vous plaît” meaning “Respond please” that has found its place in mainstream English.
If this term is written on an invitation, it means the host asks the guests to inform if they are planning to attend the party or not. It followed in from the etiquette rules followed by most Western cultures to inform the host if you have received a written or formal invitation.
This makes it easy for the host to know the head-count of the guests attending the planned party and order the number of plates or make other arrangements for the party. This term is often confused with “Regrets only” where you only need to respond if you are not attending.
If only RSVP is mentioned, you should always respond to an invitation even if you are going to attend the party. Missing out on not responding to the host within the specified date creates troubles for the host in making the arrangements for the celebration.
Any invitation to RSVP contains instructions on how to inform the host. A wedding invitation or any other formal invitations are enclosed with a response card which the guests can use to convey the message by simply mailing it back. With strict etiquette rules, you must write your reply to a written invitation.
With informal invitations, you can either call or text the host on the phone number provided. Some informal invitations have the option to accept or decline through social media platforms.
In this digital age, the use of electronic RSVP invitations has gained its popularity reducing the chances of any responses getting lost in the mail. They either come with email addresses where you can respond in writing or use links to any site usually social media where you can choose to accept or decline with the use of buttons.
Some hosts send "Save the Date" cards before sending the RSVP invitations to make the guests aware of the place and date of the celebration. Usually, these are sent out when the location of the party is in a distant place to allow the guests make travel plans or the date of the event to be held quite a considerable time in future.
RSVP, Regrets only
With the term "Regrets only", you are supposed to inform the host only if you are unable to attend the party because the host expects you to be present. Make sure to respond to the host as instructed if you are not attending. If you intend to attend the party, it is better not to reply as it might create confusion. You can use other ways to show your enthusiasm to attend the party.
If you are the host, don’t use “RSVP, Regrets only” invitations if you can’t get any refund for guests who have not turned up or if you need an exact headcount to make the party arrangements. Also, it is recommended not to use these invitations if you panic to know who is coming and end up calling or emailing all your guests.
Most importantly, it is a simple courtesy to let the host know who was nice to invite you even if it is to say that you are not coming with regret.
RSVP, Number of Guests
Some invitations come with a mention of the people who can accompany you like couples are often referred to as "together," or at times they can be mentioned as "family" which also includes your children. There are also invitations where you can bring in guests along with you which will include a number written like "+1," and if there is no mention, the invitation is explicitly for you only.
You can also write the number of guests accompanying you in the correct black space. The invitation usually has the details of the total number of guests who can accompany. Just check with the host if the total number of guests exceeds the limitation to see if any arrangements can be made to accommodate more guests. Or you may simply decline the invitation if you are unable to leave them behind.
RSVP Timing
Usually, invitation requesting an RSVP requires the guest to respond within a specified so that the host gets a proper head-count beforehand to make appropriate arrangements for the party. It's always better to let the host know as soon as possible without delay. This helps the host to make arrangements for guests of other invitees or can also invite others who were not on the initial list of invitees.
If you are unsure whether you are going to attend the party or not, it's better to decline before the deadline. It is good to be honest about your situation and explain to the host with regret.
Changing or Canceling RSVP
Without a strong reason, you should not cancel an RSVP as the host had already planned and made arrangements based on your attendance. It creates a bad impression if you cancel an RSVP without a sound reason because it might lead to the host of not inviting you in any future events. Strong reasons to cancel an RSVP are death in the family, serious illness, or any other emergencies.
If you have previously informed the host that you will not be able to make it to the party but later decided to attend, you can check with the host, but you need to understand that in some situations, the host might not be able to alter plans. Make sure to express your understanding in these situations.
No Requested RSVP
Sometimes an invitation does not mention RSVP which does not obligate you to respond. However, it is advisable to check with the host and inform whether you are coming or not, especially if you are bringing guests because it might happen that the host has forgotten to include the RSVP request.
Importance of RSVP
It is very important to RSVP because the host makes the decision based on your response. If you think that you don't want to disappoint the host by saying a no and don't RSVP, you are wrong because this creates more trouble for the host in making the arrangements. If you are unsure of the situation and don't RSVP within the specified date to commit, this also causes difficulty for the host. In these situations, let the host know about this if they can manage some arrangements which are uncertain.
Final Words
The author of etiquette books and American journalist, Judith Martin, who is better known as “Miss Manners” which is the pen name states that “RSVP” is a polite way of reminding people: You should reply whenever you receive an invitation. So, if you receive an invitation next time, just respond to your host promptly.
Been a long time since you met your friends? Want to hang out with them this weekend? Well you have to plan something then, right? This is where the difficult part comes in. We all want a chance to hang out with our friends during a weekend and just settle down and have a good time. But when it comes to planning the whole thing, everyone struggles. Who’s got the time?
It isn’t really that hard though. You just need to put your mind to it for an hour and start preparing for it. Fortunately for you, you’ve stumbled upon this guide and are now reading this article. Once you’re done you’ll be 19 ideas closer to hosting the coolest Get Together ever! So get reading and start preparing once you’re done!
What better way to hang out with friends than to sit back on the couch with all of them around you and catch a great film? This is especially fun if you’re watching a movie that just goes with friendship and relations as its main theme! Stuff like The Hangover or The Fast and the Furious work really great. More light hearted flicks like The Intern also work!Just have a bunch of these available and nearby the television set ready to play whenever your friends decide it is time to catch a movie together!
Stock up on Booze
Another important thing is to stock up on the Alcohol. There’s a very cost-effective way to go about this. Usually, everyone’s needs are met if you have certain amounts of each type of Alcohol available but make sure you have a lot more beer than the rest. Beer is cheap and pretty much anyone will enjoy it.
Image via Gabriel Gurrola@gabrielgurrola
Keep a few board games ready
Another really great idea for get-togethers is Board Games. They’re a great way to bond among multiple people. Games like Scrabble, Monopoly and Carrom are great for this! You could also keep some unorthodox games like Battleship and Chess.Another idea along a similar theme is card games. Uno is one of the best games to play with a group of friends and offers pretty much unlimited fun with all its twists and drama. There’s also Cards Against Humanity.
Plan out a few activities
Keep a few activities in mind to keep your friends indulged beforehand. You know your friends the best and you’ll also know what kind of activities they’ll love indulging in! It could be anything from drinking games to dancing to outdoor sports!Have a schedule planned out. It could start with something like a simple ice-breaker to get things going, like a game of Truth or Dare. You can then go on to things like watching a film, playing board games, going out there and having some fun playing a sport or some physical activity.Just start out subtle and keep increasing the social indulgence with each activity. You’ll have a ball of a time and it’ll really make your friends want to meet more often too!
Food Preparations
There are plenty of things you could do here. A great meal goes a long way towards increasing bonding between people and that is a known fact. It's up to you to decide how you’d want to go about this but rest assured there are plenty of ideas to experiment with here.You could order from a nearby restaurant and have them deliver it at the perfect time when everyone would be hungry (Goes in accordance with the planning of your activities). You could prepare the meal yourself if you love cooking or experimenting with cooking.As a matter of fact, you could also invite a few of your friends over to help you with planning out the meal. Come to a collective decision as to what food y’all want to enjoy or what you’d enjoy cooking together. This is as much a bonding activity as any other.
Keep a Food Dehydrator at Home
If the get-together is at your house, make sure that you have a food dehydrator. Dehydrated food is much better to eat. It feels fresher and it is healthier. It also reduces waste. You won’t have to take the trash out next morning, or you might be too hungover to do that. So, it’s pretty good to have the best food dehydrator as a backup.
Plan an outing
Who says get-togethers have to be just at home? You could plan a whole outing with an itinerary. Maybe go to the mall and hang out. Go window-shopping, visit the gaming arcade, have a great meal full of fast food! Everything works out!You could also plan a visit to an amusement park or theme park. Call your friends and decide the best mutual date. Make sure all of them are confirming and keep their schedules clear. Go ahead and plan it! Image via Muhammad Haikal Sjukri@pantiumforce
One of the most fun ways to have a get together is a Pool Party! What better way to beat the heat in the summer than to go to the local swimming pool and play some games in the water?
Keep a check on the topic of discussion
This is an important factor in ensuring that your get-together is going well with your friends and nobody goes home with any doubt or sour moods. Keep the topic of conversation light. Indulge in celebrity topic or discuss a light hearted movie or book. Most importantly, DO NOT allow the conversation to switch to Politics.When it comes to politics, everyone has a world view of their own which is bound to differ with someone else’s at some point. This can really lead to some arguments or bitter fights. Whenever you feel the conversation is headed in this direction change activities or indulge your friends with a different topic.
Have some good music playing in your house.
Music goes well with just about any gathering. It genuinely is an art that brings people together. Keep a playlist ready and start playing it half an hour to 45 minutes before your buddies arrive. This will ensure that your friends enter your house to some great music while also setting you in the mood for a get together.
Keep the Bathrooms clean and the bedrooms tidy
This is another important thing to pay attention to. Get-togethers, especially those with alcohol involved can really get out of hand for some people and people tend to need to visit the bathroom or lie down and catch a break quite often. So just go the extra mile here and have your bathroom and a room in your house prepared.Clean up the commode and arrange your bed. Keep your bedsheets in order and the pillows clean with fresh covers. Image via Ali Inay@inayali
Arrange for a Karaoke Night at your place
Karaoke Nights are the best! Call your friends over and tell them you’re having a Karaoke Night at your place. Or you could go to the local pub hosting Karaoke Nights and do the same. But it is a lot more fun if you’re doing it on your own at your place or a friend’s place.The thing about Karaoke is that people love showing off their taste in music to their friends and it is all the more fun if you get a chance to sing it to them. A karaoke night can really liven the atmosphere up!
Keep the meet up during a sports event
What could possibly be better than hanging out with your friends, enjoying beer watching an NBA or Baseball match? A get-together is really fun when all of your friends are sitting together watching the game in one room. It’s arguably one of the most fun ways to hang out with friends.There’s cheering, sneering, shouts of joy and moments of anxiety. A sport has it all and it is fun to see all your friends expressing so many emotions at the same time. It can be one of the most fun experiences ever!
Movie Marathons
Another really great get-together idea is Movie Marathons. That’s right. We’ve all wanted to go on that Lord of the Rings or Star Wars marathon with a group of friends and why not? It’s among the most fun things to do in life and you definitely can organize that!Call your friends over for the entire weekend and have a no-sleep policy. Start a series and don’t get up until the end! Keep the popcorn, drinks and food prepared, your Netflix on and connected and you’re good to go!
Video Game Tournaments
We’ve all wanted to prove that we’re the best player at Street Fighter or Mortal Kombat! Well there’s nothing better than organizing a get-together where you call your friends over, connect the Playstation and get gaming and more importantly, trashtalking about beating each other!
Scavenger Hunt
Prepare a Scavenger hunt. Plan it out with another friend and invite your group to participate in it! Not only is the scavenger hunt fun in itself but the planning out part of it is a really enjoyable experience and a great group activity to indulge in with your friends, colleagues and co-workers!
Go Camping
Pack your backpacks with tents, jackets, raincoats, a camera, and a sleeping bag and go camping as a get-together! Camping is a very enjoyable experience and it can especially be fun as a get-together. Catching up with them while roasting marshmallows over a campfire next to a lake is a surreal experience and you should definitely try it!
Start a book club
If you’re someone who loves reading, chances are you might keep friends around who love reading just as much as you. Call them up, and tell them about this new book club you’re starting and bring them in on it.Not only is this a great way to interact and catch up with friends you already know but also a really fun way to meet new people with similar tastes and interests and hang out with them! Image via Brooke Lark@brookelark
House Party
Host a house party! Invite everybody in the neighbourhood and your friends! Have a disco setup or rent a dance dance revolution machine, stock up on the alcohol and set up an open bar. Send out the invites online or over e-mail.A house party is one of the best ways to hang out, interact with and talk to people while being casual about it! There’s nothing people love more than getting invited to house-parties. It’s a great excuse to get some social interaction going!
Backyard Barbecue
Host a barbecue night at your place in the backyard. Have the grill ready and invite your friends over for it. Set up some hammocks in your backyard, a dining table with some chairs and get going. Bonding over burgers and the barbecue grill is a really great way to spend some time with your friends!
Well, that’s all we have for you! If you’re reading this now your brain is probably stacking up on some great ideas to organize a get-together with your best buddies! Go on and get planning! Have fun socializing!
From military subterfuge to religious decorations and more, face and body art has been used in countless ways over the centuries. Either it’s homemade or professional body paints, you’ll see them everywhere around the world with many cultures.
It has been used during festivals, conventions, and even to highlight various causes. While originally practiced by the indigenous people of Africa and Australia, it is now most commonly used as a form of entertainment. But like other forms of art, selecting the right tools is necessary for getting the best results.
Since the paint will be directly applied to the skin, it is important to find options that are completely safe. That is why it is recommended to use paints that are specially developed for the purpose, such as any water-based or alcohol-based formula. Our face and body are not like our home wall or ceiling; there also you cannot just use any types of paints. In fact, painting ceilings is not at all an easy job, they need skill sets and the right kind of paint that’ll stick to the ceiling without peeling off.
Besides these, there are some other options, so let’s look at them in detail.
Origin And Evolution Of Face And Body Art
Nowadays, there are several paint options for the face and body. However, this type of art dating back to the paleolithic age had humble origins. The first items that were used as a face and body paint were pigments made from plants, animal by-products, ashes, and similar materials.
During the hunting-gathering phase of human evolution, body painting was used by tribal warriors for practical purposes like identification and camouflage. Such paint was also used for ceremonial rituals and inciting fear in enemies. Later, it became popular as a decorative item, used to enhance one’s appearance, similar to how makeup is used today.
However, the problem with many of the materials that were used for face and body painting in the earlier days was that they were not safe. Pigments made from rocks, plants, and animals often turned out to be toxic for the human body.
Even most of the options available currently, like acrylic paints, are not meant for use on the human skin, as they can cause allergic reactions and skin irritation. That is why you should make sure to select the right type of paint for body art. Supposedly on Halloween, acrylic paints are only good on Halloween paintings and decorations ideas and not on human skin.
Body Painting In Modern Times
Modern-day body and face painting mainly involve creating a living piece of art by decorating a person’s body, usually for purposes like:
Promotional or marketing activities
Costumes or part of costumes for parades, conventions, and similar events
Competitions and festivals
Body painting also includes glitter tattoos, temporary tattoos, and other types of art usually created using various mediums.
What Does Body Painting Symbolize?
Various cultures associate different things with body painting, and these are different from body art done for ceremonial purposes or events by indigenous people. Indigenous people utilize body painting as an art form for special occasions like weddings, funerals, right of passage ceremonies, and other celebrations. For such events, various colors and patterns have different meanings.
In contrast, modern body art focuses on expressing an emotion or idea and is generally about the art itself. Body art is also used for celebrations but does not have any spiritual meaning and has a more decorative purpose, that of enhancing beauty.
Body Painting And Safety
Generally, body and face painting is completely safe if the right type of paint is used and proper instructions are followed. So, craft paints, which are not meant to be used on the skin, should be avoided at all costs. These include acrylic paint, regular spray paint, tempera paints, and others which can cause skin irritation, allergic reaction, or even chemical burns.
That is why you should always use paint specifically designed for the purpose, as these are completely safe.
The Best Types Of Paint For Face And Body Art
1. Water-based Paint
Water-based body paint is among the safest options if you’re going for face and body painting. Such paints need to adhere to certain quality guidelines and are properly regulated as they may also be used by kids. Besides being completely non toxic, they are easily washable and can be applied using several methods and tools. You can use a sponge, paintbrush, or toothbrush for the purpose.
However, keep in mind that water-based paints can easily be rubbed off and are susceptible to cracking. That is why they may not be the best option if you use them for professional purposes, like modeling.
2. Metallic Body Paint
If you’re trying to achieve a shiny, glossy look, metallic body paints might be an excellent option. These paints contain real metal powder blended with a synthetic liquid for application but they should be used cautiously. Since the powder is made up of real metal, it can cause skin irritation, which is why it is best for special occasions.
Compared to water-based paints, metallic paints do not rub off easily and last longer.
3. Alcohol-Based Paint
Generally used for making airbrush tattoos and for special effects applications, alcohol-based paint can resist heat and moisture for prolonged periods..
Being waterproof, these paints do not crack easily due to sweat and have to be removed using rubbing alcohol. Keep in mind that it may take some time for the paint to remove and you should do the same in a well-ventilated area, as the fumes can be toxic.
4. Latex Body Paint
Regular or liquid latex is another fantastic option for body art and is often used by cosplayers because it is more affordable than custom costume designs. One of the best things about this paint is that it does not leave any residue, unlike most other options. That said, it may not be ideal for those with latex allergies, as it can cause irritation and allergic reactions.
Latex paint is also not recommended for use in extreme heat, as it can cause heat stroke by blocking the perspiration process. And like many other types of paint, avoid applying it to damaged skin areas.
Another thing to keep in mind is that latex paint works just like wax when it comes to skin application, meaning that it can pull the hair out during removal. So, you should shave the areas where the paint has to be applied to minimize the pain when removing it.
5. Henna
One of the traditional body paints, henna is commonly used in Asia and coastal areas of Africa for body painting. Extracted from plant dye, it’s a reddish-brown pigment used for many purposes. In coastal African cities, women often use henna as decorative paint and body paint for when they are about to get married.
This is one of the safest types of body paint and can be used by kids and adults without worrying about any harmful effects. Being a temporary paint, it fades away naturally over time, but you can exfoliate your skin to speed up the process. However, unlike regular henna, black henna should be avoided since it contains chemicals that can cause allergic reactions and irritations.
6. Commercial Body Paint
You can find commercial body paint from different manufacturers for various purposes. These are generally available in containers or spray bottles and are nontoxic. They also do not contain any latex, making them a worthwhile option for those with latex allergies.
7. Markers
In addition to body paints, special markers can be used for body and face painting. Like commercial body paints, most such markers are non toxic and can be used by both children and adults. However, some may specify the areas of the body where they should not be used, so make sure to read the packaging before use.
The Process Of Body Painting
Finding the right type of paint is vital for creating highly impressive body art, but that is not the only thing that requires attention. Before you can start, it is important to understand the process to ensure the best results.
Whether you are opting for face painting or both face and body painting, it will involve multiple steps and requires considerable effort and time.
1. Planning The Painting
Proper planning is the first and most important step in body painting and, in most cases, involves creating a sketch of the design you intend to paint. A sketch makes it easy to see whether various parts of the design work well on the areas of the body they will be painted on. Plus, it serves as a guide during the painting process.
However, it may not be required if you opt for a free-spirit look.
2. Preparing The Model And The Skin
It is important to ensure that the skin is completely clean and oil-free for the paint to stick to the skin. And the first step in this regard is to use a gentle soap to clean the skin. Avoid exfoliation or abrasive skin treatments, as they may damage the skin.
Once done, dry the skin using a towel and avoid the application of any lotions, creams, or other skincare products. This is because they can affect the ability of the paint to stick to the skin.
But you can use a barrier spray on the skin before painting, which will shield the skin from oils or sweating and prevent the paint from smudging.
3. Creating The Right Setup
Both face and body paintings require a lot of time to be completed, which is why creating a comfortable setup for the model is essential. For standing models, providing them with a soft cushion to stand on can be helpful. Similarly, depending on the temperature, you may need to provide a heat source since the model will be almost completely naked in most cases.
Ensure that the model stays well hydrated and maintains circulation by moving the legs as required. You will also need to provide the model time to take refreshments and breaks, as the process can be quite tiring.
4. Applying The Body Paint
The application process of body paint will depend upon its nature, as body paints are available in various formats such as water activated paints or liquid body paints.
A. Applying Water Activated Solid Body Paints
Water activated solid body paints are among the most popular options and are generally available in cake form. They may either be dry and hard or have a clayey consistency and are usually applied with water using a brush or sponge.
Start by moistening the sponge or brush and rub it across the body paint. When the paint acquires a creamy texture, it is ready to be applied as required. When you use a sponge, tap the surface repeatedly to get good coverage. You can also use a dry blending or stippling effect to create various textures.
Alternatively, you can make circular motions using a body brush or a kabuki brush when using. And use a nice selection of face painting brushes that includes filbert brushes, round brushes, and flat brushes to get those intricate details.
B. Applying Liquid Body Paints
Applying alcohol-based or liquid body paints is not very different from applying solid ones and can be done using a brush or sponge. If the paints are adequately thin, you can use an airbrush or thin them out first if they are not. An airbrush has three basic components, an airbrush gun, a hose, and an air compressor.
Put the paint inside the container provided on the airbrush and point the device towards the area of the body to be painted. Use the trigger to apply the paint onto the skin, and the distance between the airbrush and the skin will determine the effect. Hence, learning how to use an airbrush can take some time but it can be advantageous in helping speed up the painting process.
For this method, look for an airbrush compressor and guns designed for body painting, as regular ones can be quite strong for the skin.
Tools Required For Body Painting
1. Brushes
Body painting requires high-quality specialty brushes, mainly including a one-inch flat brush, a ¾-inch flat brush, and a medium size filbert brush. You will also need round brushes in sizes zero, two, three, and five, a ¾-inch angle brush, a smaller brush, and a kabuki style brush.
Also, keep in mind that brushes with synthetic bristles work better for body painting than those with natural hair.
2. Sponges
Almost all body painting projects require high-density sponges since they allow you to cover large parts of the body easily and quickly. You can find them in varying sizes, shapes, colors, and densities. The best options are half or full-circle sponges because they provide the largest painting surface.
Avoid using regular makeup sponges since they do not work very well with water-activated face paints. They are different from body painting sponge, which are made from reticulated polyether foam.
3. Setting Spray
This is an optional resource that can be very useful in certain cases. Apply a makeup sealer to the body paint to help increase its resistance to sweat, smudges, and water and ensure that it lasts longer. However, it will not make the body paint smudge-proof, sweatproof, or waterproof. For that, you need to use alcohol-based paints.
Removing Body Paint
Compared to the application process, the removal process of the body paint is easier and does not require as much time or effort. The longer you wear the paint, the easier it is to remove later. And while removing body paint, it is common to stain various surfaces, so it is best to be prepared.
1. Removing Alcohol Or Water-Based Body Paints
Alcohol or water-based paints can be easily removed using a face and body art soap, a rag, sponge, and warm water. Add some soap to your rag or sponge and gently scrub all of the painted areas. Once the pigment becomes loose, rinse with warm water. Repeat the process as required.
If some faint stains are left, put some lotion on the skin and leave it for about 30 minutes. Then scrub with the rag again and rinse with water. In the case of acrylic, though a water-based paint, it tends to last long when it becomes dry and becomes harder to remove from skin. Thus, another reason why it’s not suitable for body art.
2. Removing Oil-Based Body Paint
Unlike water or alcohol-based paints, oil paints should be removed using oil-based products or special removers. In this case, use lotion or baby oil to loosen the pigment and wash it off with soap and water. However, most people do not use oil-based paints for body and face painting.
Getting Good Quality Body Paint
While finding body and face paints is easier than ever before, it is important to get paints that are of good quality. These are easier to work with, offer vibrant colors, and provide the best results. But finding such paints can be a bit tricky, so keep these things in mind:
1. Reputable Stores
When buying face paints, always go with reputable stores that are known to provide good quality products. Avoid purchasing from stores that only appear around Halloween, as they offer poor-quality paints that are difficult to use and do not provide the desired results.
2. Known Brands
Go with well-known brands that have been on the market for a long time and offer the best body paint. Such paints are generally safer, easier to apply, and last longer. Even if some newer brands can offer reliable products, finding them may require greater effort and time.
3. Good Customer Service
Purchasing from stores that offer specialized customer service can take your body painting process to the next level. Their staff includes body painters who can provide ideas, tips, and suggestions to improve your body painting experience.
What Type Of Paint Can Be Used For Face And Body Art Frequently Asked Questions ?
How Long Does Body Paint Last?
There is no standard time for which the body paint will last, and the period can range from a few hours to a couple of days, depending on the paints used. Products like henna can last up to two weeks with proper care, while alcohol-based paints can last for two to three days.
On the other hand, water-based paints do not last more than a day since sweat and contact with various surfaces can easily remove the pigment. And glitter tattoos can last for about a week.
What Is A Good Substitute For Face Paint?
You can use this DIY technique to create an excellent substitute for face paint.
Mix equal amounts of white cold cream or face lotion with cornstarch to make a lotion. Use water to thin the cornstarch or add more cornstarch to thicken it as required. You can also add a quarter teaspoon of vegetable oil or baby oil to make the paint smoother and prevent caking.
Can You Use Watercolor As Face Paint?
Watercolor is generally considered safe for face painting, especially children’s watercolor paints. These are generally safer than other types of watercolor because they are nontoxic and thus, can be safely applied to the face.
Is Acrylic Paint Safe For Skin?
Acrylic paint is usually used for painting purposes on surfaces like canvases and is a water-based solvent. It contains acrylic, color pigment, and a colorless liquid called MMA. Artists use acrylic paint because it is easier to clean and safer than oil-based paints. ‘
But it is not meant to be used on the skin since it stiffens upon hardening. This reduces the flexibility of the skin and prevents it from breathing, which can cause skin irritations. Additionally, it may contain harmful chemicals like ammonia, lead, and formaldehyde that should never be put on the skin.
What Do Cosplayers Use For Body Paint?
For cosplaying purposes, the best paint would be regular water-based face and body paints or airbrush body paints. Water based paints, when wet, can be easily mixed to create new colors, which helps get the right shade.
Airbrush paints also offer several advantages for cosplayers. They can be easily applied to various areas of the skin and can be easily diluted and mixed to create various shades.
What Type Of Paint Can Be Used For Face And Body Art Final Thoughts
While the purpose of body and face painting may have evolved over the years, the art itself remains quite popular today. You can see some great examples of body art at conventions, cosplays, birthday parties, and other such occasions.
So, if you’re a beginner looking to try out this form of art, there has never been a better time as there are lots of paints and designs to choose from. However, when starting out, it is a good idea to go with simple designs that are easier and can be completed quickly.
Now that you are ready to find the type of paint most suitable for you, it is time to conclude this guide. Until next time!
Black and white trees offer a refined approach to holiday décor, combining modern aesthetics with timeless appeal. This monochromatic palette is versatile, fitting seamlessly across various styles, from sleek minimalism to rustic charm. Each design in this collection emphasizes different aspects of black and white holiday décor, utilizing textures and details like plaid accents, feathers, lace, and black roses to create trees that range from whimsical to sophisticated. This guide explores 31 black-and-white Christmas tree concepts, each with a unique approach to festive decoration. From Art Deco-inspired ornaments to gothic black roses, these trees provide striking seasonal centerpieces for a stylish and memorable holiday season.
01. Elegant Black & White Christmas Tree with Sleek Ornaments
An elegant black and white Christmas tree adds a chic and sophisticated style to seasonal décor. Sleek white ornaments and black ribbons give the tree a polished look while glowing lights add warmth to the aesthetic. This refined approach is perfect for modern homes with a stylish yet classic holiday theme.
02. Minimalist Black & White Tree with Simple Décor Elements
This black-and-white tree design defines minimalism, with simple decorations and clean lines. Small white baubles, black garlands, and delicate string lights offer understated charm, ideal for spaces with a contemporary décor scheme. This minimalist aesthetic speaks to those who prefer subtlety over bold ornamentation.
03. Black & White Glam Christmas Tree with Glitter Ornaments
The black and white glam Christmas tree introduces sparkle and elegance, combining silver glitter ornaments, sparkling garlands, and sleek black ribbons. This luxurious design shines in spaces aiming for a touch of opulence, enhancing the holiday décor with a glam aesthetic.
04. Striped Black & White Tree with Bold Ribbon Patterns
The striped black and white Christmas tree brings a bold, visually striking look. Black and white ribbons, baubles, and garlands are arranged with glowing lights, creating a distinct contrast that makes this tree an eye-catching focal point for any room.
05. Monochrome Black & White Tree with Consistent Color Scheme
A monochrome black-and-white Christmas tree uses only black-and-white ornaments for a clean, cohesive appearance. While it focuses on a strict color scheme, it offers inspiration for those exploring softer palettes, such as pastel Christmas trees, for a gentler holiday ambiance. Minimalist garlands, soft lighting, and simple black and white baubles create a striking yet uncomplicated décor choice for those seeking unity in their holiday decorations.
06. Black Tree with White Ornaments for Bold Contrast
A black Christmas tree with white ornaments creates a strong contrast, drawing attention to each ornament. White snowflakes, stars, and baubles stand out vividly against the dark background, giving a contemporary twist to traditional holiday décor.
07. White Tree with Black Ornaments for Visual Impact
This white Christmas tree with black ornaments flips the typical color scheme, offering a fresh perspective. Black baubles, ribbons, and geometric ornaments create a high-contrast effect, enhancing the tree's modern look within any sleek, minimalist setting.
08. Black & White Tree with Feathers for Luxurious Texture
Adding white feathers to a black-and-white tree introduces a soft texture that contrasts with traditional ornaments. Black garlands and sleek ornaments enhance this luxurious design, ideal for adding a unique, opulent touch to a sophisticated room.
09. Rustic Black & White Tree with Wooden and Pinecone Accents
The rustic black and white tree combines natural elements with modern elegance. Wooden black ornaments, white snowflakes, and accents like pinecones create a cozy, inviting look that pairs well with farmhouse or cottage-style décor.
10. Black & White Tree with Silver Accents for a Polished Look
Silver accents elevate the black and white Christmas tree, bringing a layer of elegance. Silver ornaments and glittering garlands add a polished look, with soft white lights enhancing the festive ambiance.
11. Black & White Vintage Tree with Classic Holiday Baubles
Vintage-inspired ornaments give a nostalgic feel to the black-and-white Christmas tree. Classic baubles, tinsel, and ribbons provide a cozy holiday setting, evoking holiday traditions from years past.
12. Black & White Modern Tree with Geometric Decorations
The black and white modern Christmas tree focuses on simplicity and clean lines. Minimalist ornaments, black ribbons, and geometric decorations keep the look sleek and suited for contemporary interiors.
13. Black & White Tree with Plaid Accents for Cozy Appeal
Plaid ribbons and decorations add a cozy winter feel to the black-and-white Christmas tree. This design introduces warmth and charm, making it an excellent fit for festive living rooms with a classic style.
14. Black & White Tree with Gold Ornaments for Glamorous Style
Gold ornaments introduce a luxurious flair to the black-and-white Christmas tree. Paired with black ribbons and white garlands, this style offers a glamorous, upscale holiday décor option.
15. Black & White Ombre Christmas Tree with Gradual Color Shift
An ombre effect on the black and white Christmas tree transitions from dark to light, creating a unique look. Black ornaments blend gradually into white ones at the top, illuminated by glowing lights for a soft, ethereal effect.
16. Black & White Tree with Star Ornaments for Festive Charm
Star ornaments bring a whimsical, festive touch to the black and white Christmas tree. Black and white star shapes with elegant ribbons and lights create a holiday-ready look that celebrates the season.
17. Black & White Tree with Pom-Poms for a Playful Effect
The addition of black and white pom-poms gives this Christmas tree a playful texture. Soft and rounded, these ornaments add a lighthearted element, making this tree a fun, unique holiday décor choice.
18. Black & White Tree with Stripes & Dots for Quirky Flair
Stripes and polka dots give a quirky, modern look to this black and white Christmas tree. For those who enjoy bolder visuals, this design complements ideas found in multi-colored trees, where diverse hues create equally vibrant and dynamic holiday displays. Striped ribbons and dotted ornaments work together to make a visually engaging décor option suited for eclectic holiday styles.
19. Black & White Tree with Lace Ornaments for Vintage Touch
Lace ornaments add a vintage, delicate quality to the black and white Christmas tree. Combined with black ribbons and white lights, this tree exudes a romantic, classic appeal suited for intimate holiday settings.
20. Black & White Tree with Geometric Decorations for Modern Style
Geometric ornaments bring a modern style to the black-and-white Christmas tree. Simple shapes and glowing string lights add a sleek, contemporary appeal to the holiday décor.
21. Black & White Tree with Snowflakes for Wintery Accents
Snowflake ornaments add a seasonal touch to the black-and-white Christmas tree. Large white snowflakes contrast with black baubles and glowing lights, embodying the spirit of winter festivities.
22. Black & White Tree with Feathers & Pearls for Soft Elegance
Adding feathers and pearls introduces elegance to the black and white Christmas tree. The combination of soft feathers, pearl garlands, and delicate ornaments creates a luxurious décor style for the holidays.
23. Black & White Tree with Abstract Decorations for an Artistic Look
Abstract ornaments bring an artistic flair to the black-and-white Christmas tree. Bold shapes and black ribbons give this tree a contemporary, creative look suited for modern holiday themes.
24. Black & White Tree with Floral Accents for Fresh Details
White floral accents add a fresh touch to the black and white Christmas tree. Combined with soft lighting, these floral elements lend elegance and uniqueness, blending festivity with a natural theme.
25. Black & White Tree with Black Roses for a Gothic Edge
Black roses introduce a gothic element to the black-and-white Christmas tree. Paired with white garlands and glowing lights, this bold design offers a dramatic twist on traditional holiday décor.
26. Black & White Tree with Feathers & Glitter for Shine
Feathers and glitter add texture and shine to the black and white Christmas tree. This glamorous combination of soft and sparkling elements creates a festive look for spaces seeking a luxurious holiday style.
27. Black & White Tree with Checkered Ornaments for Playful Style
Checkered ornaments offer a playful look to the black and white Christmas tree. Twinkling lights accentuate the black and white checkered pattern, making it an ideal choice for modern, creative holiday décor.
28. Black & White Tree with Ribbon Garlands for Flowing Design
Ribbon garlands in black and white create a soft, flowing aesthetic on this Christmas tree. Paired with soft baubles and twinkling lights, this design brings a gentle, festive style to holiday décor.
29. Black & White Art Deco Tree with Geometric Ornaments
The Art Deco-inspired black and white Christmas tree features geometric ornaments and silver garlands, capturing the elegance of the 1920s. This tree appeals to those seeking a classic, vintage look with a modern edge.
30. Black & White Tree with Glittering Stars for Festive Sparkle
Glittering stars add a festive sparkle to the black and white Christmas tree. White garlands and fairy lights enhance the holiday ambiance, creating a celebratory look that suits various holiday themes.
What’s worse than knowing there’s a mosquito around you? The inability to locate it!
That irritating buzzing, combined with occasional wing flaps and the thought of them carrying some disease - don’t even get us started on the frustration! You set out on a desperate search for their hideout, but all in vain.
If you’re yet to face this, we assure you the day is closer than you think. But that’s only till you find an effective way to prevent it. And that’s why, we have come with a dozen DIY methods to help you in luring a mosquito out of hiding.
From natural ingredients to market-bought tools and even your body, we have covered it all for you to take a pick.
To get the ball rolling, let’s talk about one of the most reliable DIY methods - the yeast trap. These pests have a natural liking for CO2 (carbon dioxide), and its high content in yeast acts as the bait for them.
To set up this trap, here are the things you will need:
Active yeast
Brown sugar
1 cup boiling water
Plastic soda bottle
Duct tape
Spray paint/black construction paper
Setting The Trap
To begin with, carefully cut the empty soda bottle just below the neck area (where it flares out to meet the main section). Remove the cap from the resultant ‘neckpiece,’ and insert it into the bottom cylinder in an inverted manner, resembling a funnel.
While at it, don’t push the neck all the way down to the bottom of the cylinder. Ensure that you leave enough room to accommodate a cup of liquid and some air space. Using duct tape, secure the funnel with the bottle.
Not only does the tape hold the funnel in place, but it also seals the edges through which the mosquitoes might escape. Once done, cover the bottle using spray paint or construction paper. Leave it to dry.
Next, add about ¼ cup of brown sugar to 1 cup of boiling water. Stir thoroughly until the sugar is completely dissolved. Then, leave this solution to cool until you can comfortably stick your finger into it.
If the solution is too hot, it will kill the yeast. On the other hand, if it’s too cold, the yeast will not activate fully. So ideally, the temperature should be between 120 and 130 degrees Fahrenheit. Hence we’d recommend using a cooking thermometer to keep the temperature in check.
When the solution reaches the correct temperature, gently mix in a packet of yeast and pour it down the funnel. Your yeast trap is ready! Since the trap is meant to attract mosquitoes, don’t keep it too close to your sofa or bed. Instead, place it near the outer perimeter of the rooms.
How Does It Work?
Yeast reacts with sugar to release CO2 in a process known as fermentation. The mosquitoes follow the trail of CO2 to enter the bottle and get trapped due to the sealed edges. After some time, they get fatigued and drown into the solution. If you see too many mosquitoes getting trapped, change the solution frequently to keep it effective.
Likewise, you may adjust the quantity of yeast and sugar according to your requirement.
High velocity fans can be converted into an excellent mosquito trap with a little work. While you may also use a box fan, we prefer high-velocity fans as they produce a large volume of air.
Here are the things you will need:
High-velocity fan
Mesh screen
Strong magnets/plastic zip ties
Rubbing alcohol
Water
Paper towel
Spray bottle
Scissors
Setting The Trap
Firstly, place the fan near an area that you think houses the most mosquitoes (the rear side should face that area). If there’s no power outlet there, get hold of an extension cord. Once you’re happy with the placement, take the mesh screen and cut it to match the size of the fan’s face (round metal frame).
Make sure that the holes aren’t too small for the mosquitoes to pass through. Then, wrap it tightly around the fan so that the edges of the screen overlap with the frame’s sides. Secure it firmly using magnets. If your fan doesn’t have a flat metal frame, use plastic zip ties.
On the side, add equal parts of rubbing alcohol and water in the spray bottle.
How Does It Work?
Switch on the fan at a moderate speed. As it draws air to blow out from the front, the mosquitoes also get sucked (like a vacuum cleaner) to get trapped in the mesh screen. Let the fan run for some time.
Next, turn off the fan and spray the diluted alcohol on the screen with focus on the trapped mosquitoes. The rubbing alcohol will kill them. Ensure that you don’t get anything into the motor. At the same time, drench the paper towel with the same solution and place it directly below the fan.
Very carefully, take off the mesh screen and tap it lightly, so that the mosquitoes fall on the towel. Dispose of both and wipe the fan clean with a dry cloth.
The Beer Trap
You can also substitute the yeast and sugar solution for half a can of old beer. Several studies have shown that although mosquitoes don’t like the taste, they have a natural inclination towards the smell of alcohol.
Increase CO2
If you are too impatient to wait for the yeast trap to work, spraying a bike inflator will get the job done rather quickly. However, you need to be extremely careful while working with it, as increased CO2 levels can cause dizziness, nausea, headaches, faster heartbeats and a lot of other health complications.
Thus, we’d not recommend employing this method in very closed spaces. Furthermore, use a mask and ventilate the area thoroughly once you get rid of the mosquitoes.
A safer method to do this would be to purchase a mosquito magnet. Modern mosquito magnets use a catalyst, which is practically a set of ceramic beads or a ceramic grid coated with platinum. This catalyst directly converts the propane to release heat and CO2 without requiring a flame.
Moreover, the octanol (a chemical that attracts mosquitoes) cartridge also intensifies the appeal. The resultant combination of gases and chemicals draws mosquitoes, who then come near the source. As they get closer, a vacuum-like fan sucks them into a net bag, where they dehydrate and die.
The biggest advantage of using a mosquito trap is that it doesn’t release any harmful byproducts, like carbon monoxide or nitrogen oxides. Besides, the lack of flame reduces the risk of fire accidents.
The Flower Method
Besides amping up the ambiance of your room, flowers also lure mosquitoes out of their hiding. Since they love feeding on the nectar, you will notice quite a few mosquitoes around the flowers, especially at night. Buy yourself a bouquet or keep an assortment of your favorite flowers in rooms most affected by these pests.
And as we were not very confident about our ability to kill them with our bare hands, we fell back to a zapper.
Although this method may not show speedy results like the yeast trap, it’s effective nonetheless. Make sure to keep the flowers fresh or replace them as soon as they start drying out.
Using Fragrance
Colognes and perfumes that have a floral fragrance are said to attract mosquitoes. Additionally, skincare products that contain lactic acid (which is also produced naturally by humans with sweat) are incredibly enticing for them. Pour a few drops of any such product on every nook and corner of the house to make the mosquitoes come out.
Alternatively, you can also wear your favorite perfume or put on some lotion and then walk around the areas which tend to house the most mosquitoes. In that case, remain cautious to prevent those annoying mosquito bites!
An important thing to note here is that not all fragrances are likable for mosquitoes. So, using products that smell like the following may not serve the purpose of bringing them out:
Garlic
Basil
Lemongrass
Peppermint
Neem (also known as Azadirachta Indica, nimtree, or Indian Lilac)
Systematic Searching
The systematic searching technique is most useful for finding (and killing) mosquitoes in confined spaces. Plus, you don’t need any fancy gadgets to accomplish the task. A flashlight, zapper, and some concentration will do the job!
In case you plan to use this method for a larger space, here’s how you can do it. Start with confining the place as much as possible. You can use moveable furniture or large cardboard boxes to do this (but keep sufficient space for you to move around). Once done, close all doors and windows, and dim the lights.
Using a flashlight, scan every inch of the wall, floor and ceiling. Blow slightly near the corners for the CO2 effect; this should bring the mosquitoes out from their hiding. Be careful not to lose focus and zap quickly as soon as you spot them.
Light Trap
You can also implement this plan with a little alteration and without confining the space. Turn on a small light source and keep it stationary. Keep the flashlight turned off for the time being. After some time, the mosquitoes are likely to follow the light and settle on a nearby surface.
Now, slowly move the flashlight to that position while keeping focus on the mosquito. This will cast a bigger and better shadow for you to zap it away.
The Technology Trap
The technology trap works pretty much the same way as systematic searching, where you don’t even have to get out of your bed.
Switch off the lights in your room and get cozy under the blanket. Then, increase the brightness of your phone or tablet to the maximum. Here, you can continue holding the device, or you can place it on your chest (over the blanket). The mosquitoes will definitely follow the light, come near you, or even sit on the screen.
Again, don’t lose vision on them. Keep your zapper ready and reflexes sharp to deliver that killer strike, but make sure you don’t damage the device.
Stagnant Water
It’s a no-brainer that stagnant water is a preferable breeding ground for mosquitoes. But what if we told you that you could also use it to trap them? By adding household items to stagnant water, you can turn them into virtually death traps.
Oil
A thin layer of oil can effectively trap mosquitoes, along with suffocating the larvae. For this, you can use any natural oil like vegetable, olive, or cinnamon oil. Moreover, you don’t need more than 1 teaspoon per gallon of water. However, don’t use it for water bodies that have fish.
Soap
Adding a few drops of any soap to a body of stagnant water reduces its surface tension, which in turn, drowns the mosquitoes.
Apple Cider Vinegar
Sure, this all-organic substance doesn’t kill adult mosquitoes, but is potent enough to wipe off larvae when used in higher concentration.
Bleach
Much like apple cider vinegar, bleach can be used to kill the larvae. And since it’s essentially a toxic substance, make sure that the diluted water doesn’t mix with drinking water or feed plants and animals.
Till now, we’ve seen the use of everyday objects to lure mosquitoes out of their hidings. But to be honest-nothing attracts them more than a human body. So, in the following sections, we discuss how you can use your body to form that ideal bait.
Using Pore Secretions
Upon eating certain food, our pores secrete certain substances like salt, potassium and lactic acid that attract thirsty female mosquitoes looking for blood like no other. Crisps, salty potato snacks and soups are a few things that increase the level of salt in our body.
Similarly, sugary treats mimic the nectar-like sweetness of flowers. On the other hand, fruits like avocado and bananas are a rich source of potassium. And if you enjoy a glass of beer or two in the day, the job is already done.
If you want to employ this method, be extra cautious to avoid food that can affect your health.
Using Body Heat
It may come as surprising for many that mosquitoes can pick up thermal sensory information even from a distance. Simply put, they are naturally fond of warmed body animals because of their blood-producing abilities. This is one of the reasons why people who feel hot to touch are more prone to mosquito bites.
Hence, increasing body temperature can effectively lure mosquitoes, and there are several ways to do that.
Working Out
The heat, sweat and odor that your body produces after a good workout is simply irresistible for mosquitoes. But if working out per se is not quite your thing, you may even go for a run or do some heavy duty cleaning.
After you’re done, walk around the room to bring out as many mosquitoes as possible before your body temperature and breathing become normal.
Take A Hot Shower
While taking a hot (not lukewarm) shower may not make you sweat or breathe profusely, the resultant body temperature is still good for mosquitoes to hang around. Apart from that, sitting by a fireplace or getting snuggly under a blanket will also have the same effect.
The only thing to keep in mind for this technique is that you need to bear the heat for long enough to sweat considerably. Otherwise, it won’t show any significant results.
Assistance From A Mom-To-Be
Okay, this is us going over the top, but pregnant women are more susceptible to mosquito bites. As you may already know, frequent hot flashes are a common pregnancy symptom, thereby making them more attractive to these pests. In addition, the extra body weight during this time causes intensive breathing that makes them exhale more CO2 than usual.
So, if you have a pregnant friend or family member, it may not be a bad idea to ask them for help. However, this is a risky attempt, as mosquitoes are active carriers of many diseases. Ensure that you kill them before they can bite her to prevent any mishap.
Wait For A Full Moon Night
Aligning your mosquito hunt with a full moon night may not sound very romantic, but will get your job done more effectively nonetheless. Several studies have proven that for unknown reasons, mosquitoes become 500% more active during a full moon than on any other day.
So, grab your zapper or mosquito magnet to pull off a (not so) fun all-nighter!
Final Words
The list was long because we didn’t want to leave out any trick from the book!
From their buzzing to the carrying of diseases, mosquitoes are every bit annoying. That’s why, it’s important to get them out of their hiding and get rid of them.
But it’s still advisable to keep them away in the first place. And the best way to achieve this is by keeping your surroundings clean. Additionally, use natural mosquito repellents and carry out regular mosquito control drives with the help of professionals. Prevention is better than cure for a reason!
On that note, it’s time for us to wrap up today’s guide. We hope that by now, you have decided on a method for your next weekend's activity. Do let us know about it in the comments down below.
While gutters are essential for homes, keeping them clean can be a tough job. But, it is necessary for their overall maintenance.
When nobody wants to take up this tedious task, you can rely on the EasyOn Gutter Guard to reduce the frequency of cleaning the gutters. It helps to keep the gutters cleaner throughout the year by protecting them from most of the debris and dirt driven by rain and winds.
Not only does it provide long-term protection to gutters, but it also helps you reduce cleaning efforts. The EasyOn Gutter Guards are great at preventing clogging and ensuring overall cleanliness.
We’ve gone ahead and curated this comprehensive review of the product to help you decide whether it is good enough for your needs. You can also see which model is the right fit for your home.
So, let us jump into the details without any further delays.
Why Buy This Product?
The EasyOn Gutter Guard has been perfected over the years. The idea first took birth in 1996, when the parent company was into cleaning gutters. They discovered how guards rarely worked as advertised. Thus, the EasyOn system was launched, and this product has earned immense praise within the industry. Now, let’s take a look at its win-win features.
Unique V-Bend Technology
Not many gutter guards can boast of patented technologies. The V-Bend feature has been specially created to form a shape in the gutter guard in a manner that allows rainwater to move more swiftly and efficiently than other options available in the market.
The rainwater can also move out of the gutter system, thanks to this technology. Thus, it does not sit in one place. Special care has gone into the design to make the installation easy and to ensure it fits any gutter that you might have.
Even in circumstances where your gutter’s shape might not be normal, you can attach these guards easily, thanks to the V-Bend feature.
Micro-Mesh System Designed to Guard Gutters
There is a special micro-mesh system in place to guard your gutter. You’ll find that the design allows all of the holes of the system to filter out water that comes out from the roof and goes into the gutter.
In comparison, other systems only have provisions for around 60% of the holes in the mesh design to work. This micro-mesh design makes the EasyOn Guard the ideal choice for homeowners who might reside in areas where plenty of dirt and leaves might get into the gutter.
Moreover, the micro-mesh is made of stainless steel of the Type 304 category. This means it is resistant to corrosion and rust.
Easy and Flexible Installation
When it comes to gutter guards, installation is always a headache. Since the task involves going up to the roof and working, many homeowners consider it too perilous for themselves and wish to assign it to professionals. Of course, this means that installation charges go up as well.
With the EasyOn product, this hassle is completely removed from the picture. The guards can be fitted on different kinds of roofs with the help of flexible and easy installation. There is a dual-installation system in place as well, which allows you to fit the gutter guard faster without running into a lot of trouble.
Can Handle Heavy Continuous Rainfall
There can be no doubts about the durability of the EasyOn Gutter Guards. They can handle an immense amount of rainfall in the course of a day without adversely affecting the gutters. We have seen that for every hour after the guards are attached, they have effortlessly withstood continuous heavy rains.
Careful Construction and Design
A lot of praise that the EasyOn guard gets for its durability is due to the immense care that goes into the construction process. The mesh is made of graded surgical steel, which allows the water to flow through without interruption but catches the debris. This is kept in place and allowed to blow off once it dries.
Not only is the mesh strong, but also rather fine. This helps it catch some smaller particles as well, which might have gotten through otherwise. Most of the granule runoff from shingles is prevented from flowing into the gutter. Some small amounts do get through, but these can be washed off.
The gutter guard is lined with steel edges, providing an additional degree of stability. But, it can be attached easily, without making the roof warranty null and void.
UL Certification to Harvest Rainwater
Underwriters Laboratories or UL happen to be world leaders when it comes to testing the safety of a product. The certification from UL means that the materials that are used to make EasyOn guards are safe for rainwater harvesting.
Essentially, this denotes that there is no possibility of a chemical runoff or metal particles getting mixed with the water. Hence, it can be stored safely and used later for gardens or yards. It makes this gutter guard very popular because users can prevent the rainwater from being wasted and also save some money on bills for water.
Robust Warranty
The EasyOn Gutter Guards come with an impressive warranty, which is valid for ten years. One also has the option to extend the warranty to 25 years, but this excludes residences in coastal areas.
Simple Cleaning
We all know that gutter guards have to be cleaned as well. But, the EasyOn product requires very little maintenance. All you have to do is brush off the debris that is stuck, and you’re good to go.
What Could’ve Been Better?
Most people who have used the Easton Gutter Guards have been quite satisfied. The only concern is that the product might be a little too pricey for some. Of course, one could argue that quality products cost more, and EasyOn certainly lives up to its name.
In fact, the popularity of this gutter guard has resulted in people from all kinds of places using it. This has exposed some of the problems that the manufacturers could work on.
While the EasyOn product can efficiently handle the problems of other debris, it falls short in tackling oak pollen. If you live in an area with high amounts of oak pollen, you’re likely to see it piling on top of your gutter guard, prompting the need for frequent cleaning and maintenance.
If you happen to reside in areas with heavy ice, you’ll see that it clogs the gutter guard, too, as do asphalt debris.
What We Like
Made with durable materials
Designed to keep out fine debris as well
Easy to install and maintain
Customer-friendly due to a good warranty
Built to handle heavy rainfall
Certification marks it safe for rainwater harvesting
What We Don't Like
A little expensive when compared to other gutter guards
Can’t handle oak pollen, asphalt debris, and ice
EasyOn Gutter Guard Buyers’ Guide
Now that you’re more familiar with the EasyOn Gutter Guard, you’ll be in a better position to decide whether you should get it. Of course, we’ve highlighted the many features and characteristics that make the gutter guard stand out from similar products on the market.
That said, there are a few things you should keep in mind before taking the final call.
Pricing
While choosing the EasyOn guard, you have to realize that the pricing depends on the size of the guard you get. So, for a larger guard, you’ll end up paying more. Further, there is a cost involved in the installation process, assuming you have it done by professionals.
Here, you have to factor in the size of your house, and prices might easily run north of $500 for larger properties.
Installation
Speaking of installing the gutter guard with the help of professionals, we should mention that the EasyOn product can be simply installed by you, thanks to the dual-installation system in place. But, be sure to have some time on hand, as it is likely to take up an entire afternoon or even a sizable chunk of a weekend.
Tapes or screws might come in handy for installation, and you have to choose whichever option you’re more comfortable with.
Maintenance
While purchasing a gutter guard, obviously, you have to factor in maintenance. Though gutter guards work to keep your gutters debris-free, they have to be cleaned out occasionally themselves.
Now, the EasyOn product is very easy to clean. All you have to do is use a Gutter Guard Brush, which comes with a long handle that permits you to clean the guard even without a ladder or elevated platform.
If you carry out this cleaning process periodically, your guard should be well-maintained and in proper functioning condition. Moreover, if you notice that no debris is coming out during your scheduled maintenance, don’t be afraid to let a little time elapse until you clean the gutter guard again.
EasyOn Gutter Guard Verdict
Clearly, the EasyOn product is one of the finer options you could pick on the market. In spite of its higher price, it stands out due to the materials used, and a stellar design.
You need not worry about the debris being kept out; you can also rest assured that the rainwater accumulated can be used for gardening needs. Furthermore, it is extremely easy to install and maintain.
The customer-friendliness extends beyond that, thanks to the secure warranty system in place. In short, the EasyOn Gutter Guard is the obvious choice if you want to protect your gutters for a long time.
That said, if you wish to get any additional information before making your purchase, feel free to reach out to us.
Most homeowners would agree that scrubbing is a cumbersome way to get rid of stains. Thankfully, there are clean steamers available to make the job easier.
However, choosing a good quality steam cleaner that is durable, versatile, and easy to use isn't all that simple. As you know, there are a ton of options available on the market, so selecting the right one among them can be complicated and time-consuming.
Now, to help you, we have written this review-based guide discussing two of the best steam cleaners: the Vapamore MR-100 and the McCulloch MC1385.
Sporting multiple features, both these models are highly versatile and deserve your attention. So, without further ado, let's find out which model is better.
McCulloch MC1385 or Vapamore MR100? | Steam Cleaning Battle
1. Overview
Before we dive into the reviews of these two products, let us quickly overview the exceptional features of both cleaning machines.
The Vapamore MR-100 is one of the best multi-purpose steam cleaners on the market. It sports a compact design and is known for not using any corrosive chemicals. Instead, it uses clean water to remove grease, grime, and stains while killing mold, mildew, germs, and dust mites.
Naturally, it can wash dirty floors with ease, be it in the kitchen, toilet, or garage. Also, users can use it for outdoor purposes without any hassle.
Now, as far as the McCulloch MC1385 is concerned, it features a unique design, which makes it stand out from other conventional steam cleaners on the market. It is a very reliable unit and does a decent job at cleaning tough-to-reach spots.
Like the Vapamore MR-100, it doesn't use corrosive chemicals and solely depends on clean water for grime removal. You will find that it delivers a shiny look on most floors while also killing microscopic bacteria and organisms to keep your family safe.
2. Versatility
Versatility is an essential feature that separates a quality steam cleaner from cheaper models. So, let's find out which machine is more versatile.
The Vapamore MR-100 has a ton of attachments and tools, meaning you can use it for various cleaning tasks all over the house. For example, thanks to its triangle attachment, users will find it convenient to wash tight spots effortlessly. Additionally, the small-sized brush helps you remove the dried grout stuck in pet cages, cleaning grills, and bathrooms.
You will also find that it has a unique tool that specializes in killing bed bugs and bacteria from computer chairs, sofas, and mattresses. What's more, we loved its handheld component, allowing users to carry it easily while steaming out grime.
On the other hand, the McCulloch MC1385 steam cleaner comes with 20 useful tools that make it extremely easy to use and flexible for various purposes. For us, the main highlight of this unit is its central floor mop attachment, which you can use to disinfect hard materials such as wood, laminate, and tiles. On top of that, it has all the necessary accessories for cleaning windows, mirrors, fabrics, hob grills, and BBQ grills.
Verdict: McCulloch MC1385 or Vapamore MR100?
Both these steam cleaners are extremely versatile, primarily because of their quality attachments. Having said that, we feel that the McCulloch MC1385 has more to offer in terms of features which gives it the edge.
But, the Vapamore MR-100 doesn't lag behind, thanks to its lightweight and compact design, which makes it highly portable and easy to store.
3. Water Tank And Steaming Process
The water tank and the steaming process determine the longevity of both these machines.
While testing the Vapamore MR-100 steam cleaner, its massive water tank caught our attention right from the start. The stainless steel boiler can hold up to 1.6 liters of water, allowing a run time of 60 minutes. Plus, you can tweak the steam flow using a dial located in front of the unit.
Apart from that, it uses a robust 1500-watt heater to warm the water. When you press the start button, it gives out steam with uniform pressure. Similarly, if you release the button, it stops pushing out steam from the boiler, thereby ensuring that there is no wastage of electricity.
We also found that it utilizes its 1500-watt water heater to produce steam, thanks to its output of 4 bars. This helps users get rid of stubborn grime and stains without any difficulty.
Compared to that, the McCulloch MC1385 steamer machine has a 1.9-liter or 64-ounce water tank, which is slightly larger when compared to the Vapamore MR-100. Plus, it comes with an adjustable steam pressure system, thereby delivering a longer run time of over 120 minutes. And, just like its competitor, it also has a dial for adjusting the steam pressure.
Meanwhile, the steam produced by the McCulloch MC1385 is over 200 degrees Fahrenheit, which kills bacteria, bedbugs, and other harmful organisms easily.
Verdict: McCulloch MC1385 or Vapamore MR100?
When it comes to water tanks and run time, McCulloch MC1385 has an advantage as you can use it for longer intervals compared to the Vapamore MR-100. Having said that, both models are highly efficient and stop steaming when you release the start button.
4. Extra Accessories
It is always nice to have extra accessories, as they allow consumers to carry out numerous cleaning tasks. Additionally, these functions play a major role in enhancing the overall user experience irrespective of your choice of steam cleaner.
As mentioned earlier, the Vapamore MR-100 is lightweight and features a compact design, but what you might not know is that it has an extra storage compartment. So, users can keep all their tools and attachments in a secure place.
Apart from this, it comes with a stick attached to the cap of the water tank, which allows users to check the water level. Finally, it sports a retractable 18-foot long power cord for enhanced flexibility, thereby making it easy to move while working.
On the other hand, the McCulloch MC1385 has an 18-foot power cord, but it is not retractable, which makes it difficult to carry this unit. Plus, the steam cleaner is larger, which could be an inconvenience for some users. w
You will also find that it has a top handle for portability and a pressure indicator, making it one of the best cleaners available right now. That said, the lack of a dedicated storage compartment puts the small attachments at risk of getting misplaced.
Verdict: McCulloch MC1385 or Vapamore MR100?
It is pretty clear that the Vapamore MR-100 has a lot of extra features when compared to the McCulloch MC1385. We believe that its dedicated storage compartment will prove handy for users while storing small attachments in an organized manner. Plus, its retractable steam hose adds to its flexibility and ease of use.
Therefore, the Vapamore MR100 stands out when it comes to extra features.
Frequently Asked Questions (FAQs)
1. What happens to the dirt when using a steam cleaner?
The heat coupled with the continuous steam discharge breaks down the dirt, but it still remains on the surface. You would need a steam mop or a wet cloth to remove the loosened dirt from the surface.
2. What surfaces should not be cleaned with steam cleaners?
You should not use steam cleaners to clean the following surfaces:
Delicate materials including thin plastics and silk
Food plants and industrial spaces
Porous materials such as marble, brick, and stucco
Materials like cardboard and water-based paints that might get damaged due to heat
3. Can you use a steam cleaner to clean the walls?
Yes, you can indeed clean walls using a steam cleaner. In fact, it is one of the most effective ways to get rid of stains and molds from walls and other surfaces. Just make sure the unit has a long steam hose for flexibility.
Final Thoughts: McCulloch MC1385 or Vapamore MR100
Steam cleaning is undoubtedly one of the most efficient ways to sanitize various surfaces and objects at home. Plus, the fact that it kills 99% of germs makes it an exciting acquisition. So if you want to get rid of all kinds of bacteria viruses to rejuvenate your home, a quality steam cleaner is a must-have!
Both these heavy-duty products have the potential to remove the most unpleasant and stubborn grimes, spots, and stains from a wide range of surfaces, including floors and tiles. Also, both can kill disease-spreading viruses and bacteria quite conveniently.
When compared, both steam cleaners perform exceptionally well. The McCulloch MC1385 has more attachments, a longer run-time, and a bigger water tank, similar to that of the oz water tank. On the other hand, the Vapamore MR-100 is backed by a lifetime warranty, has a dedicated storage tool compartment and a handy retractable steam hose.
So, whenever in doubt, you can refer to our guide and rest assured that you won't go wrong. That's all for now, bye!
Knowing how to remove Gorilla Glue from skin safely is essential for anyone who regularly works with adhesives, as this polyurethane-based glue bonds quickly and aggressively to skin, nails, and other surfaces. With fast-setting, water-activated curing properties, Gorilla Glue creates a tight seal in seconds—making it an effective fixative but a challenge to remove when misapplied. Accidental contact with skin can lead to hardened residue, skin irritation, and even minor injuries if not handled properly. While the glue is designed for maximum adhesion on wood, metal, stone, and ceramics, it also adheres stubbornly to human skin. Whether it's still wet or has fully dried, removing Gorilla Glue requires the right method and materials. In this guide, we’ll walk you through multiple safe and effective removal techniques, including the use of citrus oils, acetone, rubbing alcohol, WD-40, vegetable oil, and even household items like hand lotion or Goo Gone. You'll also learn how to deal with glue on delicate areas like fingers, nails, and fabric, plus a few prevention tips to avoid accidents in the first place.
Gorilla Glue 101
The authentic formula for this trademark water and temperature-resistant wood glue was first used back in the 1990s. It is a versatile adhesive and can be used on a range of surfaces, including wood, stone, ceramic, foam, concrete, glass, and more. The glue tends to expand three times its original volume after curing and changes to a tan color.
Although it triples over after drying, the glue is not recommended for filling gaps. The original formula is one hundred percent pure and doesn’t contain any fillers or plasticizers. Despite being suitable for application on several surfaces, the manufacturers advise not to use it on rubber and polyethylene.
After developing the original product, the company diversified a little and produced more adhesives like Gorilla Construction Glue, Gorilla Tape, Gorilla Wood Glue, and many more. The possible hazards of using the glue are skin and eye irritation, allergic skin reaction, and breathing difficulties on inhalation.
Why Is It Dangerous?
We discussed all there is to know about this superglue in detail. Now, we’ll move on to its potential dangers. Its super sticky adhesive bonds make it a menace to the skin. Once spilled, it gets lodged inside the skin pores and cannot be removed easily. This blocking of pores won’t allow your skin cells to breathe and will ultimately lead to dead skin.
It is important to remove the blot before it has time to dry. Gorilla glue has a fast-drying formula, and it will be a huge pain to remove after setting. The waterproof nature of the adhesive is a boon while using it on projects, but simultaneously creates a lot of problems in case of accidental spilling.
The water-resistant composition of the glue doesn’t allow the water molecules to come directly in contact with the adhesive. As a result, vigorous washing with water is futile for removing it. But don’t you worry, we know a lot of tricks to get rid of it, and we are now going to share them with you.
How To Remove It From Skin?
First and foremost, do not panic because it’s alright, silly accidents happen all the time, and we’ve got your back. There will most likely be two scenarios. First, the glue is still wet, and you have just enough time to get it off. Second, and worse, it has already dried and hardened.
When It’s Still Wet
It is a rare chance that you’ll be able to remove the glue while it’s still wet, but there’s no harm in knowing and being prepared. You’ll have to trust your reflexes and be really quick for this.
When you are working on any project or doing anything that involves the use of Gorilla glue, as a rule of thumb, keep some paper towels, napkins, or dry cotton cloth nearby. In case of spillage, try to wipe off the glue as much as you can from the skin while it’s still soft and gooey.
The next step will be washing it off using soap and water. Take a generous amount of soap and lather it on the skin. We recommend using liquid soap since soap bars create friction, and we don’t want that.
If you can keep some soap and a basin full of water around while working, then it’s perfect; you’ll be able to get it off even quicker. Most likely, there’ll be some residual glue even after washing thoroughly. Exfoliate your skin using some salt or sugar. Exfoliation opens up the skin pores, and the adhesive will leave the skin.
So much vigorous washing will leave your skin dry, so make sure that you moisturize your skin well. But that said, remember not to overdo it! The glue will eventually come off with more washes. Overdoing it will only damage your skin further.
Let’s move on to discuss ways to remove the glue when it has dried on the skin.
When It’s Dried
If the glue has already dried, don’t worry. There are lots of easy ways to get it off without damaging or irritating your skin.
The Citrus Method
For this method, you can use any citrus fruit. Limes, oranges, lemons, grapefruits, etc., all will work well. Easy and affordable, this technique is one hundred percent organic, and you won’t have to use any chemical products. The vitamin C and acidic juices of the citrus fruits break down the adhesive forces of the glue and remove it from the skin.
Slice the fruit in half and squeeze out its juice in a bowl. Dab some nectar on some cotton, or simply use your finger to apply it to the affected area. After a few minutes, you’ll notice the glue disintegrating. Repeat it as many times as you need to until it’s effective.
Once you get rid of the glue, wash the area under some warm and soapy water to remove the residual juice. If your skin has been a little damaged, the acidic nature of the fluid will sting a little. Wash your skin until it stops stinging.
The Scrubbing Method
You can ward off the glue by using things that are very easily available in the house. You can rub it off using some coarse sugar or salt, or you can go for a pumice stone. Pumice stone is an effective and traditional tool for scrubbing. However, if you have sensitive skin, then this method is not for you.
Take some baby oil and apply it over the glue in a circular motion. The spot should be entirely immersed in oil. Doing this will soften it down, and the glue will start losing its stickiness.
Scrub the area with a wet pumice stone gently. Do not apply too much pressure because skin abrasions are the last thing you’ll want after already damaging your skin with gorilla glue.
After a while, the glue will start to flake off. Use your fingers to remove it when this happens. Carefully remove all the flakes with a light hand. When satisfied, keep the affected area under running warm water until all the oil is washed away. You can also soak it in soapy water if possible. Repeat the process until all the glue is removed.
The Vegetable Oil Method
Instead of using any toxic or aggressive material, you can also make the glue vanish using some ordinary cooking oil, almond oil, or baby oil. The method is simple, but as we are using a natural product instead of any chemical substance, it’ll take a lot of time to disintegrate the glue.
Take any oil of your choice; we suggest olive oil since it's the best for skin, and pour it on a clean cloth. Rub it where the glue has dripped on the skin for four to five minutes. Leave the oil on the area for a little while. Eventually, the glue will start peeling off. Remove all the flakes carefully by hand.
You can either wash the oil from your skin or leave it be so that it can cure the damaged skin. You won’t have to apply any other moisturizer since oil will do the job itself.
The Special Mixture Method
Straight from our grandma’s kitchen, we have a special home remedy to fight off that stubborn glue from your supple skin. What is this antidote? Keep reading to find out.
The recipe is very simple and requires just three ingredients. You will need vinegar, washing soda, and some liquid detergent, and it will be done within ten minutes.
Take a basin and fill it with about one and a half to two liters of water. Add three to four tablespoons of vinegar to it. Then add two tablespoons of ten percent baking soda and a few drops of liquid detergent. Mix the contents nicely until you get a homogeneous solution.
Once the mixture is ready, you can drench a cloth in it and wipe the affected area, or you can directly immerse that part in the basin. The glue will lose its hardness and dissolve in the solution. Vinegar is acidic in nature, while washing soda is basic, and both can be a little damaging to your skin.
It is a home remedy, but it’s not one hundred percent skin-friendly as you would expect it to be, so do not leave it on the skin for too long.
The Alcohol Method
Alcohol has adhesive-degrading properties and, therefore, is an efficient agent for dissolving the glue. Rubbing alcohol is more suited for sanitization and is skin-friendly, too, so use that instead of regular alcohol.
Take a bowl and fill it up to the brim with warm water. Add some soap to it, preferably liquid. Mix it well until bubbles appear. If you have the glue on your hand, then immerse it in the bowl for a few minutes or until you can visibly see the glue softening. For other parts, soak a clean cotton cloth in the water and rub it on the glue.
Once softened, take a cotton swab and wet it with some rubbing alcohol. Wipe the affected area with the swab until the glue comes off. Wash the skin with warm water and soap to remove the residual alcohol. Gently moisturize your skin after cleansing to avoid dryness.
The Acetone Method
Acetone is an organic ketone compound that is colorless and volatile. It has a pungent odor and is used in many products like nail paint remover, cosmetics, etc. Therefore, if you don’t have crude acetone available or have sensitive skin, you can use nail paint remover.
First, clean the affected area with soap and water and leave it wet for a while. Pour some acetone on a cotton swab or ball and brush it over the glue in circular motions. This method is quite similar to the rubbing alcohol one, except that acetone is more effective on the glue and extremely drying for the skin.
Keep rubbing until the maximum glue has come off. Rinse the skin thoroughly with lukewarm water. Acetone will leave your skin really dry, so avoid using soap or any irritating products for a while. Just put on some rich moisturizing lotion and leave it at that.
The Goo Gone Method
Goo Gone is a proficient adhesive remover that safely removes not just gorilla glue but a number of gooey messes like wax spots, markers, tar, crayons, label and sticker residues, chewing gum, etc. The original product is for surfaces only, but the topical range is safe for the skin.
Goo Gone Topical keeps the skin moist because it has an emollient in the formula. It counteracts any possible irritant in the formula and is mellow on the skin. Let us get to know how to use it.
Well, it’s simple. Just spread out the solution on a dry towel or cotton balls and put it over the glue. Keep it like that for three to four minutes. When the glue melts down, simply wipe it off, and you’re done.
Since the product is skin-friendly, you won’t need any other preventive or curing methods. However, do wipe away the solution and put on a light salve if you have irritable skin.
The WD-40 Method
The next method is a little harsh on the skin, so turn to it only when you urgently need to take off the glue and don’t have any other options left. WD-40 is a silicone-based cleansing spray. This spray can also help you get rid of grease, sticker residue, and gum, along with gorilla glue.
Spray the aerosol onto a cotton swab or clean towel and hold it over the glued area. Keep it in place for five minutes. After removing the cotton, you’ll see that the glue will start peeling off. Repeat the process until you are satisfied with the result. We’ll advise you against spraying WD-40 directly on the skin, so don’t rush into that.
Be very cautious while using the spray because it can irritate your skin and eyes and incite allergic reactions. Be sure not to inhale the droplets because it can lead to breathing difficulties and asthmatic triggers.
The Razor Method
If you spilled the glue on a flat part of your body and are desperate to remove it, then this is an ideal method for you. Follow it only when you are entirely sure about your shaving techniques and feeling a little adventurous.
Take some cold water in a bowl and dip the affected skin area into it. When the skin is wet, put on the shaving cream and lather it a little. Once you’re happy with the foam, go ahead and shave the glue from the skin.
Pay attention to the area you’re shaving, and avoid being reckless with it. The chances of peeling off your skin are fairly high, but so is the removal of the glue flakes.
The Hand Lotion Method
This technique is for small spillages on hands and other accessible body parts. You can either use a lotion or petroleum jelly. Put on a generous amount of moisturizer on the skin and leave it at that for twenty minutes.
The glue will begin to peel off after some time. This method is simple but very time-consuming. Don’t depend on it in case of big splotches, and go for the other methods listed above instead.
How To Remove It From Fingers?
To make things even simpler for you, we decided to discuss ways to remove the glue from the fingers separately. Since most of the work is done by your creative hands, most disasters happen there, especially if you have butterfingers.
Immersing Method
Take a container large enough to dip your fingers comfortably. Fill it with any of the solutions given above. You can opt for the special mixture of baking soda and vinegar or vegetable oil; however, we suggest acetone diluted with water.
Now immerse your fingers in the container and stay like that for three to five minutes. When you are done with the dipping and feel the glue soften, try to pry the fingers apart using the other hand. If you are unable to do so, then go for another round of immersing.
After sufficient soaking, exfoliate your fingers using a scrub. You can use coarse sugar or salt for this purpose, too. The glue will come off way more easily after softening. Wash your hands properly using warm, soapy water and compensate for the skin damage with some medicinal cream or lotion.
Using A Pen Or A Pencil
This method is rather impulsive and will only work if you have a light coat of glue on your fingers. Squeeze a little lemon or orange juice over the bond to loosen it, then insert a pencil between the fingers and roll it forward. That’s it, yes, it’s that simple.
However, we advise not to push with too much pressure if the glue hasn’t softened out properly. Doing so might lead to painful skin abrasions, and you wouldn’t want that.
How To Remove It From Other Surfaces?
When you accidentally get glue on your skin, the stakes of getting it on other things lying nearby are high. You might spill it on your clothes, on the floor, or on the furniture. To err is human, to fix it, divine! Let’s get to know how to fix it!
From Clothes
Trying to remove the glue while it’s wet will only spread it further, so put on your hat of patience and sit this one out for a while. When the glue has dried, lay the cloth piece on a hard surface and try working it out using your fingers.
Use lemon juice or acetone to ease it out of the fabric and do it very gently. When you’re done, go ahead and wash the cloth with warm water and detergent, unless it is a delicate dry-clean material.
From Wood, Metal, Glass, or Floor
For all of these surfaces, we recommend using the Goo Gone or WD-40 spray mentioned above. Both of these products are effective and will help you save a lot of time and effort. When you buy Gorilla glue, be sure to invest a little in preventive measures too.
Frequently Asked Questions
How quickly does Gorilla glue dry?
The glue starts drying the moment it touches any surface, and the little spots can dry entirely in under a minute. On surfaces with huge pores, it takes about fifteen to twenty minutes to dry; however, the curing period extends up to twenty-four hours.
What’s the best technique for using Gorilla glue?
The plausible answer lies not in the technique but in practice, mainly. You’ll get the hang of maneuvering the tube after using it for a while. However, you can try to handle the adhesive bottle such that the nozzle stays opposite your hand. You can keep a hard surface below the tip at all times, a coaster or a lid, for instance.
How can we dissolve the Gorilla glue?
The glue is water and temperature-resistant, so that doesn’t work well. Other solvents like acetone, paint diluent, and isopropyl (rubbing alcohol) effectively disintegrate the adhesive bonds of Gorilla glue. If you don’t have these at home, you can use citrus fruit juice and vegetable oil.
Conclusion
Prevention is indeed better than a cure. While working with Gorilla Glue, it is essential to keep your preventive measures in check. We sincerely hope that this simple yet informative guide will keep you prepared for those nasty glue accidents.
We have finally reached the end of this guide on getting rid of Gorilla glue from the skin easily and safely. Now, the next time you make an error, don’t panic, take a deep breath, and follow one of our simple methodologies straightaway.
With that being said, we bid you goodbye. See you next time!
Poster putty is a savior when you’re trying to decorate your walls without drilling any holes. But, removing the putty can be a cumbersome affair.
Any adhesive, like poster putty, is extremely easy to use and can last for a long time. You can easily hang various furnishings and DIY art projects on the blank walls using poster putty. And they don’t cause permanent damage like tacks and nails. But, the real trouble begins when you need to remove the poster putty while remodeling walls.
If you are not careful while removing the poster putty, you risk harming the integrity of the walls. Thus, it is essential to know some effective cleaning tricks while removing these temporary mounting products.
And that’s where we come in. In this article, we’ll be discussing the best methods for cleaning poster putty off your walls.
So, without wasting any more time, let us get on with it!
What Is Poster Putty?
If you are planning to hang your favorite posters or picture frames on a painted wall without making holes, poster putty is the best choice. Poster putty is an adhesive material that you can cut into different shapes and sizes for mounting things on the wall.
Simply put, it acts as a sticker or glue. So, this adhesive component in the putty helps you stick the poster or picture securely without using a hammer and nail.
However, the adhesive nature of the poster putty can act both as a blessing and a curse. That said, the adhesive component makes it very difficult to remove the putty during remodeling and renovation. And the longer an item stays on the wall, the harder it becomes to remove poster putty stains.
Moreover, if you are not careful while getting rid of the putty, you might leave an eyesore on the walls. So, it is best to have some easy cleaning hacks and tricks up your sleeve if you’re planning to change the wall décor.
How To Remove Poster Putty From Walls
We often get bored with the current bedroom wall décor and begin planning to remodel the walls by changing the old posters and photos. But, removing the existing adhesives can be a backbreaking ordeal if you don’t know the right methods and cleaning tricks.
As we mentioned earlier, the adhesive component of the putty poses the most trouble while removing the putty. It can also cause damage to the walls when kept on for a long time.
However, if you are aware of the most effective cleaning agents, removing even the most stubborn poster putty stains from the walls can become a pretty straightforward task. So, we’ll be highlighting some of the best methods for cleaning off poster putty without much hassle.
1. Using More Poster Putty
It may sound ironic, but you can remove poster putty from walls by using more poster putty.
First, use a poster putty knife to get rid of most of the poster putty. Then prepare a small poster putty ball using fresh putty and rub it gently in circular motions on the remaining stains.
You can take the small ball of new poster putty to clean old poster putty residues off the walls. Furthermore, you can dip a cotton ball in a citrus-based stain remover and apply it to get off the remaining putty after using the poster putty ball. Using fingernails or a poster putty knife can also do the trick of removing any residual stains from the walls.
2. Applying Rubbing Alcohol Or Vinegar
When we talk about cleaning stains, alcohol, and vinegar remain two of the best cleaning agents out there for deep cleaning. So, using a rubbing alcohol solution or white vinegar for removing poster putty is not a very far-fetched idea.
Simply soak a small cotton ball in rubbing alcohol solution or vinegar, and press the cotton ball against the poster putty stuck on the wall. Hold the cotton over the adhesive putty stain for a few seconds before using a poster putty knife to scrape off the putty gently.
After scraping off the majority of the putty, use a clean water-soaked cotton ball to wipe any alcohol or vinegar residues off the wall surface.
3. Using Trisodium Phosphate
Trisodium phosphate is a very common inorganic cleaning solution that is found in various cleaning agents. So, you can use it quite efficiently to remove poster putty.
The first step is to prepare a cleaning solution by mixing some trisodium phosphate with water. Then, use a cotton ball or sponge to soak up the solution gently and rub it on the stain. After you rub the solution, rinse off the stained area thoroughly and leave it to dry.
However, trisodium phosphate can cause skin irritations. So, it is best to wear protective latex gloves before using this inorganic chemical cleaning solution.
4. Applying Steam
Heat and steam can work wonders while removing adhesive putty from walls. That said, you can use your steamer or iron and apply it to the putty stuck on the wall. The steam will penetrate the adhesive and loosen it. Sometimes, applying steam can help remove all of the poster putties without leaving behind any sticky residue.
After applying the steam for a while, use a clean paper towel or a bristled scrubbing brush to scrub off the stained area in a circular motion thoroughly. You can pour a few drops of dishwashing liquid and warm water on the paper towel while scrubbing off the putty stain.
5. Using Goo Gone Adhesive Remover
The Goo Gone Adhesive Remover is a commercial citrus cleaner that can remove any difficult stains, including poster putty, crayon stains, glue stains, oily stains, and so on. It comes with a surface-safe, non-toxic formula. So, it won’t be causing any damage to your walls while cleaning off the poster putty.
You can directly spray this citrus-based adhesive remover on the putty stain and let it soak the stained areas for a few minutes. Then, wipe it off using a clean cloth or a paper towel. After wiping off the stained area, wash the wall surface with hot and soapy water using a cleaning brush to get the best results without ruining the wall paint.
6. Using 3M Adhesive Remover
A 3M adhesive remover comes with a simple wipe-on and wipe-off formula and is super-easy to use. It is non-toxic and safe to use on most surfaces. The non-abrasive solvents present in the 3M adhesive remover readily dissolve the adhesive component of the poster putty without leaving behind any sticky residue.
You can directly spray some of it on the stained area and let the poster putty soak in the non-abrasive solvents. Then, use some warm soapy water and a clean cloth to wash off the area and let it dry.
7. Applying Dish Detergent
Rubbing dish soap directly on the poster putty can also be a good trick for getting rid of the putty. Pour a pea-sized amount of dishwashing detergent on a bristled scrubbing brush or any old toothbrush for scrubbing the stained area with dish soap.
Scrub the poster putty stain using firm circular motions for getting the best results. In this case, using a citrus-based dish detergent will be the most effective in removing any stubborn poster putty stains. So, you can simply raid your kitchen and grab some dishwashing liquid to clean off that sticky putty residue from the walls.
8. Using Rubber Eraser Wheel
If you’re looking for a non-chemical cleaning solution for removing the adhesive poster putty, a rubber eraser wheel is your answer. It is a drill attachment that rotates at a maximum rpm of 4000 and is absolutely safe to use on your walls. It is suitable for removing vinyl, mounting tape, poster putty, and any such adhesive components.
You can also use a mild solvent with this tool to remove any left-over sticky putty residues without much hassle. So, it can be a safer alternative for cleaning poster putty off your walls without using any chemical cleaning agents.
Final Words
Remodeling your bedroom walls by removing old posters and decorative items can be a hectic task if mounted on poster putty. But, we hope our article has helped you to know a little bit more about the tips and tricks for getting rid of those stubborn adhesive materials.
If you are worried about damaging the wall, you can go for mild citrus-based adhesive removers, like 3M adhesive remover or Goo Gone which come with a surface-safe formula. However, it's important to consider not just the visual appeal, but also the acoustics of your room. For instance, if you're dealing with unwanted noise in your home, you may consider incorporating soundproofing elements into your wall decor. You can even use poster putty to fix soundproofing panels or acoustic foam, providing a practical solution for minimizing noise. For a comprehensive guide on this subject, feel free to check out this resource on how to soundproof your walls.
But if you decide to use chemical cleaning solutions like trisodium phosphate, it is best to take all the necessary precautions to avoid any health hazards.
Anyway, these are just a few methods that we could think of. You can always pull up your socks and do some more digging to discover new cleaning hacks. And don't forget that the tranquility of your space matters just as much as its cleanliness and aesthetic appeal.
And on that note, we’ll be signing off. Take care and happy cleaning!
Furnishing your house with functional pieces that also look great aesthetically can be a chore.
The bucket is an often overlooked and underestimated addition when it comes to providing both functionality and tying a room together. But how would you go about picking what product works for you when there are so many different options and varieties.
Buckets have come a long way from being a simple pail for mopping. They now offer a lot more in terms of build, material, function, and extra features.
To help you along, here is our complete guide to help you decide on the perfect bucket. Whatever the room may be, from a living room to a home office space, there is a bucket for any space that adds a flair of functionality and tasteful design.
With that being said, let's get right into it.
30 Types Of Buckets For Your Home
Materials
Depending on the material the bucket is made out of, the functionality can change. Certain materials have an advantage and work better in doing specific jobs over others.
Plastic
Plastic buckets are easily the most common type of buckets in any household. Being made of plastic, they are multi-purpose and durable options, able to store a variety of materials.
Coming in any color imaginable, this is the safe choice for a garden, bathroom, or any job you may need it for. Additionally, it is easy to match any room’s color scheme with its plethora of color options available.
On the other hand, plastic does not have as much of an aesthetic charm that other materials, such as wood or metal lend to a room. However, it is incredibly durable and will surely stand the test of time.
Metals
These buckets have one of the highest durability possible. This is, of course, considering it is maintained. Being made of metal, it is prone to rusting after some time; however, drying it off after using or storing it away in a secure location can prevent rust from forming.
Additionally, using them indoors is always a safe option. For example, using metal buckets as plant pots is a creative way to add a rustic vibe to any room. There are also certain metal materials that are less prone to rusting and decay, lengthening the lifespan.
These metal buckets have the ability to withstand odors without absorbing them, opening up the possibilities to more innovative functions.
Wood
One of the more traditional yet uncommon materials being used nowadays is wood. It is more commonly seen to be aesthetic than functional lately. As newer materials have been used to make buckets with better durability and functionality, wooden buckets have taken a back seat.
Susceptible to breaking down due to rot and mold, it is a better idea to look for a different option if functionality is what you are looking for. However, using wooden buckets indoors is an entirely different story. Shielded from the elements and protected from this breakdown, they are a great option that match every aesthetic.
Glass
Another of the more uncommon materials to make a bucket out of is glass. As a niche material, it works well in what it is designed for, usually filled with ice for drinks. The ice does melt, so making sure the bucket is insulated is essential.
These buckets are a beautiful but fragile item if you want to have a functional and tasteful way to display or store temperature-sensitive materials. That said, the pros of aesthetic design and functionality weighed against the fragility should be considered before picking up a glass bucket.
Size
Having multiple sizes of buckets can change what they are used for. Furthermore, the size of a bucket brings different aesthetic qualities from a decorative perspective.
Extra Small
Having extra small buckets is almost always used for purely aesthetic purposes as it is too small to lend any functionality for a task. A great idea for party favors or as a plant pot, these palm-sized buckets are loved by many for their adorable appearance and charm.
Small
Small buckets are an excellent choice for similarly sized small jobs. Whether it is displaying food at a party in servings, mixing different colored paints, or using simple plant pots, small buckets can be a niche yet a perfect sized tool for specific jobs.
Medium
Coming in at around ten quarts, these medium-sized buckets are usually used around the house for keeping drinks cool at a party or holding water while washing your car. The applications that these buckets can be used for are endless. The sizing makes it ideal for many household tasks, from storing items to transporting things; medium-sized buckets are the perfect middle ground choice.
Large
Should you require more space for larger jobs, the large bucket is an excellent purchase for any task, with ample space to get the job done. Usually measuring 15 quarts, these buckets are perfect for mopping or storing items away cleanly while still being easily accessible.
Extra Large
If you have any jobs involving larger volumes and the 15-quart bucket is insufficient, extra-large buckets are available. Usually a more niche purchase due to their size, it is perfect for storage and typically includes a lid to preserve the contents. Be it storage or holding materials, these 20-quart buckets can be a practical option for more oversized items and jobs you may have.
Unique Features
Buckets come in many different sizes, as we have seen, but the various available features are where the variety truly shines. This variety in design lends a hand mainly to the bucket’s functionality and purpose in performing specific tasks.
Included Lid
An included lid allows an entirely new world of possibilities for a bucket’s purposes. It protects the contents from outside contamination. This makes buckets with lids the go-to choice for long-term storage or for materials that need to be protected and maintained separately.
Additionally, having a lid gives you the option to store multiple buckets on top of each other, which is a great space saver. The easy snapping on of a cover is perfect for quick and easy storage for any household.
One other type of bucket with a lid is tamper-proof lids. These buckets are securely sealed for transporting food or other materials that you may not want to be opened until they reach the recipient. The lid will show if it has been opened to ensure no tampering happens en route.
Be it tamper-proof or not, having a lid is a must if keeping the contents of a bucket safe is a priority for you.
Food Safe
If you want to display food in a fun and unique way, food-safe buckets are a good idea. Be it for a potluck or buffet-style party, they can be replenished easily and lend a special touch on par with bars and restaurants.
Being approved by the FDA is what sets this bucket apart from other regular buckets. The materials it is made of are certified to be food safe. As such, the food cannot be contaminated, and at the same time, the bucket will not be affected by the food over time.
Dual Spout
Purely designed with convenience in mind, the dual spout build allows for a more effortless pouring experience. Having two spouts on the bucket removes the constant mental reminder to align the bucket to have a clean pour.
Of course, having a single spout bucket is still an option. But, if having a clean pour from one container to another with little thought involved is what you want, the dual spout is perfect for you.
Translucent
Initially, having a translucent bucket may not be the first choice for specific tasks. Due to its see-through nature, what sets this bucket apart is being able to keep tabs on how much material is left inside. For jobs requiring measurement or simply keeping tabs on how full a bucket is, an opaque bucket is a great pickup.
Partitioned
Truly a unique design, having a partition in the middle of a bucket gives you superb usability to transport two different materials at the same time. In the context of a household, it is easy to imagine using this for mopping; one side is used for clean water and the other for soapy water.
Another use could be for displaying or storing items and plants in an appealing arrangement. Easy to see and access, with its open-top design, a bucket with partitions in it is excellent for efficient storage.
Whatever the job or purpose, the partitioned bucket gives the functionality of two buckets in one. Saving both energy and money, picking one of these buckets up is an excellent idea for any home.
Reinforced
While using any bucket, it is a common occurrence for the top of the bucket to become misshapen due to the heavier loads and uses. It is easy for standard buckets to warp or even break over time when used with a handle. Reinforced buckets handle this issue by incorporating rings to reinforce the shape around the lip of the bucket.
This simple addition is enough to keep the bucket’s shape no matter how heavy the load or how many uses you put your bucket through. A reinforced bucket is ideal for more practical use over time or for jobs that deal with heavy materials.
Nesting
Nesting buckets are simple buckets save for the tapered design that allows them to be stored within each other. It is similar to a Russian nesting doll, hence the name nesting bucket.
Buying multiple units of this type of bucket is a good investment; they provide functionality when you need it but store away when not in use. This design can be helpful for those who may need multiple buckets for a specific task, such as a party or cleanup. When the job is done, they can be stacked into each other and stored away cleanly.
Included Wringer
One of the most useful buckets for the house setting, a bucket with a wringer built-in, is a hands-down value purchase. It can be a hassle to keep the mop from dripping soapy water onto the floor when mopping. This bucket wringer is the extra feature that will leave this inconvenience in the past.
There are multiple designs when it comes to buckets with a wringer. One more industrial version has two buckets on top of each other with the wringer on top of the larger water bucket to collect and hold the soapy water. Both of these buckets are on wheels in order to move them around easier.
Another design catered to the more minor household needs is a simple bucket and wringer on top to push the excess water back into the bucket. Removing the excess water and putting it back into the bucket, the wringer is efficient and saves time when mopping.
Personalized
A bucket with a simple touch of customization that sets it apart from any plain bucket has no other function than cosmetics. However, this addition adds just that much more sentimental value with that personal touch.
Any room’s décor will benefit significantly from a simple bucket with a personal flair added to it. Customizing a bucket will make it unique for a specific purpose, such as storing different items. It can also set apart different buckets for people, like having a bucket for different children’s toys.
Included Tongs
Similar to glass buckets, these buckets are usually used for storing ice. The included tongs allow you to take the ice out easily. Where this bucket differs from the glass type is the material that the bucket is made out of. They can come in a variety of finishes and designs, not just glass.
Purchasing one of these buckets is meant for those who want a cohesive design between their bar and ice bucket with matching tongs. Of course, you could buy tongs separately but getting the ice bucket and tongs as a set will ensure the aesthetic build is maintained throughout. These small touches will be sure to add to the overall décor of any home bar.
Collapsible
For those who are limited in space for storage, the collapsible bucket is a fantastic innovation in the design of buckets. With the ability to fold fully flat, they take up little to no room. Of course, with the innovative design, it is limited in the materials that it is available in.
Mainly composed of plastic, the durability is not as confidence-inspiring as a traditional bucket. It is susceptible to spilling the contents as the plastic walls of the buckets have no rigid structure and support.
As a result, it is not advisable to put any materials you don’t want being spilled in these. However, it is a unique option for many general household tasks when it comes to bucket design.
Cushioned Lids
One of the more practical features that a bucket could have is a cushioned lid. Not only does this allow a dual feature to the bucket, but it adds an extra furniture element to a room. Having an extra seating option available is great for entertaining guests.
As the bucket is doubling as a seat, it is imperative that the comfort is not compromised simply to increase functionality. On the one hand, a quality cushion will give you more function out of your bucket by adding another seating option. On the other hand, the more permanent set up as a seating arrangement limits the purpose it serves as a bucket. It is thus used as a bucket solely for storage rather than transporting materials.
Uses
A bucket can serve many purposes with its functionality. However, there are still specific purposes that some perform better in a household simply due to their material. What’s more, some buckets are specifically designed with a particular job in mind. Both design and material are what dictate their use for a specific purpose.
Mopping
One of the staple items of every house is a mop bucket for any cleanup situation. Similar to those used in industrial cleaning services by janitors and custodians, these buckets are designed specifically for mopping.
Some of them come with special features added onto a standard bucket, such as a wringer, which easily removes water from the mop. Another notable feature is a spout to pour out dirty and soapy water easily.
These buckets are also adequately sized to carry around large volumes of soapy water. As they are meant to hold dirty materials and strong cleaning products alike, they are usually made of plastics.
Storage
Buckets in a household are a common storage choice. Due to their easy stackability, variety of sizes, and ease of access, it is easy to see why they are ideal. In fact, these buckets can come in a plethora of materials that change what you can store in them.
More giant metallic units are ideal for more heavy-duty materials and items. For example, they are a perfect choice for garden sheds to store tools and gardening soil. On top of that, making it easier to store and transport them are handles for easier lifting. And having a lid on the bucket can allow you to stack these storage containers on top of each other.
Alternatively, plastic options or even wooden buckets are available for more delicate storage to lend an aesthetic addition to any space. Different color finishes allow them to fit in with the décor or style of any space, be it indoors or outdoors. Sizing also varies to fit in with any constraints you may have when it comes to space.
Sand Bucket
For those who have children in their homes or simply love the beach - a sand bucket is a great idea. It is simple to use for children, thanks to its plastic and light build. Of course, any bucket could technically be used at a beach as a “sand bucket,” but the lightweight nature and bright colors are what make this particular type shine.
A day at the beach will be made much more pleasurable with a sand bucket to build a sandcastle, fill water in a moat, or collect seashells. Bright colors help them to stand out and be found easily after playing in the sand.
Car-Wash Bucket
Not to be confused with the prior mopping bucket, a car-washing bucket serves a similar purpose of cleaning. Of course, these buckets are identical in purpose; they can be differentiated in the build and features of a car-washing option that makes it easier to clean a car.
One such difference between this variant and the mopping bucket is the size. Car washing buckets are generally smaller in size for easier maneuverability around a car. You wouldn’t want to scratch your car while cleaning it after all.
An ergonomic handle is a must to help with carrying the bucket around with one hand easily. Another feature of car washing buckets is a grit guard to prevent scratches. All these features and the design of a car-washing bucket together make it ideal for washing vehicles over other types.
Ice Bucket
Usually made of metal or glass, these buckets are insulated to hold ice without it melting. The ice bucket is an ideal option for parties or home bars, providing easy access to ice without having to repeatedly go to a freezer.
They also come with special features to help store ice more efficiently so that it doesn’t melt within minutes. Of course, handles on the sides or top that fold away will help transport the ice around easily. Furthermore, a few variants come with a lid to lock in the cold air and increase the insulation, making the ice last longer.
Ash Bucket
A simple bucket with a simple task, an ash bucket is simply for convenience’s sake. For homes with a fireplace, it will remove the need to carry the ash outside for disposal repeatedly.
Positioned next to a fireplace, you can store ash and coals over time and dispose of the entire bucket when it fills up. An attached lid is a cherry on top to ensure the ash won’t spill or be spread in the air. You wouldn’t want to risk all the ash staining your furniture or floors.
Gardening
Gardening can be a demanding physical task or hobby. To help cut down on the strain, as well as increase your efficiency, gardening buckets would be a good investment. Due to its build and special features, you will be able to tend to your garden with ease.
One unique feature of the gardening bucket is an attached adjustable strap. By wrapping the strap around your waist, it will let you carry around the bucket. As the bucket is attached, you won’t have to pause to bring your bucket around constantly. It also frees up both hands for work instead of constantly going to and from your bucket.
Saving time and energy, as well as potential body aches, a gardening bucket has multiple advantages for home gardeners.
Additionally, buckets can be used to store your plants. There is little to differentiate a bucket from a traditional flower or plant pot. This allows for a beautiful way to bring nature into your home. Hanging buckets holding your favorite flowers and plants will brighten any room.
Industrial Pail
In the event that you are doing some DIY work around the house or are working with industrial materials like paint or cement, industrial pails are the standard choice. Typically made of plastic or metal, these buckets allow for the safe storage and transport of the materials being used.
A typical industrial pail is the paint bucket. Two-gallon buckets are perfectly sized to hold paint safely with a lid to store it when not in use. Small DIY paint jobs are handled with ease with these pails at your disposal.
For larger projects, there are five-gallon-sized pails to accommodate heavy-duty materials. Be it for cement or mixing mortar, the volume of this larger bucket has ample space to help you along with any project you have.
Party Favors
Using small buckets as party favors is an excellent use for their size. Due to their easy-to-carry, palm-sized nature, using them as individual party favors is a no-brainer. Many are made of plastic due to their durability and availability in different colors and styles to match any party theme.
Continuing from the party favor theme, they can also be used to display decorations and snacks. While these sized buckets may not have many practical uses in practical tasks, they make up for it in the potential of decorating parties and special occasions.
Selecting A Bucket
To determine which bucket is right for you, it all comes down to the material and design. Some materials do have advantages over others in functionality. Similarly, sizing and additional features attached to the actual bucket help them perform specific jobs better.
Plastic and metallic buckets are multi-purpose and more durable than the glass and wooden variants. Depending on the job or task you have, a specific design can change how efficiently you can get the job done. Matching the right build to a suitable material is how you should go about selecting the right bucket for your needs.
Final Words
When having all these different materials, designs, and uses available, you can see how choosing the perfect bucket for a task can make a vast difference in your experience. It is simply a matter of combining the suitable material with the right build.
Be it for decorating or manual work, the perfect bucket for you is somewhere out there - built just for your specific needs. All you need to do is make the right pick!
Let's face it; most of us are not enthusiastic about cleaning, especially with busy schedules. But thank God for vacuum cleaners!
And one such line that makes the job really easy is CrossWave from the house of Bissell, which allow wet and dry cleaning for multiple surfaces. And two such models that grabbed our attention are the Bissell CrossWave Pet Pro 2306A and the 1785A.
Both of these units are suitable for daily use and can clean the messiest of grounds easily. Besides, they are equipped with a long cord that allows seamless movement around the house. But there are some other similarities and differences that you should be aware of before making a choice.
And in this guide, we have listed all those details. So, dive in!
Bissell CrossWave 1785A vs Bissell CrossWave Pet Pro 2306A
Here, we will talk about the major factors that will help compare both the products better. We have divided in the comparison into sections so as to provide more clarity. Read on to know all about the bells and whistles of both the cleaners.
To begin with, the Bissell CrossWave Pet Pro 2306A comes with a 2-tank system, which enables efficient cleaning. One of the tanks will contain fresh water along with the cleaning solution that you are using. The other tank would contain the dirty water accumulated after cleaning.
In hindsight, it makes the cleaning process really easy, and you will be able to clean floors in one go. This wet dry vacuum vacuums and washes floors simultaneously to ensure that all the dirt is removed.
Moreover, the rinse and clean-out storage tray comes in handy while cleaning the Bissell Pet Pro 2306A after use. You can easily wash the brushes and set them out to dry before storing them.
Every Purchase Saves Pets. BISSELL proudly supports BISSELL...
Dual Action Multi Surface Brush Roll Uses An Innovative...
This wet dry vacuum cleaner is also equipped with a 2-tank system just like the 2306A, meaning it will never mix up clean and dirty water. This is a very important factor that will determine how clean the entire area becomes after using the machine. Plus, you can clean the insides of the cleaner easily as the tanks are separated.
If we are to compare the Bissell CrossWave 1785A and Bissell CrossWave Pet Pro 2306A, then we'd say that they work pretty similarly for vacuuming and washing floors. Both of them are equipped with similar tanks and advanced technology, which makes it possible to clean the house quickly and without any hassle.
Furthermore, users have said that they found these devices to be very convenient. Long story short, these CrossWave vacuum cleaners will help users who already have a very busy schedule.
2. Design And Features
Bissell CrossWave Pet Pro 2306A
The Bissell CrossWave Pet Pro 2306A is perfect for houses with pets, as it has some features specially dedicated to this purpose. These include a multi-surface pet-odor removal formula called Febreze, a hair strainer, and a tangle-free surface pet brush roll.
The multi-surface brush roll will work with hair up to 8 inches long and will prevent them from getting tangled while picking them up. Otherwise, the tangled hair can hamper its productivity by creating an obstacle. However, this device ensures that they don't wrap around the multi-surface brush roll, enabling you can collect them easily.
Other than that, it has a pet hair strainer that separates the pet hair from other dirt particles in the liquid. Now, remember that this is a very important step to prevent clogging inside the tanks and sinks. Since the pet hair will be separated, the dirty water tank can be directly drained into sinks while the hair can be discarded separately and thrown in the dustbin.
Moreover, you will get a multi-surface pet formula with Febreze that will help in providing freshness by eliminating pet odors. This is again another accessory that makes the cleaning experience fruitful. Plus, the Bissell CrossWave Pet Pro 2306A vacuums and washes floors and is known to work on multiple kinds of surfaces, including vinyl marble and linoleum.
It can clean up food spills and pet hair as well as dust and dirt particles from hardwood, tile laminate vinyl surfaces, tile laminate vinyl marble, and fabric surfaces. Furthermore, this device can be used to clean the floors after any construction work in the house.
Bissell CrossWave 1785A
The CrossWave 1785A comes with a dual-action brush roll that can be used on multiple surfaces. It's made with nylon and microfiber and will clean up wet as well as dry wastes at the same time.
So, if you are worried about tiny particles that are left on the ground, then this brush roll will come to the rescue. And it will work a lot better than other kinds of sponge mops.
Apart from that, it comes with smart touch controls that will allow easier and smooth usage. They are located on top of the handle, so you can shift between modes with a single touch of a button.
With the Bissell CrossWave 1785, you will get options that will allow you to take care of hard floors. There is a separate mode as well for cleaning rugs. Then there is a solution trigger that will help in adding more cleaning solutions when needed.
Moving on, you can use this one multi-surface floor cleaner to clean a number of surfaces and floors. That includes hardwood tile laminate vinyl surfaces, laminated floors, tile laminate vinyl marble, rubber rugs, pressed wooden surfaces, area rugs, sealed wood, linoleum, and tiles. So, it is indeed versatile and will easily fit right into most homes.
Now when comparing both Bissell CrossWave Pet Pro and Crosswave 1785A, you will see that they both come with a set of very useful features. However, the Bissell CrossWave Pet Pro is geared towards cleaning pet hair and pet wastes and hence, comes with a few extra features specially dedicated to this purpose.
The Bissell CrossWave Pet Pro is a floor cleaner that vacuums and mops up pet wastes along with normal household dirt. Plus, the Pet Pro can be used to clean floors, including hardwood tile laminate and wooden surfaces, along with fabric rugs and mats. It can be used every day and will work with vinyl marble and linoleum too.
The best part is that you can use this Bissell CrossWave model to clean sticky spills and pet wastes that would otherwise be difficult to remove. There is no need to spend hours rubbing your floors as this one multi-surface floor cleaner will take care of all wet and dry wastes.
Next, the wet dry vacuum cleaner weighs 11 lbs and will be easy to carry while working. It comes with a 25 feet cord that increases the cleaning power by allowing better mobility around the house. Moreover, it measures 10.5 x 12 x 46 inches and can be stored easily.
That is not all; you will also get a 3 years limited warranty that should take care of any malfunction that happens. Contact customer care in the beginning to know more about what the warranty covers.
Bissell CrossWave 1785A
This wet dry vacuum cleaner vacuums and washes floors easily with the help of a dual-action brush roll. The brush roll can rotate at 3000 RPM, and you will be able to clean the ground very quickly. Also, the Bissell CrossWave 1785A will act as a modern alternative to the mop sponge and water, and it soaks up dirt way quicker than mops.
Moving on, the Bissell CrossWave 1785A measures 10.5 x 12 x 46 inches and weighs 11.02 pounds. Hence, it will not take up too much area and will be easy to store. Also, as you must have already noticed, both the devices have the same size and very similar weight.
Plus, it is equipped with a 2-year warranty, and you can contact customer care to know about the clauses here. Yes, the warranty is a year less than that offered by the Pet Pro 2306A, but the 1785A comes at a lesser price too.
The Bissell Pet Pro 2306A and the Bissell CrossWave 1785A both have their sets of pros and cons, and we have listed them here. This will help in summarizing the points that have been discussed above to help you get a better insight.
Bissell CrossWave Pet Pro 2306A
Pros
Comes with a pet hair strainer
Has a tangle-free brush roll
Perfect for wet and dry wastes
Backed by 3-year limited warranty
Cons
Assembly will be required
Bissell CrossWave 1785A
Pros
Works with both wet and dry wastes
Comes with a dual-action brush roll
Can vacuum all kinds of surfaces
Backed by a 2-year warranty
Cons
Cannot separate pet hair
When compared to CrossWave Max all in one model, we have found that the one major difference is with the cord. While both the models discussed here come with a 25 feet cord, the Max all-in-one model does not have one. Instead, it is powered by a battery and can only run for 30 minutes at a stretch.
Final Words On Bissell Crosswave 1785A vs 2306A
With that, we have reached the end of our guide. And to sum it up, we'd say that while the Bissell CrossWave Pet Pro is known for cleaning sticky spills and pet wastes, the Bissell CrossWave 1785A is perfect for rugs and hardwood floors.
However, the Bissell CrossWave Pet Pro is equipped with a few extra accessories like the multi-surface brush roll and a hair strainer. But these would only be required if you have a pet in the house and the product is more expensive than the Bissell CrossWave 1785A.
The Bissell CrossWave 1785A is perfect for those who want modern cleaning technology but do not want to go over their budget.
With this, we have reached the end of this guide, and it is time to say goodbye. Let us know if you have any further doubts in the comment section below.
Robot vacuums aren’t just smart devices—they often become quirky household companions with unique personalities. Whether your robotic cleaner is stealthily sweeping under the couch or buzzing past the dog, naming it transforms it from a gadget into part of the family. In fact, assigning a fun, clever name not only makes setup and voice commands more entertaining (especially with assistants like Alexa or Google Home) but also makes the experience more personal for kids and adults alike. According to iRobot, more than 75% of Roomba users give their vacuum a name, proving it’s not just a novelty—it’s a cultural habit among smart home enthusiasts. From pun-based picks and sci-fi tributes to cute, kid-friendly names, we’ve curated 55 of the most creative, funny, and charming names for your robot vacuum. Whether you just unboxed your first smart cleaner or are upgrading your loyal bot, this list will help you find a name that fits its vibe and makes cleanup a little more fun.
Robot Vacuum Names From Popular Characters
1. Irona
We couldn't possibly start a list of robot vacuum cleaner names without mentioning this famous character from Richie Rich. And, if your robot vacuum is as passionate as Irona, then the name's a perfect fit.
2. R2-D2
Are you a Star Wars fan? If yes, then naming your robot vacuum after a loyal astromech droid can never go wrong.
3. Wall-E
How can we even forget this doll-eyed cleaning robot? So, name your robot vacuum Wall-E if it happens to love cleaning as much as our beloved Disney Pixar character.
4. J.A.R.V.I.S. Or Jarvis
Have you always dreamed of having something similar to Tony Stark's AI assistant? Then, make your dreams come true by presenting this famous name to your robot vacuum.
5. Mr. Robot
As you can guess, this robotic name is inspired by the series Mr. Robot. We just hope that you will remain in control of your robot vacuum.
6. Marvin The Paranoid Android
If Douglas Adams' The Hitchhiker's Guide to the Galaxy series has never failed to make you laugh, then you could think about giving this name to one of your robot vacuums.
7. Rosie
Rosie is one of the most iconic names to give a robot vacuum cleaner, as it comes from a popular show The Jetsons that used to air in the 1960s featuring a robot maid.
8. Bender
Happen to have feisty features in your robot vacuum like Futurama's Bender Bending Rodríguez? Then there's no need to think of other names.
9. Hal 9000
Do you have smart features like a Wi-Fi connection in your robot vacuum? If yes, then give it the name of Hal 9000 that belongs to Arthur C. Clarke's popular Space Odyssey series.
10. Alfred Pennyworth
You can only hope that your robot vacuums can be as loyal and efficient as Batman's ever-present butler, Alfred.
11. Buzz Lightyear
Those who have grown up with Toy Story know the emotion behind this name, and you can keep it as your Roomba's name to honor its work to keep the home clean.
12. Consuela
Consuela, the mother of twelve, is great at cleaning Peter Griffin's house in Family Guy while maintaining a straight face. If your robot vacuum is similarly unbothered by you standing on the floor, then give it the name of Consuela.
13. Optimus Prime
Fans of the Transformers franchise can actually find plenty of inspiring Roomba names, but we think that Optimus Prime does stand out on account of his leadership skills. Let's just hope the name rubs off on your Roomba!
14. Rambo
Rambo is rather a fun name for a robot vacuum to signify its dedication to vacuuming your floors, and the name comes from the eponymous film franchise.
15. Obi-Wan Kenobi
When it comes to Star Wars, no one can forget Obi-Wan Kenobi, the legendary Jedi Master, so if you're a fan, you could give this name to the robot vacuum as a tribute.
16. Butter
Apart from being a well-known robotic character from Rick and Morty, the name Butter will also remind you how essential the robot vacuum is for cleaning up the mess on your floors.
17. Mr. Meeseeks
Keeping up with the theme of Rick and Morty, Mr. Meeseeks is another great name for a robot vacuum, as the gadgets are also eager to help you out in cleaning around the house.
18. DJ Roomba
If you happen to own an iRobot Roomba, then DJ Roomba is the perfect name to give to it if you're a fan of the TV series Parks and Recreation.
19. The Terminator
Do you realize how useful a robot vacuum is for your home? As it helps out in vacuuming the floors throughout the day, so a name like The Terminator is more than justified.
20. Johnny 5
People who are a little old school will remember the Short Circuit films, which star the Johnny 5 robot. You could give this name to your robot vacuum to honor its smart and intelligent approach to cleaning.
21. Robocop
Well, no one is better at arresting the dust and hair on your floor than the handy-dandy robot vacuum, so why not name it after the popular movie franchise?
22. K9
One of the critical tasks your robot vacuum cleaners will have is to vacuum up the billions of cat and dog hair strewn around your floors. So, naming the device in honor of Doctor Who's companion can never go wrong.
23. Jeeves
Let's be honest that there are times when the strange activity of robot vacuums does crack us up. So, naming it after an iconic character, Jeeves created by P. G. Wodehouse doesn't seem like a bad choice.
24. Mr. Carson
Any fans of Downton Abbey over here? If you're, then it's hard to forget this straight-faced butler from one of the most iconic TV shows that have ever existed.
25. Argus Filch
Kids raised on Harry Potter will never forget Argus Filch, the caretaker of Hogwarts School of Witchcraft and Wizardry. And, just like him, the robot vacuums at times seem to lurk around your home for no apparent reason.
Funny Names For Robot Vacuums
26. Hairy
We couldn't help but include this in our suggestions as it's a pun on Harry, one of the most common English names. But, it has a greater significance as Roombas are often highly efficient at cleaning pet hair.
27. Dustin Bieber
It's always good to hope that your robot vacuum model works as well as Justin Bieber sings.
28. Sir Cleansalot
At times, you do want to give respect to your vacuum cleaner, and nothing can be better than addressing it with a formal name if your robot vacuum is connected to a voice assistant like Amazon Alexa.
29. The Grimeinator
Say goodbye to all the dust and grime present on your floors when the Grimeinator bot is out on its mission.
30. Sir Scrubsalot
This is one of our favorite names, as nothing can keep your home clean and tidy like a little scrubbing. So, such a respectable name is apt for the Roombas.
31. Dustbin
Isn't it fun to call your robot vacuum a dustbin? And, if you think deeper, it's a literal dustbin as it holds the dust after it's done with vacuuming.
32. The Mother Of Dust
Does the robot vacuum remind you of your mother, who never forgot to tell you about cleaning the room? If yes, then you'll surely know the importance of this name.
33. The Dirt Detective
The latest robot vacuum models are perfect for a smart home, as you can call it to clean the dirt out of hidden corners. Hence, it's apt to give it a suitable name.
34. Cat Car
The internet has graced us with instances where pet cats have hitched a ride on robot vacuums. If your iRobot Roomba happens to have a similar feline friend, then it can surely be called a Cat Car.
35. The Maid
Fancy a party trick? Connect your robot vacuum with Wi-Fi to use a virtual assistant like Google Home or Amazon Alexa and set its name to "the maid". And, when your friends are over, surprise them by calling out to the vacuum cleaner by its name.
36. Optimus Grime
Yes, it's a pun on the name of Optimus Prime from the Transformers, and we aren't sorry for thinking that the name is funny.
37. Puumba
Along with being a great The Lion King reference, Puumba will also be quite suitable for an iRobot Roomba. Funnily enough, this name also rhymes with the popular workout, Zumba.
38. Katniss Everclean
Katniss Everdeen may have had a hard time in The Hunger Games, but she didn't have to clean the dirty floor of your room like the robot vacuum.
39. Dustin Timberlake
Do you like shaking to the tunes of Justin Timberlake? If yes, then give this punny name to your robot cleaner to laugh every time you call it out using Google Home assistant.
40. Vlad The Inhaler
This exquisite name is a pun on the name Vlad the Impaler, and rest assured, your bot vacuum is way better than the inspiration behind Count Dracula.
41. Minion
For some people, their robot vacuums are no less than a minion, as there's always a need to clean a floor or some room.
42. Sir Vacsalot
If your bot vacuum tirelessly cleans without any complaints, then this respectable name is the best way to honor its work.
43. The Mop
Sometimes it's funny to give a literal name to an object, and as the robot vacuum is a cleaner, calling it a mop won't be that bad.
44. Roundabout
Just like in a roundabout, your vacuum robots always know how to follow a path without hitting a wall.
45. The Grim Sweeper
Even though we are sure that your iRobot Roomba will never be grim about cleaning a room, you could still give it such a punny name to chuckle while calling it out.
46. Not A Toaster
Well, it's obvious that your Roomba isn't a toaster, but the robots don't even look like the usual vacuum, so you can create this name to have a bit of fun.
47. Pet Hair Eater
Give this name to your iRobot Roomba if it works as a savior by picking up all the pet hair present at your home.
48. Cookie Monster
If you have kids, then a robot vacuum often has to pick up food crumbs along with other dirt, so a cute name like Cookie Monster works out well. Also, it's easy for the kids to remember to summon the gadget when needed.
49. Baron Von Sucksenstein
Bring a little fun to your life by giving your robot vacuum a fun name like this, which has an air of importance but makes you chuckle at the same time.
50. The Housekeeper
The Roomba is nothing less than a caretaker for your home,e as it always makes sure to keep the space clean.
Human Names For Robot Vacuums
51. Bob
As Bob's a common English name, you can always select it as a name for your Roomba as it's easy to remember.
52. Mildred
The name Mildred reminds us of the peaceful yet model housekeeper who is always there to help out her employer, and we love to see similar qualities in a Roomba.
53. Roberto
Along with sounding like the name of a Spanish butler, it's also a play on the word "robot," which is often used to describe a Roomba vacuum.
54. Andrew
Andrew is the friend who's always by your side, just like the Roomba, or robot vacuum cleaner, is ever-ready to clean.
55. Martha
Martha is yet another great name for your robot vacuum as it's simply, along with being helpful for you to build a strong connection with the trusty cleaning device.
So, those are all the name suggestions we have for your robot vacuum. Pick one that's closest to your preference, but be sure to give it a name. Or, use this list as an inspiration to come up with a name of your own for the beloved cleaner.
Also, remember that you can change the device's name anytime, so don't fret about making a choice. If you're unsure, keep the default name for a while, and then come back to this list for a fresh perspective.
Furthermore, if you happen to think of any other amusing names for a robot vacuum cleaner, do let us know. We would love to add it to our list so that everyone can find a suitable name for their Roomba.
As essential as wood glue is for any DIY woodworking project, it comes with a couple of negatives too.
And the worst of them is when it accidentally drops on hardwood flooring or spills over a workpiece during a project. Removing it might be quite a struggle, something that every DIYer is acquainted with. But at the end of the day, you need to get done with the removal.
Don’t worry; there are some effective methods to tackle this mess, too, as with other materials. And that’s what we’ll tell you about in our extensive guide. Just follow these accurately, and you’ll be relieved from the headache of wood glue spills.
With all said and done, let’s begin!
How to Remove Wood Glue
Some Essential Tips And Quick Tricks
When it comes to removing wood glue, the first thing to keep in mind is that all glue products on the market aren’t the same. Each has its own set of characteristics, and when used on wood, it might create a different kind of glue mark that you must remove.
While using wood glues, they often drip from the bottle or tube and form globules that can be difficult to remove immediately. However, once they harden a bit, you can remove them more easily with the help of a mechanical procedure.
All you need to do is take a scraper or chisel and chip away the unwanted globules, which will take just a few minutes. But the only sticking point with this procedure is that some paint might also be removed, or the wood surface might get damaged sometimes.
Another possibility is the glue getting blotched and forming undried lumps that might filter into cracks and spread out on the wooden surface.
You can adopt several methods to tackle such stains, which include using warm soapy water and wiping off the glue. Again, you need to be extra careful while wiping the glue off as certain wood surfaces can get damaged easily. That’s why it will be best to use a less abrasive technique that will preserve the wooden surface.
Proven Methods For Removing Wood Glue
To ensure that wood glue is removed effectively, it’s essential to consider the wood surface you’re dealing with. That’s because every technique might not be suitable for all types of surfaces.
However, there are two proven methods that will be equally effective on any wooden surface. And we’ll begin by discussing these procedures.
This process works wonderfully in softening and removing powerful vinyl glues and is quite simple. Just set your hairdryer at a particular heat setting and position it above the part with the dried glue for about five minutes.
And you’ll soon find the glue softening and loosening out. Once you spot this, scrape or peel the glue off the surface, and it will be back in its original form. Thus, applying heat is the best technique when you need to remove dried and hardened glue.
If the surface you’re working on is slightly raised and the glue covers a fairly large portion of the area, this method can prove to be quite useful. It requires you to soak a cloth in hot water and place it on the site stained with dried glue. Let it soften for some time, and then scrape off the softened glue from the surface.
Brake cleaners can be found in any hardware store, so you won’t have any difficulty fetching such a product. For this method, you just need to spray the cleaner onto the stained area and then clean it with a dry cloth till the glue is totally removed.
Sometimes, spraying once isn’t enough, so you’ll need to do it several times to ensure that all the glue is softened and can be wiped out easily.
Other Materials You can Use
If the glue turns dry in some hard-to-reach areas on the surface and you require removing it, some other materials can be used for the same. Your choice will vary according to the surface that you have to clean and the stubbornness of the dried glue.
Here are some materials that can be beneficial for getting rid of the unwanted wood glue:
Ammonia
Vinegar
Acetone
Salt and lemon
Methylated spirits
Special glue removers
Choosing The Best Wood Glue Remover
If you opt for a glue remover among the above products, choosing the right product becomes important as not all are equally suitable for your purpose. So, these are factors you should consider while making a choice.
Ingredient
Glue removers come with a particular active ingredient that makes removing sticky substances easy. While some are formulated with chemicals, others consist of natural ingredients such as soy or citrus oils.
Remember that apart from being truly effective in removing the glue, the product must also be safe to use. Speaking of chemical-based removers, these emit a strong odor and have a harsh formulation that’s harmful to the skin. On the other hand, citrus-based removers come with a pleasant fragrance and are much safer to handle.
That’s why you must read through the reviews to ascertain whether the product is efficient as well as safe to use.
Form
Adhesive removers are available in the form of liquids and sprays, so you can choose between either form as per your convenience. Liquid removers are the best to go for in case you mostly work in areas with limited ventilation since they don’t produce chemical odors. But if you work in well-ventilated spaces, sprays will be perfect for the job.
When you’re working with raw or bare wood, you must ensure that the surface doesn’t have any unwanted marks after the removal procedure is complete. Using some particular materials will make sure no damage is caused to the surface.
1. Using Baking Soda
Firstly, soften the undesirable glue on the wood surface using a hairdryer and then scrape off the softened part with a spatula. Follow this by mixing some baking soda with hot water and spreading that paste all over the unwanted marks of glue on the surface. You’ll have to wait for around 15 minutes and then wash the entire surface with soapy hot water.
2.Using A Nail Polish Remover
Though it might sound surprising, the chemical used to remove nail polish can be quite beneficial for getting rid of wood glue. But make sure that the remover doesn’t have acetone, as that will create unwanted marks on the surface.
Using this product is quite simple, as you just need to apply some of it on the area which has the glue and allow it to set in for a few minutes. After this, you can use steel wool, emery paper, or steel sponges to take off the softened glue from the surface.
Working With Painted Wood
If you need to remove glue from painted wood, it will require much more work than what we’ve discussed till now. The extra effort lies in trying to protect the underlying paint from any damage or removal. For this, you’ll have to start off by removing the bigger chunks of hardened glue with a hairdryer or plastic spatula. Then you may follow any of the two techniques described below:
Again, this fact might seem surprising, but cooking oil is indeed excellent for getting rid of wood glue. You can access some cooking oil anytime you want since it’s available in every household. And most importantly, it will never damage either the bar wood surface or the underlying paint.
Soak a piece of cloth in some cooking oil and wipe it over the area with the wood glue. You’ll also need to apply a little elbow grease along with the oil. Finally, wash the wood surface with warm soapy water, and you’ll soon find that the wood glue has been removed.
Another non-toxic yet highly effective way of removing wood glue is by using vinegar. Take a piece of cloth, soak it in vinegar, and pat it softly on the part with the glue. This will cause the glue to loosen from the surface. Now, take another cloth piece, dip it in hot water, and wipe it over the surface. The loosened glue will then come off easily. But in case there’s still some glue left on the surface, use the steel wood to wipe that off.
Dealing With A Range Of Wooden Surfaces
The wooden surface that you’re working with might not always be of the same type. Moreover, it might be used in different furniture and other parts of the house, such as floors and decks. All these types of surfaces have different applications, and hence you will need different methods to remove glue from them.
1. Hardwood Surfaces
While using wood glue for your projects, you will often find some spills on the floors, and in case they’re made from hardwood, getting rid of it can seem difficult. However, there’s a way you can get through this task, but you need to be very cautious at every step. That’s because hardwood flooring is more prone to damage than other materials.
Here’s how you’ll have to proceed:
Step 1
Begin by softening and loosening the dried glue with a hairdryer. Then scrape off the softened glue from the hardwood floor using a spatula.
Step 2
Mix some baking soda with hot water and apply the paste to the glue stain on the floor. Wait for some time to let it sit in.
Step 3
Now, wipe off the undesirable stains using a cloth soaking in warm soapy water.
2. Wooden Tables
Simple items in your kitchen such as salt and lemon will be enough for removing wood glue from any wooden table. A solution of lemon and salt is highly effective in getting rid of glue stains and won’t have any adverse effects on the wood.
All you need to do for the procedure is squeeze a little lemon juice on the area stained with glue and leave it to soak in for around 15 minutes. Follow this by sprinkling some salt on the area and let it work for some more minutes. As a result, the glue will loosen and can be lifted off quite easily using a spatula.
3. Waxed Wood
You’ll require using a slightly different process when you’re working with waxed wood, and it has lots of wood glue stains. These are the steps you must follow for removing wood glue from such surfaces:
Step 1
Use absorbent paper or paper towel to cover the glue stain.
Step 2
Then heat an electric iron and run it all over the paper or towel so that the glue softens. Be careful not to heat the iron too much as it may burn the paper in that case.
Step 3
The paper will now absorb the softened glue stain, and the surface will soon be clear of all the glue.
4. Parquet Floors
Parquet is a rare and appealing flooring type that consists of a geometric mosaic of several wood pieces assembled to create a decorative effect. And like hardwood floors, this type is also easily affected by undesirable glue stains. To get back the much-loved original look of a parquet floor, you can proceed in two different ways as per the form of glue used.
In case the stains have been caused by a solvent-based glue, they will be much simpler to deal with. Just use a scraper to remove all the unwanted glue chunks. Then apply a paste of warm water and baking soda to the affected area and clean it off with a cloth.
However, removing vinyl glue will be slightly more difficult as it’s much more brittle in nature. Begin by removing the worst of glue stains using a spatula and finally wipe the area with a clean cloth. Remember that you should use the spatula gently as applying more force might end up damaging the floor.
5. Teak Wood
Teak is a particular variety of hardwood that is widely used for making furniture of different kinds. The aesthetic appeal of this variety and its high termite and moisture resistance make it an ideal fit for the purpose.
But teak is still prone to being stained by wood glues. Hence, in case you’re struggling to remove wood glue spills from your favorite teak furniture, the following procedure can do the trick:
Step 1
First and foremost, you’ll have to soak a sponge in warm water and wipe it gently over the glue stain.
Step 2
Follow this by dipping some balls of cotton wool in methylated spirit and rub over the stain gently so that it comes off.
Step 3
In case you find the wood surface to be slightly uneven after cleaning off the stain, use some sandpaper of fine grit to smoothen the surface.
6. Varnished Wood
Varnishing a wooden surface provides it with a layer that can be damaged very easily. As such, while removing glue from surfaces, you should be gentle throughout the procedure.
First, you’ll have to soak a piece of cloth in warm water and dab it gently over the stained areas. But if this doesn’t work, you can try applying cooking oil in the same way. And in case the stains still persist, you can use white spirits as these won’t affect the varnish. Dip a piece of cloth in the spirit and rub it over the stains gently, and they’ll surely soften and come off.
Removing Wood Glue That’s Still Wet
It’s always better to treat glue stains while you’re working with wood pieces, as they are less stubborn and hence easier to clean. Plus, treating them then and there also saves the effort and time you’ll have to put into it later on.
This procedure requires you to soak a piece of cloth in warm water and then wipe the glue off the surface. But in case there’s a large glue blob on the surface, you should ideally let it turn slightly dry and then remove the blob with a spatula. If you find that glue has turned too hard, apply some acetone on it, and you’re good to go.
After you’ve looked at various methods to use for removing wood glue, let’s look at some essential things you need to know about working with wood glues.
Preparing Wooden Surfaces Before Applying Wood Glue
When starting a woodworking project, you’ll naturally aim to create perfect fixtures and joints and cuts to ensure the perfect outcome. As such, it’s essential to prep your wood pieces so that you’re able to achieve long-lasting bonds using wood glue.
Gluing Edges, End Grains, And Faces
For gluing each of these parts of the wood pieces, you must create pockets, dovetails, or a tenon and mortise joint as per the space you need for the job. Usually, face and edge gluing is easier since there is more surface area for the wood to create a bond. But to use the end grain, you’ll definitely have to create any of the joints or fixtures that we mentioned.
Sand The Wood
Remember that wood glue bonds best to wood pieces that are properly sanded or smoothened. But in case there’s a finish such as a sanding sealer on the surface, the glue won’t bond well and create a weaker fixture.
Hence, make sure you check all the wood pieces for any such finish before you start the work. If you come across such a finish, you must remove it completely.
Precautions To Take While Working With Wood Glue
Using Masking Tape
You can avoid unnecessary glue spills by using some masking tape. All you need to do is tape off the section where you’ll have to apply the glue. This way, the tape would prevent excess glue from spilling over other portions of the surface or onto the floor.
Check The Instructions For Application
Most of the glue products available nowadays come with a manual containing certain instructions for application. Some might have the instructions mentioned on the label over the tube or the bottle.
Either way, you must go through these instructions carefully. These often include the ideal amounts to be used for different purposes or a certain standard amount applicable in all cases. So, adhering to the prescribed amounts will help prevent the possibility of a glue spill. You should also work in batches instead of applying the glue over a large portion at once.
Another thing to make a note of is the time for which the glue can be left open without drying up. Keeping it open for a long time may cause it to dry completely, thereby rendering it useless.
Furthermore, some dried glues might emanate toxic fumes that are harmful to the body, so it’s best to fasten the lid or cap the moment you’re done using the glue.
Using Proper Tools
Try spreading the wood glue using a trowel as that will help apply more precise amounts on the wooden surface and will also keep the hands protected. If glue comes in contact with the hands, it may cause irritation or might even lead to burns or rashes on the skin.
Wearing Protective Gear
Many wood glue products have toxic chemicals such as formaldehyde included in their formulation. Hence, you need to adopt certain protective measures to prevent any accidental injuries. The parts that need to be protected are your eyes, respiratory tract, and skin. As such, you should wear safety goggles, a respirator mask, and a pair of safety gloves.
Dispose Of The Glue Safely
Once you’ve finished using the glue, make sure to dispose of the container safely. You must not pour the remaining amount down a drain or in a sink, as that can clog parts of your plumbing system and will also contribute to polluting waterways.
The Area Must Be Well-Ventilated
Exposing yourself to wood glue for a long time can lead to headaches and breathing problems. Moreover, it might contribute to the development of more dangerous diseases in the long term.
This is why it’s essential to work in a room that’s well-ventilated. All harmful odors and fumes produced by the glue can then drift away quickly, ensuring that there’s only fresh air to breathe in.
How to Remove Wood Glue Frequently Asked Questions
Q1. Can Wood Glue Be Sanded?
Yes, you can sand down wood glue to flatten the bumps that it may leave behind. You can also sand the wood after removing glue stains to achieve ultimate smoothness, as we’ve mentioned earlier.
Yes, you can remove Titebond glue with acetone, even though it’s much stronger than most other products. Start by moistening the glue with a damp cloth and then wipe it off with another cloth soaked in acetone.
Final Words
With that, it’s a wrap for today!
We hope you’ve developed a much clearer idea about how to proceed with removing wood glue from various wooden surfaces. So, resume your projects on a fresh note by steering clear of all the extra glue stains on the wood pieces. Nothing can go wrong this time around!
Here’s a last piece of advice for you. While purchasing any product such as acetone, glue remover, or a brake cleaner, make sure you read some online guides. That’ll help you zero in on a good-quality product.
We’ll be back soon with more intriguing guides, so watch out for this space. Till then, all the best!
Pens may be one of the greatest inventions of humankind, but they can be a real mess.
They often leave behind ink stains when they are not capped properly or when the tip breaks off. And removing ink stains can be a real nuisance — especially if you have a white carpet at home.
So whether the culprit is a leaked ballpoint pen or a toddler who spilled a jar of ink on the carpet, there’s no reason to fret. This article will guide you through the entire process of removing persistent ink stains from your favorite carpet.
Indeed, we will cover everything in this article, from the type of ink stains to effective cleaning hacks that can help you remove them from the carpet. So, without wasting any more time, let us get on with it!
How To Get Ink Out Of Carpet
What Causes Permanent Ink Stains On Carpets?
Any type of pen ink or printing ink is made from dyes for marking or staining. Needless to say, ink stains can be very persistent, and it can be a backbreaking task to try and remove them from clothing or rugs.
But before attempting to remove these notorious blobs, you must know the reason why ink causes such persistent stains.
When the surface is a piece of white paper, the staining from the ink is absolutely fine. But, if the surface is your new carpet or your favorite shirt, it indeed becomes a bit messy. Additionally, carpets are more prone to staining because of the carpet fibers. The ink dye seeps through the threads and spreads across the rug, leaving a persistent blotch.
Ink Stain Types
Even though all ink stains might look the same to you, it is not always so. So, before you try to remove one, it might be a good idea to identify what type of ink stain it is.
Inks are either made from a water-based or oil-based liquid. Either way, they contain coloring pigments that spread through the carpet fibers, and the stain persists. Anyhow, here are a few common types of ink stains and some tips on how to remove them.
1. Ballpoint Pen Ink Stains
Who doesn’t like a good ballpoint pen to jot down some quick lecture notes? Ballpoint pens are the most commonly used pens — students love them, and so do professionals. But, when it comes to ink stains from ballpoint pens, you’ve got a whole different story.
Ballpoint ink stains are bold and long-lasting because they are oil-based to add extra clarity while you write on a piece of paper. Naturally, these ballpoint ink stains are persistent and harder to remove.
But, it is very much possible to clean the stains using the right tricks. For example, you can use cornstarch to treat the color, slowing the drying time and making it easier to remove. So remember, cornstarch is your go-to home remedy for oil-based inks.
2. Water-Based Gel Ink Stains
Remember those bright and pretty pens that you loved so much during your kindergarten days? All those fancy metallic pens usually have water-based gel inks. That said, the water-based ink stains from these gel pens are much easier to clean than their oil-based counterparts.
However, these gel inks are not waterproof, so it is always a risk to use them for writing important notes. At the same time, this very characteristic comes as a boon when you’re removing any gel ink stain.
Indeed, you can simply use soapy water to rub off the stain from your carpet.
Additionally, for glitter pens that contain water-based inks, it is best to brush off the glitter before you try and remove the stains. After all, you don’t want the glitter to create a complete mess on your carpet.
3. Fountain Pen Ink Stains
Fountain pens are essentially the new-age version of the traditional ink and quill. Even though the new pens do not leak as much as the old ones, refilling any fountain pen can still be a messy affair.
Moreover, the reserve at the back of the pen often breaks, and the metallic tip is prone to leaking, which often spells trouble for your clothes or your carpet. So, it is best to have some cleaning tricks up your sleeve when you’re dealing with fountain pens.
These pens use water-based inks, making it easy to remove the ink stains in case of any unprecedented leaks. Also, it is easy to remove minor water-based ink stains, but more prominent stains can be a problem. So, it would help if you took extra precautions while using fountain pens to avoid getting large ink stains on your carpet or study table.
4. Printer Ink Stains
While working in an office, you often have to change the toner cartridges in printers and copiers. This everyday task can easily become a nightmare if the office floor is adorned with a carpet or rug.
The ink in these toner cartridges can be liquid inks or powder inks. In the case of liquid ink, removing the ink from the carpet is comparatively easier. All you have to do is dab or gently blot the liquid ink stain before applying any chemicals to remove it from the carpet. Keep in mind that it might leave a permanent mark if the printer ink is not removed quickly.
On the other hand, you’ll have to take an extra step to remove the stains if you are dealing with a printer powder ink stain. That said, you need to gently vacuum the affected area from the top to get rid of the powder before rubbing it off the carpet.
What Can Be Used For Removing Ink Stains?
Once you know the type of ink stain, you can apply different products to clean off the stain from the carpet. In this section, we’ve highlighted some of the most widely used products for removing ink stains from carpet.
Let us take a look!
1. Rubbing Alcohol
Using rubbing alcohol is probably the easiest trick there is when you’re dealing with stubborn stains. All you need to do is pour alcohol on a piece of paper towel and dab the stain gently without scrubbing it. If you scrub it, the stain will spread and cause a bigger mess.
Also, use some alcohol to soak the carpet fibers. It will help you to get the deeper stains off the carpet. Next, you can use hand sanitizers or denatured alcohol for the cleaning. Denatured alcohol is more potent and does a better job than hand sanitizers. But, it is also toxic, so you need to use it very carefully.
2. Vinegar
Well, if you don’t have any alcohol in the house, we suggest you raid the kitchen and find some vinegar to do the trick. Indeed, white vinegar can do magic when it comes to removing any stains.
Moreover, using baking soda with vinegar is one of the best deep cleaning tricks that exist for removing stains from carpets and rugs. That said, you can add some baking soda with the vinegar to remove every single inch of that persistent stain. Plus, applying vinegar on the stained area won’t cause any damage or discoloration to the carpet.
3. Dishwashing Liquid
If you don’t want to use alcohol or vinegar on your favorite rug, go for some good old dishwashing liquid to take off the stubborn ink stains. It;’s worth noting that dishwashing liquids are safe to use as they do not contain any harmful and toxic chemicals.
And since they are strong enough to clean food stains from your dinner plates, they may just as easily remove ink stains from the carpet — albeit with a little elbow grease.
4. Carpet Shampoo
If you own a carpet, you are most likely to have a carpet shampoo hidden somewhere in the basement. And if you don’t have a bottle, you can always visit any departmental store to get some. It is relatively affordable and specifically designed to clean any and all sorts of carpet stains.
However, be sure to carefully read the instructions provided on the shampoo bottle and apply a generous amount of the product to the stained area. Perhaps, carpet shampoo may prove to be the most hassle-free method to clean your carpets — who would’ve imagined?
5. Windex
Even though Windex is a window cleaner, it can work wonders on your carpet stains. The ammonia present in Windex can remove even the most stubborn and persistent ink stains from carpets.
Be careful while applying Windex on your carpet, as too much of it can damage the carpet. However, it can be a bit strong and can ruin the carpet fibers. So, it is best to dilute it with water before spraying it on the stained area of the carpet.
6. WD-40 Lubricant
Industry-grade and widely popular lubricants like WD-40 are not only effective in removing little elbow grease but also helpful in getting rid of an ink stain from the carpet. However, before applying a strong lubricant like WD-40 on your favorite carpet, test it on an inconspicuous area of the rug to ensure it doesn’t ruin the carpet fibers.
After you’ve done the test run, spray the lubricant on the stained area. Wipe the area with some soapy water and paper towel before finally rinsing it off. Let the carpet dry, and wait for the magical effect of WD-40 on the persistent ink stain.
7. Peroxide And Bleach
Both peroxide and bleach are superb cleaning solutions, especially when you’re dealing with a stubborn ink stain. Compared to bleach, peroxide is less harsh and toxic, so it is much safer to say if you have children running around the house.
However, both these cleaning solutions are specially designed to use on white-colored fabrics as they cause discoloration on their application. So, if you have a beautifully colored carpet, we suggest you steer clear of these cleaning agents. Moreover, you also risk damaging the carpet fibers if you use too much bleach or peroxide while cleaning the ink stain.
8. Shaving Cream
It might come as a surprise to you, but shaving cream actually works really well on an ink stain. But make sure to use a foamy shaving cream instead of a gel. Also, go for a white foam rather than choosing a tinted one for removing the stain.
You can simply spray the white foamy cream on the stained area and gently pat it. Let the stained area soak in the foamy cream for a while before using some warm water to rinse it off. The alcohol present in the shaving cream will work wonders in removing the ink stain from your favorite carpet.
What Are The Steps To Remove Ink Stains?
Knowing about the right products or chemicals that can help on removing an ink stain isn’t enough. You also need to know about the right methods to carry out the process. And in this section, we’ll talk about four essential steps for cleaning that persistent ink stain from your favorite rug.
Step 1: Control Spreading Of Stain
All types of inks are liquid and can spread very quickly by seeping inside the carpet fibers. Thus, the first step in getting rid of the ink stain is to stop the stain from spreading across the carpet. It is important that you don’t step on the stain as it will help in spreading it.
Also, try to avoid rubbing the stain to wipe it off the carpet. You’ll only make it worse. You can gently pat the stained area, but do not scrub it. Instead, place a clean and dry paper towel to soak up the extra stain. Moreover, if it’s an oil-based ink stain, try dabbing the stained area with some cornstarch to prevent the ink from drying up.
Step 2: Soak The Stain
The next step will require you to get your hands wet. In this step, you need to work on preventing the ink from binding permanently with the carpet fibers. If you do not soak the stain with a cleaning liquid, there’s a fat chance of getting permanent stains on the carpet. This is the step where you get to apply the cleaning agents that we talked about earlier.
You can use the usual alcohol and vinegar or even go for stronger agents like WD-40 or Windex if you have a more persistent stain. Alternatively, you can also use bleach or peroxide, but only if your carpet is white. Also, be careful while soaking the stain so that you don’t damage the carpet in return.
Step 3: Scrub It
Once you have soaked the stained area of the carpet with the cleaning agent, it’s time to get scrubbing. Use a soft brush and scrub the stained area from outside to inside to limit the spread of the stain. The stain will be deeper as you go further in that carpet area.
Once you’ve thoroughly scrubbed the area, use a dry and clean cloth or paper towel to gently dab the area and lift the pigments off of the carpet surface. You can also clean any loosened stain from the carpet using a dry paper towel. After all the pigments and loose stains have been scrubbed, you can wash the carpet with carpet shampoo or dishwashing liquid.
Step 4: Vacuum And Let It Dry
Now, it is time for the last and final step of this entire cleaning ordeal. Once you have scrubbed the stained area and washed the carpet, you have to vacuum it using a vacuum cleaner and let it dry for a while.
After the carpet has dried up, you can assess the ink stain and decide whether the carpet needs any more cleaning. If more cleaning is required, repeat all the steps from the beginning. Otherwise, you can keep the carpet back to where it belongs.
How To Get Ink Out Of Carpet Frequently Asked Questions
A bad ink stain on your favorite carpet can ruin your entire day. You’re most likely to spend hours and hours searching the internet to get some easy Do It Yourself cleaning tricks and hacks to remove that ink stain from the carpet. So, to help you, we’ll be answering some of the most commonly asked questions in this section.
Q1. How To Remove Old Or Dry Ink Stains?
You can simply use alcohol or denatured alcohol to soak the dry or old ink stain and then rub it off gently without causing any damage to the carpet fibers. Gently dab the stained area with alcohol and a clean paper towel or cloth. Wipe off the alcohol after scrubbing, and leave the carpet to dry.
Q2. Can I Use Baking Soda For Removing Ink Stains?
Yes, you can use baking soda to remove any new ink stain from the carpet or rug. Mix a tablespoon of baking soda with warm water and gently apply the mixture to the stained carpet area. Let the baking soda mixture soak the stain for a while before scrubbing it with a brush. Then finally, vacuum the dried baking soda mixture.
Q3. Is There Any Organic Non-Chemical Technique For Removing Ink Stains?
If you are not a huge fan of chemicals, you can use some salt and fresh lemon juice to clean off an ink stain from the carpet. Simply add some salt with fresh lemon juice, and apply the paste to the stain. Let the paste sit for some time, and then dab it gently with some water and a clean white cloth. Finally, vacuum the carpet and brush off the excess salt.
Conclusion
After going through the article, we hope you are a bit more confident about cleaning that stubborn ink stain off your favorite carpet. Simply follow the steps that we’ve covered in this article, and you’ll be just fine.
But we’ll suggest you be a bit cautious while using the cleaning agents because some of them might contain toxic chemicals. Also, test the cleaning agents before spraying them on the carpet to ensure that they do not cause any damage to the carpet fibers.
And on that note, we’ll be signing off. Until next time!
Many like to mark essential items in the kitchen or office with a sharpie. But, a sharpie stain can be a nuisance.
Permanent markers have become a must-have in any domestic household or office. That said, you must have used sharpies to label spice containers in your kitchen cabinet.
But, what happens when you want a clean plastic surface so you can relabel them? Indeed, you must first remove the existing permanent marker stains.
On that note, it is best to have some easy cleaning hacks up your sleeve to get rid of any blemishes and streaks.
And that's where we come in. This article will list 15 methods to clean permanent marker stains from plastic surfaces. So, without further ado, let's begin!
Ways To Clean Permanent Marker From Plastics
Unwanted scribble stains on a plastic surface can be a real headache, and to remove them, you will need to use the best cleaning agents. So, before you try and clean that stubborn permanent marker stain off plastic surfaces, it is best to know what cleaning agents are ideal for removing such stains.
In this section, we've highlighted the best ways to clean permanent marker stains from plastic containers with the help of 15 effective cleaning agents. Take a look at how you can use them:
1. Rubbing Alcohol
Rubbing alcohol is probably the most effective cleaning agent when it comes to getting rid of stubborn stains. It is more potent than many industry-grade cleaning agents that are available on the market. So, if you want to relabel the plastic container, you can rub some alcohol on the existing permanent marker stain.
For effective results, we will suggest pouring some rubbing alcohol solution directly on the plastic surface and letting the market ink soak in the alcohol for a while. Then, use a cotton ball, clean cloth, or paper towel to wipe off the marker stain from the plastic. It will also remove all the remaining residue of the permanent ink stain.
2. Applying Bathroom Soap
If you do not have any alcohol in the house, you can always go for any good ol’ bathroom soap. Indeed, ordinary bathroom soaps used for washing our hands can efficiently work to remove persistent, permanent marker stains from any plastic surface.
To do this, you must first apply the soap generously on the stained area and scrub it thoroughly. After you are done scrubbing, rinse the lather off with some warm water. Finally, wipe the container with a clean cloth to check the results.
If the stain is only partially removed, you can repeat the process until it is thoroughly clean.
3. Using Vinegar
Vinegar can work wonders when it comes to removing persistent stains. So, head to the kitchen and find a bottle of vinegar to get rid of a stubborn permanent marker stain that has ruined your favorite plastic bowl. White vinegar is the ideal option under such circumstances.
Also, using baking soda and white vinegar is one of the oldest deep-cleaning tricks to exist in the book. That said, you can sprinkle baking soda on the stained plastic surface and gently pour a small amount of white vinegar on the baking soda.
Let the mixture sit for a few minutes before wiping it off with a clean paper towel. We promise that the results will surely amaze you.
4. Applying Baking Soda With Toothpaste
Although it is a bit unconventional, applying a mixture of toothpaste and baking soda can help remove permanent marker stains from plastic. But, you need to be careful while measuring out the proportions of these two items before preparing the mixture.
Moreover, based on the size of the stain, the amount can also vary. Anyhow, it is best to maintain a ratio of 1:1 for the toothpaste and baking soda. Here, you can use a fork to mix the two items in a cup until it forms a jelly-like texture.
Apply this paste on the plastic surface generously and scrub it thoroughly using an old toothbrush. If the plastic container has a textured surface, make sure that the mixture covers every nook and cranny of the container.
Then, let it rest on the plastic surface for a few minutes before washing it off with water and a clean cloth to see the final result.
5. Rubbing With Magic Eraser Sponge
A magic eraser is specially designed to clean marker ink from all types of surfaces. You can give a quick visit to a local hardware or grocery store to buy a magic sponge eraser. It is best to purchase a magic eraser that doesn't contain any harmful chemical additives.
For the best results, treat the sponge eraser with water or a rubbing alcohol solution before using it on the stained plastic surface.
All you need to do is rub the marker stain with the eraser for about five to ten minutes. Perhaps, this is the easiest way to remove marker stains as you won't be needing any extra cloth or cotton balls to wipe off the stain.
6. Using Hydrogen Peroxide
Hydrogen peroxide is one of the most potent cleaning agents available on the market. It works like magic, especially when you are dealing with stubborn and old marker stains. What’s more, you can easily purchase a bottle of the chemical compound from any nearby pharmaceutical store.
At the same time, you should get some cotton balls for applying the hydrogen peroxide to the stained plastic surface. As for the actual cleaning process, pour a few drops of peroxide on a cotton ball and wipe the marker stain on the plastic container. This method is effective in cleaning light stains.
On the other hand, if you want to remove an old and persistent marker stain, it's best to pour some drops of the peroxide directly onto the stain. Then, you can wipe it off with a clean paper towel or washcloth.
However, you need to be careful while using hydrogen peroxide as your chosen cleaning agent. It is designed to be used on white surfaces as it causes discoloration. So, if you're working with a colored plastic container, it is best to avoid using this method.
7. Applying Glass Cleaner
Commercial glass cleaners like Windex work really well when it comes to cleaning any stained surfaces. Needless to say, you can use this easy DIY cleaning trick for removing permanent marker stains from plastic. Moreover, this method works well against stubborn stains.
It is interesting to note that the ammonia present in Windex is what helps to clean off the unwanted marks. However, ammonia can be a bit harsh on the plastic container, so it is best to dilute the glass cleaner with water before applying it to the plastic surface.
8. Applying Hairspray
Like rubbing alcohol, hairspray uses the same mechanism to remove unwanted marker stains from a plastic surface. So, if you do not own any rubbing alcohol solution, you can use hairspray to get similar results.
It’s simple, really — spray the product on the stained area and let it rest for a while before wiping it off with a washcloth or a clean paper towel. Here, the acetone present in the hairspray will dissolve the marker ink and remove every inch of the stain.
However, you can only use hairspray to remove light or fresh stains. Unfortunately, it won't work on old or stubborn marks.
9. Using WD-40 Lubricant
WD-40 is a widely popular industry-grade lubricant that you can use to grease the sharpie stain so that it comes off easily. Moreover, WD-40 does not contain any toxic chemical additives, so you won't risk causing any damage to the plastic container.
Anyhow, all you have to do is apply the lubricant to the stained area. After the stain is lubricated, you can use a clean washcloth or paper towel to wipe off the product. Once you are satisfied with the cleaning job, lather the stained item with soap and rinse off the excess.
10. Using Dry Erase Marker
It may sound weird, but you can actually remove permanent markers from plastic by using another marker. A dry-erase marker ink can help in erasing any previous marker stains. You can simply cover the old marker stain with the dry-erase marker.
Once you're done covering every inch of the marker stain, you wipe it off with a clean paper towel or washcloth when the dry-erase marker ink is still wet. It is best to apply a little bit of pressure while wiping the plastic container. In this way, both the dry erase marker ink and the old permanent marker stain will be removed from the plastic surface.
11. Applying Nail Polish Remover
You can easily find a small bottle of nail polish remover in your regular makeup kit. This tiny bottle can work like magic in removing both your nail polish and permanent marker from plastic surfaces. The chemical components in a nail polish remover include acetone like in a rubbing alcohol solution, which basically acts on the marker stain.
You need to gently pour a few drops of nail polish remover on the permanent marker stain. Then, use a paper towel or cotton ball to gently dab the stained surface to soak up any excess liquid. Continue tapping the plastic surface gently until all the nail polish remover is absorbed while the marker stain disappears with it.
12. Rubbing With Pencil Eraser
If you don't want to use any harsh chemical products for removing marker stains from plastic surfaces, you can always trust a pencil eraser to do the trick. As a pencil eraser does not contain any toxic chemicals, it can act as a safe and effective cleaning agent in this case.
We're pretty sure you can find a pencil eraser near your study table. So, grab that eraser and start rubbing on the surface of your favorite mug or any other plastic container to clean off that stubborn marker stain. Continuous rubbing of the pencil eraser on the plastic surface will create friction that'll help in removing the marker stain.
13. Using Tea Tree Oil
Tea tree oil is not only used for treating skin ailments but can also be used as a brilliant stain remover. This essential oil can be used to clean any marker stains from plastic as well as wooden surfaces. The organic chemicals present in the tea tree oil can soften the marker stain, which helps in removing it from any wood or plastic surface.
You can pour a few drops of the essential oil on a cotton ball and gently rub the stained plastic surface. The stain will start fading gradually with the continuous rubbing of the tea tree oil. Once you're done rubbing the stained area, wipe off the plastic surface using a clean paper towel or washcloth. Repeat the process until you get a desirable outcome.
14. Applying Dishwashing Liquid
Just like your regular bathroom soap, the dishwashing liquid can very effectively clean off a permanent marker stain from the plastic surface. Moreover, dishwashing liquids do not contain any harsh chemicals and are absolutely safe to use.
You can apply the dishwashing liquid directly to the stained area and scrub it thoroughly with an old toothbrush. Once the scrubbing is done, wash the plastic container with water to rinse off the lather. If you're not satisfied with the result, you can repeat the process until every inch of the marker stain is removed.
15. Using Hand Sanitizers
Believe it or not, hand sanitizers are very potent in removing permanent markers from plastic surfaces. So, if you have a small bottle of hand sanitizer tucked somewhere in the purse, you can easily use it to clean off stubborn marker stains from a plastic container.
Just like a rubbing alcohol solution and nail polish remover, hand sanitizers also contain small amounts of acetone. The acetone essentially dissolves the marker stain, which makes it easy to remove the stain. You can apply the hand sanitizer directly on the stain and gently rub the plastic surface before wiping it off with a clean cloth.
Steps To Remove Permanent Marker From Plastics
Knowing about the right cleaning agents might not be enough if you don't know how to apply them properly to the stained plastic surface. So, in this section, we'll be discussing the steps that you can follow for removing a stubborn permanent marker stain from a plastic container.
Step 1
First, you have to soak the stain with a cleaning agent. If the stain is light and relatively new, you can use mild cleaning agents, like hand sanitizers or pencil erasers. But, if the stain is old and persistent, you need to go for more potent cleaning agents, such as vinegar, hydrogen peroxide, or rubbing alcohol solution.
Step 2
After applying the cleaning agent to the stained area, let it sit for a while as the stain soaks in the cleaning liquid. You'll notice that the chemicals present in the cleaning agents will slowly dissolve the marker ink. After soaking the stain, you need to scrub it thoroughly using a brush before wiping it off with a clean washcloth or paper towel.
Step 3
Once you have wiped off the plastic surface, rinse off the container under water to remove any excess cleaning liquid, along with the remaining marker ink residues. If some of the marker stains still persist, you can repeat the entire process until every bit of stain is cleaned off the plastic.
Things To Keep In Mind
While removing permanent markers from plastic surfaces can be a pretty simple task, it is best to keep certain things in mind when you are using harsh chemicals. For instance, if you have a colored plastic container, you need to stay away from cleaning agents like alcohol or hydrogen peroxide, which can cause discoloration of the container.
Furthermore, strong cleaning agents like baking soda and hydrogen peroxide contain toxic chemicals that are harmful to children and pets. So, it is always best to go for non-toxic cleaning agents, such as a pencil eraser, magic sponge eraser, or even nail polish remover.
But, if you want to use stronger cleaning agents to remove old marker stains from plastics, we'll suggest you wear gloves. These harsh chemicals often cause skin irritation and skin burns. So, to avoid such issues, it is best to wear normal latex gloves while working with these cleaning agents.
Final Words
We understand that removing a permanent marker stain from plastic surfaces can be a bit of a nuisance. After going through the article, we hope you have a better idea regarding the best methods and techniques that you can apply to clean off marker stains easily.
If you're trying to remove an old and stubborn marker stain, you can use potent cleaning agents such as baking soda with white vinegar or even hydrogen peroxide. However, if you're having a light stain on the plastic surface, you can go for less harsh cleaning agents, like regular bathroom soaps, hand sanitizers, or nail polish removers.
Additionally, we'll suggest that it is best to take extra precautions if you're using strong chemicals. And on that note, we'll be signing off. Take care, and we will see you next time!
To be honest, leather is one of the most high-maintenance materials that you may have in your closet or around the house.
Be it your favorite leather jacket or a new pair of suede shoes, you always need to keep an eye on them to prevent damage. That's especially true for instances where you may accidentally spill something like glue on leather. This mostly happens when people try to fix leather items or glue leather to something like a shoe.
Worry not, as removing glue from leather isn’t as hard as it seems. In fact, the easiest way to remove glue from leather is by gently cleaning the hardened glue stain with a cotton soaked in acetone-based nail polish remover. Most of the time, good quality leather glue comes out very easily rather than other adhesives.
But there are other methods to get the job done as well. So, we thought of coming up with this guide to make removing glue from leather a tad easier for you. Glue spills might happen whether you are repairing your leather couch or fixing your leather car seat tear, so we’ve listed all the possible ways to remove glue from leather.
Without further ado, let's get started with how to remove glue from leather!
Simple Methods To Remove Glue From Leather
As we said already, cleaning glue from leather is easier than it seems. You only require some household items to remove something like super glue without damaging the leather. We have tried to mention some of the most simple ways used by leather enthusiasts. Just make sure to be gentle to the leather, particularly with suede items, to give them a long life.
1. Using Acetone-Based Nail Polish Remover
One of the easiest ways to remove super glue from leather is by using an acetone-based nail polish remover readily available on the market. Just be sure to test it on a less visible area of the leather to avoid the possibility of discoloration.
Let the super glue harden to form a stain
Saturate a cotton swab or cotton pad with the nail polish remover and rub it on the glue stain till it loosens
Once the stain has loosened, gently dab it using a folded dry paper towel or tissue to remove the glue
Soak a sponge in a mixture of warm water and mild soap to wipe the area where the glue stain had been sitting
You may apply a bit of leather conditioner to prevent the surface from becoming dry or brittle
Observe the leather surface after the water has evaporated to ensure that there's no glue residue
Repeat the process until the leather is free from all traces of glue
2. Using Sandpaper And Emery Board
At times, it can be pretty hard to get the glue off leather if the super glue stains are too thick or rigid. In that case, you may need something abrasive like sandpaper to wear away the super glue. This method is beneficial for suede as it tends to hold on to glue more than other leather surfaces.
Use a fine sandpaper or emery board to file away the hardened super glue from the leather gently
Removal of the stain may take a while, so try not to use a technique that might be damaging
Stop filing once you reach the bare leather surface
Vacuum or brush away the glue dust resulting from the glue removal
Check if any further glue is left on the leather
Use the acetone-based nail polish removal process to dilute and take off the remnant glue
You can wipe the surface with a leather cleaner to preserve its health and look as a final step
3. Using Soapy Water
Have you just spilled some super glue on your leather couch? Don't panic; take a soft cloth or sponge and a bowl of warm water mixed with dish soap to remove glue from the leather item. This technique specifically works for minor, fresh glue stains. You can also use the soapy water method with other glue removal techniques to clear away the final traces of dried glue from leather.
Pour some dish soap into a bowl of warm water and agitate the mixture until it lathers
Dip a soft clean cloth into the soapy mixture and lay it over the affected area
Let the soaked cloth sit on the leather furniture or other leather items for at least an hour so that the glue can loosen up
After an hour, carefully use a circular motion to remove the adhesive
Next, rinse the soft cloth with warm water to wipe away any glue residue present on the leather surface
Then, use a dry cloth to remove excess moisture from the leather
Finish off by applying a small amount of leather conditioner to the location once it's dry to keep it nourished
4. Using White Vinegar
Another recommended method to remove glue from leather is using white vinegar, which is usually present in our kitchens. You can use a toothbrush with vinegar to gently wear away the strong adhesive from most leather surfaces, including leather shoes.
Make a mixture of one part white vinegar and one part warm water in a bowl
Dip a soft-bristled toothbrush into the mixture and gently scrub the glue spot in a circular motion
Use a clean fabric to dab the excess moisture and wipe away the glue residue
Check for any leftover glue and repeat the process if necessary
Once the surface is dry, use a leather conditioner to make it shiny and prevent cracking
5. Using Lemon Oil
It may come as a surprise, but lemon oil works as an excellent super glue remover. The essential oil doesn't cause any discoloration, so you can safely use it on suede leather shoes or your leather wearables. Plus, the oil leaves your leather items with a refreshing scent.
Take a bit of lemon oil on a cotton ball and place it at the location of the glue stain
Let the cotton ball sit for five to ten minutes for the glue to loosen
Then, you may use the edge of a nail file to lift the glue from the leather surface
If the adhesive is too stubborn, reapply a bit more lemon oil and leave it on the stain for five more minutes
Once all the glue has been removed, dip a towel in warm soapy water and clean the leather surface to remove glue and oil residue
Finally, use a dry towel to absorb any moisture and apply some fabric conditioner to protect the leather from drying or cracking
How To Remove Glue From Leather Final Words
That's everything we had to tell you about how to remove glue from leather. We hope that this guide will help you to retain the health of your leather items even if it accidentally gets in touch with super glue.
Other than the above-mentioned methods, some chemical-based super glue removers are available on the market. But, you have to be careful while using them as some can damage and discolor leather products.
Having said that, at times, you may find it extremely difficult to remove glue from leather. We suggest seeking help from a professional leather cleaning service in such situations.
Until next time, goodbye, and take care!
To wallpaper around windows, begin by measuring the wall and cutting your wallpaper to size, leaving extra material for trimming. Clean and prime the wall, then mark a vertical guideline using a plumb line. Apply the wallpaper, smoothing it outward from the centre, and allow it to overlap the window's edges. Make diagonal relief cuts at the corners, fold and adhere the flaps to the window's sides, and trim any excess cleanly with a sharp knife. Work with a high-quality adhesive and take care with alignment to achieve a seamless finish. Wipe away any residual paste immediately before it dries.
Wallpaper is a decorative material sold in rolls and adhered with wallpaper paste, used to add character and warmth to the interior walls of homes and commercial buildings. It may be used as plain lining paper — to prime walls before painting or to conceal surface imperfections — or as a decorative finish in its own right. Wallpaper comes in textured varieties such as Anaglypta, in designs built around repeating geometric or illustrated patterns, or, less commonly, as a continuous mural spanning multiple sheets. The smallest repeating unit of a pattern is known as the pattern repeat. Hanging wallpaper becomes considerably more demanding around windows, where sills, overhangs, and reveals introduce angles and interruptions that require patience, precision, and methodical technique.
What is a Window Sill?
A window sill is the horizontal ledge forming the base of a window frame. Integral to the window's structure, it projects outward from the wall beneath the glazing and serves a dual purpose: it provides a useful surface for objects and, more importantly, acts as a barrier against water ingress, directing rainwater away from the wall below. This makes it a key component in both the structural integrity and weatherproofing of a building.
What is a Window Overhang?
A window overhang is an architectural projection found either inside or outside a window opening. On the exterior, it acts as a canopy, deflecting rain away from the window frame and the wall beneath. On the interior, it serves both practical and aesthetic functions — concealing fittings, housing lighting, or simply adding architectural depth and visual interest to an otherwise plain opening.
What is a Window Reveal?
A window reveal is the internal face of the wall visible between the outer wall surface and the window frame itself. Its depth reflects the thickness of the wall and is a prominent feature in older or solid-walled buildings. Beyond its structural role, the reveal contributes significantly to the visual character of a window, creating depth, casting shadow, and interacting with natural light in ways that shift throughout the day. It is also one of the most technically demanding areas to wallpaper neatly.
How to Hang Wallpaper Around Windows
Recessed Window
1. Position the first length of wallpaper above the window, allowing it to hang down and overhang into the window recess. Affix and smooth it securely to the wall, working down to several inches above the top of the recess.
2. Make a horizontal relief cut just above the edge of the window reveal, allowing the paper above the cut to lie flat against the wall.
3. Make a corresponding cut below the window sill, then fold the remaining flap of paper inward to wrap the side of the reveal cleanly.
4. Using a smoothing brush or plastic smoother, press and adhere the paper firmly onto the reveal surface, working out any bubbles or creases from the centre outward.
5. Using a straightedge and a sharp utility knife, carefully trim away the excess paper for a clean, precise edge against the window frame.
6. Measure, paste, and hang the next length of wallpaper to cover the wall above the window and any overhang. Follow with a separate strip for the wall below the sill, ensuring the pattern is matched correctly at both joins.
7. Move to the opposite side of the window and repeat steps 1 through 5 to paper the other reveal, maintaining consistency in technique and pattern alignment throughout.
8. For the small unpapered sections at the upper corners of the window overhang, cut an off-cut piece to size with an additional 20 mm at each end. Ensure the pattern aligns correctly with the adjacent strips before applying.
9. Paste the strip into position above the window recess, overlapping the existing paper slightly. Execute a double cut through both layers, remove the underlying strip, press the new edge firmly down, then fold the paper onto the overhang and trim any excess flush with the frame.
10. Repeat this process for any remaining sections of overhang, always checking pattern continuity and trimming with care to maintain a tidy, professional result throughout.
Wallpapering Around a Flush Window
Wallpapering around a flush window is a considerably more straightforward process than working with a recessed one, as there are no reveals or overhangs to negotiate. The following steps will guide you through a clean, methodical wallpaper installation:
1. Hang your first length of wallpaper above the window, smoothing and securing it to the wall down to just above the window frame.
2. Trim away the bulk of the excess paper covering the window, leaving approximately 1–2 inches of wallpaper overlapping the frame at the top, bottom, and sides.
3. Press the overlapping paper gently against the frame and run your finger firmly along the outer edge of the frame to crease the paper and locate the exact corner.
4. At each corner, make a 45° angled relief cut to allow the paper to sit flat around the external corners of the frame without bunching or tearing.
5. Using a smoothing brush or plastic smoother, press the paper firmly into the junction between the wall and the frame, ensuring full adhesion with no lifting edges.
6. Trim the remaining excess paper around the perimeter of the frame using a wallpaper edge trimmer guided by a straight edge, or score the paper carefully into the frame-wall junction with scissors and peel away the excess strip.
7. Reposition any edges that have shifted during trimming, pressing them firmly back into place with a seam roller or smoothing tool.
8. Continue working around all sides of the window in the same manner until the wallpaper installation is complete and the frame is neatly bordered on all sides.
Types of Wallpaper
Choosing the right type of wallpaper is just as important as the hanging technique itself. Vinyl wallpapers are among the most widely used, prized for their durability and moisture resistance — solid vinyl and vinyl-coated variants are particularly well-suited to kitchens and bathrooms. Non-woven wallpapers are a strong choice for living rooms and bedrooms; breathable, mould-resistant, and straightforward to remove, they are increasingly popular for their eco-friendly credentials. Textile wallpapers bring a sense of tactile luxury to low-traffic, dry spaces, while traditional paper wallpapers remain a versatile and affordable option for rooms with minimal moisture exposure.
Beyond these core categories, flocked wallpapers offer a rich, velvety texture with a classic elegance; foil wallpapers deliver a reflective, contemporary metallic finish; and bamboo wallpapers introduce a naturally sustainable, organic quality to a room. Grasscloth wallpapers provide a similarly earthy, textured appeal, while mural wallpapers transform an entire wall into a visual centrepiece. Each type brings its own balance of aesthetic character and functional properties, making the selection as much a practical decision as an aesthetic one. Explore the full range of wallpaper types to find the finish that suits your space.
Whether your windows are recessed or flush, and whatever the style of your room, there is a unique wallpaper to suit it. Which type are you considering for your next project? We would love to hear about the choices and techniques that have worked for you.
Red accent walls occupy the most psychologically powerful position in any interior design decision — a color clinically shown to elevate heart rate, increase metabolism, and heighten emotional response, which is precisely why most homeowners avoid it and why the ones who use it correctly create rooms that are impossible to forget. If you've been considering a red wall but aren't sure which room can absorb it, how to balance its intensity, or which shade works without overwhelming the space, this collection spans kitchen and dining applications, hallway installations, bedroom feature walls, and living room accent configurations across dozens of real interiors. Adjacent territory includes red-and-white contrast builds, earthy tone balancing strategies, gallery walls on red backgrounds, natural greenery pairings, pattern-and-texture combinations, and light management techniques for rooms where red risks reading as dark. The detail most red wall guides skip: saturation level matters more than hue — a deeply saturated primary red demands significantly more natural light and white balance than a muted brick or crimson tone, and choosing the wrong saturation for your room's light conditions is the single most common reason red walls fail in practice. Whether you're working with a sun-flooded kitchen, a narrow hallway, or a bedroom that needs energy without anxiety, beginner-friendly red accent wall ideas for every room type are represented throughout this collection.
Before You Start Red paint looks entirely different on a wall than it does on a chip, and that gap is wider with red than with any other color family. Saturation is the variable most people get wrong — a deeply saturated primary red in a room with limited natural light reads as dark and enclosed rather than bold and warm, while the same red in a sun-flooded room reads entirely differently by mid-afternoon. Test the actual paint on the wall in a 60 by 60 centimeter (24 by 24 inch) patch and observe it at morning light, midday, and under artificial evening light before committing. The color you see on the chip under store lighting bears almost no relationship to what you will live with. Undertone is the second decision worth getting right before purchasing: red paint pulls either orange-warm or blue-cool depending on its pigment base, and the wrong undertone against your existing flooring or furnishings creates a visual tension that no amount of accessory styling resolves. Hold the chip directly against your largest fixed surface — the floor, the sofa, the cabinetry — not against a white wall. Primer matters more with red than with any other color because red pigment has low opacity; skipping a tinted primer means three or four coats to achieve even coverage, which adds cost and time the chip never warned you about.
Red Accent Wall Ideas
Red Kitchen and Dining Wall Accents
Red in the kitchen and dining room has a functional logic beyond aesthetics — the color is associated with appetite stimulation and social energy, making it one of the few paint choices that actively supports what the room is designed for. Balanced with white surfaces, sufficient natural light, and warm wood tones, a red kitchen wall moves from overwhelming to genuinely invigorating. The designs below demonstrate the full range of what that balance can look like.
Red confined to a single wall and balanced by white cabinetry, sufficient light, and clean lines stays energizing rather than aggressive. The proportion of red to white here is the key decision — the wall provides the emotional charge while the surrounding surfaces absorb it.
The bar wall receives the full red treatment, framed cleanly in white trim — while the kitchen beyond retreats into white and gray. This zoning approach lets you use the color at full intensity in a social area while keeping the functional workspace visually calm.
A Scandinavian setting that uses red alongside polka dot detailing demonstrates how pattern can distribute a strong color across a surface, reducing its visual weight while maintaining its energy. The minimal furniture keeps the composition readable.
A chalkboard in a red frame mounted on a white wall creates a contained, high-contrast focal point that references the red accent wall concept without committing to it fully — an effective approach for kitchens where full wall coverage feels like too strong a commitment.
via coastalliving.com
A deep, saturated red wall functions as a stage backdrop — it pushes everything placed in front of it forward, creating the depth of field effect that makes sculptural objects, ceramics, and kitchen collectibles read as curated rather than simply stored.
via journal.homepolish.com
The taupe and gray palette here works in concert with a restrained red accent to pull the wooden island forward as the room's primary focal point. The red doesn't dominate — it directs attention, which is arguably the more sophisticated application of the color.
via HGTV
Red furnishings rather than red walls represent a more permanent and considered approach — harder to change than paint, which means the decision requires greater confidence in the color. Sufficient natural light is non-negotiable here; without it, red furnishings read as dark and oppressive rather than warm and energizing.
Full red furnishings, a black countertop, and exposed wooden beams is a composition that demands exceptional light management to avoid feeling heavy. The extraordinary volume of natural light flooding this room is what makes the combination work — the light literally bleaches the red's intensity and allows the wooden structure to dominate visually.
One red wall against a black chalkboard and white surrounding furnishings demonstrates the classical red-black-white triad — a combination with enough contrast energy to make a small kitchen feel considerably larger and more dynamic than its dimensions suggest.
A French cottage kitchen relies on the natural complementary relationship between red and green — the aged red wall and the fresh greenery resolve each other's intensity, producing a warmth that neither could achieve alone. This is one of the most reliable color pairings available to anyone working with a red wall in a kitchen setting.
Red used as a paint color behind cabinetry highlights the silhouette of every piece in front of it — the contours of shelves, handles, and open frames all read more crisply against a warm saturated background than they ever would against white or gray.
via hgtv.com
A red-painted pallet shelf brings the rustic energy of a rural outbuilding indoors without requiring any structural changes to the kitchen. The color here is applied to the object rather than the wall, which makes it a reversible and low-commitment way to test red's effect in a space before committing to full wall coverage.
An aged, time-worn red surface demonstrates that the color's intensity can be dialed back significantly through finish choice — a distressed or matte application reads as warmer, softer, and more historically grounded than a fresh high-sheen coat of the same hue.
The hallway is arguably the highest-impact room for a red accent wall — it is the first space a guest experiences, it is typically narrow enough that a single wall dominates the entire field of view, and it is also the room where the energy of red is most appropriate since it is a transitional space rather than a place of rest. The designs below show the full range of what a red hallway can achieve.
A red hallway wall energizes guests from the moment they enter and provides an immediately powerful backdrop for a gallery display. The color amplifies the impact of framed art in a way that white walls simply cannot — every frame reads as more intentional, more considered, more worth stopping to look at.
via centsationalgirl.com
Intense red framing a white opening beyond, flanked by two black doors — this is a composition that requires precise execution but produces extraordinary results. The contrast between the red enclosure and the white space beyond creates a visual tension that makes the hallway feel longer and the destination feel more significant.
Subtle hue variations across adjacent red surfaces create a depth that the eye registers before the mind processes — the space feels dimensionally richer than a flat single-color application without any additional decorative elements required.
A gradient gallery hallway that opens red at the entrance and deepens toward a lit opening at the far end uses the color to create a deliberate journey — the visitor moves from warmth and energy into light, which is a narrative effect most paint choices are entirely unable to produce.
A personal memory display on a red wall reads as a statement of identity rather than decoration — the color behind the photographs and mementos amplifies their significance, making this one of the most emotionally resonant applications of the red accent wall in any room type.
In the dining room, red functions as both a social and appetitive stimulant — two qualities that are entirely appropriate for a space centered on shared meals. The key design challenge is managing the color's intensity so it enhances the atmosphere of a meal without competing with the food, the table setting, or the conversation happening around it.
White wood paneling in a room using multiple red hues does essential work — it breaks the red into zones, prevents it from becoming visually monotonous, and reinforces the sense of spatial depth. The result reads as considered and formal rather than simply painted.
The contrast between natural wood grain and a textured red wall in a light-flooded dining room creates a warmth that neither material achieves alone. The texture of the wall surface adds further visual interest by varying the way the red absorbs and reflects light across the day.
In a densely furnished dining room with competing patterns, textures, and materials, red on the wall functions as the unifying element — it provides a consistent warm background tone that ties disparate objects together without requiring any of them to match each other directly.
via Jeremy Samuelson; designed by Rachel Horn
via houzz.com
A single red wall in an open or ambiguous space requires careful consideration — without strong architectural framing or sufficient surrounding contrast, one accent wall in an ill-defined room can feel arbitrary rather than intentional. The lesson here is that the wall's context matters as much as the color itself.
Source Unknown
Source Unknown
Red Accent Wall in the Bedroom
Red in the bedroom is the most contested application of the color in residential design — its energizing properties are exactly what makes it both compelling and problematic in a space meant for rest. Used on a single feature wall behind the bed, at a muted or aged saturation level, and balanced with soft neutrals in the bedding and flooring, red can create a bedroom that feels sensual and grounded rather than agitated. The examples below demonstrate both the possibilities and the boundaries.
Multiple red hues used within the same bedroom create a chromatic space that feels layered and considered rather than flat — the variation between tones prevents the color from becoming monotonous while the consistent warm family keeps the room visually cohesive.
via debbietravis.com
Stark white bedding and furnishings against a pure red wall create the maximum possible contrast within a warm palette — the white acts as visual relief, allowing the eye to rest between encounters with the intense wall color. Without it, the same red would read as considerably more oppressive.
There are reds that simply announce themselves — not aggressively, but with complete confidence. When you encounter the right shade for your room's light conditions and furnishings, the decision will feel obvious rather than considered. This is one of those shades.
A red backdrop makes a personal gallery wall — photographs, prints, and collected objects — feel curated and deliberate. The same collection on a white wall reads as casual; on a red wall it reads as a considered statement, which changes the entire emotional register of the room.
A red bedroom can achieve serenity — not despite the color but because of how it is applied. Deep, muted red with soft furnishings and controlled lighting produces an atmosphere closer to a private sanctuary than the energized, active space that brighter reds create.
Depth created through layered red hues and balance achieved through considered lighting — this bedroom demonstrates that the management of light within a red room is as important as the paint choice itself. The same red in poor light would read entirely differently.
via eudecoro.com.br
via cowboyreflections.com
The small heart detail above the bed does something technically important here — it introduces a softening element into a high-contrast palette, breaking the tension between red and white just enough to shift the room's emotional register from bold to genuinely warm. It is the kind of finishing detail that determines whether a decorated space feels complete.
Source Unknown
Black and red is not a combination most designers recommend for bedrooms, but when executed with confidence it produces a boldness and contrast that no other pairing achieves. It suits a very specific aesthetic sensibility — and for those who share it, no alternative will ever feel as right.
The red-and-brown combination in a child's room reads as rustic and dated rather than vibrant — the two warm tones absorb each other's energy instead of creating contrast. What redeems this particular space is the red wall paired with the playful toy cart, which introduces enough visual separation to make the color work independently of its problematic pairing.
Simple, well-chosen furnishings in a red living room demonstrate that the color doesn't require elaborate styling support — it provides its own visual energy and asks only that the objects placed in front of it be allowed to stand on their own rather than compete with each other.
Red is one of the few background colors that can absorb a complex pattern or a densely framed gallery without the composition collapsing into visual noise — the color's warmth holds disparate elements together rather than fragmenting them.
via christinefife.com
Used as a support element, a red accent wall earns its place by amplifying what is placed in front of it — the color recedes into a supporting role while the intricate furnishings, textiles, and objects it frames become the primary focal points.
via ladolcevitablog.com
Use Simple Shelving to Display Memories
Source Unknown
Bring Forward a Gallery
Gold frames on a red wall is one of the most classically considered combinations in residential interior design — the warmth of both materials reinforces each other, and the contrast between the frame's reflective metallic surface and the matte wall creates exactly the visual separation needed to make each piece legible as an individual artwork.
Earthy tones — terracotta, tan, warm beige, natural wood — reduce red's intensity more effectively than cool neutrals because they share the same warm undertone. This chromatic relationship means the room feels cohesive rather than in conflict, and the red reads as the most saturated member of a family rather than an intruder from a different palette.
Modern interiors with sculptural, low-profile furnishings handle red remarkably well — the clean geometry of modernist pieces creates enough visual breathing room around the color that it reads as a bold design choice rather than an overwhelming one.
Source Unknown
Break the Impact With Light
Natural light entering through a large window changes the character of a red interior more dramatically than any other single variable — the same wall that reads as dark and enclosed in artificial light becomes vibrant, warm, and alive when flooded with daylight. If you are considering red for a room, assess it at multiple times of day before committing.
via bhg.com
A wood-burning stove or fireplace in a red room creates a layered warmth that goes well beyond the visual — the association between red walls, flickering fire, and the smell of burning wood produces one of the most atmospherically complete interior environments possible. This is red at its most elemental and most justified.
Introducing an unexpected object — a repurposed window frame, an oversized clock, an architectural salvage piece — onto a red wall breaks the color's dominance at a specific point and creates a focal element that the eye navigates toward naturally. The red becomes the context rather than the subject.
Green and red are complementary colors on the color wheel — the chromatic relationship that produces the most natural-looking contrast available. Plants and foliage against a red wall resolve the color's intensity without competing with it, and the organic naturalness of living greenery softens what might otherwise feel like a formally composed interior.
via books.google.com
Complementing Texture and Patterns
The right background color allows every texture and pattern placed against it to perform at full strength. Red, used as that background, gives textiles, wallpapers, and layered furnishings the visual support they need to read as intentional rather than busy.
Red accent walls are most powerfully used as support elements — a background that amplifies the things placed in front of it rather than competing with them. The homeowners who use red most successfully understand this distinction: they choose the color to serve their furnishings, their collections, and their light, rather than expecting the color alone to do all the work. Which room in your home could benefit from that kind of bold, considered background? Share your thoughts in the comments below.
DIY desk decor is one of the highest-leverage small investments available to anyone who spends significant time at a desk — a category where a mason jar, a sheet of cork, a tin can, or a handful of clothespins can shift a workspace from visually draining to genuinely motivating without touching the furniture itself. If your desk feels functional but impersonal — or if you're working in an environment where you have limited control over the layout — this collection of 31 projects spans tassel garlands, chalkboard jar organizers, succulent bookends, photo displays, ombre calendars, triangle modular organizers, copper accent accessories, and a full farmhouse desk build for under $80. Adjacent territory includes corkboard pinboards, marble-effect magazine holders, monitor risers with integrated storage, clothespin note displays, painted rock faux cacti, and string light styling for stark white setups. The detail most desk decor guides overlook: visual weight distribution — not color or style — is what determines whether a decorated desk feels calm and productive or cluttered and distracting, which means grouping items in odd numbers and varying heights matters more than matching everything to a single palette. Most projects here require only cardboard, paint, basic adhesive, or repurposed containers, making beginner-friendly DIY desk decor ideas the practical starting point for anyone personalizing a workspace on a tight budget.
Before You Start Desk decor fails most often not because it looks wrong, but because it was placed before the working zone was defined. Every desk has a primary reach zone — roughly the arc your forearms cover when your elbows are at your sides — and anything placed inside that zone competes directly with the work itself, not with the other decorative items. Map that zone first: sit at the desk in your normal working position and mark the natural reach of both hands. Everything functional stays inside it; everything decorative goes outside it. The monitor height decision belongs in this same planning stage — a screen below eye level pulls the neck forward and makes every hour at the desk progressively more uncomfortable, regardless of how well considered the surrounding accessories are. A monitor riser that brings the screen to eye level also creates the most useful hidden storage on the desk, which is worth building before any organizer or display is placed. Define the working zone, set the monitor height, then decorate outward from there — the projects in this list will all look better and cause considerably less frustration when the ergonomics are settled first.
1. Shape a Playful Tassel Garland
A tassel garland is one of the fastest possible desk upgrades — cut strips of your chosen paper, fold and tie them onto a length of string, and you have a colorful backdrop that changes the entire feeling of a workspace in under an hour. The real advantage is how easily it can be swapped out: change the paper color with the season, the mood, or the project without spending more than a few dollars each time.
via penniesforafortune.com
2. Create a Photo Display Defined by Elegance
The black and white framing components here do the design work — they pull every image forward without competing with it, while the weighted arrow at the base points subtly toward the work surface below. The result is a display that motivates without distracting, which is a harder balance to strike than most photo wall tutorials acknowledge.
A mason jar tissue holder solves a small but persistent desk annoyance — a tissue box that never matches anything — by replacing it with a glass vessel you can paint, wrap, or label to fit your exact palette. The jar diameter accommodates standard folded tissues comfortably, and the weight keeps it stable on even a busy working surface.
A dry-erase surface inside a decorative frame gives you a to-do list that functions as desk décor rather than a utilitarian afterthought. On days when the list is empty, the frame reads as a pattern display — choose a background print you genuinely like, because you will be looking at it every day whether the list is full or blank.
A corkboard cut to your preferred size and covered in your chosen fabric or paper produces a mouse pad that is both functional and completely personalized — something no retail option can offer at the same price point. The cork base provides just enough friction for accurate tracking while protecting the desk surface underneath.
Bookends with living succulents planted into their base do two things simultaneously: they keep notebooks and references upright and they bring the single most effective natural accent — greenery — directly onto the desk surface. Succulents are ideal for this application because their water requirements are minimal enough to survive the irregular attention most desk plants receive.
via ispydiy.com
7. DIY Marble-Effect Magazine Holders
Cereal boxes wrapped in marble-effect contact paper or craft wrapping produce magazine holders that are indistinguishable from retail versions at a fraction of the cost. Cut the opening at an angle for easier access, line them in a row, and a formerly chaotic stack of paperwork becomes a coherent, designed storage system in under twenty minutes.
The most effective desk personalization is often the most restrained. A corkboard with a small photo cluster, two plants for contrast, and a considered color palette in the accessories does more for a workspace atmosphere than any amount of decorative objects. Note the trash can here — even that has been chosen deliberately, which is the level of intention that makes a desk feel truly owned rather than assembled.
A hand-painted ombre calendar replaces the generic grid of a standard desk calendar with something you actually want to look at — the color gradient draws the eye naturally to the current date while the overall composition reads as wall art rather than office stationery. It is also the kind of object that tells anyone entering the space something specific about the person who works there.
Accent pieces — a single bold color in a pen holder, a patterned tray, a metallic stapler — do the visual work of establishing a palette without requiring a full redesign of the workspace. Commit to two or three accent colors maximum and repeat them consistently across every accessory on the surface; the coherence this creates is what makes a desk look styled rather than decorated.
via Hobby Lobby
11. Craft Inexpensive Storage With Wooden Crates
Wooden crates painted dark on the exterior with a contrasting interior color create storage that reads as furniture rather than organization hardware. The delicate pattern detail added here deepens the visual interest considerably — a step that takes ten minutes with a stencil and a single color but transforms the overall impression of the workspace entirely.
A single typographic print above or behind a desk does more motivational work per square inch than any other desk accessory — but the wording matters enormously. Choose something specific and meaningful rather than generic, because a quote you genuinely believe reads completely differently to a visitor than one that was simply available in the right size and color.
Gluing a small toy or figurine onto a jar lid and finishing the whole piece in gold, copper, or silver spray paint produces a desk accessory that looks deliberately collected rather than improvised. The metallic finish is the key step — it unifies any object underneath it, which means the quality of the base item matters far less than the quality of the paint application.
A coat of chalkboard paint on a mason jar converts it from a generic glass container into a labeled, customizable desk organizer that can be updated any time its contents change. Group three or four jars of varying sizes together on a small tray and the arrangement reads as a designed desktop system rather than a collection of repurposed kitchen items.
A cardboard pinboard covered in your chosen fabric or textured paper costs almost nothing and can be cut into any shape — which immediately distinguishes it from the standard rectangular options available in every office supply store. The ability to change the cover as frequently as you like also means the board can be refreshed seasonally without rebuilding the whole structure from scratch.
via lifeannstyle.com
16. Modular DIY Triangle Organizer
Cardboard scored and folded into triangular modules creates a desktop organizer with a genuinely architectural presence — the angled compartments hold pens, scissors, and rulers more accessibly than a standard cylindrical holder, and the geometric form adds visual interest that flat-sided boxes never achieve. Cover the exterior in paper or fabric to match your palette and the whole system looks like a considered purchase rather than a craft project.
Cardboard compartments cut to fit inside a drawer and painted in coordinating colors turn the inside of a desk drawer into an organized system that is genuinely satisfying to open. Color-coding the compartments by supply type — one color for writing tools, another for adhesives, another for clips — adds a layer of functional logic to what is otherwise a purely aesthetic improvement.
Raising a monitor to eye level — the ergonomically recommended position — simultaneously creates a hidden storage shelf beneath it that reclaims desk surface without adding any visible footprint. The space underneath a monitor riser is exactly the right depth for a keyboard, a notebook, or a small row of frequently accessed items, which makes this one of the few desk upgrades that improves both posture and organization at the same time.
Wooden boxes bring a warmth to a desk surface that no plastic or metal organizer replicates — the material absorbs light rather than reflecting it, which makes the overall setup feel calmer and more considered. Add a small succulent or trailing plant alongside them and the natural pairing of wood and greenery does the rest of the design work without any further intervention.
A horizontal string pinned between two points above the desk creates a note display that is both more visual and more flexible than a standard pinboard — cards and notes can be added, moved, and removed without leaving holes or residue, and the color-coded clothespins provide an instant organizational system that reads across the workspace at a glance.
Source Unknown
21. Identity in Simplicity and String Lights
A stark white desk setup needs only two things to feel complete: contrast and warmth. The black and copper accessories here provide the contrast, and the warm-toned string lights provide the warmth — a combination that transforms an otherwise clinical space into something genuinely inviting without adding a single decorative object that doesn't also serve a function.
via Pinterest
22. Painted Rocks as Faux Cacti
Painting smooth rocks in varying greens with white dot detailing and setting them in small terracotta pots produces a desk cactus garden that requires zero watering, never drops a leaf, and costs almost nothing. The organic shapes of the rocks mean no two look identical, which gives the arrangement a natural variation that painted ceramic alternatives rarely achieve.
A cereal box covered in colored duct tape — cut at an angle at the opening for easy access — produces a desk organizer that is structurally sound, visually bold, and free to make. The key is choosing tape colors that are already present elsewhere on the desk so the organizer reads as part of the palette rather than an isolated craft object.
Tin cans wrapped in paper, fabric, or painted directly become desk organizers with a genuinely solid, weighty presence that plastic equivalents never match. Group them in a cluster of three or five at varying heights — achieved simply by using cans of different original sizes — and the arrangement has the visual weight distribution of a deliberately designed desktop accessory set.
via HGTV
25. Copper and Marble Desk Accessories
Copper spray paint applied to any standard desk accessory — a tray, a stapler, a pen holder, a small vase — immediately elevates it into something that looks deliberately sourced. Paired with a marble-effect surface or a concrete tray, the combination produces a desk palette that photographs exceptionally well and holds up to daily use without looking tired, which is a rare combination in DIY home office decor.
A black-and-white base palette anchored by gold accents and a handful of personally meaningful objects is one of the most reliable desk styling combinations available — the monochrome backdrop makes the gold pop, and the personal items give the whole setup a specificity that no generic desk accessory can replicate. This is the approach that makes a workspace feel inhabited rather than arranged.
A single stem or a small bunch of flowers in a simple vessel is often the only thing a clean white desk needs — the organic form and natural color introduce warmth and life that no manufactured object replicates, and the impermanence of cut flowers means the display is always slightly different, which prevents the workspace from feeling static or stale over time.
For those who want to address the desk itself rather than just its surface, this farmhouse build delivers a full-sized, furniture-grade work surface for under $80 in lumber and hardware. The construction is straightforward enough for a first woodworking project — straight cuts, basic joinery, and a good sand and seal finish — and the result is a desk with the material warmth and proportional generosity that flat-pack alternatives at three times the price rarely match.
via Chad Dickenson
29. Complete Your Desk With a Handmade Planner
A large, well-designed desk planner keeps the day's priorities visible at all times — which research consistently shows reduces the cognitive load of task management more effectively than any digital equivalent. Making your own means you control the format, the size, and the aesthetic, producing a planning system that fits both your workflow and your workspace rather than the other way around.
30. Boost Color and Texture With Painted Containers
Any container — a cup, a box, a tin, a jar — can be transformed with a coat of paint and a few minutes of drying time. The key decision is committing to a consistent finish across every container on the desk: the same paint sheen, the same color family, or the same pattern language ties disparate objects together into a cohesive set that looks curated rather than accumulated.
The most powerful desk decor element is often the smallest — a ticket stub, a postcard, a printed quote, a small photograph pinned without a frame. These objects carry specific personal meaning that no purchased accessory can replicate, and their cumulative presence on a pinboard or desk surface is what ultimately makes a workspace feel like it belongs to one particular person rather than anyone at all.
Which of these 31 ideas are you starting with? A personalized desk is one of the most productive investments you can make in your daily working environment — and as this list shows, the most effective changes are rarely the most expensive ones. Share your setup in the comments below.
DIY wooden lamp projects deliver one of the highest visual-to-cost ratios in home décor — a category where a fallen tree branch, a stack of paint stir sticks, or a handful of reclaimed pallet wood can produce a finished piece that reads as designer furniture rather than a weekend craft. If you want lighting that adds genuine character to a room rather than simply illuminating it, this collection of 50 builds spans rustic bedside lamps, geometric pendant lights, driftwood floor lamps, tripod stands, Edison bulb installations, ceiling wood lighting rigs, and multi-purpose shelf-and-lamp combinations. Adjacent territory includes chicken wire shade builds, upcycled stool bases, hexagon walnut desk lamps, cracked-resin table lamps, stir stick pendant shades, and LED strip modern builds. The detail most wooden lamp guides skip entirely: hiding the cord is the single finish decision that separates a build that looks handmade from one that looks custom — surface-mounted cords undermine even the most carefully constructed base, while a routed channel or fabric-sleeved cord elevates the entire piece without adding more than thirty minutes to the build. Most projects here require only a drill, basic adhesive, and a lamp cord kit costing under $15, making beginner-friendly DIY wooden lamp ideas the genuine entry point for the overwhelming majority of builds on this list.
Before You Start Wood and heat require more planning than most lamp build guides acknowledge, and the gap between a safe build and a fire hazard often comes down to two decisions made before drilling starts. Enclosed wooden shades — the geometric pendants, cube lamps, stir stick shades, and basket builds in this list — trap heat, and any incandescent or halogen bulb inside one will exceed the ignition temperature of the surrounding wood under sustained use. LED bulbs only, always, in any shade where the wood surrounds or sits close to the light source. The second decision is the cord kit: every build here that requires wiring should use a UL-listed pendant or table lamp cord kit, which costs under $15 and includes a socket, switch, and correctly rated wire in a single assembly. Splicing standard electrical cable, using zip cord rated below 300V, or repurposing an extension cord as a permanent lamp fixture creates a fire and shock risk that no amount of careful woodwork compensates for. For builds that route the cord through a drilled channel in the base — the solid wood chunk lamp, the trunk base, the tripod floor lamp — drill the channel before cutting the base to final dimensions, and size the hole to 3/8 inch minimum so the cord sleeve passes through without compression. Compressed cord insulation degrades faster than any other failure point in a DIY lamp.
DIY Wooden Lamp Projects and Crafts
We've listed 50 awesome wood lamps that can transform your space to look like it belongs to an IKEA catalog.
Adding a simple lamp is one of the best ways to complete your rustic-themed room. If you've got a used lantern lying around, consider repurposing it to lamps!
Use a dim yellow bulb to give your room a cozy feel. Paint the outside with your favorite color, and you're done!
You can use wall brackets as base for your lamps. It's one of the best ways to create a unique and simple lampshade at home.
It hardly takes hours to do, and all you need is to screw the brackets to the wall! Hang the light bulb on the bracket, and make sure the wires are covered.
Wood pallets are highly durable and easy to work with. They're highly affordable, and you might even be surprised to find wood pallets given away for free!
Create a unique wood pallet table lamp, and make it feature décor in your room. Sanding the wood is also a good idea so you don't encounter any splinters.
If you chance upon a fallen tree trunk, consider using it as a base for your wood lamp. Creating a trunk lampshade is a good way to mix modern and rustic designs.
Make sure to cut the edge to a size that fits your desk or bedside table. Watch a tutorial to help you sand the edges properly.
Geometric wood lamps are always a good centerpiece for a small room. It's a good conversation starter and takes little effort to do.
All you need are wooden triangles or cutouts, which you can glue together to form a shape. Look for a guide or tutorial to help you properly shape the dimensions.
Consider this wood lamp idea if you want to spruce your lamp with style. Cover the whole lamp shade with thin wood cutouts to transform it immediately!
You can use wood samples for the cutouts to complete this lovely rustic and minimal wood lamp.
Another awesome wood lamp idea is this intertwined fallen tree branch. Grab a few tree branches in your garden, and tie them together until you form a smooth, solid base.
Smoothen the surface until you're sure there are no more splinters. Make sure to watch a tutorial to help you with sanding your wood properly.
Adding frames or shelves is a good idea to liven up your home. You can be as creative as you want with your ideas.
A good idea is to start creating a modern multipurpose shelf and wall lamp in one DIY project. All you need are shelves and your favorite lighting to get started.
Don't throw out your used sunshade slats and upcycle them to be wooden table lamps.
The beauty of using slats is that you can place holes and screws, creating an adjustable lamp. You can use a tutorial to help you position your screws.
This wooden lampshade is perfect for adding warmth and elegance to your room. At a glance, this lamp looks expensive, but it's a project you can DIY immediately.
You only need a wood trunk for the base and attach a lighting system on top. We recommend watching a tutorial on how to attach the cord properly.
This simple lamp looks like an eel swimming. The bulb is the head, and its peaking cord is the body. Crafting this lamp is so easy to do. You don't need a tutorial for it.
However, be careful with how you put the wires together.
This hexagon-shaped lamp is the perfect addition to your office, and you can make it as small or big as you want. Not to mention, it's also a perfect gift idea for your friends!
We highly recommend using black walnut wood for that sleek and clean finish. Finish it off with some varnish, and you're done.
At a glance, this quirky wood lamp looks easy to do. But once you've started this project, you might find that there are little bits and pieces you need to worry about.
Finishing this project requires a tutorial to help you out. But rest assured; you'll finish this lamp successfully.
This lamp and shelving unit is perfect for people looking for a space-saving project. Stick these lamps on a shelf on your wall and a lighting system underneath!
Install the shelf properly, so it doesn't fall from your wall.
Chicken wires aren't just for keeping your chickens in. You can repurpose it and use it as the base of your shade!
You need wooden and wire end rings to attach the wires. Be sure to also have glue so that you're ready. Handle the wires carefully cause they tend to be sharp.
IKEA better make a run for their money once you've figured out how to make this modern wood lamp. It looks unique, yet only requires a few pieces: favorite wood and LED strips.
Watching a tutorial on assembling LED strips will help you a lot.
Transform your geometric candle holder as the cover for your DIY wooden project. This project looks unique and intricate but only requires two components.
Grab a solid wood to use as a base, and ensure it is sturdy enough to support your geometric cover.
One of the most stunning wooden lamps we've seen is made of driftwood, and it's probably the last thing you'd expect.
You can tie a couple of driftwood together and assemble them to be the base of your lamps! Add a neutral tone as the shade, and you will have a dramatic-looking décor.
Stir sticks are often overlooked. You'd hardly think you could use it for lamps! But now that you're here, you know this is a project you can do next.
It doesn't cost a lot, and you only need a couple of stir sticks that can be used to form a shade. Once you're done, you've got an IKEA-looking project!
You might also want to check out a tutorial for plastic spoon crafts for your next project.
If you've got an extra stool lying around you've decided to dispose of, don't! You can use it as the base for your floor lamp.
All you need left is your bulb and a clear glass dome as a cover. Drill the middle of one side of the stool to connect the wiring from the bulb to the socket.
Say goodbye to your usual kitchen lights and trade them for a unique natural wood front lighting system. This project is easy to DIY immediately, and instructions are hardly necessary.
You can use a thick driftwood or a fallen thick tree branch. Hang the lights, and you're ready to install!
This is one of the simplest wooden lamps you can DIY immediately. All you must worry about is cutting your wood to a perfect rectangular shape.
Both the lamp base and shade can sport the same rectangular shape to give it a modern minimalist vibe. Choose a cool-toned material as shade, and you're all set.
The inside of a tree trunk looks stunning, especially the closer it gets to the center. A slab of the trunk can get expensive, depending on the wood you use.
Customize your own tree trunk ceiling light. Trade in your usual chandelier for this awesome DIY project.
Building this DIY table lamp is a lot of fun, but it is certainly tricky. You want to create a cracked illusion in both the base and middle, where the light will be illuminated.
Once you finish this project, you'll overwhelm many friends with this cool DIY lamp.
Who would've thought you could use branches as pin lights? Consider picking them up and bringing them home if you chance upon thick branches.
Create holes with a hollow center to insert the pin lights into the hole.
Wooden Lamp Projects Conclusion
Creating your wood lamp is simple, easy, and will hardly cost you a fortune! You can have your IKEA-looking lamp at home.
Be sure to follow along with your favorite tutorial to help you finish your wood project successfully!
We hope you enjoyed this article. Let us know in the comments which DIY project you decided to create. We'd love to hear about it.
You might also want to check out DIY PVC pipe projects that can get your hands busy.
DIY PVC pipe projects are the most underestimated category in home crafting — a material that costs almost nothing per meter, cuts with a hand saw or even a length of string, and handles everything from outdoor furniture and garden irrigation to children's furniture, camera mounts, and kitchen organizers with equal structural reliability. If you have leftover pipe from a plumbing job or simply need budget-friendly solutions to real household problems, this collection of 50 builds spans bike racks, aquaponic gardens, overhead garage storage, ball pits, photography backdrop stands, wine rack drawers, dog cots, and a full cabana — covering the complete range from ten-minute utility fixes to weekend structural builds. Adjacent territory includes PVC lamps, starburst mirror frames, honey spinners, no-ladder gutter cleaners, sprinkler socket irrigation systems, and kiddie carwash setups. The detail most PVC project guides skip entirely: pipe diameter is the single variable that determines whether a build works or fails — using the wrong diameter for knife holders, shoe organizers, or wine racks means nothing fits, and no amount of assembly skill compensates for a material mismatch at the planning stage. Most builds here require only PVC elbows, T-fittings, pipe glue, and a saw, making beginner-friendly DIY PVC pipe ideas the genuine majority of this list rather than the simplified exceptions.
Before You Start PVC cement does not work like regular glue, and treating it as though it does is the reason most structural PVC builds — the bed frame, the cabana, the dog cot, the ball pit — fail at the joints under real load. PVC cement is a solvent that chemically melts both pipe and fitting surfaces, fusing them into a single piece as the solvent evaporates. That process requires purple primer applied first to both surfaces, followed by cement applied while both surfaces are still tacky — the window is roughly 30 seconds. A joint assembled dry first and then glued, or one where the cement was applied to only one surface, looks identical to a correctly made joint but carries a fraction of the load. Twist the pipe a quarter turn as you push it into the fitting to distribute the cement evenly, hold it for 30 seconds without movement, and allow a full 24-hour cure before applying any load. For builds involving food — the aquaponic garden, herb planters, and honey spinner — standard gray DWV pipe is not rated for food contact. NSF-61 certified pipe, clearly marked on the label, is the only type safe for those applications. Check the label before cutting anything.
50 DIY PVC Pipe Projects You Can Do Today
Polyvinyl Chloride pipe, or PVC pipe, is a type of economical material used in sewer systems and water lines as it is durable and resistant to environmental factors over time.
Yet, there are instances where excess PVC pipes can be left rotting in the nooks and crannies of our storage space after construction or DIY repairs.
There will also be times when we'll need budget-friendly solutions for everyday needs, such as storage racks or even interior design elements.
So, instead of stocking PVC pipes, we can reuse them for other purposes which are laid down below. Let's get started!
If you are a habitual cyclist who uses bikes to-and-from work or are a serious cyclist who competes in marathons and races, you'll surely need a bike rack for your two-wheeled buddy.
To make a sturdy and reliable PVC bike rack while keeping your budget on track, use 3/4-inch PVC pipes and assemble them to replicate the image above.
The key challenge here is ensuring that your front wheel can fit and balance between the gaps.
During summer beach days or camping trips, you would want your toddlers to feel comfortable sitting down while getting some sun through this DIY PVC pipe project – a toddler chair!
In making the toddler chair, you must have a 3/4" PVC pipe, eight elbows, and six PVC tees.
You will also need to add a cloth that will serve as the seat and backrest. You can use fabrics showing your toddler's favorite cartoon character, superheroes, or preferred colors.
An organized station for your drilling tools can bring joy to every individual immersed in mechanical work. You can work with PVC pipes to make organization happen even on a budget.
In making a drill dock PVC pipe project, you'll need to measure your drills and buy PVC pipes with diameters that can fully accommodate your equipment once slotted in.
Providing your kids (and kids at heart) a fun time means creating PVC pipe projects that are entertaining, like a water shooter.
Making this PVC pipe project is easy because you only need the barrel (external) and the piston (internal), both of which can be made with different-sized pipes.
You'll need to insert the piston into a relatively larger barrel with a seal cap on top that has a drilled hole. This creates enough pressure to push the water out in the signature super soaker style.
Keep the intensity (and fun) high during kiddie parties or family gatherings by shooting marshmallows everywhere! To have enough for everyone, you must have a cost-effective alternative – a DIY PVC pipe marshmallow gun!
It is easy to make, as you only need to combine PVC pipes, tees, and elbows to create a gun-like shape. Just ensure both ends are open to blow on one end and push the marshmallow out the other.
When teaching your kids, and even some adults, to swim, they need reassurance that they will float no matter what, and you can do that through pool noodles.
To elevate your pool noodle's buoyancy and ease your tutees, you can cut it in half and insert a PVC pipe between the two noodles for additional stability and rigidity.
You can also use this for pool photoshoot designs if you keep the water noodles festive and on theme.
As you create a PVC pipe aquaponic garden, sustainability and healthy living can now be found within your household.
To do this, you have to connect your PVC pipe (fluid conveyance) with holes to a water source (hose) and make sure that the latter can generate water throughout your pipe system.
Living in the modern world also calls for modern solutions, including a DIY laptop holder made of PVC pipes.
To do this, you need a 1 to 1-1/4-inch PVC pipe and six elbows. Then, you can sand and paint them to your liking. Lastly, connect them using glue to form an angled-laptop stand based on the size of your device.
If your hobbies include collecting shoes, the first thing you need to remember is the answer to the question: where will I put the shoes?
The most obvious answer is a shoe organizer. Yet, if you are on a tight budget for organizers, as most of your funds are focused on buying shoes, PVC pipe may be your friend!
You can cut a standard-sized 6-meter PVC pipe into 15 to 20 short lengths, depending on your shoe size, arrange them like the image above, and you can have your very own DIY shoe organizer.
Relaxation is not complete without a cabana, whether by the swimming pool, at the beach, or right in your backyard.
Lounging in the comfort of a cabana while sipping your coffee does not need to be expensive, as you can include it in your lists of PVC pipe projects.
To do this, you must have at least eight PVC pipes, which can be six to ten meters long, depending on your desired design. Then, connect these PVC pipes using L and T-shaped fittings.
Recycling your stock PVC pipes can also help up your indoor design by making it the mirror's frame. As we know, mirrors are essential parts of a home that can create the illusion of a bigger space in a smaller area.
To make a starburst pattern mirror, any tutorial would include cutting each pipe, gluingthe pipes together in your chosen design, and attaching them to your walls via screws.
Moreover, you can also elevate this inexpensive way to decorate your home through light spray paint or aerosol paint.
During the summer, one thing that both you and your kids will enjoy doing is making a lemonade stand to sell lemonade.
Before we proceed with the selling part, you can create a lemonade stand PVC pipe project with your young entrepreneur using a 40-foot PVC pipe, and slip tees, all of similar diameters.
After you have assembled the PVC pipe system, you can paint the signage by hand or with spray paint, add a stand cover, and let your kids start selling!
If you want to spark excitement among the young ones during your annual family gathering or just for your usual weekend leisure, DIY projects like this kids' sprinkler will be perfect for any occasion
To make this DIY PVC pipe happen, you must use your imagination, lay out a design, buy PVC materials, use colorful tape and design all over the sprinkler, and connect to a water source like a hose.
When you want your kids to feel the excitement and sensory stimulation from a ball pit without actually going to a ball pit park, ball pit PVC pipe projects are a great idea.
Aside from using a PVC pipe, it would be best to have some water noodles, elbow connectors, pipe glue, zip ties, netting, and balls.
Moreover, an additional way to boost your kids' mood is by incorporating their outdoor slides as an entrance to the kids' ball pit.
In trying to introduce the world of books, and life in general, to your kids, you are left with so many books and so little space to keep them. A bookshelf DIY PVC pipe can save your day!
With a bookshelf DIY PVC pipe, you secure the books and keep your little ones' areas nice and tidy. Make sure to make a shelf they can reach when their need to read arises.
Tip
The bookshelf design in the image above can also be used as your bag organizer within your closet.
During summer breaks, we need something that will keep our kids' minds busy, their bodies moving, and their hearts gleaming with joy, and there's no better way to do that than with a kiddie carwash in your backyard.
Aside from using a PVC pipe for the structure and fencing, make sure you have fabric, textiles, water toys, paper designs, sponges, a pool noodle, an expansive lawn, and colorful cones to add to the fun.
In the digital age, where content creation has been the topmost priority to earn money, and social relevance, an overhead camera mount is another essential that you need to have to take pictures or videos from a bird's eye view.
Overhead camera mounts on the market are expensive, so including this in your DIY PVC pipe projects is a must.
For this, you must ensure the lower PVC pipe mount is sturdy enough to support the neck and the weight from the camera once mounted.
Birds need water to drink and to keep their bodies clean. To do that, they will need a bird bath.
But, a bird bath does not need to be expensive, it just needs to be efficient, and you can do that by creating one in your backyard using PVC pipe.
You can use a thick PVC pipe as the column of the bird bath. You can also cut a PVC pipe into sections, cut them in half (vertical), and form a frame using elbows to create a table-like bath.
Birthday shoots, homecomings, and other celebrations need a photo booth; in that booth, you will need a backdrop stand. Well, with that problem, the best solution is a DIY PVC pipe square frame covered in fabric.
It's easy to do as you only have to ensure the mount is well-built, the stands that hold it are well-balanced, and the fabric you attach is aligned with the theme.
If you or your kids' hobbies involve arts and crafts, something that will surely spark joy in your lives is a craft room tool organizer.
Aside from the end product, you will also enjoy the process of making PVC pipe projects like the image above.
To make it more creative, aside from when you cut PVC pipe, remember to paint the tubes in your favorite hues and incorporate different patterns to make them lively and fun.
Things can get messy in a hardware store or workshop when tools and accessories are in disarray. Yet, you can prevent it with tool pockets PVC pipe projects.
This project's straightforward process only involves cutting the PVC pipe into a tube with lengths depending on the tools.
Then, proceed by painting (optional), attaching them to a wooden wall board, or just letting them stand tall above your work desk.
Cleaning the gutter takes tons of energy as you need to climb the roof and clean it from there. However, times have changed, and the DIY PVC pipe projects game has leveled up as you can now have a no-ladder-toss gutter cleaner.
To make this gutter cleaner, you must assemble the nozzle and the valve. The nozzle will be the one that will clean the gutter, and the valve is the one connected to your air or water source.
Having kids means providing them with their own beds. Yet, what if you are on a budget or have a small space? The answer is a DIY PVC pipe bed!
In building a pipe bed, the foundation is the main thing you need to stabilize. They must be adequately connected using elbows and have different columns attached through a T-shaped PVC pipe.
Moreover, you can use cute rainbow washi tape designs to make it more appealing for the kids and tape it all over the poles.
If you are looking for fun and games to keep your kids away from the spell of gadgets during the summer, you can create a fall wall for kids inside your home or in your garden.
For a complete tutorial, what you need to have are PVC pipes, elbows, a board where you can glue these materials, and a container so that the balls will not go anywhere upon falling.
You can also add some colors to your pipes using spray paint. Make sure that the colors you incorporate are eye-catching and can stimulate visual sensations.
A fence is a protective element that protects the perimeter of your yard, yet it sometimes costs a lot, especially in this economy. However, there are cheap but reliable alternatives, such as a PVC pipe fence.
Aside from securing your homes, it can also be an excellent addition to level up your garden aesthetics, especially when you know how to design the fence using T and L-shaped PVC pipes.
Another inexpensive way to organize your cords is by creating a PVC pipe cord organizer.
To do this, you only need to cut a PVC pipe horizontally to the lengths you need, attach them to the wall using glue or an adhesive, or drill a hole and lock them with a screw.
In every pool session, your kids would gladly want a place to get or hang their wet towels to dry off quickly. A PVC pipe drying rack is the best affordable idea you can get in this case!
You can have it in a two-way parallel design or a layered rack similar to the image. Just remember to make the frame foundation well-connected to ensure the balance of the rack.
You can permanently mount the drying rack in your garden. It will act as your pool towel hanger and washed clothes dryer instead of letting them dry inside the bathroom.
Extracting honey from honeycombs can be done quickly using a honey spinner. To help small-time beekeepers, a DIY PVC pipe spinner can be used as a cheap yet efficient alternative.
In making the PVC pipe honey spinner, you only need about a meter and a half of PVC pipe to seal the deal.
When you are a busy person who goes to the office before sunrise and leaves after sunset, you surely won't have spare time to water your garden. Yet, it's not a problem when you have a sprinkler socket system.
You must assemble and connect the pipes to a primary water source or hose for an irrigation sprinkler socket system to work.
A fun detail to add in a kitchen is a floating window planter for your herbs, which means having flavor and health benefits right within your reach while preparing food.
You must have at least a 4-inch PVC pipe to have this kind of magic indoors. Then, you must put holes in the pipe's body, depending on how many herbs and shrubs you will plant.
Also, ensure the holes are big enough for the plants to breathe and take in enough water for sustenance.
If you are tasked to decorate your house's interior design, an idea worth doing is a PVC pipe lamp project.
For PVC pipe projects like this, you need to follow this tutorial: cut a PVC into a tube, depending on the diameter of your liking, carve different shapes and patterns on its shell, paint, and put a light source inside.
In addition, you can also put this as a table centerpiece to level up your table décor and preparations.
Remember
You can always complement the PVC with a wooden lamp by following the full instructions in this DIY wooden lamp article!
A PVC pipe can also save your dull day by helping you create a ladder golf game for kids and adults.
The tutorial for this project is simple, as you only need to connect the lower frame with the standing frame and add other accessories using yarns or ropes.
A PVC pipe can transform a plain and simple yard into a play and training area for kids who like playing soccer or association football.
To create a sturdy soccer goal, use a thicker PVC pipe about 2 inches in diameter, and attach a net around it. You'll have your little FIFA players scoring goals in no time.
Sometimes the floor area of your garage is not enough to cater to all of your stuff (given your car and associated tools), which is why you need to be creative and integrate additional overhead storage using PVC pipe.
To do it, you must connect the pipes and use a screw to safely fasten the pipes to the garage's ceiling.
Oils can be reused, but sometimes, recovering them after every use isn't easy. Yet, it's an easy task to do when you have an efficient oil recovery system made of PVC pipe.
For this, you must assemble a tube that connects to a particular funnel. You will need another pipe that will act as the main line for all the other tubes and another connection that will lead the oil right into the recovery bin.
If you think glass and wood are the only table materials that bring out the aesthetics in every house, then you're wrong because a PVC pipe table can be an elegant addition to your interiors, too.
Aside from being sophisticated furniture when it comes to visuals, a PVC pipe table can also be a valuable item that can house your fish, just like in the image above.
Dogs like to play and sleep anytime and anywhere, but it will surely make them feel more loved and cared for when they have their very own dog cot to play and sleep on.
A PVC pipe dog cot is simple to make. Its complete tutorial only involves making a frame, cot feet, and adding fabric that will act as the dog's bed.
When using a vacuum, we tend to forget where we placed a specific attachment, and in turn, delay our cleaning or storing.
To help you keep things tidy and secure, we have a solution allowing you to store all your vacuum attachments in a single area – a PVC pipe vacuum attachment holder!
All you need is a pipe with a diameter that fits the opening of your attachments, connect it to wood or wall using a screw, and stick and store your vacuum attachments.
Earlier, we discussed how to build a cabana, and the best pair to a cabana is a PVC pipe utensil serving station to complement your outdoor set-up with a fitting buffet.
To make your serving station, cut the PVC into the length of your utensils from the neck down to the handle. After that, you can style the pipes using ribbons or other colorful accessories.
Then, you can store the utensils inside your DIY PVC utensil serving station.
Tip
You better check out the tutorial on plastic spoon crafts to be aware of the other creative and fun activities you can do with your utensils.
When your life revolves around fishing, you most likely have a lot of fishing rods stored in your garage. That raises the question: how can I store all these rods?
The answer is simple, use a PVC pipe similar to the image above. A PVC pipe organizer can house at least eight fishing rods. But it can still accommodate more, depending on the size of your PVC pipe.
You do not need heavy equipment to cut through a PVC pipe, as a string can help you get the job done.
This is done when you create friction by continuously rubbing the string around the area of the pipe you want to cut. After a few tries, the friction will neatly divide the PVC pipe.
Moving a mattress from one place to another is a no-brainer with a full tutorial on how to make a PVC pipe mattress transport sling.
To do this, you need to make a bottom structure based on the average length of your mattress, vertical stands to connect the bottom and top parts, and a rectangle-like upper part that will serve as holders.
Doing your hair is all fun and games until you finish the actual hair styling part, and you are left with nothing but a question about where to put your hair dryer and flat iron.
Well, we have an answer – a PVC pipe hair dryer stand!
The complete tutorial for the hair dryer stand is undemanding, as you only need a Y connector PVC pipe to solve any hairy situations.
Last but not least from this PVC pipe full tutorial list is the flower vase that can elevate the visual aesthetics of your home, office, or other places.
To do this, all you have to do is get a Y connector or an elbow PVC pipe, put some flowers on it, and display it on your coffee table or give it as a gift on Mother's day.
DIY PVC Pipe Projects FAQs
We know you want to clarify some things related to PVC pipes and DIY activities. Well, we have some of the answers to your FAQs in this section. Read on!
How can you make a PVC pipe look nice?
You can make a PVC pipe look nice by doing the following:
Adding light to dark paintcolors
Decorating with a stylish Washi tape
Reusing it in your garden, bathroom, or as house decor where you wouldn’t expect to see PVC pipes
How do you bend PVC pipe DIY projects?
You can easily bend the PVC pipe by putting oven-heated sand inside the pipe for about a minute.
Conclusion
With all the do-it-yourself projects on PVC pipes from this list, you can surely have an enjoyable, productive summer with your kids through the different activities listed above.
Just remember that a PVC pipe is not only for sewers and water systems, as it can also be your best companion for a fun-filled activity and the best one for organizing stuff.
Now, get your pipe, follow the tutorial of your preferred DIY, and create magic with your PVC pipe projects!
DIY bamboo projects occupy a category most outdoor crafters underestimate — a material that is stronger than most hardwoods by weight, grows faster than any timber alternative, and works equally well for structural builds like gates and shower enclosures as it does for decorative ones like wind chimes and LED landscape lights. If you're looking for garden and outdoor project ideas that feel genuinely distinctive rather than generic, this collection of 31 builds spans cascading fountains, privacy screens, tiki bars, vertical planters, tomato cages, hanging lanterns, bee houses, and full furniture builds, including benches, chairs, and coffee tables. Adjacent territory includes bamboo rain gutters, sunburst mirror frames, grow walls, spiral garden edging, yard dividers, and bamboo torch lighting installations. The detail most bamboo craft guides skip: bamboo must be dried for six to twelve weeks before any structural build — using green, moisture-laden poles in joinery or furniture projects causes warping and joint failure as the material cures, which is the single most common reason first-time bamboo builds fall apart within a season. Most projects here require only twine, a drill, and zip ties as core hardware, making beginner-friendly DIY bamboo garden ideas the practical starting point for the majority of builds on this list.
Before You Start Plastic spoons are not all the same material, and that difference determines whether a project holds together or falls apart within days. Most craft failures with plastic spoon projects trace back to hot glue applied to polypropylene — the slick, slightly waxy plastic used in many disposable spoons that hot glue cannot bond to reliably. Polystyrene spoons, which feel slightly more rigid and snap cleanly rather than bending, accept hot glue and paint far better. A simple test: press a fingernail into the back of the bowl — polypropylene leaves no mark and feels slightly greasy; polystyrene marks more easily and feels drier. For projects that require melting and reshaping spoons into petals, roses, or bangles, use a heat gun rather than an open flame — a candle produces uneven heat that scorches before it softens, and melting polystyrene over an open flame releases styrene vapors that require ventilation. Work near an open window regardless of heat source. For gluing, roughing the spoon surface with 120-grit sandpaper before applying adhesive improves bond strength on any plastic type — skipping surface preparation is why most spoon flower and mirror projects shed pieces within weeks of completion.
50 Creative Plastic Spoon Crafts and Projects
We always end up with a ton of extra plastic spoons at home. Instead of throwing them out, consider transforming them into beautiful art pieces!
1. Plastic Spoon Christmas Trees
Make your Christmas memorable by creating small Christmas trees using plastic spoons. This project is easy, and you can use different colored spoons.
You can use green or red spoon heads in keeping with the Christmas spirit. Alternatively, you can go for a monochromatic look using only white spoons.
Did you know you can make roses out of plastic spoons? The results look stunning, especially if you use colorful spoons.
All you need to do is melt the spoon and mold it into a rose. Leave it to harden, and you're done! Just be careful with handling the heat, especially around kids.
Don't throw your old plastic bottle just yet — you can repurpose it as a bird feeder. You hardly have to do anything except cut two parallel holes in the body.
Insert old wooden spoons in the hole, which will serve as a holder for the bird feeds. This bird feeder project will take you only a short time to do!
Children love catapulting things at each other, and they can get very creative with what they use. Why not teach them how to make a plastic spoon catapult?
You only need popsicle sticks, rubber bands, and old plastic spoons. Your kids can use it to catapult marshmallows at each other!
Are you always confused about which plant is which in your garden patch? Why not add signage by using wooden spoons?
You can write the names of the plant on the spoon heads and even draw them! Stick it in your garden patch, and you will no longer have any trouble distinguishing them.
Disney princesses are an icon to every child — they know each character by heart. Why not let them craft their favorite princesses with the help of plastic spoons?
You only need dollar-store materials to end up with a really beautiful project. Your child will surely love this idea.
Many children look forward to thanksgiving because it's one of the few holidays to bond with their whole family and eat out.
Make this holiday extra memorable by creating this spoon craft. Cut out a few pieces of art paper to use as turkey feathers. Add eyes and watch the spoon come to life.
The next time you're looking for an art piece for your home, consider making one instead. This plastic spoon centerpiece looks stunning — you won't believe it only costs a few dollars!
All you have to do is stick your plastic spoons to a circular Styrofoam and spray paint it with your favorite color.
Start with this simple flower pot project to teach your kids how to have a green thumb. You need a small pot/vase and a few plastic spoons to stick on the pot!
Use a sharpie pen to draw on the spoon heads to get more crafty. Remember to place beautiful flowers once you're done!
Who would have thought a plastic spoon could be used as an accessory? Plastic spoon flowers make a good addition to your collection without spending a fortune.
Paint it with your favorite color, and viola! You have a DIY rose accessory that will be a show-stopper and a good conversation piece.
Crafting water lilies is so fun because of the overall results. There's something about the flower which looks so stunning, even if they're just plastic spoons.
Cut off the spoon heads, and start sticking them together until you form beautiful flowers. You can also paint the center yellow to make it more realistic.
There's something special about homemade décor, especially during the holidays. It's even more special knowing your children put much effort into making it.
This plastic spoon snow pot is one of the best DIY projects we love to plan for the winter. Let your kids dress up their plastic spoon to become their favorite snowman!
Besides princesses, children are all about monsters that spook them out. Help them conquer this fear by making monster spoon heads!
They can spray paint a wooden spoon their preferred colors, that'll surely give them the spooks! Their imaginations can run wild with the type of monsters they can create.
We loved playing with maracas as a child because of the different beats and rhythms to explore. Not just that, we were always so curious about where the sounds came from.
Feed your child's curiosity and craft maracas with them. This DIY project only requires plastic spoons, washi tape, and a few beads!
Transform your plain mirror into something spectacular! With the help of plastic spoons, you can spruce your average mirror to become a centerpiece.
We recommend using your favorite colors or one that matches the interior of your home. Creative plastic spoon projects like this one are always a crowd favorite.
Mark the start of the Christmas season with these beautiful and festive candle holders. Christmas trees aren't the only thing to help you feel the holiday spirit!
Layer your spoon heads to make them look like flowers, and paint them with festive colors. Glue them together and make sure they can lay flat on your table.
Conclusion
If you've got a ton of plastic spoons to spare, consider creating all these stunning ideas we've mentioned!
The projects range from very easy to slightly hard — but we're sure you and your children are ready to take them on.
We hope you enjoyed this article!
If you'd like to do more crafts, you can also check out the differentDIY wine cork projects, which are very fun and easy to do.
DIY bamboo projects occupy a category most outdoor crafters underestimate — a material that is stronger than most hardwoods by weight, grows faster than any timber alternative, and works equally well for structural builds like gates and shower enclosures as it does for decorative ones like wind chimes and LED landscape lights. If you're looking for garden and outdoor project ideas that feel genuinely distinctive rather than generic, this collection of 31 builds spans cascading fountains, privacy screens, tiki bars, vertical planters, tomato cages, hanging lanterns, bee houses, and full furniture builds, including benches, chairs, and coffee tables. Adjacent territory includes bamboo rain gutters, sunburst mirror frames, grow walls, spiral garden edging, yard dividers, and bamboo torch lighting installations. The detail most bamboo craft guides skip: bamboo must be dried for six to twelve weeks before any structural build — using green, moisture-laden poles in joinery or furniture projects causes warping and joint failure as the material cures, which is the single most common reason first-time bamboo builds fall apart within a season. Most projects here require only twine, a drill, and zip ties as core hardware, making beginner-friendly DIY bamboo garden ideas the practical starting point for the majority of builds on this list.
Before You Start Bamboo is a grass, not a timber, and it behaves differently from wood at every stage of a build. Green, freshly cut bamboo contains enough moisture to warp, crack, and pull joints apart as it dries — which is why any structural project in this list, from the bench and gate to the swing and tiki bar, requires poles that have been air-dried for six to twelve weeks first. Skipping that curing period is the single most common reason bamboo builds fail within a season. Dried poles are also far less likely to split when drilled, but bamboo's hollow, fibrous structure still needs a pilot hole slightly smaller than the fastener — driving screws or bolts directly into underprepared bamboo causes radial splits that travel the full length of the pole. Pre-drill every fastener point, and wrap joints with twine or wire in addition to any mechanical fastener for builds that carry load. For outdoor installations, seal cut ends with exterior wood glue or melted wax immediately after cutting — open bamboo ends absorb water faster than the pole wall does, and that moisture imbalance is what causes the characteristic longitudinal cracking that appears months after a build looks finished.
DIY Bamboo Projects
Like DIY wine bottle and tire crafts, DIY bamboo projects are great CREATIVE OUTLETS. You can use your imagination to make crafts and decorations out of natural elements, plus add a personal touch to your designs!
Aside from pieces of ornaments, you can also use bamboo to create yard and lawn art so you can have something more creative than your plain old garden gnomes.
Here's a list of 31 projects you can do to beautify your garden using bamboo:
Including a cascading fountain in your garden is a great choice to add a refreshing vibe to the place. It's made of alternately split bamboo poles, so they look like they're pouring water on each other.
A cascading fountain could be one of the sophisticated DIY bamboo projects, and it may take some time to create. However, the results speak for themselves.
Another DIY bamboo project you can create is a bamboo garden trellis. It's made of bamboo pieces that follow a crisscross pattern. This can be attached to the wall or directly on the dirt of your backyard.
A trellis allows you to be creative with your flower or fruit-bearing vines.
Aside from a bamboo trellis, you can also make a vertical bamboo planter to add a fresh touch to your patio, balcony, or courtyard.
You can create bamboo planters using a bamboo pole with INTACT BOTTOMS so the soil will stay in place. Don't forget to drill small holes at the back portion.
An outdoor shower is another fixture you should add to your garden near your pool area or if you live near the beach to maximize the tropical feel.
You can make an enclosure using whole bamboo poles or those split in half. This is quite similar to making bamboo fencing, except it follows a half-circle shape.
If you're using bamboo poles for fencing, you might as well create a bamboo gate to match the yard fence. How it's made is similar to a bamboo garden fence but with hinges and locks.
You can make a double door or one large gate, depending on your preference.
A swing is a FUN and RELAXING fixture to add to your patio or outdoors. Small swings, like those you see in parks, are easier to make since you only need to secure short bamboo poles and tie them together like a raft.
However, the one in the photo might involve a drill, metal washers, bolts, and nuts to secure the large poles in place.
You can also make small baskets out of thin bamboo stalks and slide a candle or LED light inside to make lanterns for your garden or backyard. You can also add rope handles to hang them anywhere in your area. This adds visual interest to your garden, especially at night.
A tiki bar gives your garden Hawaii beach vibes. If you're into this, it's a project WORTH your time.
In these types of bamboo projects, the basic materials you must prepare are four bamboo poles, large enough to be the bar's foundation, as well as smaller poles, weaved bamboo sheets, and dried palm leaves for the roof.
Another DIY bamboo project you can make is a bamboo garden bench. It's perfect for making your outdoor space cozy and enhancing the natural beauty of your garden.
It would also make an excellent addition to your indoor space. When putting this outside, make sure to position it below a shed.
A coffee table is a perfect pair for your bench. This is one of the DIY bamboo projects where you need to prepare a drill, twine, and some thin bamboo poles. As seen in the photo, you can also incorporate woven rattan and a large piece of glass into your design.
A room divider made of bamboo might look like an indoor bamboo fence. It divides the space while still maintaining the illusion of continuous space. You can make this with varying length of poles to add visual interest to the design.
A DIY bamboo wind chime adds a serene, calming feel to your garden. It's believed by many to purify energy and attract good, friendly spirits. You can hang this in trees in your backyard or on the front porch.
These hanging planters are quite similar to the vertical bamboo planters we featured earlier. It's probably the easiest DIY bamboo craft you can make. Just grab a bamboo pole and split it into equal parts. Make sure to drill small holes at the bottom before filling it with soil.
A DIY bamboo privacy screen is great for attaching to existing walls, especially if your wall is made of wood. You can install woven bamboo screens to your yard's fence to add a more rustic vibe.
This is just like the vertical bamboo planter we featured previously. This is also attached to the wall, along with a series of planter containers. You can grow herbs, veggies, and small flowering plants in this.
This bamboo cubby is a great addition to your garden too. This can be your child's secret fort, your pet's little playhouse, or even your own space to RELAX. You can bring pillows and some furniture inside to make it feel more homey!
Thin bamboo poles can also be used to decorate your garden edging. It blends well with the flowers and ground, and it DOESN'T overpower the colors of the plants.
This one is pretty simple to do. You only need to line the sticks up, secure them with zip ties, twine, or thin rope, and stick it on the soil around your garden box.
This simple mini water feature is also a great DIY bamboo project if you don't want the large cascading fountain. You only need three small poles and a short one that acts as a faucet. You must purchase a small water pump for this one.
Another variant of a bamboo planter is this big plant box.
The frame is made of long bamboo poles. You can use a different kind of wood for its base, but some prefer to use purely bamboo. This is perfect for growing flowers and vegetables in your yard.
This spiral garden is relatively simple and cheap to make since you only need short sticks. The method is still similar to garden edging. But don't wrap it around the plant box! Instead, make a spiral pattern with significant gaps in between.
As with the regular DIY bamboo wind chimes we showed you, this LARGE VERSION is also a great project to work on. Instead of using small poles, you'll need larger stalks. You can hang it on a circular base, like in the photo, and secure it using a wire or rope.
This yard divider is a great option if your property has an open space near the woods or fields. If you don't want to cut the open space short, making the area still appear wide and unbroken, this yard divider made of bamboo stalks is a must-try!
You can also use a bamboo pole for your rain gutter instead of your usual PVC pipes. This is more ECO-FRIENDLY and adds a grove-like feel to your home.
Bamboo torches provide great lighting to your yard or garden, especially at night. Like a tiki bar, it makes your home feel like you live on a tropical island, especially if the area is filled with flowers, plants, and other rustic fixtures.
You'll surely appreciate this bamboo plant stand if you love MINIMALIST and NORDIC DESIGNS. It's a perfect pair for your ornamental plants since the colors brown and green blend well, giving a refreshing, natural look.
Bees give life to flowers and plants. So, giving them a home within your home is a good call. You can make this bamboo bee house and place it on a tree. You may even get free honey out of the deal.
You can also use bamboo to make the frame of a mirror. This sunburst design is easily achieved by aligning the poles to follow a circular shape and securing them with twine or wire.
You can use bamboo with varied or similar lengths, depending on how symmetrical or asymmetrical you want your mirror to be.
If a bench is too big for your liking, you can make a bamboo chair instead. It's also a fine choice to include in your courtyard, along with other wooden furniture.
You can make LED landscape lights using large bamboo poles by drilling holes or carving different shapes and patterns. This can look mesmerizing at night and make you feel like you're looking at the sky full of stars.
Bamboo Projects FAQ
Let’s answer some of your questions about working with bamboo!
How Long Does It Take for Bamboo to Dry?
Air drying bamboo takes 6-12 weeks to ensure all the moisture has dried out completely.
What Projects Can You Do with Bamboo?
You can make all sorts of craft projects with bamboo, such as a garden planter and trellis, furniture, shower enclosure, and even a small hut! You can consult our list for just some of the bamboo crafting ideas you can try.
Bamboo Project Conclusion
That's a wrap! You now have 31 DIY bamboo projects to work on to enhance the beauty of your garden and backyard.
You can even look for a video tutorial online for the DIY bamboo craft you plan to make.
So, are you planning on making a bamboo planter, fence, outdoor shower, or other fixtures?Whichever it is, we hope you HAVE FUN in your spare time!
Tip
If you want to add a splash of color, you can always paint your projects. But, when doing multiple colors, always use masking tape to keep things clean.
DIY wine bottle crafts are the single most versatile upcycling category available to any home crafter — a material that is structurally strong, naturally beautiful when lit, and available in an endless range of shapes, colors, and sizes at zero cost. If you've been accumulating empty bottles after dinner parties and have no idea what to do with them, this collection of 55 projects spans pendant lamps, tiki torches, herb garden planters, outdoor chandeliers, soap dispensers, sea glass vases, citronella candles, and frosted centerpieces — covering everything from a five-minute spray paint makeover to a full slumped glass serving platter. Adjacent territory includes decoupage and Mod Podge finishes, twine-wrapped bottle dispensers, chalkboard paint message bottles, boho centerpieces, and self-watering hanging planters. The detail most wine bottle craft guides skip entirely: glass color determines which projects work best — clear bottles maximize light transmission for lamp and torch builds, dark green bottles absorb and diffuse light for a warmer glow, while brown glass photographs best when used in vase and centerpiece applications. Most projects here require only spray paint, a hot glue gun, and materials you already own, making beginner-friendly wine bottle craft ideas the realistic entry point for the overwhelming majority of these builds.
Before You Start A significant number of projects in this list — pendant lamps, pendant lights, planters, chandeliers, and slumped platters — require cutting glass, and this is where most builds fail or cause injury. A standard glass cutter scores the surface but does not cut through; the break happens when heat is applied along the score line, and the quality of that break depends entirely on a single continuous score made without lifting the tool or changing pressure mid-line. A hesitant score, or one made in two passes, produces an uneven fracture that shatters rather than separates cleanly. Score once, apply heat with boiling water or a candle flame along the line, then transfer immediately to cold water — the thermal shock completes the break. Always wear cut-resistant gloves and sand the cut edge with 80-grit wet-dry sandpaper before handling the piece further, since freshly cut glass carries razor-sharp microburrs invisible to the eye. For the slumping project specifically, a household oven does not reach the 700°C (1,292°F) required — that build requires kiln access, and attempting it without one produces glass that warps unevenly rather than flattening. Sort your projects by whether they need cutting before collecting materials, and the rest of the build becomes considerably more straightforward.
55 DIY Wine Bottle Crafts You Can Do
After the holiday season, we often find ourselves having plenty of empty wine bottles lying around.
Now, with some of these beautiful ideas, we can safely turn them into colorful home decorations without spending too much money.
If you plan on taking them to the next level, check out these wonderful DIY recycled wine bottle ideas!
Most of the time, crafts and ideas regarding wine bottles don't have to be challenging. Any type of wine bottle and a little spray paint can do the magic for you.
Spray paint what you envision in these spray bottles and let your imagination control. Be sure to collect plenty of glass bottles of different shapes and sizes.
2. Transform Your Wine Bottle into Wine Bottle Lamps
One of the best ways to recycle wine bottles is by transforming them into something we're not accustomed to. For example, they are great tools for making good dining lights.
Since wine bottles are made of glass, they can be cut through with a cutter and insert those loose light bulbs that can serve as your light fixtures.
It's always a fun idea to decorate bottles with paint. One of the better ways to decorate wine bottles for home décor is to paint them with the Ombre effect.
These ideas can be great when you plan to place them in your flower garden or the backyard. It complements any surroundings as long as you pick the right color.
Slumping is a form of flattening glass bottles. There are plenty of ways to flatten a bottle, but using a kiln is the most effective.
Turning your empty glass bottle into a serving platter is a budget-friendly option. Before flatting the glass bottle, ensure the empty bottle is completely dry, and the labels are removed.
5. Colored Marbles Inside a Wine Bottle Outdoor Torch
This wine bottle craft will inspire you when staying on your patio and backyard. You can create these through simple materials as well.
Just be sure that when you fill the marbles inside, it is completely clean. Tiki torches are a fun way to decorate any area in your home that needs lighting late at night.
This wine bottle craft can enlighten the atmosphere in your area. It can be placed on your office desk, dining table, or foyer. It all takes a few wine bottles for this craft to come to life.
Enlighten the entire backyard or patio with these repurposed, upcycled wine bottles turned Tiki torches. You can add a few plastic flowers or bird feeders to make it more appealing during the day.
During the day, they can serve as feeders for our feathered friends; when it's nighttime, they can ignite the entire area with a cozy ambiance.
A bird feeder can be done with just a few materials, like a wine bottle and spare wood. You can decorate these bottle crafts using a hot glue gun to make them more appealing to our feathered friends.
Glue in colorful flowers, shapes, and other naturistic designs to help make it more inviting to our birdies. Place it in your garden or hang it on your roof.
10. Homemade Vinegar Using Repurposed Wine Bottles
Sometimes, discarding your favorite wine bottle is hard, so repurposing them into vinegar bottles is the best way to use them.
This DIY wine bottle repurposing idea is amazing if you know what herbs to put. Pour some olive oil, favorite herbs, and spices for your mealtime enjoyment.
Empty wine bottles make for amazing fixtures and pendant lights. This craft can be done by cutting the bottom part of the glass bottle and turning it upside down.
Insert the bulb through the hole and look for a great place to put it. It can simply make the atmosphere of your home even more relaxing.
You can put these bottles as a design for your car. About cars, if you want to design your tires in your own way, check out the best DIY tire projects here!
Most wine bottle crafts revolve around converting them to vases. These unique and aesthetically pleasing can serve as a vase or a centerpiece in your dining area.
While sending messages through an empty wine bottle is a thing of the past, we can still use them in a way we want to convey a message. This wine bottle message craft will look adorable and be displayed in your home.
Families with kids know glitters make their lives colorful. Cover an entire wine bottle with glitters and paint some polka dots to make it more creative-looking.
Wine bottle crafts like these can add new life to any part of your home.
Especially when the holiday is coming, this craft can do wonders for you without spending hundreds of dollars. For this idea, you'll need plenty of wine bottles and light bulbs
Lights, paint, and empty wine bottles always go hand in hand, especially with these DIY Wine bottle crafts. What makes them great is they look wonderful regardless of where you want to put them.
Just imagine how beautiful the sun, moon, and stars will be if the light is turned on in your garden.
However, using recycled wine bottles for this craft will require precise cuts and wine corks. They can also serve as your Christmas lights when the holiday season is approaching.
Sometimes, wine bottle crafts don't need to be challenging. Most of the time, they only need a simple makeover using materials hanging around the corner.
For this wine bottle DIY project, you'll need plenty of paint to fill the entire glass bottle and incorporate decorative pieces using a glue gun.
Vases on the table are common, right? What about hanging them onto your walls to make your walls breathe new life?
This simple wine bottle DIY idea is a super easy project to do. Feel free to use any beautiful bottles with a few spray paint bottles. You can also use scrap wood for backplate purposing when installing it onto the wall.
A chandelier is a popular home décor. Why not use your old drinking glasses and turn them into a piece of the chandelier? That sounds like a cool idea, right?
Cut the wine bottle in half and fill the entire bottle with colors using chalkboard paint. It's fun to bond with the kids while decorating your home.
Repurpose your old wine bottle and turn them into wine bottle planters! Plant enthusiasts should love the idea of turning their old glass bottles into a haven for their Philodendrons!
You can place them on your bookshelves, dining table, or garden. Old wine bottles also make good wine bottle crafts.
It feels like putting a nose and a beard on an empty wine bottle can make for a gnome! Gnomes are pleasant to look at and can make for great home décor.
Before decorating the wine bottle, use dish soap to clean the entire bottle to ensure everything sticks!
One of the most common wine bottle crafts is used as centerpieces. You can use them as-is or paint wine bottles that complement an area where you will put them.
Greens and yellows make for great centerpieces, especially when summer is fast-approaching.
Wine bottle edging is a good way to create boundaries. Most of the time, glass wine bottles are left outside to either rot or be broken; why not use them for edging?
A wine bottle can serve as a base. You can turn wine bottles into colorful vases with a few cans of spray paint and flowers.
Let your imagination take over, and do what you feel appeals to your eyes. This way, seeing them in any area of your home creates positivity about how you feel when making them.
Making a hanging herb garden can spice up the atmosphere if you want to breathe new life into your garden.
You'll only need a few bottles, soil, and plants that love the sun's rays to ensure they can live long enough to brighten any area of your home.
Cut them in half, discard the rest, and use corks to seal the top portion and turn them upside down. Fill the bottle with soil and place your plants. Use hanging ropes and carefully attach them
Summer and cold nights should be free from creepy crawlies and pesky mosquitoes. These wine bottle crafts that use a tiki wick can solve that problem.
Instead of throwing your empty wine bottle in the recycling bin, why not use them to clear the area where you will be camping? Citronella is a great mosquito-repellant, and its smell is very relaxing too!
Painting wine bottles with chalkboard paint is a great wedding gift you can give. Most people paint the entire bottle with a single color and use white paint to put their messages on it.
This idea is amazing if you put in the fact that they don't cost you much, and the message will always do wonders for the couple!
Decoupaged wine bottles are creative ways to make your old bottles look unique and appealing. You can pick up designs like mod podge, abstract, and unique shapes.
You can also tear book pages and paste them onto the wine bottles for a more vintage look. Glass bottles look grander if covered with amazing color combinations.
A typical dinner night with hubby can make it more romantic with floating candles inside a wine bottle. It can also serve as a gift for couples if you have one.
These candle wine bottles are best when using darker bottles paired with lighter candles. They will simply light up the atmosphere making the ambiance lovelier!
Marbles are easy to find; they take on another life once you put them in these bottles. All the shades of blue and green swirl together and marvel around once the light is torched.
It's one of the better touches you can add beside your pool or along the attic to make the scene more serene and mellow. Tiki torches make the area glow most nicely!
Grab the kids and make your way into making these colorful decorations at home with just a few materials. This project is one of the brilliant ways to make old wine bottles breathe new life.
In addition, why not host a girls' night party at home and serenade them with this home décor that can liven up the atmosphere? Sounds pretty amazing, right?
With this simple trick, why not add an empty, repurposed wine bottle for your outdoor plants? Whether you want to hang it in your garden or along the hallway, this will make for great décor.
This design might be an old favorite, but it never goes out of style. You can also add self-watering features to ensure the plant grows optimally!
Bamboo goes well with this idea! If you want to know more projects involving bamboo, check out the best DIY bamboo projects here!
Hand-painting a wine bottle will almost do the trick most of the time. This elegant wine bottle is carefully repurposed and painted to make it look elegant and dazzling.
42. Modern Repurposed Wine Bottle Outdoor Sidewalk Lights
Outdoor and fairy lights in your garage make the entire area look brighter and more lively. It can also help illuminate the entire walkway to help watch your steps!
Upcycling an old bottle looks good, especially when the holiday season knocks at your doorstep. This idea can give a repurposed glass bottle new life paired with green and red colors.
Insert in the lights, making your Christmas merrier as you save a few bucks instead of buying new ones.
For similar ideas, check out the bestDIY wooden lamp ideas here!
Herb gardens are becoming more popular in wine bottle crafts in recent years. Look at this idea; you only cut the bottle into two and turn it upside down.
To make it more appealing, sticking a chalkboard label in front of it will almost certainly do the trick!
Another bottle planter idea, this creative design allows you to display your indoor plants inside your room while still making an impact.
Ensure you keep the corks to lock the bottom when you turn it upside down. The glass bottle planter should also be placed in areas with less shade for plants to grow.
Torches are becoming our favorite because they brighten any area but don't require heavy machinery.
You can put this on your outdoor fence or a nearby kitchen garden. For good measure, fill the torch with citronella oil to keep those pesky mosquitoes away!
A frosted-looking wine bottle looks luxurious and elegant, right? What if you can do it without spending hundreds of dollars?
The next time you plan on painting your old wine bottle, make sure you do it like this! They should not be too opaque; a little hazy would do the trick!
An old empty bottle on your kitchen cabinets can serve a couple well if you plan on repurposing them for gift-giving purposes.
Look at this project; you don't need to be an artisan to make this one. A block of scrap wood, an empty bottle, and a wrap will almost certainly do the trick for you!
Some of us love a cactus plant. They are hardy, adaptable, and stand the test of time as a bottle can do. This idea might need a few tools to make it work.
You'd want a drill and a garden tool for this project. You don't want to crack the glass as it can break entirely.
Polka dot designs are among the most common designs you can paint on your empty glass bottle. You can also gift them to your kids as home decor to make their room brighter and more colorful.
Spray painting the whole bottle with white and incorporate bold colors when making polka dots to make it bolder.


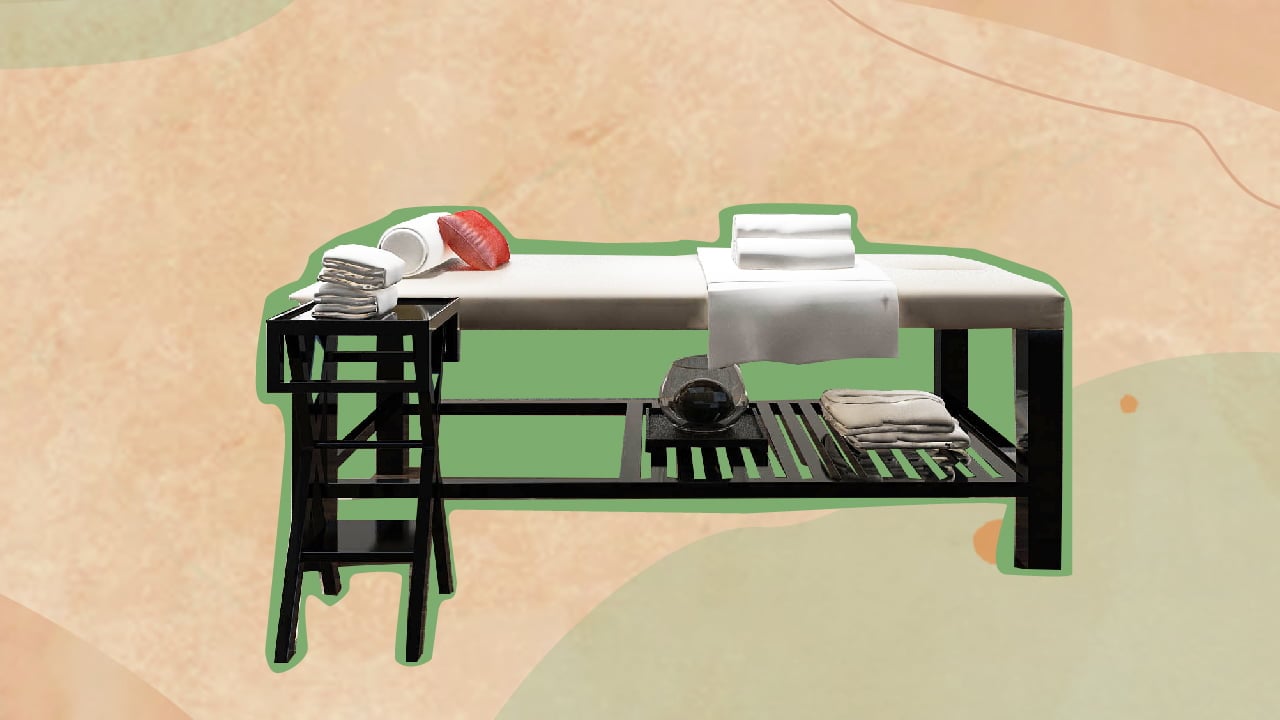

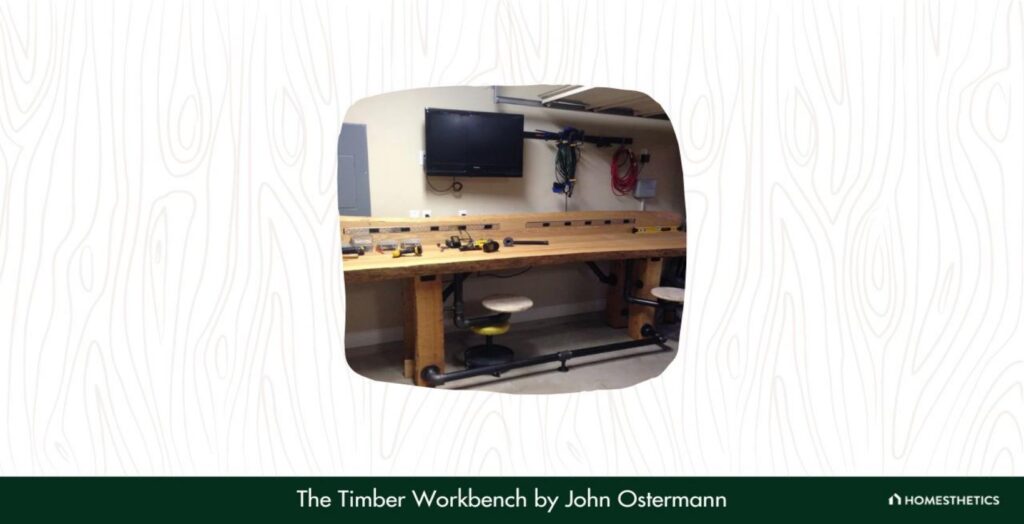
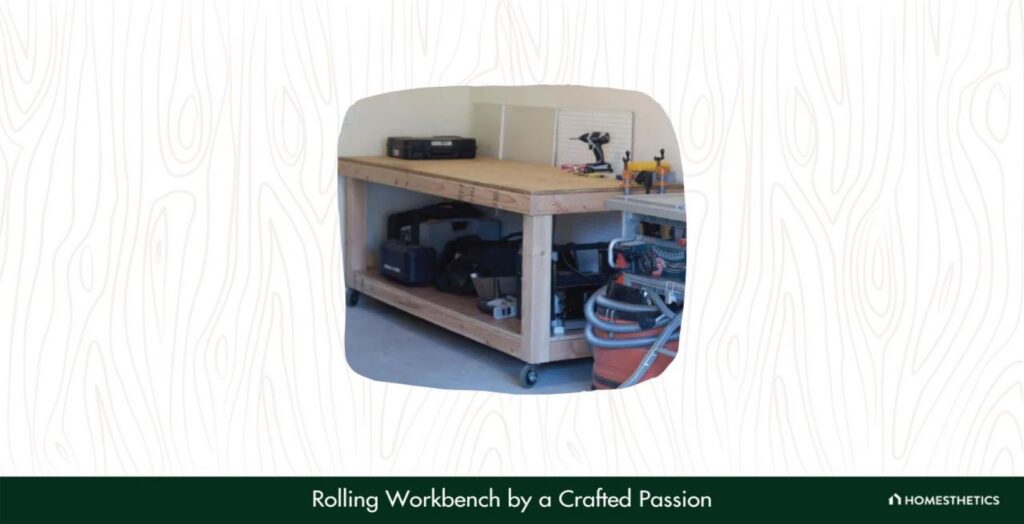
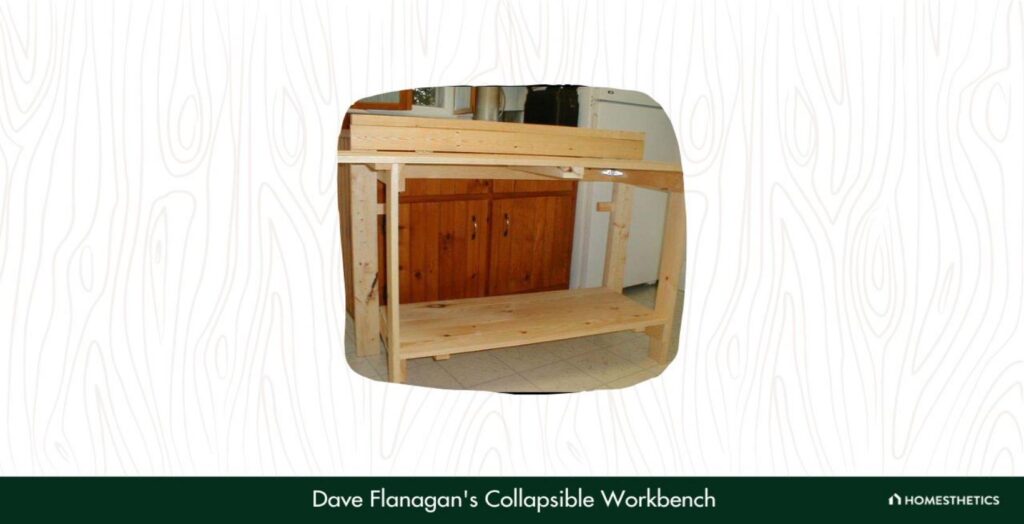
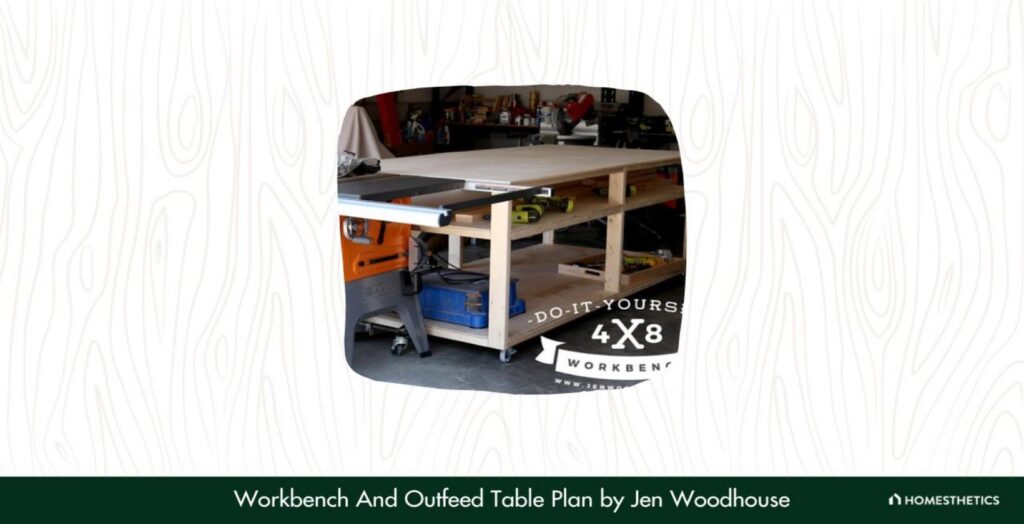
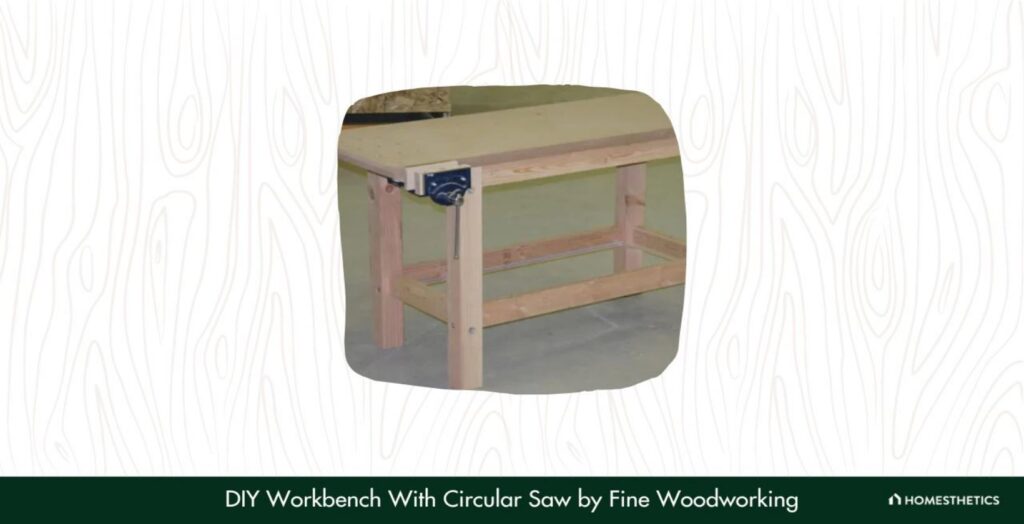
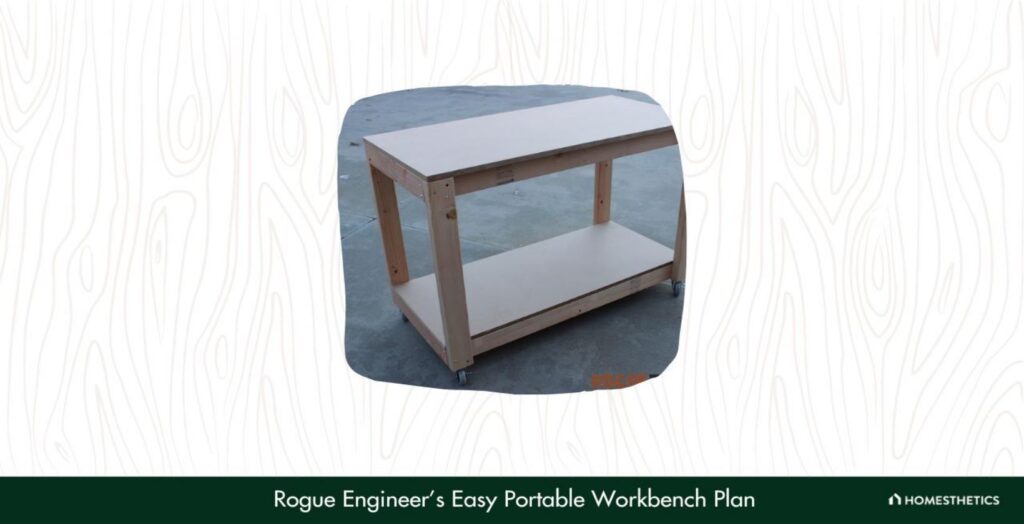
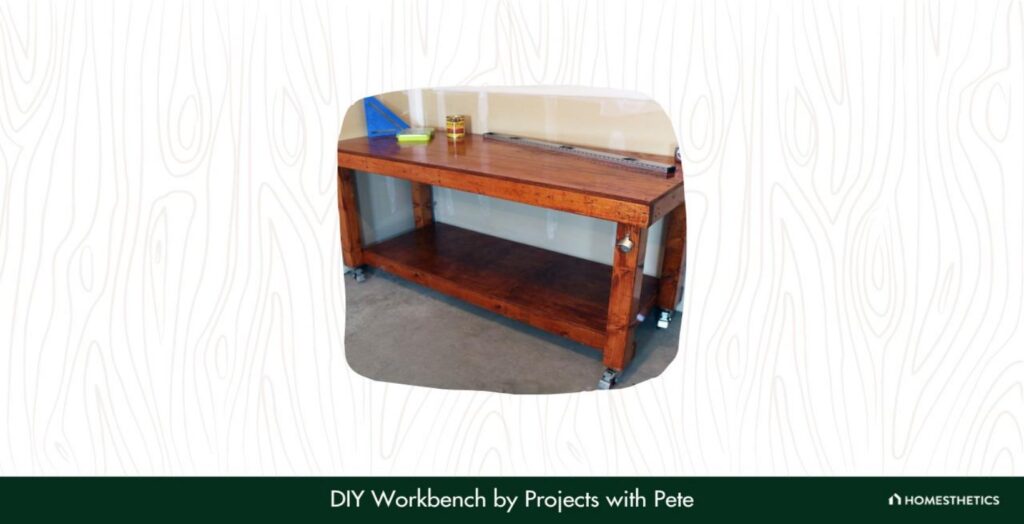
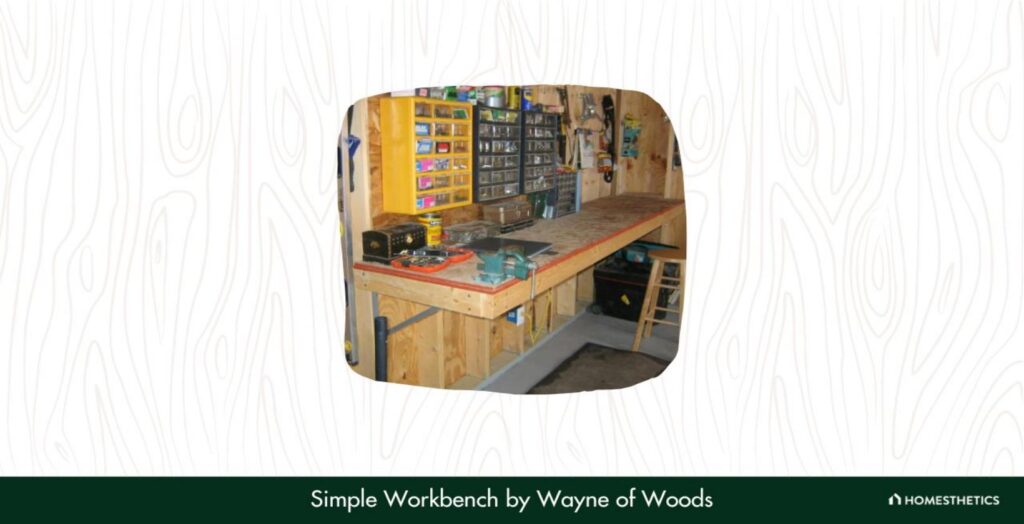


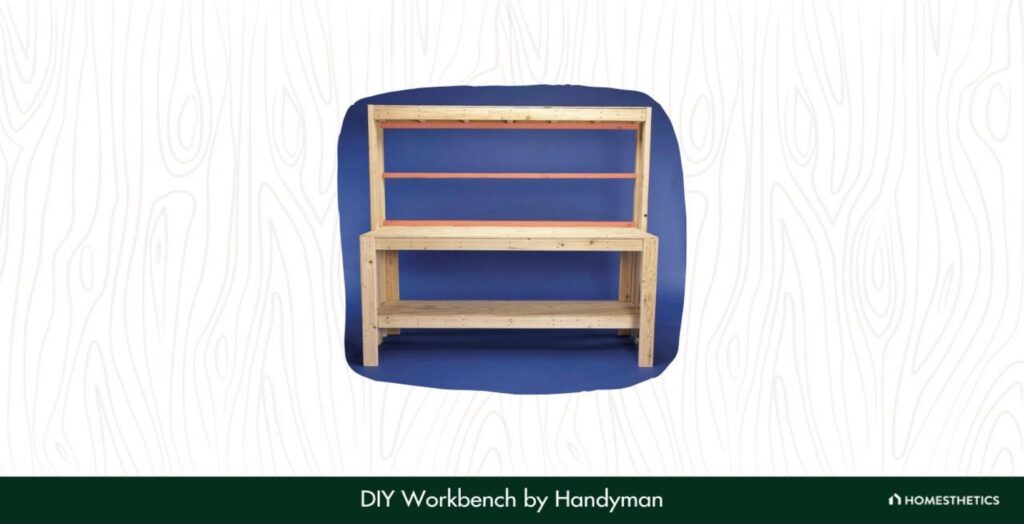
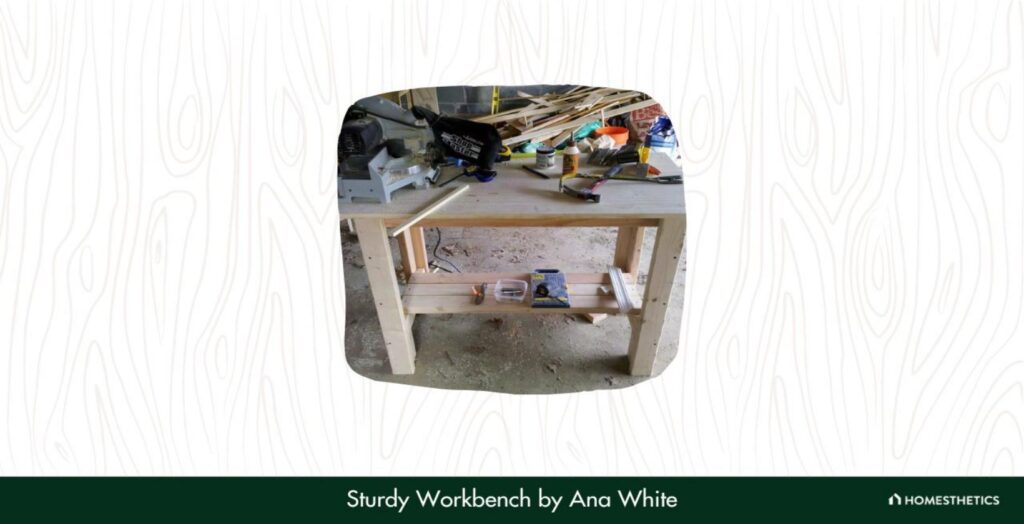
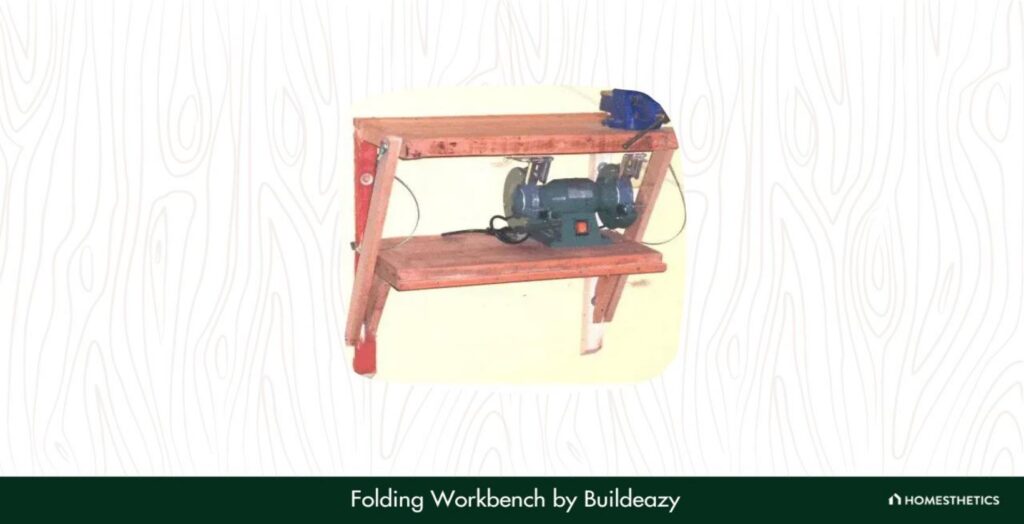
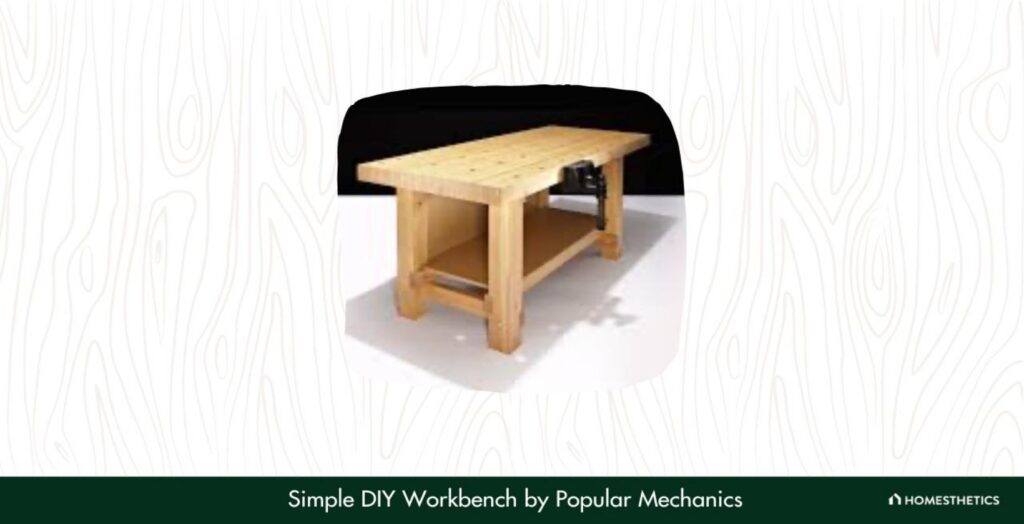
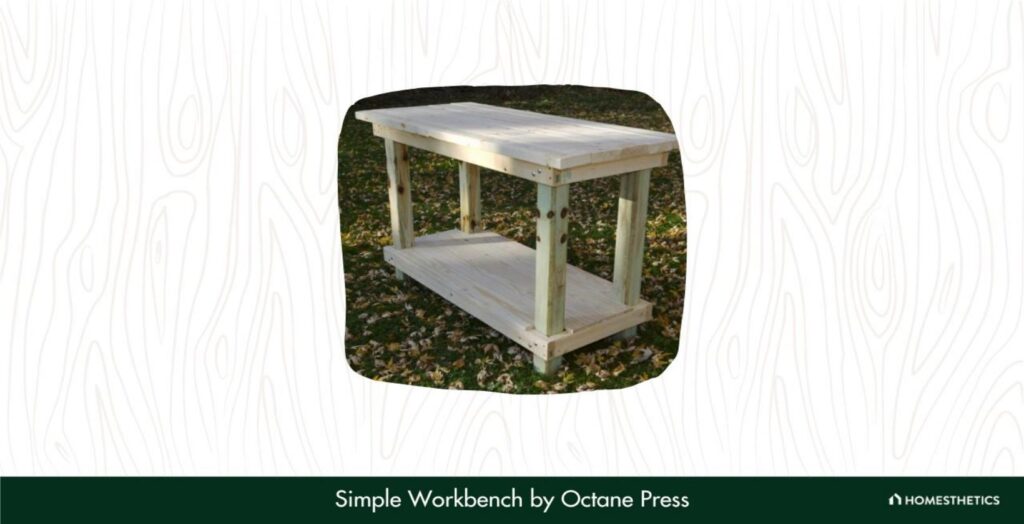

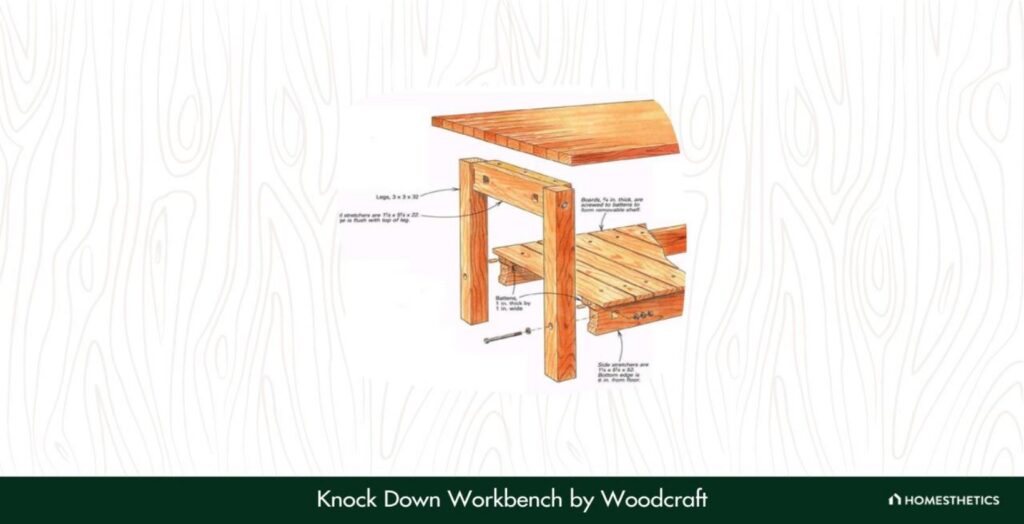
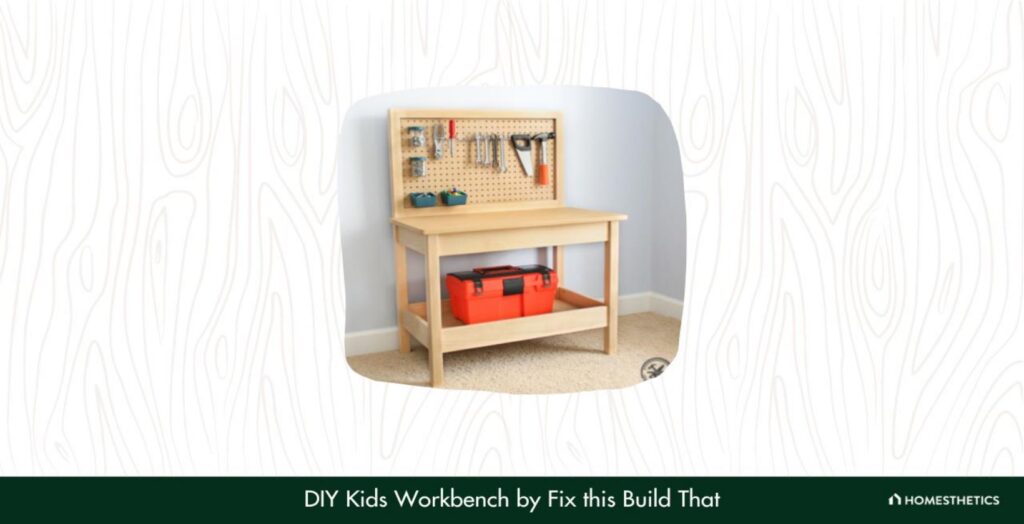
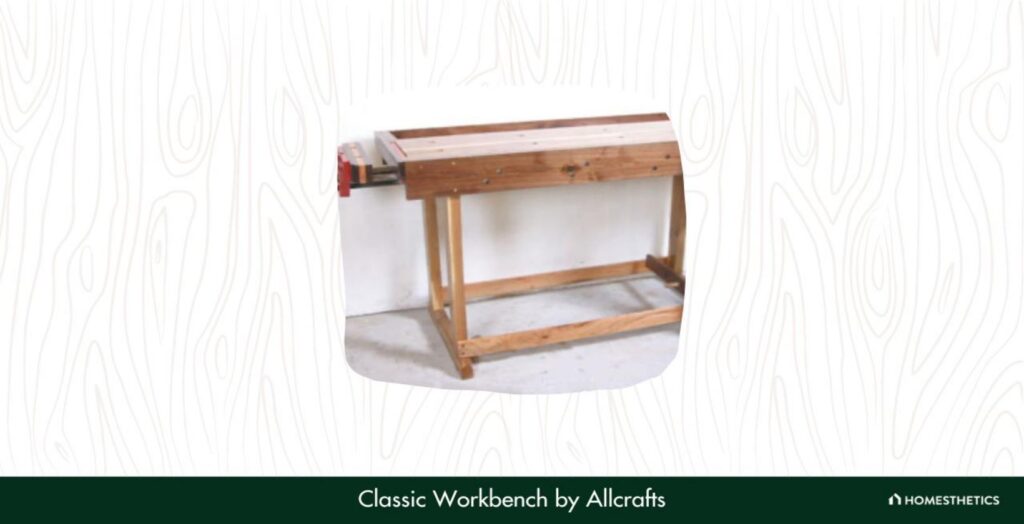


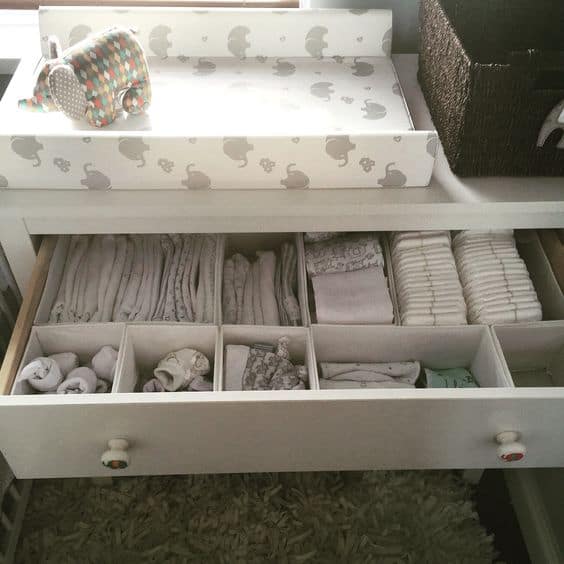
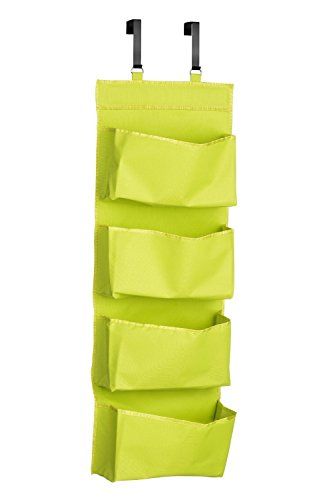

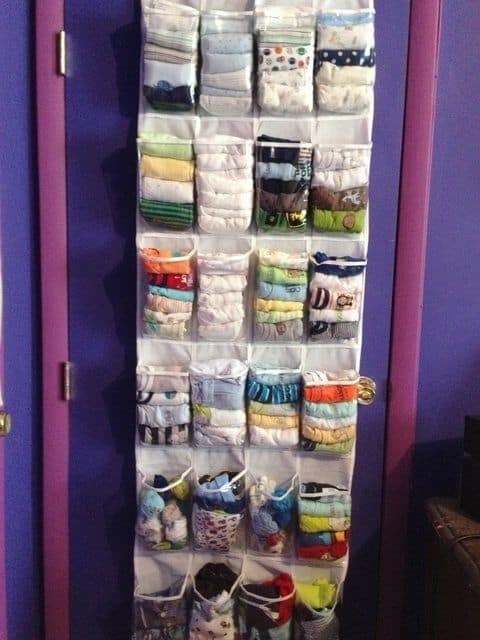
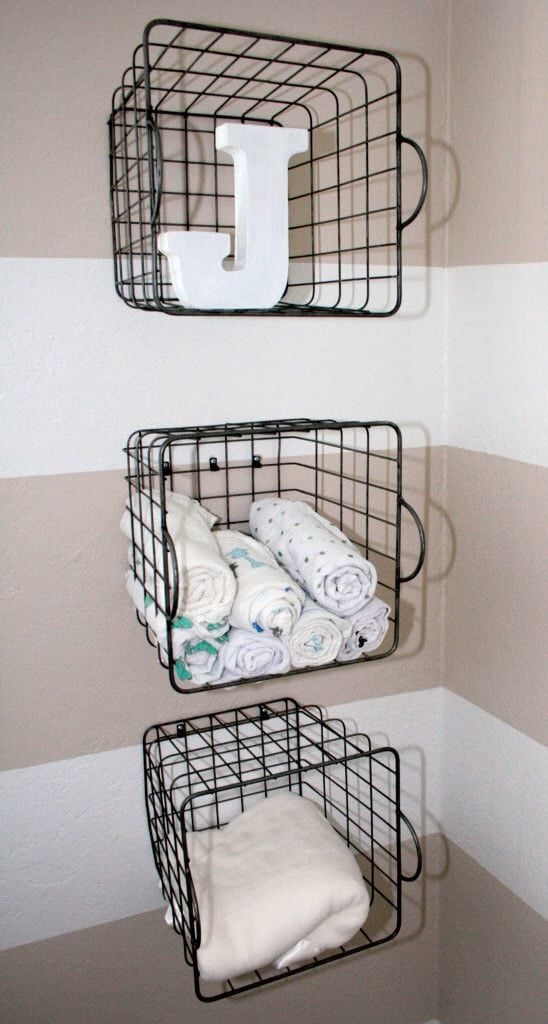


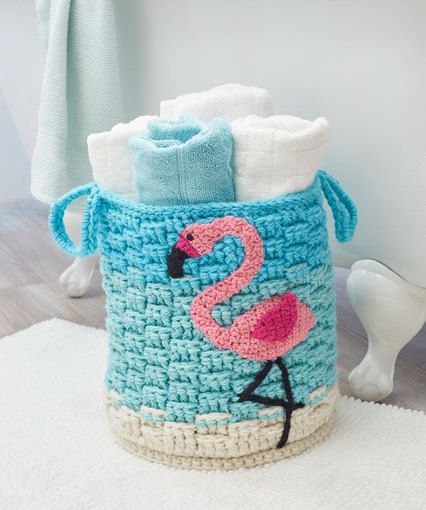

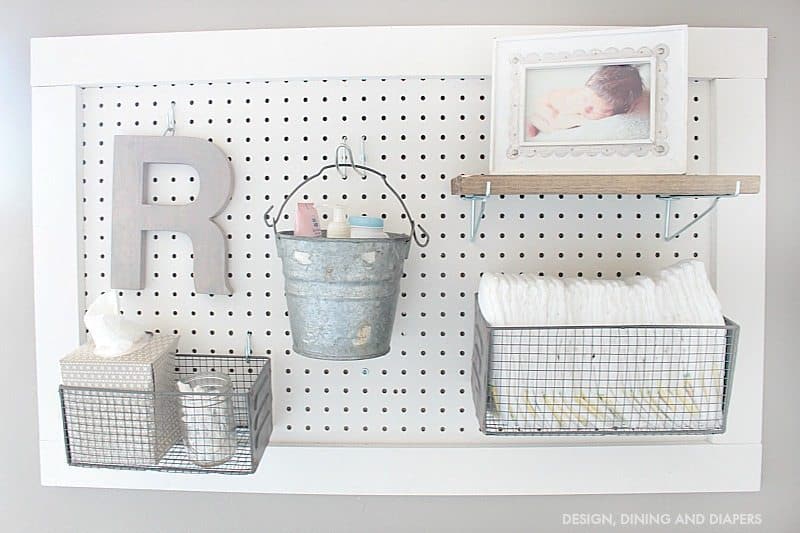
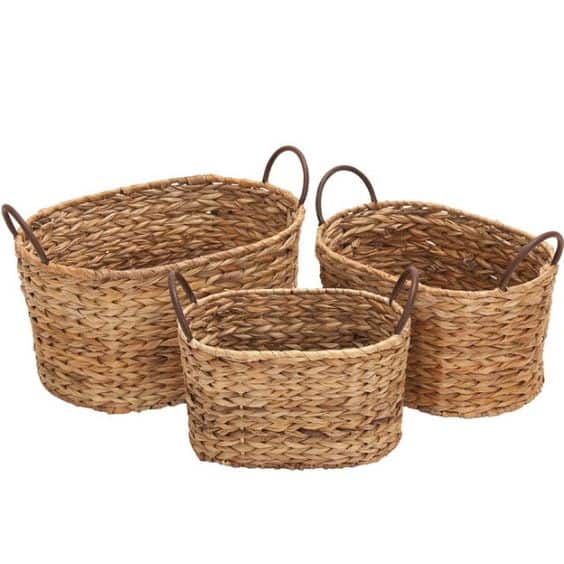

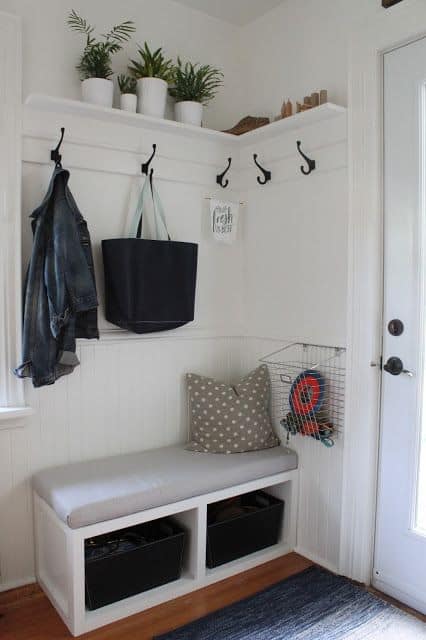


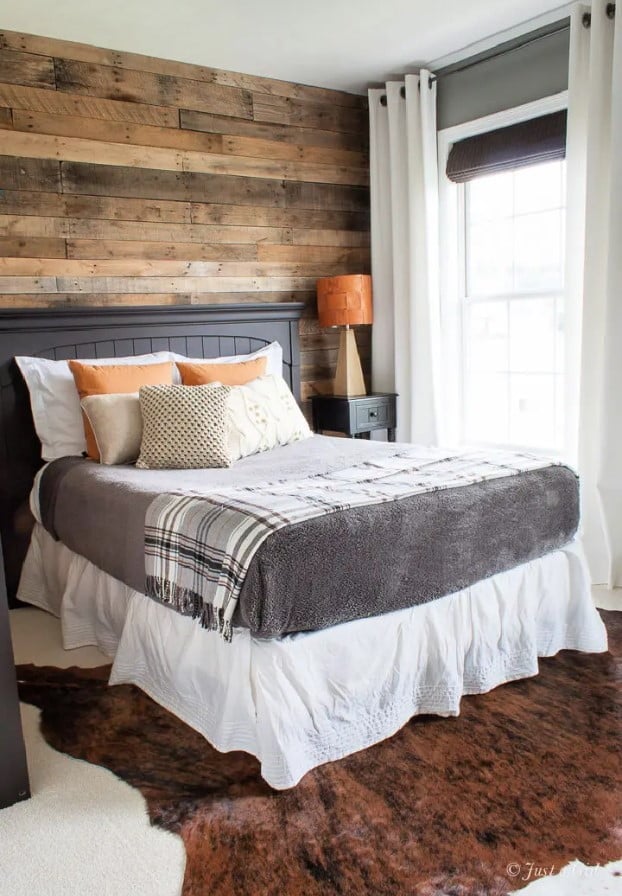
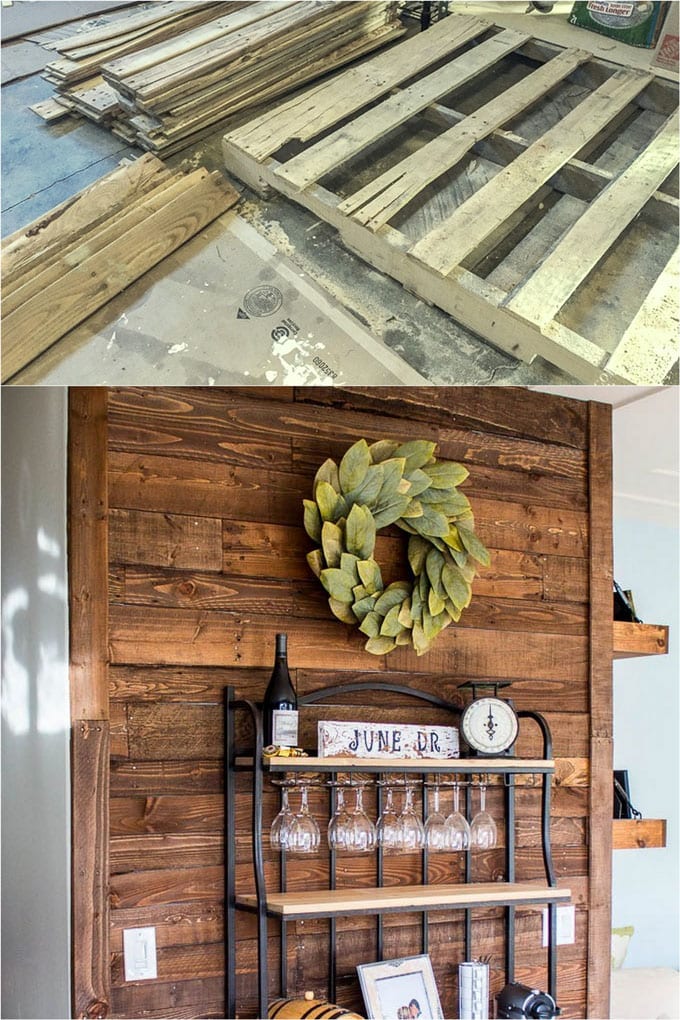
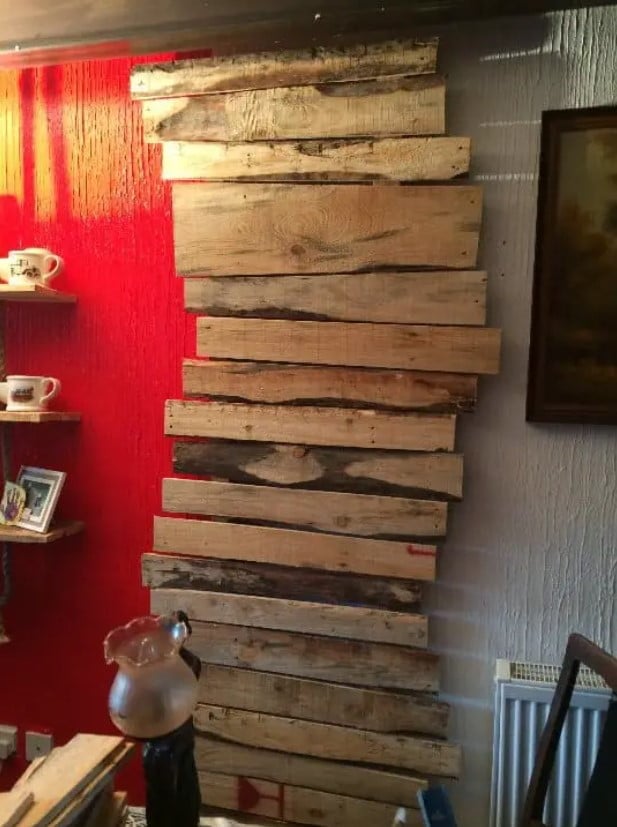
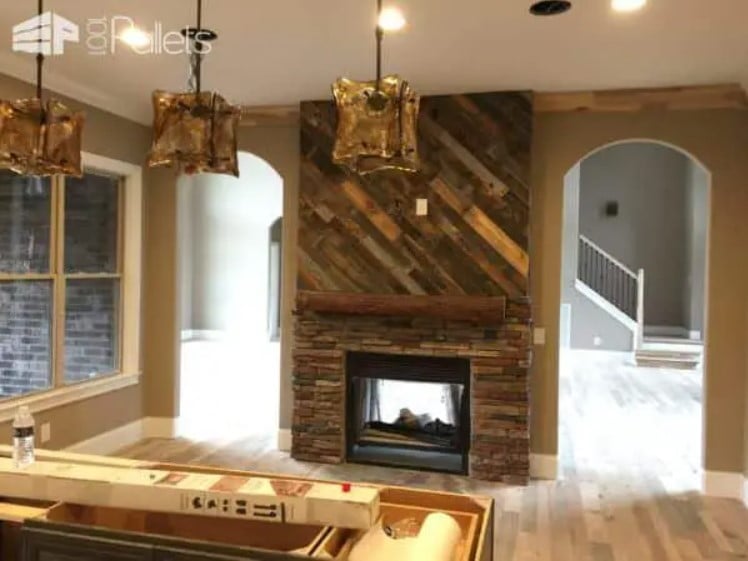

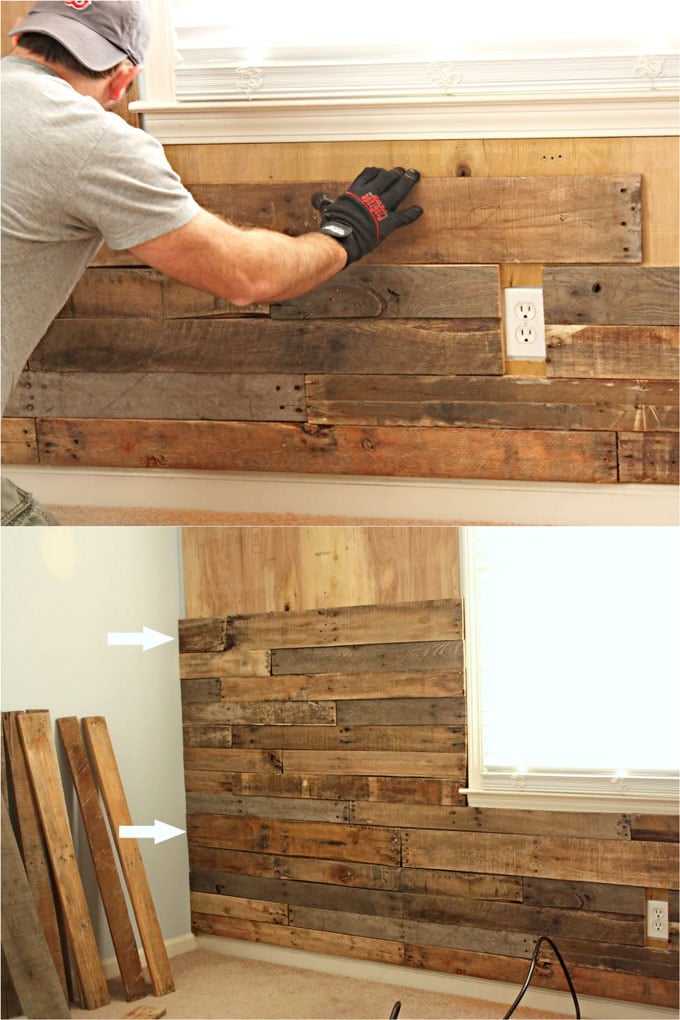
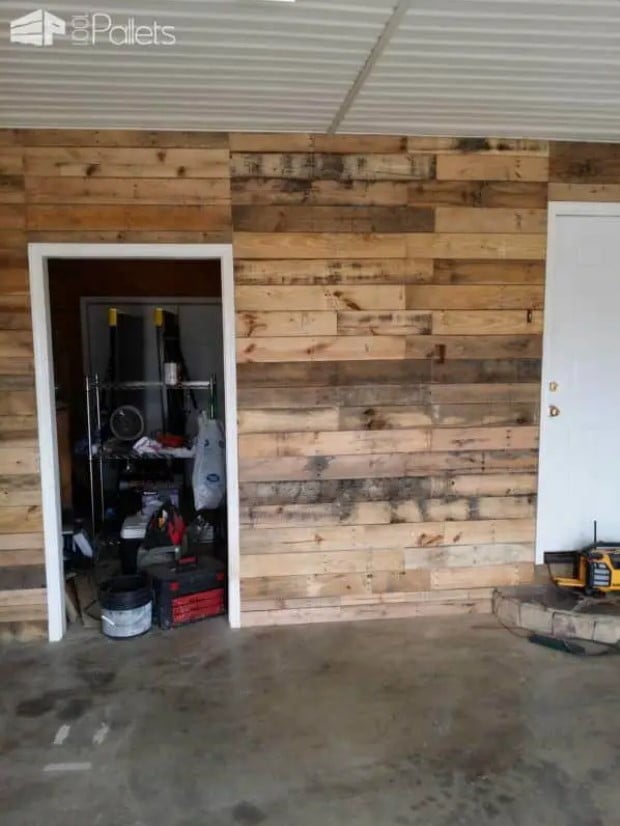
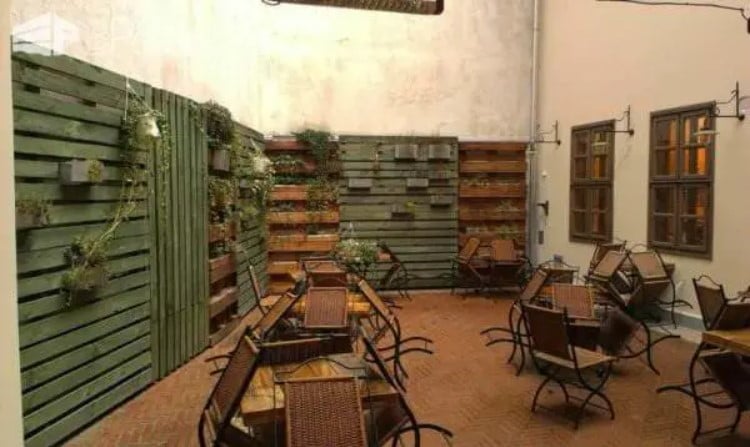
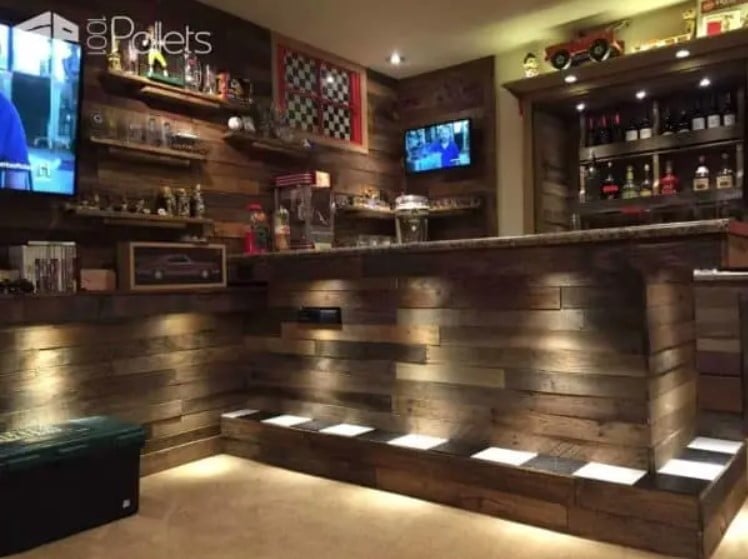

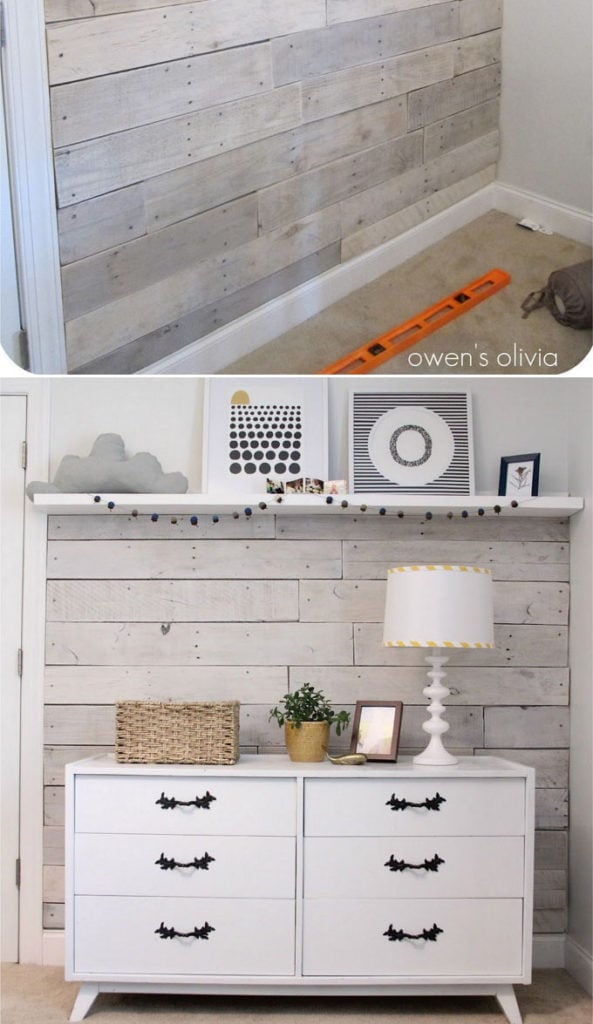
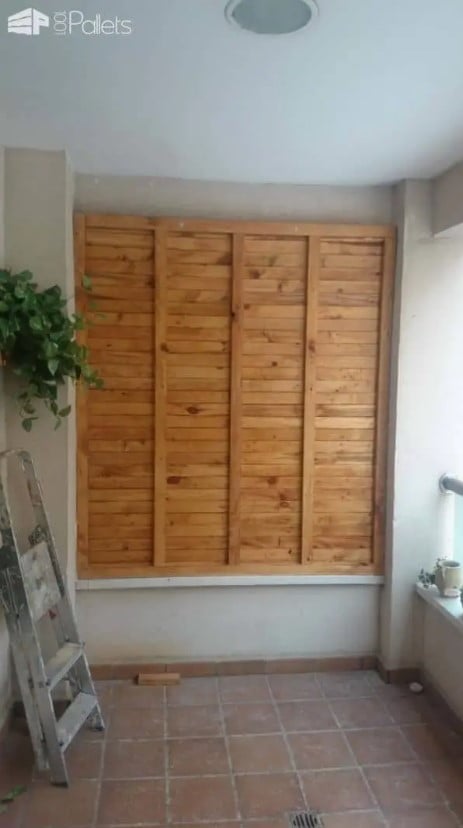
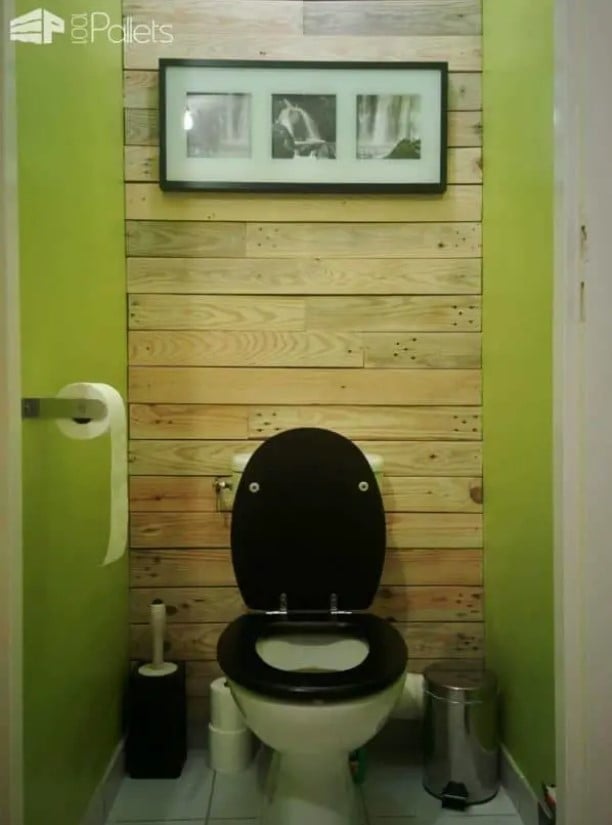
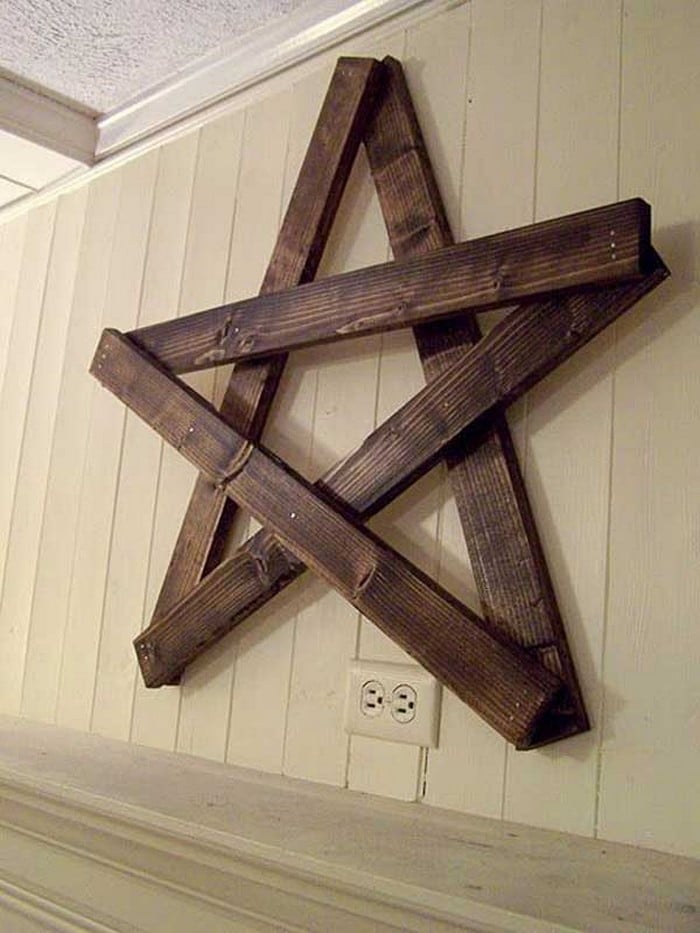

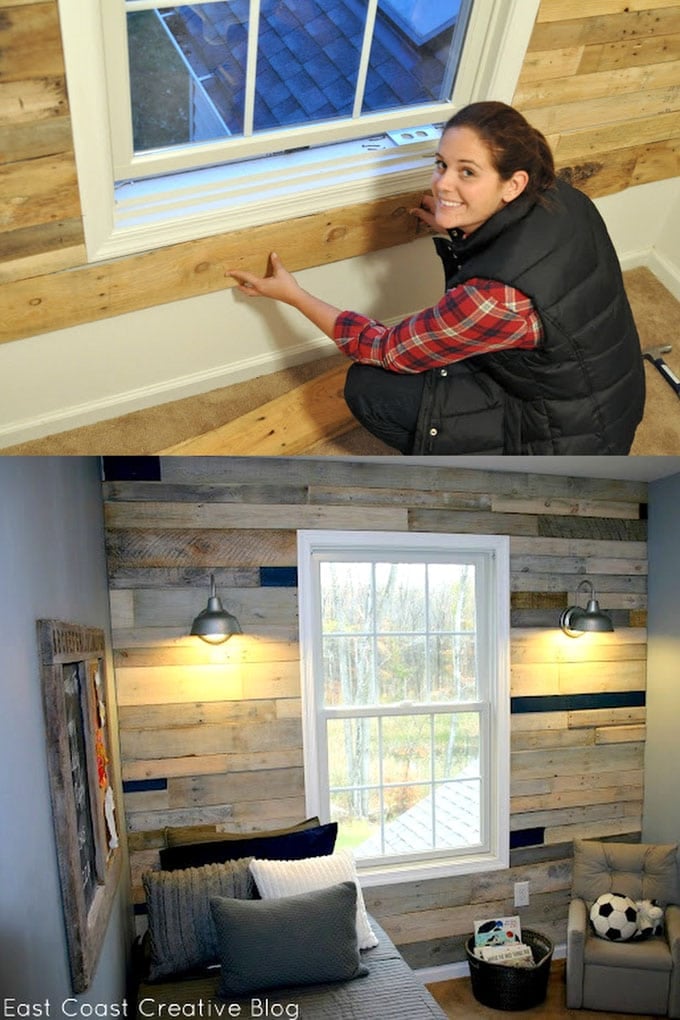


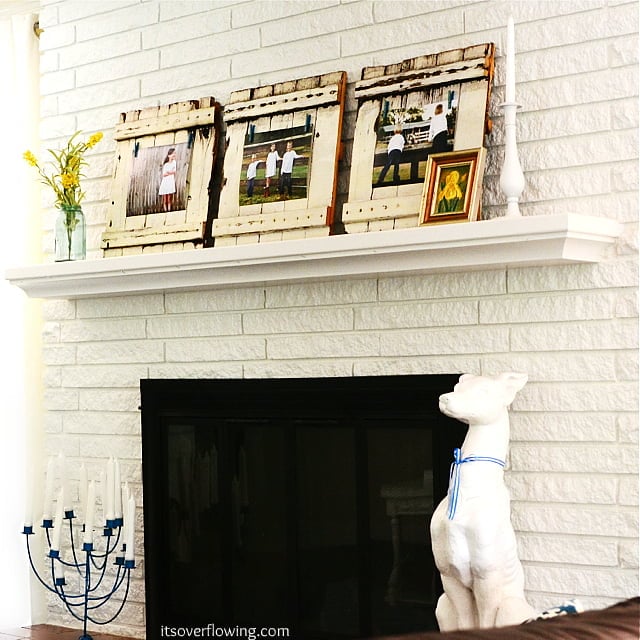
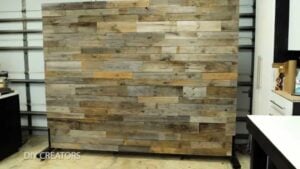
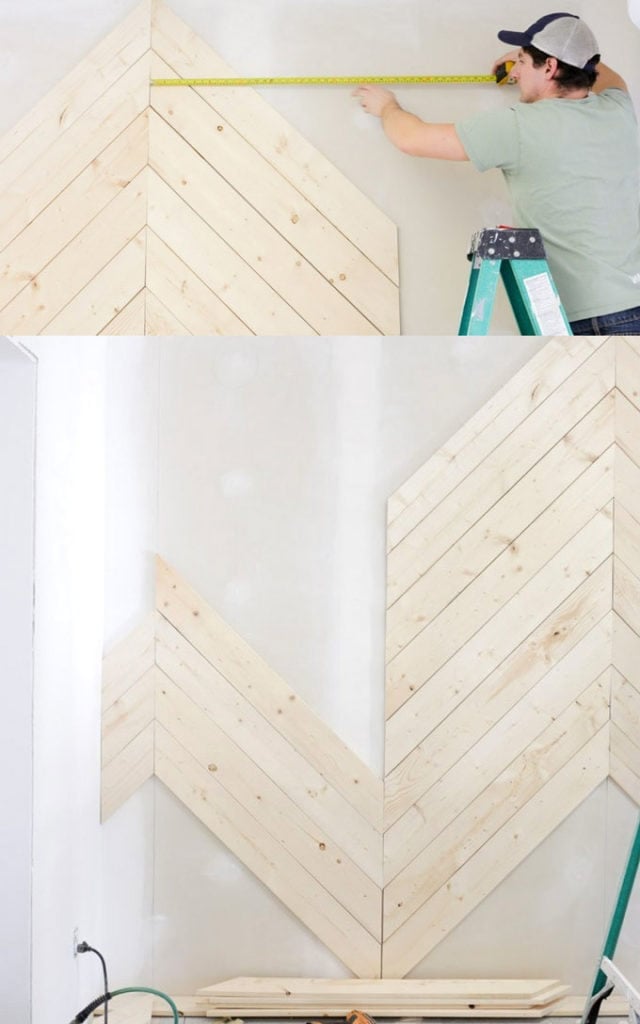
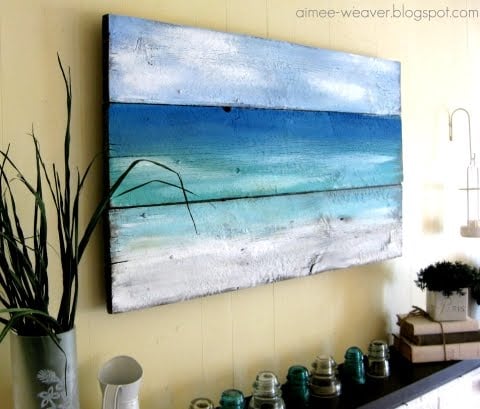
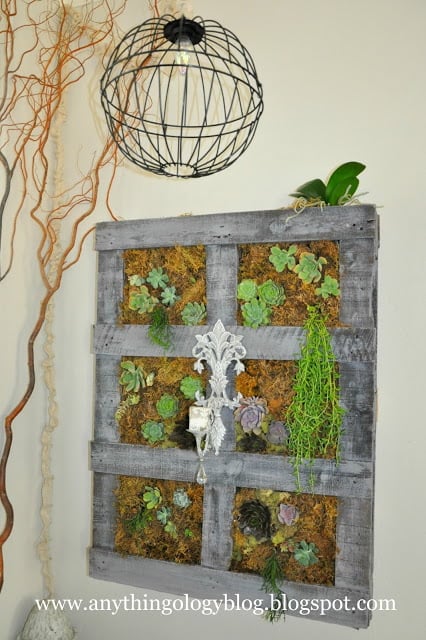
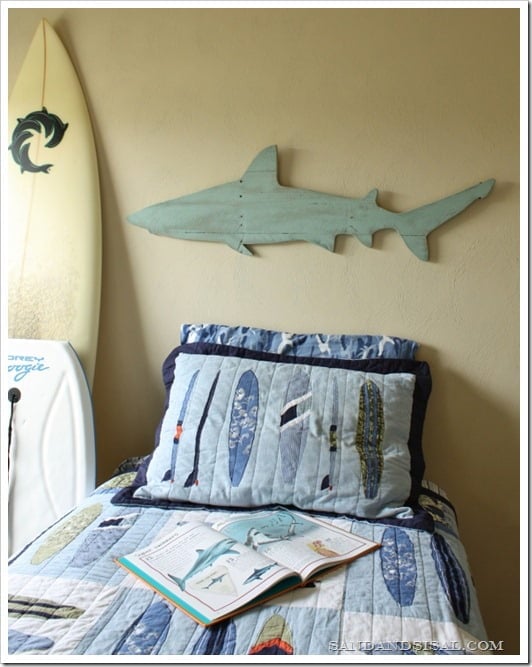
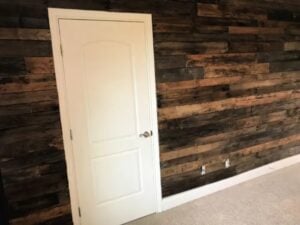
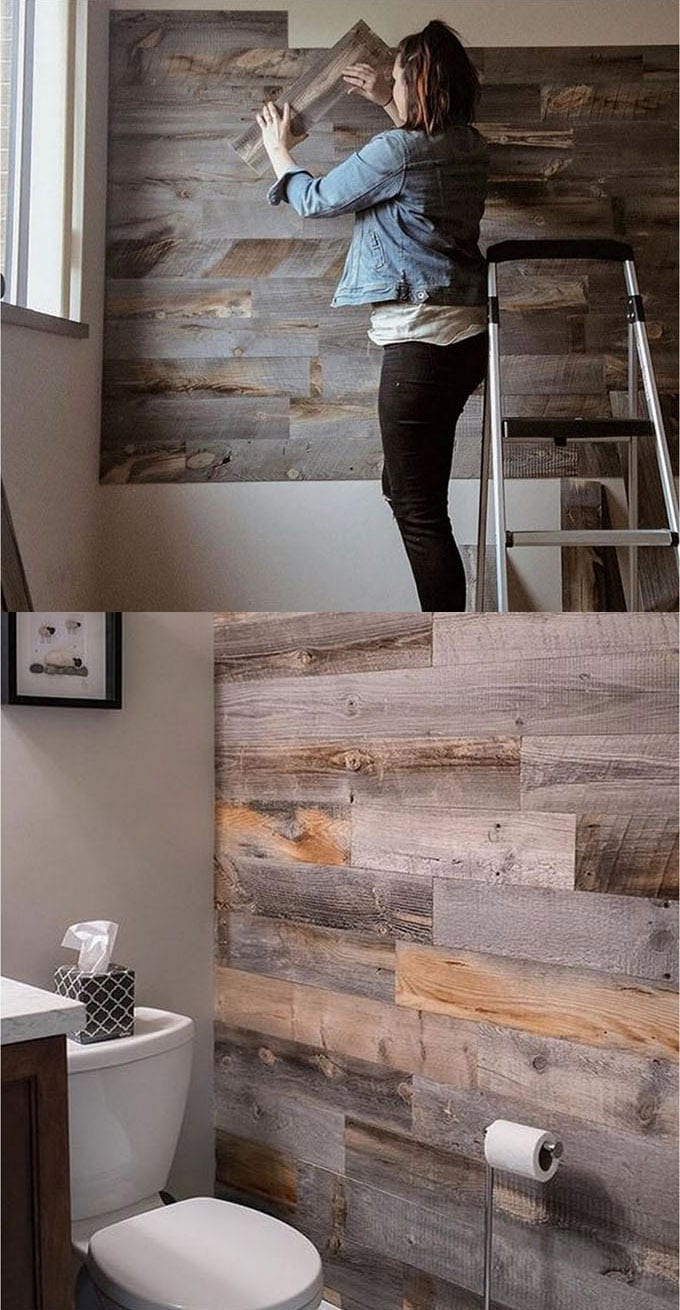
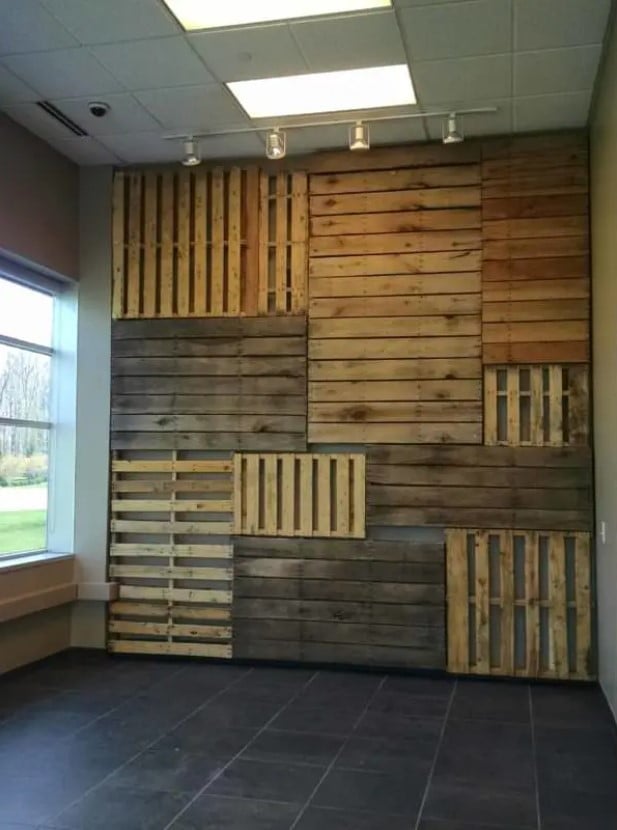

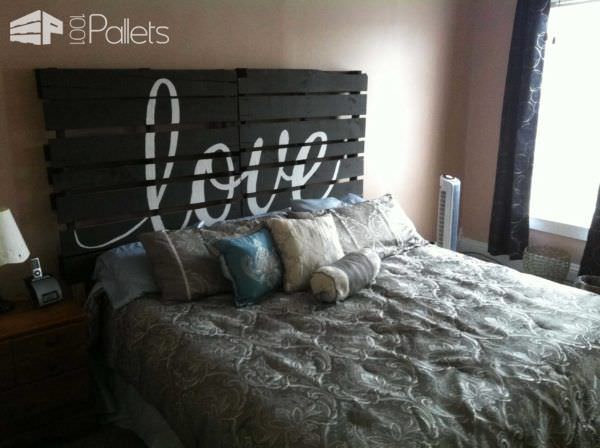
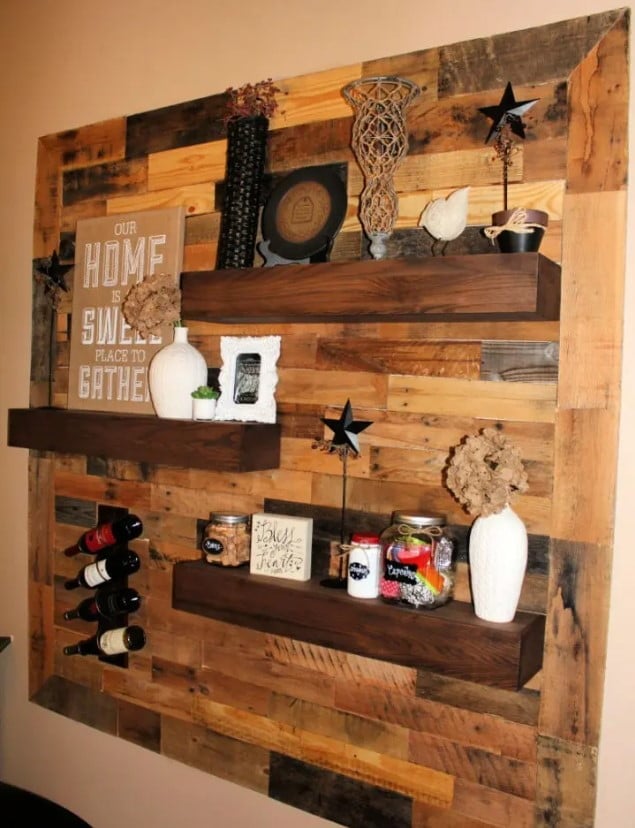
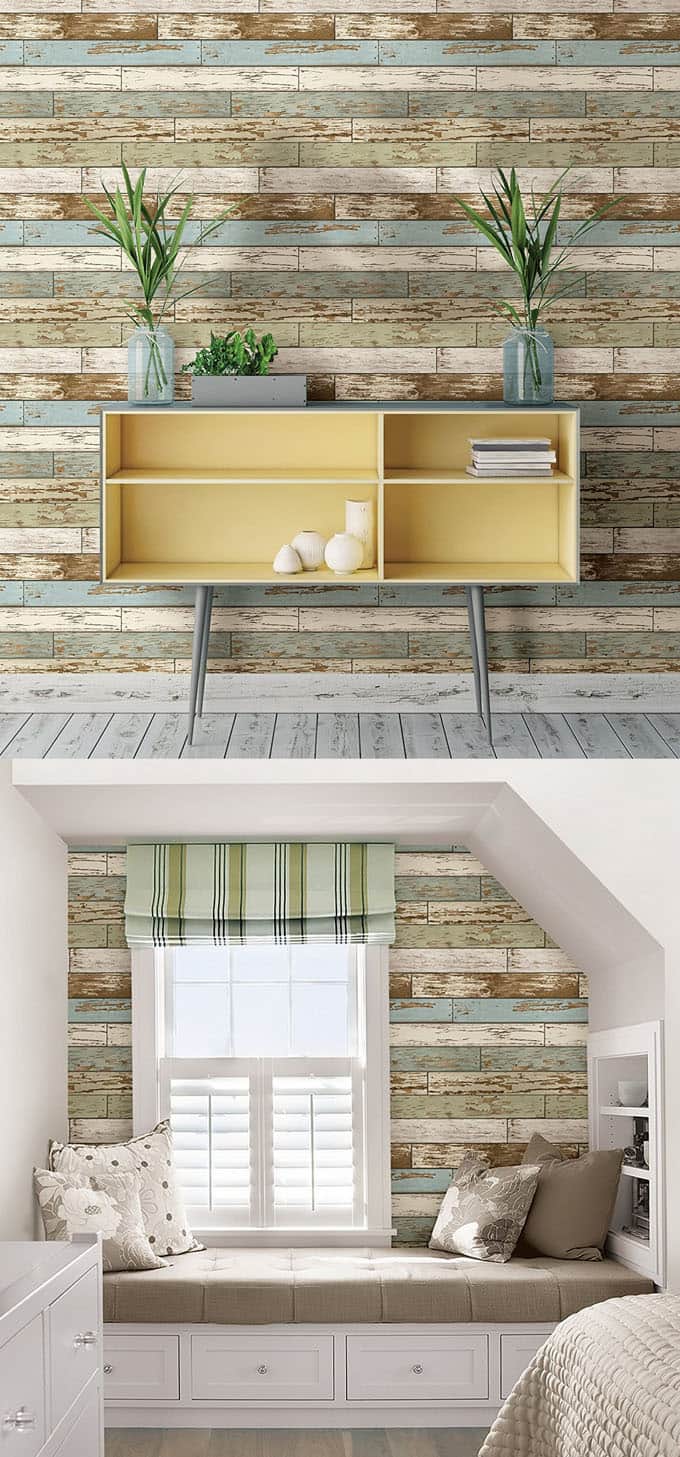
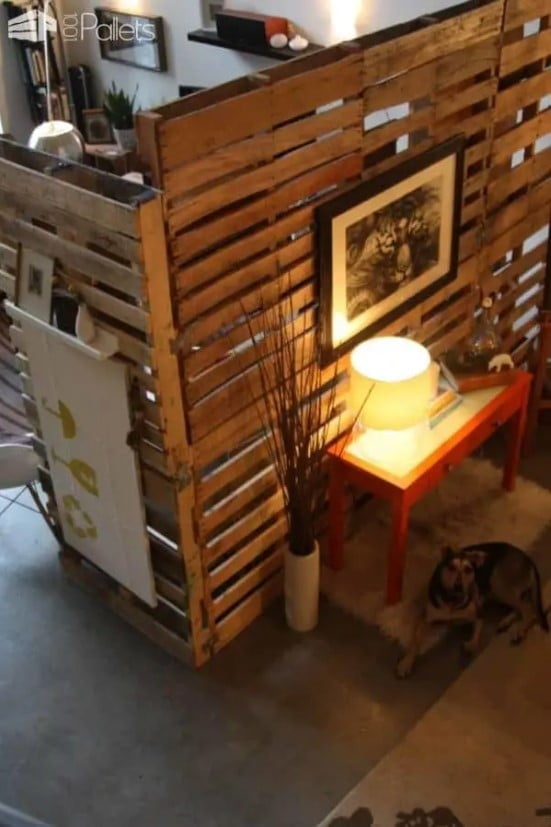

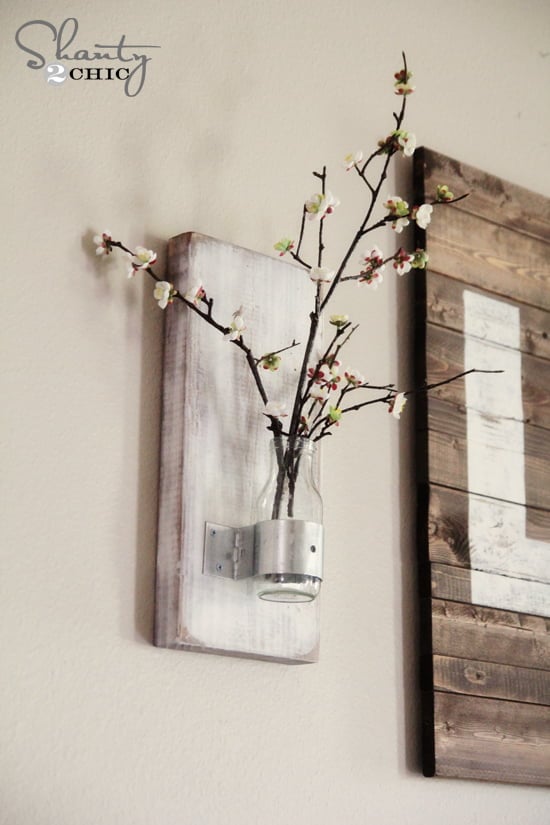
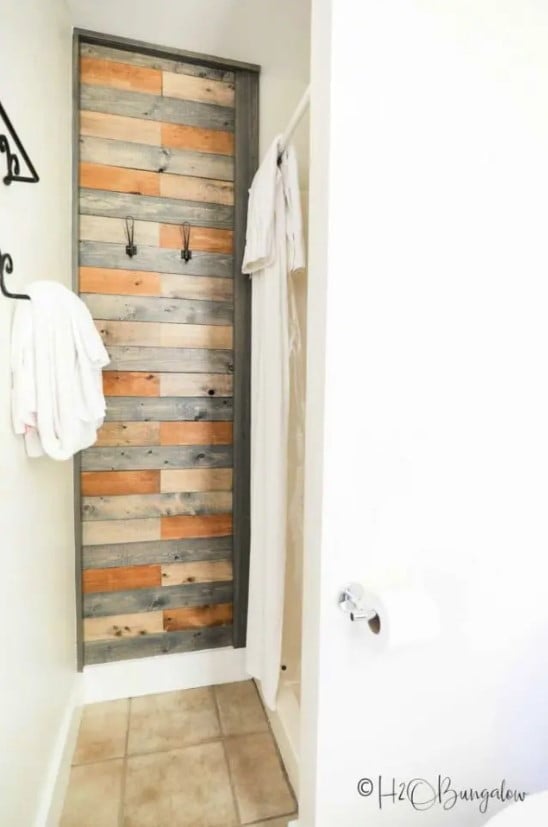


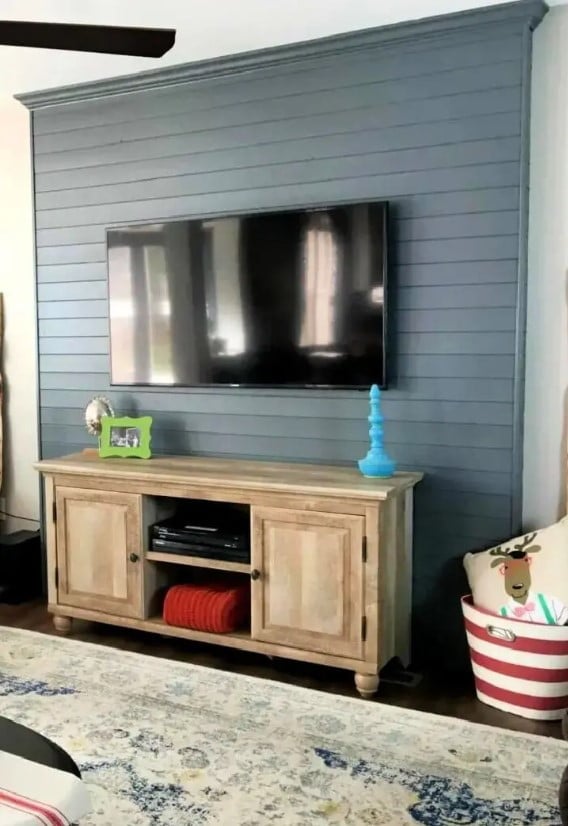
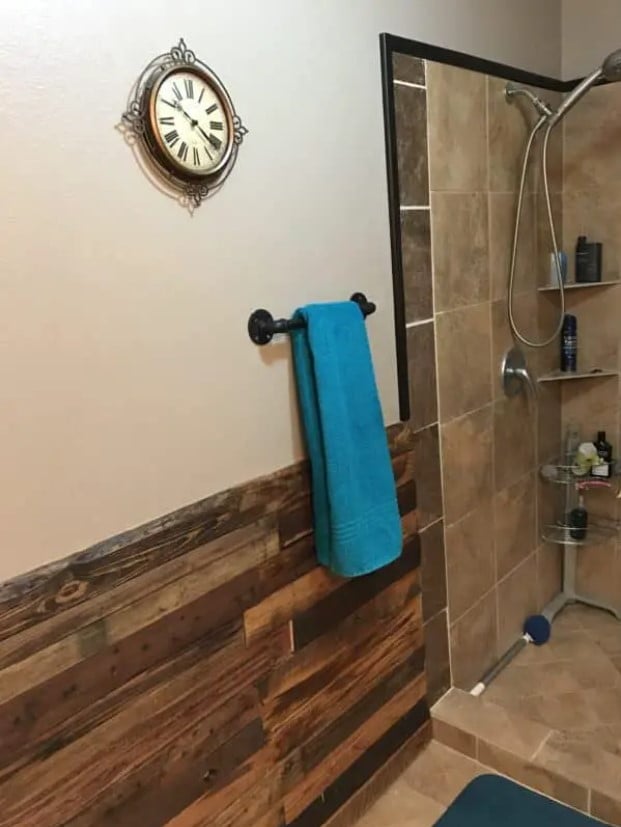
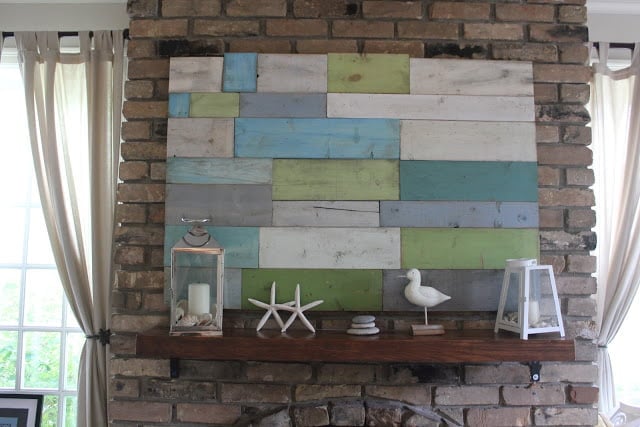
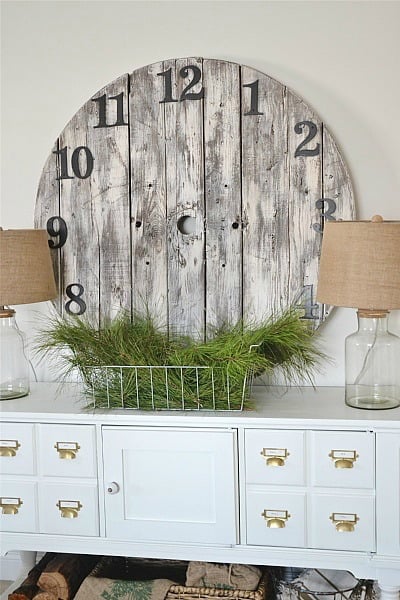
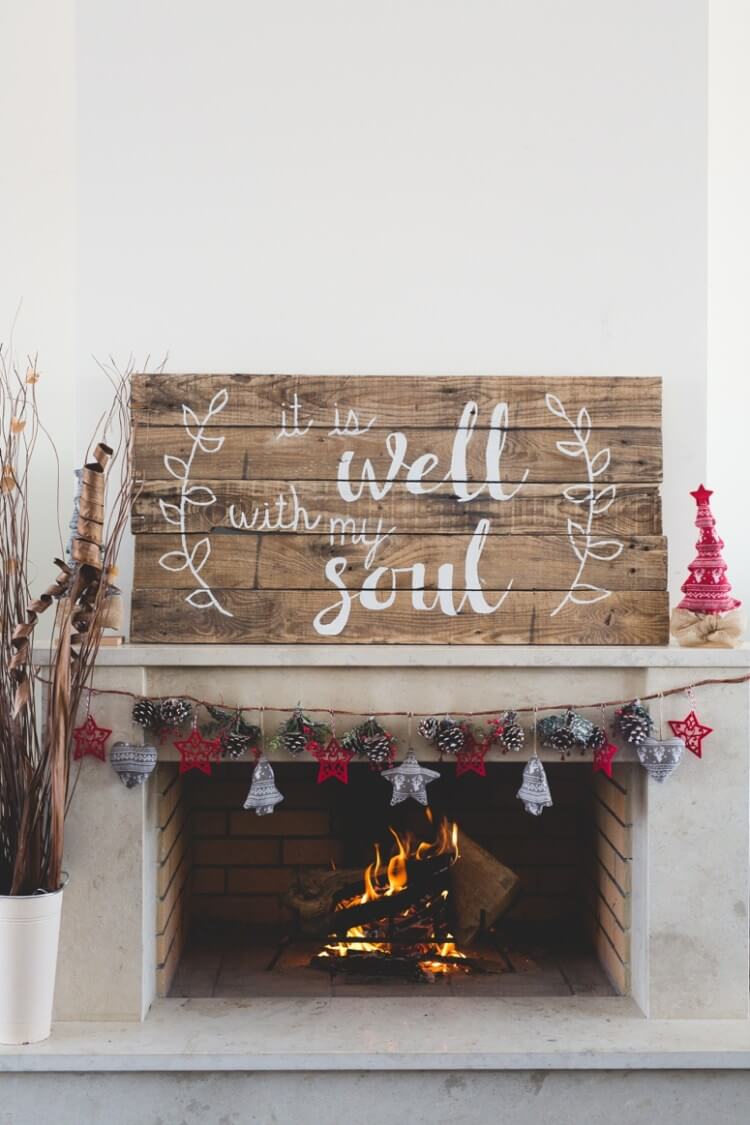

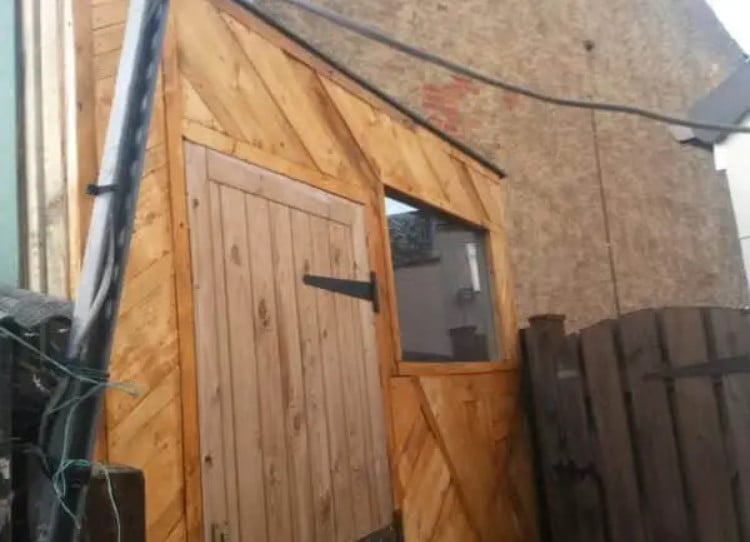
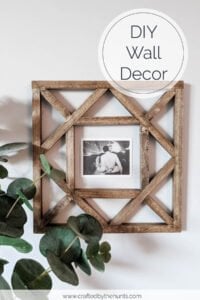
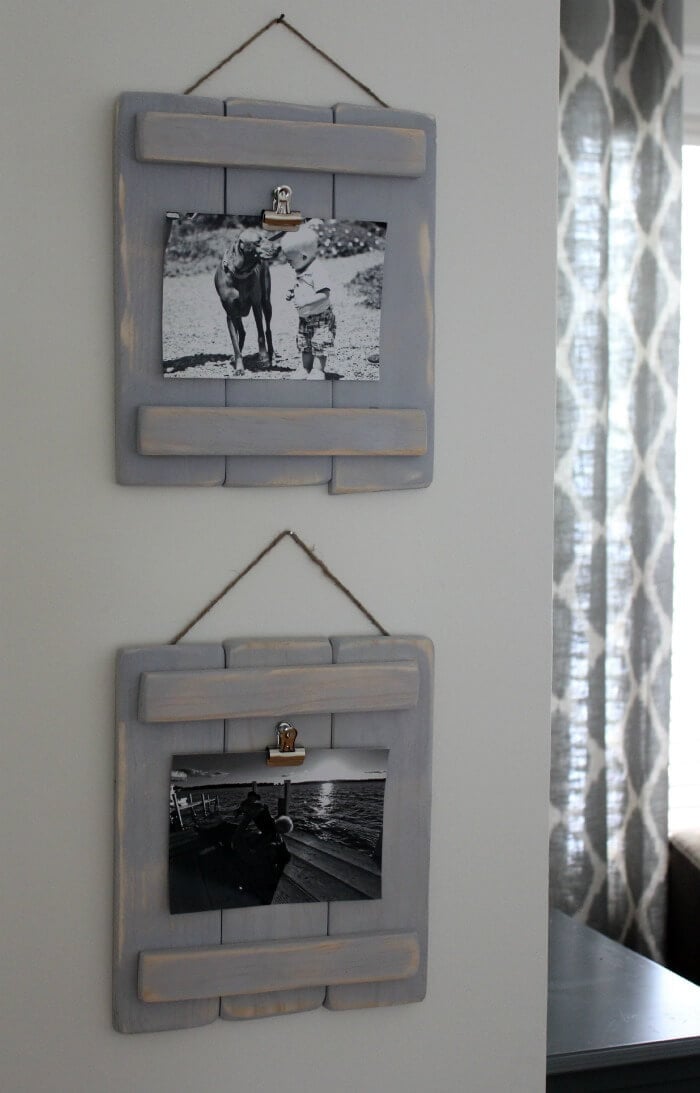
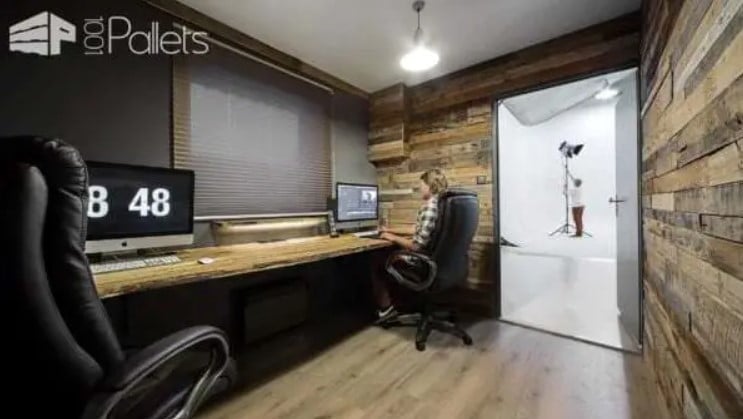
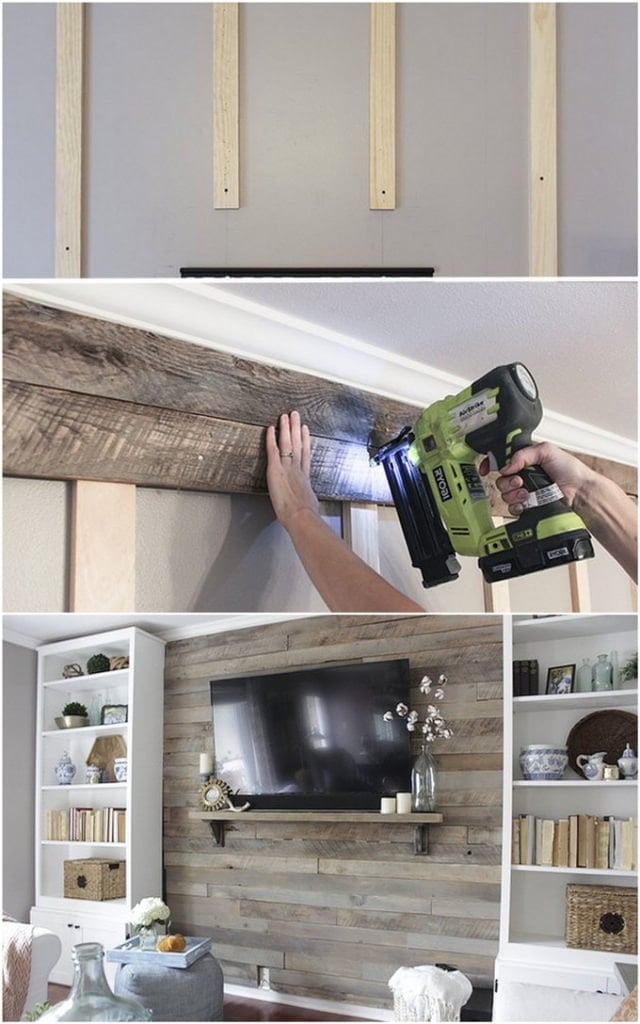


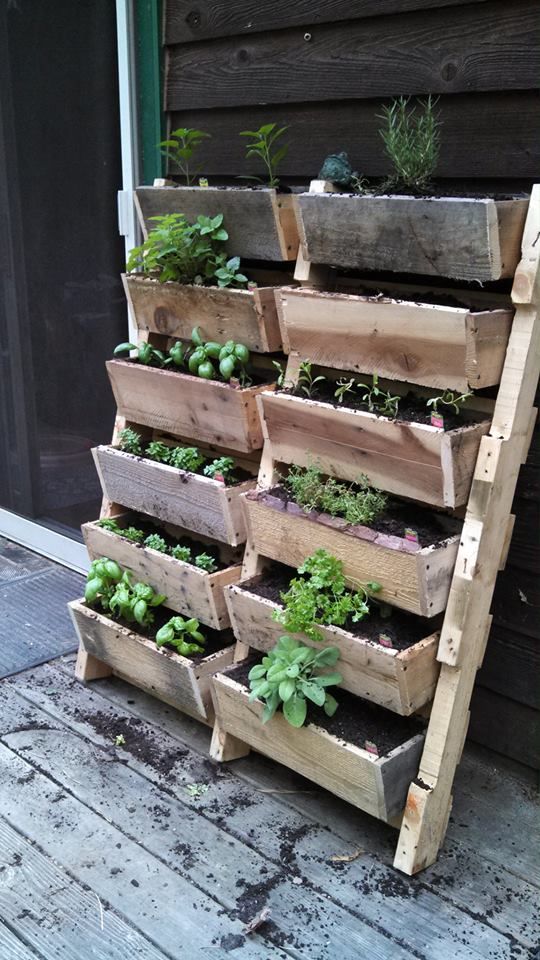
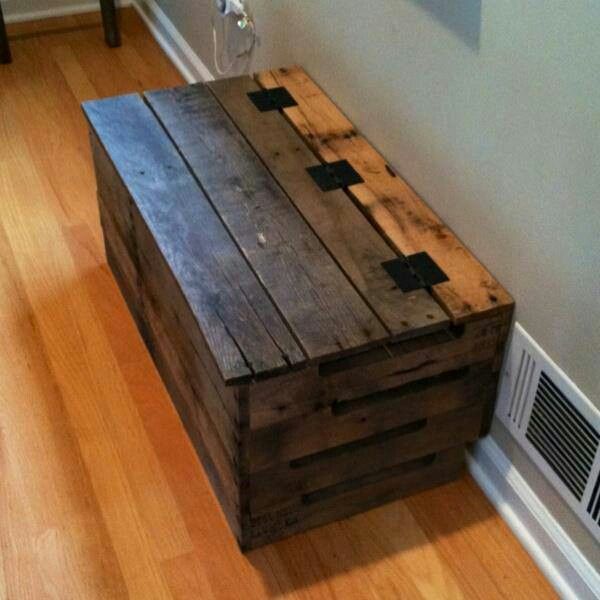
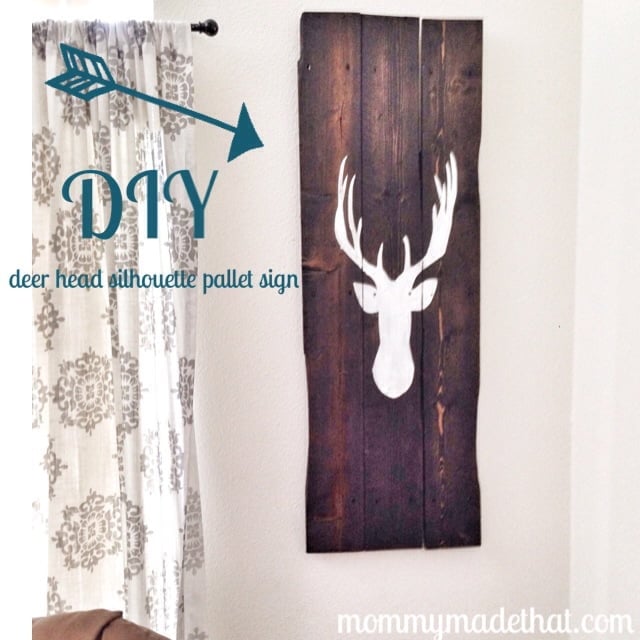
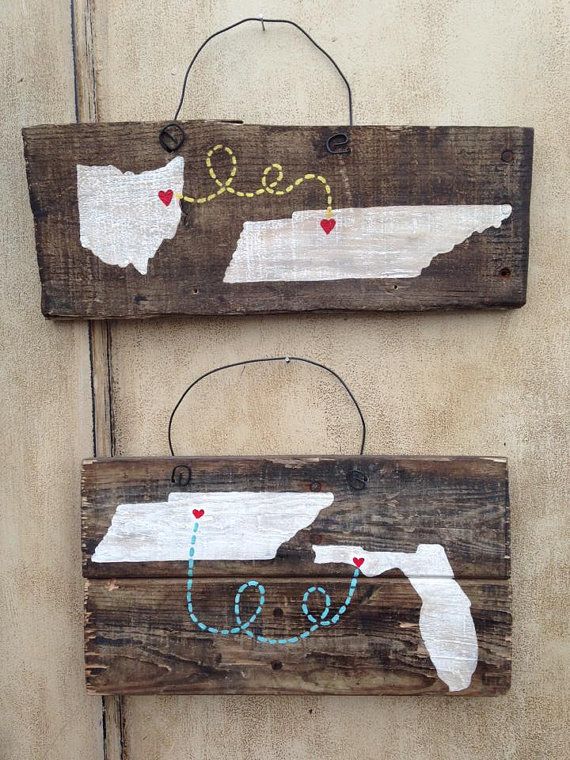
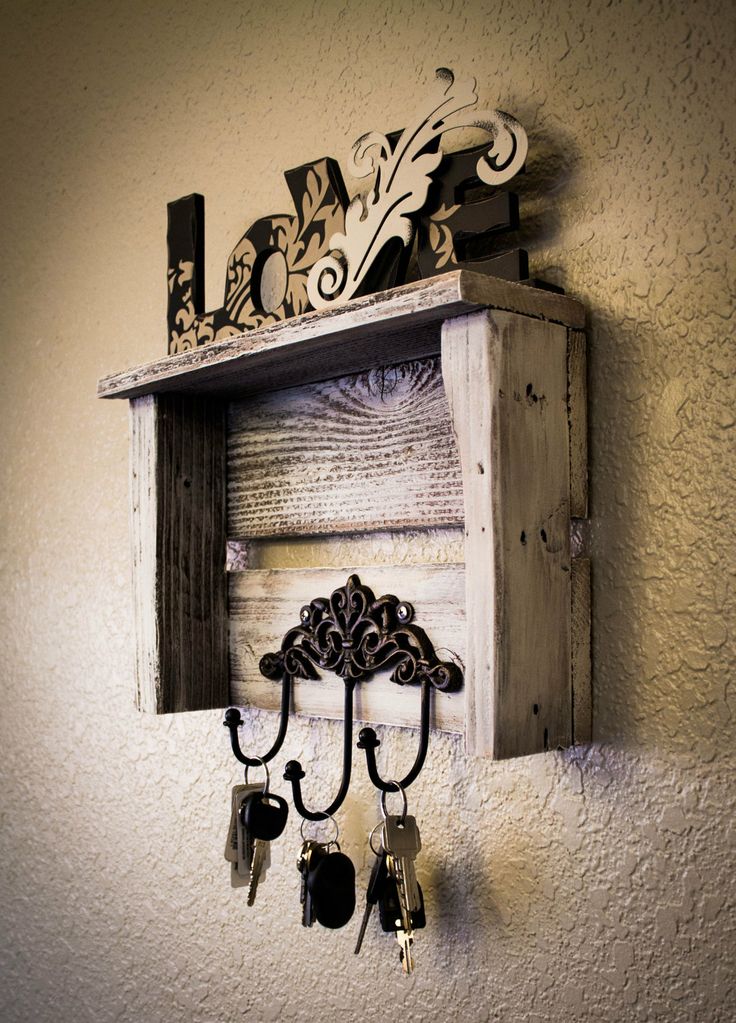
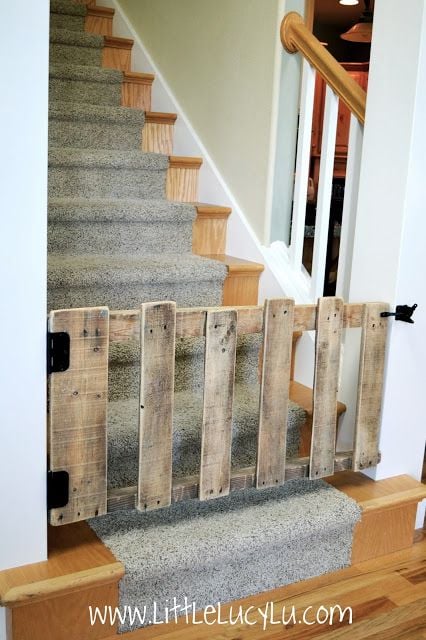
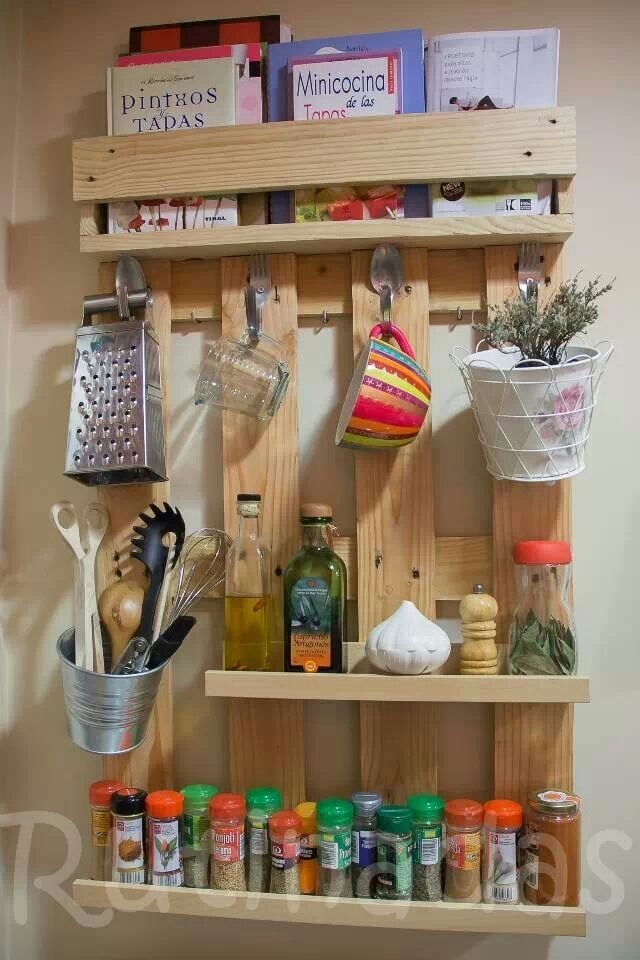
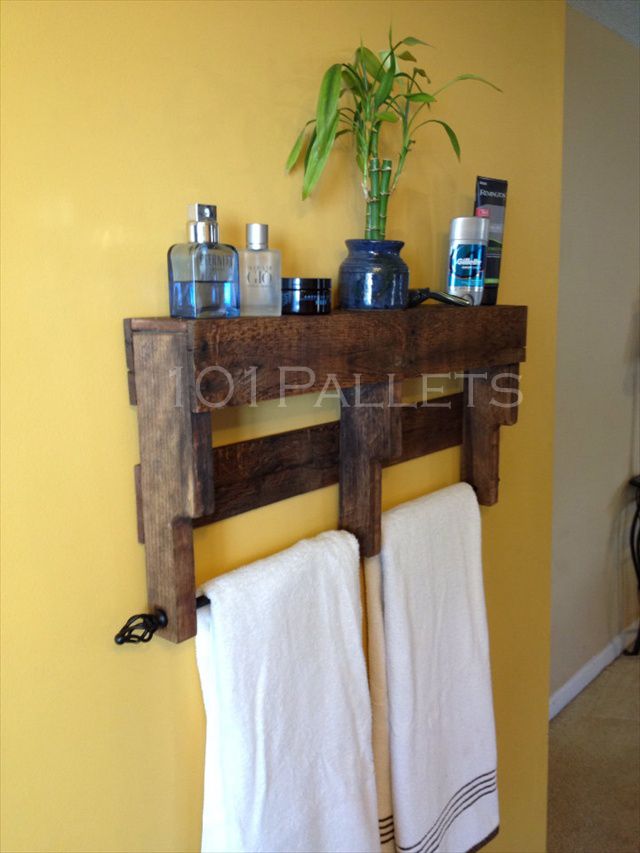
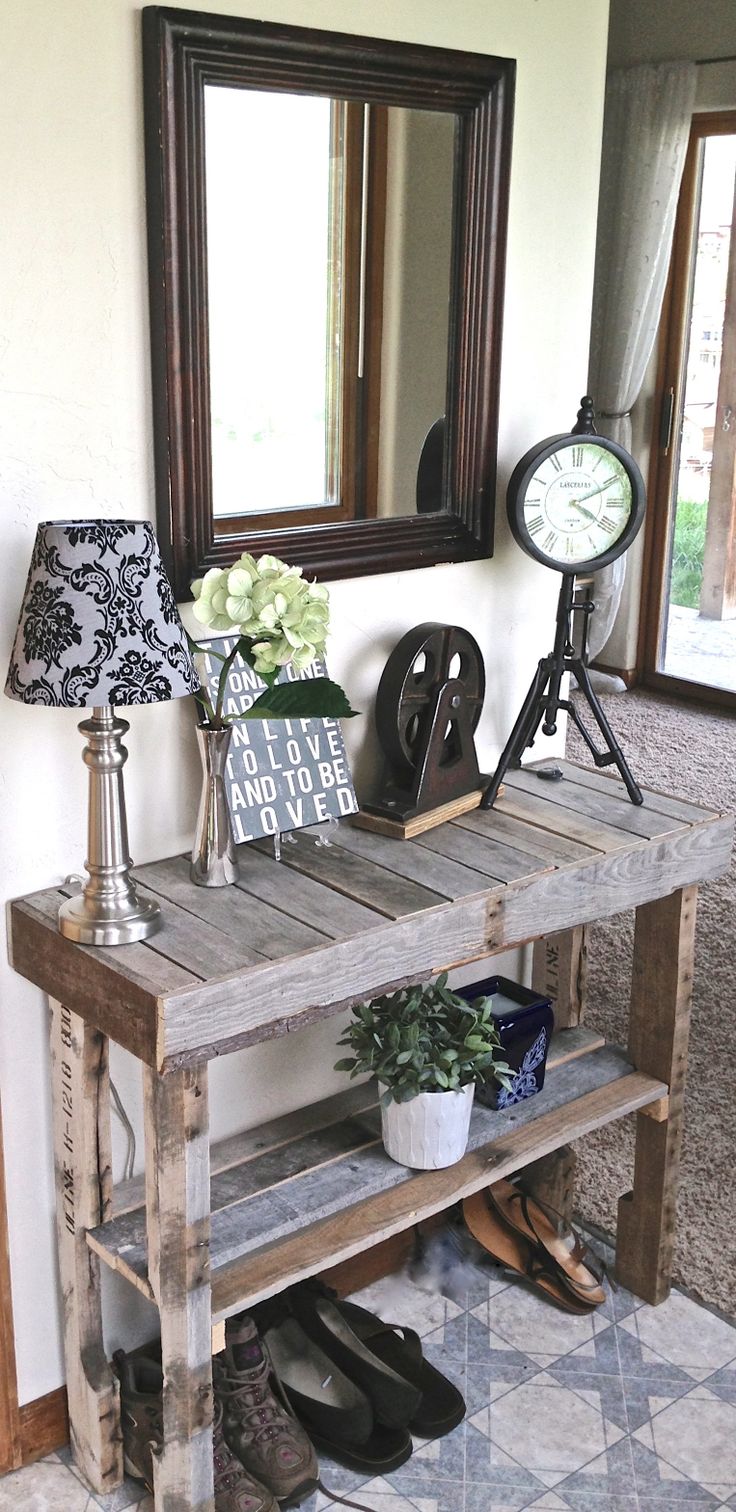
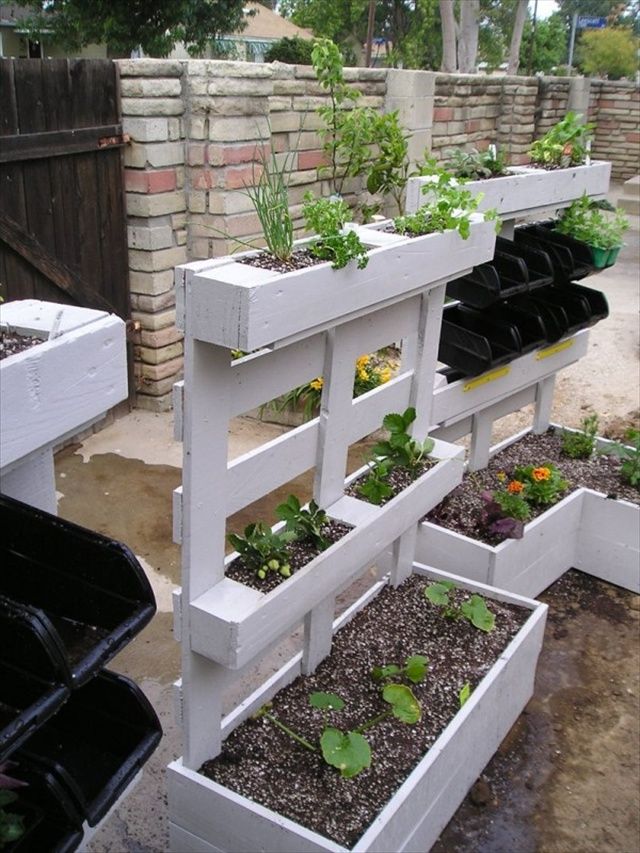
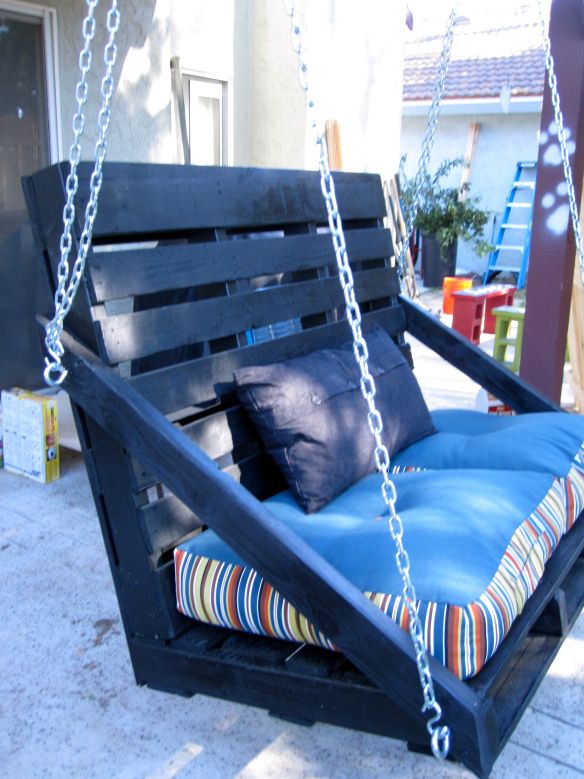
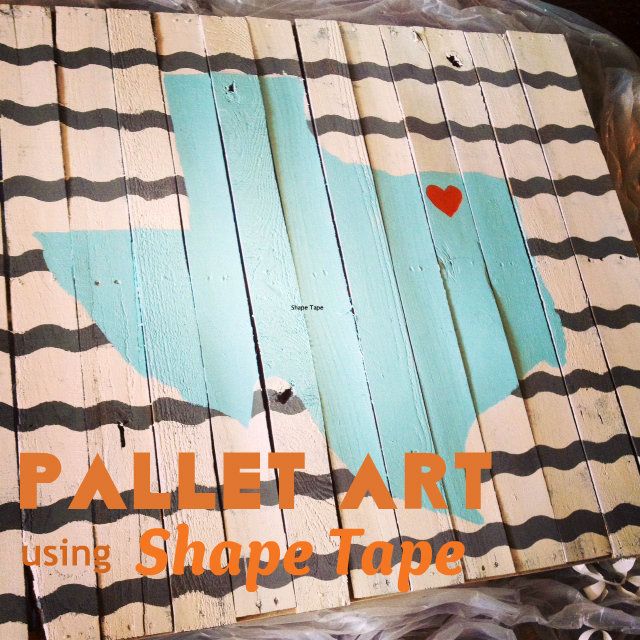
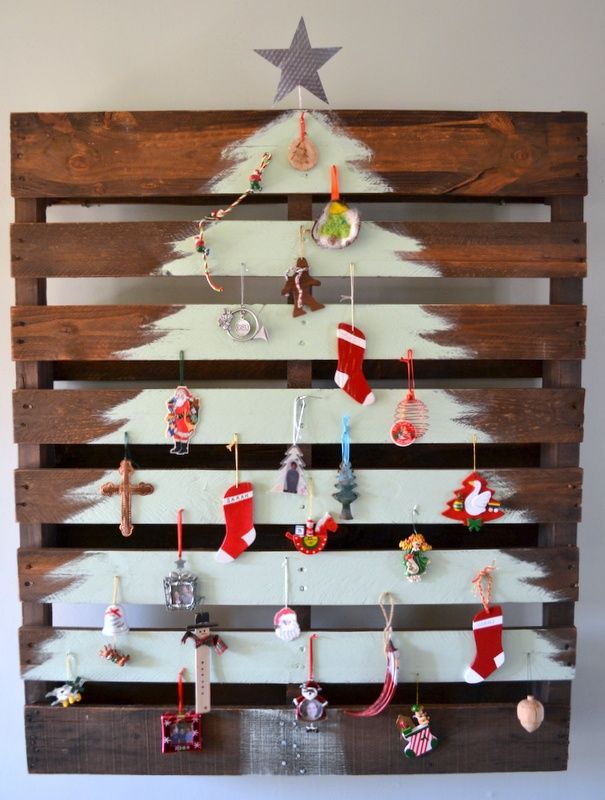
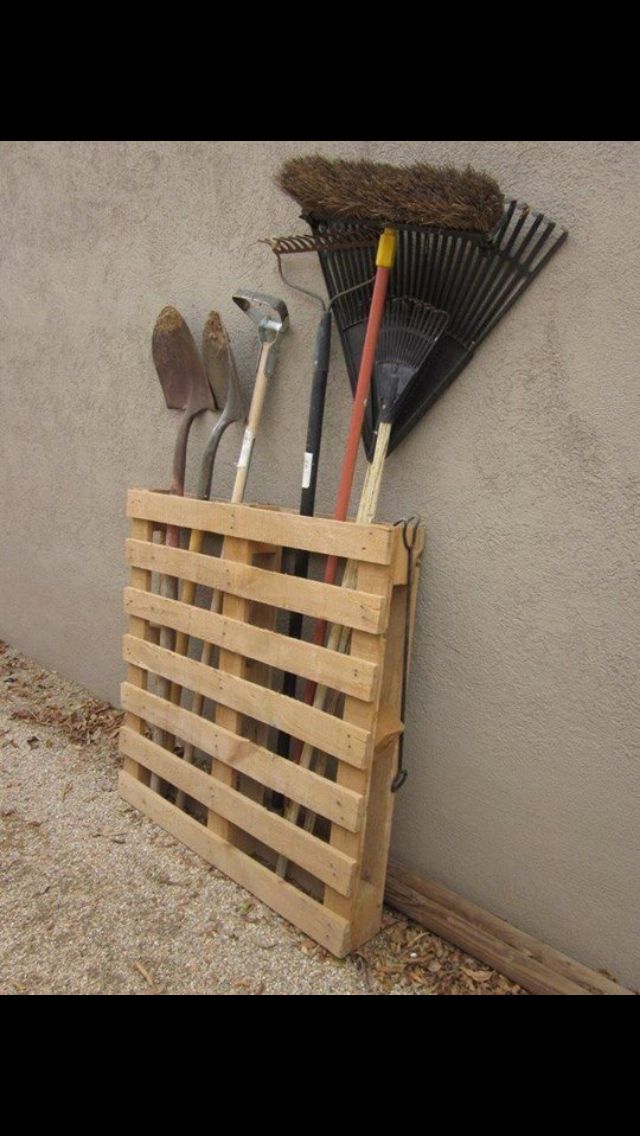
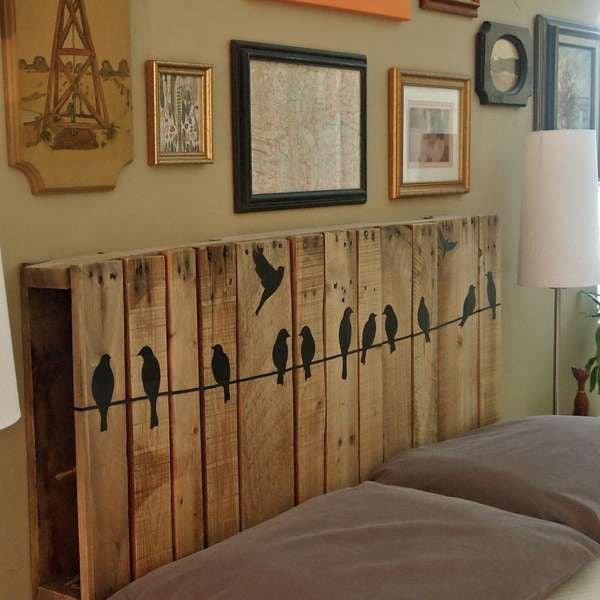
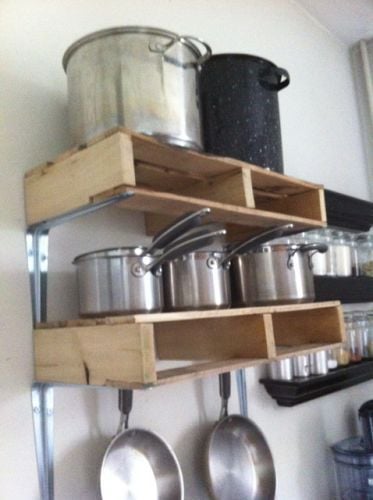
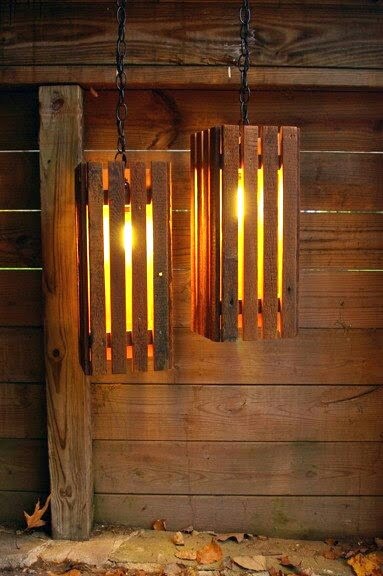
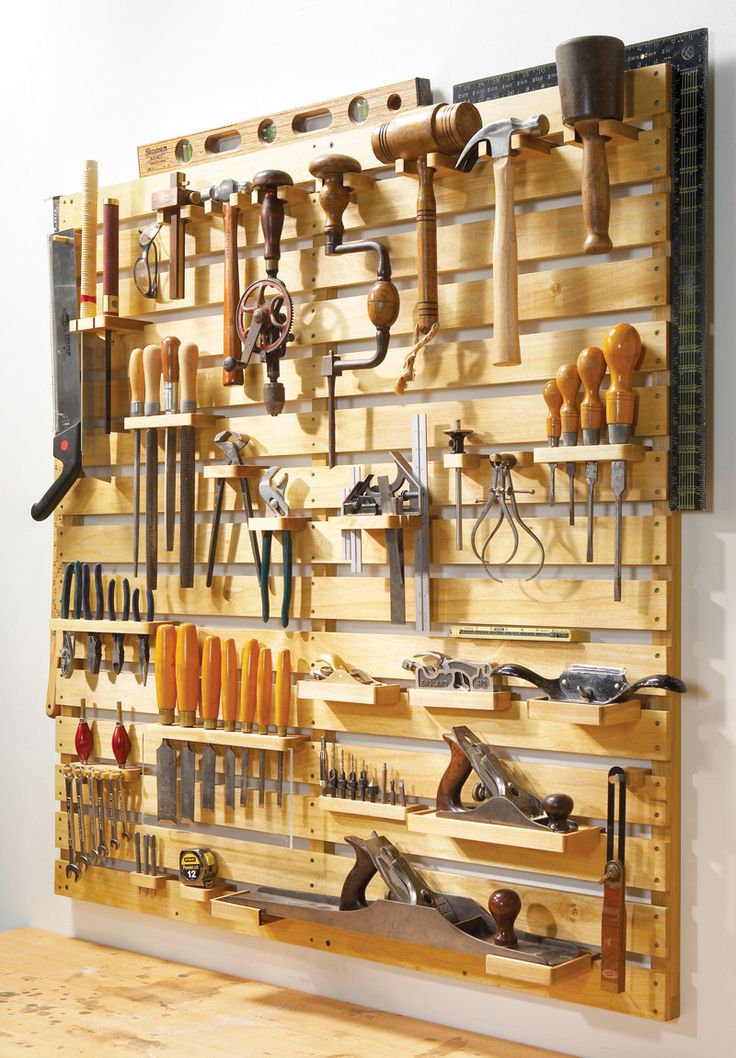
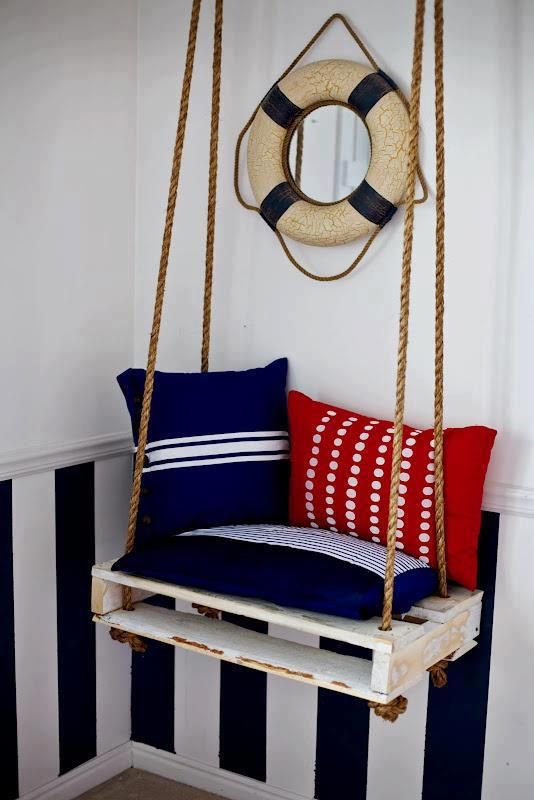
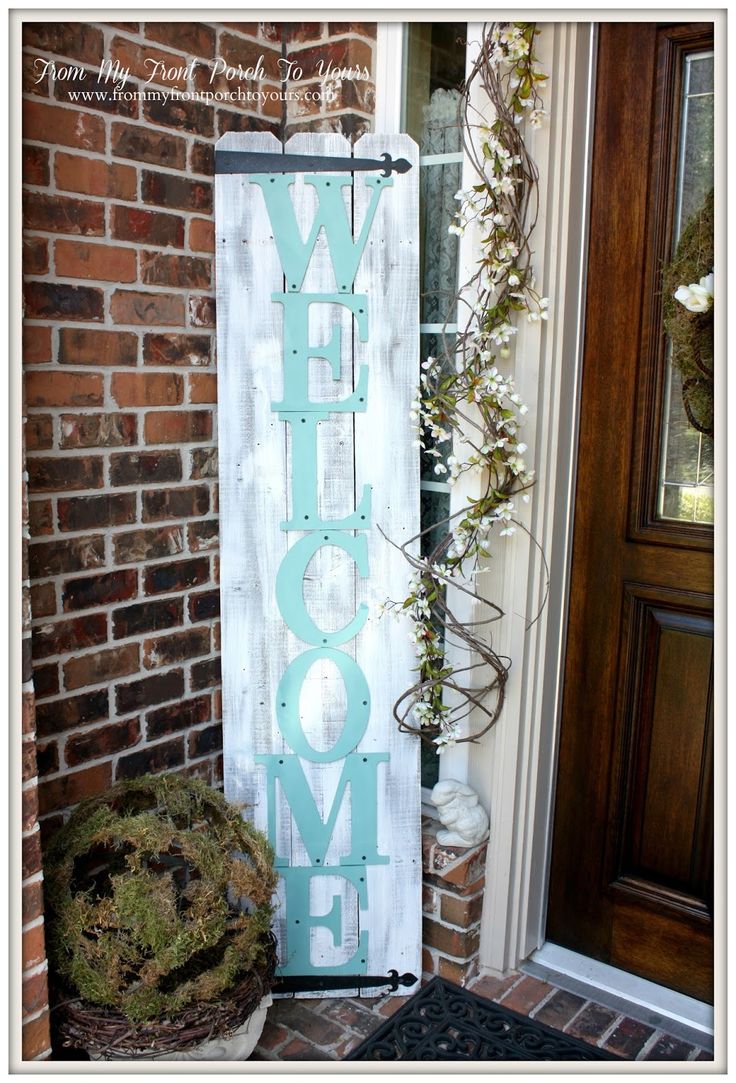
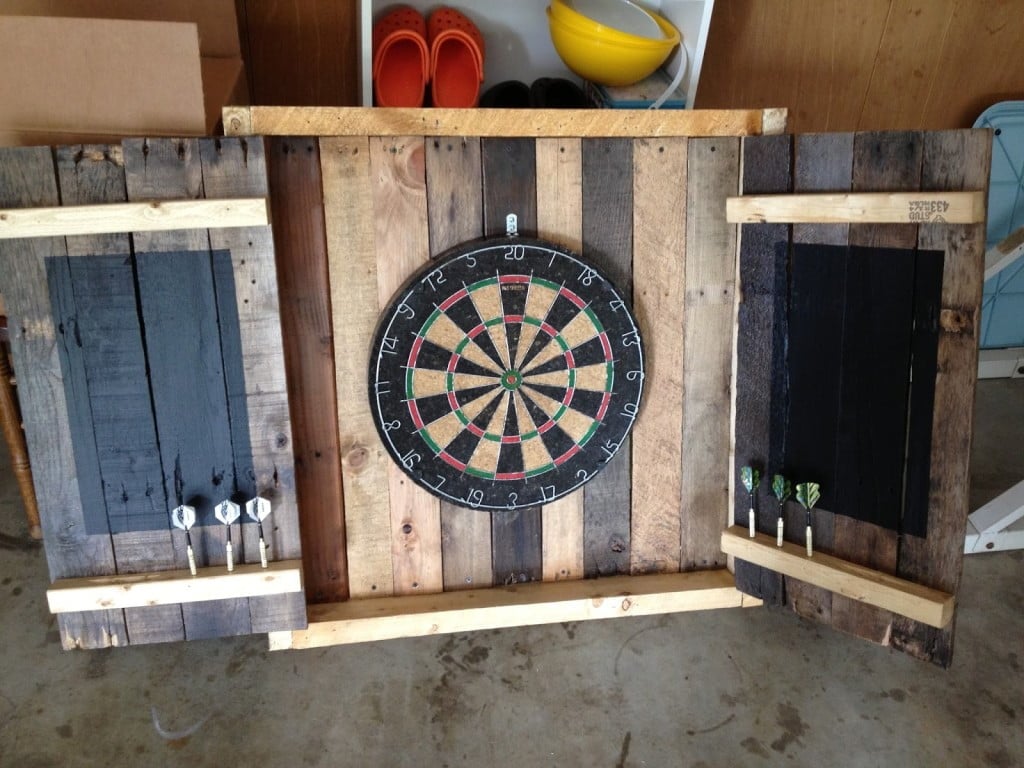

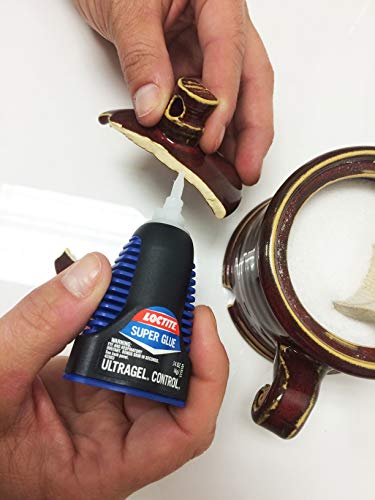
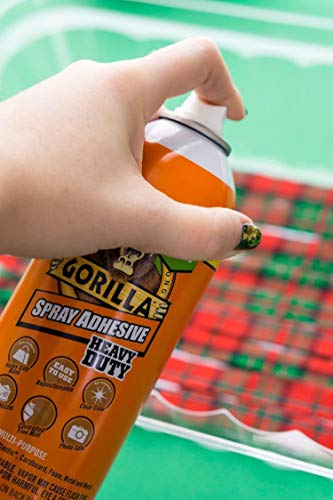
![Forstner Bit vs. Spade Bit [All You Need to Know & Winner]](https://homesthetics.net/wp-content/uploads/2021/06/Forstner-Bit-vs.-Spade-Bit-01.jpg "Forstner Bit vs. Spade Bit [All You Need to Know & Winner]")


![Wood Filler vs. Wood Putty [A Clear Winner?]](https://homesthetics.net/wp-content/uploads/2021/08/Wood-Filler-vs-Wood-Putty-01.jpg "Wood Filler vs. Wood Putty [A Clear Winner?]")


![How To Stabilize Wood [All You Need To Know]](https://homesthetics.net/wp-content/uploads/2022/01/How-to-Stabilize-Wood-1.jpg "How To Stabilize Wood [All You Need To Know]")

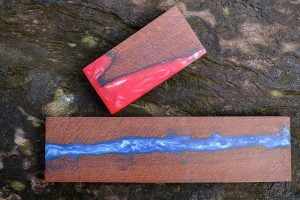

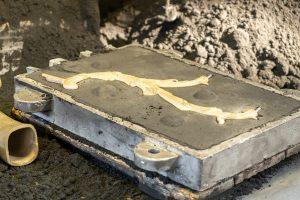
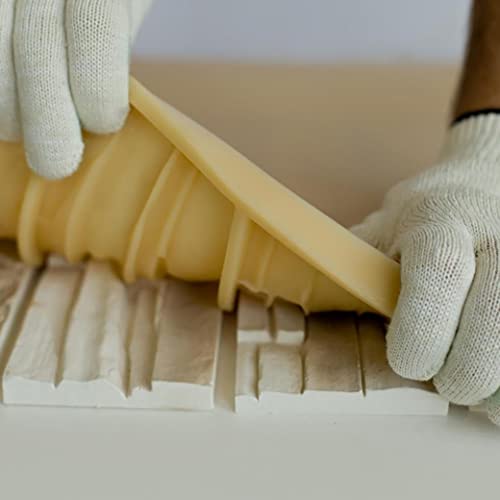

![DW7485 vs. DWE7480 [All You Need to Know & Winner]](https://homesthetics.net/wp-content/uploads/2021/04/DW745-vs.-DWE7480-01.jpg "DW7485 vs. DWE7480 [All You Need to Know & Winner]")
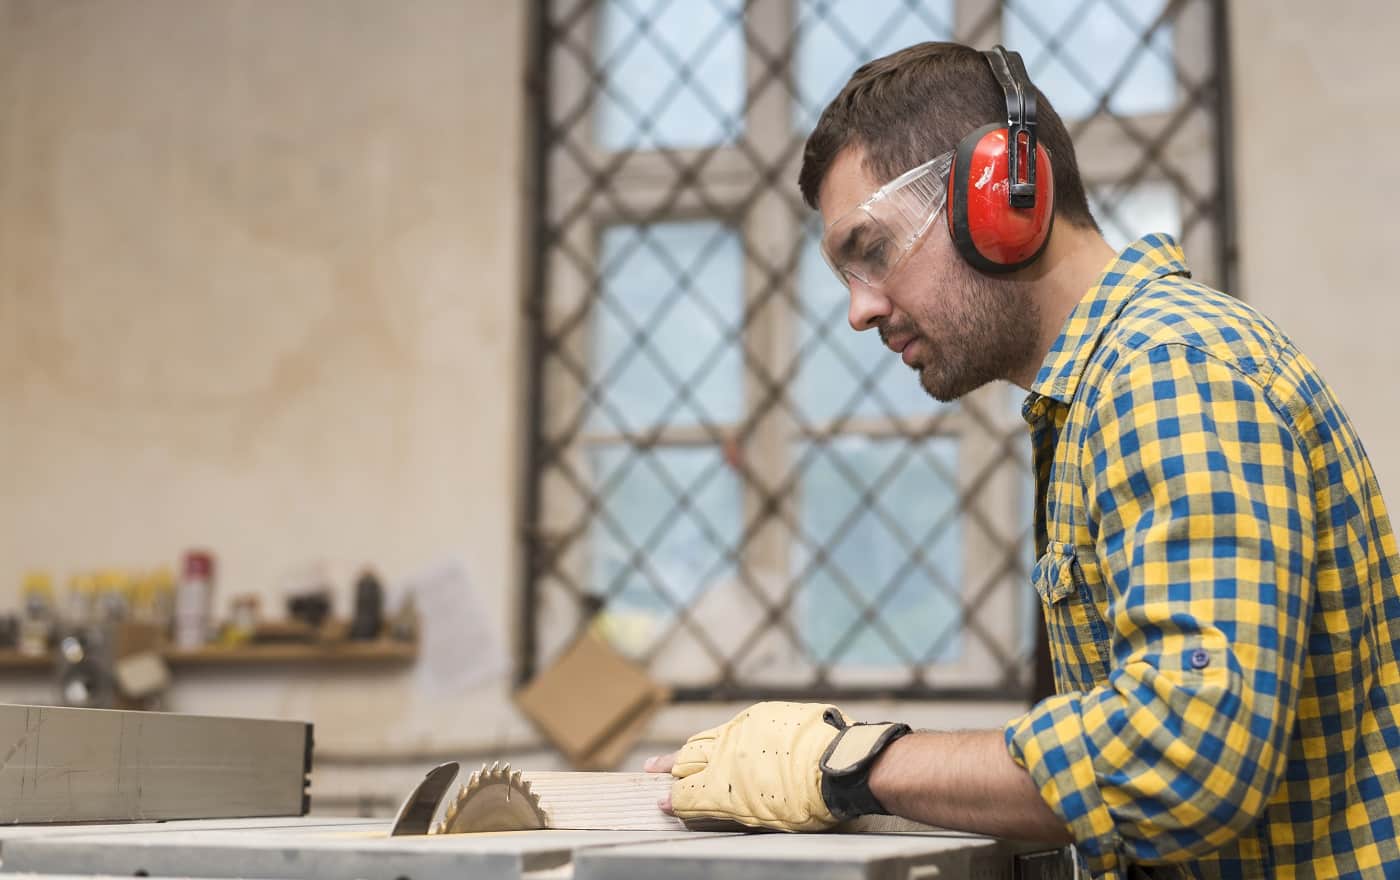


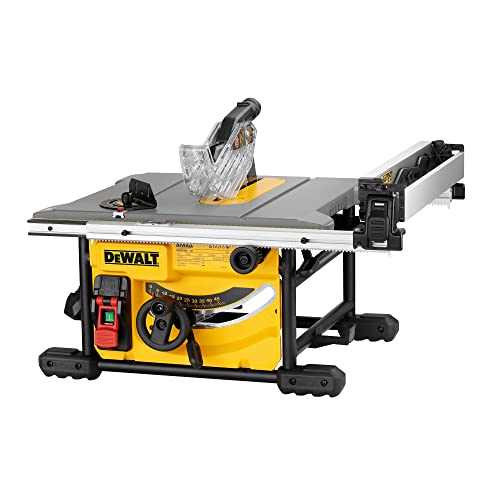

![Bosch 4100-09 Review [A Clear Winner?]](https://homesthetics.net/wp-content/uploads/2021/08/Bosch-4100-09-Review-11.jpg "Bosch 4100-09 Review [A Clear Winner?]")

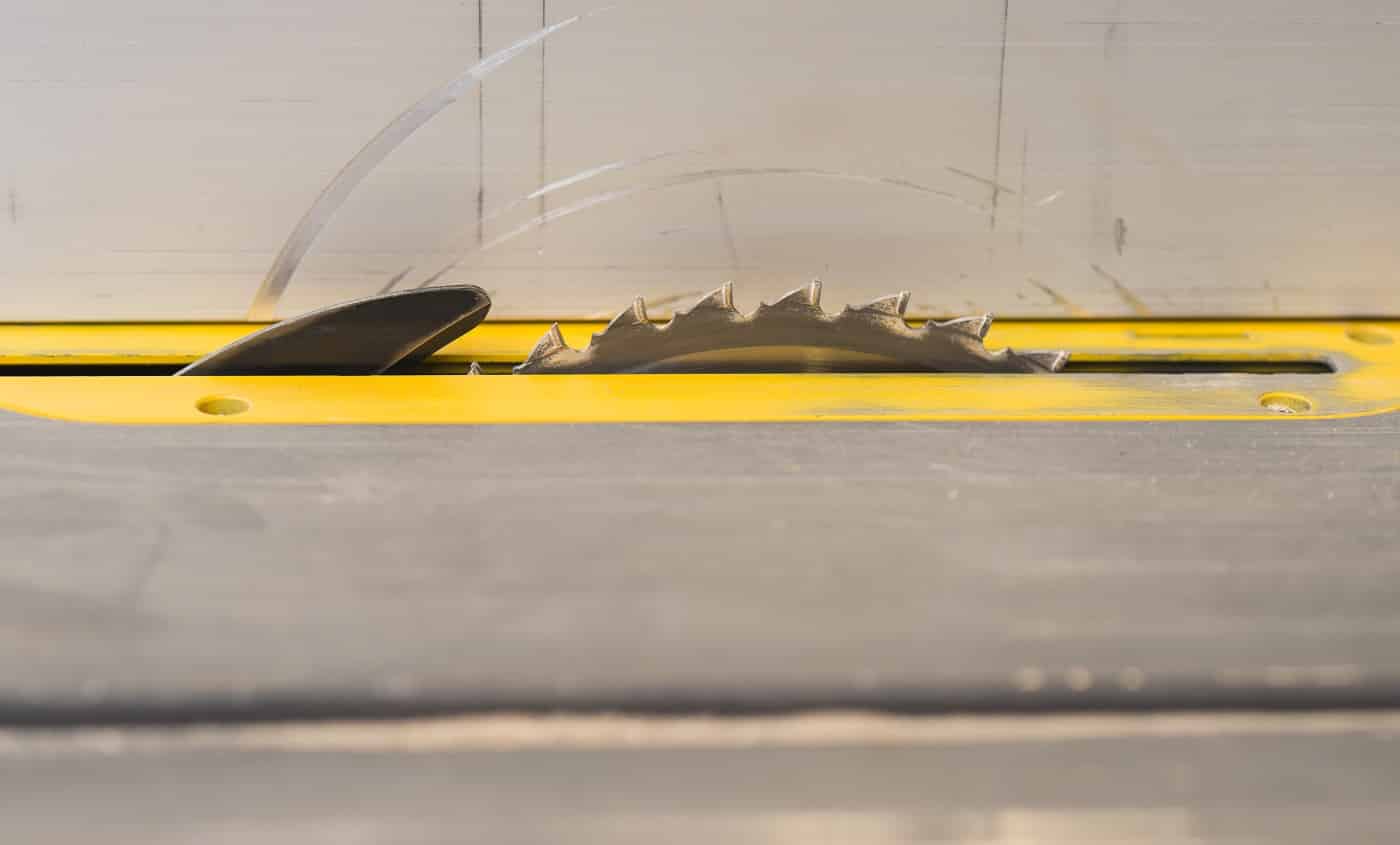

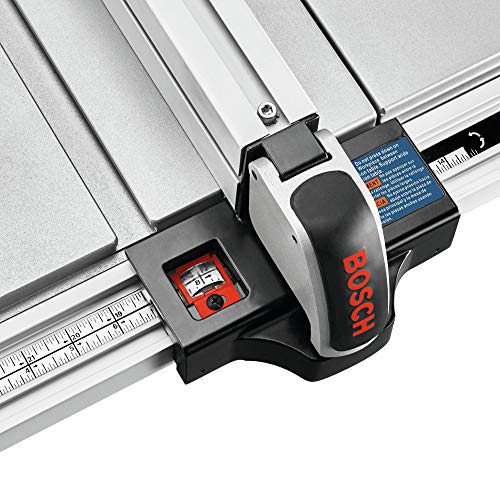


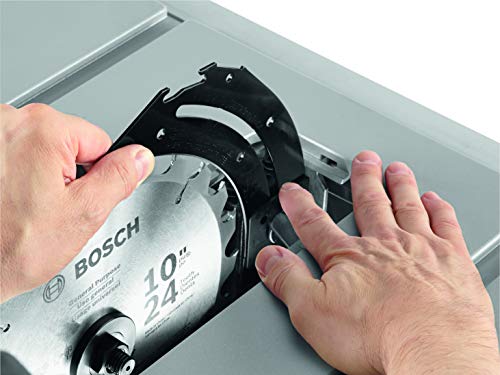
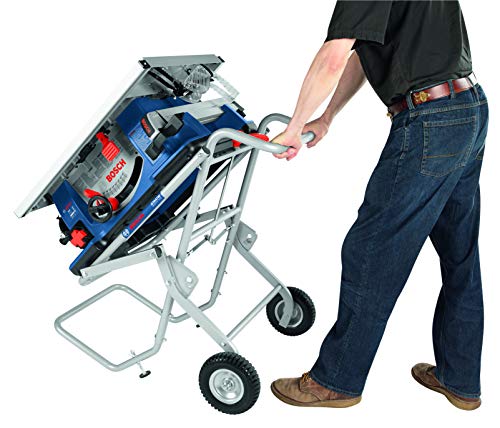
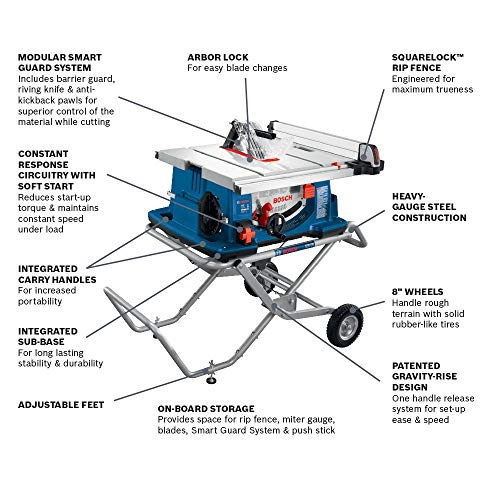


![WEN 6550 VS 6552 [A Clear Winner?]](https://homesthetics.net/wp-content/uploads/2021/09/WEN-6550-VS-6552-01.jpg "WEN 6550 VS 6552 [A Clear Winner?]")
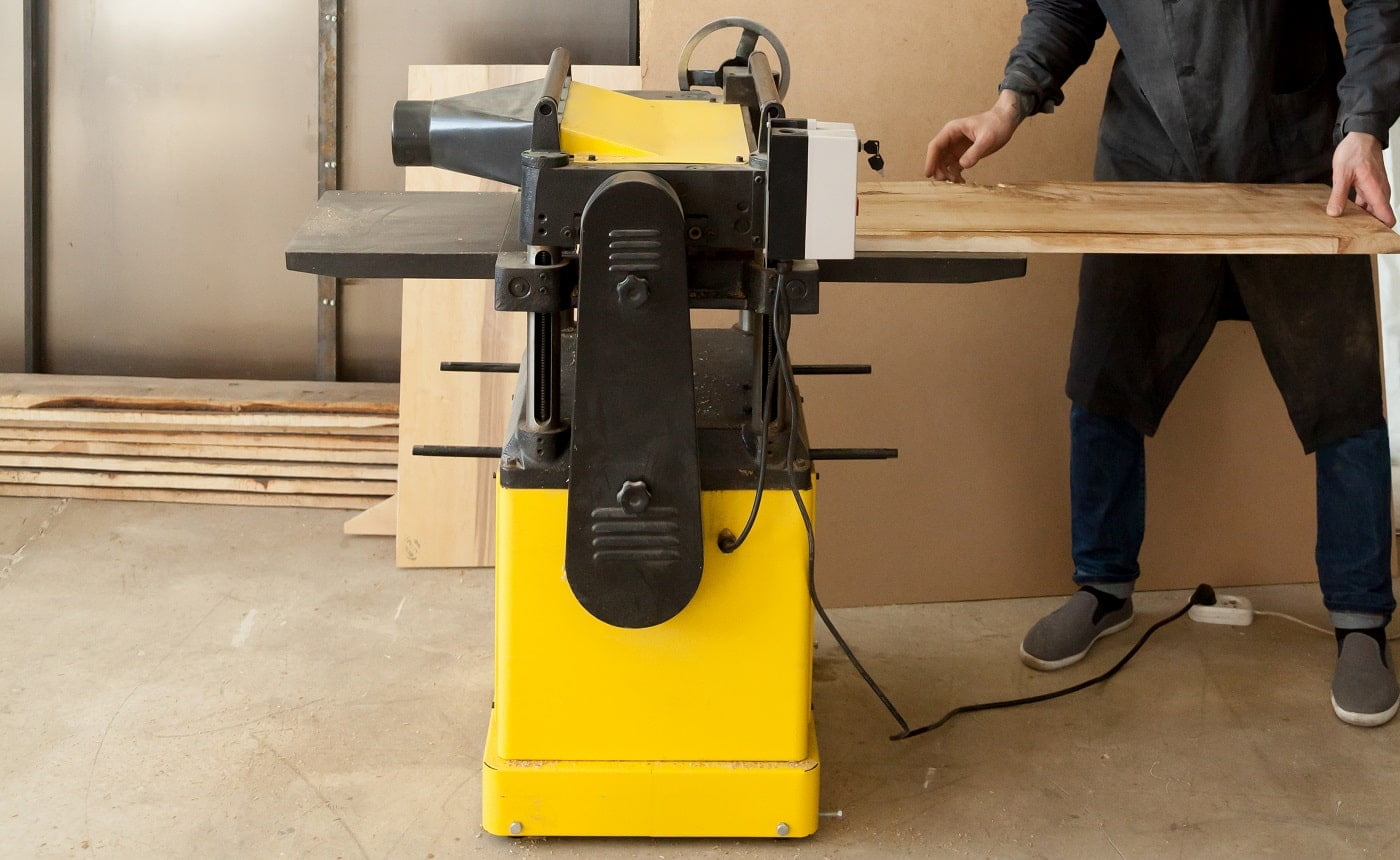


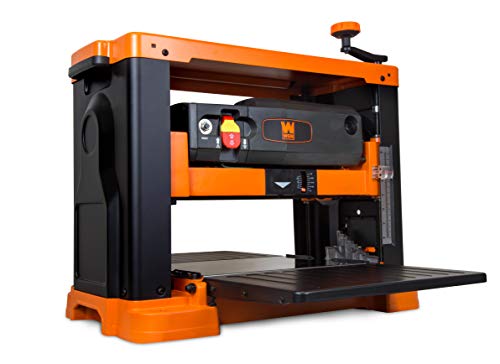
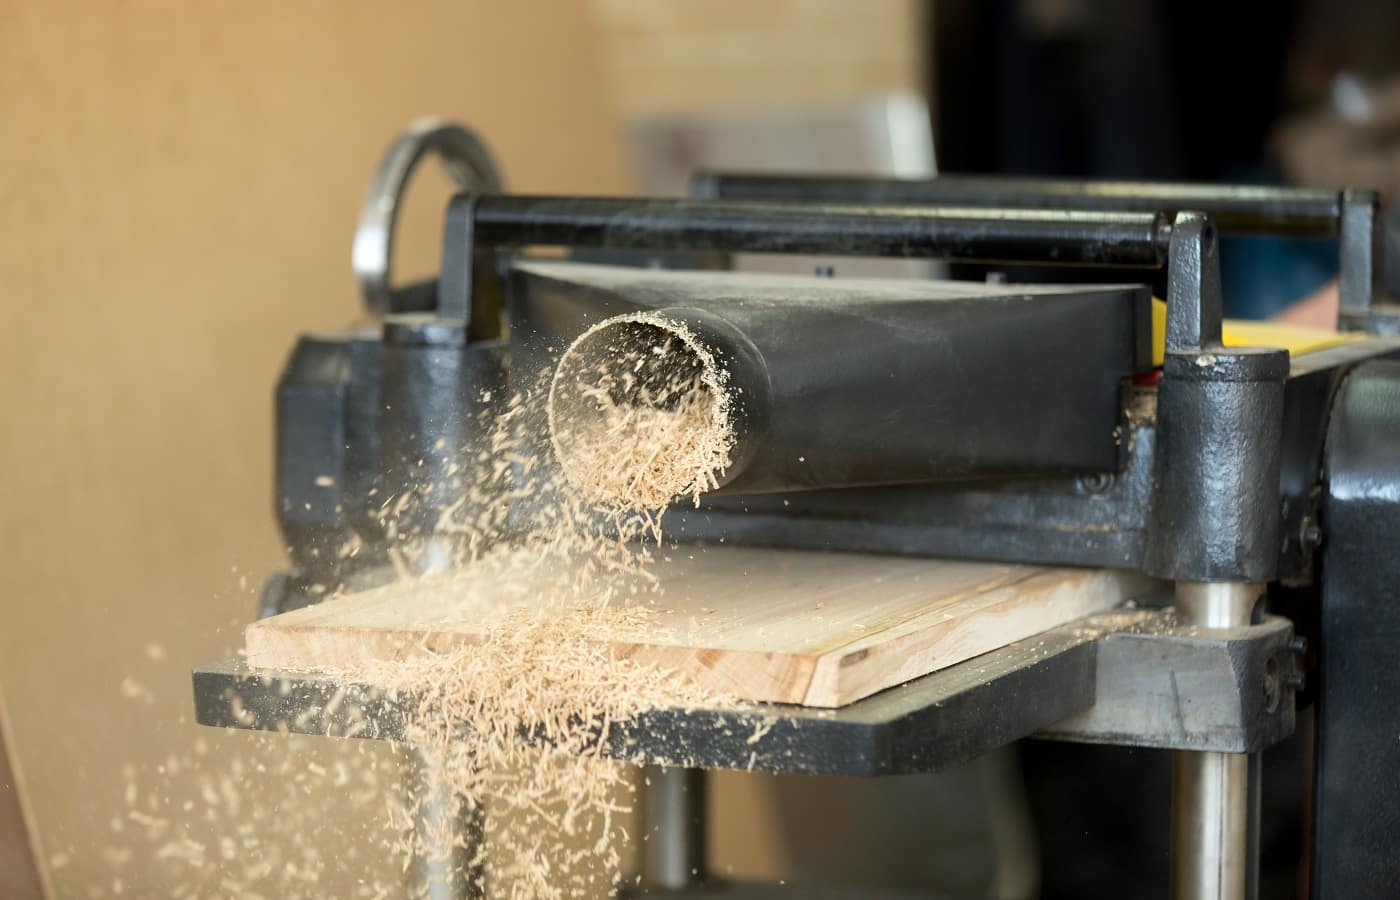
![DeWalt DW745 vs DWE7480 [A Clear Winner?]](https://homesthetics.net/wp-content/uploads/2021/09/DeWalt-DW745-vs-DWE7480-01.jpg "DeWalt DW745 vs DWE7480 [A Clear Winner?]")


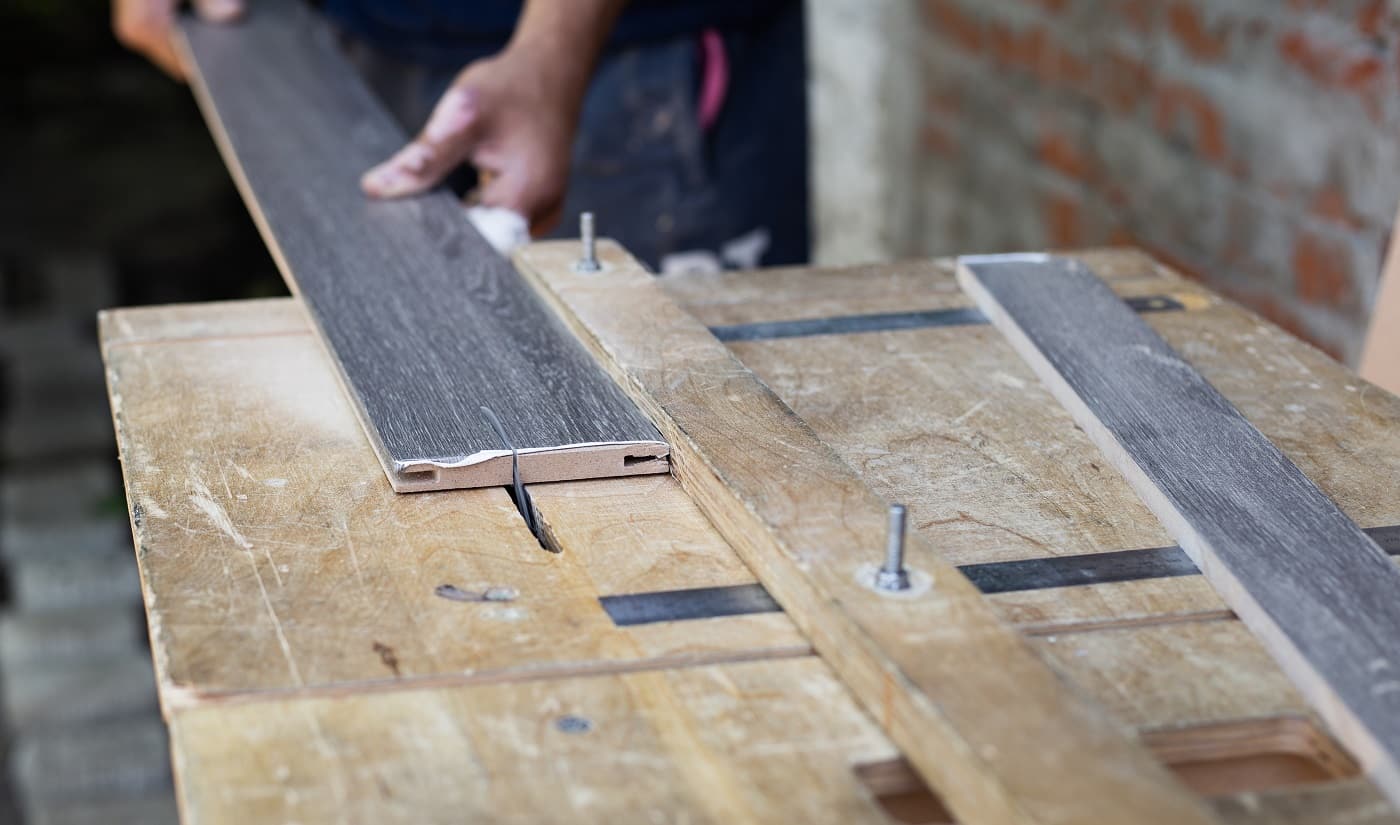
![Grizzly Lathe Review [Clear Winner?]](https://homesthetics.net/wp-content/uploads/2021/08/Grizzly-Lathe-Review-01.jpg "Grizzly Lathe Review [Clear Winner?]")


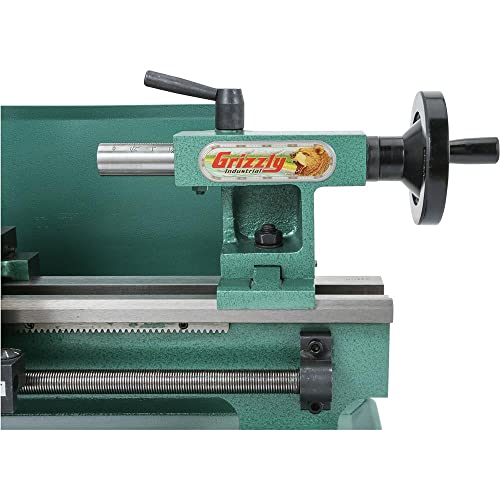
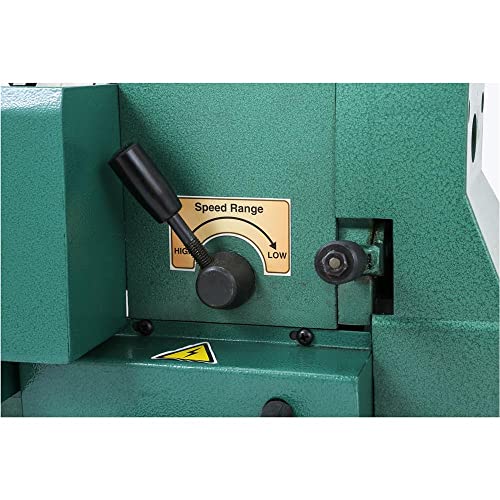

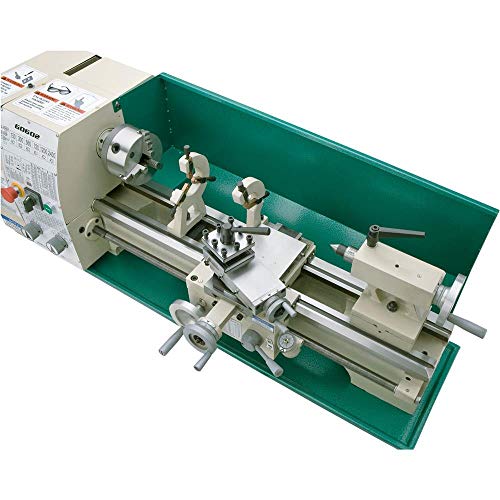


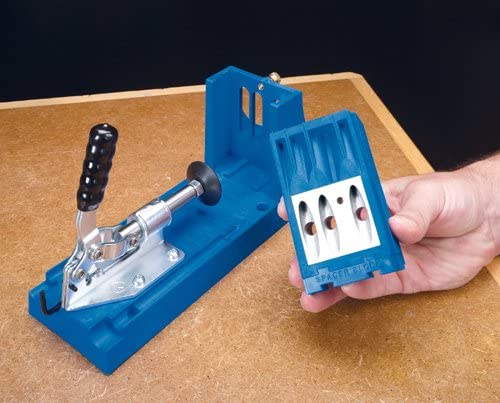
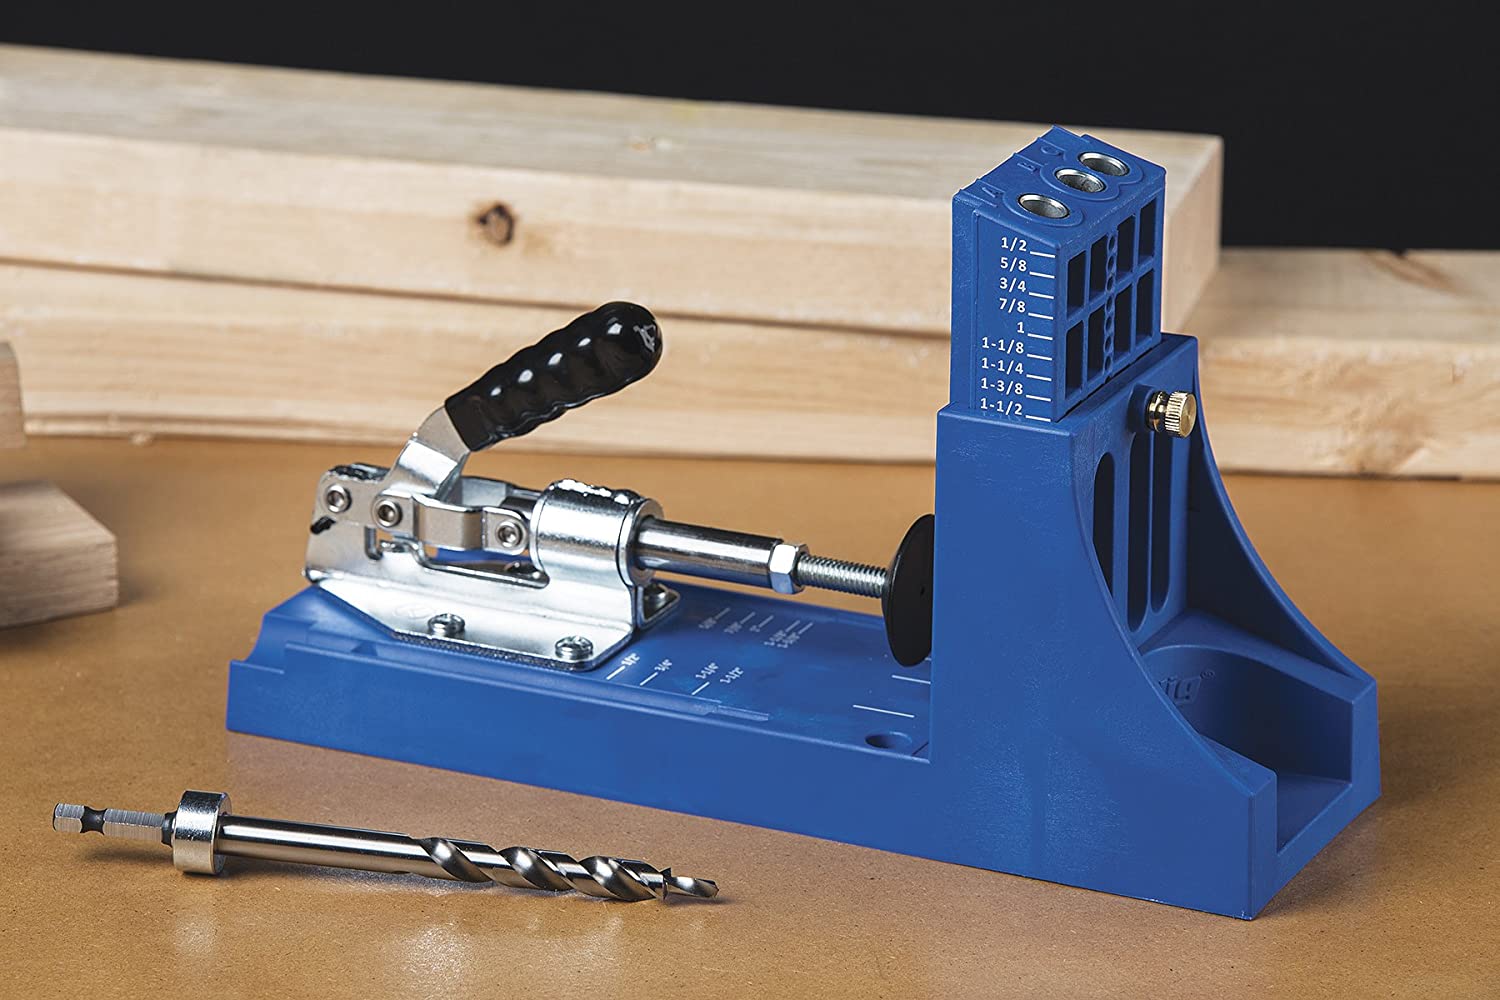


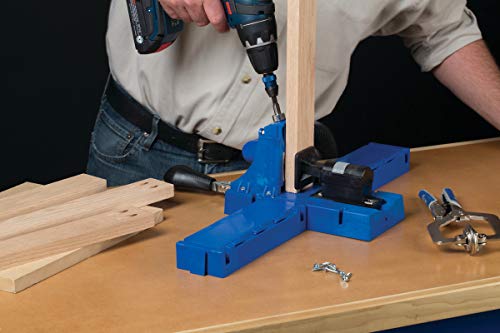
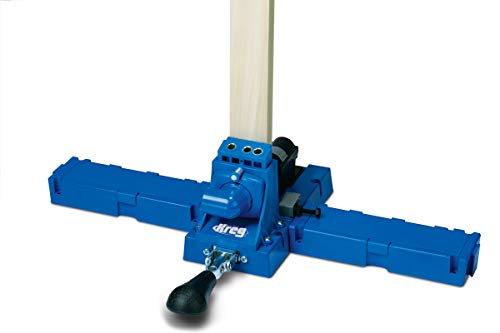
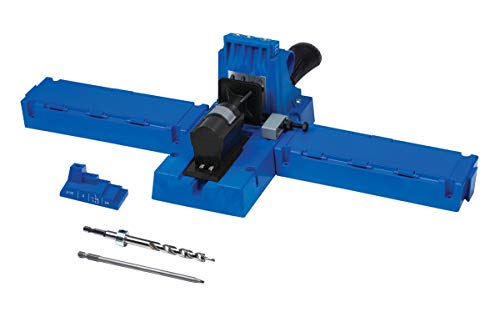


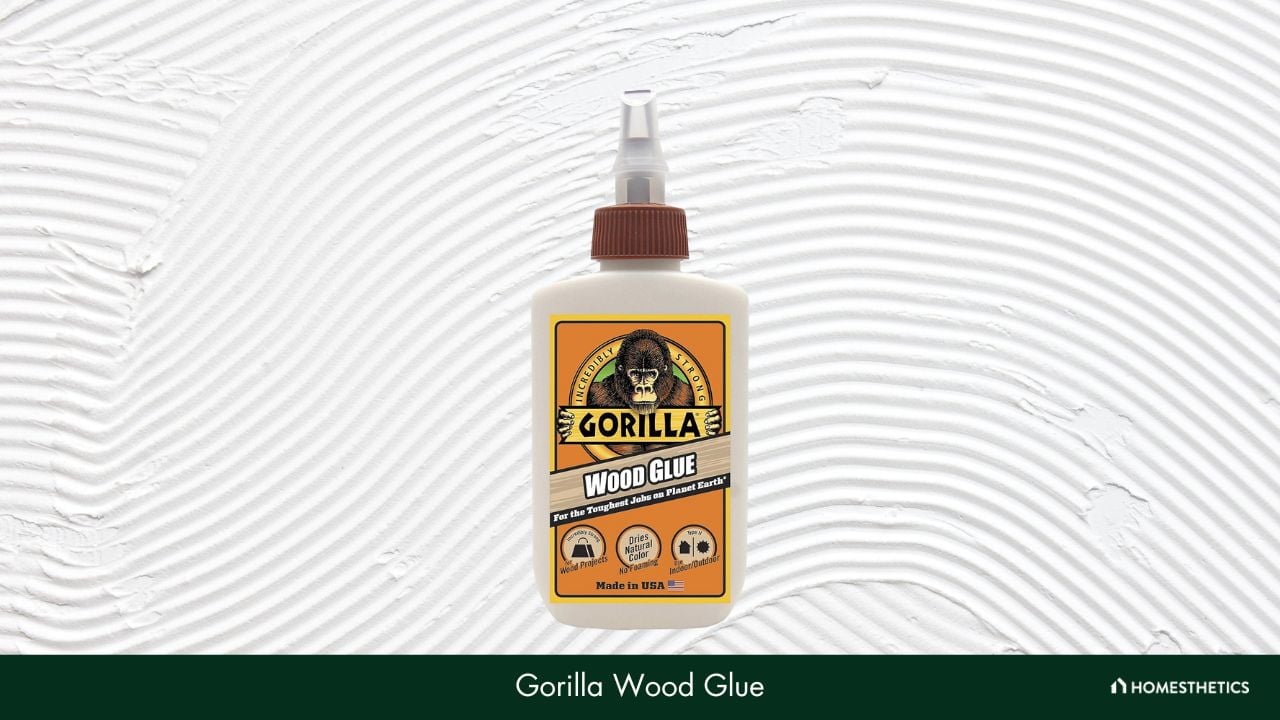
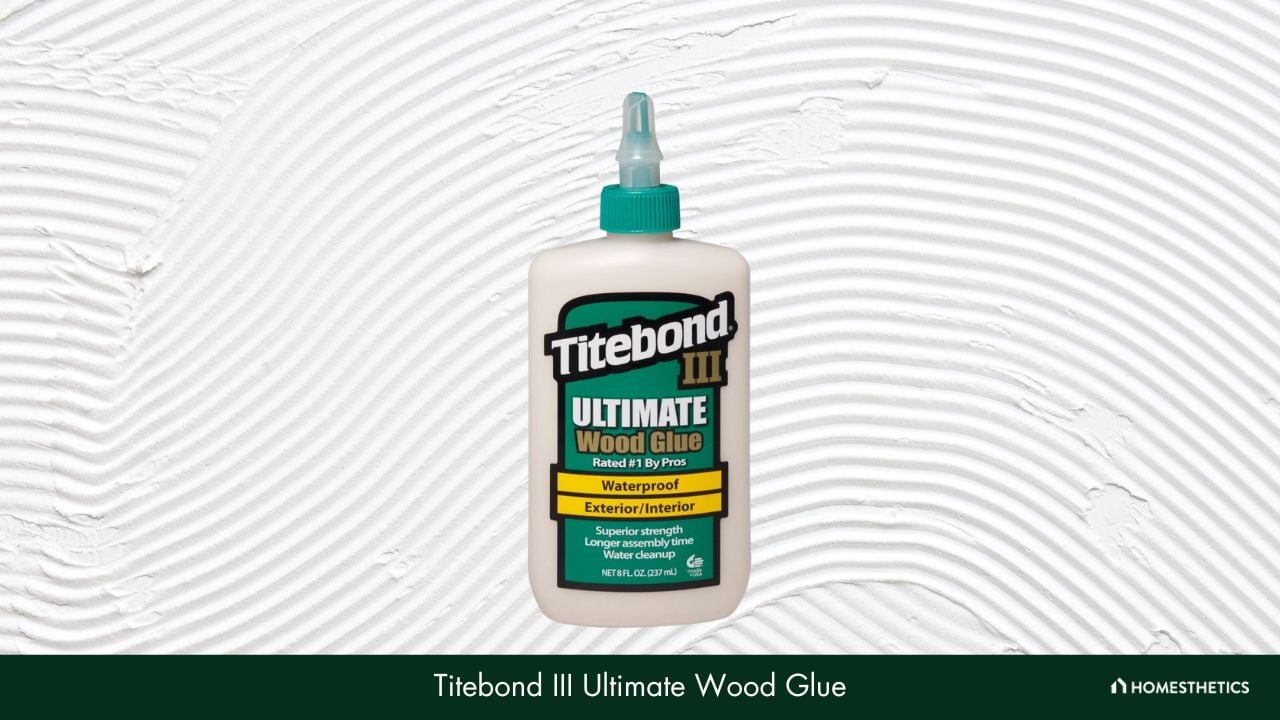


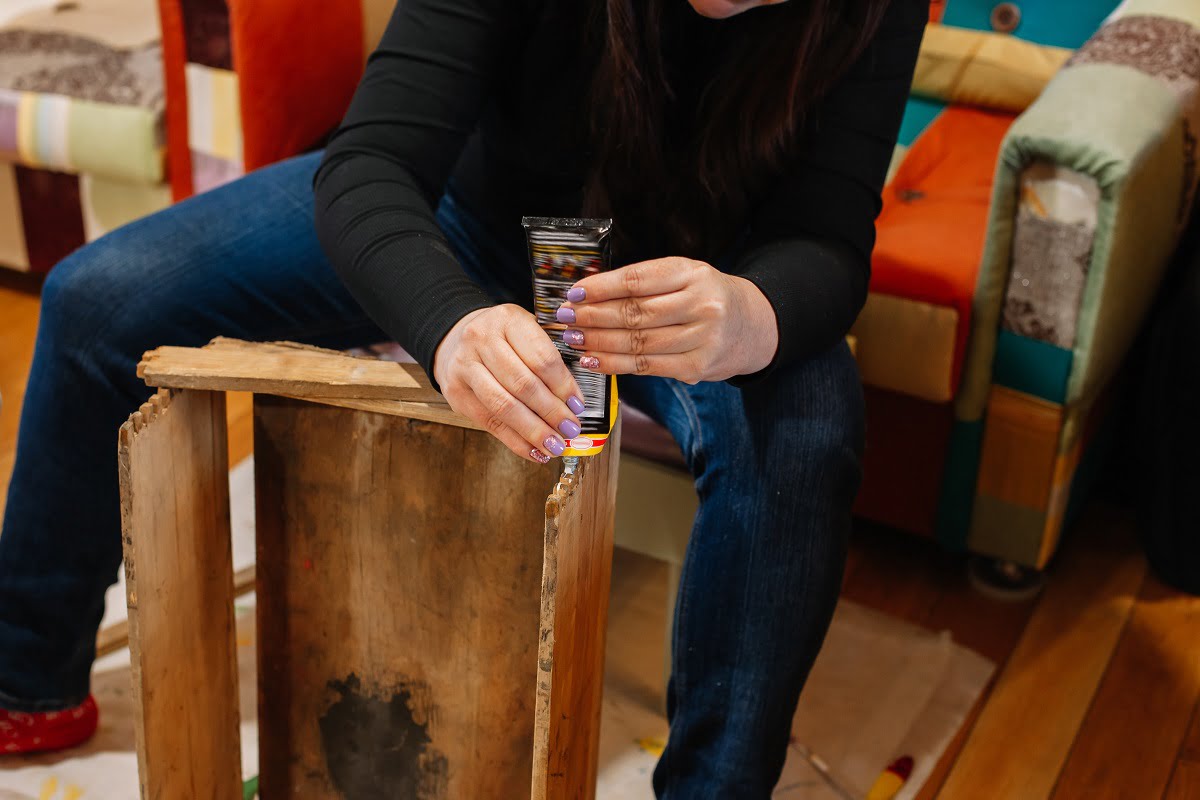
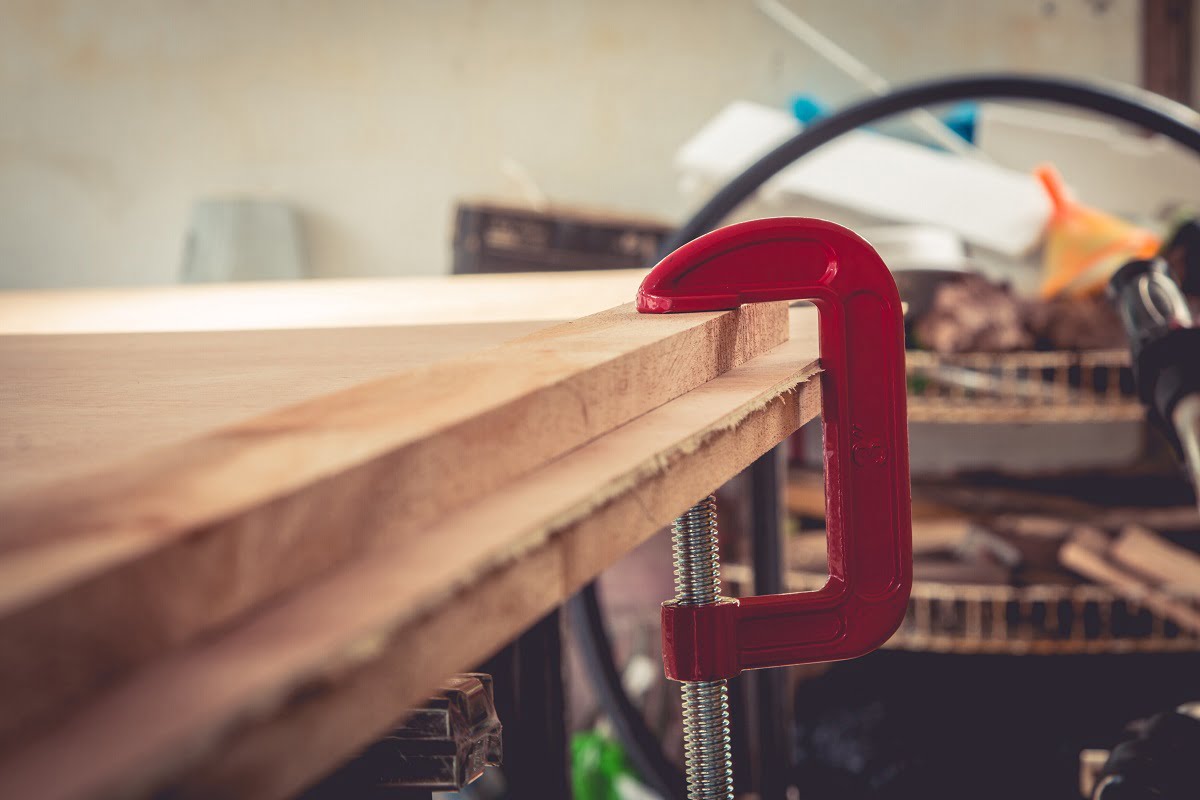


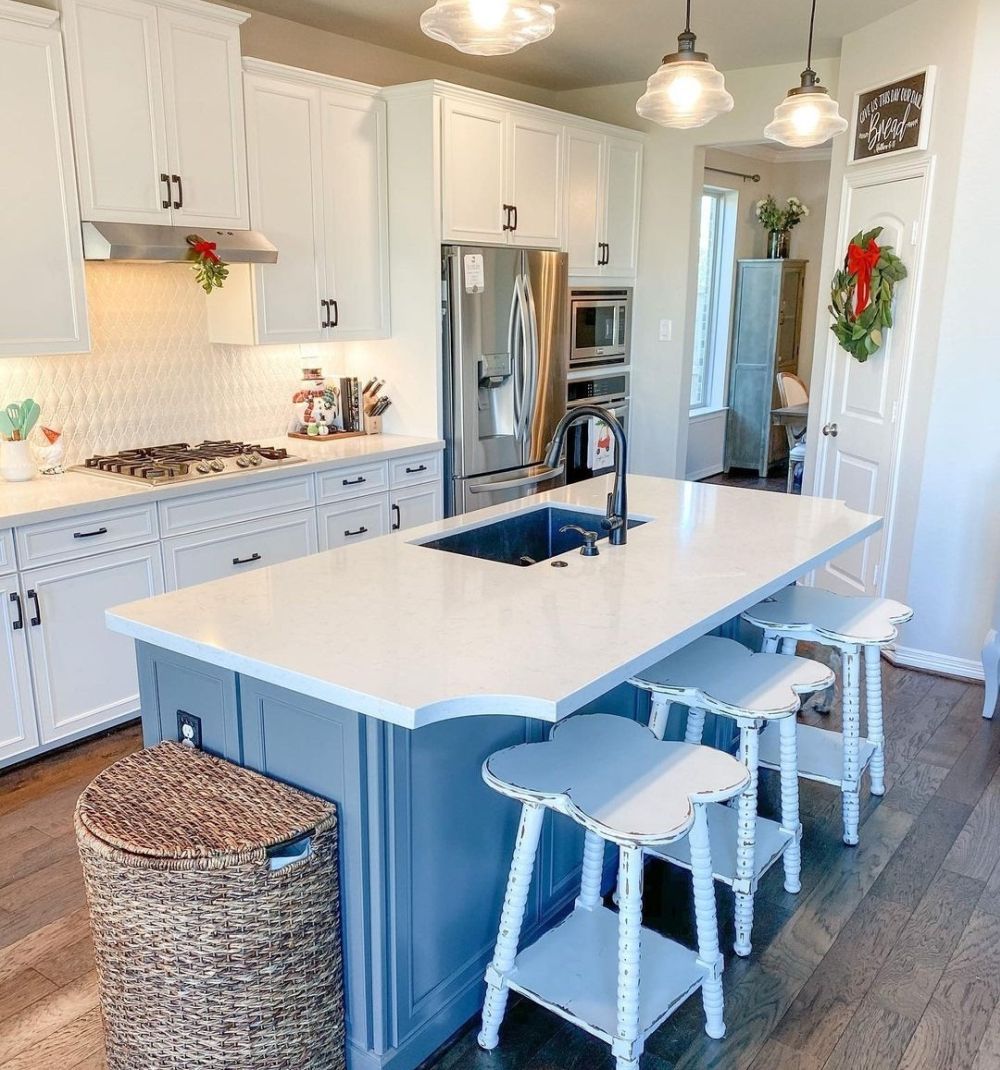

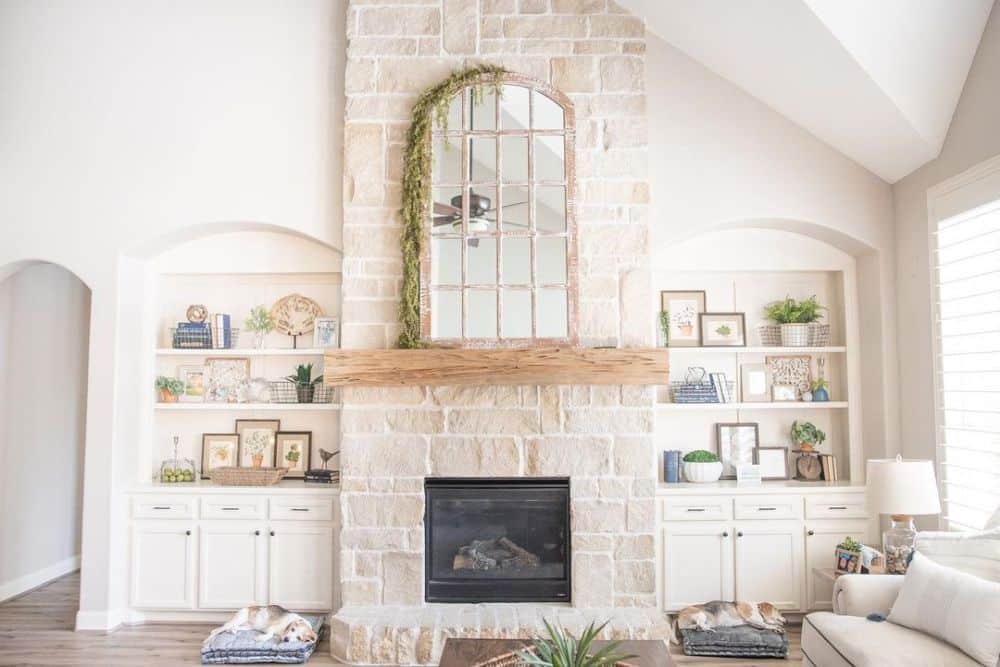


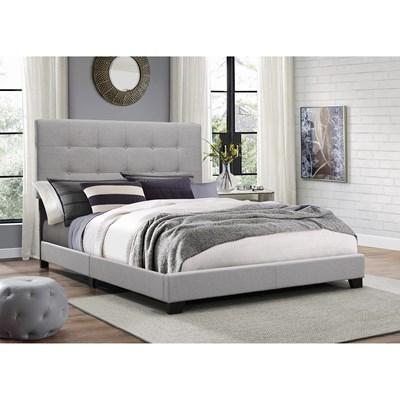


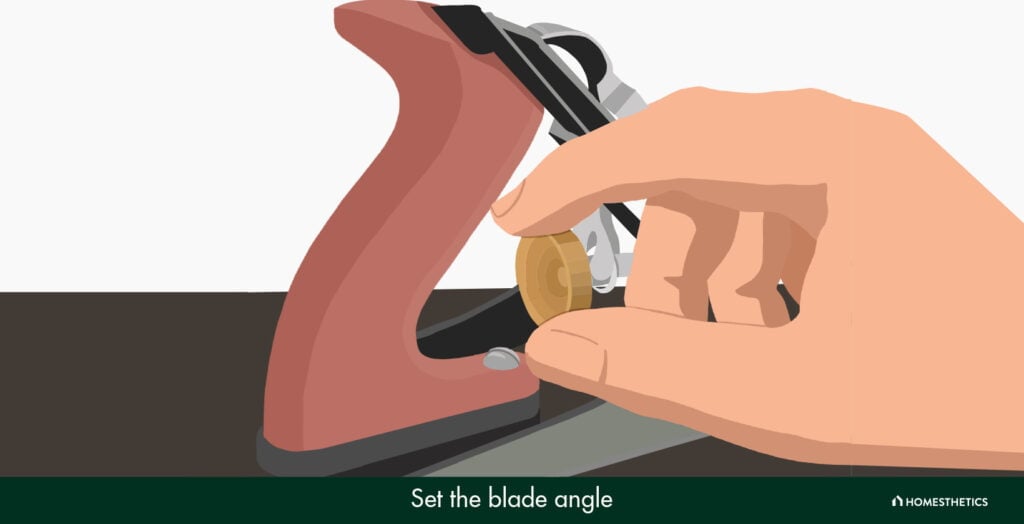
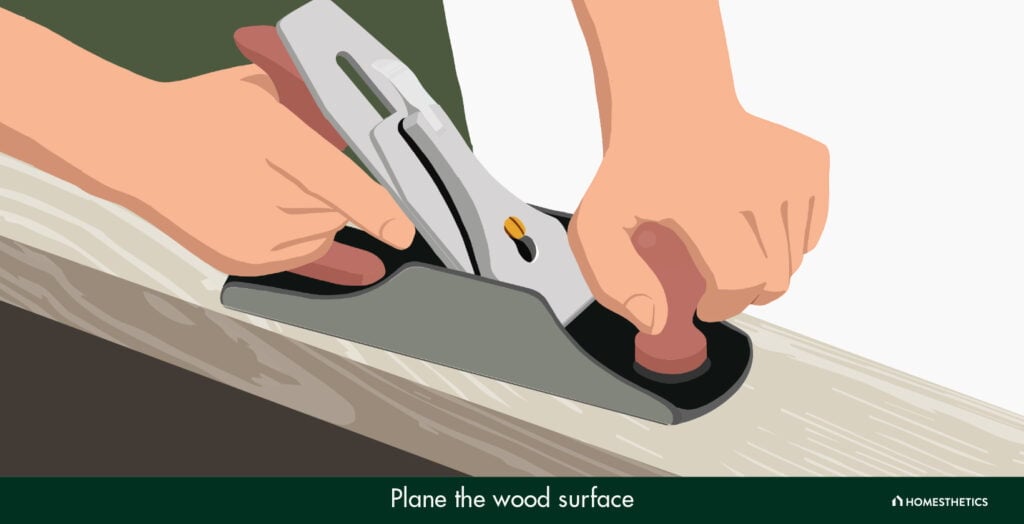
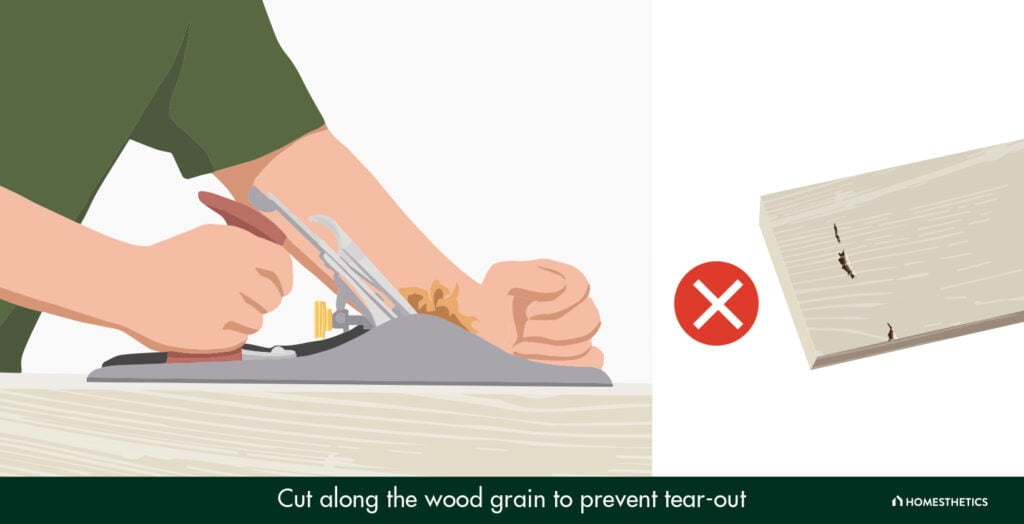
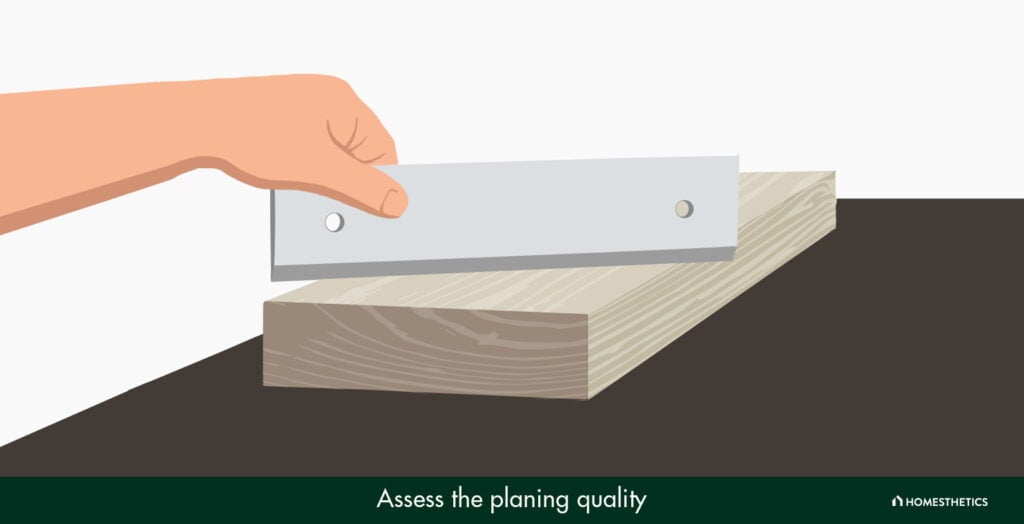
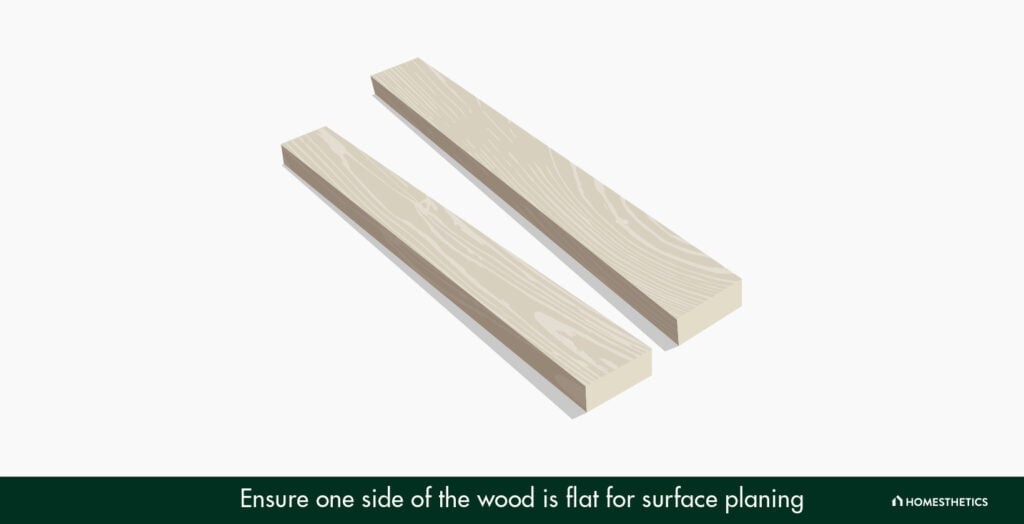
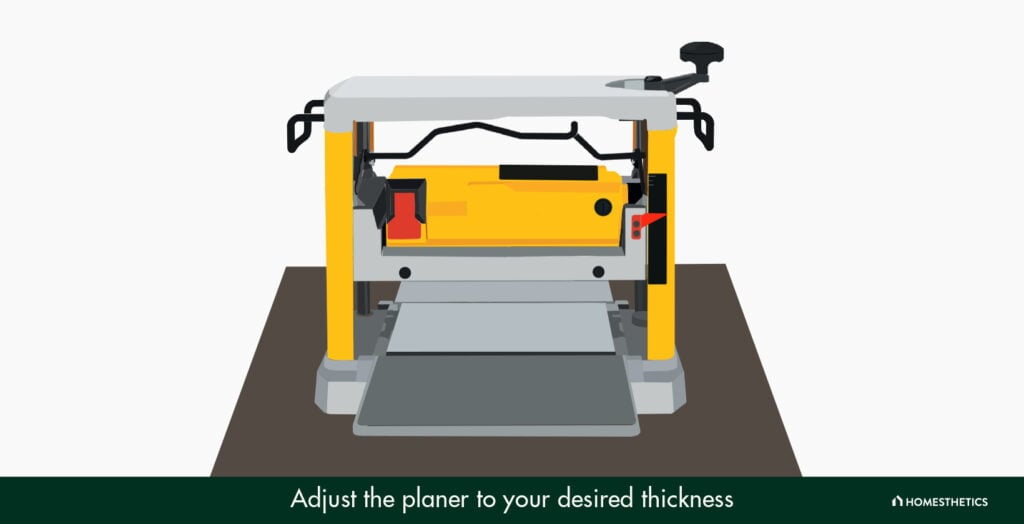
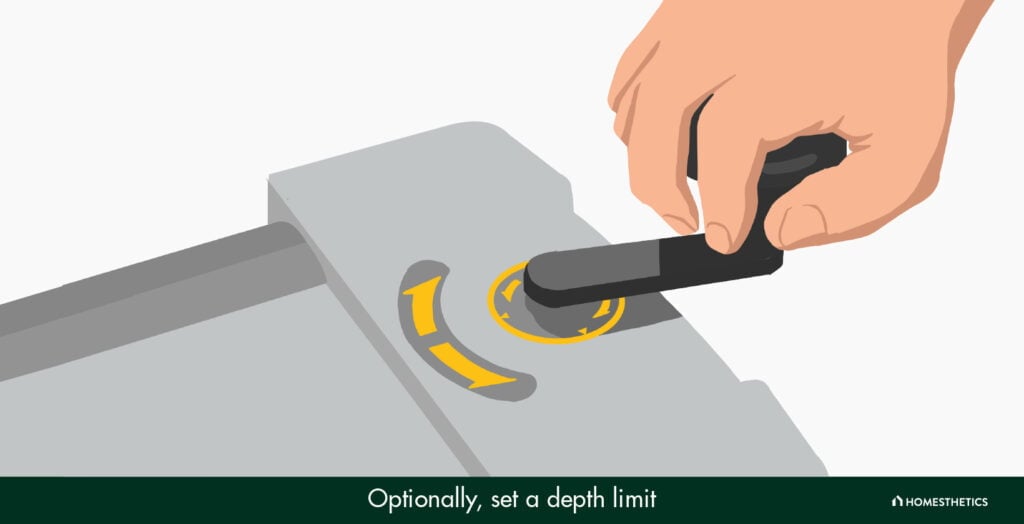
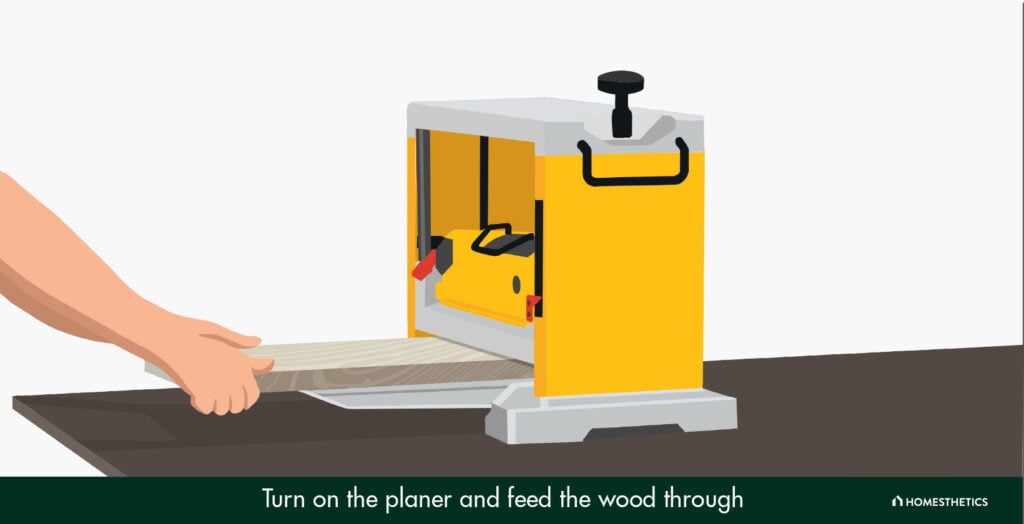
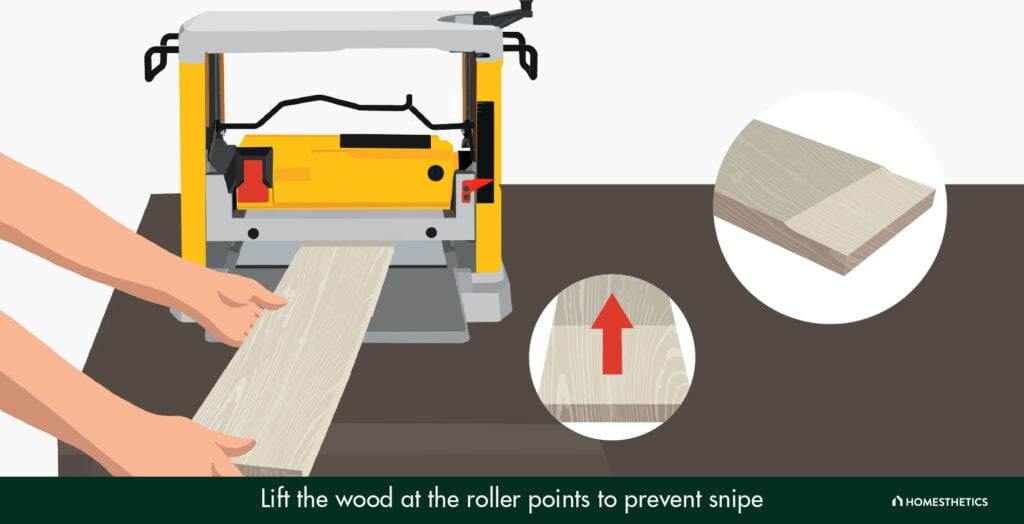

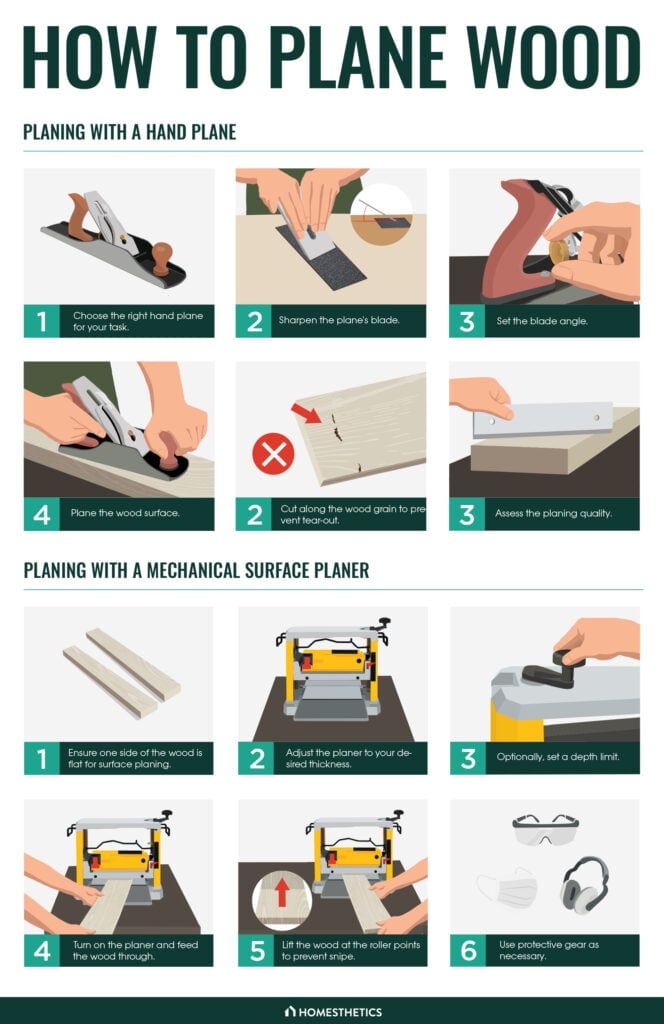

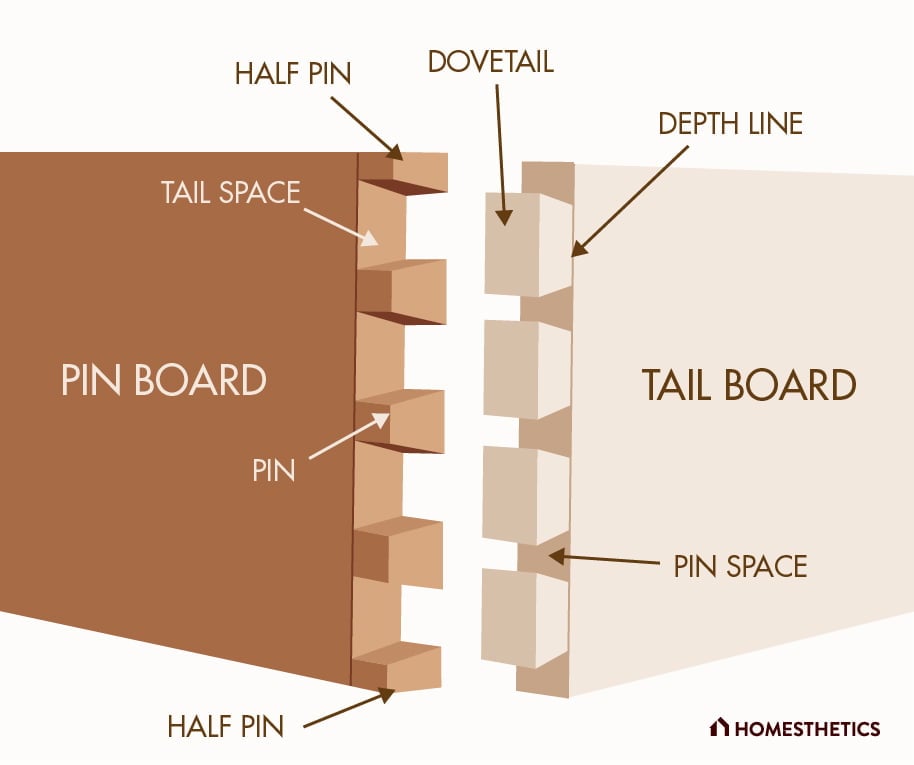
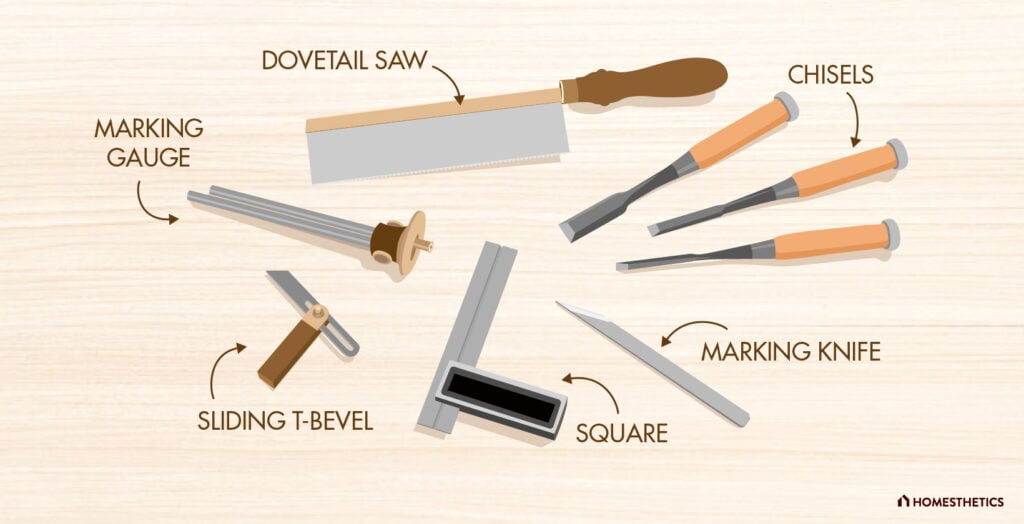
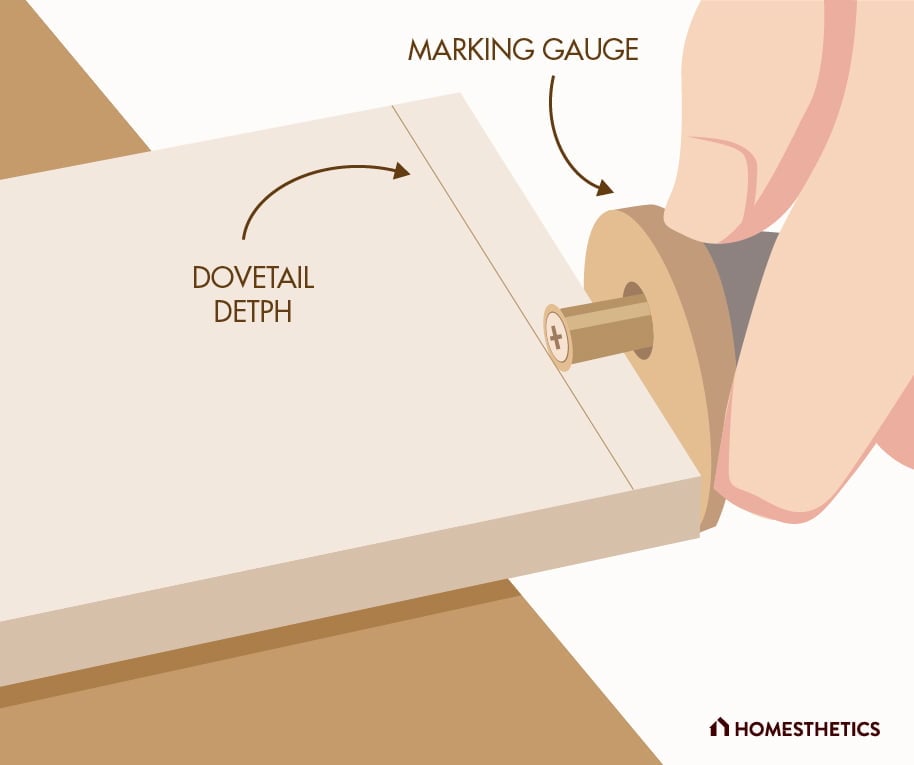
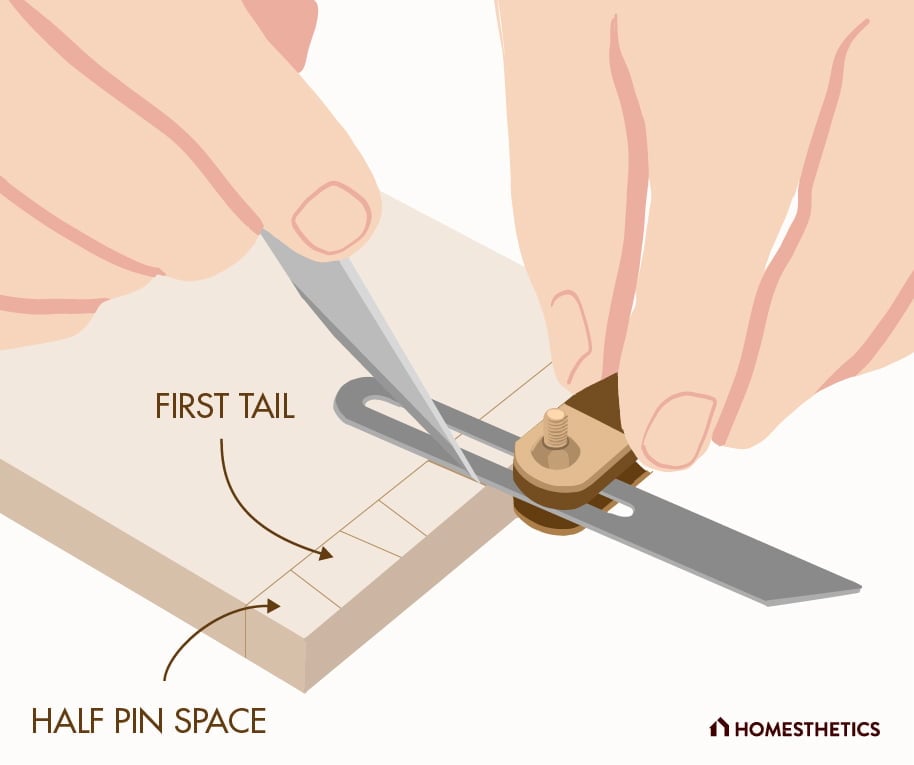

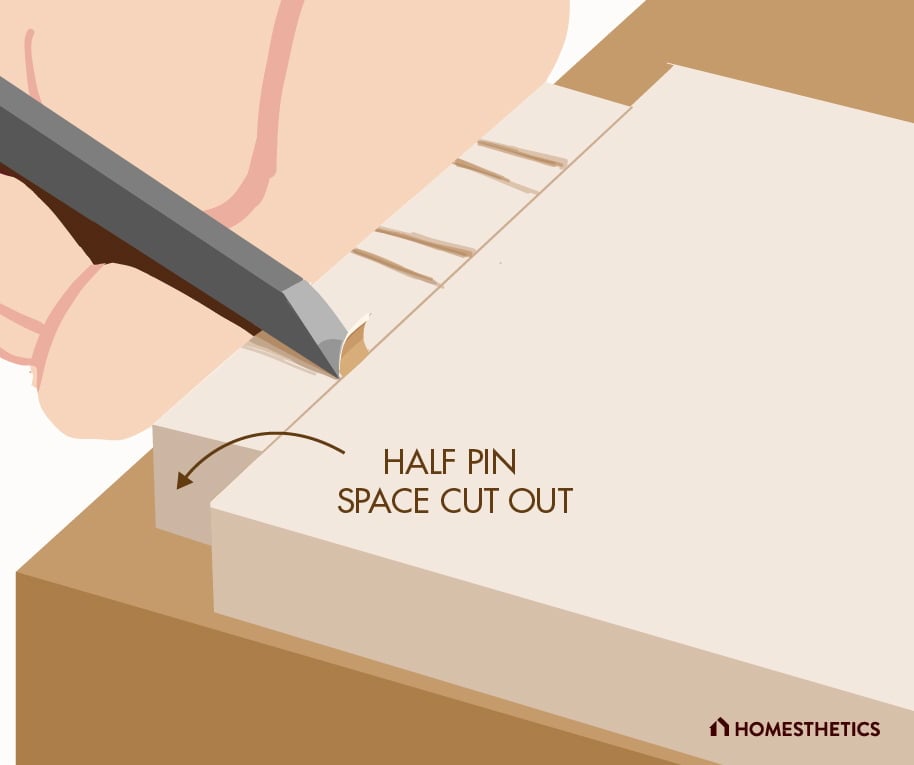
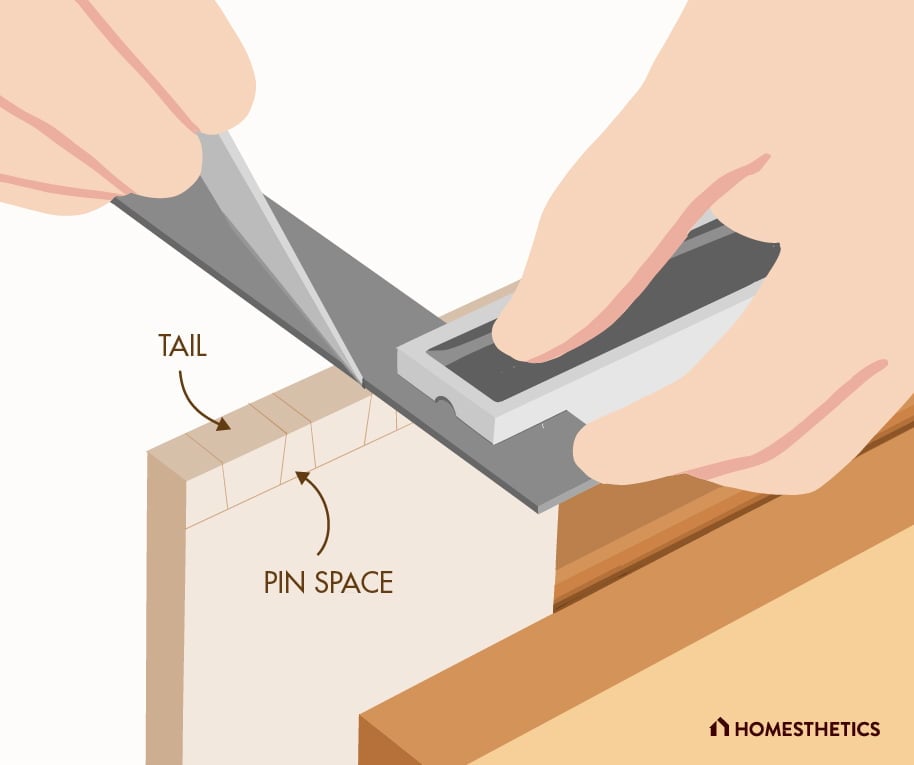
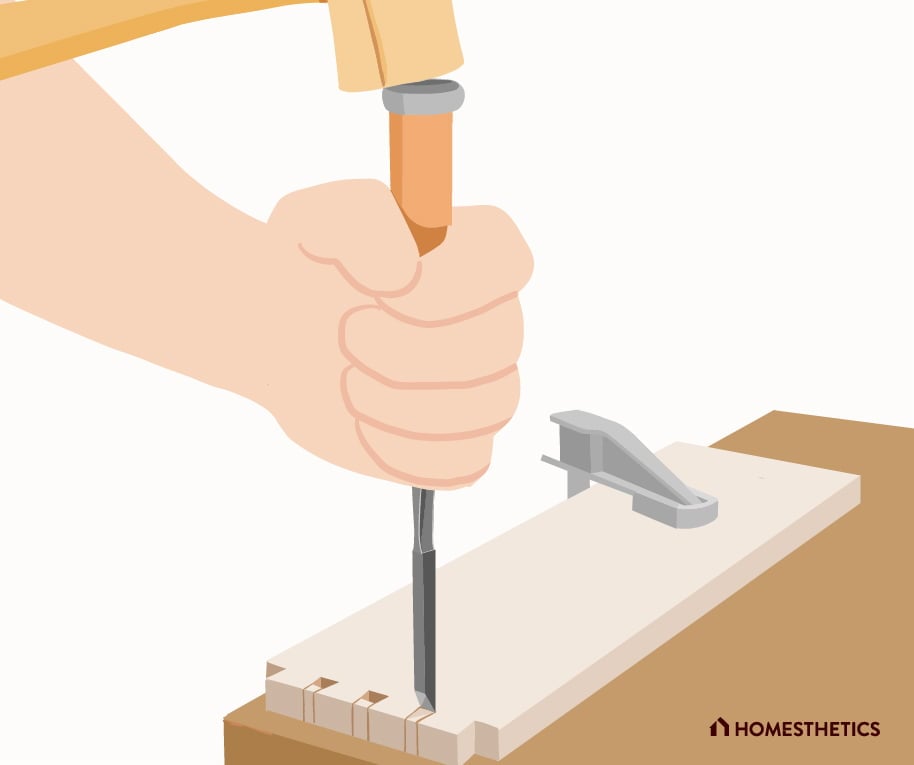
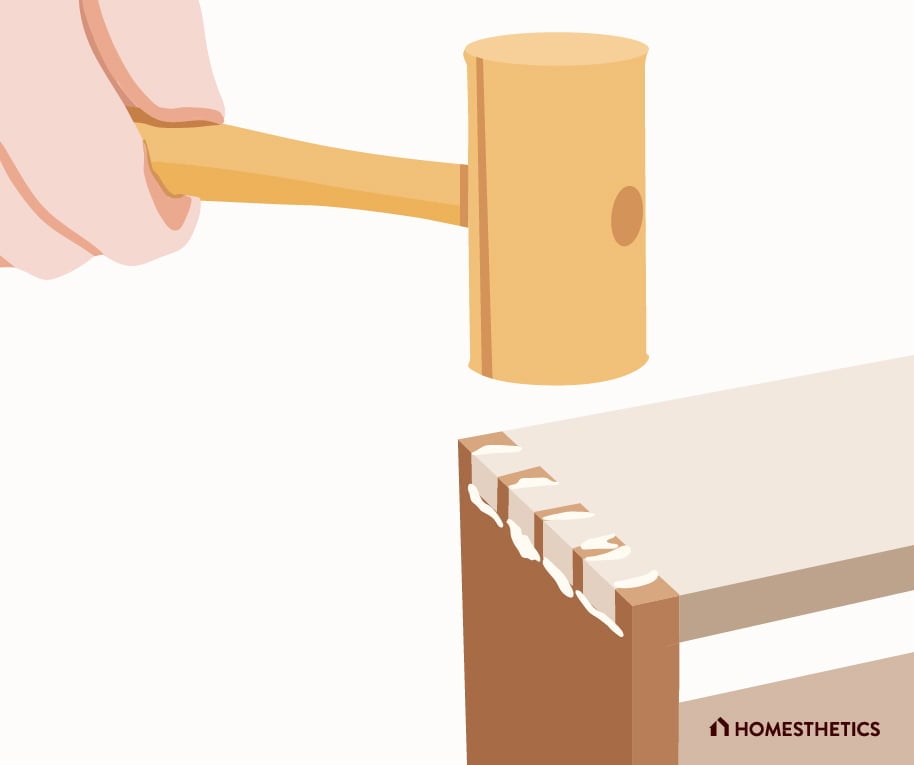
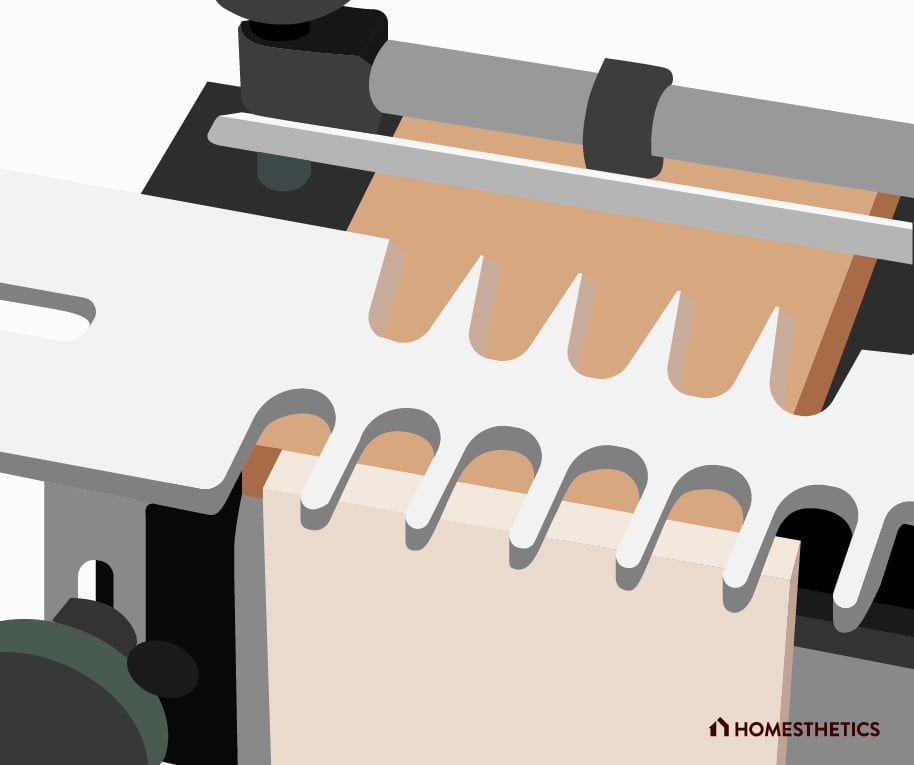


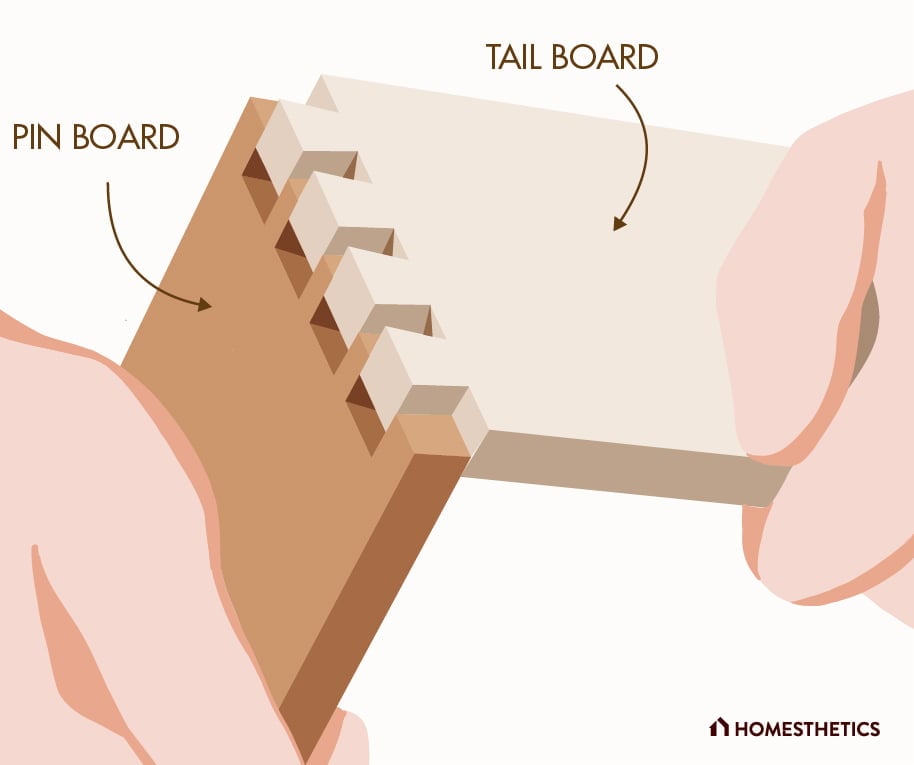
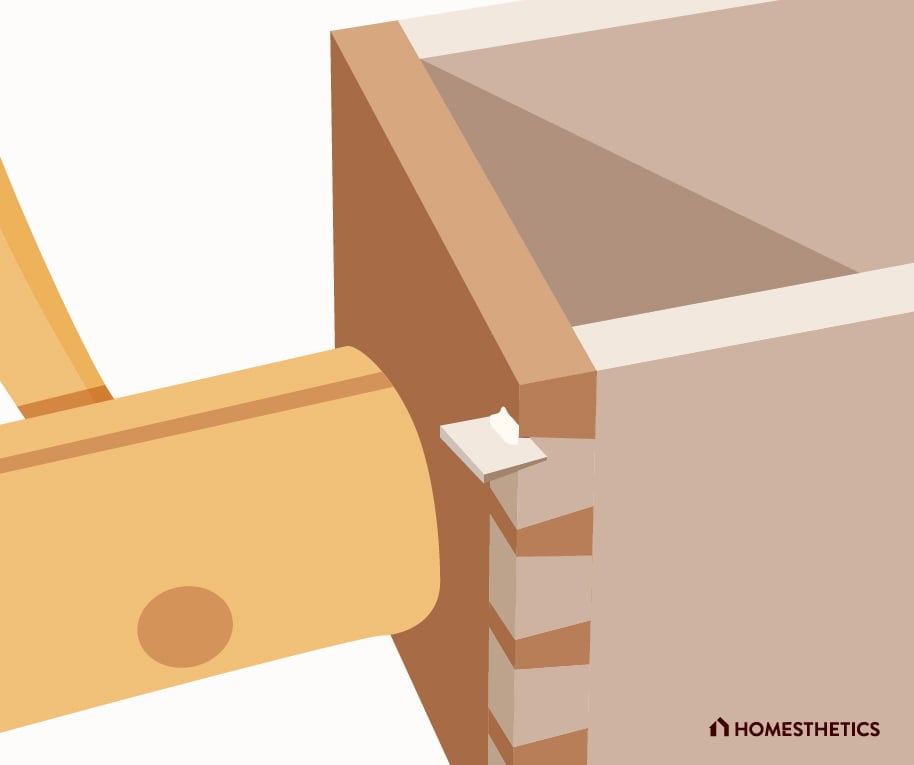
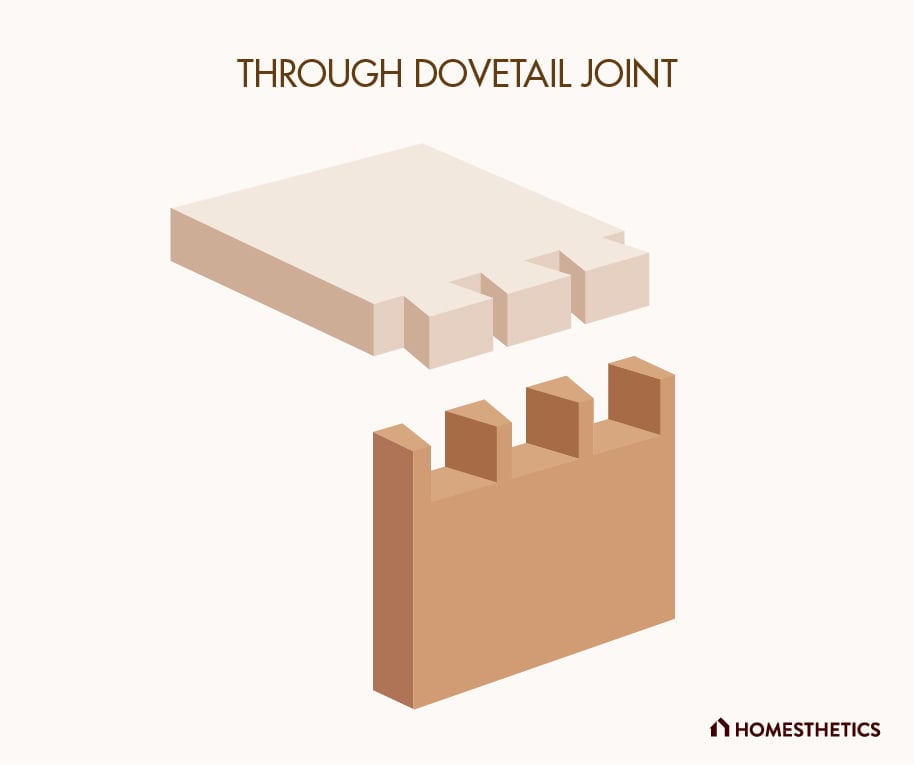
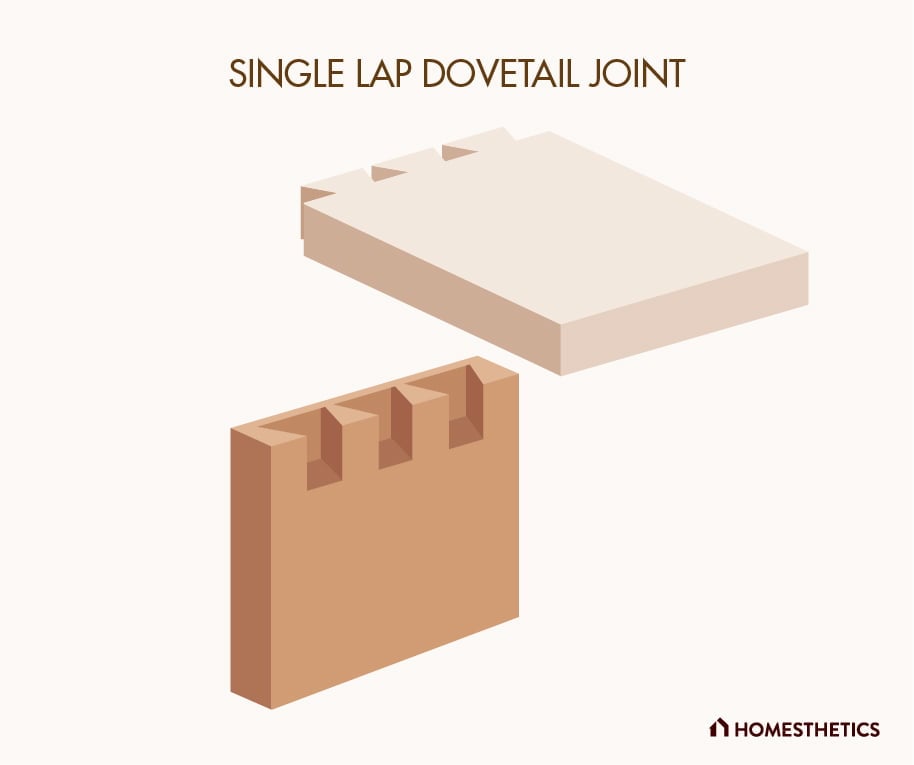
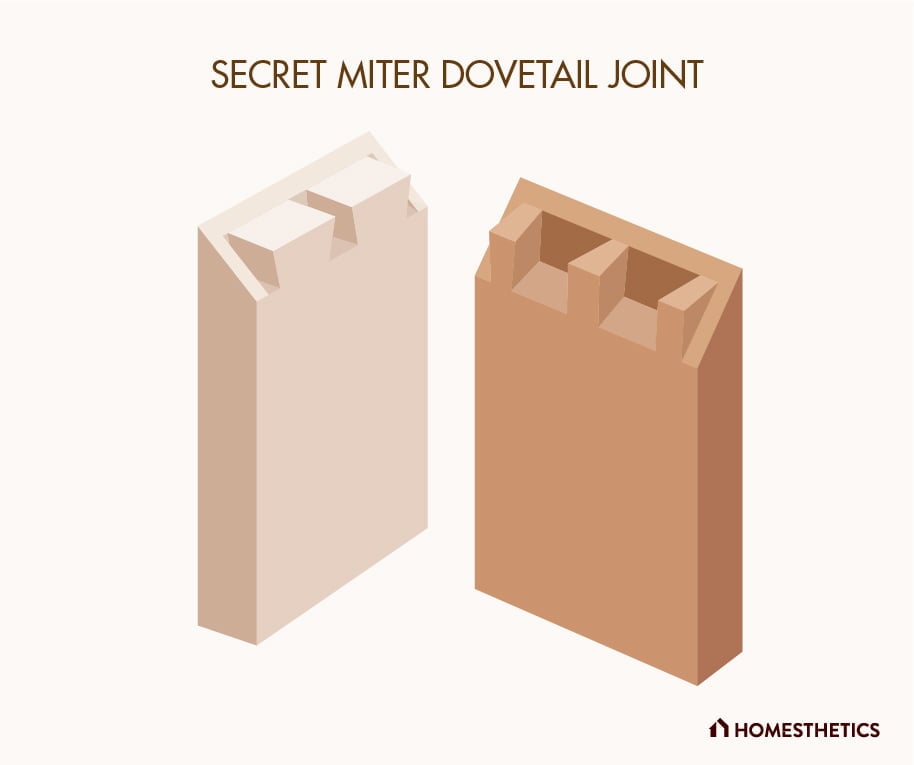
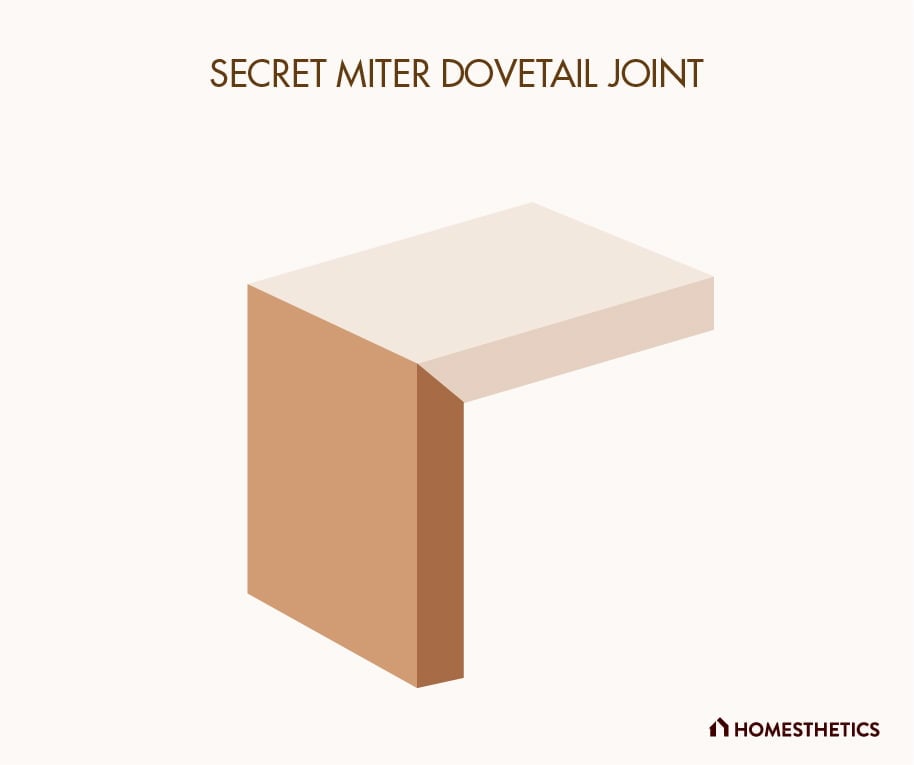
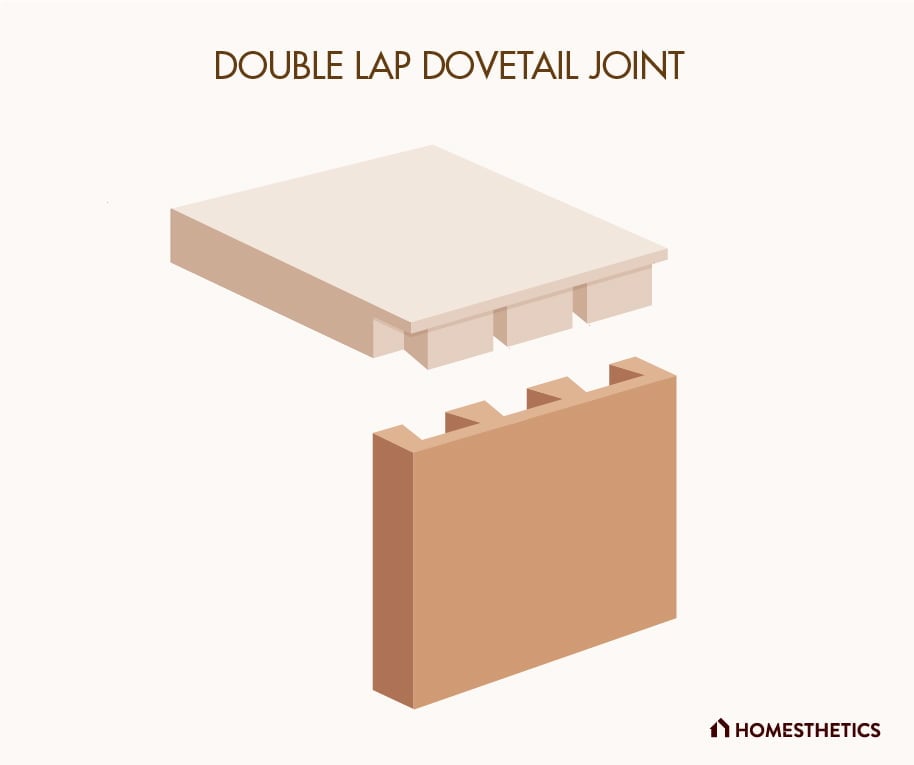
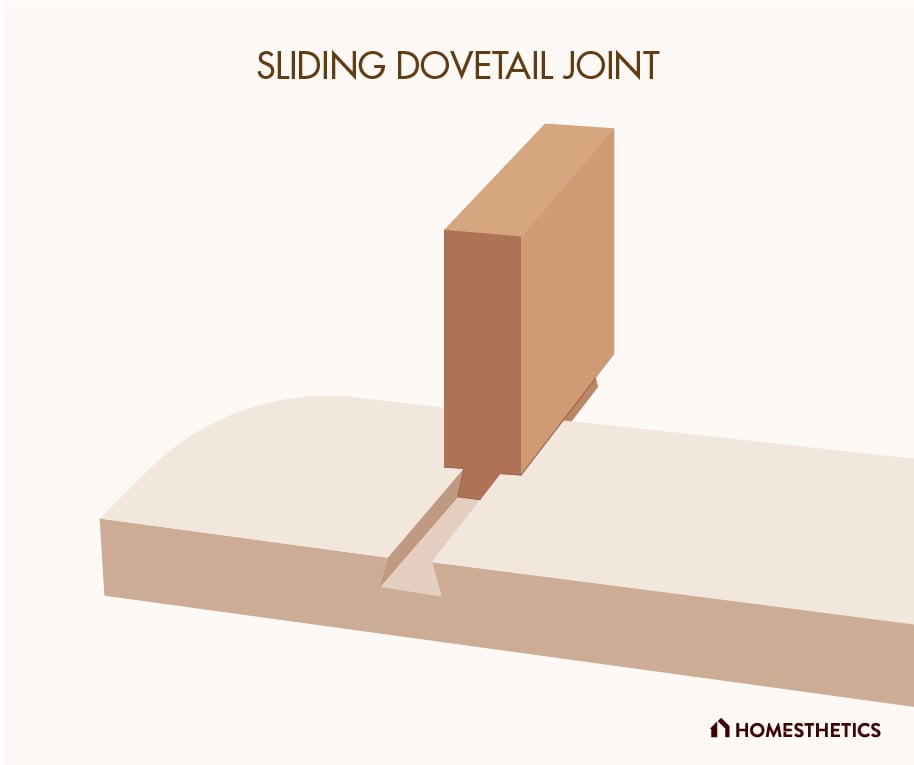


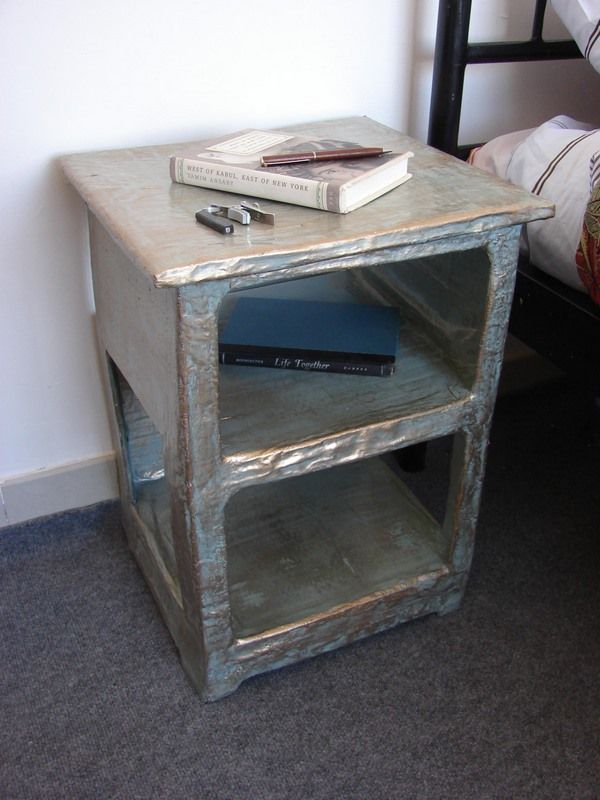

![Wood pallets can be used to make any piece of furniture : tables , beds, chairs , so keep that in mind when your plan your DIY interior furniture project. [ Read More at www.homesthetics.net/?p=15205&preview=true&preview_id=15205&preview_nonce=74c4e926f9&post_format=standard © Homesthetics - Inspiring ideas for your home.]](https://homesthetics.net/wp-content/uploads/2014/09/exnwhy.jpg)

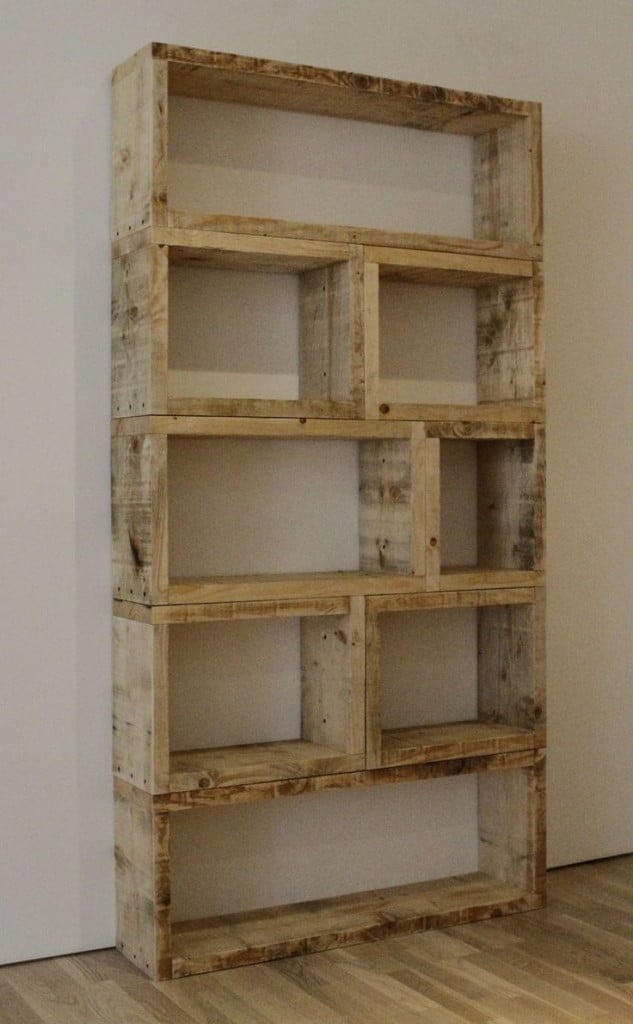
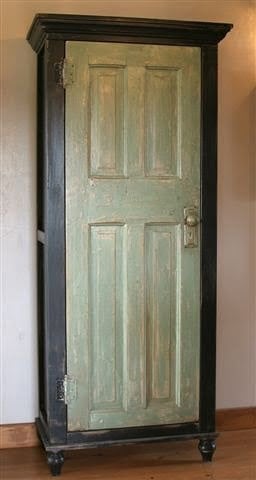
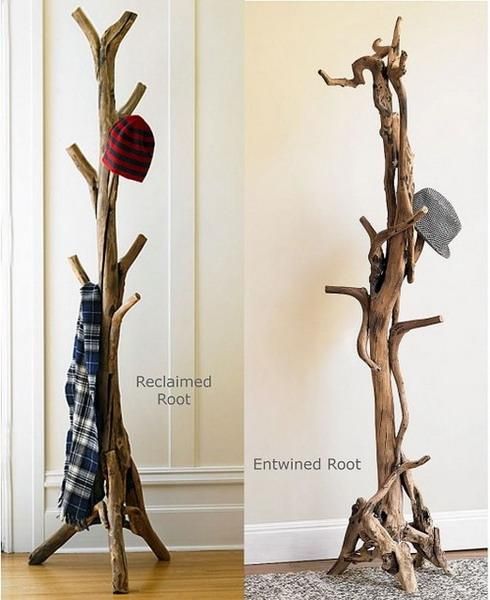
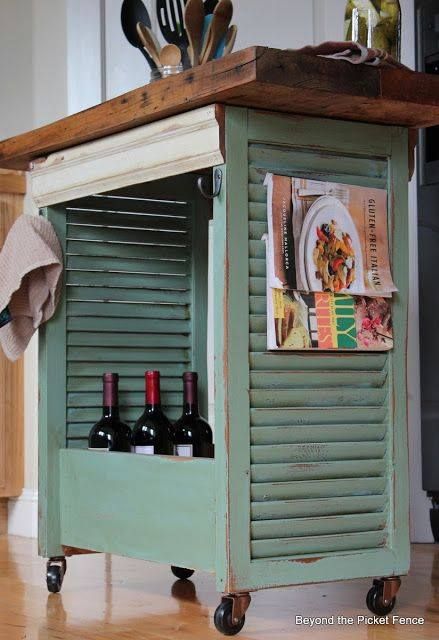
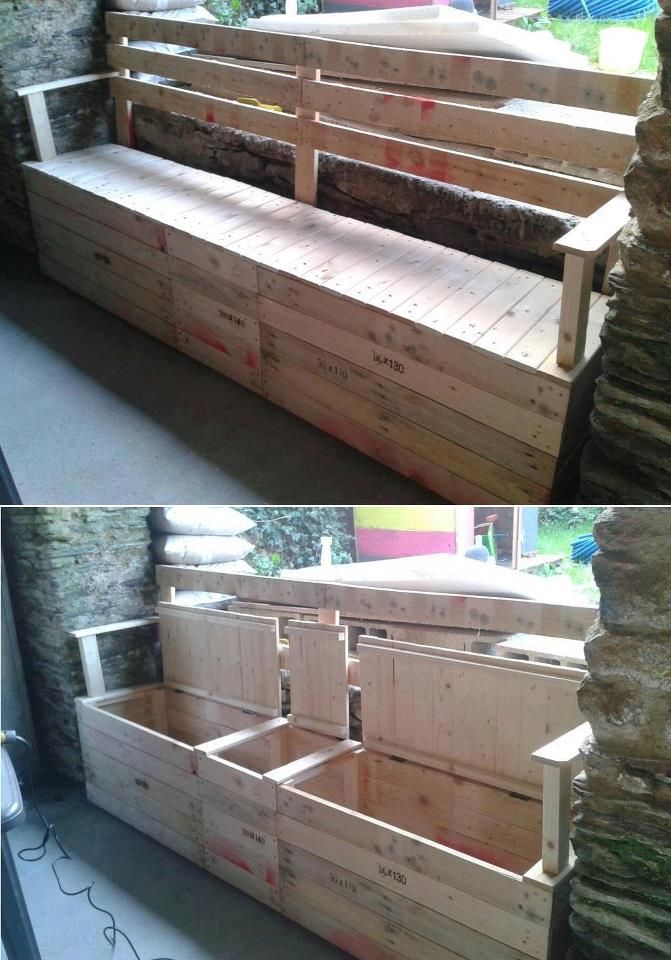
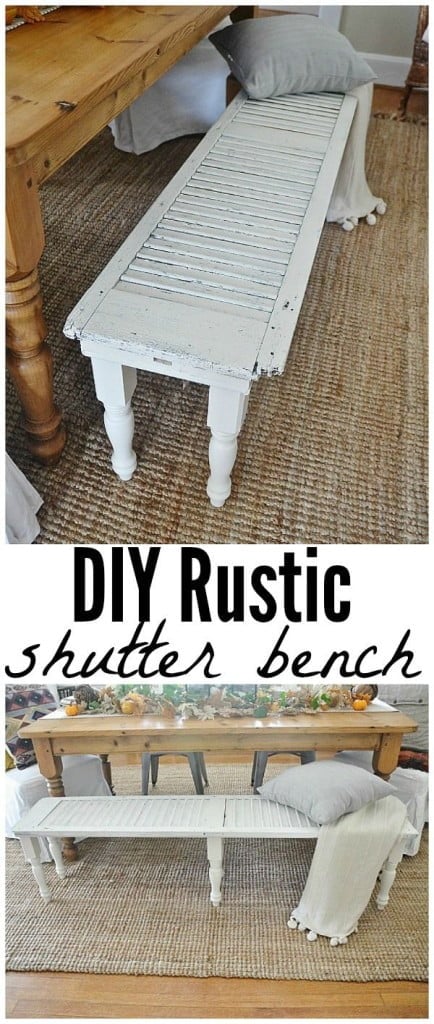
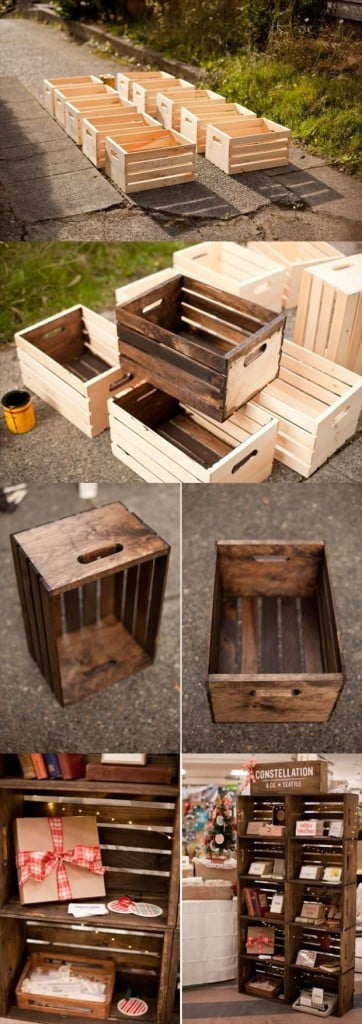
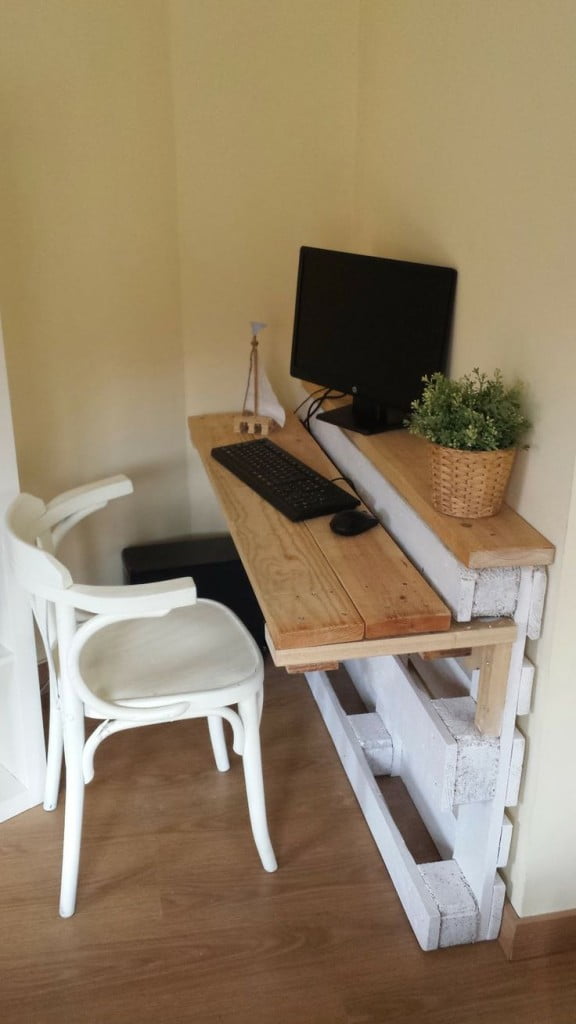
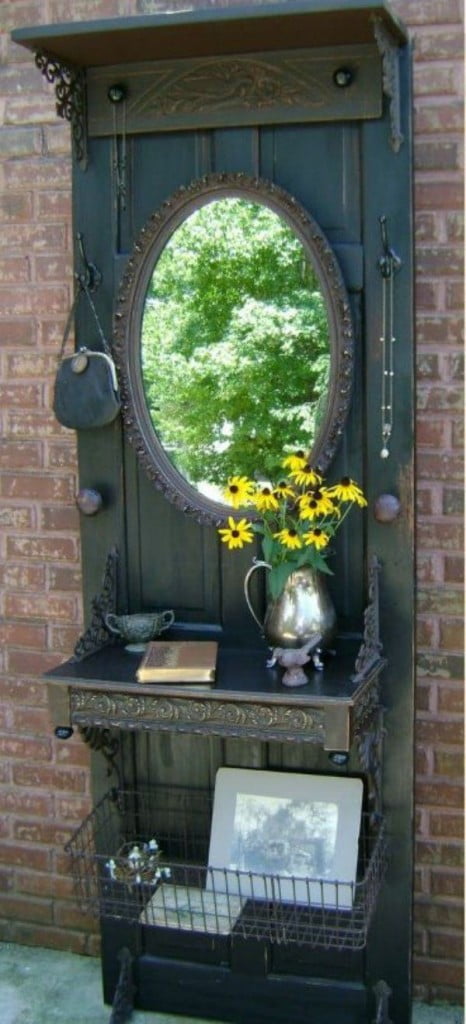

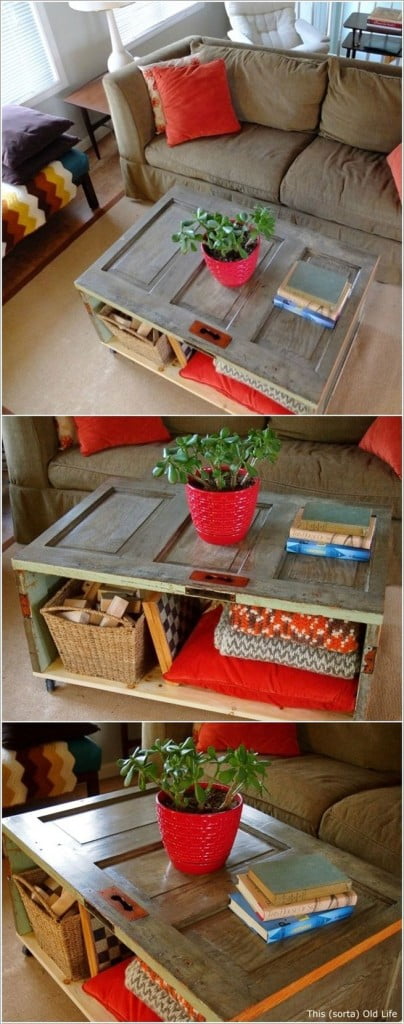
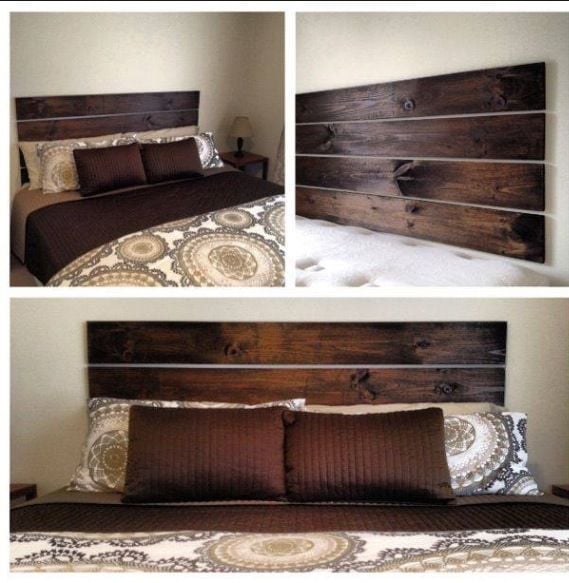
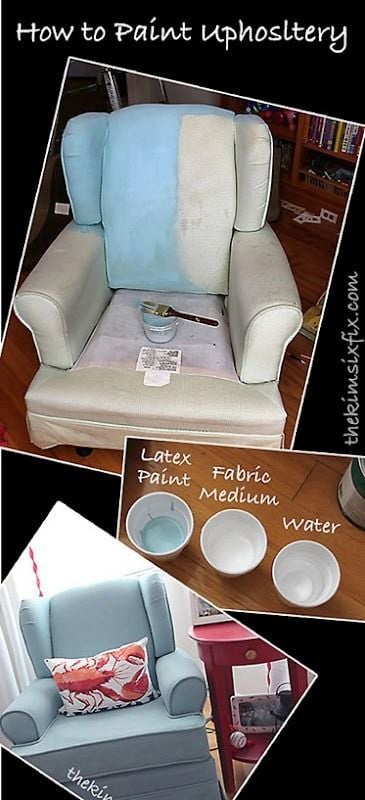

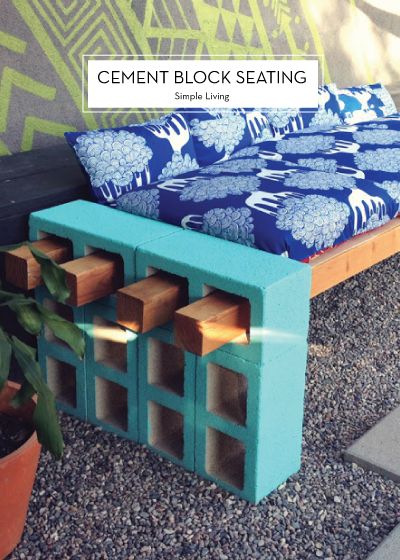
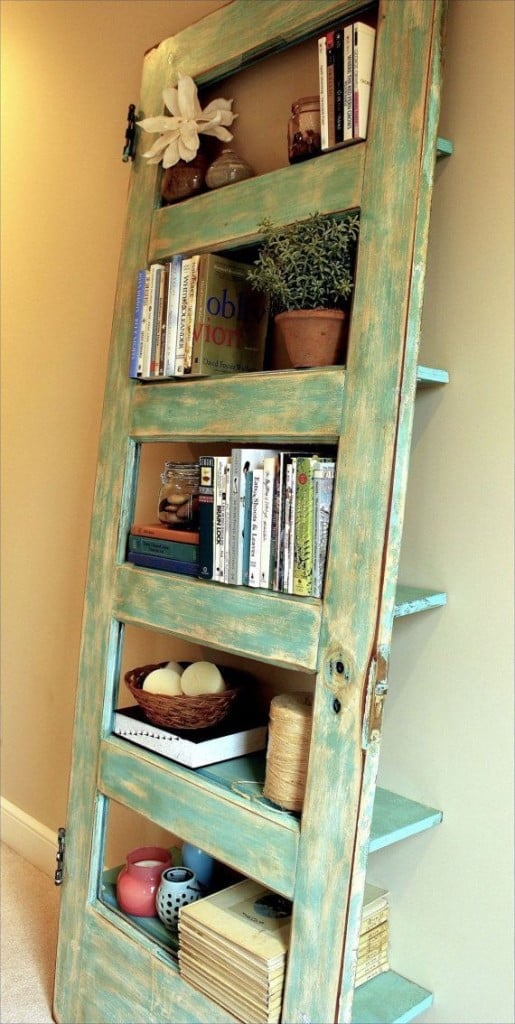

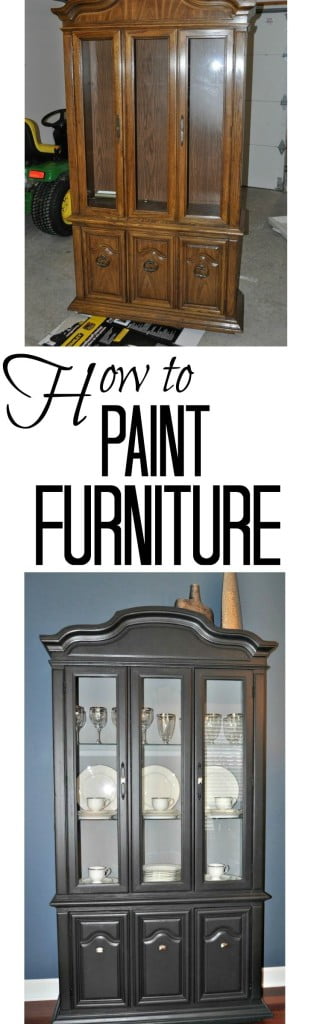


 Image via
  Image via
  Image via


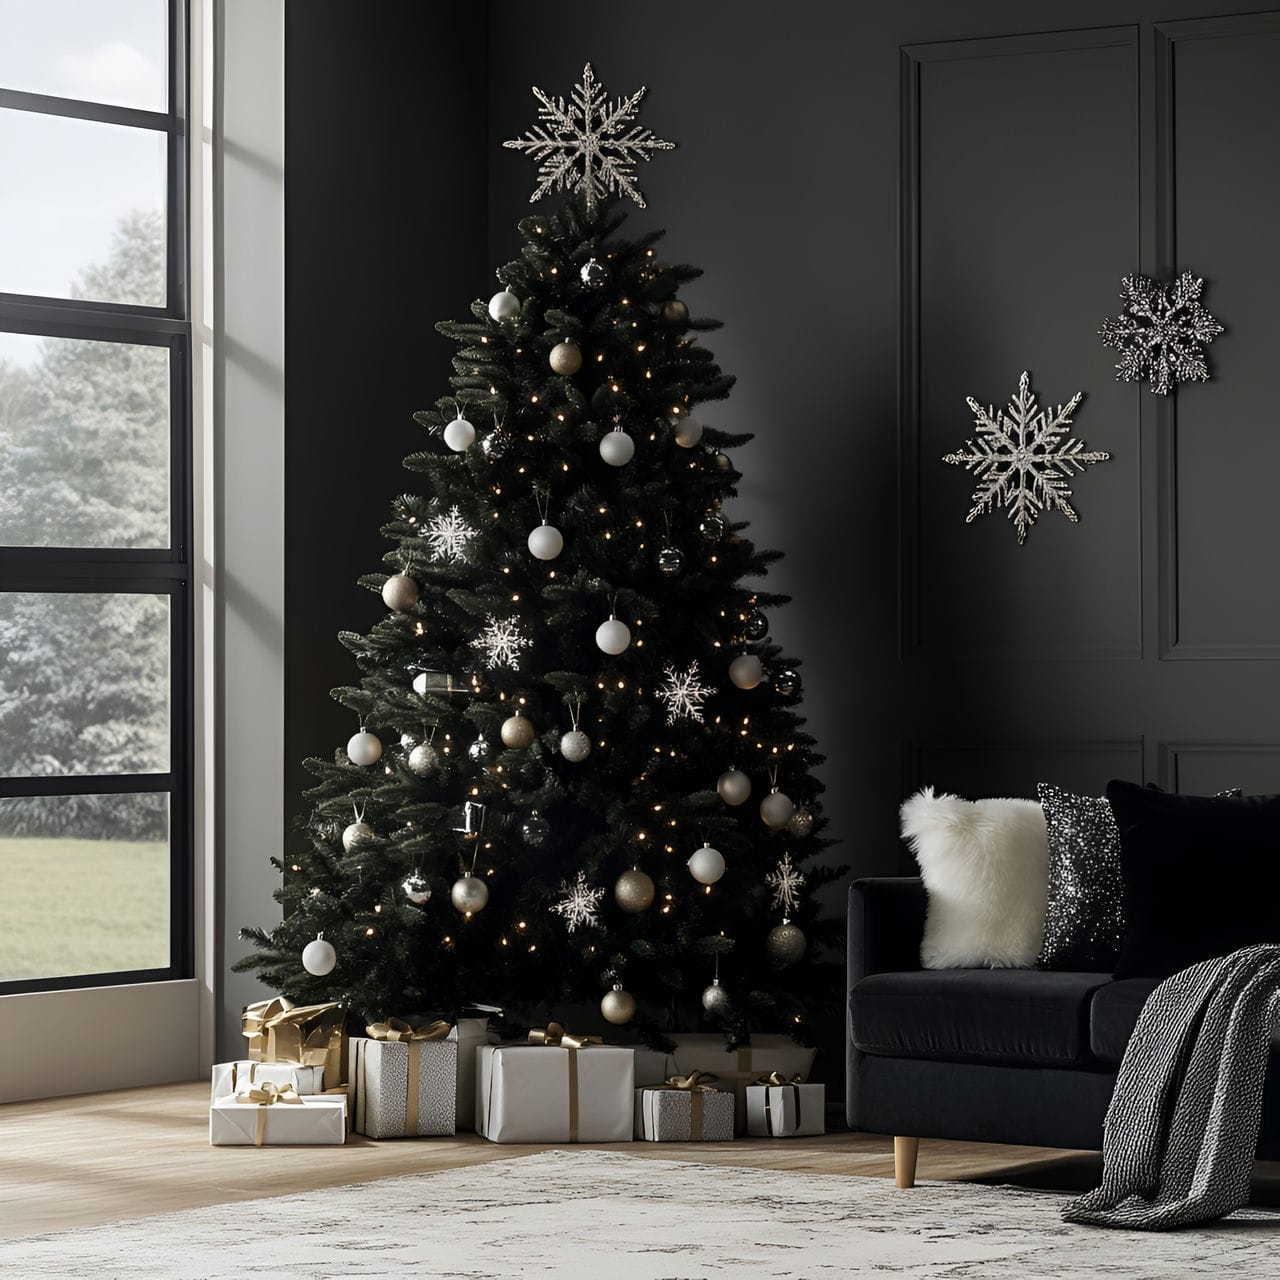


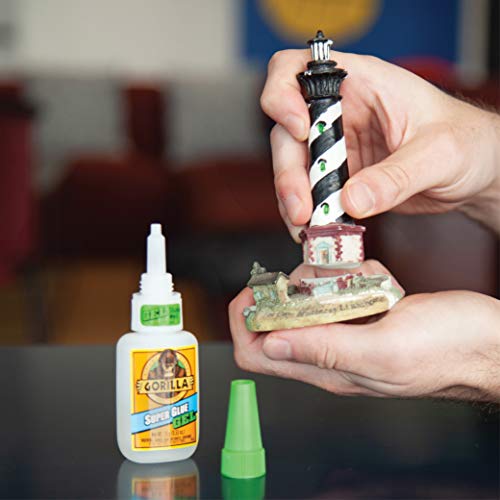
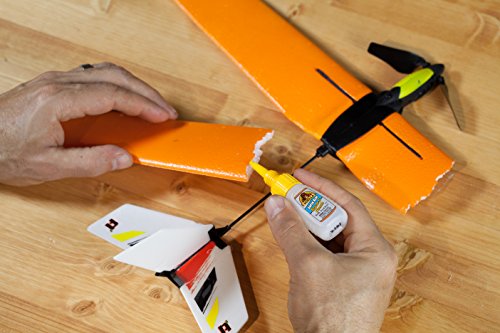

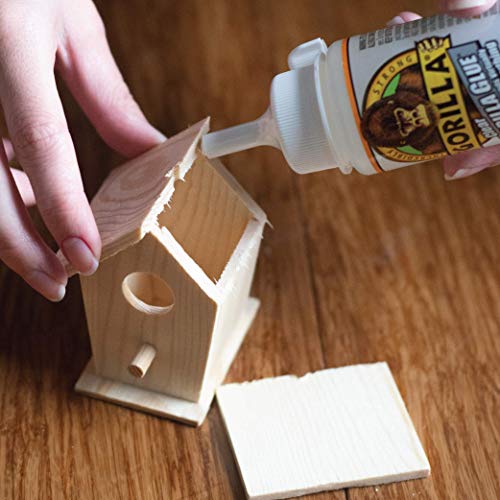
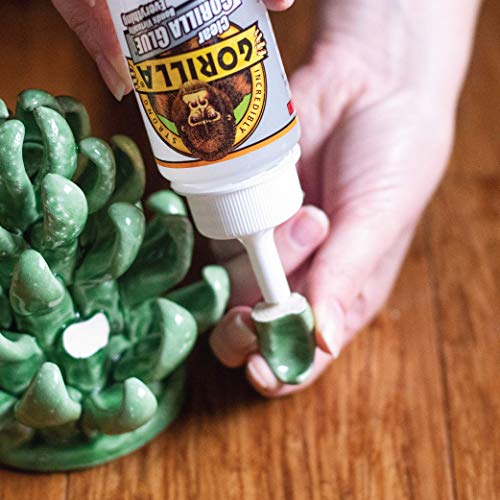
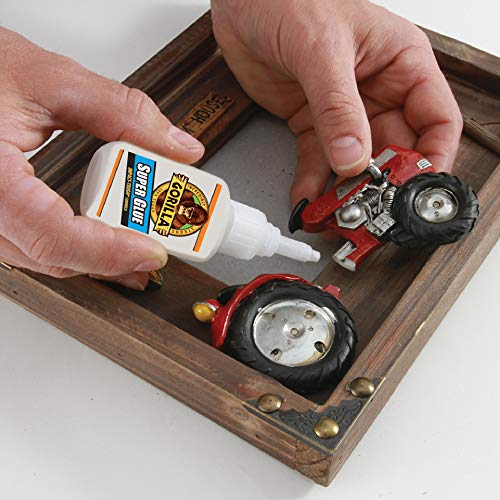
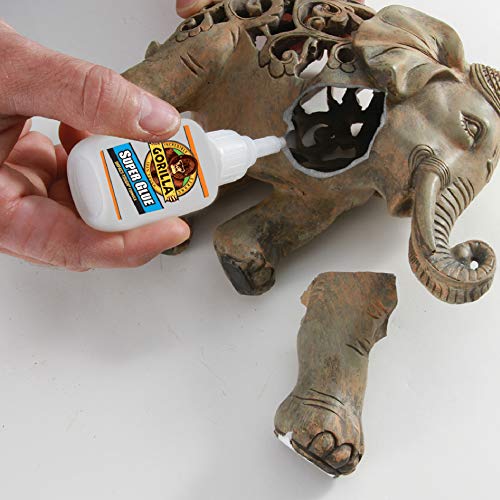


![Bissell Crosswave 1785A vs 2306A [Two Legends Compared]](https://homesthetics.net/wp-content/uploads/2021/12/Bissell-Crosswave-1785A-vs.-2306A.jpg "Bissell Crosswave 1785A vs 2306A [Two Legends Compared]")
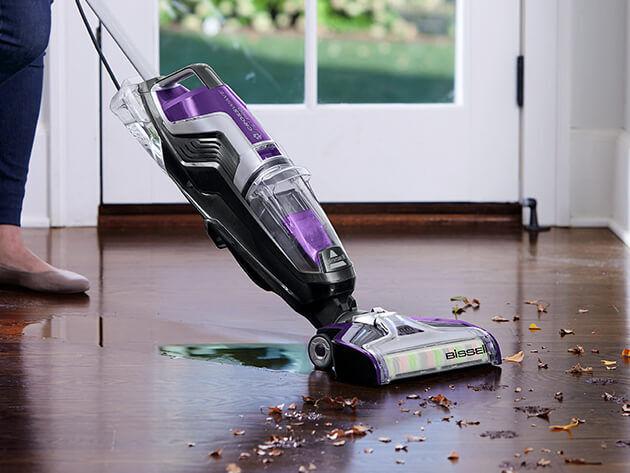

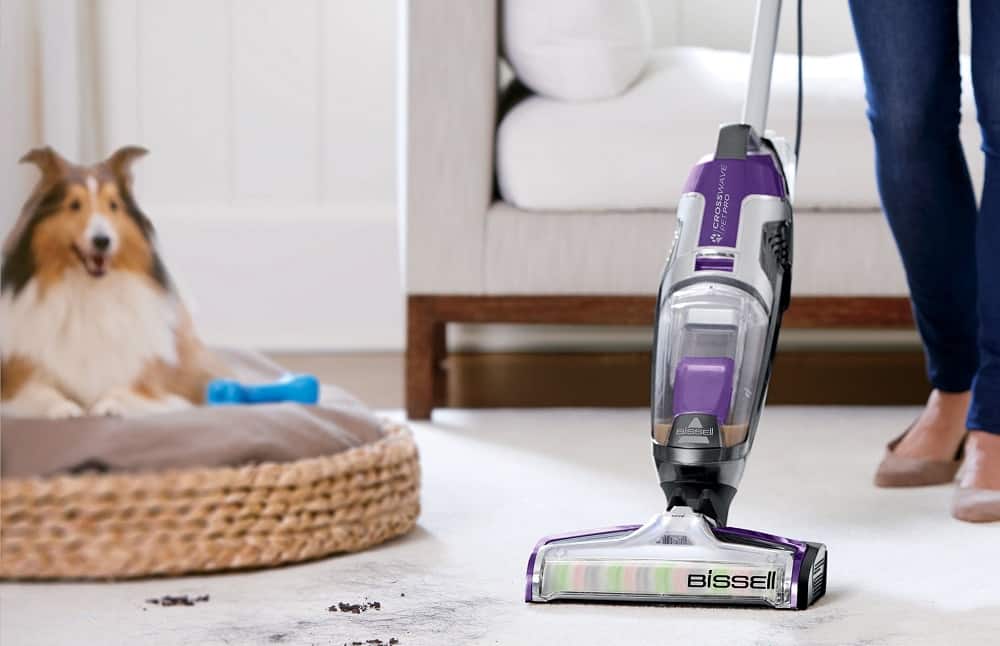
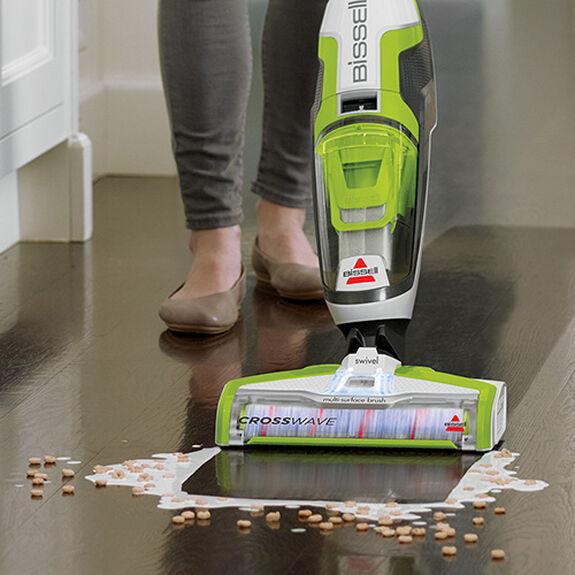
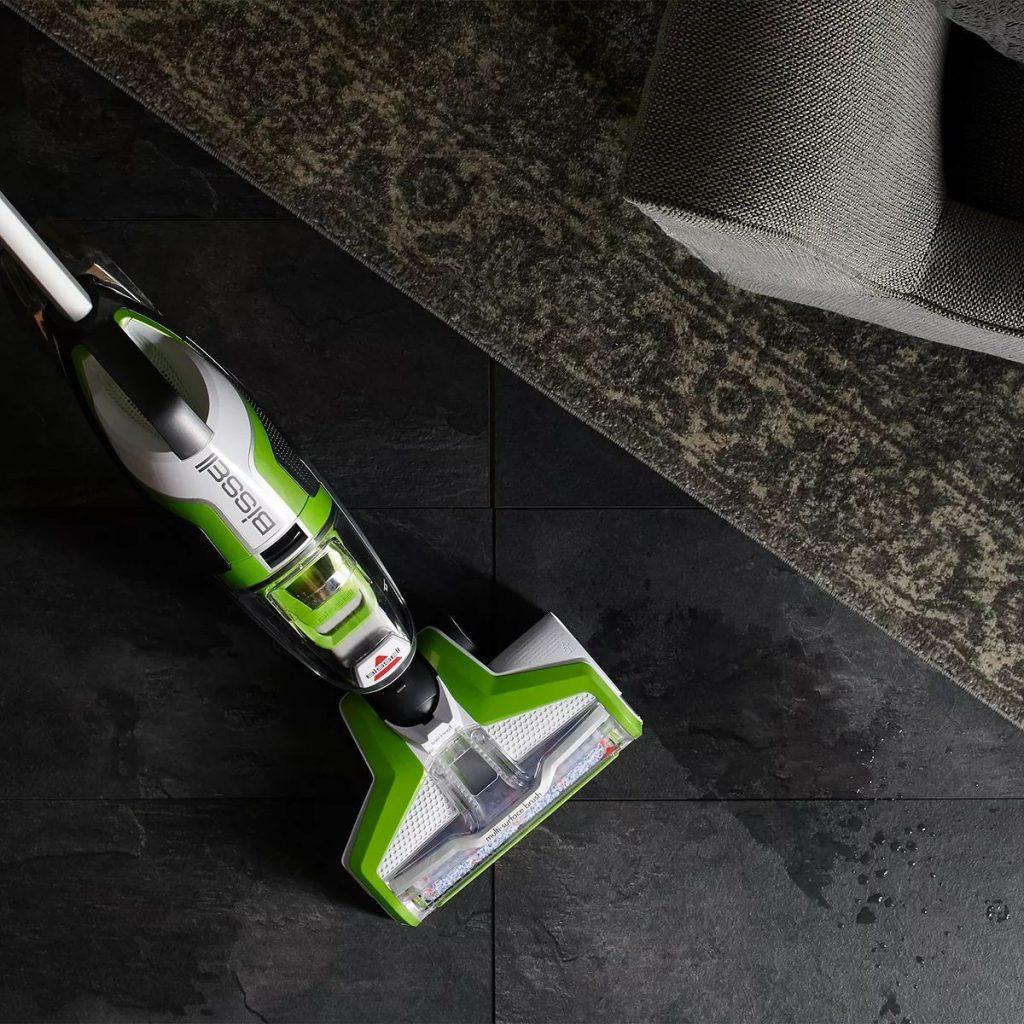


![How to Remove Wood Glue [Removing Wood Glue 101]](https://homesthetics.net/wp-content/uploads/2022/01/How-to-remove-wood-glue-1.jpg "How to Remove Wood Glue [Removing Wood Glue 101]")