

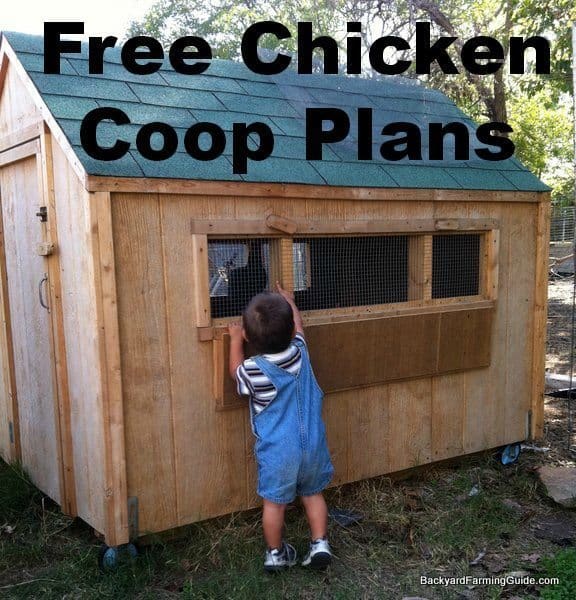
Well, the first thing you need to do is to choose a plan that will fit your needs and give your chickens the right room to stay in. A portable coop plan lets you be more flexible in designing your coop and is also a popularly chosen option. So, it will be an ideal style to go for.
But there are a multitude of portable chicken coop plans available across the internet. As such you might get confused while searching for a plan that will fit your requirements.
To make your task simpler, we have selected the 30 best options for you. Also, we have included the details of the materials to be used, the structure, and a few instructions for each coop plan.
Read on to know more.
Portable Chicken Coop Plans
-
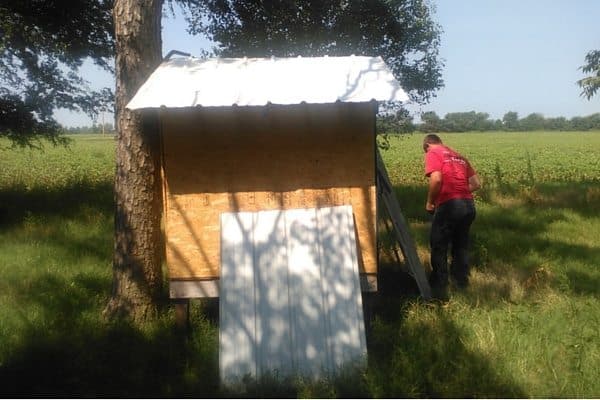
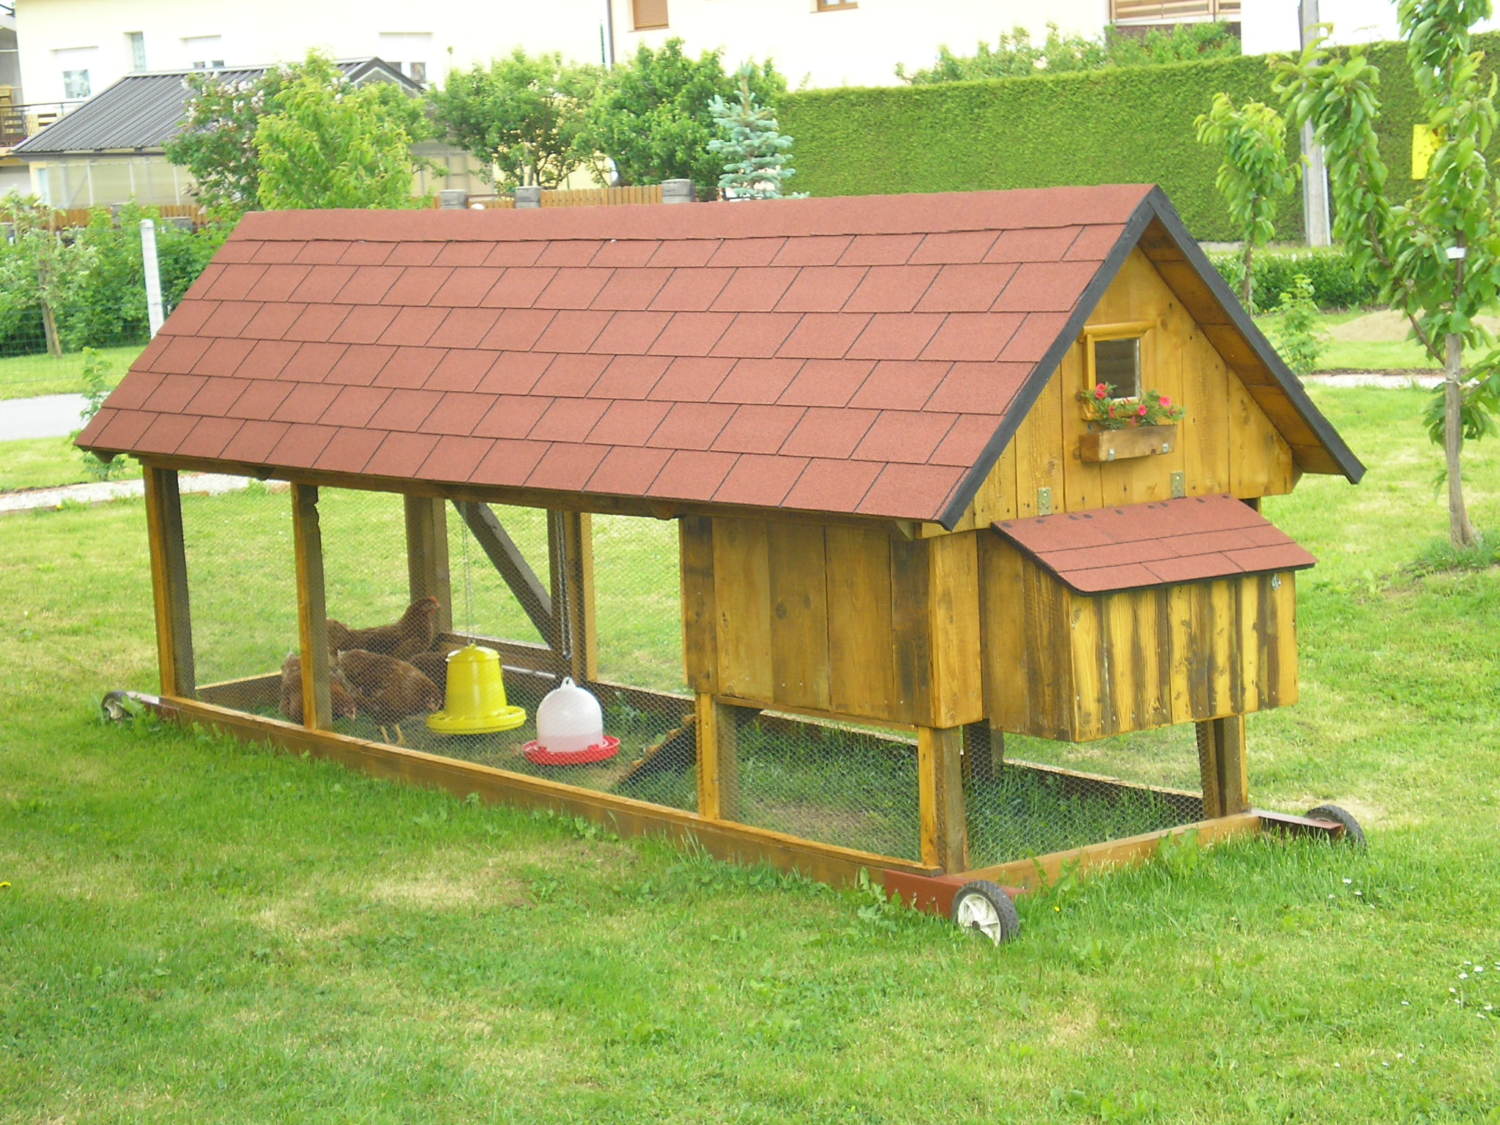
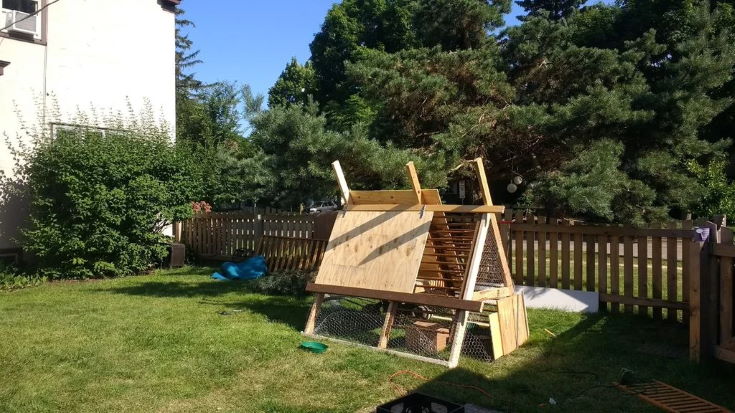
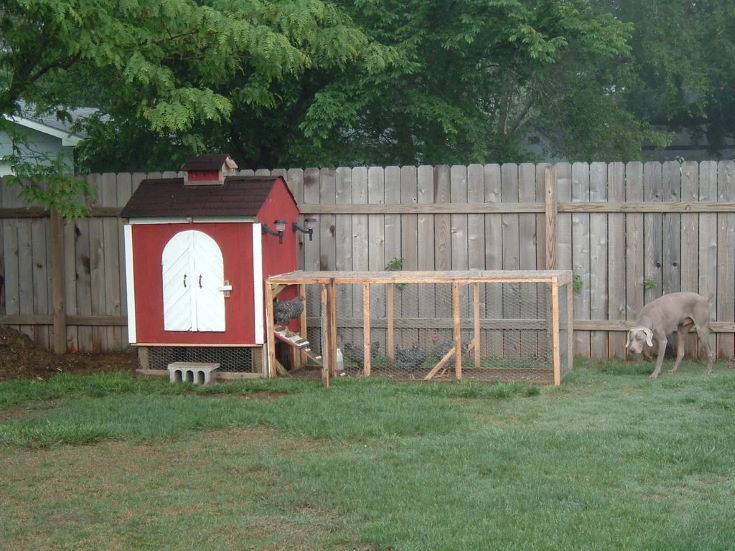
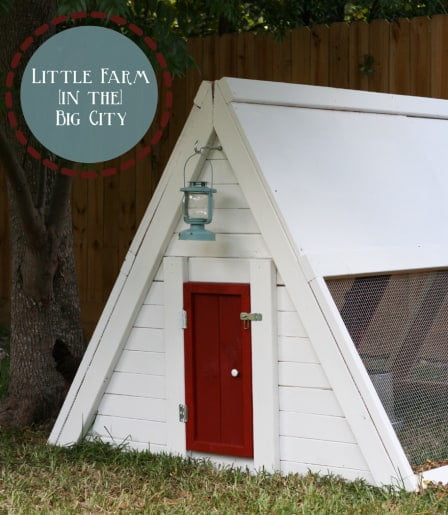
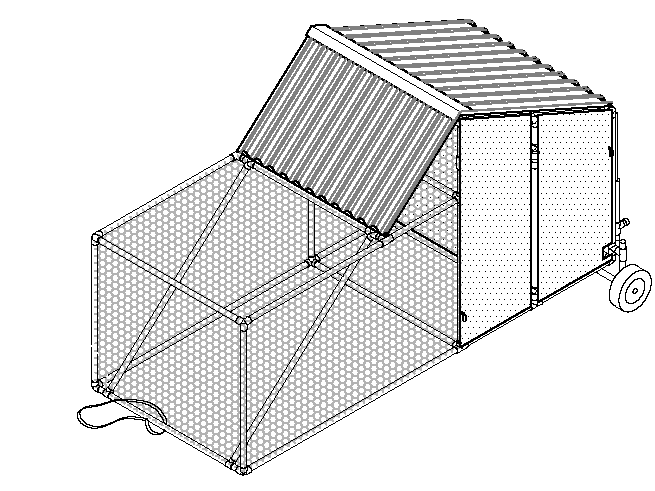
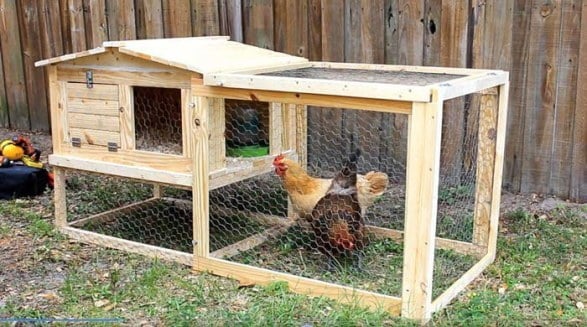
Classic A-Frame
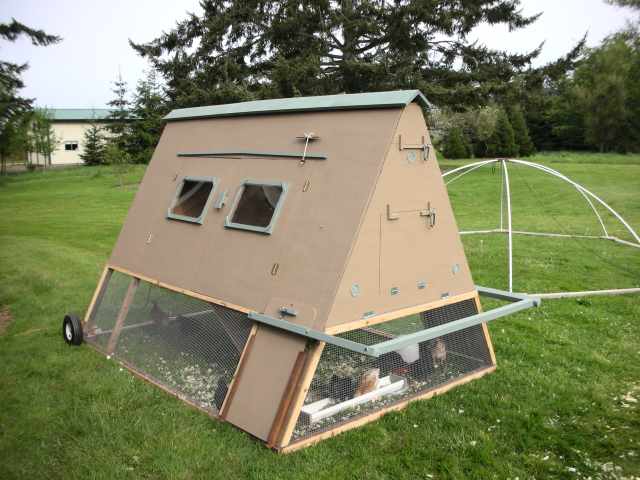
If you want your chicken coop to be easy to manage, you will love this classic coop with an A-Frame shape. It has a whole lot of amenities that you can’t help being impressed with.
First of all, it has a large living area that is fit for breeding lots of chickens. Added to this, durable wheels help easy movement, while convenient handles enable pushing and lifting. Thanks to the sturdy material of the wheels, there is also not much wear and tear during the movement.
Most importantly, the coop can be moved to your grass lawn whenever you feel. In this way, the chickens could have sufficient insects and grass to graze on.
Also, the A-frame helps you to cover the lower portion easily during inclimate weather for added protection. Even placing water and food within the coop is not much of a problem.
-
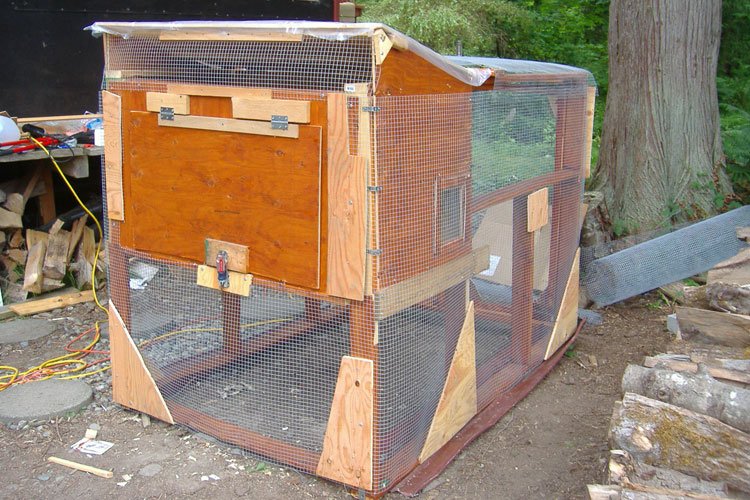
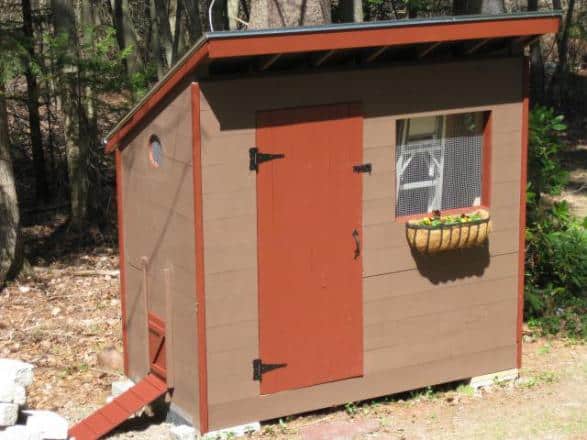
Vacation Home
This one truly looks great and seems like it would be perfect for any beachfront. It has a run styled like a porch and a cute ‘upper-story’ living area. Equipped with wheels and handles, it is quite easy to move from one location to another.
Note that this coop is ideal if you have 8 to 10 chickens or a few more. The design is a very simple one and has few angular ends. There are quite a few segments so as to house more chickens than the tractor-shaped ones.
To make the plan a reality you can start by forming the structure through rectangular wooden blocks. Then move on to complete the coop through old treated plywood pieces and discarded vinyl floorings. These can make the walls and floor of the ‘vacation home’ respectively.
Besides, large windows can be made by cutting through the plywoods, but the openings must also be covered by hardware cloth. As such, the ventilation would be perfect for both scorching summers and freezing winters.
-
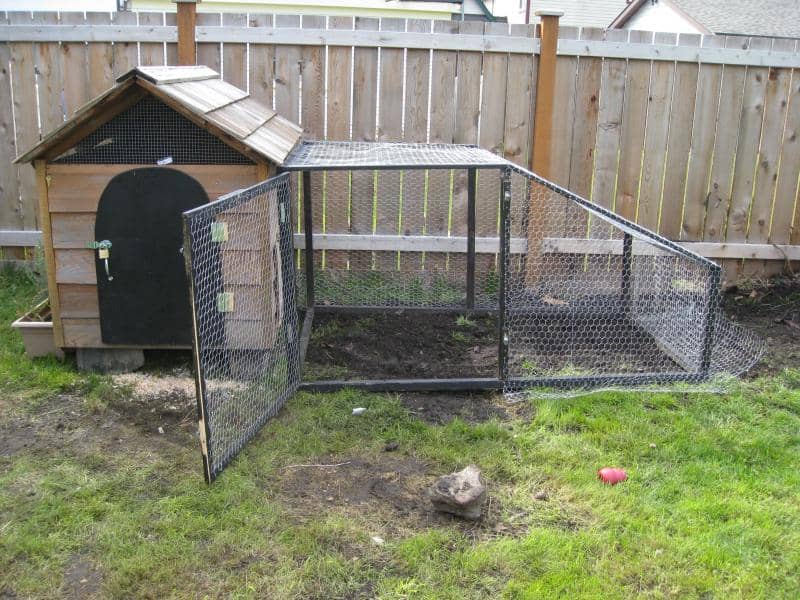
On The Go
Being one of the most innovative plans that you will come across, this would let you move the chickens just about anywhere. What does the magic is a combination of supportive and strong frames and large and durable ties.
Interestingly, this coop is made to look like a hutch and consists of an enclosure with both an outdoor and indoor area. Also, an external door lets the chickens free-range and forage prior to returning to the safely built coop.
To construct this coop, you just have to centralize the weight of the hutch so as to balance the gravitational centre of the two-wheels used for movement. Once this is done, your on-the-go chicken coop is all set to be used!
As for the number of chickens that can be housed, it can range from a dozen to more than 30. However, this doesn’t make any difference in the ease of movement, thanks to the balancing of the wheels. Also, the wire mesh windows keep away any predators, thus providing complete safety to your chicken.
-
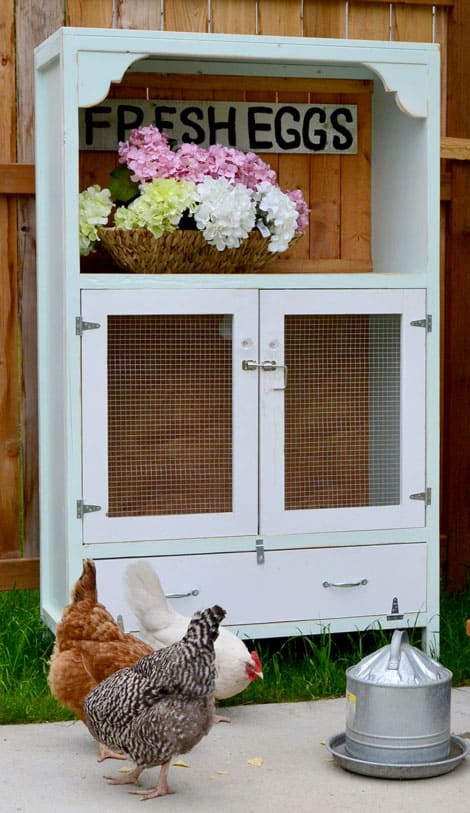
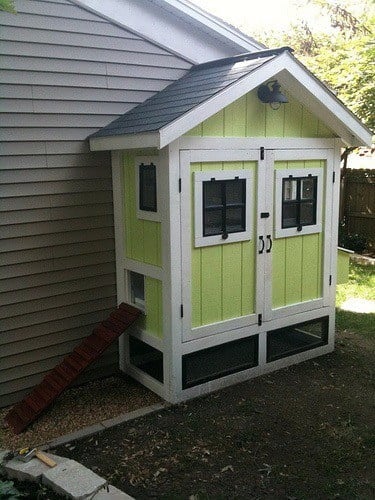
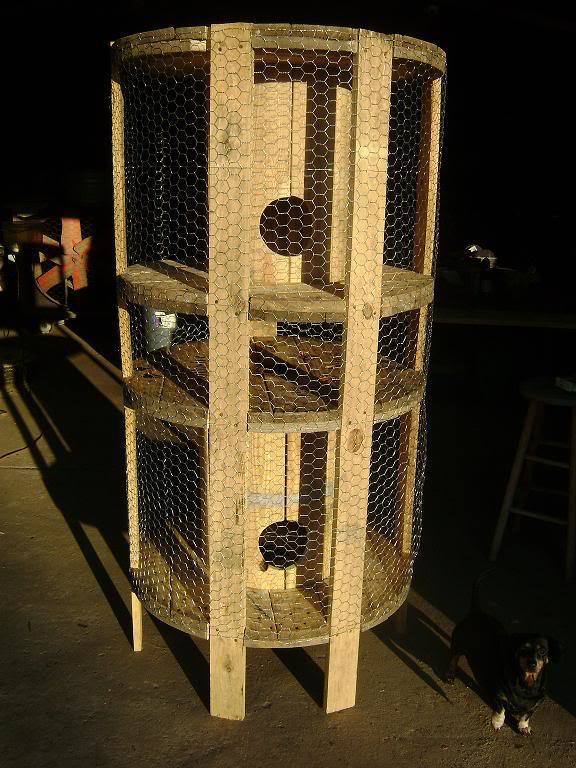
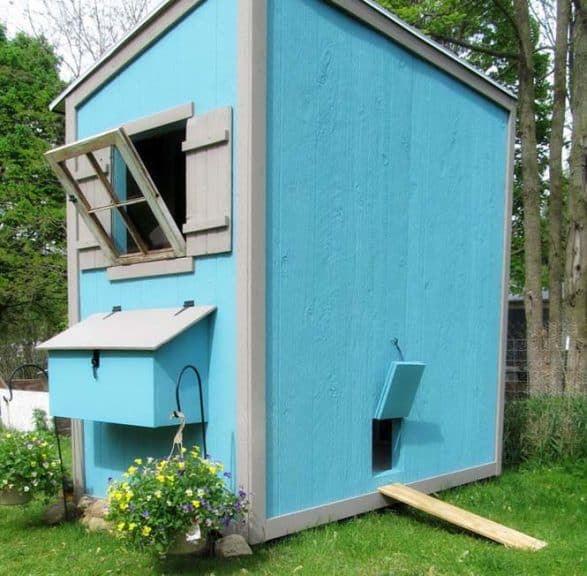
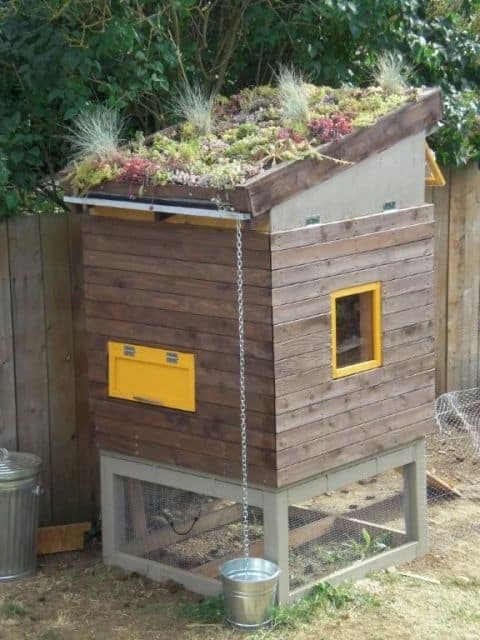
Compact Hen House
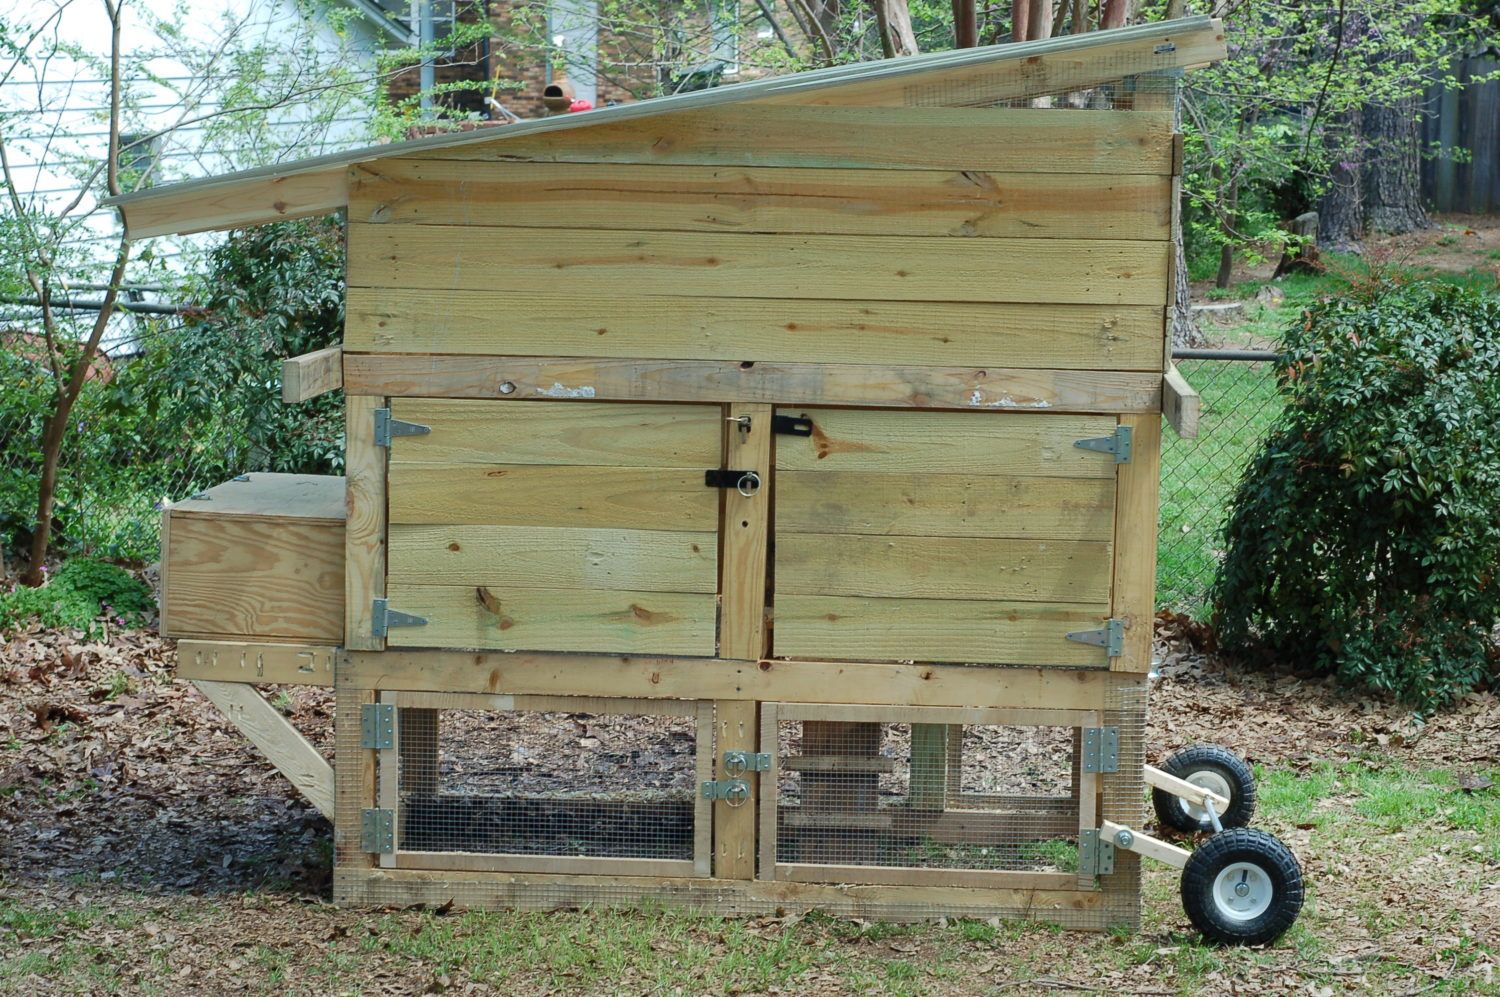
If minimization of space is a priority for you, this plan would be the perfect option to go for. It is designed to be upright and compact and is meant for keeping a few hens.
Though its size is smaller than other coops, it has sufficient room to provide optimal comfort to the chickens. The structure is such that it provides a lot of vertical space, which is ideal for chickens as they roost in perches above the ground level.
Constructing this coop is simpler to many others and just requires wood pieces, fencings, pallets, wire mesh, a roofing sheet, and other odds and ends. As for the cost involved, it is just that of the PolyCarb sheet used for the roof and the wire mesh for the windows.
However, the process can be a bit time-consuming, since you need to get rid of nails and break down pallets from the fencings and wood pieces. But then, the completed coop will have two doors on the bottom “run” and two at the top, along with medium-sized wheels. So, it’s definitely worth the effort!
-
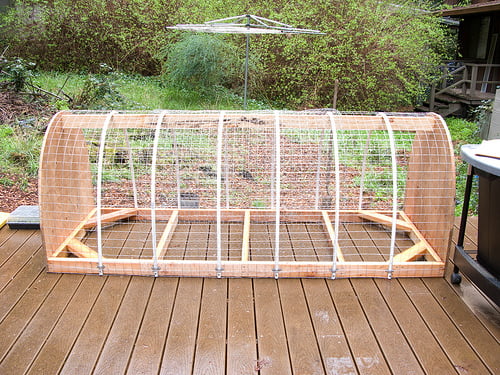
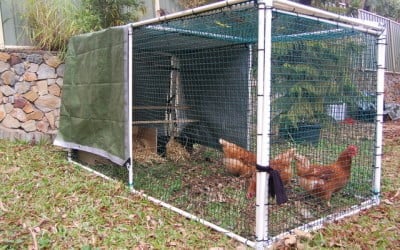
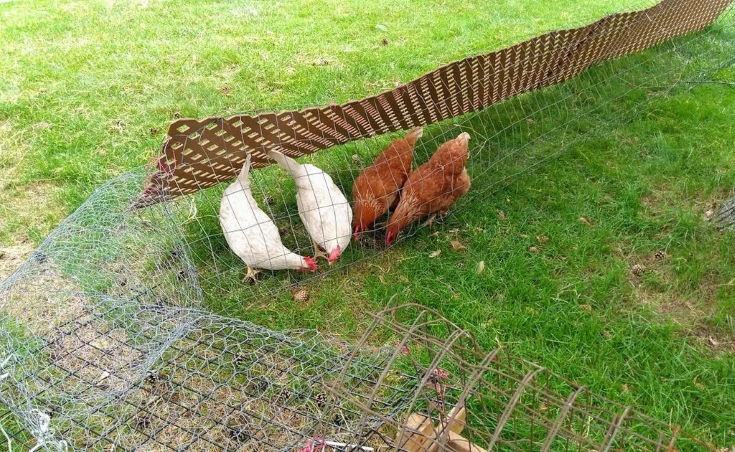
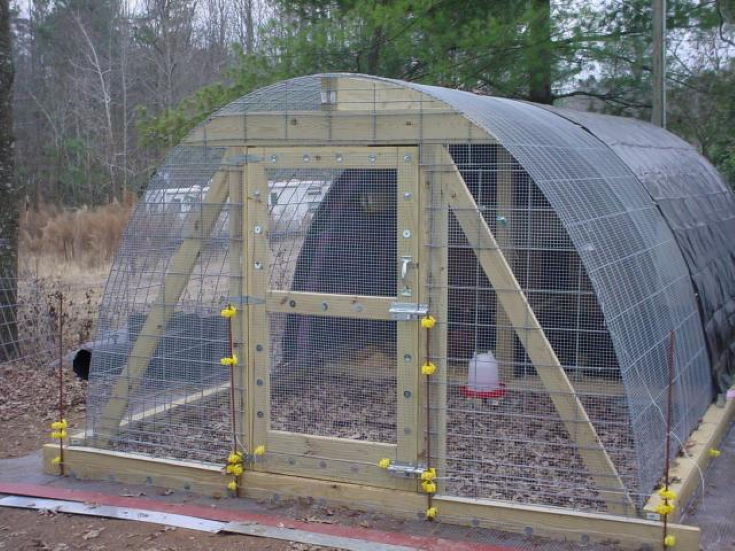
PVC Run Framework
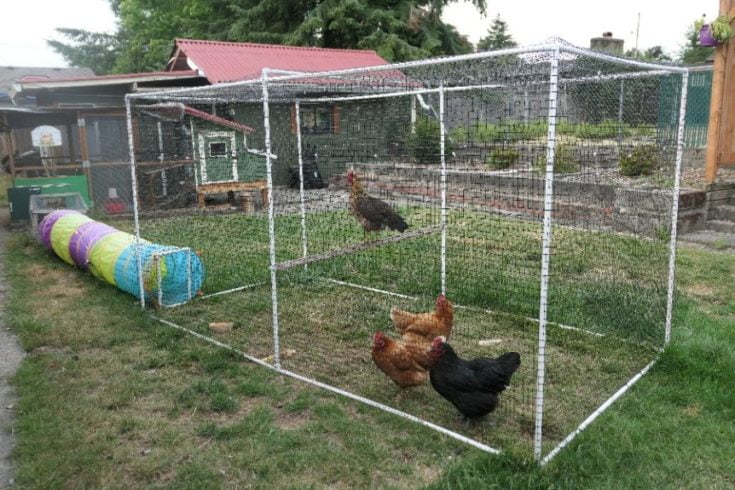
Giving your chickens more space for roaming while also keeping them safe might seem tough on the face of it. But with this coop plan using a PVC framework makes this super easy to achieve. All you need for building this one is some fittings, nettings, and PVC pipes.
Ideally, hens should be given the freedom to roam in your backyard and scratch up some insects. In this regard, a coop made primarily from PVC pipes is quite convenient. It provides a protected space that you can move to different areas of the yard.
And the best bit of the story is that the whole thing can be put together in a matter of minutes. It may be done with or without tools, cutting, or glue.
Wrapping the safety netting around the PVC frames and securing the ends with wire ties may seem a bit difficult. However, two people working together on it can make the task much easier.
-
Cottage Classic
As the name suggests, this coop looks exactly like a mini cottage on wheels and is actually a diy chicken tractor. While turning this plan into a reality, you can make as many modifications as you desire to make it exactly like you want it to be. The result? Your chickens can have a ‘luxurious’ home.
However, the fun fact behind making this coop is that most of the things required are obtained from lay-offs of old structures. Wood pieces can be obtained from garden sheds or fencings, while wheels can be gathered from old mowers. You only need to buy the hinges for doors and the wire-mesh.
Also, as lovely as it looks from outside, it has an unbelievably easy design. While the ‘cottage’ part is meant for the living area and the nesting, the extended part built by pieces of rectangular fencing is the run area.
The rectangular pieces are also extra long to make for handles so that it becomes easy to pick the coop up. Apart from this, a medium sized window and a small hole at the back for ventilation make the coop complete.
-
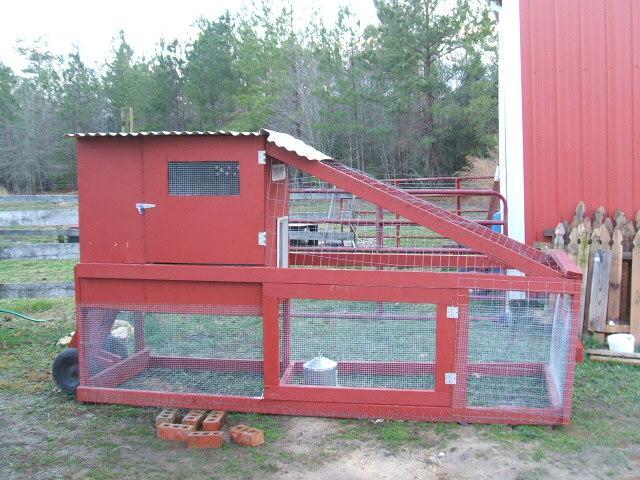
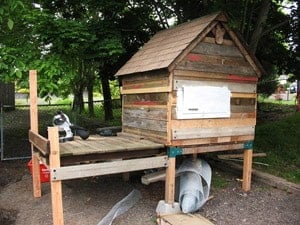
Chicken Wagon
You might not have thought about it before, but an old trailer dumped in the backyard can act as a great foundation for your chicken coop. In fact this is the best possible way to reuse a trailer instead of letting it be trashed in a dump. Your coop will have great potential for placement as well as addition of run areas.
For making the living and nesting areas, you can take inspiration from the structure of gypsy caravans. Materials that can be used are odds and ends of rough wooden planks and frames of old windows. Interestingly, T posts can be used to make a sufficiently large portable yard and also to move the coop around easily.
As many as 8 nest boxes can be made inside the coop and you can access those from behind the doors. Storage areas are also present below and above the nest boxes. Also, there are two kinds of doors suitable for use in different climates.
-
Chicken Barrow
With this chicken coop plan, you can give the home for your chickens a different look altogether. It can be made by following some easy steps and only requires a few basic tools and supplies. Such a coop can also fit well in any backyard and is a quite budget-friendly idea to go ahead with.
This coop plan gets such a name due to its wheel-barrow-like shape. The design is actually referred to as a “hoop-house”. For the base, a rectangular piece of plywood with dimensions of about 8’x3’x3’ has to be used.
For the arched ends of the barrow, jigsaws have to be used to cut out the arch shape. One one end there is a nesting box with a hinged lid while the other end has a door cut out in between.
Ball-bearing wheels must be attached to base, and PVC pipes must be fitted as support for constructing the cover of the barrow coop. Thereafter, both chicken wires as well as welded wires are attached to cover the coop.
-
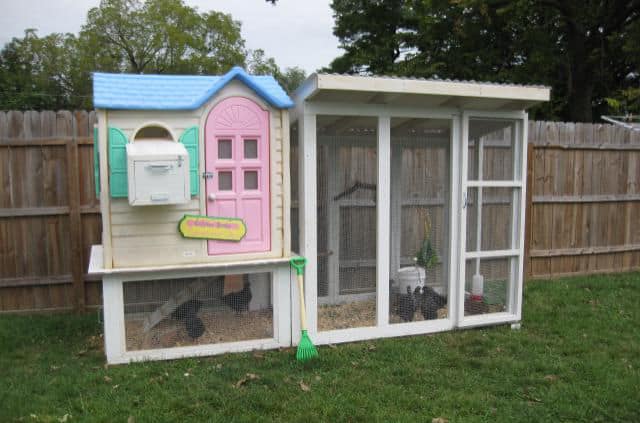
House in the Woods
Is building a cabin in the woods for your chickens a long-cherished dream of yours? If so, then this chicken coop plan will let you fulfill this dream in the easiest way possible. A playhouse that the kids may no longer want to use can form the basic structure of this coop. It can be conveniently used for 6-9 chickens that will also help in fertilizing your garden soil.
This playhouse-coop will have one door for the chickens and a human door to the run. Besides, the nesting boxes will be external and hence can be accessed without entering the coop. It will also have a flooring that is easy to clean. As for the transportation, the ‘cabin’ can be built on a low trailer or on skids to enable easy movement.
Ultimately, this chicken coop would keep your birds protected from attacks by predators as well as mosquitos. It would also provide you with maximum convenience, thanks to the doors and nesting boxes which will enable easy feeding and accessibility.
-
Rolling Coop
Most of the chicken coops seen nowadays are built at at least a slight elevation from the ground to enable more mobility. This is one such plan and allows for 4 wheels which make it easy to push it from one area to another without lifting or straining.
This coop has an inverted-V shape and has one nest box each on both the ends. While the back wall is made solid to keep away critters, a lift door is added to the main entry at the front. To make it further protected from racoons and other predators, the bottom portion is covered with chicken wire.
You can build this coop for housing 4 chickens at most but it needs to be moved often to allow the birds to forage. Once it’s ready for use, it can comfortably fit in average garden beds. Also, to make sure the wooden portions last longer, it would be best to paint those.
-
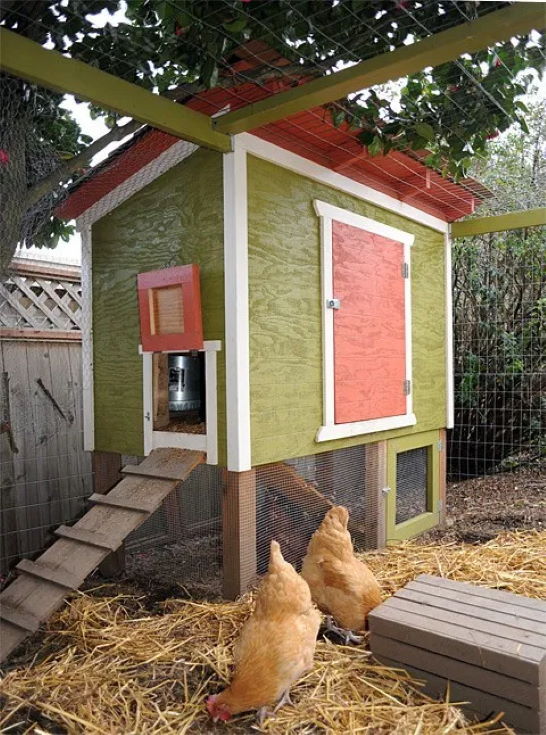
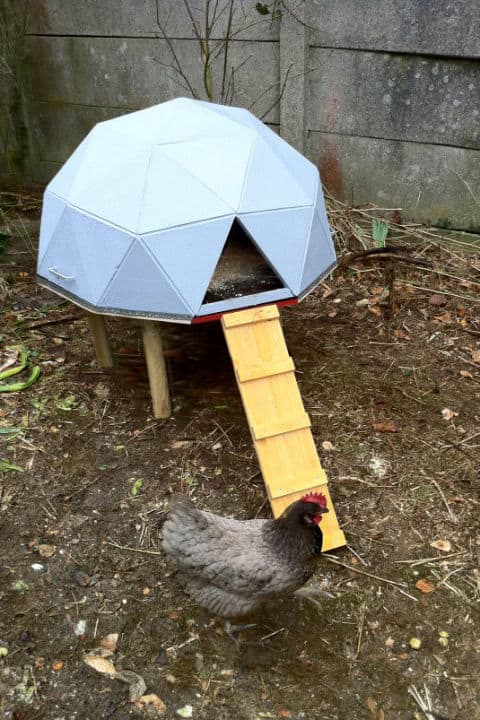
Geodesic Home

This plan might require you to get a bit more creative, but it is an ideal option if you need to move the run and coop across seasons. For fresh grass lawns or dorman garden areas, this is hence a perfect coop to go ahead with. Further, as a bonus, you will get free fertilizer for your gardening escapades next year.
This structure is strong enough to house and protect as many as 12 chickens. You can also build it quite conveniently with materials that are readily available. Also, a circular bed makes much more efficient use of the space than the rectangular one.
To build up the structure you require PVC pipes for making the dome and chicken wire to cover it up. As for the amenities, you can put in one nesting box and some perches for roosting. Nesting boxes can be made from the grass-collector of a mower. To ensure durability, you should clad it with scrap chicken wire.
-
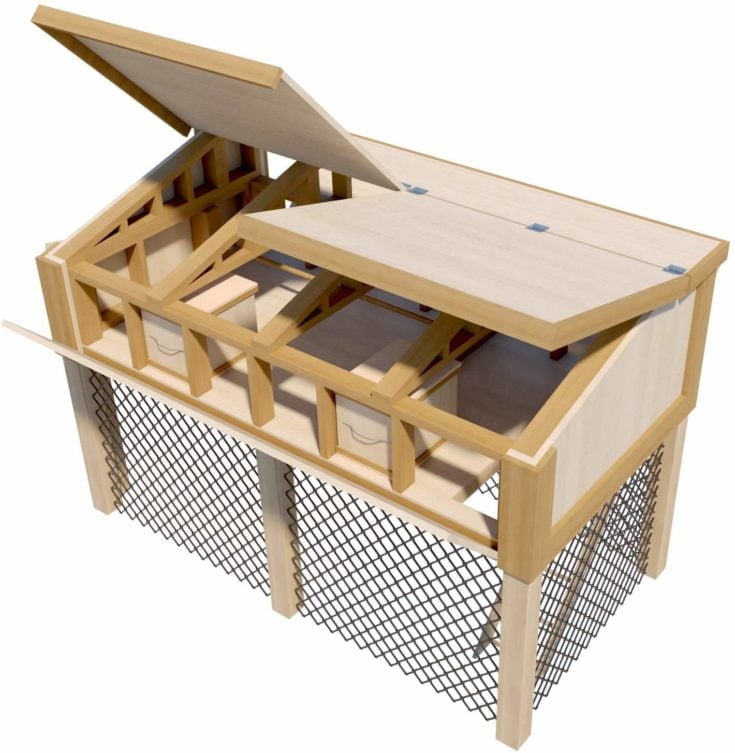
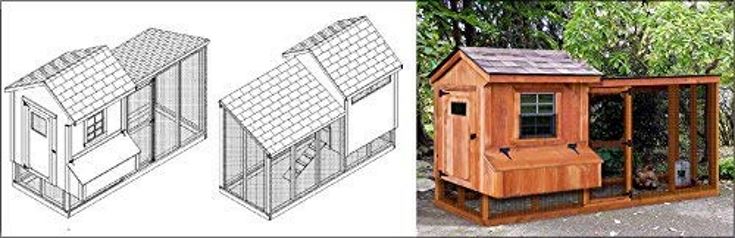
Basic Frame
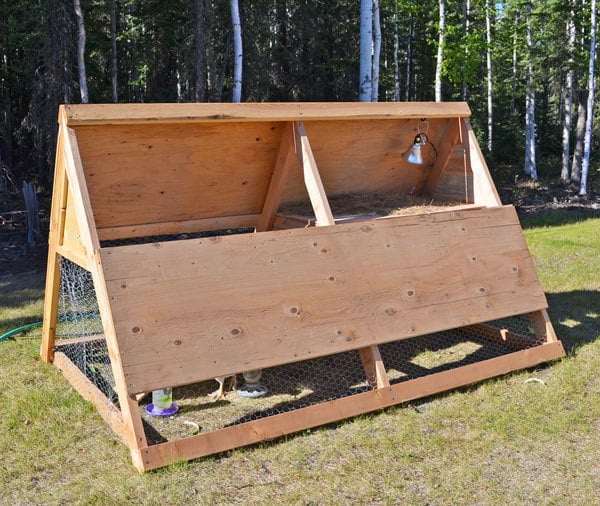
A-frames are one of the most popularly made forms of chicken coops. And this is another simply designed A-frame option that lets you easily access the nesting and roosting space of your birds. It also makes cleaning much simpler and allows convenient egg collection. You can fit it as per a wide range of flock sizes and can easily connect it to an additional run as well.
This chicken coop consists of a built-in nesting box and a perch. It would be suitable for rearing 2-4 chickens. The bottom run portion is clad with chicken wire, while there is a coop-cum-living space at the top.
With this plan your chickens will get as much as 40 square feet of run space and 10 square feet of coop space. Also, keeping the bottom covered with wire provides the chickens utmost protection. All in all, this plan is a perfect fit for someone who is looking to make a simple but also convenient and protective chicken coop.
-
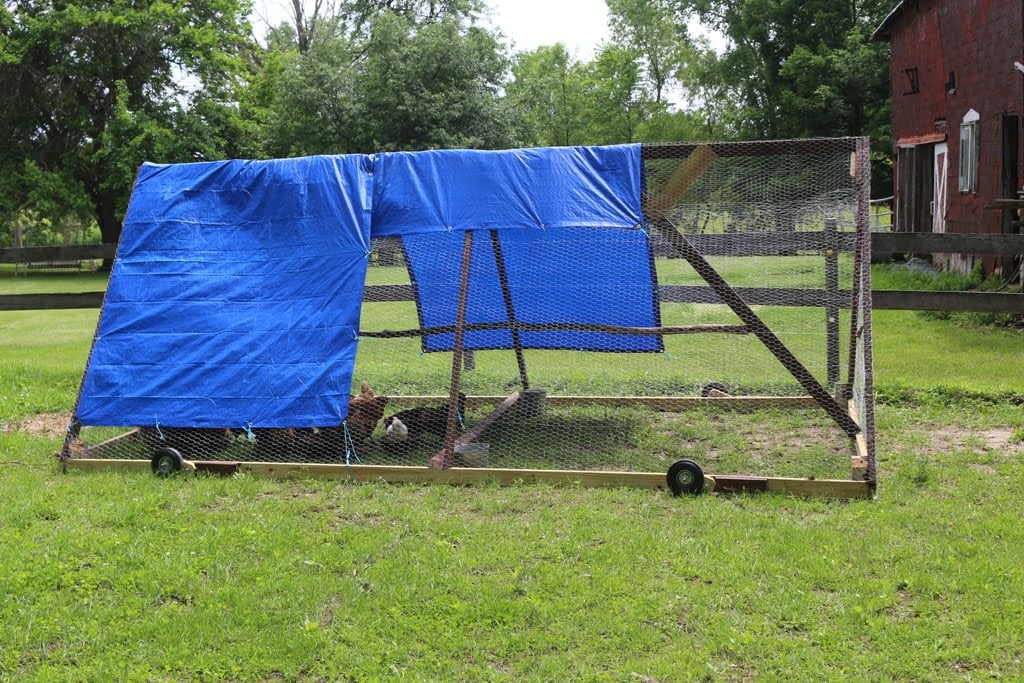
Making The Rounds
This is another coop plan that offers you a fancy looking house for your chickens. Though it foregoes the traditional run, you can easily add one if you feel that to be more convenient. Being a compact and mobile henhouse, you can close it up for safety on each night, bring it to a garage or shed and then wheel it back each morning.
This plan will allow your chickens free range while also protecting them for hawks and other predators. It can be placed in a pasture and has beneficial effects on the land, thanks to the free range that the chickens get. There are also no major chores involved for cleaning the coop. What you have to do every couple of days is to push it onto fresh grass.
For building the coop, you must first make a box-shaped structure with dimensions of about 7’x3’. Supporting wooden planks fitted on all sides of the coop frame and the nesting box should be added on the end. As for the door, it is built in an easy-to-operate two-in-one fashion.
-
Little Egg Factory
This coop basically has an A-shaped design but it gives much more portability than other A-shaped plans. There are easy-grip handles at both ends to facilitate the movement.
As the bulk of the weight lies near the bottom portion, it becomes easier to move the coop. Added to this, there is perfect space-utilization with the run being placed beneath the living-space.
This coop is built by firstly joining thin rectangular wood -pieces just the way a basic A-frame is structured.
Two nest boxes are kept on the two sides, while a space for moving is cut out from the partition separating the living space from the run. Glue as well as screws are used for attaching the pieces, with the holes being pre-drilled.
As for the wheels for the coop, they can be installed on one end or both ends depending upon your preferences. If one end has wheels, then the handle should be on the opposite end.
-
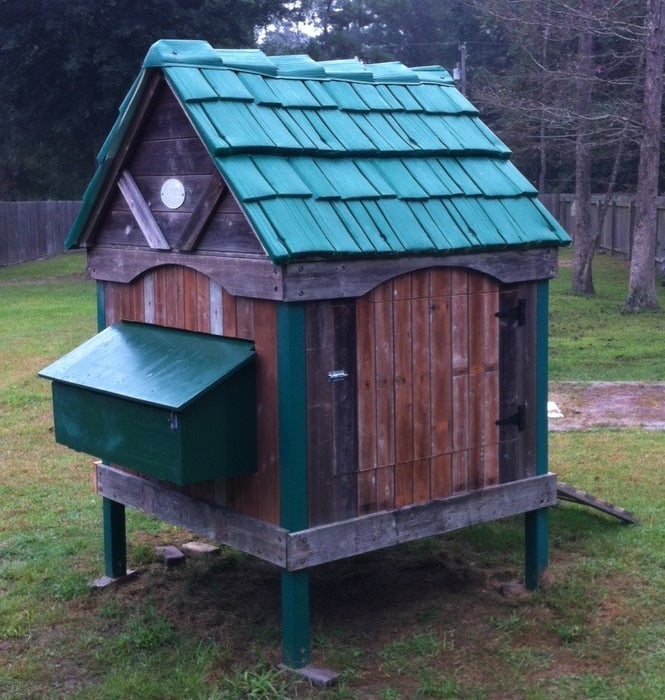
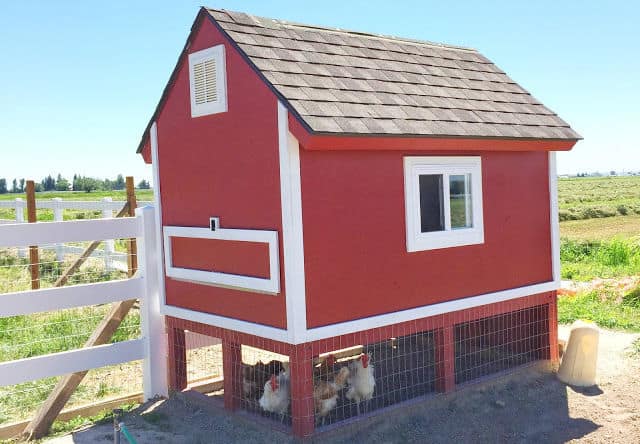
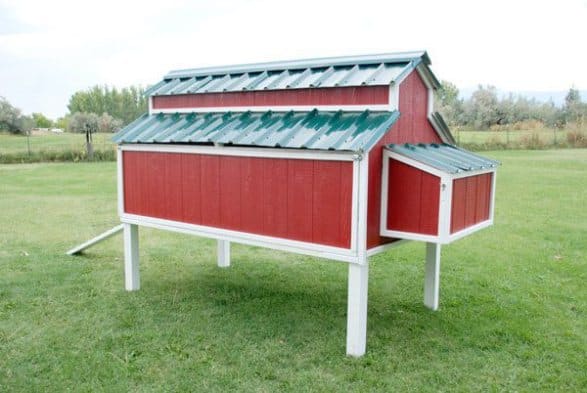
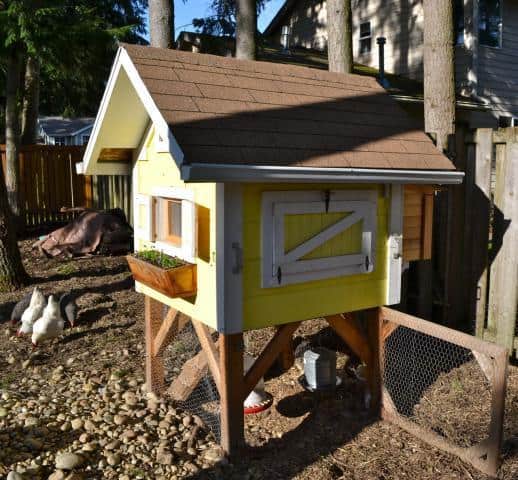
Barn Inspired
If you would want your chicken coop to have a unique design but also not be too difficult to make, this plan is a great one. Your chickens would have a barn of their own, but it still won’t be too large and hefty in terms of the design. This style is also most suitable for simple customization, such as external access to windows, decor and nesting boxes.
This coop can be built just with the help of leftover building material and pieces of reclaimed wood. While the top part of the barn has the nesting boxes and the coop, the remaining part is entirely devoted to the run. And it is the top part where the doors and the arrangement for ventilation is made.
Most of the barn is covered by good-quality chicken wire to ensure maximum protection. There is also a ‘stair-way’ ramp connecting the top to the run. Easy movement is facilitated by wheels on all four sides.
-
Traditional Design
PVC pipes are commonly used in making chicken coops as they are lightweight and can be moved easily. This traditionally-styled coop is another hen house which uses PVC pipes as the main building material. It can be moved from season to season or just whenever you feel the chickens need a change of environment.
This coop has such an easy design that you can alone put it together in no time. Basically, it is a box of dimensions 2 mt x 1 mt x 1 mt and is suitable for holding 2-4 chickens. However, you can also accommodate more chickens by adding an extension to the original structure.
For moving the coop, you can just drag it along since it’s really lightweight to move. Thus there is no need to attach wheels either. Two nest boxes can be created with plywood and put within the coop, along with two planks placed above to act as the roosts. Clearing the nest boxes and accessing them for egg collection would also become very easy through this arrangement.
-
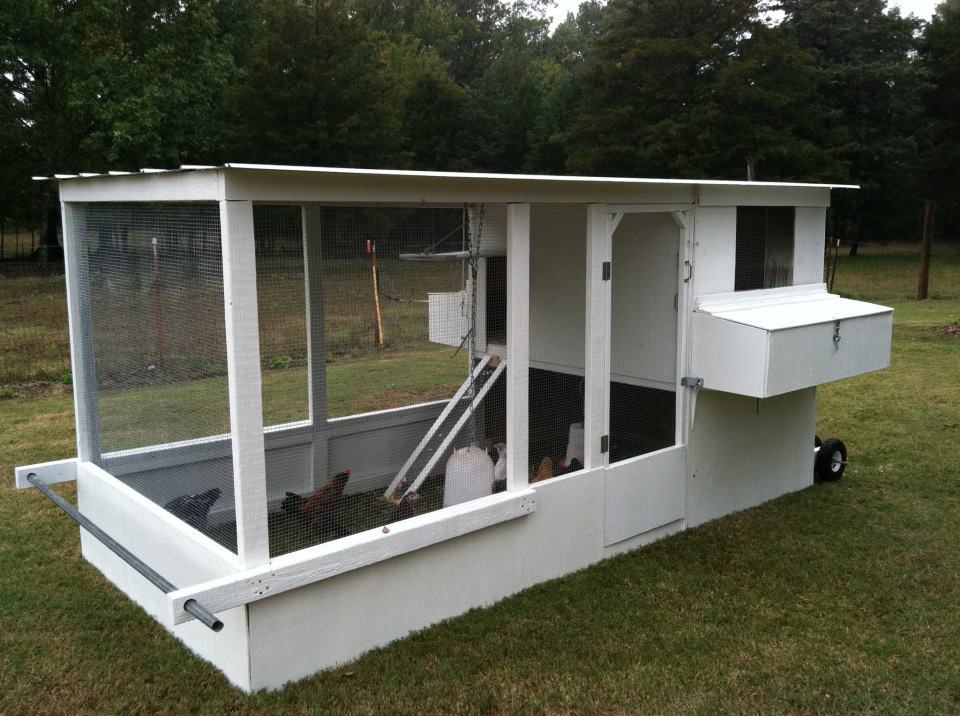
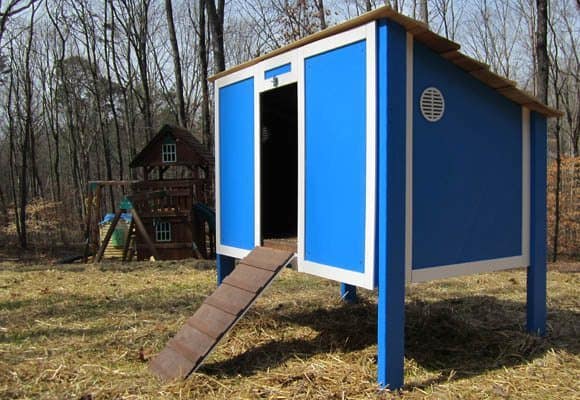
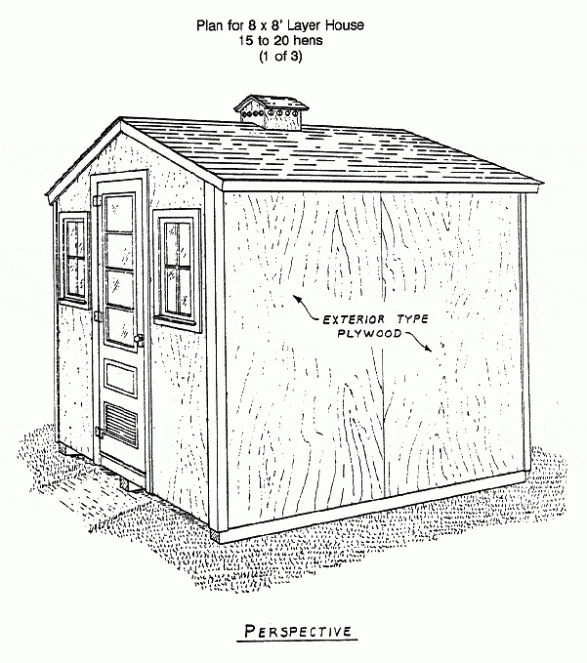
Budget-friendly Design
To make your chickens a coop with the maximum amenities as well as protection, the budget may often become a constraint. But this plan would provide you all that you desire and would yet not involve costs beyond your budget.
This coop is made by attaching pieces of 2x4 wood pieces to make the floors and walls. A firm base is constructed by using pallet wood which is a really cost-effective option. The wall is made sturdy by screwing the 2X4 wood pieces to the base and adding beams to cover it. Also, the floor made by adding the plywoods over the base gives the chicken flock a firm place to rest and stand on.
Even the roofs of this simple tractor are created through such plywood pieces, by attaching them to make 22 degree angles. After that, you would just need a corrugated metal sheet for the roof.
It is also super easy to make the doorway, as you just need to attach the front playwoods to the base at a gap of 16”. This large space is great for the chickens to travel in and out of the coop and also makes the leaning quite easy.
-
Easy Access Plan
Most people living in urban areas neither have many chickens nor have the space for making an average-sized chicken coop. This plan with an easy-access design will just be the right one for them.
It is also very simple to make and can be easily moved from one place to another. While the nesting and roosting space is in the upper portion, the lower part gives the chickens enough room to roam about. You can also connect a larger run without too much of hassle.
This coop has two nest boxes on both sides at the front, which can be easily accessed for egg collection by using the handles attached. As for the living area, it is divided into three segments and can be opened through hinged doors for feeding the chickens. Once built up, this chicken coop can also be maintained very easily.
-
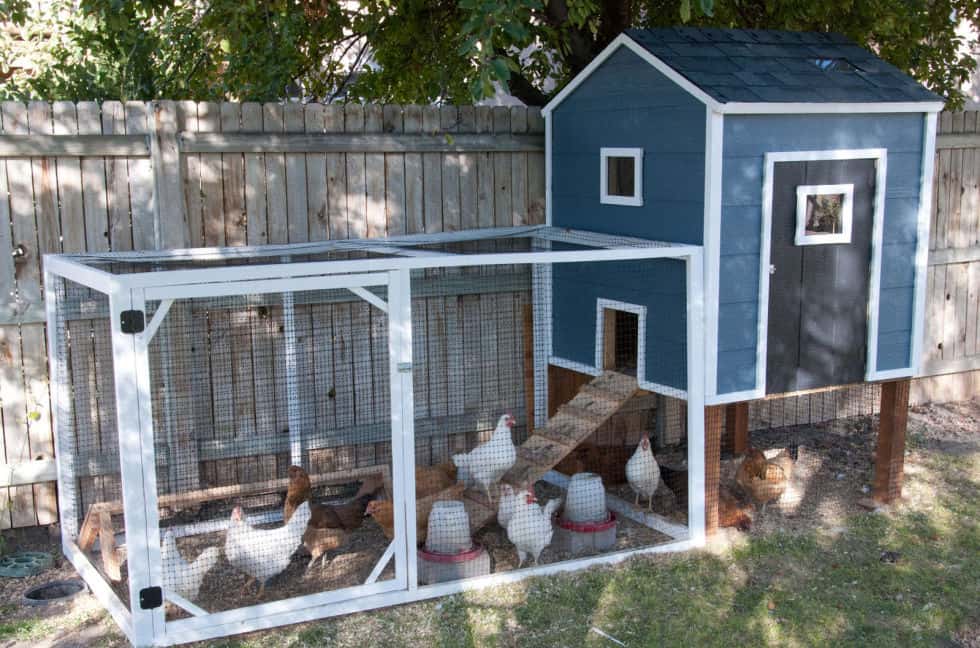
The Kerr Center Chicken Tractor

This chicken coop plan is another suitable choice for producing home-grown eggs in urban settings. It is raised slightly above the ground and is actually a portable tractor. This design allows maximum run space for chickens, along with easy egg collection and cleaning of the rear part.
While the nesting boxes and an enclosed shelter are positioned at the backside, the front portion is entirely devoted to the run area. Also, the boxes are placed at a height of 20 inches, which also allows a part of the rear portion to be used for grazing.
A ramp is attached at the front opening of the shelter to let the chickens move out to the run area easily. Besides, the coop also has a door flap at the back that must be raised to access the eggs. It provides complete protection to the birds during the night.
-
Kevin’s Chicken Tractor

Among the range of portable chicken coop plans available, this one has an unique look and design. It closely resembles a rabbit pen due to the arched shape. You can easily move it from place to place since it is lightweight and has a set of wheels at the backside. And the best part is that no special tools or expensive materials are required to build it up.
As for the structure of the coop, the base is square-shaped and is actually made up of wood pieces. Three arches are made by attaching PVC pipes to the base, and welded wire is used to cover the coop up.
Chicken wire may be used in place of the welded wire, but the former is rather flimsy. Also, the door is made from wood as well, with its upper portion being arched to match the shape of the coop.
At the back is the external nesting box, with a pull-up hinged lid. All in all, if you are looking forward to constructing a light, portable yet well-built pen for your flock, this will be a great plan to go for.
-
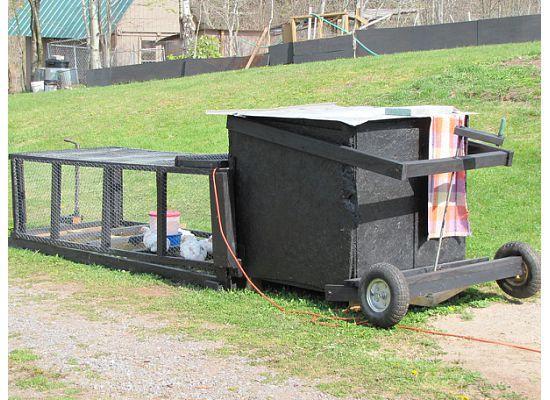
The Mobile Stage Coach
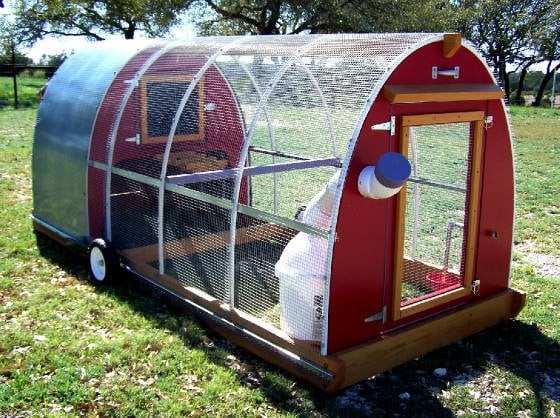
This chicken coop is especially suitable for organic urban landscapes and gardens. It is in effect a chicken tractor, which will allow you to move the birds all over your property.
Note that those of you who are not that confident about building a coop all by yourself will love this option. That’s because you can order a precut version. This will save a lot of the work involved in building it up. It will also have a nesting radiant misting system or heater installed.
This coop has an extended roost area of as much as three feet. You get a plastic-lined roost floor to enable easy cleaning, along with an auto-feeder and auto-waterer. A stainless solar day/night ventilation facility is also made at the back.
Besides, there are plastic nesting insert trays that make cleaning the nesting space much easier. To sum it up, this chicken coop plan is a ‘super-speciality’ unit of your chickens and also ranks high in terms of convenience.
-
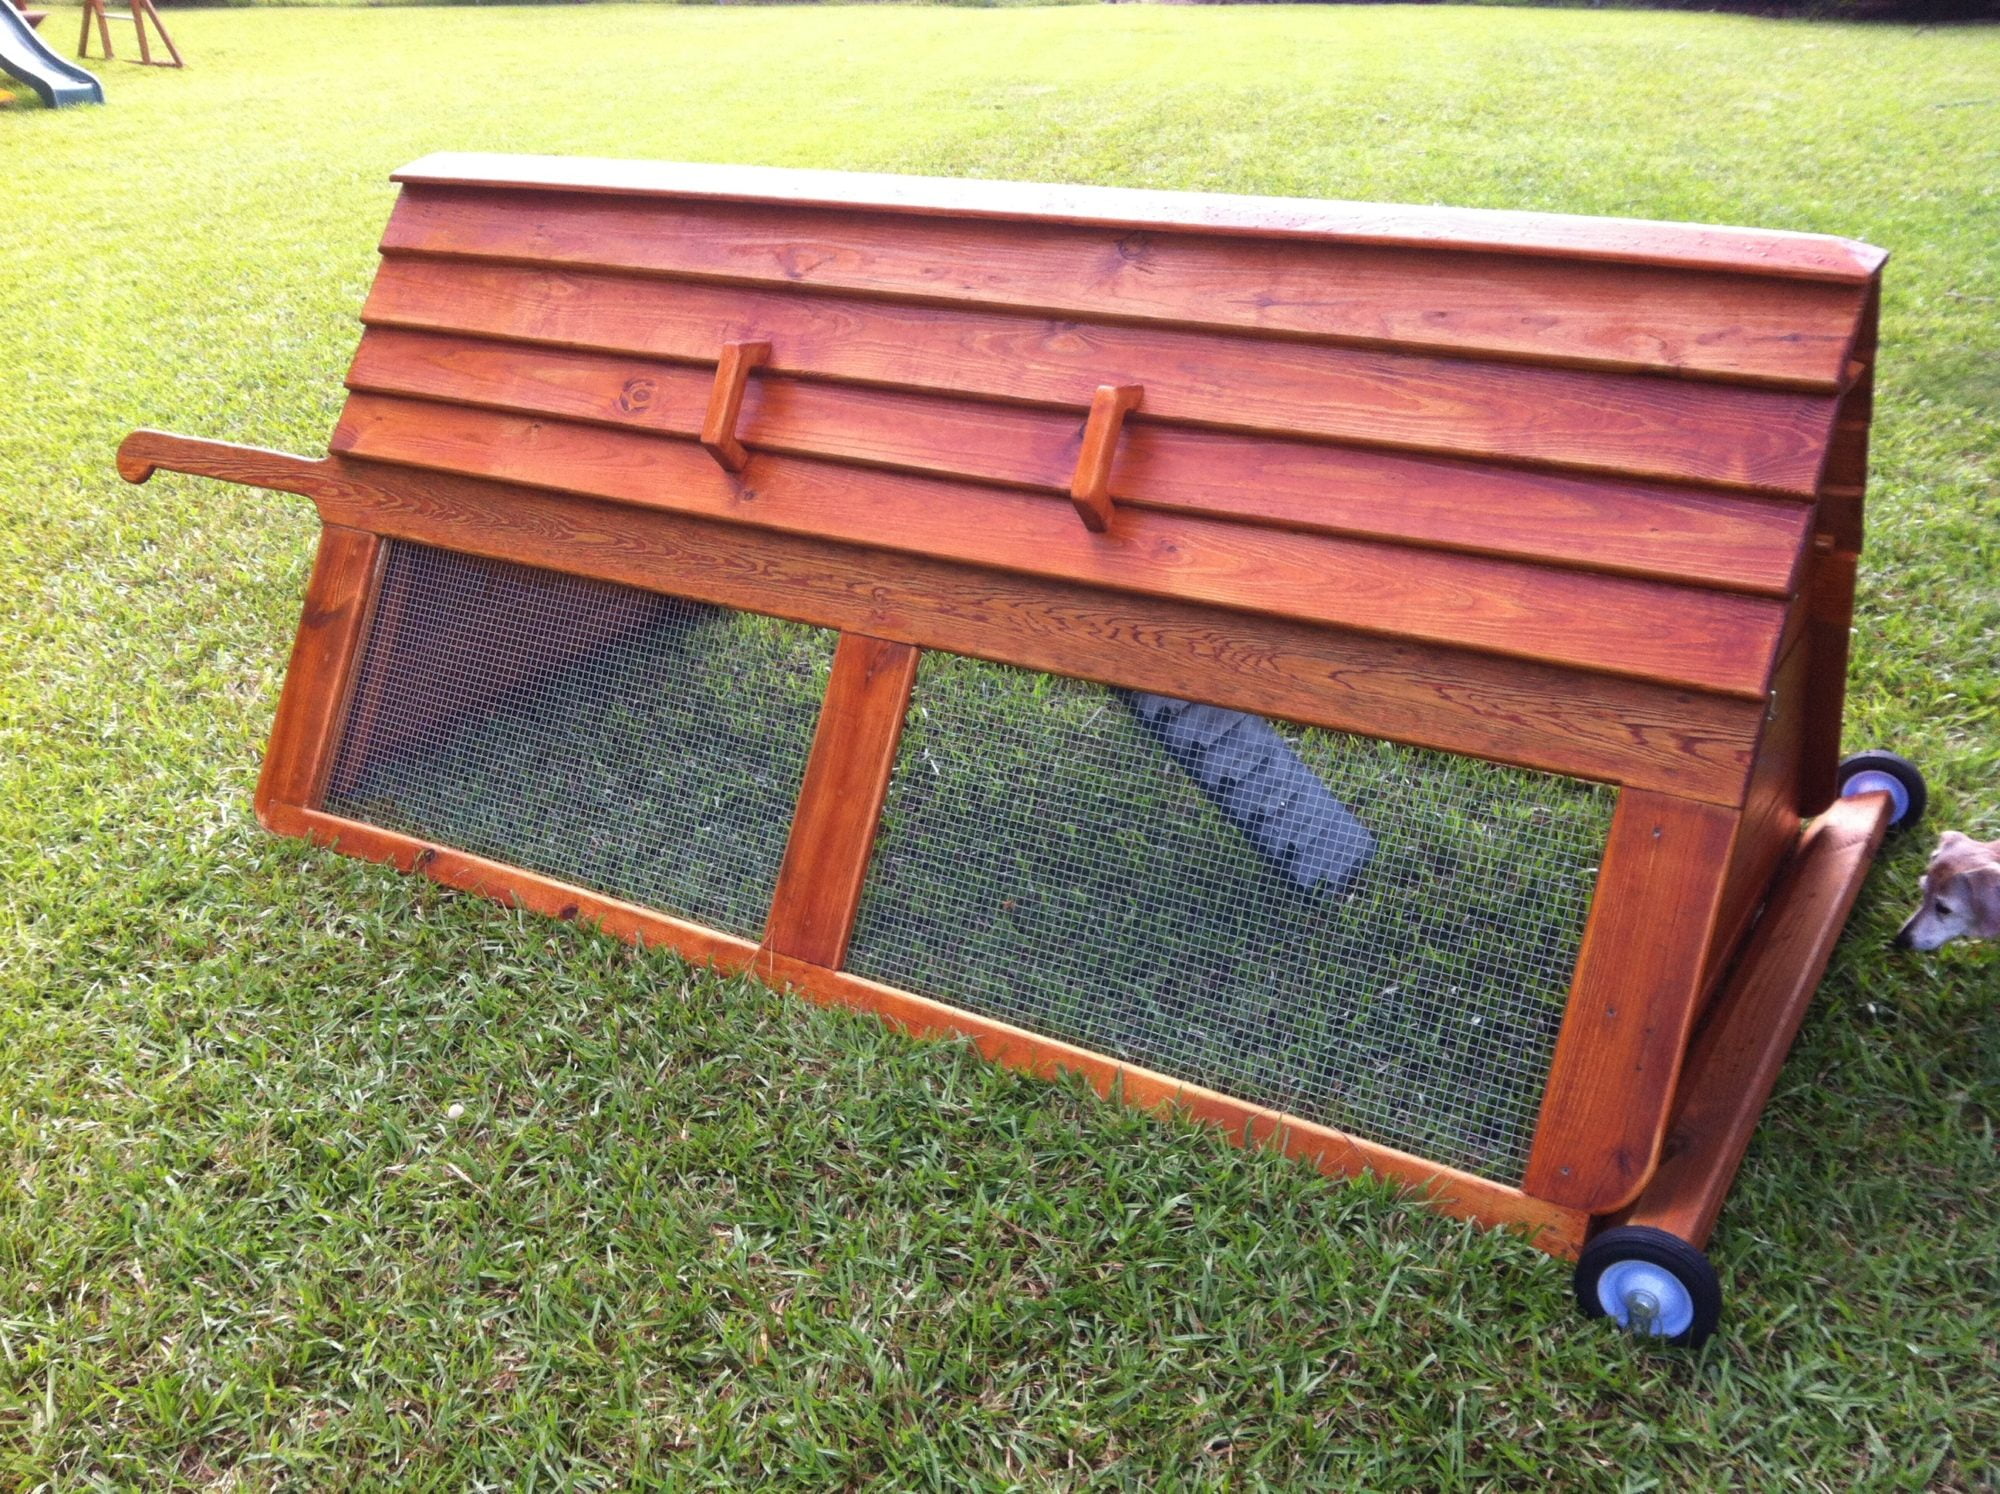
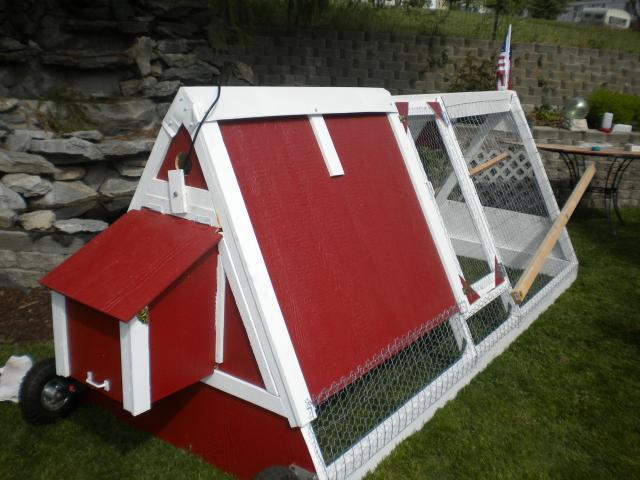
Back to Basics
The A-frame structure can be used for making a lot of simple and easy to maintain chicken coops. This is another such chicken coop plan which is also a cost-effective way to keep the birds in one place. You can even move the coop to any desired spot whenever you feel.
To make this coop, you will require lumber pieces of several dimensions for the A-frame. Both the tent-shaped sides of the frame should be supported by additional wood pieces attached in between. Similarly, the base must also have such supports in the middle.
Importantly, in this design, chicken wire must be used to cover the entire coop instead of plywood pieces. Movement takes place through wheels attached at about 3 feet from each corner of the A-frame. These wheels have to be accompanied by swing-up arms for moving the coop, that can be swung down to allow it to rest on the ground.
-
Hen Hideout

You can use PVC pipes not only to make the simpler and smaller chicken coops, but also relatively bigger ones. This hen hideout coop is among those great chicken coop plans and also represents fair value for money. You don’t require using any wood pieces to build the frame. For the movement, a large wheel is fixed at each corner.
This coop will provide your chickens with a fairly large protected enclosure to roam about. You can make the structure wholly out of PVC pipes as they won’t rot out or absorb any foul smell from the chickens. It should be made based on your requirement for living and run area. After this, you can cover the coop by attaching ½ ” wire mesh screens to the PVC pipes.
For making the ‘henhouse’, you have to use plywood. The quantity would again depend on the size you would want it to be. A medium henhouse generally requires about 11/32” inches of plywood. At the bottom of this structure, there would be swing-up doors to access the feeder, and for letting chickens out to forage.
-
The Hyperion
This plan is among the most affordable options in the list. Though it looks fairly basic, it is a truly effective solution to all problems that you might be facing with many smaller coops. Importantly, it has the coop space raised to a two feet height above the base. This gives the chickens a large area to roam about.
While plywood is used to make the coop space, hardware cloth is used to cover the bottom and rear run and perching areas. This coop has a waterer as well as a feeder attached to the wall by electric cables.
A chicken door is set on the wall of the coop. It can be opened or closed from the outside, which ensures that the chickens can’t escape when you do it. At the backside of the coop is a human door with side-hinges. If you have a door with a hinge at the top, when you go inside the chickens can run out through the side opposite to you.
-
Lane Brooder
Having a unique design, this coop offers two entrances for the chickens, one up to the coop and the other into the run. If you find that the chickens use the coop entrance, you can build a ladder for them. For making the basic structure of the coop, you can either gather a discarded wide wooden box or have to make one with plywoods.
Attaching the legs beneath and a door on the open end will give you the coop space. After this, you need to make the long rectangular run area by fixing pieces of plywood on the sides of the henhouse.
For making the nest box, a 4 x 4 plywood piece is used that keeps the hay piled up properly. As for the wheels, they are attached in the same manner as a wheel-barrow. So when you lift the small end of the run, it should tip up on the wheels.
-
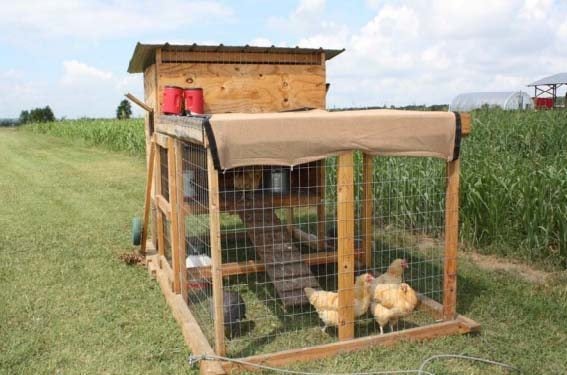
Meaties Tractor
This a coop plan suitable for keeping meat chickens. Those of you who own a small flock can go for this plan which is simple to transform into reality. There also won’t be any budget problems as all the materials to be used are quite affordable. This coop can be made by using scrap lumber pieces for the coop space. For the run area, thin rectangular plywood pieces and wire mesh can be used.
While the run area is made in the form of a long horizontal extension from the hen house, the coop space is a box with dimensions of about 3’ x 3’. It has a door of medium height at the backside. You can paint the plywood portions of the coop black so that chicks are provided with extra warmth during the spring.
To allow easy access for cleaning the coop, there is a hinged opening on top of the run. As for the wheels, they can be repurposed from an old wagon or mower. Wide handles are also made from wood pieces which make movement very easy.
-
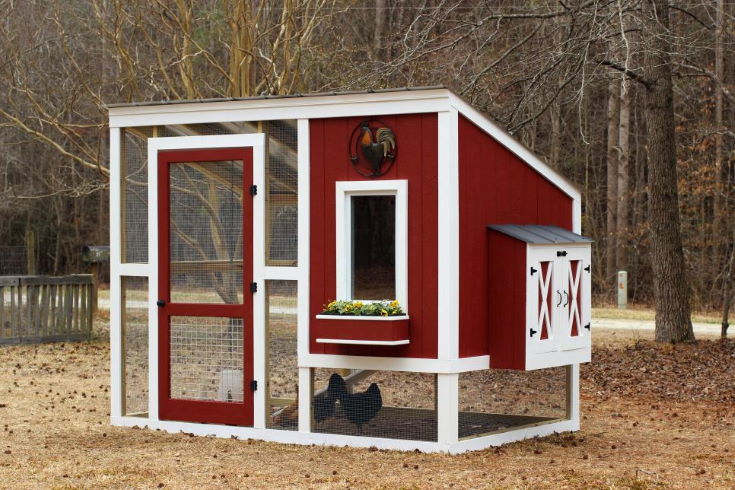
The Roadhouse
If budget is not a major constraint for you, this coop plan will be quite a nice option to go ahead with. Besides having a sheltered area for roosting, the coop also has a nesting box at one end.
As for the basic structure, it is the same as that of an A-frame coop and is made by using plywood. The coop is slightly raised and has a doorway to the run with a ramp attached for the chickens to move out. Corrugated vinyl sheets are laid on the floor, which makes it easy to clean the coop.
Welded wire is used to cover the run part as well as the lower portion of one side. Your chickens get a run of about 4x10 ft, which is quite a lot of area. They would enjoy this freedom, while also remaining protected, thanks to the strong welded wire. The nest box at the back end can be accessed from the top and is also easy to clean.
-
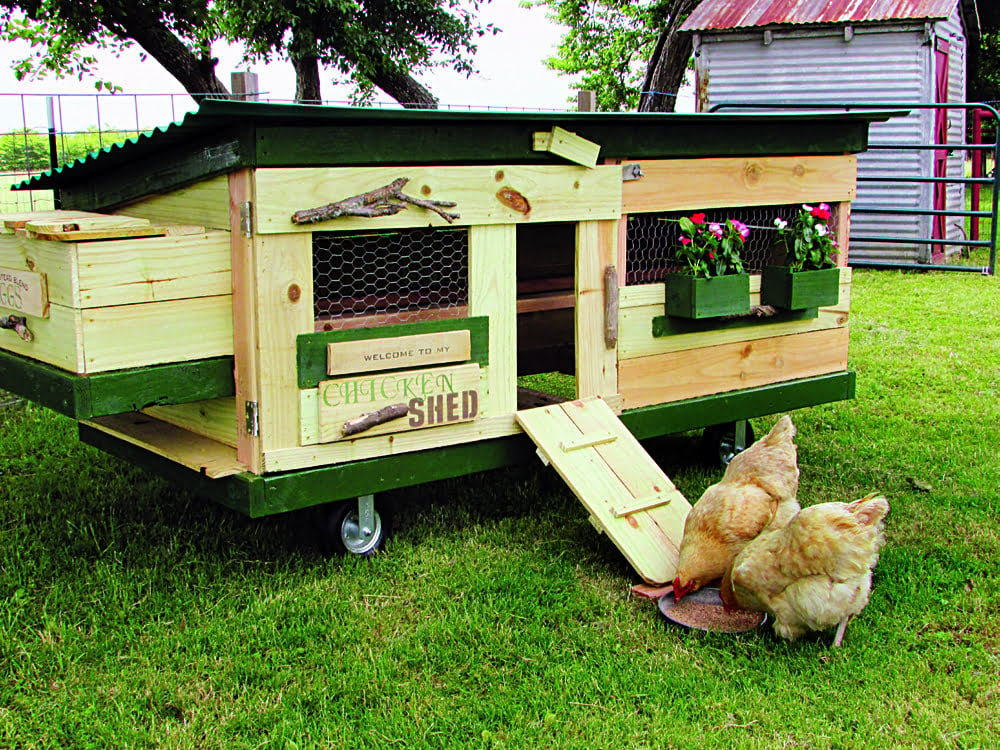
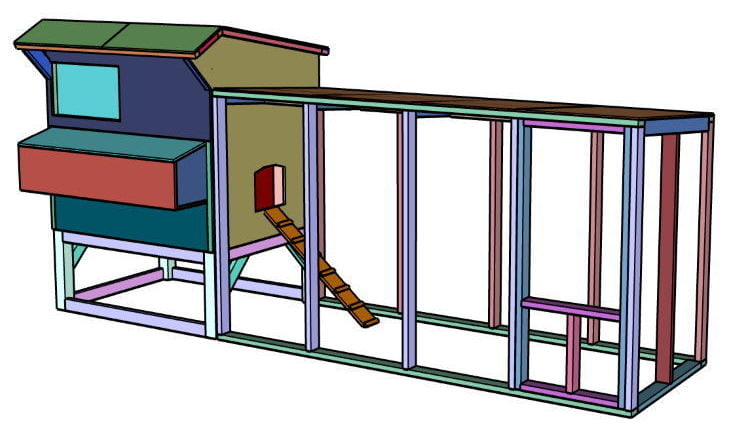
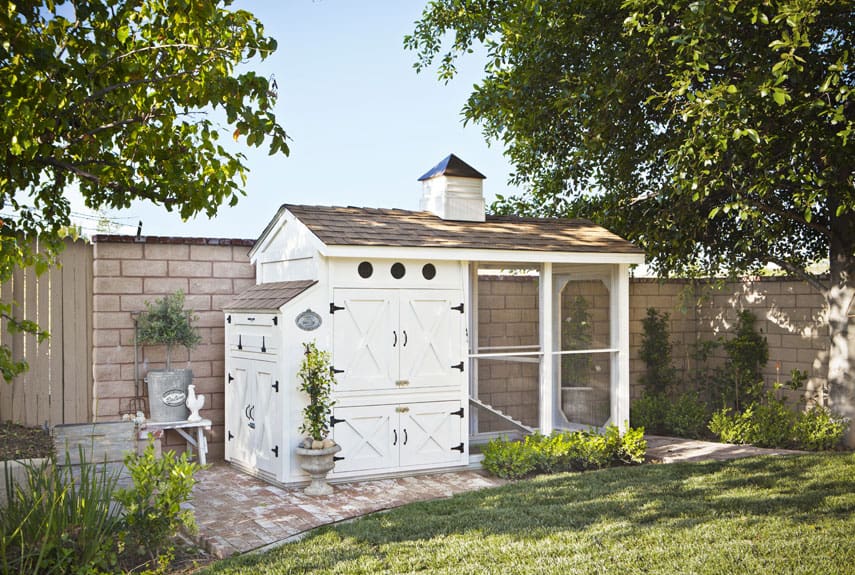
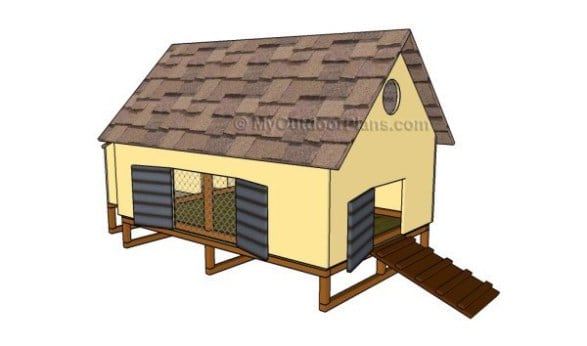
Coco Channel
This spacious as well as protected chicken coop is an ideal for anyone who can devote weeks to its construction and has a large budget as well. It is capable of holding more than 12 chickens comfortably. This plan even consists of flower beds for decorating the exterior and would definitely be a high-end coop for you birds.
This coop must be spread across an area of at least 80 square feet. It is basically a long rectangular cottage, with a “house” for the living area at one end. A ramp from the house leads to the long and sufficiently wide run area.
High-quality plywood has to be used for constructing this coop, which has a large nest box at the back. You can use the roofing material of your choice, but there must be a large tent-shaped roof. As for the wheels, they should be placed on all four ends.
-
The Mini Coop
This is another plan which utilizes available space quite efficiently. It is suitable for 3 to 4 chickens and can provide them pretty much room for roaming about. This coop is shaped like a tent, with the front run area being relatively lower in height and having a roof with a gentler slope.
While the run is covered with welded wire, the walls of the coop space as well as the roof are created by corrugated metal sheets. As for the frame of the henhouse, it is built by joining scrap wood pieces.
Large wheels are attached to the backside of the coop, and can be obtained from a discarded lawnmower. To move the coop, you just have to drag a bit from the front.
-
Perfectly Portable
This plan is pretty basic but looks quite adorable. Its design is also quite convenient and spacious. Moreover, the design is such that you can readily make it larger if you wish to have more chickens over time. A larger run can also be added when you need it.
But the most amazing thing about this coop is that it can be moved with just one hand. What does the trick is the use of PVC pipes to make a wide handle at the front. While the base is square-shaped and has dimensions of 5 x 10, the height of the coop is 6 feet. This size is perfect for a few home-grown chickens.
Also, the wood pieces used are made by ripping 2 x 6 pieces into two halves instead of the regular 2 x 4s, which reduces the weight of the coop substantially. A large nest box at the back and the front run area makes the coop a complete home with roaming-area for the chickens.
Conclusion
If the idea of having chickens seems exciting to you, you will surely want them to be safe and able to have enough room to roam. Chicken coops are exactly what you need to fulfill that purpose and keep your chickens healthy and happy.
However, for choosing a suitable plan, you must be clear about your priorities when it comes to a chicken coop. For instance, if space is not a constraint for you, plans such as a PVC framework or a perfectly-portable design may be suitable.
That said, if space is not ample but you still cannot compromise on the run, those such as the Little Egg Factory or the compact chicken coop would be ideal.
So, sort out your priorities and go on to choose a plan for making your chicken house. All the best!
Related Articles
Barndominium 101 | Floor Plans, Pricing Guide & Pictures
57 DIY Chicken Coop Plans in Easy to Build Tutorials – 100% FREE
47 Free DIY Swing Set Plans for a Happy Playing Area in Your Backyard
49 FREE DIY Router Table Plans For an Epic Home Workshop
43 DIY Duck Houses Plans and Duck Coop Plans to Build Now
57 DIY Bookshelf Plans and Ideas For Healthy Home Libraries
163 Free DIY Pole Barn Plans and Designs That You Can Build Easily
37 Free DIY Tiny House Plans for a Happy & Peaceful Life In Nature
27 Insanely Cool DIY Rocket Stove Plans for Cooking With Wood
39 FREE DIY Bat House Plans to Shelter the Natural Pest Control
19 Adorable Free Cat Tower Plans For Your Furry Friend
23 Awesome Free Deer Stand Plans You Can Start Right Now
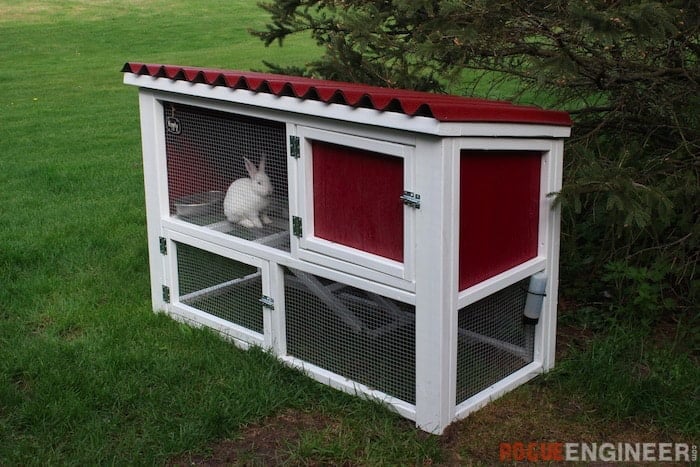
13 Epic Free Rabbit Hutch Plans You Can Download & Build Today
23 FREE Detailed DIY Garage Plans With Instructions To Actually Build
101 Simple Free DIY Coffee Table Plans


![21+ Small Garden Ideas That Will Beautify Your Green World [Backyard Aquariums Included]outdoor fish ponds homesthetics (2)](https://homesthetics.net/wp-content/uploads/2015/04/21-Small-Garden-Ideas-That-Will-Beautify-Your-Green-World-Backyard-Aquariums-Includedoutdoor-fish-ponds-homesthetics-2.jpg)
![21+ Small Garden Ideas That Will Beautify Your Green World [Backyard Aquariums Included]outdoor fish ponds homesthetics (1)](https://homesthetics.net/wp-content/uploads/2015/04/21-Small-Garden-Ideas-That-Will-Beautify-Your-Green-World-Backyard-Aquariums-Includedoutdoor-fish-ponds-homesthetics-1.jpg)
![21+ Small Garden Ideas That Will Beautify Your Green World [Backyard Aquariums Included]outdoor fish ponds homesthetics (3)](https://homesthetics.net/wp-content/uploads/2015/04/21-Small-Garden-Ideas-That-Will-Beautify-Your-Green-World-Backyard-Aquariums-Includedoutdoor-fish-ponds-homesthetics-3.jpg)
![21+ Small Garden Ideas That Will Beautify Your Green World [Backyard Aquariums Included]outdoor fish ponds homesthetics (4)](https://homesthetics.net/wp-content/uploads/2015/04/21-Small-Garden-Ideas-That-Will-Beautify-Your-Green-World-Backyard-Aquariums-Includedoutdoor-fish-ponds-homesthetics-4.jpg)
![21+ Small Garden Ideas That Will Beautify Your Green World [Backyard Aquariums Included]outdoor fish ponds homesthetics (5)](https://homesthetics.net/wp-content/uploads/2015/04/21-Small-Garden-Ideas-That-Will-Beautify-Your-Green-World-Backyard-Aquariums-Includedoutdoor-fish-ponds-homesthetics-5.jpg)
![21+ Small Garden Ideas That Will Beautify Your Green World [Backyard Aquariums Included]outdoor fish ponds homesthetics (6)](https://homesthetics.net/wp-content/uploads/2015/04/21-Small-Garden-Ideas-That-Will-Beautify-Your-Green-World-Backyard-Aquariums-Includedoutdoor-fish-ponds-homesthetics-6.jpg)
![21+ Small Garden Ideas That Will Beautify Your Green World [Backyard Aquariums Included]outdoor fish ponds homesthetics (7)](https://homesthetics.net/wp-content/uploads/2015/04/21-Small-Garden-Ideas-That-Will-Beautify-Your-Green-World-Backyard-Aquariums-Includedoutdoor-fish-ponds-homesthetics-7.jpg)
![21+ Small Garden Ideas That Will Beautify Your Green World [Backyard Aquariums Included]outdoor fish ponds homesthetics (8)](https://homesthetics.net/wp-content/uploads/2015/04/21-Small-Garden-Ideas-That-Will-Beautify-Your-Green-World-Backyard-Aquariums-Includedoutdoor-fish-ponds-homesthetics-8.jpg)
![21+ Small Garden Ideas That Will Beautify Your Green World [Backyard Aquariums Included]outdoor fish ponds homesthetics (9)](https://homesthetics.net/wp-content/uploads/2015/04/21-Small-Garden-Ideas-That-Will-Beautify-Your-Green-World-Backyard-Aquariums-Includedoutdoor-fish-ponds-homesthetics-9.jpg)
![21+ Small Garden Ideas That Will Beautify Your Green World [Backyard Aquariums Included]outdoor fish ponds homesthetics (10)](https://homesthetics.net/wp-content/uploads/2015/04/21-Small-Garden-Ideas-That-Will-Beautify-Your-Green-World-Backyard-Aquariums-Includedoutdoor-fish-ponds-homesthetics-10.jpg)
![21+ Small Garden Ideas That Will Beautify Your Green World [Backyard Aquariums Included]outdoor fish ponds homesthetics (15)](https://homesthetics.net/wp-content/uploads/2015/04/21-Small-Garden-Ideas-That-Will-Beautify-Your-Green-World-Backyard-Aquariums-Includedoutdoor-fish-ponds-homesthetics-15.jpg)


![21+ Small Garden Ideas That Will Beautify Your Green World [Backyard Aquariums Included]outdoor fish ponds homesthetics (22)](https://homesthetics.net/wp-content/uploads/2015/04/21-Small-Garden-Ideas-That-Will-Beautify-Your-Green-World-Backyard-Aquariums-Includedoutdoor-fish-ponds-homesthetics-22.jpg)


 x
x


![DIY HAMSTER CAGE [ IKEA BIN CAGE]](https://homesthetics.net/wp-content/uploads/2017/12/16-5-1024x681.jpg)
![Why Are My Solar Lights Not Working? [Answers & Solutions]](https://homesthetics.net/wp-content/uploads/2021/01/Why-Are-My-Solar-Lights-Not-Working-01.jpg "Why Are My Solar Lights Not Working? [Answers & Solutions]")


![Vitamix 5200 vs Vitamix 5300 [All You Need to Know]](https://homesthetics.net/wp-content/uploads/2021/04/Vitamix-5200-vs-Vitamix-5300-01.jpg "Vitamix 5200 vs Vitamix 5300 [All You Need to Know]")


![Mauviel vs. All-Clad [All You Need to Know & Winner]](https://homesthetics.net/wp-content/uploads/2021/06/Mauviel-vs.-All-Clad-01.jpg "Mauviel vs. All-Clad [All You Need to Know & Winner]")
![2 Wusthof Classic vs. Gourmet [All You Need to Know & Winner]](https://homesthetics.net/wp-content/uploads/2021/07/Wusthof-Classic-vs.-Gourmet-01.jpg "2 Wusthof Classic vs. Gourmet [All You Need to Know & Winner]")


![Acrylic Pour Painting [All You Need To Know]](https://homesthetics.net/wp-content/uploads/2021/06/Acrylic-Pour-Painting-01.jpg "Acrylic Pour Painting [All You Need To Know]")


![Acrylic Pouring Medium Guide [All You Need to Know]](https://homesthetics.net/wp-content/uploads/2021/05/Acrylic-Pouring-Medium-Guide-01.jpg "Acrylic Pouring Medium Guide [All You Need to Know]")


![Can You Bake Modeling Clay [All You Need To Know]](https://homesthetics.net/wp-content/uploads/2022/08/Can-You-Bake-Modeling-Clay-1.jpg "Can You Bake Modeling Clay [All You Need To Know]")


